You are using an out of date browser. It may not display this or other websites correctly.
You should upgrade or use an alternative browser.
You should upgrade or use an alternative browser.


Off-Road Ranger I
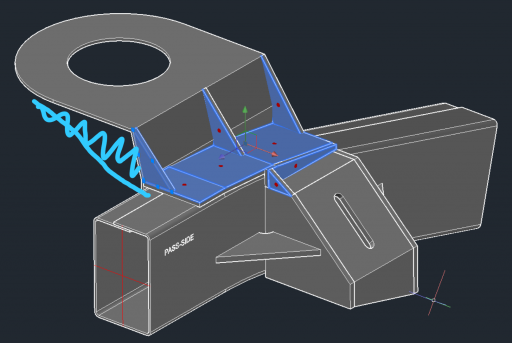
Right! I think I'm pretty much sold on adding something like that. And those shock tower perches that rise up ~2" right on the opposite sides of the frame-rails from my new mounts are almost begging for bracing up too... so I might have a go at tying it all in like so:


Right! I think I'm pretty much sold on adding something like that. And those shock tower perches that rise up ~2" right on the opposite sides of the frame-rails from my new mounts are almost begging for bracing up too... so I might have a go at tying it all in like so:
I would add some more metal on the sides of the spring mounts. (See my lousy sketch attached)
Attachments
Off-Road Ranger I
I would add some more metal on the sides of the spring mounts. (See my lousy sketch attached)
That's my bad there, didn't have a chance to finish modeling the shock tower perches. They have something like what you've drawn, even so they're are only attached to the frame along a narrow bit of the side of the frame rail.
Might be an okay construction for running back 'n forth to the shops... but I'm thinking it'll need bracing where those blue bits are when I start pushing well past the original design intents of the chassis.
Off-Road Ranger I
Finally put a video together going thru the 1st prototype custom interior-camper sleeping-setup I've built (apologies for the shake cam near the end).
Off-Road Ranger I
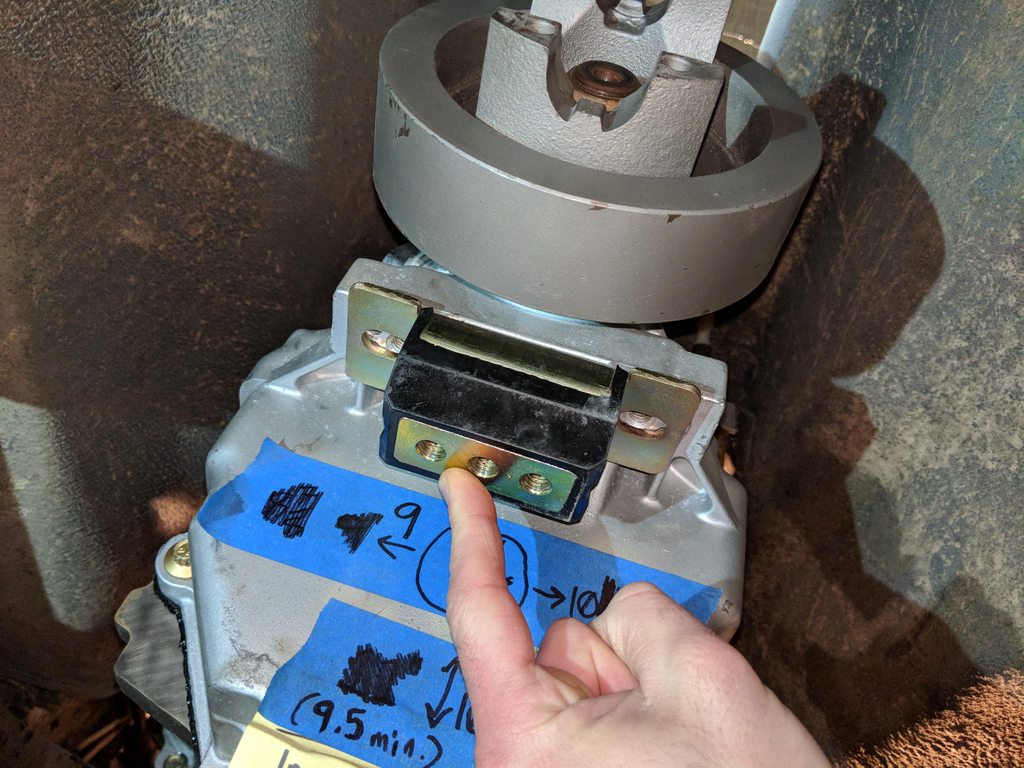
Next up is building my transmission mount & getting the Rover LT230 AWD transfer-box setup for it's divorced mounting behind the NV4500.
Took a little digging around until I found a trans mount that met all my criteria. Matching bolt pattern, upgraded materials, & common enough application (Jeep in this case) to facilitate replacement in the future:
I think I'll be able to utilize the original trans & transfer perches on the frame rails, maybe the original rubber isolators too, even so I'll definitely need to build something to reach between them all. For that I dusted off my bender, dragged it over to the shop, & picked up a variety of DOM tubing:

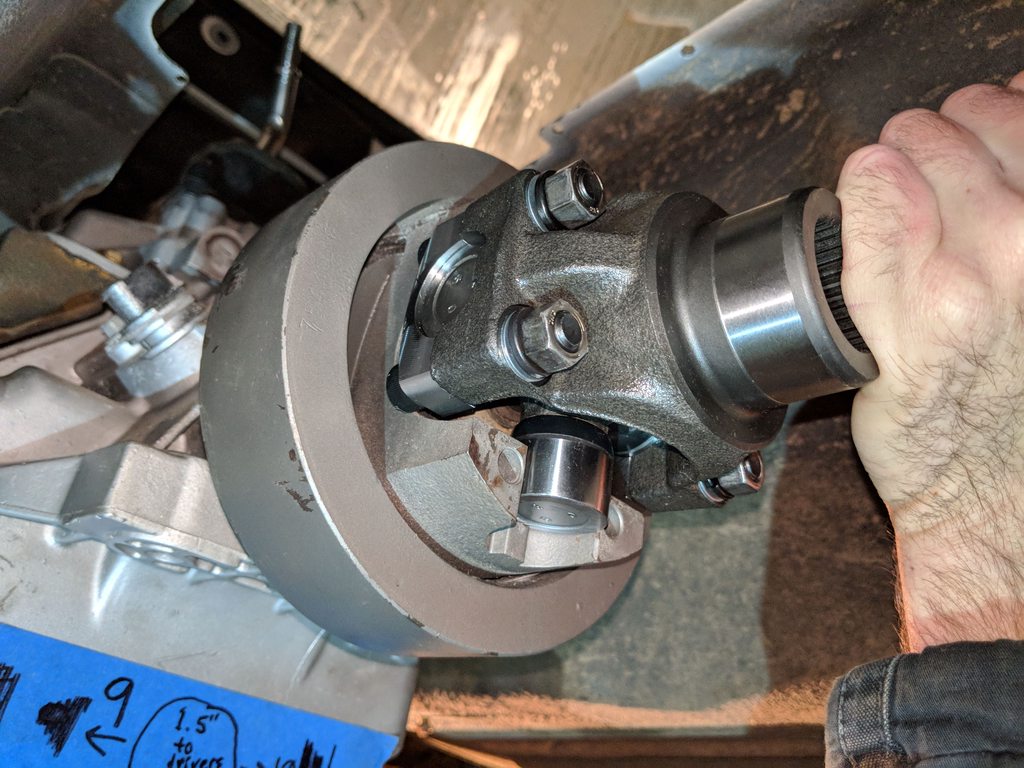
First step in divorcing the transfer-box is yanking out the old ZF automatic transmission's output "spud shaft":

Thankfully the Rover engineers sought fit to build a damn fine all-gear transfer-box, complete with an internally supported input. So it's as simple as sliding the spud shaft in & adding a yoke or flange to match your trans:

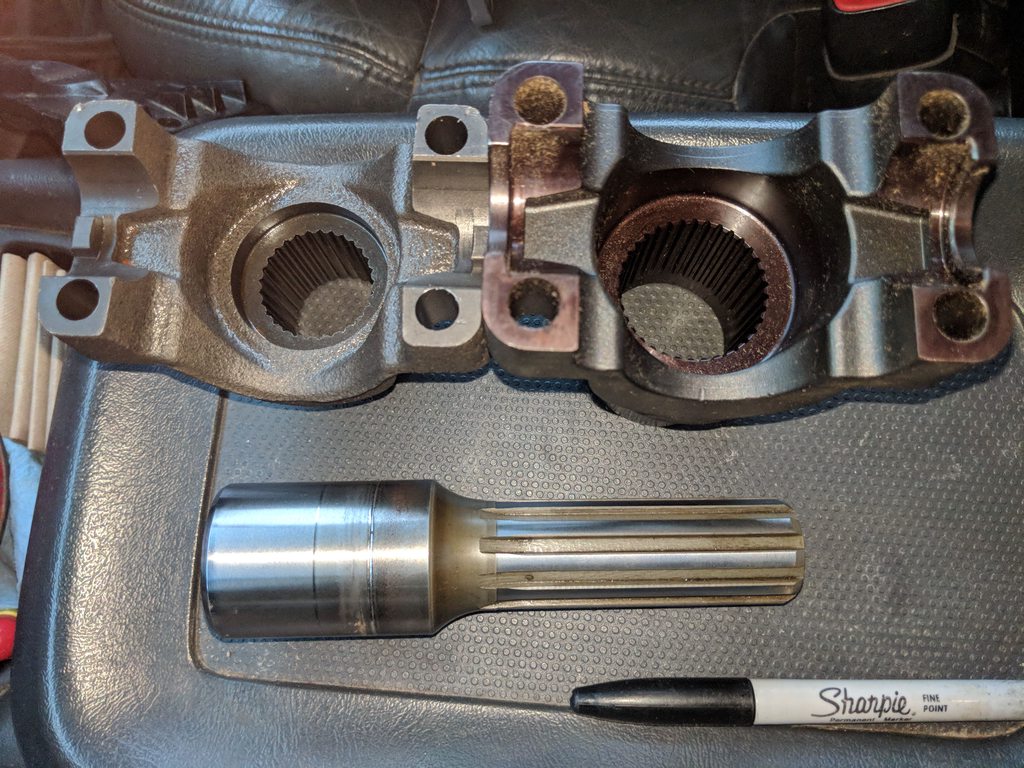
At first I was looking at turning down the inner splines of a cast steel Dana60 29-spline yoke on a lathe to press in & weld the spud shaft... but after a week's worth of back & forth with several driveshaft & machine shops it was looking like cutting splines into the spud shaft would be a superior option... until we ran into issues with the old spud shaft's hardness that made a custom-made spud shaft seem like the way to go... then I got the quote & ran away white-knuckling my wallet. Here's the original mocked up:
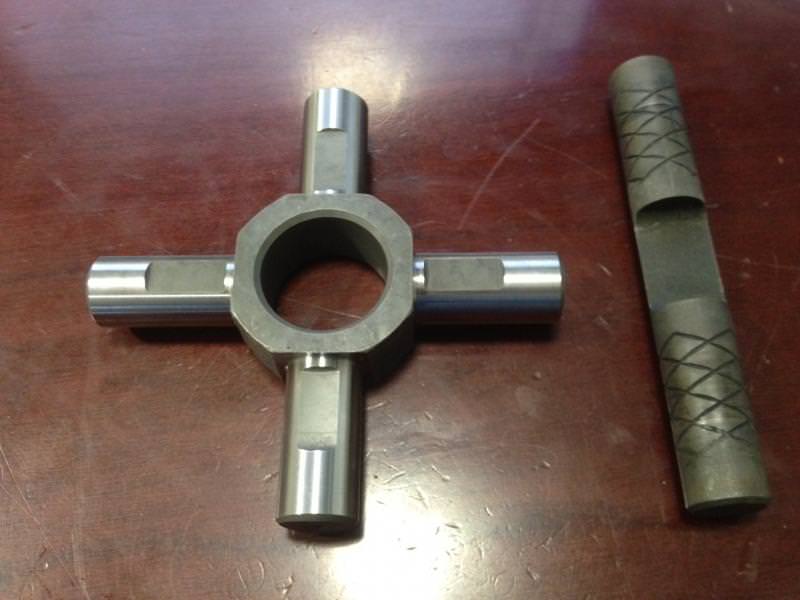
Back to the original plan of pressing & welding! All that previous work wasn't a total loss though. During the many discussions with drivetrain specialists I found a far superior option to the cheap cast yoke I started with. Strange makes a 4140 chromoly steel yoke that would still utilize the 1350 u-joint AND had a 35-spline inner diameter that was much closer to the outer diameter of the spud shaft. This way I'll cut considerably less (only slightly beyond the splines) out of the internal bore, and I'd prefer to deal with pre/post heating the billet for TIG welding versus welding cast to the hardened shaft. Cast 29-spline on the left, 35-spline billet on the right:
The transfer-box will get new seals & a heavy duty "crosspin" for the center differential inside. That will take the primary weak point out of the assembly. The only other weak point being an intermediate shaft that sometimes wears it's bore & needs the case sleeved, but thankfully this used case is still tight. Here you can see the upgraded 1-piece pin (left) laying beside one of the original (right) 2-piece pins:
Took a little digging around until I found a trans mount that met all my criteria. Matching bolt pattern, upgraded materials, & common enough application (Jeep in this case) to facilitate replacement in the future:
I think I'll be able to utilize the original trans & transfer perches on the frame rails, maybe the original rubber isolators too, even so I'll definitely need to build something to reach between them all. For that I dusted off my bender, dragged it over to the shop, & picked up a variety of DOM tubing:
First step in divorcing the transfer-box is yanking out the old ZF automatic transmission's output "spud shaft":
Thankfully the Rover engineers sought fit to build a damn fine all-gear transfer-box, complete with an internally supported input. So it's as simple as sliding the spud shaft in & adding a yoke or flange to match your trans:
At first I was looking at turning down the inner splines of a cast steel Dana60 29-spline yoke on a lathe to press in & weld the spud shaft... but after a week's worth of back & forth with several driveshaft & machine shops it was looking like cutting splines into the spud shaft would be a superior option... until we ran into issues with the old spud shaft's hardness that made a custom-made spud shaft seem like the way to go... then I got the quote & ran away white-knuckling my wallet. Here's the original mocked up:
Back to the original plan of pressing & welding! All that previous work wasn't a total loss though. During the many discussions with drivetrain specialists I found a far superior option to the cheap cast yoke I started with. Strange makes a 4140 chromoly steel yoke that would still utilize the 1350 u-joint AND had a 35-spline inner diameter that was much closer to the outer diameter of the spud shaft. This way I'll cut considerably less (only slightly beyond the splines) out of the internal bore, and I'd prefer to deal with pre/post heating the billet for TIG welding versus welding cast to the hardened shaft. Cast 29-spline on the left, 35-spline billet on the right:
The transfer-box will get new seals & a heavy duty "crosspin" for the center differential inside. That will take the primary weak point out of the assembly. The only other weak point being an intermediate shaft that sometimes wears it's bore & needs the case sleeved, but thankfully this used case is still tight. Here you can see the upgraded 1-piece pin (left) laying beside one of the original (right) 2-piece pins:
Looking like progress.
You could machine the yoke to a square shape and the stub shaft to match. That way the geometry is transmitting the torque and not the round press fit and tig weld.
Or save turning the cast yoke and make a flat steel 4 bolt flange and then use a bolt on 1350 yoke. Similar setup to the old chevy np203’s.

http://www.superturbodiesel.com/std/showthread.php?tid=6602

That trans mount looks suspiciously like a Chevy th350 or th400 mount, common as dirt.

https://www.summitracing.com/parts/...MI19e5vb_I2QIVxAOGCh12Wws0EAQYAiABEgJYhvD_BwE
You could machine the yoke to a square shape and the stub shaft to match. That way the geometry is transmitting the torque and not the round press fit and tig weld.
Or save turning the cast yoke and make a flat steel 4 bolt flange and then use a bolt on 1350 yoke. Similar setup to the old chevy np203’s.
http://www.superturbodiesel.com/std/showthread.php?tid=6602
That trans mount looks suspiciously like a Chevy th350 or th400 mount, common as dirt.
https://www.summitracing.com/parts/...MI19e5vb_I2QIVxAOGCh12Wws0EAQYAiABEgJYhvD_BwE
Last edited:
Off-Road Ranger I
Yep, it's in the same family as that mount. They sell a few different bolt patterns in that same style, & I'm quite liking the look of it, solid!
I toy'd with the idea of joining it with flanges or a mini driveshaft like that, but decided on direct yoke to yoke (something about that statement keeps making me laugh) for the sake of reducing overall length, & in my experience the u-bolts over the caps are superior for serviceability to the c-clip/press-in fitting with flanges.
A few British companies (Ashcroft, Rakeway) used to make "remote inputs" for the LT230, but no luck finding any new old stock.

Off-Road Ranger I
Ah I didn’t realize you were doing a straight coupling set up.
No worries! A single u-joint between is what I'll try 1st. And if I run into any vibrations that are too difficult to resolve then I ought to have just enough space for a CV/Double-cardan with the centering ball, like so:

Off-Road Ranger I
This is the coolest disco ever. I hope my d1 motor doesn't crap out on me. If it does I've always planned on just dropping another one or rebuilding the current one. This does give me hope I could throw a different platform in there.
Hey thanks man! Treat her gentle, all depends on the casting, but you could get a long life out of it. I thought about the same, just worked out well that I had options to get me by til this new powertrain was sorted. Was lucky I just picked up the enduro bike & have friends willing to lend a vehicle when the snow's too deep!
Off-Road Ranger I
Nah if all else fails just run a extra thick guibo coupling like all the BMW's run.
Ooooooo... I didn't know that's what those were called! The Disco's stock rear driveshaft has one on the diff end. Here I've just been referring to them as "that squidgy thing on the driveshaft"

Ooooooo... I didn't know that's what those were called! The Disco's stock rear driveshaft has one on the diff end. Here I've just been referring to them as "that squidgy thing on the driveshaft"
A C5 corvette uses the exact same guibo as a E36 M3 at 2/3rd the cost. ;)
Off-Road Ranger I
Good to know!A C5 corvette uses the exact same guibo as a E36 M3 at 2/3rd the cost. ;)
Off-Road Ranger I
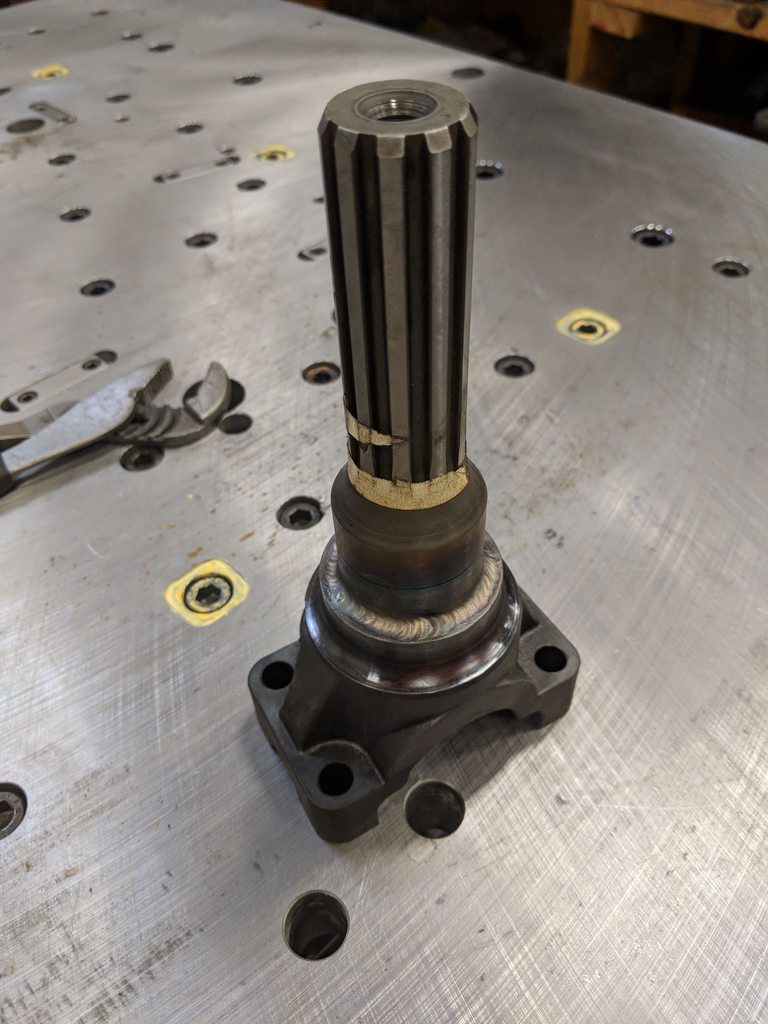
Spud shaft is complete! And damn am I thankful for a friend & his expertise with machining, otherwise this part would've ended up messy and/or very expensive $$$$
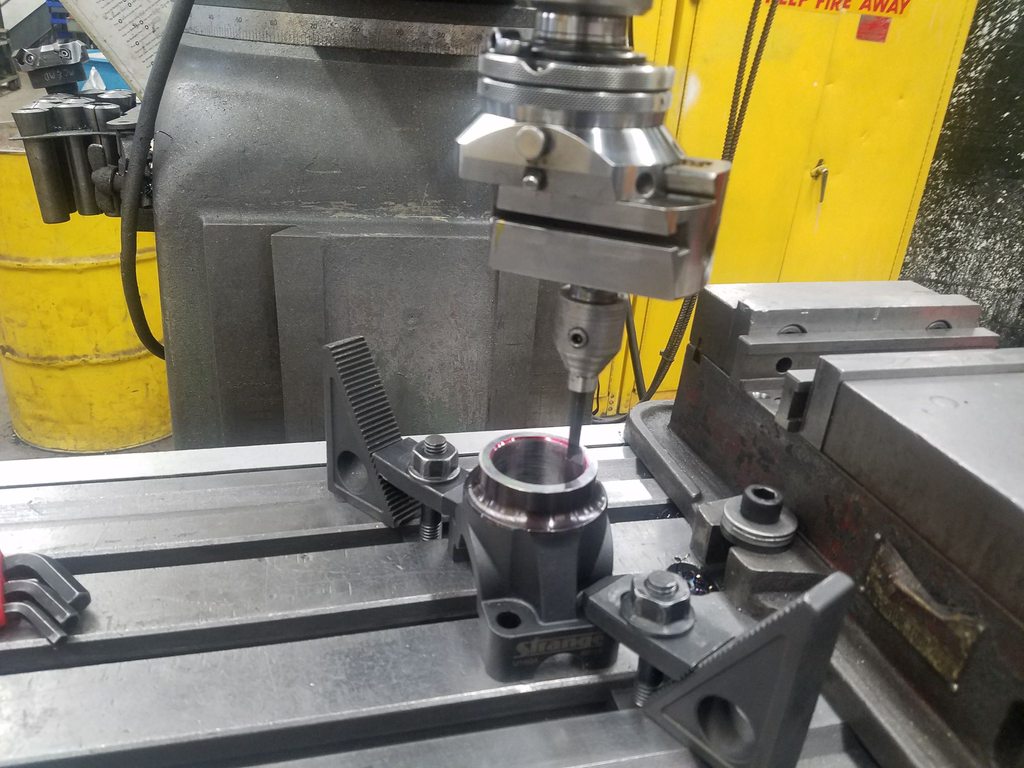
We started out with a boring-bar on a lathe to trim the internal splines out of the 35-spline chromoly yoke:

It was getting a bit chattery working thru the heat treat in the splines so we jumped over to the bridgeport to rough it out:
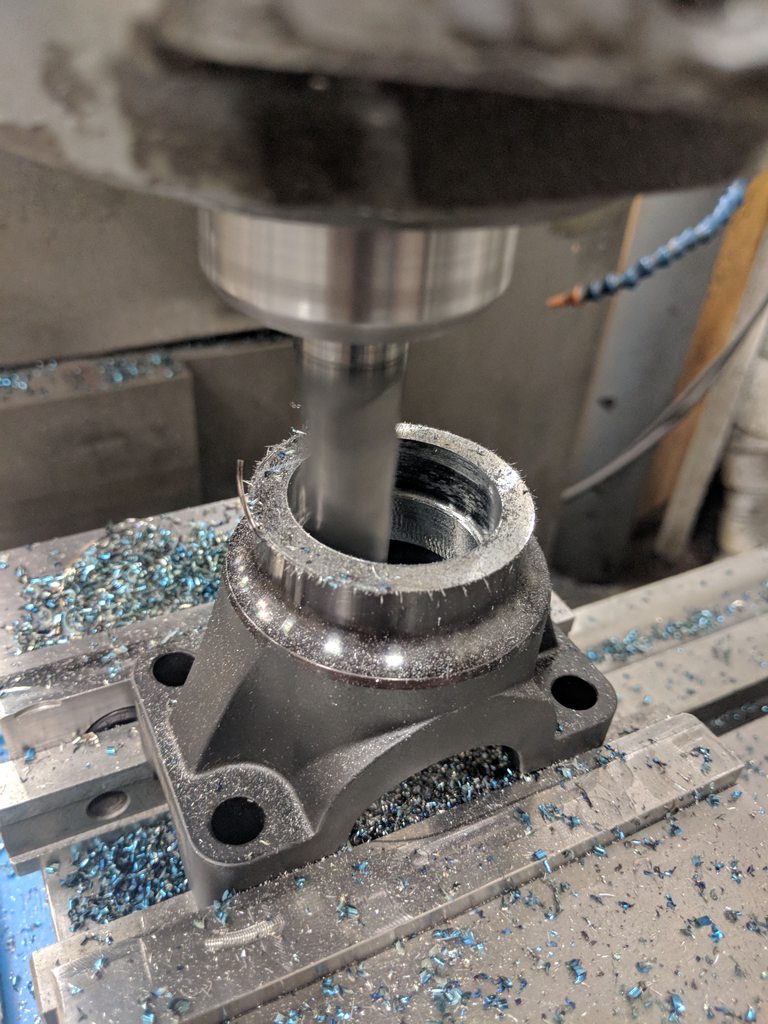
And then the finish cutting of the bore with this cool setup here:
We chucked the shaft in the freezer & the yoke in the oven. Pressing together was a breeze, so after a good bit of preheating back in the oven we got to the TIG welding.

My friend's so humble about his skills that I never know what to expect when he says "Oh I'm alright at that I guess" ....then he burns in these welds that are sunk in & laid out perfect!
Now that I have a spud shaft & single u-joint to mate up between the transmission & transfer case, mounts & crossmembers are up next!

We started out with a boring-bar on a lathe to trim the internal splines out of the 35-spline chromoly yoke:
It was getting a bit chattery working thru the heat treat in the splines so we jumped over to the bridgeport to rough it out:
And then the finish cutting of the bore with this cool setup here:
We chucked the shaft in the freezer & the yoke in the oven. Pressing together was a breeze, so after a good bit of preheating back in the oven we got to the TIG welding.
My friend's so humble about his skills that I never know what to expect when he says "Oh I'm alright at that I guess" ....then he burns in these welds that are sunk in & laid out perfect!
Now that I have a spud shaft & single u-joint to mate up between the transmission & transfer case, mounts & crossmembers are up next!
Off-Road Ranger I
And a moving picture to go with:
So happy it's in there under it's own weight :)

So happy it's in there under it's own weight :)
