"Nanuuq" my Land Rover Discovery 2 diesel swap, ...forever a project!

  • HTML tutorial

Tinker

Rank V
Launch Member

Off-Road Ranger I

2,357
West Michigan
First Name
Mike
Last Name
Klemish
Member #

5606

That thing is looking awesome!

Is there a build thread floating around somewhere for that Subaru?


Sent from my iPhone using Tapatalk
Thanks!

Not quite yet, but I have been taking a fair amount of photo/video to keep track of the progress, of what was supposed to be a new "daily" ...oops lol!
 
  • Like
Reactions: Bergi85

Tinker

Rank V
Launch Member

Off-Road Ranger I

2,357
West Michigan
First Name
Mike
Last Name
Klemish
Member #

5606

I would warn against only using 1 joint, be it a U-joint or a CV joint such as this above GIF. Having only one joint between the TC and the gearbox would potentially transmit a lot more radial load to the TC input bearing. You see most divorced lt230 setups incorporating a shaft with a u-joint at each end and a slip yoke. This way the TC and the transmission are free to dance about as they please. I am referring to a setup such as this below:

It adds length to the setup but it just appears that you would be asking for trouble!

Anyway sorry to butt in, i just would not want this thing to fail, it is such an awesome build. I am pulling a lot of inspiration from it to do a om606 swap in my 2004 d2 here in Australia, i can dream! Keep it up mate, your build quality is top notch.
Oh my bad, I never replied to this!

I do appreciate the advice, because you are right that the single-joint is not the most ideal setup. Would've certainly preferred a setup like you have pictured there... if I had the space. Just not enough room under there without going hack-n-slash on the body, which would also interfere with my camper setup inside.

It isn't unheard of though! There are successful custom single-joint setups, one of which is even a Disco2 like mine with an LS engine that gets properly bashed off road. As well as loads of factory single-joint setups, granted they are rather old, military, or construction vehicle applications.

The key is eliminating any torsion between the transmission & transfer case under load. Rather than having the 2 units separately mounted under there. I'm working on a subframe of sorts to to tie the 2 together, but I still want urethane/rubber for damping vibration where this new subframe will mount to the stock frame rails. Been a challenge to make it all adjustable (namely to clock the transfer case angle) AND easily serviceable. All this DOM tube & bracketry should look pretty interesting when I'm finished :laughing:

All that being said... iiiiiif I do chew up joints/bearings too rapidly then my ideas for the next iteration of joining the 2WD NV4500 to the AWD LT230 (while still retaining the ability to clock the case!) is to chop off the u-joint yokes & either:
1) Weld on tri-bolt flanges & use a rubber/urethane coupler between them to soak up any misalignment under high torque loads, like so:

2) OR, weld a pair of flat flanges that will bolt them together solid, like so but with a centering ring or something to ease the install process:


Time will tell!
 
  • Like
Reactions: dolli310

Tinker

Rank V
Launch Member

Off-Road Ranger I

2,357
West Michigan
First Name
Mike
Last Name
Klemish
Member #

5606

Still chugging along on the project & have a ton of the systems hanging right at the edge of the near done: Steering, coolant, intake, fuel, drivetrain mounting, parking brake, driveshafts, etc.

Saved myself so many hundreds of dollars ($60 vs $800) by catching a Land Cruiser at the u-wrench-it yard just as it was rolled out. I dropped everything I was doing & sprinted in there like a lunatic to get after it before the whole thing was stripped clean:


New radiator & step-van charge cooler are out for modifications to better fit the Rover. The inlet/outlet on the radiator are getting slightly larger & on the charge cooler they're getting shortened + rotated:


Finally found the right compressor outlet elbow I needed & have my new vise-grip "bead crimper" ready to go, so when I get the 2 coolers back all my piping's ready to go together:


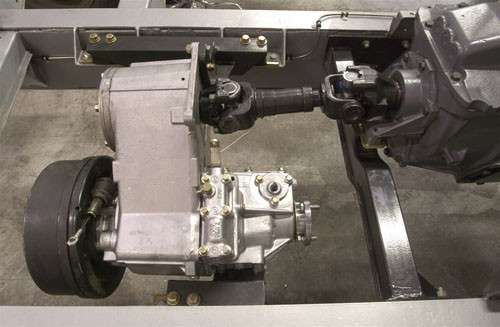
Transfer case is mated to the transmission, yoke to yoke & nice 'n straight. Perhaps not the most ideal pairing with a single joint, but given the space I'm working with it's what I'll try first, maybe a flange to flange or urethane insert coupler in the future if things get chewed up too fast:


Fuel tank's out, gasoline's out, all the wiring & pipes are out too... ready for a fill of the good stuff!


Took a mess of measurements off the old fuel sending assembly for machining a new aluminum cap that'll accept my AN lines & reed style level sensor:


Working on building my own disc brake off the back of the transfer case to replace the giant drum that was on there from the factory, as well as setup my front/rear driveshafts to be equal length (they're within a 1/2" now) via some fiddling with the flanges so they'll be interchangeable:
 

Kingsize

Rank III
Launch Member

Enthusiast III

646
Mont Belvieu, TX
Member #

13019

Read and watched this thread from start to finish tonight. Absolutely awesome!

One HELL of a build here. Can't wait to see what is next!
 
  • Like
Reactions: Tinker

Tinker

Rank V
Launch Member

Off-Road Ranger I

2,357
West Michigan
First Name
Mike
Last Name
Klemish
Member #

5606

Started hanging my new fuel lines under the driver's side of the truck, now using a supply in -8 AN & return in -6 AN, roughly 5/16" & 7/16" respectively, probably will use the old heat-shield studs under the body near the rails to fasten the hoses:


Lift pump line's sorted, return line's fit to the adjustable overflow valve, just waiting on an 1/2" NPT to -8 AN adapter for the lift pump's inlet:


Here's the plumbing assortment I'm using for my new "sending unit cap" that a friend's helping me machine from a lump of aluminum into a stepped disc (to fit the OEM seal) that'll drop right in place of the old unit. All the OEM fuel sending unit is bound for the bin! Punched right through the middle of the aluminum cap will be my new reed-style level sensor, & on either side these bulkhead 90's will poke through as well, & to reach the depths of the tank the aluminum tubes will be cut to length & act as straws:


Thankfully a friend reminded me that the fuel fill will need modifying as well, to accommodate the larger diesel pump nozzles, better get after it with a file before the tank goes back up:

-versus-
 

dolli310

Rank IV
Launch Member

Advocate I

1,402
Halifax, NS
First Name
Jason
Last Name
Dollimont
Member #

4162

Thankfully a friend reminded me that the fuel fill will need modifying as well, to accommodate the larger diesel pump nozzles, better get after it with a file before the tank goes back up:

-versus-
I wonder what was going threw the attendant's head while you were measuring the nozzles... :smirk:
 
  • Like
Reactions: Tinker

Tinker

Rank V
Launch Member

Off-Road Ranger I

2,357
West Michigan
First Name
Mike
Last Name
Klemish
Member #

5606

I wonder what was going threw the attendant's head while you were measuring the nozzles... :smirk:
Wouldn't be the first time I got funny looks at the gas station haha!

The way all my vehicles end up looking after a few weeks in my hands tends to be a bit conspicuous... especially this poor Subaru that's sitting 11" taller now than when I first bought it :tongueclosed:
 

Tinker

Rank V
Launch Member

Off-Road Ranger I

2,357
West Michigan
First Name
Mike
Last Name
Klemish
Member #

5606

In preparation for new driveshaft length (very near equal now!) modifications I got the old rear "rotoflex" coupler out:


Here in my spares pile (lower right) you can see the odd centering pin & three-bolt flange the rear 3rd member had pressed in & bolted on:


After a bit of a battle I now have the Disco 1 rear flange ready to accept a shorter driveshaft:


Yanked this huge counterweight off as well, from all the diagrams I saw they're included on Disco 2's with rotoflex shafts, must be to counter some vibration in the rubber:


Ground off all the passenger side fender well brackets:


So now I have room to mock up the 2 sizes of Donaldson filters I'd like to plumb in, & these things sure are NOT small but for a snorkel they're just the only thing that makes sense:
 

Tinker

Rank V
Launch Member

Off-Road Ranger I

2,357
West Michigan
First Name
Mike
Last Name
Klemish
Member #

5606

Worked with a friend to get my new fuel tank cap machined from a block of aluminum:


I really enjoy working on machining things like this, & I swear I learn something new every time this friend takes the time to walk me thru the process:


Here's the underside of the cap, showing the big step around the perimeter that holds the ring seal for the Rover tank. The black fittings are tube adapters that will receive the aluminum "straws" down into the bottom of the tank for the pickup & angled away for the return. The long shaft is the new reed-style fuel level float:


This is the top, before paint, that shows the AN bulkhead fittings I'm using to make the sharp turn under the floor for the new hoses:
 

Tinker

Rank V
Launch Member

Off-Road Ranger I

2,357
West Michigan
First Name
Mike
Last Name
Klemish
Member #

5606

Broke the sharp edges down & sprayed my freshly machined aluminum fuel tank cap & chucked it in the oven for a few hours to lock in the oil/fuel resistant coating:


After plenty of research, thumbing through diagrams, & asking some experts on the subject... I have confirmed that I'm lucky enough that Rover's LT230 transfer case does in fact have interchangeable output flanges:


My hope was to setup both my driveshafts exactly the same, as they are very near the same length (few mm's difference) now, so I'm swapping my transfer case's forward flange with this rear flange from my spare case:


This way ONE spare shaft can replace either end, or if I'm in need of exchanging one for the other to limp away from trail damage, or even to aid in towing... seeing as this is an all-wheel-drive truck. Here are the flanges side by side at the front of the LT230:
 

Tinker

Rank V
Launch Member

Off-Road Ranger I

2,357
West Michigan
First Name
Mike
Last Name
Klemish
Member #

5606

Been a real head scratcher trying to decide what rotor, among the thousands of choices, to choose for my new transfer case brake. I was getting a bit overwhelmed by the heaps of options online & on my way out for work had a look at my Crx's front hub... which seemed pretty close. When I looked up the dimensions I was surprised to see it checked off nearly every size constraint (max diameter, hub bore, thickness, hat depth) I was looking for, so with the new bolt pattern drilled in it might just do the trick!


My new radiator is back from the shop with my requested modifications, now with a larger input & output to better match the 4BT's pipes:


My old charge cooler was modified & tested as well, with the elbows roughly an inch shorter & rotated outward to get me around the large radiator:
 

Tinker

Rank V
Launch Member

Off-Road Ranger I

2,357
West Michigan
First Name
Mike
Last Name
Klemish
Member #

5606

For the brake, I just discovered this: https://www.britpart.com/all-parts/da5526/

Looks interesting, but I haven't heard of anyone using it.
Ah yeah, that's one of those TerraFirma disc-kit replicas (in yellow-zinc below), which is what I'd originally had my eyes on... until I saw the price tag was well north of $400 :dizzy:


I did some research & found there are a decent amount of mechanical caliper options out there from reputable companies. Only going to have $130-140 into my whole custom setup using this caliper here below + a Crx rotor. Just gotta whip up a bracket to put it in a nice tucked up spot underneath:
 

Jeff Blake

Rank V
Launch Member

Enthusiast III

Nice, I didn't know Terrafirma made one for the D2. But now that I think about it... they're compatible on any LT230 right? I should know this, I just rebuilt an '04 box with CDL, 1.41 gears, HD cross pin, and new bearings... putting it in this weekend!! Finally sourced an '04 shifter. Had a delay last weekend, broke a bolt off in the transmission governor extension housing, luckily found another one on ebay.
 
  • Like
Reactions: Tinker

Tinker

Rank V
Launch Member

Off-Road Ranger I

2,357
West Michigan
First Name
Mike
Last Name
Klemish
Member #

5606

Nice, I didn't know Terrafirma made one for the D2. But now that I think about it... they're compatible on any LT230 right? I should know this, I just rebuilt an '04 box with CDL, 1.41 gears, HD cross pin, and new bearings... putting it in this weekend!! Finally sourced an '04 shifter. Had a delay last weekend, broke a bolt off in the transmission governor extension housing, luckily found another one on ebay.
Right, & that's awesome! The CDL is a big upgrade (Center Differential Lock in the Land Rover transfer cases, for anyone else wondering). I was half tempted to chuck a 1.00 gear-set in mine when I was putting the HD pin in the locking case... but figure I should just wait & go nuts building up my spare later so that I can stay focused on the swap.
 

Tinker

Rank V
Launch Member

Off-Road Ranger I

2,357
West Michigan
First Name
Mike
Last Name
Klemish
Member #

5606

Dropped the modified coolers in place & looks just like I hoped! Going to build some saddles on the frame & brackets up top (with rubber nestled within) to put them roughly 3/4" apart. Should be no sweat sealing them both to the front opening with aluminum sheet, rubber flaps, foam strips etc. These old Cummins engines are notorious for running quite cool as it is, but I still intend to do my best to properly direct the flow of air, keep from pressurizing the engine compartment, or causing odd stalling conditions... after all, this compartment was never designed for something this awesome :sunglasses:


To keep things simple I'm going to run only straight 3" long rubber/silicone couplers for the water pipes, so I gathered a pile of tubing & a bead-crimper for fabricating the hard lines between those flexible joints. Also that huge water pump inlet (seen in black, on the lower left in previous image) on the 4BT that has the 90-degree forward angle is going right in the bin. In the lower-left here you can see the replacement 3-bolt flange I'm welding a 2" pipe to, complete with a 1/2" NPT bung for my heater return line:


Confirmed my Honda Crx rotor will fit nicely underneath, just need to drill the new bolt pattern in it. Thanks to it's small diameter it doesn't hang low, should end up on the same plane as the transfer-case crossmember I'm building. That being said, I'll still make a little skid-plate ramp type thing, just so anything I might try & drag it across doesn't snag. All the thought I'm putting into this parking-brake might seem odd... but the old drum just won't fit anymore & the aftermarket options can be pricey as previously mentioned:


Finally got my mitts on a 6BT exhaust manifold (the much more common 6-cylinder version of my engine) to chop the ends & cap off with a bit of plate & weld. Should bring my turbo several inches down & slightly away, to help with hood clearance + snorkel/charge pipe routing:
 
  • Like
Reactions: Hafaday