Hello all, a few weeks ago i was on the fence about buying an ARB awning for my rig to help clear some space on the roof rack & cutting some weight by leaving the old ez up at home. Also, it seems like these awnings have the potential to give better shade when compared to any canopy because you can park your vehicle in a way that blocks the sun as it sets or rises maximizing shade potential in your site. After much consideration the hefty price of the awning steered me away since I'm currently budgeting to do some kind of fridge set up on the rig, thus pushing me to the DIY side of things. I knew i could cut corners on the awning by making a cheap version that meets my needs. The money saved will be put towards some kind of set up that I'm not able to really corners and costs like a 12v fridge.
SO heres goes nothing, my own cheap twist on a 9 x 9 awning for 90 bucks

A) Materials & Price list
HOMEDEPOT
- 3/4" x 10' electrical conduit (4 sticks) $17.00
- 3/4" fitting 90 degree elbow (2) $7.46
- Hex head metal screws 3/4" (had some in my storage, only used about (5 or 6)
- Misc. hardware - Grade 8 bolts 1/4" thick by about 3" in length (2), wing nuts (2), washers (about 8), eyelet bolts threaded to fit into the conduit elbow fittings (2), & depending on how you secure it to your roof rack this may change but i used 3/4" U-Bolts (6) $15.00
HARBOR FREIGHT use your 20% off coupon lol
- 11 x 9 ' tarp $10
- 1/2" grommet installation kit $3.99
AMAZON
- Stansport telescoping tent pole (2) $24.82
- 7" velcro cable tie organizer 50pack $7.49
- ozark trail buckle straps 4 pack $7.99
B) Build
sorry for the lack of "during build process" pictures, i pretty much winged it and wasn't thinking about making a diy thread until it was finished. i was extremely surprised by how solid it turned out so i figured why not share the knowledge.
1) cut 2 of your conduit tubes down to 9' 8" . these will be the two that run along your vehicle front to back. The tarp measures 9' 4" so this will leave about an inch of play on each side of the tarp for you to draw tension on it with your velcro straps so that it doesn't sag.
2) cut the other 2 conduit pieces down to 9' 6" these 2 will be the ones that run away or towards the vehicle (perpendicular to the truck)
3) On one of the 9' 8" conduit pieces you're gonna drill 2 holes, one on each end, wide enough to fit the grade 8 bolts all the way through. This conduit piece will be the one that sits parallel or secured to the roof rack.

4) Grab your two 9'6" conduits and drill 1 hole on one of the ends, wide enough for the same grade 8 bolts that are going through the first conduit piece on step 3, to feed through these too.
5) go ahead and secure these 3 conduit pieces together on the floor having the first conduit that has 2 holes (9'8") run parallel your truck with the other two conduits that only have 1 hole each (9' 6") run perpendicular to your truck. Use the grade 8 bolts to feed through both sticks of conduit at each corner and tighten using the wing nuts. Wing nuts should be tight enough so they don't vibrate off but loose enough to where you are able to fold the conduits inwards into line for packing. *NOTE* the conduit bolted perpendicular on the front end of your truck should rest on TOP of the main conduit ( 9'8" 2 hole piece running parallel to your truck) while the conduit running perpendicular on the rear end should sit BENEATH the main conduit piece so that when you fold the 2 side conduits inward for storage they will be able to sit nice and flush not interfering with each other. one folded on top of the main conduit and the other folded beneath

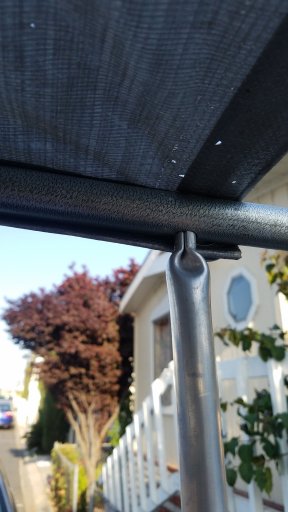
6) the 4th and final conduit (9'8") will be the one furthest away for your truck. Go ahead and drill 2 holes on opposite ends but NOT all the way through for this is where the telescoping tents poles will insert into. Drill these holes 4-5 inches away from the ends since there needs to be room for the 90 degree elbow fittings to slide onto the conduit.


7) Grab the 90 degree elbow fittings and TIGHTLY screw them ONLY onto the conduit furthest away from the truck, using the original phillips head screws included in the fitting. Make sure they are tight for these fittings need to be semi permanent to help make set up and take down times shorter. Next, replace the screws on the other end of the fittings where they will connect into the perpendicular conduits with the eyelet bolts in your misc. hardware from home depot. The reason for this is these are the bolts you will need to hand tighten when setting up your awning each and every time. Hand tightening an eyelet bolt is a lot easier to do than a regular screw & not having to use any type of tools to set up and collapse your awning will help cut set up and take down times.

8) You should now be able to secure your main conduit that runs along the truck onto your roof rack using either U-Bolts or tie straps (in the meantime). On the other side, secure the elbow fittings onto the perpendicular conduits hand tightening them with the eyelet bolts. Once you insert your telescoping poles into the slots you created on the conduit furthest away from the truck, you should have a free standing awning structure. The structure my feel weak or wobbly but this will all be corrected once the tarp is secured.
9) Go ahead and open up your tarp and lay it on a flat surface. You're going to cut down the tarp from its original length 11'4" down to about 9'5". **Please be sure to measure the inside length of your structure as my measurements could differ yours if we secured our conduits in slightly different locations on the grade 8 bolt side of the structure. Be sure to ADD 3" to the length in order to compensate for the width of the seam you will be making once you reinforce your cut side of the tarp with the grommet installation kit from harbor freight.
10) once your tarp is cut down to size you are gonna fold a 1.5" piece of the cut edge back onto the itself in order to make a double layerd edge or seam. Go ahead and put 5-6 grommets along this seam using your grommet installation kit from HF in order to restore original strength along the cut side of the tarp. This step is VERY important in making this awning reliable. ***If you don't reinforce the tarp you will constantly replace it due long tears along the cut edge.


11)Once your tarp is restored and sized, go ahead and start strapping it up to your awning structure using the velcro straps from amazon. * NOTE* their should be a small gap between the conduit and tarp once tight). Strap down on all sides EXCEPT the side furthest away from the truck.
12) the tarp end furthest away from the truck needs to be SCREWED onto the conduit using your 3/4" metal screws and a washer on each screw to keep the large tarp grommets from falling off or coming loose around the small screw heads. Make sure you pull the tarp tight while screwing. DO NOT SCREW THROUGH TARP CANVAS. USE A SCREW AND WASH THROUGH THE LARGE GROMMET HOLES. The reason for screwing instead of strapping on this side of the tarp is to help rolling and storing of the awning to be a lot easier and neat.


13) Once you've put your screws securing the tarp to the outer conduit you should have a solid shady strong awning on your truck that is ready to go through hell and back haha. For added rigidity you can add guy lines to the corners and stake them down at camp.
Congratulations you just built a large awning and saved over $200 bucks in doing so.
Please be sure to ask questions or add any other ideas that could possibly improve this design ! cheers
ADDED NOTES
securing the awning onto your roof rack can be the tricky part, i used U bolts to secure the main conduit side onto my rack through some brackets i fabricated but I'm sure i could have done it without. I use the ozark trail buckle straps from amazon to keep the awning in a tight roll while driving. the straps are long so i actually run the strap all the way around the awning and through my rack for added security.
Also, save the piece of tarp you cut off, maybe someone here can figure out how to make a zippered case out of it. Lastly the telescoping poles to collapse very far down to i just drilled a few more pilot holes further down for the button to spring into them if i need lower positions.


SO heres goes nothing, my own cheap twist on a 9 x 9 awning for 90 bucks
A) Materials & Price list
HOMEDEPOT
- 3/4" x 10' electrical conduit (4 sticks) $17.00
- 3/4" fitting 90 degree elbow (2) $7.46
- Hex head metal screws 3/4" (had some in my storage, only used about (5 or 6)
- Misc. hardware - Grade 8 bolts 1/4" thick by about 3" in length (2), wing nuts (2), washers (about 8), eyelet bolts threaded to fit into the conduit elbow fittings (2), & depending on how you secure it to your roof rack this may change but i used 3/4" U-Bolts (6) $15.00
HARBOR FREIGHT use your 20% off coupon lol
- 11 x 9 ' tarp $10
- 1/2" grommet installation kit $3.99
AMAZON
- Stansport telescoping tent pole (2) $24.82
- 7" velcro cable tie organizer 50pack $7.49
- ozark trail buckle straps 4 pack $7.99
B) Build
sorry for the lack of "during build process" pictures, i pretty much winged it and wasn't thinking about making a diy thread until it was finished. i was extremely surprised by how solid it turned out so i figured why not share the knowledge.
1) cut 2 of your conduit tubes down to 9' 8" . these will be the two that run along your vehicle front to back. The tarp measures 9' 4" so this will leave about an inch of play on each side of the tarp for you to draw tension on it with your velcro straps so that it doesn't sag.
2) cut the other 2 conduit pieces down to 9' 6" these 2 will be the ones that run away or towards the vehicle (perpendicular to the truck)
3) On one of the 9' 8" conduit pieces you're gonna drill 2 holes, one on each end, wide enough to fit the grade 8 bolts all the way through. This conduit piece will be the one that sits parallel or secured to the roof rack.
4) Grab your two 9'6" conduits and drill 1 hole on one of the ends, wide enough for the same grade 8 bolts that are going through the first conduit piece on step 3, to feed through these too.
5) go ahead and secure these 3 conduit pieces together on the floor having the first conduit that has 2 holes (9'8") run parallel your truck with the other two conduits that only have 1 hole each (9' 6") run perpendicular to your truck. Use the grade 8 bolts to feed through both sticks of conduit at each corner and tighten using the wing nuts. Wing nuts should be tight enough so they don't vibrate off but loose enough to where you are able to fold the conduits inwards into line for packing. *NOTE* the conduit bolted perpendicular on the front end of your truck should rest on TOP of the main conduit ( 9'8" 2 hole piece running parallel to your truck) while the conduit running perpendicular on the rear end should sit BENEATH the main conduit piece so that when you fold the 2 side conduits inward for storage they will be able to sit nice and flush not interfering with each other. one folded on top of the main conduit and the other folded beneath
6) the 4th and final conduit (9'8") will be the one furthest away for your truck. Go ahead and drill 2 holes on opposite ends but NOT all the way through for this is where the telescoping tents poles will insert into. Drill these holes 4-5 inches away from the ends since there needs to be room for the 90 degree elbow fittings to slide onto the conduit.
7) Grab the 90 degree elbow fittings and TIGHTLY screw them ONLY onto the conduit furthest away from the truck, using the original phillips head screws included in the fitting. Make sure they are tight for these fittings need to be semi permanent to help make set up and take down times shorter. Next, replace the screws on the other end of the fittings where they will connect into the perpendicular conduits with the eyelet bolts in your misc. hardware from home depot. The reason for this is these are the bolts you will need to hand tighten when setting up your awning each and every time. Hand tightening an eyelet bolt is a lot easier to do than a regular screw & not having to use any type of tools to set up and collapse your awning will help cut set up and take down times.
8) You should now be able to secure your main conduit that runs along the truck onto your roof rack using either U-Bolts or tie straps (in the meantime). On the other side, secure the elbow fittings onto the perpendicular conduits hand tightening them with the eyelet bolts. Once you insert your telescoping poles into the slots you created on the conduit furthest away from the truck, you should have a free standing awning structure. The structure my feel weak or wobbly but this will all be corrected once the tarp is secured.
9) Go ahead and open up your tarp and lay it on a flat surface. You're going to cut down the tarp from its original length 11'4" down to about 9'5". **Please be sure to measure the inside length of your structure as my measurements could differ yours if we secured our conduits in slightly different locations on the grade 8 bolt side of the structure. Be sure to ADD 3" to the length in order to compensate for the width of the seam you will be making once you reinforce your cut side of the tarp with the grommet installation kit from harbor freight.
10) once your tarp is cut down to size you are gonna fold a 1.5" piece of the cut edge back onto the itself in order to make a double layerd edge or seam. Go ahead and put 5-6 grommets along this seam using your grommet installation kit from HF in order to restore original strength along the cut side of the tarp. This step is VERY important in making this awning reliable. ***If you don't reinforce the tarp you will constantly replace it due long tears along the cut edge.
11)Once your tarp is restored and sized, go ahead and start strapping it up to your awning structure using the velcro straps from amazon. * NOTE* their should be a small gap between the conduit and tarp once tight). Strap down on all sides EXCEPT the side furthest away from the truck.
12) the tarp end furthest away from the truck needs to be SCREWED onto the conduit using your 3/4" metal screws and a washer on each screw to keep the large tarp grommets from falling off or coming loose around the small screw heads. Make sure you pull the tarp tight while screwing. DO NOT SCREW THROUGH TARP CANVAS. USE A SCREW AND WASH THROUGH THE LARGE GROMMET HOLES. The reason for screwing instead of strapping on this side of the tarp is to help rolling and storing of the awning to be a lot easier and neat.
13) Once you've put your screws securing the tarp to the outer conduit you should have a solid shady strong awning on your truck that is ready to go through hell and back haha. For added rigidity you can add guy lines to the corners and stake them down at camp.
Congratulations you just built a large awning and saved over $200 bucks in doing so.
Please be sure to ask questions or add any other ideas that could possibly improve this design ! cheers
ADDED NOTES
securing the awning onto your roof rack can be the tricky part, i used U bolts to secure the main conduit side onto my rack through some brackets i fabricated but I'm sure i could have done it without. I use the ozark trail buckle straps from amazon to keep the awning in a tight roll while driving. the straps are long so i actually run the strap all the way around the awning and through my rack for added security.
Also, save the piece of tarp you cut off, maybe someone here can figure out how to make a zippered case out of it. Lastly the telescoping poles to collapse very far down to i just drilled a few more pilot holes further down for the button to spring into them if i need lower positions.