The F150 Baja 1000 Chase / Overland Build

  • HTML tutorial

The Ocular Engineer

Rank V
Launch Member

Enthusiast III

The last details of the chase rack were fire extinguisher, Maxtrax, shovel, and wheel mounting as well as quick connect air fittings to plug in an air hose.
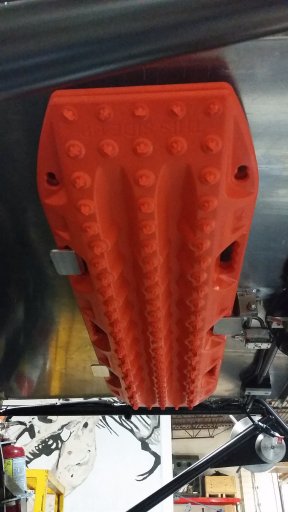
The Maxtrax mount is welded to the bottom of the cargo deck and incorporates a 5/8" pin that has a 3/8" cross hole for a pad lock. remove the lock, pull the pin (it can not be pulled all the way out because of a lanyard) and the keeper drops down to release the trax.

The shovel mount (not pictured) is a simple rubber clasp that is just forward of the Maxtrax. While not super accessible, I figured (and was hoping) that it wasn't going to be needed often or in a hurry.

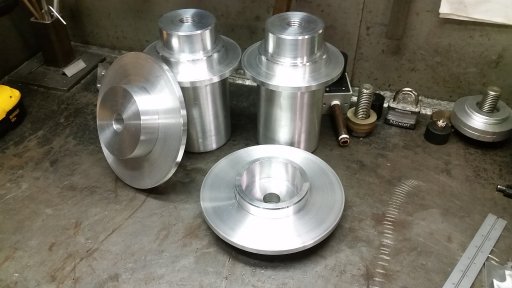
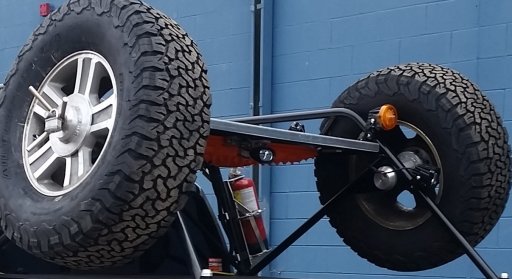
The wheel mounts.... My mental illness showed up in the form of 4 1/4" aluminum bar stock machined / welded to fit the wheels for my F150 and the wheels of the race trucks of my friends...

Quick connect air fittings are tucked next to the cab and are covered to keep dust and debris out of them.

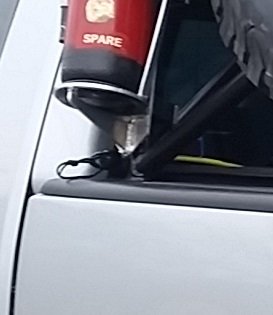
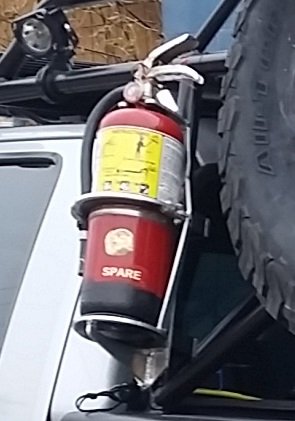
The fire extinguishers are held tight by mounts that I made from aluminum.
 

Attachments

Last edited:

The Ocular Engineer

Rank V
Launch Member

Enthusiast III

Drive train improvements consist of Eaton TrueTrac differentials in the rear and front and Motive 4.10 gears (from 3.73s). I had this work done by Libson Twin Cities in Minneapolis. I think that their pricing was reasonable and their customer service has been good. If you need drive train work done, I recommend them. While the truck was in the shop, all u-joints were replaced and the drive-lines were balanced.

The Motive gears do make more noise than the stock set and after >8000 miles on them, they still hum a little.

(From my post in https://www.overlandbound.com/forums/threads/tru-trac-experiences.11664/#post-181558)
My experience so far is limited but very positive. After the first snow this year, that started as rain, the roads were covered in about 2" of cake ice with some breaks to the pavement. I left the house in 2wd to feel how it handled, made a left onto a 4 lane road, got a little loose but gathered it up easily. Switch to 4wd and it was like the ice went away. After that, I had to make an effort to lose traction. Transitions from ice to pavement we nothing more than a bump in the road with no pull from the steering wheel.

While it is true that with a wheel in the air, the Truetrac will spin the wheel, you can apply the brake and gas at the same time to help send traction to the wheel on the ground. For my application, this is a very small percentage event.

Overall, I am very happy with the performance of the Truetracs.
 

Attachments

The Ocular Engineer

Rank V
Launch Member

Enthusiast III

So the electrical system.... so many lights, switches, accessories, wires, fuses, relays and on and on and on....

This was by far the most time consuming part of the project. By the time I had finished it (mostly, there are a few things to finish, still) I was pretty sure that I have some form of mental illness.

The quick and dirty of the system: The heart is the 27oA DC Powersystems alternator that feeds duel Optima Yellow Top batteries. They are tied or separated by a Power Stream 12V smart battery isolator. The main battery powers the OEM harness and the winch and the auxiliary battery powers everything else (all aux lighting, air compressor, fuel transfer pump, 2300W inverter, GPS, VHF)

The main elements of this part of the build are the duel battery system, distribution and control.

Let's start with the batteries:
After pulling the stock battery tray out and surveying the space I wanted to land the two Optima Yellow Tops, I knew a few thing: I needed to make more room and it was going to be tight. More room meant moving the windshield washer fluid tank forward. A few custom chunks of aluminum later and I had a little more breathing room. Next was making a secure lading pad for the batteries. This ended up being an aluminum plate that is bolted to the OEM battery tray point, topped with a sheet of UHMW and has pile of machined and welded bits and ends to hold things in place. The last pic shows the UHMW top sheet that holds more relays, fuses and the solenoid for the winch. From here, the power goes to the aux distribution fuse blocks, inverter, compressor and fuel transfer pump. Unfortunately, this is the best pic I have of it at the moment.
 

Attachments

The Ocular Engineer

Rank V
Launch Member

Enthusiast III

I knew I wanted the fuse blocks and relays protected & easily accessible. To me, this meant putting them in the cab and the best real estate I could find was the glove box. So after relocating the owner's manual and sawing off the part that would hold your gloves, I made an aluminum plate to hold the fuse blocks, terminal strips and relays.
20170911_125834.jpg

Side note: I know there are these new fangled black box blue tooth stroboscopic touch screen techno wizardry controlers out there. I prefer old school. When your accessories master controller module releases the magic blue smoke, it is real hard to put that back in the box.

To get from the batteries to the distribution hub, I popped two holes on the inner fender well, ran hundred or so feet of wiring and tucked things neatly behind the plastic inner fender well.
20170918_123101.jpg

Now the "glove box" looks like this:
20171007_095811-1.jpg
 

The Ocular Engineer

Rank V
Launch Member

Enthusiast III

Switch. Lots of switches.

The list of things to turn on & off is long.
Bumper flood lights
Bumper light bar
Rack light bars
Cornering lights
Driver side work lights
Pass side work lights
Rear bumper lights
Rear work lights
Rear amber and blue (don't f'n hit me) lights
Bed down lights
Under hood lights
Inverter
Air Compressor
Transfer tank fuel pump
Winch power & hoist / pay out
Interior map lights

My original though was to build a new overhead console to put the majority of the switches in. However, the time I had to get things done before leaving to go to the Baja 1000 was getting short and compromises had to be made. The result was grafting in a switch panel into the OEM overhead panel.
20171009_152119.jpg

Wiring things up:
20171002_220735.jpg
 

The Ocular Engineer

Rank V
Launch Member

Enthusiast III

Thanks allredchad.

The GPS, Tuner, winch controls, and a few more switches needed some real estate, so the center dash pod was fabbed.
20171009_121111-1.jpg
The Big Red Button is to momentarily turn on all forward facing lighting, just in case oncoming traffic refuses to dim their lights or someone needs a little more than the usual flash of the high-beams to alert them that there is faster traffic behind them.
Then there is the winch control: Hoist / pay out, winch on.
The Bypass switch is for self jump-starting. If the main battery gets to low to start the truck, I can manually override the automation on the solenoid that normally ties the batteries together.

On the other wing that is hard to see, is a volt meter that can be switched off, transfer tank, air compressor and inverter power switches and the plug in for the wired winch controller.
 

The Ocular Engineer

Rank V
Launch Member

Enthusiast III

The last interior panel holds the pressure gauge for the air system and the regulators for the air bags in the rear suspension, dimmer for the list toggle switches, 2 spare switches and a jack for a pendant switch to turn on all auxiliary lights at once (in case something goes bump in the night).
20171102_100853.jpg
There will be another jack for an auxiliary speaker that can be set outside the cab for the VHF.
 

The Ocular Engineer

Rank V
Launch Member

Enthusiast III

20171031_161833.jpg
The compressor is mounted on the passenger side of the bed. Since this pic was taken, I have put in a steel braided hose to t takes the heat generated by the compressor.

The 7 gallon receiver is mounted under the bed, where the OEM spare tire was hung and there are quick connect fittings on each side of the rack.
 

The Ocular Engineer

Rank V
Launch Member

Enthusiast III

20171103_145012.jpg
The last major addition before I left for the Baja 1000 trip was the addition of fuel transfer tank. This one holds 38 gallons and takes up about 9 inches of bed space. Somehow, it magically grew new mounting feet, an alternate pump mount, non-venting filler cap and vent bungs fitted with rollover valves that are plumbed into the truck's vapor recovery system.

The taneau cover keeps it out of sight and rolls up just far enough to fill it.
 

The Ocular Engineer

Rank V
Launch Member

Enthusiast III

Who made your tank and is it dot approved for gasoline?
Hey darthyota, here is the link for the tank that I bought:
https://www.jmesales.com/38-gallon-dot-aluminum-rectangular-transfer-tank/

It is a DOT Certified for Gas, Diesel, Methanol, Kerosene, Aviation fuel and other liquids. ...... as it is delivered..... just sayin'... for further discussion, please PM me.

Really nice people to deal with and I was very fortunate that my good friend lives close to JME and was able to pick up the tank for me and save me the freight charges.

This is a really nice, well made tank and I would not hesitate to recommend for someone who wants more than a couple Jerry cans of fuel.
 

The Ocular Engineer

Rank V
Launch Member

Enthusiast III

So, everything that I have posted was completed before I went to Baja in November of '17 for the 50th anniversary of the Baja 1000. The truck and all of the mods worked great in support of the Fire Guys Racing Jeepspeed 1788. The only things that were not used (thankfully) were the winch, MaxTrax and the shovel. The suspension with the air bags did a great job of keeping an 8000 pound rig well poised and keeping me alive.

So what is next?

Maintenance. Transmission & power steering service.
After that I will build a new rear bumper with a swing out spare tire carrier, flip-down table and possible extra storage. Also on the short list is new springs and new air bags for the rear end. I am considering Alcan springs with 2 to 3" of lift. I am also considering expanding the rack and adding a RTT and awning.... CB radio (in addition to the VHF), fridge/freezer, solar, water tank, heat exchanger for hot water off the engine, proper rock sliders (not the Fab4 damage multipliers that I have)....................................

I have lost my mind....
 

The Ocular Engineer

Rank V
Launch Member

Enthusiast III

This was a pretty amazing read, and write-up. I enjoyed seeing the progression of the build. Kudos!
Thank you.

One of the lighting additions was LED lights under the hood just in case.
20171008_131254.jpg
During the duel battery tray building, I hung a four foot LED shop light under the hood so I could see what I was doing. These two strips light it up as well, if not better.
 

Gmanf150

Rank 0

Traveler I

I'd be worried your still going to mangle your bed between the weight go the rack and what you put in/on it and the forces of bombing through the desert at speed. Are you planing on a bypass/ tire rack in the bed, like either of these? If you are then I would tie the over cab rack into the bed/frame mounted rack to take the stress off the thin box sheetmetal.
View attachment 42845 View attachment 42846
I was thinking the same thing.
 

Schmitty

Rank IV
Launch Member

Enthusiast III

953
Spokane, WA
First Name
Matt
Last Name
Schmitt
Member #

10794

I'm currently building out a 2006 same gen F150. Nice to finally find someone else working on one and documenting it so I can steal ideas!

What kind of adjustment do you get on the rear Icon suspension? I've been looking at getting that setup.