• HTML tutorial

Reaver's Squaredrop Camper Build!!

DangitDad

Rank III
Member

Enthusiast III

So glad I found this thread! What you're doing is very similar to what I'm imagining for my build. Some significant differences in the configuration, but you have me thinking about changing from a true fiberglassed solid plywood panel to the "cutout" plywood panel with inner paneling and insulation + PMF. Curious to know how you'll make the surface for the canvas uniform and smooth. Epoxy filler?

You're doing roof struts, which I did on my first camper build and it worked well to accept the aluminum roof sheet, as well as bury lighting wiring and insulation, but this time I think I will create the roof structure with plywood panels instead, rabbit joints glued and screwed to an inner brace/moulding piece. I realize it may end up with something of a "drop ceiling" to add a little insulation and hide wiring, but it won't need to be structural. And I'll skip that if I can accomodate wiring somehow, without it looking like crap...

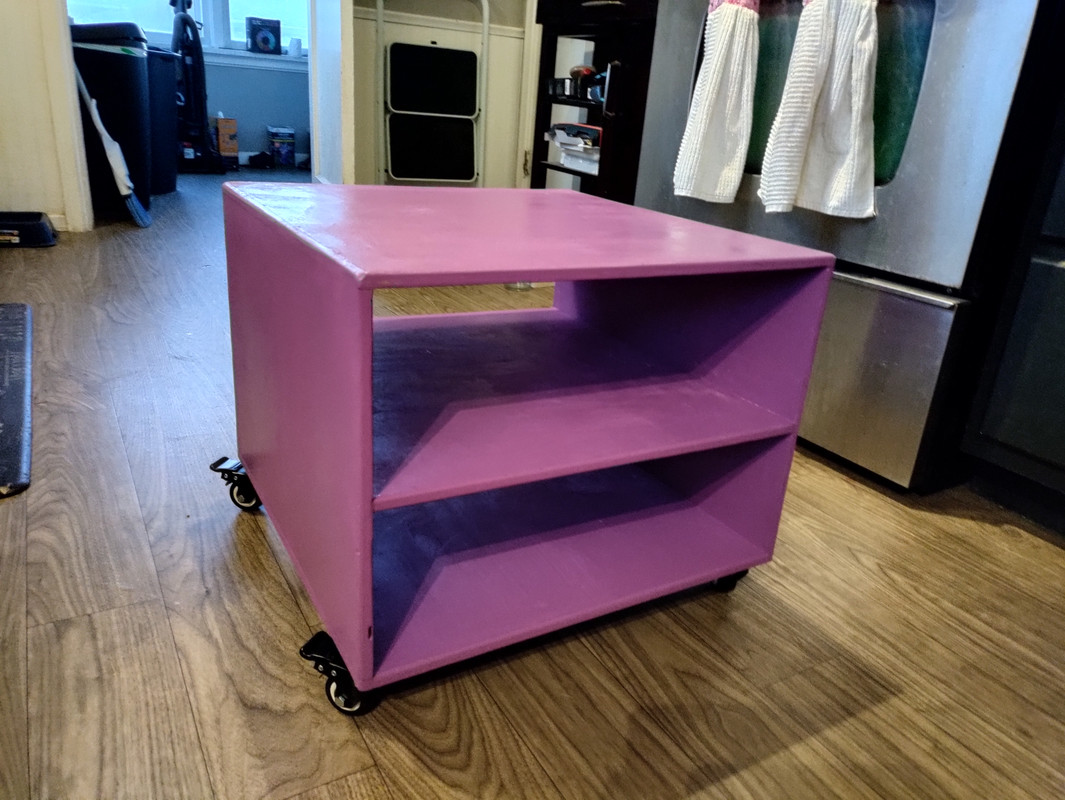
Also, I really like your kitchen box. I had planned on making a side-swing galley hatch that would carry modular pieces like a stove and countertop, maybe a molle panel or french cleat setup, but you have me rethinking again!

Very cool build and kudos on putting in the modeling time.
 

reaver

Rank VI
Member

Explorer I

So glad I found this thread! What you're doing is very similar to what I'm imagining for my build. Some significant differences in the configuration, but you have me thinking about changing from a true fiberglassed solid plywood panel to the "cutout" plywood panel with inner paneling and insulation + PMF. Curious to know how you'll make the surface for the canvas uniform and smooth. Epoxy filler?

You're doing roof struts, which I did on my first camper build and it worked well to accept the aluminum roof sheet, as well as bury lighting wiring and insulation, but this time I think I will create the roof structure with plywood panels instead, rabbit joints glued and screwed to an inner brace/moulding piece. I realize it may end up with something of a "drop ceiling" to add a little insulation and hide wiring, but it won't need to be structural. And I'll skip that if I can accomodate wiring somehow, without it looking like crap...

Also, I really like your kitchen box. I had planned on making a side-swing galley hatch that would carry modular pieces like a stove and countertop, maybe a molle panel or french cleat setup, but you have me rethinking again!

Very cool build and kudos on putting in the modeling time.
I'm not sure what you mean about making the surface uniform. There will be an outer layer of plywood that will be pin nailed or stapled to the 3/4 plywood structure, along with an adhesive. A touch of wood filler will smooth out the fasteners, and the pmf process will happen on top of that.

The only wires I plan on running through the roof will be for the overhead lights, and the fan. Everything else will run through either the wall or the floor.

I have to go and buy a new dishwasher tomorrow, so that will delay some of the upcoming purchases.
 

reaver

Rank VI
Member

Explorer I

Got my battery monitor delivered the other day. I went with a Simarine Pico system, so I can utilize the tank monitors and phone connectivity. Along with temp sensors and built in relay triggers. I plan on using one of the built in relays to use the outside temperature to trigger my water tank heating pad to turn on when the temp drops to 33* to keep my tank from freezing.

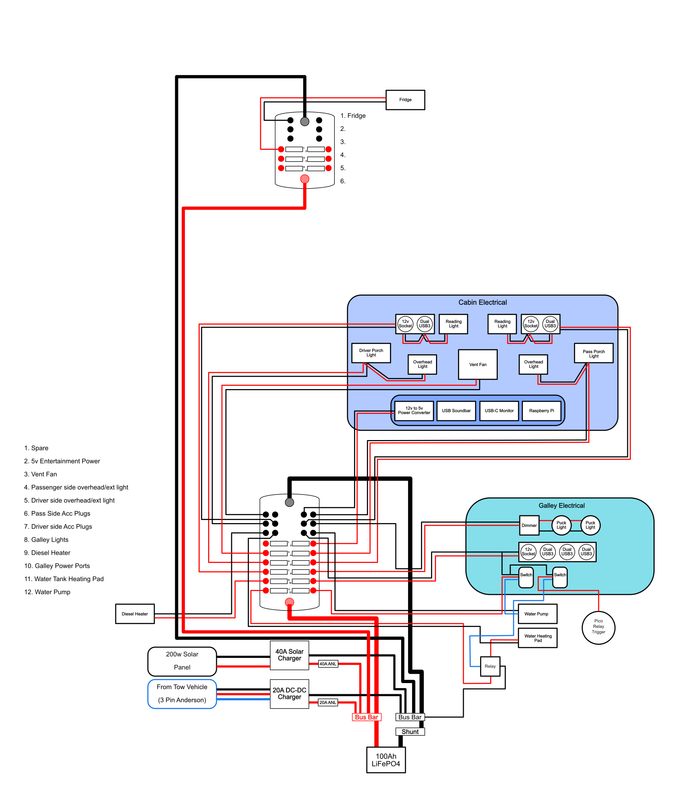
I've also been working on the electrical design of the trailer. I think I've accounted for pretty much everything.


A few things to note here. I may move the diesel heater, and both the water pump and water tank pad to the front box. I'm not entirely sure yet there. Doing so will free up a couple of slots on the cabin fuse block as well.

This electrical system is considerably different than the one in my current trailer. I relied heavily on relays for switching things on and off. I found that for the most part, that's not really necessary, as almost everything (including the water pump) draws less than 6A, and most of the switches are rated to 20-30A. This will make things considerably easier to wire up, and I'll only use relays where they're absolutely necessary.

I'm looking for lights that have switches built into them, as well as dimmers. Whether I go this route or not will be dependent on whether I find something I like.

Ordering my rear galley door next week, then I just need to save for a bit more before I can get the wood to get started! Getting closer!
 

reaver

Rank VI
Member

Explorer I

Nice looking drawing Brian, a lot of thought went into that:)
Thanks! I actually did the diagram at work while waiting for videos to render.

I'm ordering the last big part of the build next week (the rear door). Then I'll have all the major components required to start the build.
 

reaver

Rank VI
Member

Explorer I

Got around to testing out the battery monitor this weekend. I also got it hooked up to the app.

It currently has a temp sensor on it, and that's it. I'm still working on figuring out how to set up the voltage monitor for the battery, but hopefully I can figure that out this week.

Looking forward to actually starting to build this thing.


DangitDad

Rank III
Member

Enthusiast III

So why did you choose to build your own electrical system and not go with a power station? I'm torn...
 

reaver

Rank VI
Member

Explorer I

So why did you choose to build your own electrical system and not go with a power station? I'm torn...
Lots of reasons.

First of all, I already have all the tools to build it. As well as all the components but the fuse block and lights.

Second, even if I had to buy a 100Ah battery, if you have the knowledge to build it, it's actually cheaper to build from scratch. A 100Ah battery is equivalent to about 1280wh. Most of the power stations in that range are about a grand, last time I checked. Most of the DC output ports are limited to 10-15A.

Also, I'm a masochist, and absolutely LOVE building 12v systems. I also like having separate components in case something fails. I also use dc-dc charging to charge the battery from my tow rig, which pumps 20A into the battery. I can charge a 100Ah battery from flat to full in 5 hours. Try doing that with a power station. It's also possible to add capacity by installing an additional battery. I can pump 40A of solar to the battery if I have enough solar panels.

Don't get me wrong, power stations are great, and have their place (I have 2 of them already), but I'm not a fan of using them in my trailer as my primary power source.
 

reaver

Rank VI
Member

Explorer I

Well, I'm now 850 bucks poorer.... But....

The rear galley door has been ordered!

The last exterior component I need is the roof fan. I've found one I like, that also has an integrated led light, so I'm going to go that route.

I just need to wait a few weeks until I can get started building.
 

reaver

Rank VI
Member

Explorer I

Just ordered the vent fan this morning. The model I initially wanted went out of stock, but I found a similar fan for a bit less money, and it still keeps the rain sensor and integrated LED light, while also being a little bit cheaper.

Just a couple more weeks to wait until I can get started. Have to get through GS cookie season first.
 

reaver

Rank VI
Member

Explorer I

Rear galley door was delivered to @David H so house yesterday. Received the fan with integrated light today. Now I just need to grab a dimmer and make sure that I can use it to control the light.
 

reaver

Rank VI
Member

Explorer I

Ordered everything I need to actually wire up all these different components. Everything should be here tomorrow, so I can work on making it all work over the weekend. I'll mount everything to a piece of plywood I have laying around.
 

reaver

Rank VI
Member

Explorer I

I think I've finished the electrical schematic for the new trailer:


To view the full size image, click the following link:

Electrical Schematic

I've also got the main part with all build and laid out on a piece of wood.


Now I just need to or all my wire. I'm not sure how long the pigtail to connect the distribution box needs to be yet, so I've made a temporary connection there. That's why it's just hanging over the top of the DC-DC charger. I still need to pull the 40A solar charger out of my xterra, and swap that with the 20A charger I originally had in the trailer, but the connections will work all the same.
 

reaver

Rank VI
Member

Explorer I

Well, in playing with the lights in the vent fan, not only did I hate the daylight color (cool white), but I wanted to be able to dim them.

So, after ordering an led strip and a dimmer, I have swapped the light strips in the fan for the correct color temp.

Cutting out of work early tomorrow, and going to pick up the wood to build the floor, inner skins, and the skeleton.

Building commences Saturday morning!!
 

reaver

Rank VI
Member

Explorer I

And so it begins...

Yesterday, @David H and I managed to get the floor completely assembled.


The total thickness of the floor is about 2 inches. The bottom layer of plywood is 23/32, with 2x4 and 1.5 inch insulation, with 1/4 Inch birch ply making the top most layer.

We then measured about 8 times before cutting out the door.

We then stood the wall panel up to see how it would look:


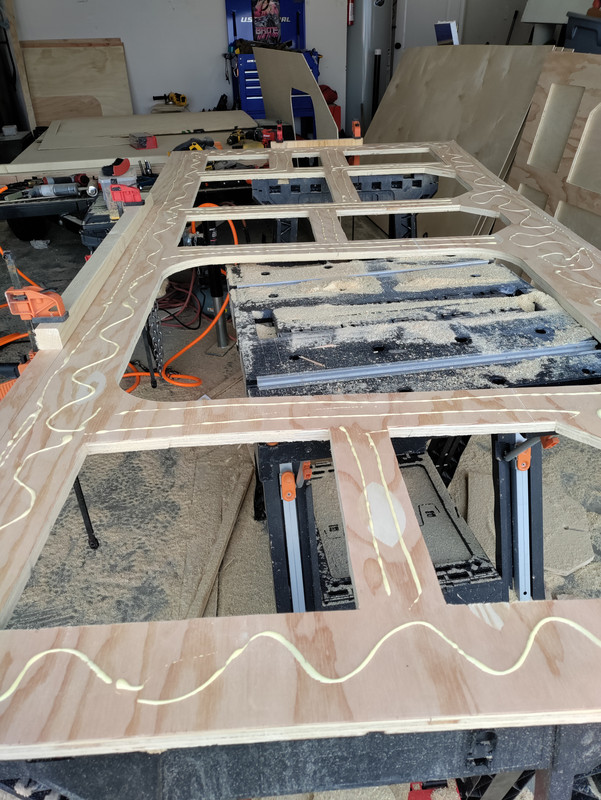
We then cut out all the voids in the wall for insulation and weight savings.... And boy, did it save weight.


Today's goal is to get the other wall cut out, as well as the galley outer wall.

The nice thing is the other wall will be much faster, as we can lay it over the top of the first one, and use the router to create an exact duplicate.
 

reaver

Rank VI
Member

Explorer I

Honestly, I'm not really sure. The door itself is probably about 3/4 Inch or so? The whole assembly will fit anything between 3/4 to about 1.75 inches I think.
 

reaver

Rank VI
Member

Explorer I

I managed to get both skeletons cut and skinned on the inside today.


Unfortunately, I won't be able to work on it again until next weekend, when we cut the hole for the galley door.
 
Last edited:
Top