Reaver's Squaredrop Camper Build!!

  • HTML tutorial

reaver

Rank VI
Member

Explorer I

3,680
Caldwell, ID, USA
First Name
Brian
Last Name
McGahuey
Member #

23711

Ham/GMRS Callsign
GMRS WRMV941
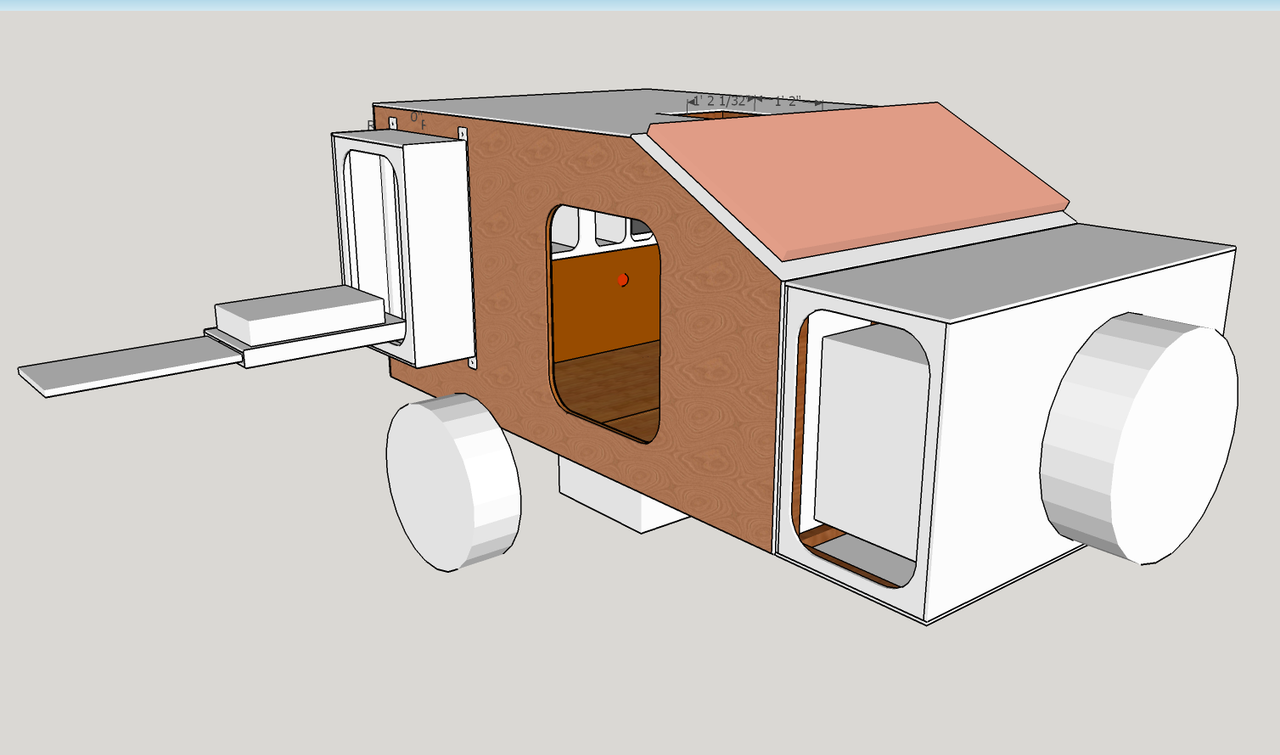
The time has come to build a new off road trailer. While Groot 1.0 has served us well, including a trek down the Idaho BDR, we've decided that it's time to move to a square drop style camper.

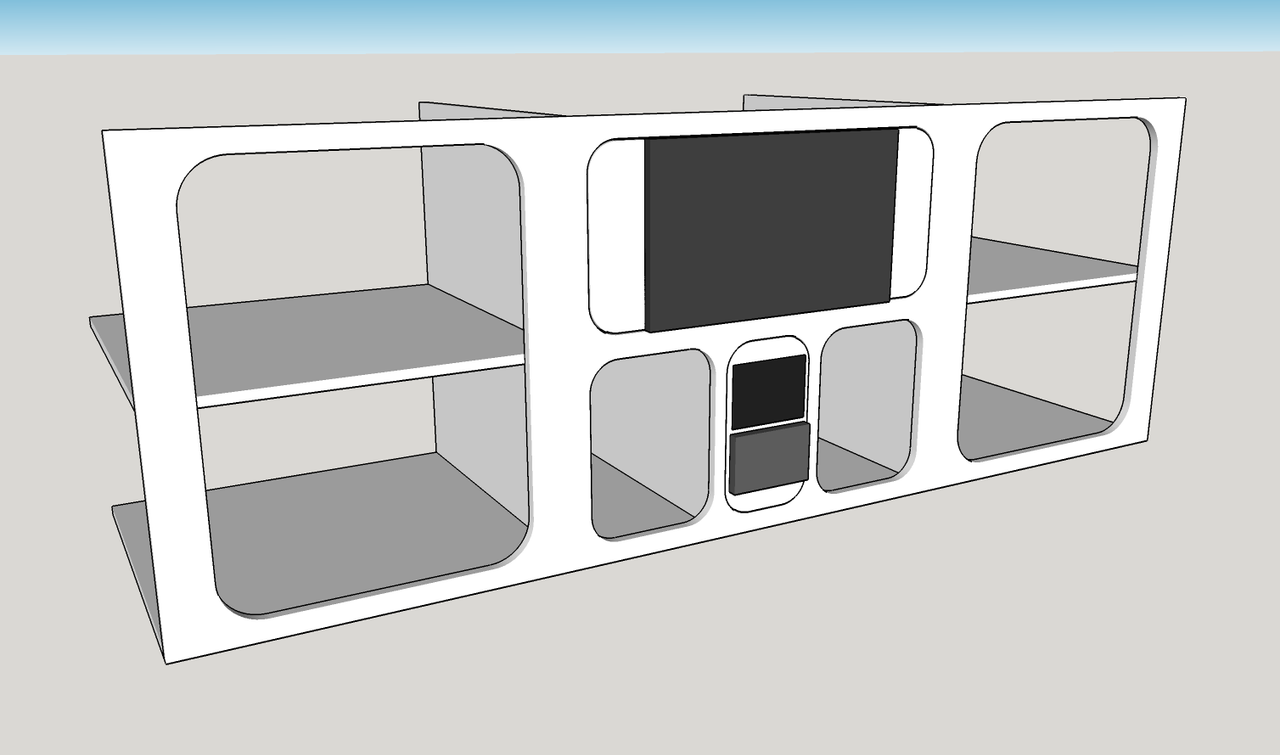
I've begun planning the cabin, while also learning how to use sketchup.


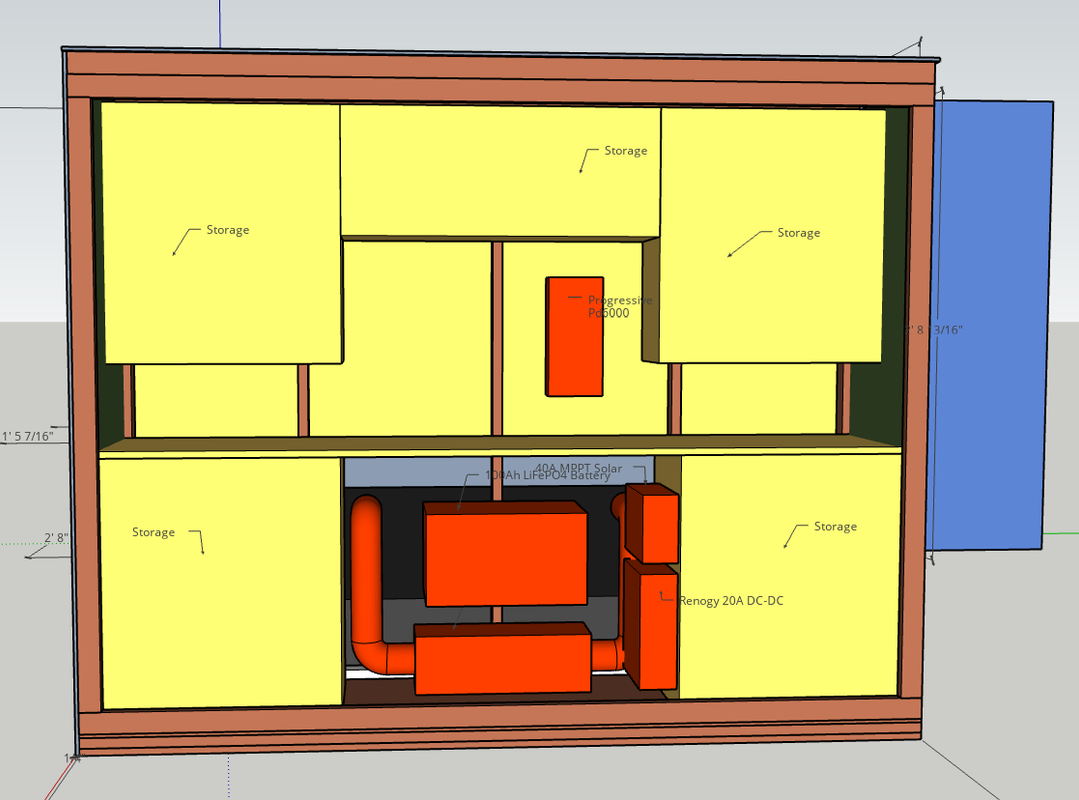
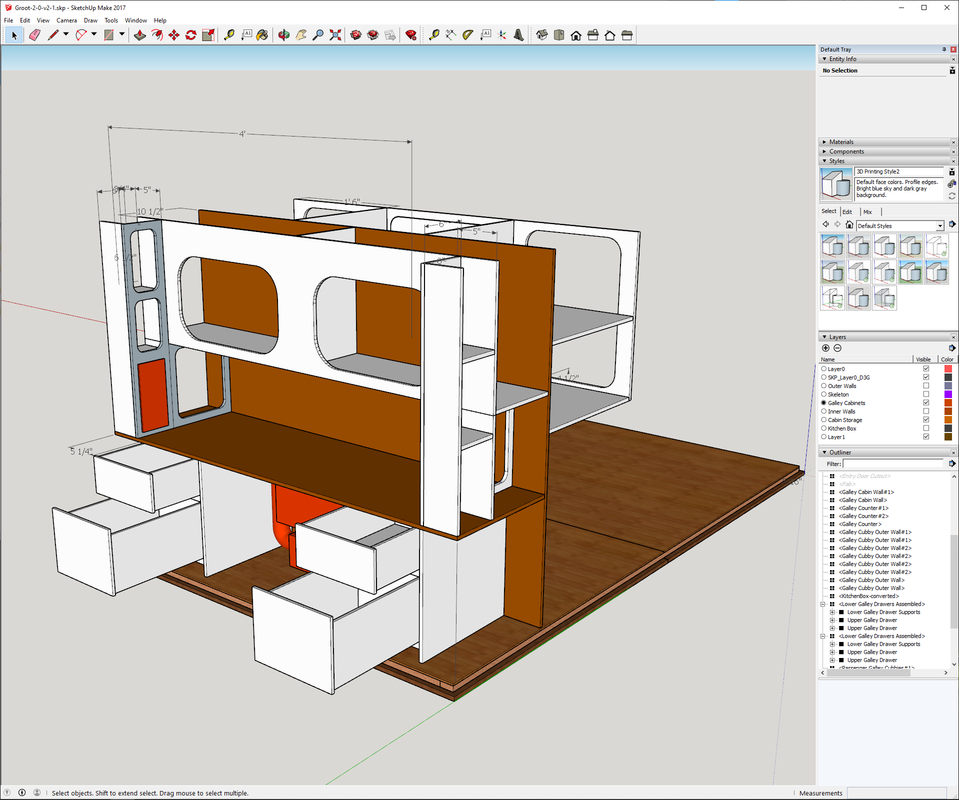
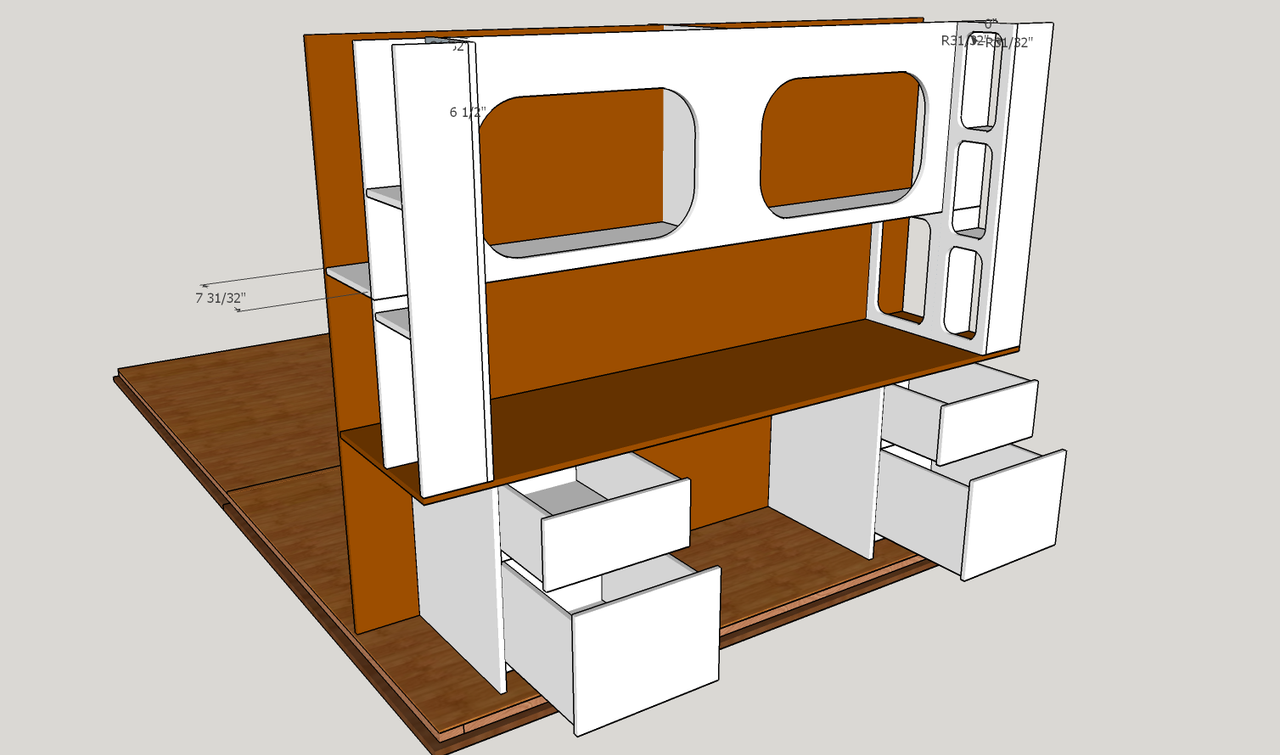
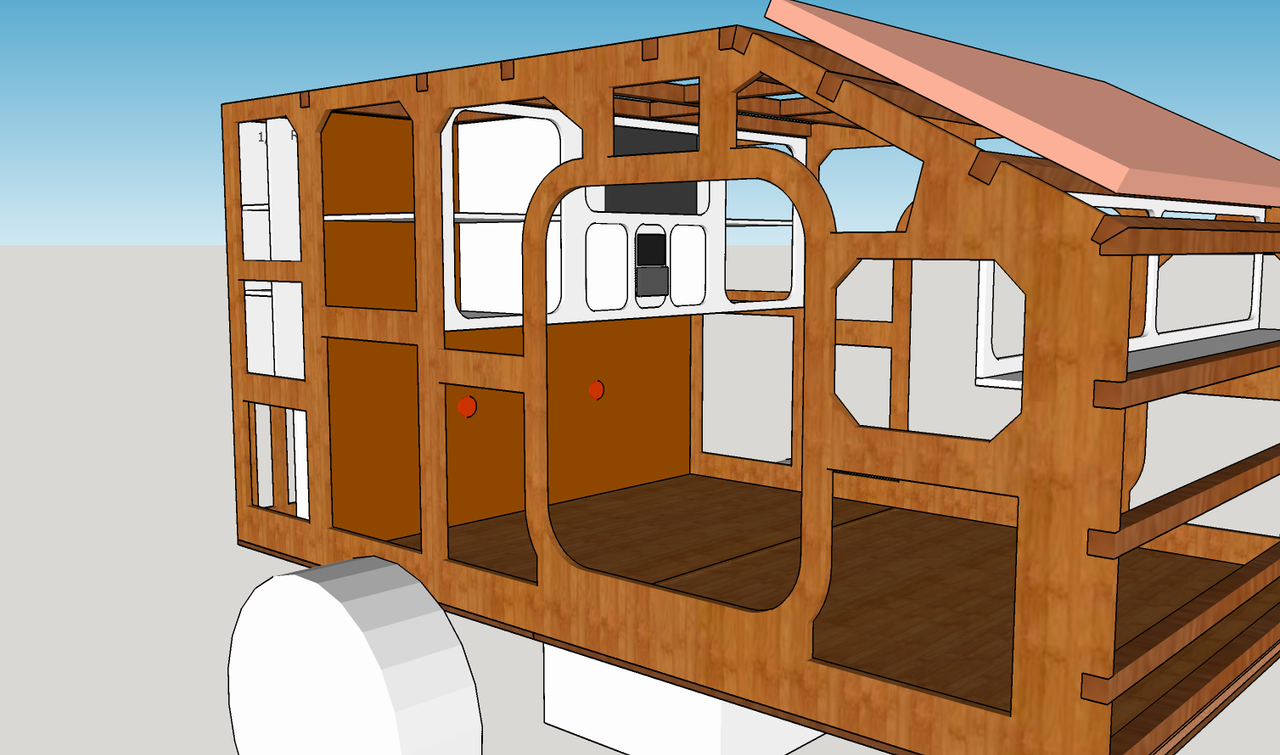
The basic cabin structure will consist of a 1/2 in plywood base, with 1x2 and 3/4 in foam providing insulation and structure, followed by a piece of 1/4 in plywood. a 6 inch mattress will sit on top of this, so more insulation is not really required.

Walls will consist of 1/4 inch outer wall, with 3/4 inch foam and 1x2 providing additional structure, with 1/4 inch interior wall.

the roof will be 1.5 inches thick, with 2x2 spars and 1.5 inch thick foam sandwiched between two layers of 1/4 inch plywood.

Now, I know what you're thinking.....1/4 inch plywood won't be very strong. And normally, you'd be right. The ENTIRE box, including the floor will be coated and strengthed using 4 oz fiberglass. This will not only stiffen the entire box, but will completely waterproof everything.

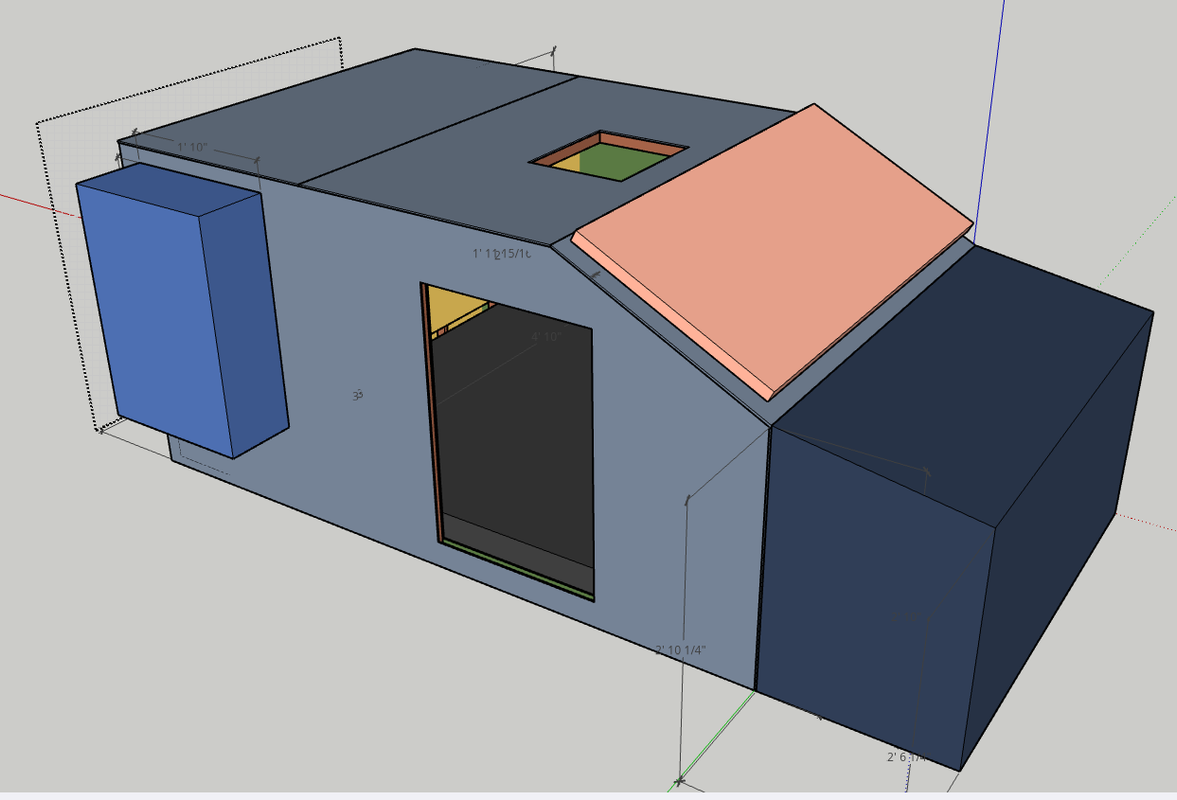
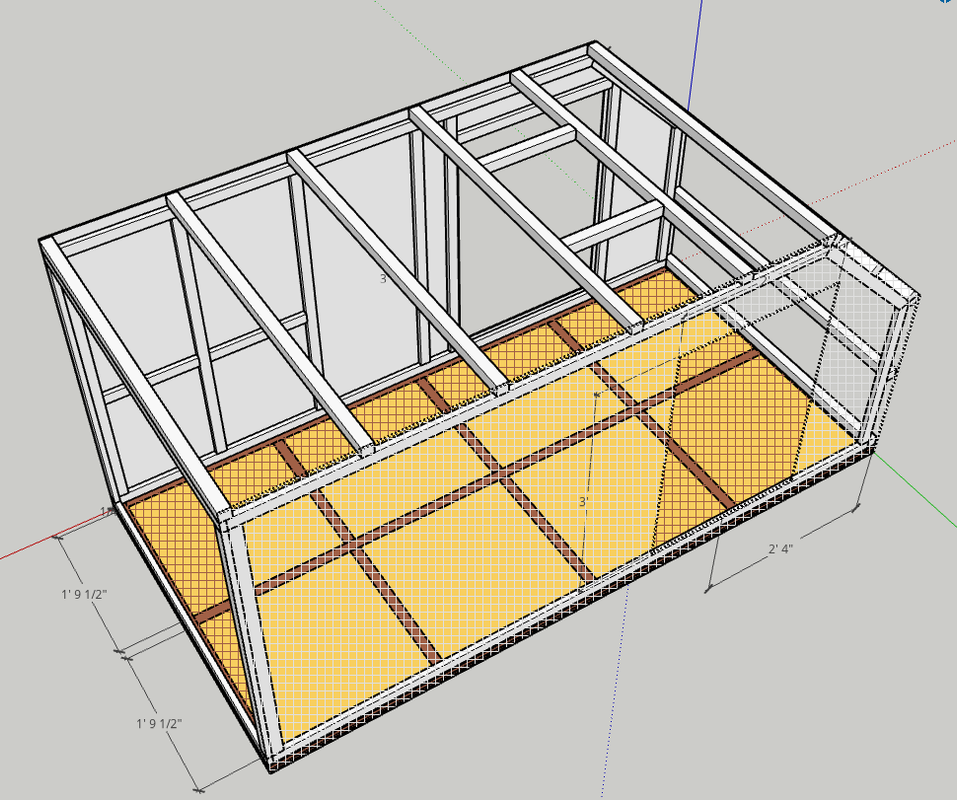
The exterior dimensions of the cabin will be 96 inches long x 60 inches wide, and will sit on a 5x9 frame consisting of welded 2x2.5 in square tubes.

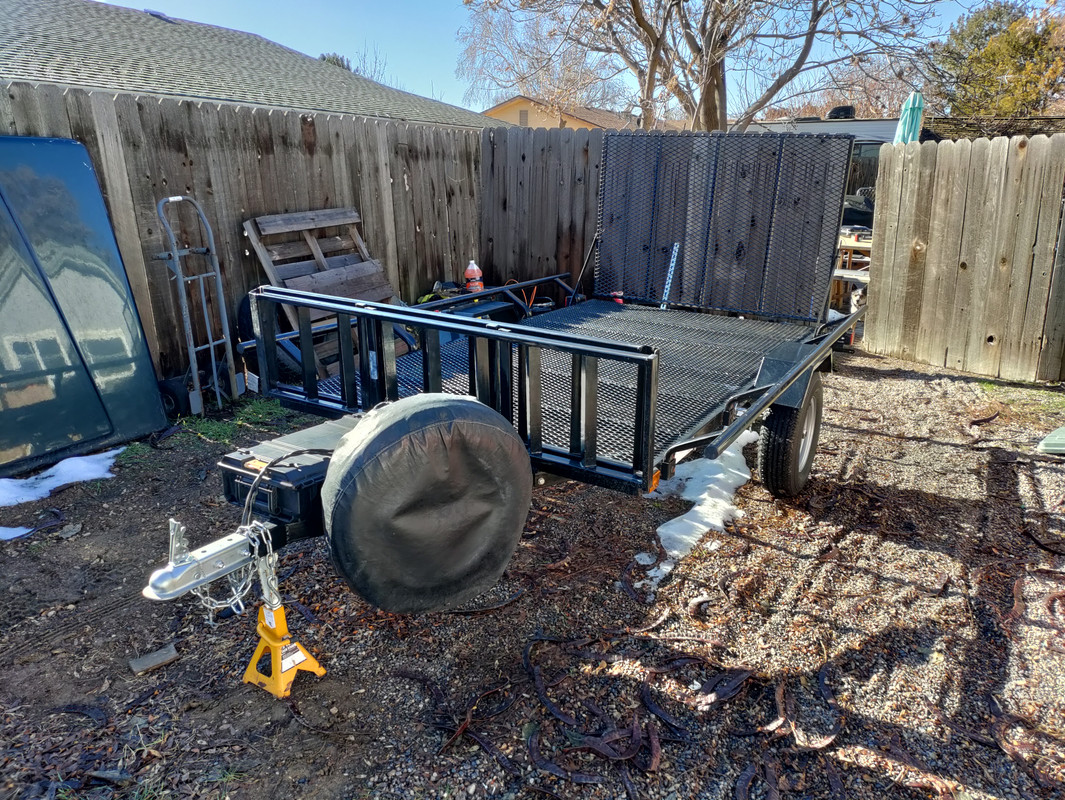
There's a local trailer manufacturer here in Caldwell that makes utility trailers.

This is the frame I'll be starting with to build on.


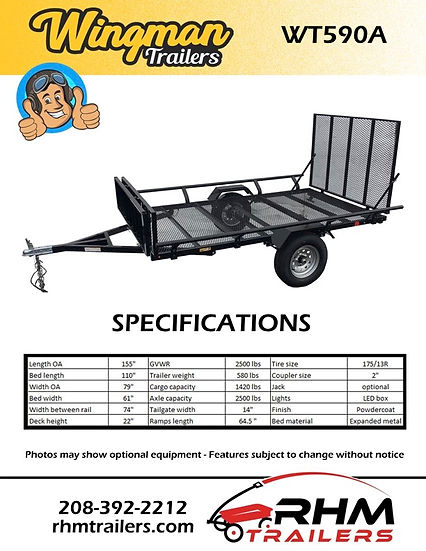
All the rails, tailgate and front part bolt off, and the trailer quickly converts to a flatbed.

I'm shooting for a dry weight, with the box of 1500 lbs. The trailer has a gross weight of 2500lbs, and weighs 550 lbs in the above configuration. Taking all the extras off should shave 100 lbs or so off the weight, and I'm anticipating the box to weigh roughly 700lbs or so.

I'll update this as the design evolves.

Let the fun begin!
 

reaver

Rank VI
Member

Explorer I

3,680
Caldwell, ID, USA
First Name
Brian
Last Name
McGahuey
Member #

23711

Ham/GMRS Callsign
GMRS WRMV941
I've been refining my design over the last couple days. I think I've got the basic layout of the galley figured out, as well as where all the electrical components will go.

Galley Layout


Cabin Layout


Sidewall Framing


Overall Design


I had to adjust the angle on the front of the trailer. The solar panel I've chosen hung over the angle. Which, if I didn't want that front box there (which is where the fridge will live), it wouldn't be a big deal.

So, I made the angle not as steep to accomodate the fridge box, and the solar panel.

In the galley, I've layed out all my electrical devices, and the diesel heater. I'll put the diesel heater on a mounting plate that goes through the floor, and seal it all up using high temp sikaflex or something like that. I'll be recirculating the heater through the cabin so that it's not always blowing in cold air. I'll build a shelf on top of the heater to put the battery (it doesn't weight terribly much due to being lifepo4). DC-DC and solar charger will be on the wall between the battery compartment and the storage to the left.

As far as lower storage, I've not decided if I want drawers down there, or shelves, or a mixture. I'll have to consult the wife to see what she thinks would be best for that.

Up above, will be my Progressive Dynamics PD6000 Distribution panel, along with the display for the battery monitor, solar charger, and a secondary control for the stereo I'm planning on putting in the trailer.

I've started ordering parts.

Today, fedex showed up with the first of the hatch doors.


This one is for the kitchen box (the blue box on the side of the trailer). I'm trying to mimic what off grid trailers does with their kitchen:


I just ordered the doors for the front fridge box. The box will be plenty big enough to house a 60L fridge, maybe even bigger, depending on how wide it is. The opening of the doors I ordered is 30x20, so most fridges should fit through there.
 

reaver

Rank VI
Member

Explorer I

3,680
Caldwell, ID, USA
First Name
Brian
Last Name
McGahuey
Member #

23711

Ham/GMRS Callsign
GMRS WRMV941
Glued and screwed. That's how my current trailer is put together, and it's held up just fine.

The one thing I haven't settled on yet is how I'm going to cover the outside.

The way I see it, there's basically five options:

1. Penetrating Epoxy, followed by paint.
2. Penetrating Epoxy and skinned with aluminum composite
3. Poor man's fiberglass, followed by acm panels
4. Poor man's fiberglass, followed by paint
5. Actual fiberglass, followed by acm panels

These are the options I'm looking at.

With number one, this would be my cheapest option. But, it's not really the finish I'm after.

What I'm thinking is actually a hybrid of pmf and fiberglassing. I'm thinking I coat the wood in one to two coats of cpes to seal the wood. Then, I lay down canvas like pmf, but instead of coating the canvas with waterproof wood glue, I'll coat it with a two part epoxy. This will harden to provide a very rigid outer structure that is lightweight, but stiff.

Then, I'll sand the epoxy so it's flat, while scuffing it up.

I'll then skin it with aluminum composite panels.

I looked into bed lining it, but it would take a lot of extra work, and equipment to get the smooth finish I'm going for with the bedliner.

The floor will get 4 layers of cpes, followed by some sort of undercoating prior to starting to install the walls.

The point here, is to minimize the expansion and contraction of the wood, and create a shell that eliminates any chance of water getting into the structure of the wood. While the acm panels are inherently waterproof, the only function they will be providing is a smooth, professional looking outer finish.
 
  • Like
Reactions: brien and grubworm

freak4life

Local Expert
Member

Contributor II

1,300
Cañon City, Colorado, USA
First Name
rich
Last Name
anderssohn
Glued and screwed. That's how my current trailer is put together, and it's held up just fine.

The one thing I haven't settled on yet is how I'm going to cover the outside.

The way I see it, there's basically five options:

1. Penetrating Epoxy, followed by paint.
2. Penetrating Epoxy and skinned with aluminum composite
3. Poor man's fiberglass, followed by acm panels
4. Poor man's fiberglass, followed by paint
5. Actual fiberglass, followed by acm panels

These are the options I'm looking at.

With number one, this would be my cheapest option. But, it's not really the finish I'm after.

What I'm thinking is actually a hybrid of pmf and fiberglassing. I'm thinking I coat the wood in one to two coats of cpes to seal the wood. Then, I lay down canvas like pmf, but instead of coating the canvas with waterproof wood glue, I'll coat it with a two part epoxy. This will harden to provide a very rigid outer structure that is lightweight, but stiff.

Then, I'll sand the epoxy so it's flat, while scuffing it up.

I'll then skin it with aluminum composite panels.

I looked into bed lining it, but it would take a lot of extra work, and equipment to get the smooth finish I'm going for with the bedliner.

The floor will get 4 layers of cpes, followed by some sort of undercoating prior to starting to install the walls.

The point here, is to minimize the expansion and contraction of the wood, and create a shell that eliminates any chance of water getting into the structure of the wood. While the acm panels are inherently waterproof, the only function they will be providing is a smooth, professional looking outer finish.
Interesting, I am wondering if an epoxy would harden too much. Have you researched or experienced that issue? I am hoping I can build my own trailer also. I hope to have my purchase order approved ( base trailer) and then learn to weld. I thought an aluminum frame would be a lighter option over wood. The shell I would use is still under consideration. I drive a 4R and so I am wanting it to be light weight like yours is projected to be. I will be watching your build and I appreciate you taking time to respond to my inquires.
Blessings
 
Last edited:

grubworm

Rank V
Launch Member

Member III

2,358
louisiana
First Name
grub
Last Name
worm
Member #

17464

Service Branch
USN-Submarines
Glued and screwed. That's how my current trailer is put together, and it's held up just fine.

The one thing I haven't settled on yet is how I'm going to cover the outside.

The way I see it, there's basically five options:

1. Penetrating Epoxy, followed by paint.
2. Penetrating Epoxy and skinned with aluminum composite
3. Poor man's fiberglass, followed by acm panels
4. Poor man's fiberglass, followed by paint
5. Actual fiberglass, followed by acm panels

These are the options I'm looking at.

With number one, this would be my cheapest option. But, it's not really the finish I'm after.

What I'm thinking is actually a hybrid of pmf and fiberglassing. I'm thinking I coat the wood in one to two coats of cpes to seal the wood. Then, I lay down canvas like pmf, but instead of coating the canvas with waterproof wood glue, I'll coat it with a two part epoxy. This will harden to provide a very rigid outer structure that is lightweight, but stiff.

Then, I'll sand the epoxy so it's flat, while scuffing it up.

I'll then skin it with aluminum composite panels.

I looked into bed lining it, but it would take a lot of extra work, and equipment to get the smooth finish I'm going for with the bedliner.

The floor will get 4 layers of cpes, followed by some sort of undercoating prior to starting to install the walls.

The point here, is to minimize the expansion and contraction of the wood, and create a shell that eliminates any chance of water getting into the structure of the wood. While the acm panels are inherently waterproof, the only function they will be providing is a smooth, professional looking outer finish.
#3 sounds good. epoxy is supposed to have more flex strength than fiberglass with resin.
sounds like its going to be pretty tough and durable either way you decide...
 

reaver

Rank VI
Member

Explorer I

3,680
Caldwell, ID, USA
First Name
Brian
Last Name
McGahuey
Member #

23711

Ham/GMRS Callsign
GMRS WRMV941
So most people in the teardrop building community use plywood coated with fiberglass, and sealed with epoxy. This method is also extremely common in boat building. I'm not at all concerned with its ability to withstand water.

I have a welder, but haven't used it yet. It will get used for a few modifications to the frame I'm purchasing for this build (I'll need to add tabs for mounting the box, as well as pipe mounts for rear jacks).

@grubworm the downside to #3 is less water resistance than fiberglass and epoxy, not to mention much more prep work to smooth the surface out prior to applying the acm panels. That being said, all of them are good options, but I think I'll go with the fiberglass and epoxy method, based on what the folks in the teardrop community have told me.

Each method is designed to work as a system, so mixing and matching systems isn't the best idea.
 
Last edited:

reaver

Rank VI
Member

Explorer I

3,680
Caldwell, ID, USA
First Name
Brian
Last Name
McGahuey
Member #

23711

Ham/GMRS Callsign
GMRS WRMV941
After several days of research, I've settled on PMF with a paint outer. There are a few reasons I've decided to go this route.

first of all, is cost. covering the outside of the trailer with this method should cost me less than $150 total.

This method is extremely durable. The glue bonds the canvas to the the trailer, and a high grade exterior paint bonds with the canvas, and creates a durable, and flexible outer coating that is completely waterproof.

In one of the videos I watched, a guy built a small trailer, and covered it in pmf. He neglected to cover the floor though. After three years, the floor had received enough water damage that the trailer needed to be stripped down. In the process, he decided to strip the pmf off, and take a look at the wood....it was perfect. Absolutely no water damage on the upper parts of the trailer.


Another video I watch, there was someone building a small house boat for himself. He also decided to use PMF for bis cabin.


I figure if its good enough for a boat, its good enough for my trailer!
 

reaver

Rank VI
Member

Explorer I

3,680
Caldwell, ID, USA
First Name
Brian
Last Name
McGahuey
Member #

23711

Ham/GMRS Callsign
GMRS WRMV941
I've been doing lots of research on Central systems.....

I've decided I'm going with the Simarine Pico system. Ill be integrating water tank, propane, diesel heater heater fuel level, and a few other things.
 

reaver

Rank VI
Member

Explorer I

3,680
Caldwell, ID, USA
First Name
Brian
Last Name
McGahuey
Member #

23711

Ham/GMRS Callsign
GMRS WRMV941
Been working out design details for the water tank, front fridge box, spare tire location, etc. I think I've got things figured out (for the most part). This is what I have right now:


This is sized for a 58QT fridge, which is great. I have a 30 gallon water tank underneath. I may put the spare tire on the front of the box. Still waiting on the doors for the front box to show up. I won't know how the water tank will work until I have the frame on hand. I want to be able to fit a tank between the frame rails and cross member's, so capacity may change based on what I have to work with.
 

reaver

Rank VI
Member

Explorer I

3,680
Caldwell, ID, USA
First Name
Brian
Last Name
McGahuey
Member #

23711

Ham/GMRS Callsign
GMRS WRMV941
Got the design for the kitchen box worked out. I was hoping to put the faucet in there, but that doesn't look like it's going to work out. If I do put it on the kitchen box, it'll have to be done in a manner similar to my current trailer, which is putting it in an abs junction box. If I did that, it would go on the rear side of the kitchen box, but I'm not sure if I want to do that yet.


reaver

Rank VI
Member

Explorer I

3,680
Caldwell, ID, USA
First Name
Brian
Last Name
McGahuey
Member #

23711

Ham/GMRS Callsign
GMRS WRMV941
While pursuing Facebook marketplace for parts, as one usually does, I stumbled across the exact frame I posted above. I'm going to pick it up tonight after work.

Let the building and modifications begin!
 

reaver

Rank VI
Member

Explorer I

3,680
Caldwell, ID, USA
First Name
Brian
Last Name
McGahuey
Member #

23711

Ham/GMRS Callsign
GMRS WRMV941
Frame has been acquired! I'm planning on building the kitchen box this weekend, to test out the pmf process.


I'm working on scoring some doors. Once I get that nailed down, I'll post what I found.
 
  • Like
Reactions: Smileyshaun

reaver

Rank VI
Member

Explorer I

3,680
Caldwell, ID, USA
First Name
Brian
Last Name
McGahuey
Member #

23711

Ham/GMRS Callsign
GMRS WRMV941
I took off everything off the trailer that I could yesterday. I now have a 5x9 flatbed, and a good base to build on.


I finally got a good look at the trailer in the daylight. There are a couple of things worth noting.

I think I am going to have to move the axle back a bit. I haven't measured the placement of the axle yet, but I feel like its sitting close to the middle than it needs to for proper weight distribution.

I also ordered my cabin doors yesterday. I managed to score a set of 24x36 entry doors for 450 +shipping, which is almost half the cost brand new doors.

Supposedly, these doors were purchased new in 2020, but never installed.

I also got some of the plywood cut for the kitchen box yesterday. Getting that finished and assembled today.

I have a 4ft x12ft piece of canvas drop cloth that I bought to try out the pmf process.

Things are starting to move, and I'm pretty happy about that.

We start building the main box on 3/9, and I'm hoping we have a rolling, weatherproof box by 4/1.
 
  • Like
Reactions: Smileyshaun

reaver

Rank VI
Member

Explorer I

3,680
Caldwell, ID, USA
First Name
Brian
Last Name
McGahuey
Member #

23711

Ham/GMRS Callsign
GMRS WRMV941
Made the outer part of the kitchen box today.

Still have a bit more work to do before I can start the pmf process, but overall, it turned out rather good, but I I think.


  • Like
Reactions: Smileyshaun

reaver

Rank VI
Member

Explorer I

3,680
Caldwell, ID, USA
First Name
Brian
Last Name
McGahuey
Member #

23711

Ham/GMRS Callsign
GMRS WRMV941
Ok, I think I've finalized the design of the trailer.

Bear with me here, as there's a lot to go over. First off, exterior shots, giving an idea of what it's going to look like when it's all built.

3/4 Passenger (Camp) side view


3/4 Driver Side View


Rear Galley View


Inner Structure

I've decided to change the way I'm doing the inner structure of the walls. I will cut the voids out of a single sheet of 3/4 plywood. This should be stronger than trying to frame it using 1x2. It's a bit more complicated to get everything correct, but if I take my time drawing everything out on the first piece, I can use the router to create an exact copy for the other side.

The inner most layer of wall will be 1/4 in plywood, with the outer layer being 3/8 plywood for a bit extra durability. The voids will be filled with 3/4in foam insulation on the walls, and 1.5 in insulation on the front and roof.


Galley

The galley is the most complicated part of the build. I wanted to maximize storage space, while maintaining easy access. The rear door will also be narrower than the width of the trailer, so I needed to figure out a way to use that space on the sides of the door. Four drawers will live underneath the counter, allowing storage for utensils and pots/pans and other various items. The center space will be taken up by my 100Ah lifepo4 battery, DC-DC charger, and 40A solar charger, with the 2k diesel heater occupying the bottom section. I'll have a false panel that will be screwed in covering those items up, but allowing for easy access in the case I need to get in there.

The red box on the side of the counter top will be my distribution panel. It has a cover, but will allow for easy access in the case of a blown fuse


Interior


The interior has two areas for storage. The first being the main wardrobe cabinet. I designed it so that it had room for 5 front runner flat boxes, with a few small cubbies for things like socks, and small things that we'd like to be able to access.
The black items on the front are as follows. Top is a USB-C powered portable PC monitor with HDMI input. This will be run from a raspberry pi running Kodi for some entertainment when the weather is ultra crappy. Middle is a simarine Pico system display. This will tell me the state of my battery, temperature inside and outside, water levels, and fuel level for the diesel heater. Bottom is the control for the diesel heater.


The above head storage is basically just a shelf that we can put some games on, as well as set up our CPAP machines, and leave them set up.


And here's a few more shots of the full structure of the trailer as it's currently designed.


Now I just need to save for the rear door, and then wait for @David H to get his garage, so we can start building it!!
 

Blu12T

Rank V
Member

Enthusiast III

2,470
Clovis, California, United States
First Name
Patrick
Last Name
Linares
Member #

31647

Wow, you have put a lot of thought and planning in. Looks like it’s going to be a great project. Looking forward to seeing the progress and the end product.
 

reaver

Rank VI
Member

Explorer I

3,680
Caldwell, ID, USA
First Name
Brian
Last Name
McGahuey
Member #

23711

Ham/GMRS Callsign
GMRS WRMV941
Wow, you have put a lot of thought and planning in. Looks like it’s going to be a great project. Looking forward to seeing the progress and the end product.
I've tried, for sure. Over the last couple of years, we've really narrowed down what we want in a trailer. Barring towing a stand up camper with a toilet, this setup will have everything we need. I'll be migrating the water pump from the old trailer, as well as one of the 10 gallon tanks. I'll also be mounting a 26 gallon tank underneath as well. I'll have heat, running water, hot water, and entertainment for crappy weather.

Privacy enclosure will be mounted on the driver's side, and an awning mounted on the passenger side.

I've got the door framing done for the kitchen box. Tomorrow I'll be able to get the fold out kitchen built and tested, as it's not supposed to rain tomorrow.
 

reaver

Rank VI
Member

Explorer I

3,680
Caldwell, ID, USA
First Name
Brian
Last Name
McGahuey
Member #

23711

Ham/GMRS Callsign
GMRS WRMV941
Finished building the fold out part of the kitchen today. I need to cut some aluminum angle to mount the stove, and drill and fit the propane bulkhead fitting, but the rest of it is done!


I've gotta say, it turned out almost exactly like I had planned. It's a tight fit with the stove in there (I put it all the way against the back wall to make sure it closed), but it fits.

I was planning on putting a leg on the bottom, but there's not enough room for that. I can always use a steel cable, but I may try and figure out how to use the door to help support it.
 
  • Like
Reactions: Smileyshaun

reaver

Rank VI
Member

Explorer I

3,680
Caldwell, ID, USA
First Name
Brian
Last Name
McGahuey
Member #

23711

Ham/GMRS Callsign
GMRS WRMV941
Well, the build has slowed down a tad.

I did order my simarine pico battery monitoring system tonight. The kitchen box is essentially done. I have the stove mounted, and plummed with a propane line, with a 3/8 flare bulkhead fitting running through the box.

The kitchen box has been finished with poor man's fiberglass. While I'm not happy with how the seams turned out, overall, I'm very happy with the finish.

It's going to need Ed another coat of paint down the road, as we don't want it to be white, but we can add another coat of paint later.

The last thing I need to do for the box is get some steel angle, and mount it to the back of the box, providing the mounting points. I don't need to do that until the trailer is built though.

The next step is either building the fridge box, or starting the actual cabin build. I can build the fridge box here though, but the cabin build will need to be done at @David H house when he moves.