2018 GMC Canyon MTB/Overland/Adventure Rig

  • HTML tutorial

JCWages

Rank V
Launch Member

Pathfinder I

2,271
Grass Valley, CA, USA
First Name
Justin
Last Name
Wages
Member #

18693

Got the 1.25" body lift in. I'm waiting on the bumpers to show up before drilling the new brackets. Overall it really wasn't difficult, just time consuming. I think it took longer to take the chrome parts off my grille so I can have them painted than it did to install the lift pucks. lol

So she'll sit like this till Friday when the bumpers and winch arrive.


My snatch block and winch line damper showed up too. I guess you could say things are getting serious...
 

JCWages

Rank V
Launch Member

Pathfinder I

2,271
Grass Valley, CA, USA
First Name
Justin
Last Name
Wages
Member #

18693

Looking good man! I'm still a bit torn if I level mine at some point or not lol.
Thanks! The ZR2 is pretty well set from the factory. With all of the weight you plan on adding in the rear I would wait on raising the front until you get everything else added. Otherwise you risk butt sag. Haha
 
  • Like
Reactions: dj_mccomas

JCWages

Rank V
Launch Member

Pathfinder I

2,271
Grass Valley, CA, USA
First Name
Justin
Last Name
Wages
Member #

18693

With two more snatch blocks you can winch yourself backwards with a front mounted winch. A last resort for sure but can be done.
Haha yeah. I've been watching some pretty complex recoveries on 4wdAction. Learning a lot from YouTube. :)

I have a few more items I need but I have the basics covered now. Snatch strap, static strap, shackles, tree saver, snatch block, damper, rolled up magazine, etc. Sadly, I know I will definitely end up using this stuff before the end of the year. In fact, I mean to do just that! :smilingimp:

 
Last edited:

JCWages

Rank V
Launch Member

Pathfinder I

2,271
Grass Valley, CA, USA
First Name
Justin
Last Name
Wages
Member #

18693

I wrapped up the DVO Off-road front steel bumper install and chrome delete on the grille then slapped on the new front skid plate. The bumper and skid plate lined up very well despite not being designed for a body lift but I had some trouble getting the winch to clear the lower active grille shutters so I'll need to make some changes as well as extend the lower mount bolts before I add the winch. It's VERY solid even without the 3 lower bolts so I'm comfortable with how it sits for now. The owner of DV8 actually responded to my questions this morning when I had trouble getting the winch installed. They're not even open on weekends. LOL

The body lift creates enough room to retain the use of the factory recovery points. Sweet!


I used the OEM mounting bolts for now. I was too tired to drill out new holes for the much thicker bolts that came with the skid. Before I hit any hardcore trails I'll drill out the holes and mount the skid correctly. :)


I scuffed, cleaned and primered the chrome grille before painting but I hold no illusions it will hold up for long. Looks good for now. I used Duplicolor Perfect Match Polar/Arctic White BGM0153. The paint code for Summit White calls for Olympic White but that looks way too dark. Polar White is a little too bright with a hint of blue but it's closer than Olympic. *shrugs* Good enough.


Last edited:

alexdnick

Rank IV

Enthusiast III

1,212
Washington, USA
First Name
A
Last Name
N
I wrapped up the DVO Off-road front steel bumper install and chrome delete on the grille then slapped on the new front skid plate. The bumper and skid plate lined up very well despite not being designed for a body lift but I had some trouble getting the winch to clear the lower active grille shutters so I'll need to make some changes as well as extend the lower mount bolts before I add the winch. It's VERY solid even without the 3 lower bolts so I'm comfortable with how it sits for now. The owner of DV8 actually responded to my questions this morning when I had trouble getting the winch installed. They're not even open on weekends. LOL

The body lift creates enough room to retain the use of the factory recovery points. Sweet!


I used the OEM mounting bolts for now. I was too tired to drill out new holes for the much thicker bolts that came with the skid. Before I hit any hardcore trails I'll drill out the holes and mount the skid correctly. :)


I scuffed, cleaned and primered the chrome grille before painting but I hold no illusions it will hold up for long. Looks good for now. I used Duplicolor Perfect Match Polar/Arctic White BGM0153. The paint code for Summit White calls for Olympic White but that looks way too dark. Polar White is a little too bright with a hint of blue but it's closer than Olympic. *shrugs* Good enough.


Ever think about pulling the headlights apart and painting the housings black? It would look great on your truck.

Also, how tall is your truck now? I’m assuming you have a suspension level then the body lift, I want to do the same but I’m in Seattle and parking garage clearance is a thing for me sadly.
 
  • Like
Reactions: JCWages

JCWages

Rank V
Launch Member

Pathfinder I

2,271
Grass Valley, CA, USA
First Name
Justin
Last Name
Wages
Member #

18693

Ever think about pulling the headlights apart and painting the housings black? It would look great on your truck.

Also, how tall is your truck now? I’m assuming you have a suspension level then the body lift, I want to do the same but I’m in Seattle and parking garage clearance is a thing for me sadly.
I've done retros in the past and I really hate baking headlights. I've had some turn out well and others were never the same. It would look good but it's not something I'm willing to risk right now. Besides, I need to fix my noisy leaf springs and brakes first. lol

Total suspension + body lift is about 3.95" up front and 3.5" in the rear. Add another 1.25" of lift from the tires on top of that. I have never measured the roof height. Fender height from the ground to the bottom of the fender lips is probably at 40" in the front and 41" in the rear give or take 1/2". I haven't measure it since the body lift and bumpers but I was at 38.5" and 40.5".
 
  • Like
Reactions: alexdnick

alexdnick

Rank IV

Enthusiast III

1,212
Washington, USA
First Name
A
Last Name
N
I've done retros in the past and I really hate baking headlights. I've had some turn out well and others were never the same. It would look good but it's not something I'm willing to risk right now. Besides, I need to fix my noisy leaf springs and brakes first. lol

Total suspension + body lift is about 3.95" up front and 3.5" in the rear. Add another 1.25" of lift from the tires on top of that. I have never measured the roof height. Fender height from the ground to the bottom of the fender lips is probably at 40" in the front and 41" in the rear give or take 1/2". I haven't measure it since the body lift and bumpers but I was at 38.5" and 40.5".
Yeah that makes sense about the lights. I did that to my WRX a year or so before I sold it. Put some RGB demon eyes in them and sprayed the housings black, they looked good but the headlights after that always just felt "off" whether it be brightness or leveling. So I totally get you on that.

Thats the part you don't see on the youtube videos!
 
  • Like
Reactions: JCWages

Kye_In_The_Sky

Rank II
Launch Member

Off-Road Ranger I

319
Colorado Springs, CO, USA
First Name
Kyron
Last Name
Thomas
Member #

18155

Ham/GMRS Callsign
KE0WFT
I'd say thanks but I think you are looking at Cole's truck from DV8 in the pictures above. lol It's a damn good looking rig for sure! I still need the fender flares and when that roof rack becomes available I'll be adding it too.

My truck is currently running the Eibach setup as well but my King 2.5s should be arriving any day now and I'll report back with my observations. When it comes time to replace the UCAs I'll be doing the Icons with Delta joints. I don't want to deal with uniballs. IMO go with the Kings if you want more cush and Icons with compression adjusters if you do more high speed trails and don't mind a firmer ride. If you are on the fence then just get the Kings. I lurk on the Toyota forums a lot and I have yet to hear of anyone complain about Kings when set up properly but a lot of people are disappointed with the Icons because they don't like the firmer/harsher ride at low speeds. And you don't have to do the UCAs at the same time. If money is tight then just get the shocks and keep the lift at 2.5" or lower until you can get the UCAs. It's easy enough to add preload and lift the truck later on down the road.
Thanks for the Info. I think i'm going to go with that setup. I was thinking of going with a LT setup from Baja kits but don't really want the stress of having uniballs. I'll order the Icon UCAs soon and the Kings just gotta save up some dough. I kinda wanted the Icon Coilovers but I do think they'll be too stiff. I'm also gonna steal your shovel and ax storage idea, its perfect. Let me know how the Kings ride.
 
  • Like
Reactions: JCWages

Pathfinder I

1,685
Pacific Northwest
First Name
Steve
Last Name
Claggett
Service Branch
U. S. Army
Thanks for the Info. I think i'm going to go with that setup. I was thinking of going with a LT setup from Baja kits but don't really want the stress of having uniballs. I'll order the Icon UCAs soon and the Kings just gotta save up some dough. I kinda wanted the Icon Coilovers but I do think they'll be too stiff. I'm also gonna steal your shovel and ax storage idea, its perfect. Let me know how the Kings ride.
Take a look at the UCA's from SPC Performance, fully adjustable and up to 4* castor for help with tire clearance, replaceable hi angle ball joint.
 
  • Like
Reactions: JCWages

JCWages

Rank V
Launch Member

Pathfinder I

2,271
Grass Valley, CA, USA
First Name
Justin
Last Name
Wages
Member #

18693

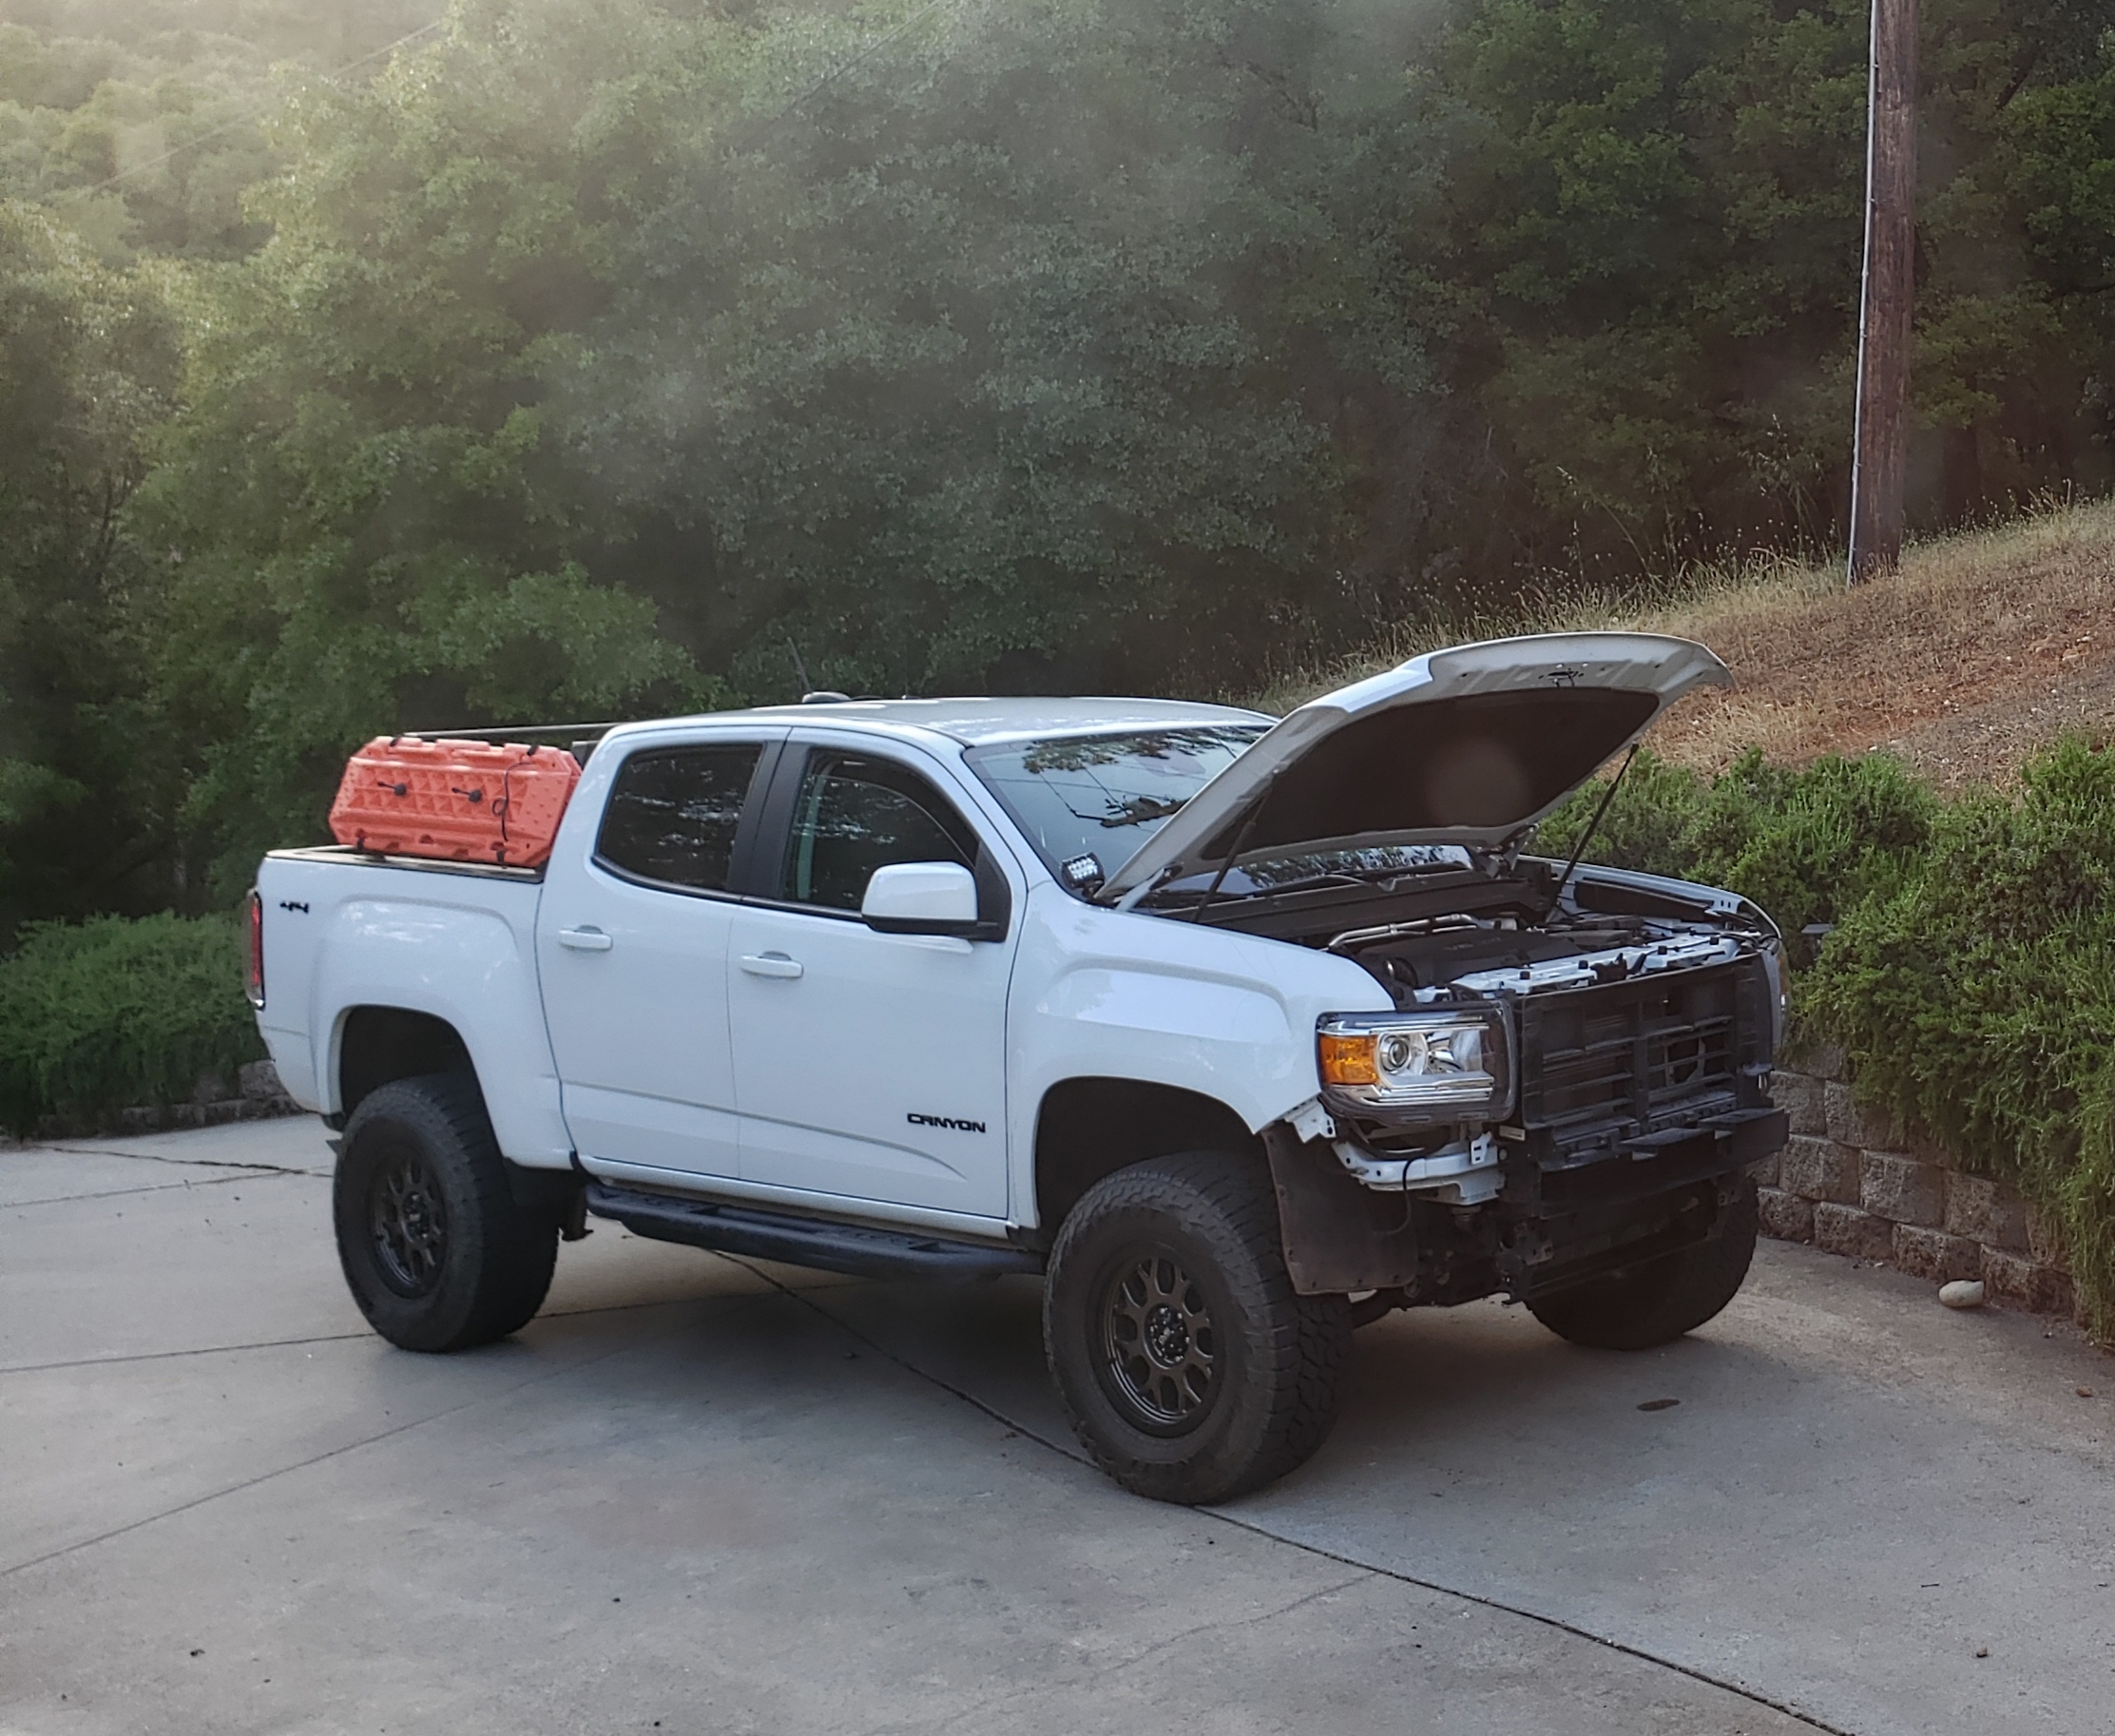
I decided to try and raise the new DV8 rear bumper to align with my 1.25" body lift. Because the DV8 bumper comes with its own mounting brackets that don't mount tbe same as the OEM bumper brackets I couldn't use the brackets supplied with the body lift kit.

To raise the bumper I simply needed to drill 4 new holes in the DV8 brackets, 1" lower than the existing holes. I marked where I currently had the bolts positioned and drew a line straight down 1". Because I don't have fancy tools that would allow me to make and elongated hole I did my best to make the round hole as accurate as possible while still maintaining my usual level of laziness. I also didn't anticipate doing before and after shots of this so I apologize for the lack of angle similarity.

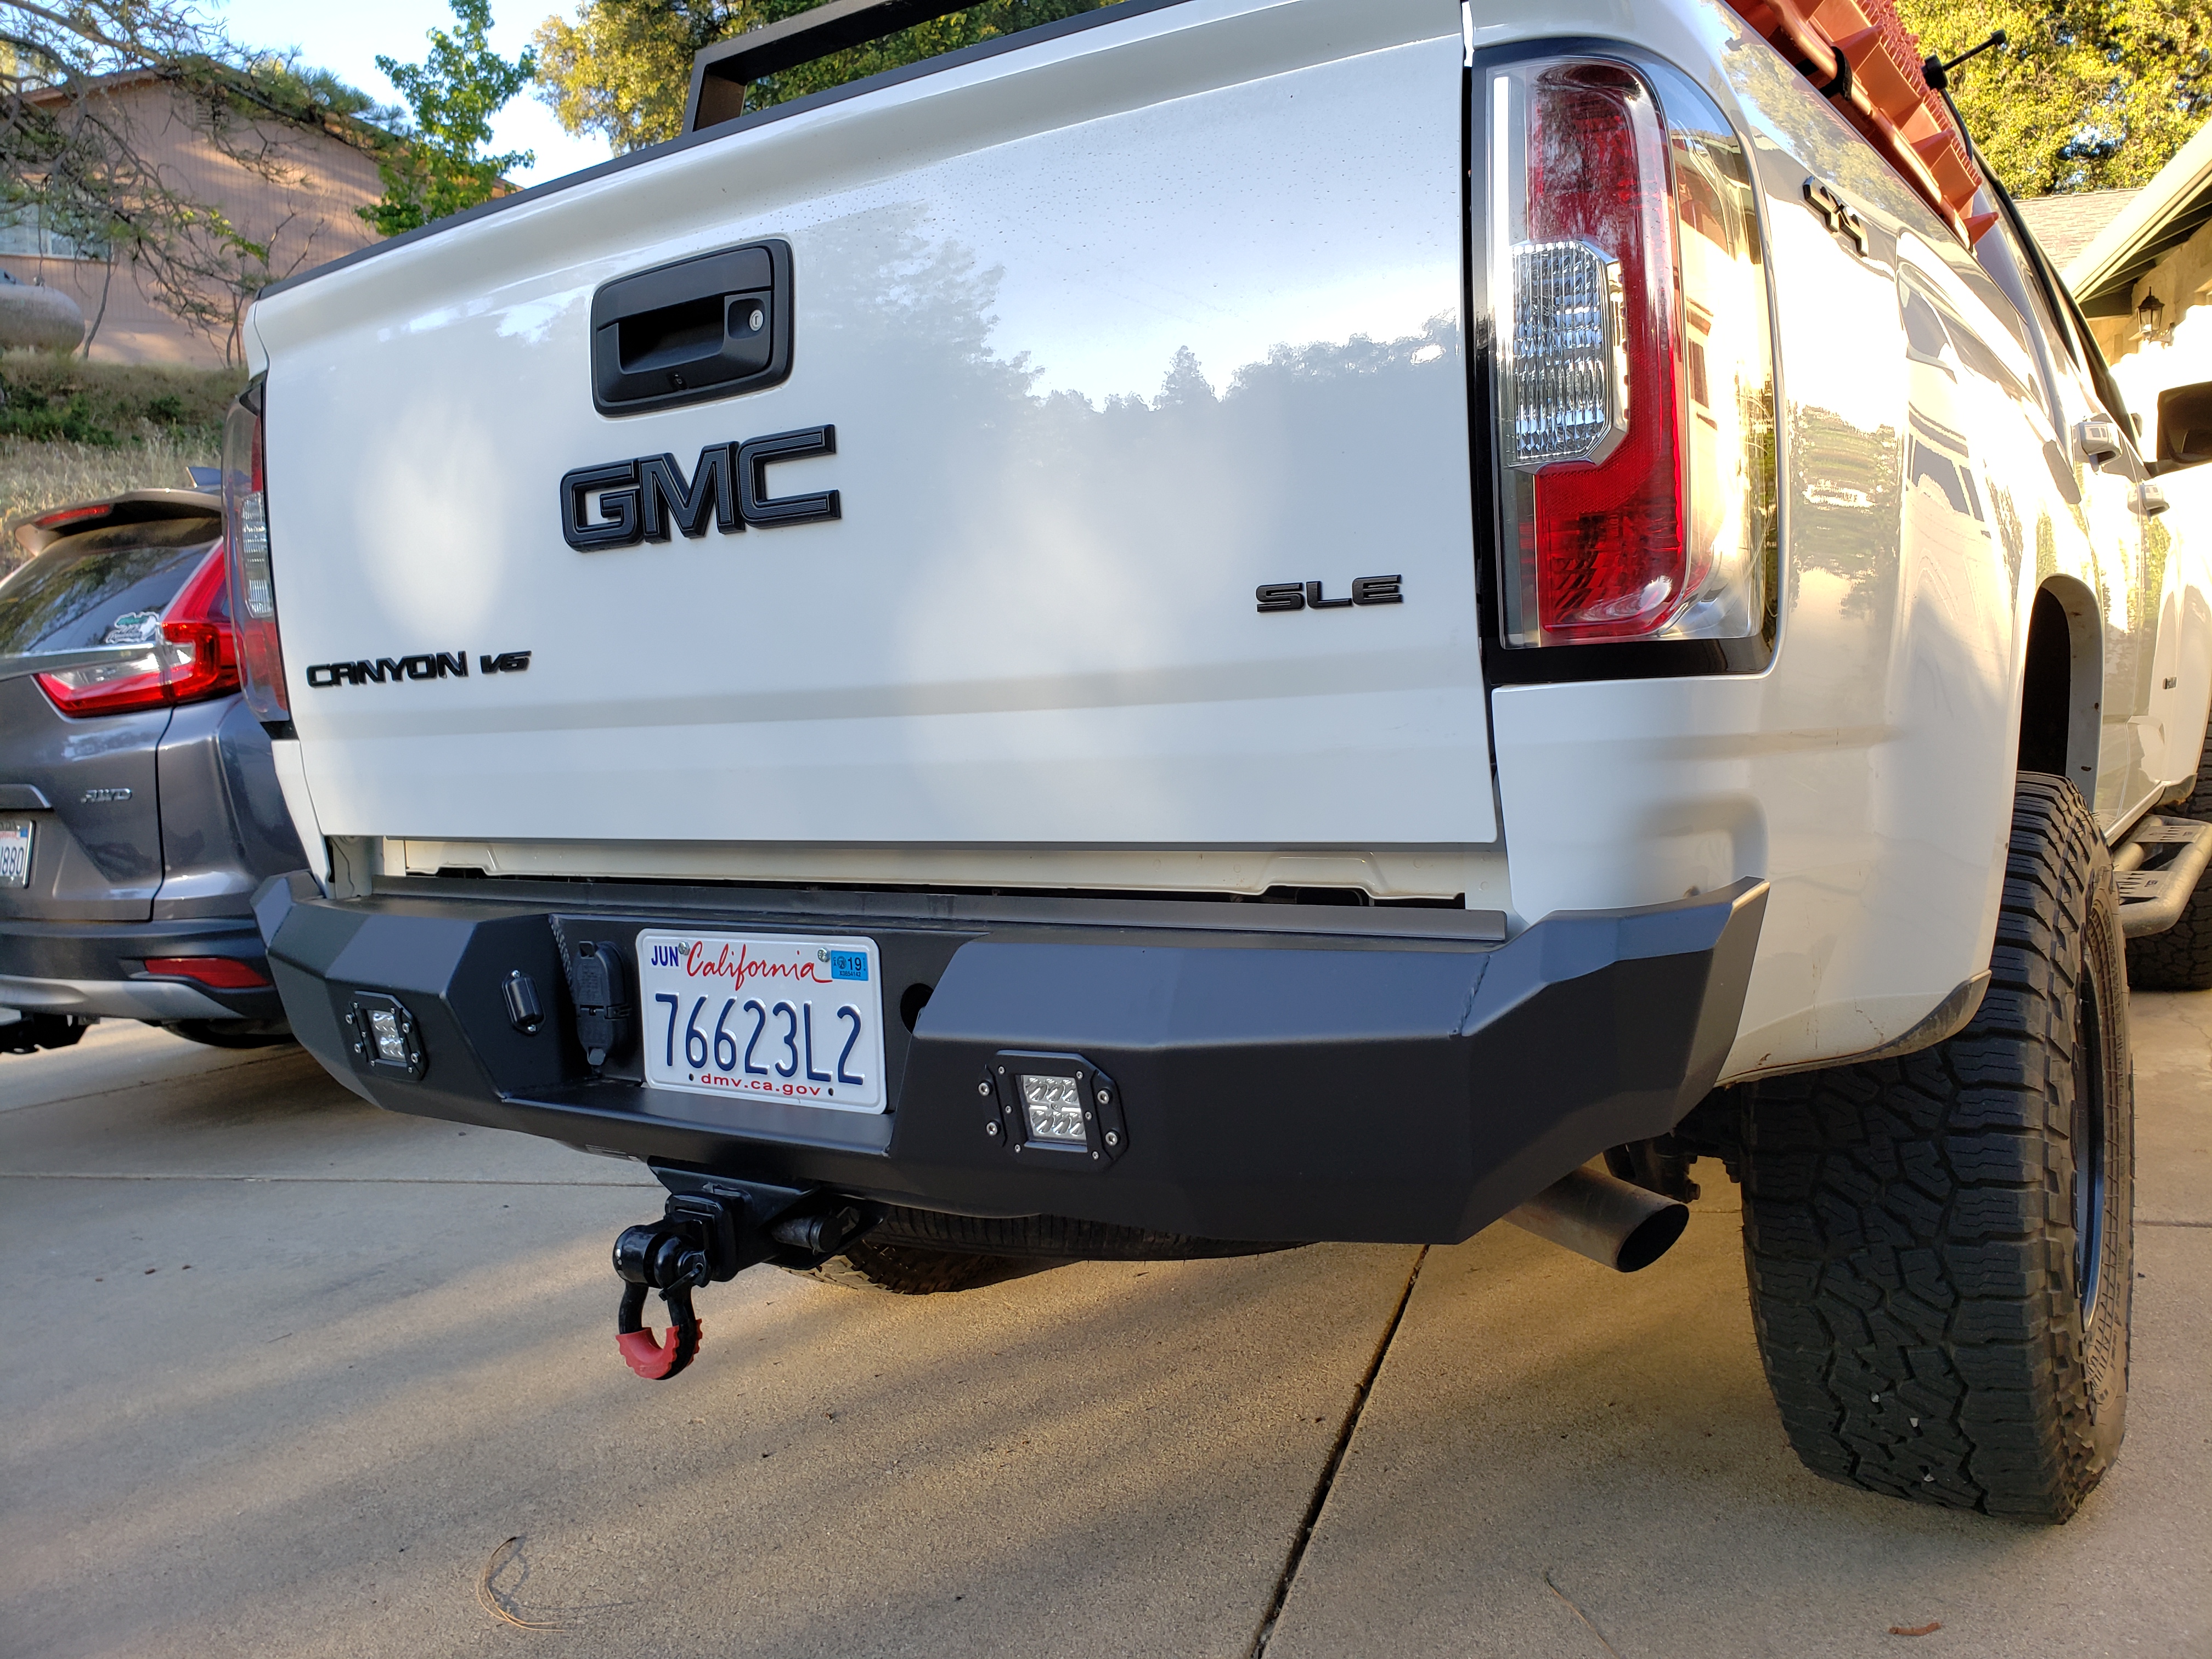
This is how the bumper sat with the body lift before I modified the brackets.


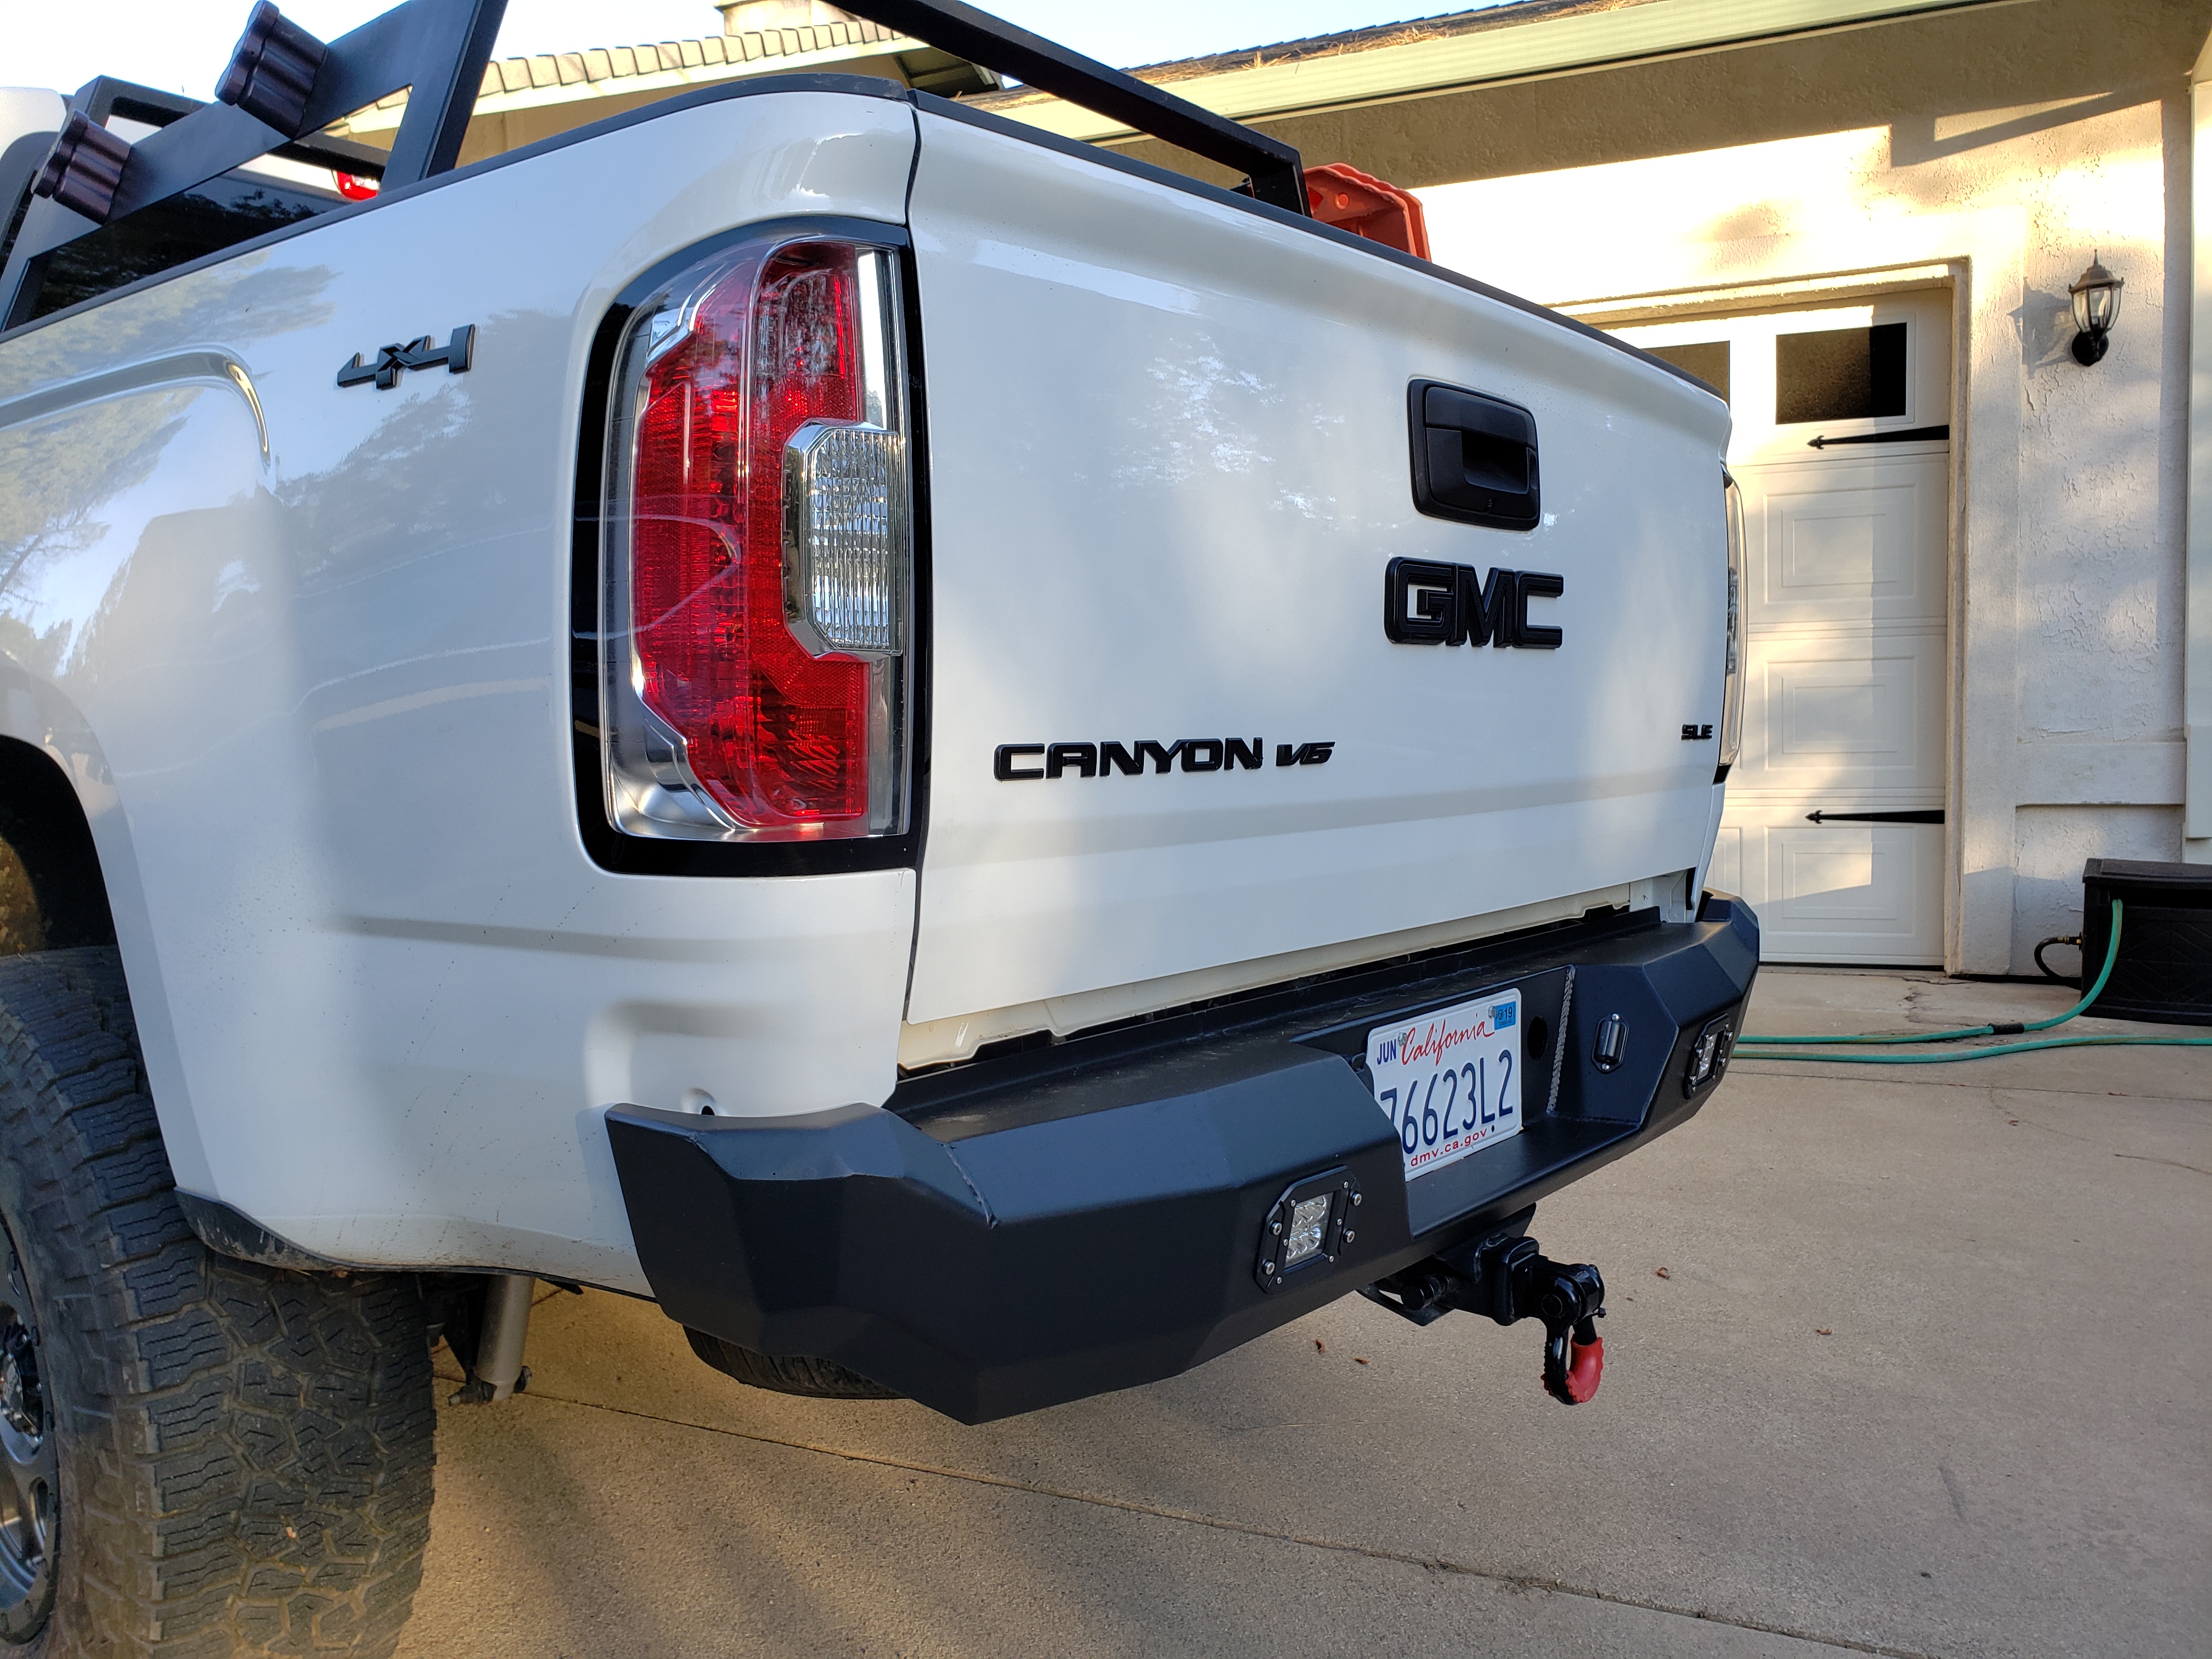
This is how it sits after modifying the brackets.


Before


After


I messed up and drilled one of the holes on the drivers side bracket too low so when I tried to install it the top of the bracket hit the underside of the bed. So I took some material off in 2 places using an angle grinder. I covered the bare metal with self etching primer then hit it with protective enamel.

The 2 round holes I drilled on each bracket then primered.


These are the 2 spots, indicated by my index and middle fingers, where the bracket hit the bed. Don't be like me. Measure correctly so you don't have to grind. :)


Then primered the areas I had to grind down to clear the bed because I drilled a hole too low. Grrr


I'm finding a common theme with this whole lifted truck thing. My floor jack is never tall enough to jack up anything but the rear diff. LOL Ammo can to the rescue! Don't worry, it's just holding the unbolted bumper up on one side.


Once I got the main brackets attached to the frame again I found the bolts that DV8 supplied to attach the bumper to the bracket were too long now and they hit the frame in the new alignment. Double Grrr Thankfully I had a handful of 3/8"? OEM bolts leftover so I used those for the lower mounts and the DV8 bolts for the upper. You could simply cut 2 of the DV8 bolts a little shorter if you prefer or buy new shorter ones.

In all the work took a few hours but wasn't very difficult using basic tools most of us have. I'm going to submit my modification info to DV8 in hopes they can make the bracket work with trucks with and without body lifts. It would be very easy to do.

Note! I would not suggest raising the bumper higher than 1" in this way. The sides of the bumper where they wrap around the side of the bed are VERY close to the sheet metal because of the way the bed tapers narrower towards the ground. The higher you raise the bumper the closer you will come to closing the gap and hitting sheet metal. For those with the 1.50" body lift you may be able to raise the bumper by 1.25" if you pull the bumper out a little instead of as far in as possible like I did.
 

alexdnick

Rank IV

Enthusiast III

1,212
Washington, USA
First Name
A
Last Name
N
Looks awesome. Modifying the brackets was a great choice.

So does it change the departure much? Not like our rear bumpers were very big at all though.

I’m jealous. I can’t decide what to get first, sliders or a front/rear bumper. I’m sure sliders are the smartest next to front.

Would you recommend the sliders you have? And sliders before front bumper?
 
  • Like
Reactions: JCWages

JCWages

Rank V
Launch Member

Pathfinder I

2,271
Grass Valley, CA, USA
First Name
Justin
Last Name
Wages
Member #

18693

Looks awesome. Modifying the brackets was a great choice.

So does it change the departure much? Not like our rear bumpers were very big at all though.

I’m jealous. I can’t decide what to get first, sliders or a front/rear bumper. I’m sure sliders are the smartest next to front.

Would you recommend the sliders you have? And sliders before front bumper?
Departure angle straight off the back bumper will be the same because the hitch is the limiting factor from that angle. However, anything from the sides has increased quite a bit due to the body lift and the cutout shape of the new bumper. The steps on the sides of the oem bumper get bashed quite a bit on harder trails. For maximum ground clearance the Relentless Fabrication rear bumper nets over 5" of gain because it removes the oem hitch and incoporates an integrated hitch behind the license plate. That won't work for me though so I went with the DV8.

I would fully recommend sliders and skid plates well before bumpers. Real sliders are just starting to become available. If you don't need steps then grab a set of ZR2 take off sliders for $250 or less. Just make sure they come with hardware! You can't buy the hardware seperately. Real sliders that bolt or weld to the frame start at around $650. Mine are not actual sliders. They just look like it and you can slide on them if you are VERY careful but I do not recommend them for such. I'm trying to talk DV8 into making them for our trucks because they have some nice Jeep sliders they could copy. Otherwise I'll wait for something else affordable that has steps.

After sliders and armor then get a front bumper and winch. The rear bumper would be way down on my list of mods.
 
  • Like
Reactions: alexdnick