2003 Jeep Grand Cherokee Overland Build

  • HTML tutorial

tjZ06

Rank V
Launch Member

Advocate I

2,268
Las Vegas/Palo Alto
First Name
mynameisntallowed
Last Name
Adams
Member #

20043

Doing this via imgur is horrible, so I probably won't provide as much context as usual, and they're going to end up out of order. It's really a bummer file-upload doesn't work anymore.

Front lower shock mount fab:


The (metric) 35"s mounted up:


Starting on the rear hydraulic bump can mounts:


Rear stuff nearly done:


Fuel tank back in for good:


Little finishing touch in the rear:


And with wheels/tires on:


Actually sitting on its own weight:


Moving to the front now (bump-cans, AntiRock sway, finish-welding, paint, etc. all still need done):


And a little work on the rear bumper/tire carrier:


-TJ
 

tjZ06

Rank V
Launch Member

Advocate I

2,268
Las Vegas/Palo Alto
First Name
mynameisntallowed
Last Name
Adams
Member #

20043

More progress, and more changes. No more loose-leaves in the front of the Heep, went to c/os. But first, more stuff out back...


Bumper coming together:
1_1.jpg

The Bumper isn't done, it will have rear corners kind of like this, but it will be plated in and most of the body behind them will be cut off:
1_2.jpg

1_3.jpg

Finishing touches in the rear:
1_4.jpg

Got some RCV/10Factory axle shafts:
1_8.jpg
1_6.jpg
1_7.jpg

And then the front, very nice setup to go coil overs with the bypasses and there's still the hydraulic bump stops to sneak in:
1_9.jpg
1_10.jpg
1_11.jpg

I really like how he's boxing/gusseting in the top and tying it into the unibody where the stock coil buckets were cut out. It'll get seam sealed for a "factory look" but also to provide a totally sealed upper wheel-well to keep mud/water out of the engine bay.

1_12.jpg

And an all new trackbar vs. what we started with:
1_14.jpg
1_13.jpg


-TJ
 
  • Like
Reactions: JimBill

tjZ06

Rank V
Launch Member

Advocate I

2,268
Las Vegas/Palo Alto
First Name
mynameisntallowed
Last Name
Adams
Member #

20043

It seems like the more and more gets done... the more we realize there is left to do. But, it did see daylight, under its own power last week:
1.jpg

Obviously there will be some fender trimming still coming up front. Out back, the bumper work is continuing:
2.jpg

And underneath, exhaust done:
3.jpg

Bump pads getting built on the front axles:
4.jpg
5.jpg
6.jpg

Most of the front stuff together:
7.jpg

And fitting up the sway bar:
8.jpg

The core support needs totally changed, so Bash from HK Offroad (who makes my hidden winch setup) is sending one of his core supports to make a better foundation to mod from:
1597947936244.png

-TJ
 

tjZ06

Rank V
Launch Member

Advocate I

2,268
Las Vegas/Palo Alto
First Name
mynameisntallowed
Last Name
Adams
Member #

20043

Hell of a WJ there TJ.. impressive work.
Thanks! I wish I could take credit for the actual fab work, that's all Xero Fab Works in Shaver Lake, CA.

Also, ordered a Superchips TrailDash2 to do a few things... it'll:

  • Allow correction for the gearing (4.88 vs. stock 3.73)
  • Allow correction for the tire size (metric 35" vs. metric 29")
  • Provide canned motor and trans tunes
  • Provide real read-outs for ECT, oil pressure etc. vs. factory gauges that aren't super-accurate
  • Provide IAT, trans temp readout and others that aren't even available on the stock dash
  • Provide expandable module to control all sorts of stuff like lights and other accessories down the road, but I'll also be using it to switch my e-lockers
td2_productimage1.jpg


98609_main_full.jpg


-TJ
 

tjZ06

Rank V
Launch Member

Advocate I

2,268
Las Vegas/Palo Alto
First Name
mynameisntallowed
Last Name
Adams
Member #

20043

One of the last things is the hydraulic assist, of course one of the rod-ends was wrong so it couldn't get finished up.
a4.jpg


Little bit of testing:
a1.jpg
a2.jpg
a3.jpg


As you can see, the front swaybar and radiator support need finished, there' some wiring to do (ABS mostly), rear bumper corners, and a bunch of other "little" things but it's there. Front c/o's were rebuilt as it was too much damping w/ the bypasses. After that and some tuning on everything it seem to be working really good, but I haven't been able to experience it first hand.


-TJ
 

tjZ06

Rank V
Launch Member

Advocate I

2,268
Las Vegas/Palo Alto
First Name
mynameisntallowed
Last Name
Adams
Member #

20043

Change of plans on the rear bumper "caps." Originally we were going to do tube-style similar to this, but with plans to plate-in between the tubes:
1_2.jpg


However to make things really tuck up high and clean, we cut a lot of the lower body out then plated it back in:
BumperWork.jpg


But, it just wasn't working to our tastes, so we decided to go with a "cap" style to finish it off:
BumperCaps3.jpg
BumperCaps2.jpg
BumperCaps1.jpg


-TJ
 

MrWilsonWJ

Rank V
Launch Member

Member III

1,691
Kennewick, WA
First Name
Dustin
Last Name
Wilson
Member #

23384

Change of plans on the rear bumper "caps." Originally we were going to do tube-style similar to this, but with plans to plate-in between the tubes:
View attachment 168709


However to make things really tuck up high and clean, we cut a lot of the lower body out then plated it back in:
View attachment 168708


But, it just wasn't working to our tastes, so we decided to go with a "cap" style to finish it off:
View attachment 168707
View attachment 168706
View attachment 168705


-TJ
Looks really clean. I also like the round tube for the swing out, when I redo mine I might try something like that.
 

tjZ06

Rank V
Launch Member

Advocate I

2,268
Las Vegas/Palo Alto
First Name
mynameisntallowed
Last Name
Adams
Member #

20043

So, the shop that's been working on the Jeep is in Shaver Lake, CA. Shaver is the center of the Creek Fire basically, if you're not familiar: https://www.sacbee.com/news/california/fires/article245563350.htm

The builder contacted me, and let me know he had evacuated my Jeep:
HeepEvac.jpg


So the Jeep is safe, not that it matters in the grand scheme of things, because this is his house:
xh.png

Obviously, I've offered all the help I can for him, including getting his 5'er to my RV pad or putting them up in our guest rooms. I'm sure the Jeep is on ice for a while, but again, that doesn't matter.

-TJ
 
  • Like
Reactions: FastLayne

tjZ06

Rank V
Launch Member

Advocate I

2,268
Las Vegas/Palo Alto
First Name
mynameisntallowed
Last Name
Adams
Member #

20043

Not really much news, but the builder was able to get back to his shop, and get my Jeep up there. It's really just the hydraulic steering, e-brake cables, and a few other odds 'n ends. I'm still hoping to at least do some kind of overnight trip before the real winter hits, but that'll be tough with Glamis season starting.

-TJ
 

tjZ06

Rank V
Launch Member

Advocate I

2,268
Las Vegas/Palo Alto
First Name
mynameisntallowed
Last Name
Adams
Member #

20043

It's basically done. He's tracking down an exhaust rattle, needs to add loops for safety chains on the rear bumper/hitch, and that's basically it. I might go get it this weekend, but because of work probably next:

HeepDone1.jpg
HeepDone2.jpg
HeepDone3.jpg
HeepDone4.jpg

-TJ
 

tjZ06

Rank V
Launch Member

Advocate I

2,268
Las Vegas/Palo Alto
First Name
mynameisntallowed
Last Name
Adams
Member #

20043

She lives, and she's out in the wild. I picked it up from Shaver Lake on Friday and took it home to Lincoln (~230 miles), then drove it back down to Palo Alto on Sunday (~160 miles). This morning I took it down to Hollister Hills. A buddy of mine tagged along with his coworker who has a new JLUR but hasn't ever wheeled. We mostly kept it mild, but I did a few little climbs and I played in a v-notch to figure out what still needs trimmed (mostly in front of the rear tires). As always, we failed to get many pics of vids, but here's a bit:


  • Like
Reactions: JimBill

tjZ06

Rank V
Launch Member

Advocate I

2,268
Las Vegas/Palo Alto
First Name
mynameisntallowed
Last Name
Adams
Member #

20043

And now you all get to laugh at my hideous exhaust leak. About the ONLY thing left original drivetrain-related are the exhaust manifolds, so of course they leak. I already ordered new ones, so that's the next thing to get addressed (along with the additional fender trimming):

 
  • Like
Reactions: JimBill

WJJEEPIN

Rank II

Enthusiast III

473
California, USA
First Name
William
Last Name
Mitchell
And now you all get to laugh at my hideous exhaust leak. About the ONLY thing left original drivetrain-related are the exhaust manifolds, so of course they leak. I already ordered new ones, so that's the next thing to get addressed (along with the additional fender trimming):

Looks like fun. Is that your lifters ticking I’m hearing?
 

tjZ06

Rank V
Launch Member

Advocate I

2,268
Las Vegas/Palo Alto
First Name
mynameisntallowed
Last Name
Adams
Member #

20043

Okay, time for a little update. Ever since Glamis season started, this thing hasn't been at the front of my mind. But I thought it was time to check in with my buddy doing the fender/body work. Good news: he's done! Here are some super-great, high production quality vids of the work:


Obviously without context, it's hard to see what's going on or changed, so let's look at some pics. Let's start with the rear, where the most rubbing was occurring. This is the aftermath of the Hollister Hills trip:

01puaa8.jpg


It looks worse than it was, since the tire got into the sheetmetal and pulled it out. A view before the "damage":

c2QjgzQ.jpg


tSXnkMr.jpg


(in this pic note how much further back the bumper is than the sheetmetal)

Nsz0hEP.jpg


(in this pic note the tire did get UP into the top of the fender a bit)

And here's now:

XructbD.jpg


You can see basically all of the body behind the rear doors was taken out. The structural part that doubles as the sealing surface for the door was left intact, but the rest was removed. You can also see the fender was cut up much higher, following the line of the rear door, and that follows through to meet with the rear bumper more evenly.


Moving to the front, it didn't get it as bad in Hollister:

vrsZ6ZR.jpg


0pmvoT1.jpg


PwCq2ET.jpg


And a before the "damage" pic:

ELfR9wS.jpg


(in this pic note how long the bullet-shaped parts of the trim piece just behind the front tire are)

And here's now:

NBzFm1Z.jpg


BzcKPmp.jpg


YsSB6a2.jpg


(he did really nice work inside the wheelwell area)

The main thing you're seeing here is that he opened up a good bit behind the front tires. He shortened the trim piece and moved it back, so it's not obvious, but you can really tell when you compare where the fender opening is to the front of the slider (the slider was NOT moved) in the before/after. Just like the rear, the fender was also opened up all the way around, in fact if you look close in the "before" pics you'll see a little dent at about the 11:30 position which is now gone because all of that sheetmetal was removed.


Overall final product:

dOzsO9B.jpg


And if you're noticing the black stripe, that was a compromise we made. Keep in mind, this is a wheeler/camper/beater - not a show rig (no bluetooth driveshafts here). The body guy wanted to do it right and roll a little lip in the fenders and the only way to do that right would require some paint. Sure, he could have tried to color-match and blend, but on a nearly 20-year old Heep the chances of getting a good match/blend without practically repainting the whole thing aren't great. So we agreed on the little stripe... which will also be easier to touch up if the tires still get into it or I go bigger and we need to cut more later.

In fact, everything is welded up, seam-sealed and painted even up inside the fenders. The area right behind the front tires was especially complex. But IMHO this is what makes it worth paying somebody to do it right, vs. just going after it with a sawzall and death-wheel. Long-term, having the unibody closed back up properly and having smooth edges will be worth it.

1hf79iP.jpg


t6ZsLrC.jpg


R8WAVTr.jpg


jRm1fUM.jpg


oYDsi7H.jpg


cPv3MhT.jpg


dfPUe6H.jpg


-TJ
 
Last edited:
  • Like
Reactions: JimBill

ThundahBeagle

Rank V

Advocate I

1,548
Massachusetts
First Name
Andrew
Last Name
Beagle
Member #

0

I posted about this in the "What Did You Do With Your Rig Today" thread, but I figured I should update here, so largely copy/paste:


Dug into the WJ yesterday to figure out what broke. I took it on its first real wheeling trip a couple weekends back that involved real articulation and some legit rock crawling. Everything seemed fine, and no issues on the trail. In fact, this WJ really impressed me compared to the crawlers I used to wheel with and even other rigs in my group like my buddy's long-arm XJ on 35"s and locked D44s. Anyway, I was super happy with how it all went. Then last week my girlfriend's younger brother Jake was driving it when something let go. Jake lives with us and DDs the WJ to school and work for now until he goes off to college next year and we get him economical beater. I was in the Bay Area for work, so I couldn't go pick it up myself, luckily we have AAA and they towed it home. Jake had to get rides to school/work the rest of the week, and I finally got to dig into it (with him) yesterday. He had thought something in the front end broke, and he found a large bolt that had sheared in the threads under it when he stopped. The bolt was obviously a non-stock, zinc-coated 10.9 so we went about checking out all of the IRO long-arm kit mounting points, the trackbar, over-the-knuckle-steering etc. Everything was good and tight, and nothing was missing a bolt. So we went to the rear, and found:

View attachment 120059

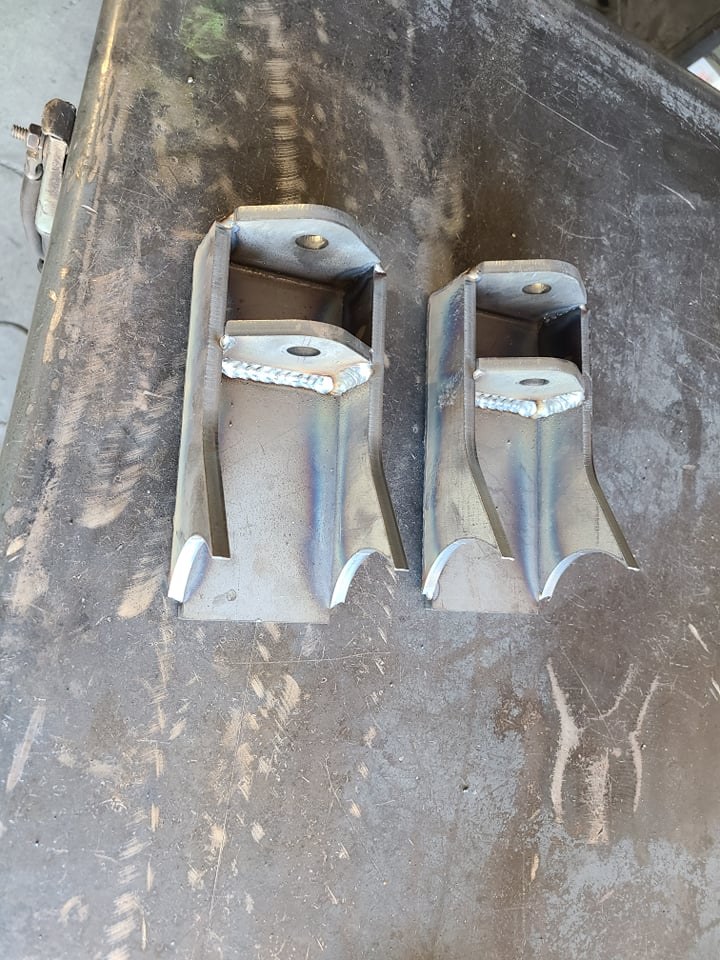
You're looking at the upper "wishbone" on the rear of the suspension. The WJ uses a 3-link rear design with 2 trailing arms going from the body to the outer ends of the axle, then an upper "wishbone" that attaches to the axle in ones spot, via this 3-bolt bracket with a ball-joint. The wishbone looks something like this:


And here's what the whole deal looks like (you're looking from the "front" of the vehicle):


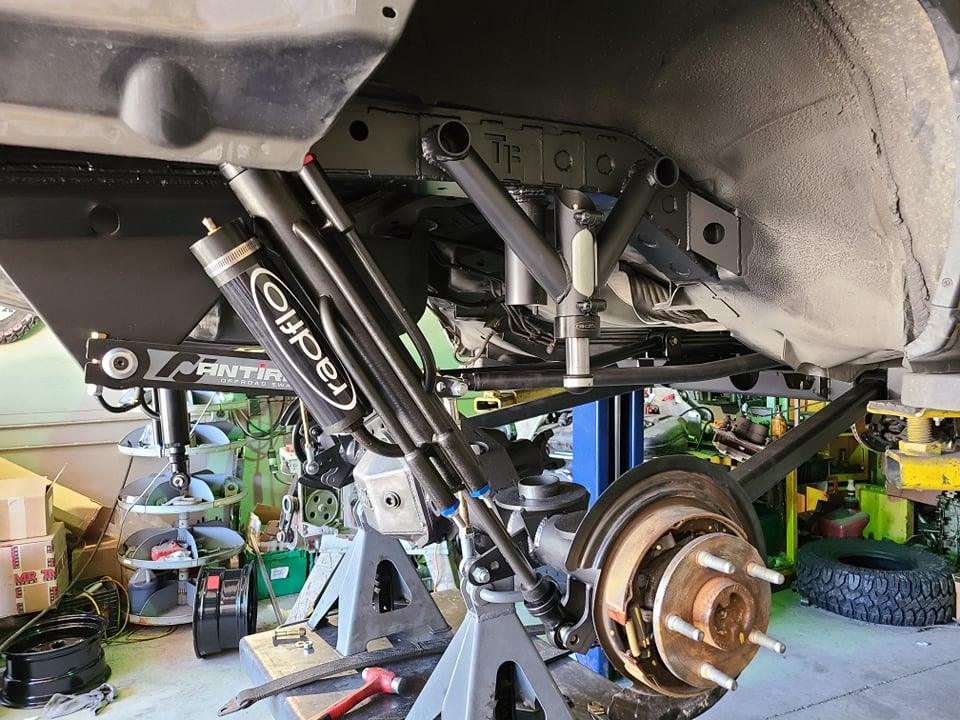
The big spacer you're seeing is part of the rear lift kit, which is NOT a long-arm (the front is on my WJ). It uses the stock arms and wishbone, longer/heavier rate coil springs, and then this spacer to restore pinion angle and axle alignment. It's not the ideal system, and I do plan to long-arm the back of this WJ. However, when I first got this kit a few years back the WJ was only going to be Jake's DD for school and work, and perhaps mild camping, not the crawling I put it through. Anyway, the bolts must have been loose. Now, we had developed a little clunk in the front end a month or two back. For those that don't know, I work in the Bay Area of CA and "live" down there Mon-Thurs (usually Sun night through late Thurs) and then come home to my house in Lincoln where Jake and the WJ live on the weekend. We needed it fixed up quickly, so we took it to a local mechanic to go through everything. He found the Flex-Joint on the Trackbar a bit loose, so he changed it and went through and re-torqued "everything" in the suspension.

This is 100% on me... first of all I shouldn't have ASSumed he checked the rear suspension too. Second, I SHOULD have gone through the entire suspension myself before the first "real" wheeling trip with the rig. But I didn't. It sucks re-learning lessons I learned 20 years ago, and making mistakes when I "know better" but hey, at least I got lucky and this didn't happen on the trail or with Jake driving at highway speeds (it let go on the on-ramp he uses nearest our house).

Again, my theory is that all 3 bolts were loose: that's the only way I can see these large (M14x2.0) grade 10.9 bolts shearing. At this point I had identified the problem, but as any shade-tree mechanic knows the fun was just starting. All 3 bolts had broken off in the rear-end housing, and needed extraction. I jacked the back of the WJ up some more and got to removing/disconnecting things so I could droop the axle out for more access. Luckily a regular old easy-out got all 3 out - but not before I went through a few drill bits trying to drill the hardened 10.9 bolts (I went up in 3 steps from a pilot hole, to an intermediate, to the 1/4 needed for the extractor I was using) and not before I had to disconnect things even further.

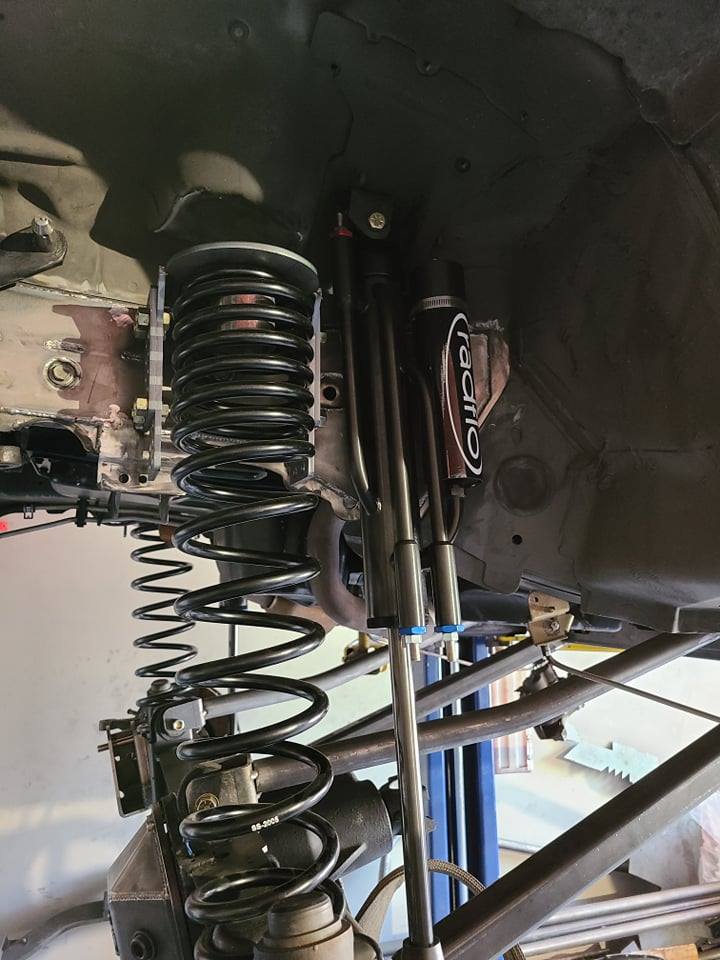
Here's about mid-way, before I fully removed the e-brake cables from the wishbone, disconnected the brake-line mount from the body and moved the coil-springs out of the way (basically just wheels-off and lower shock bolts and sway-bar end-links disconnected):

View attachment 120058

View attachment 120057

And the mounting holes with the stub of the bolts still in them:
View attachment 120056

And finally, some success, here's the first one out:
View attachment 120055

I did manage to get ALL 3 OUT, but I had to call it quits at this stage as I had a Prime Rib going for dinner and some guests coming over for dinner. Luckily I had already planned to "work from home" today, so I'll be headed back into the garage shortly to put it back together. While I'm there I have an oil change to do, air filter swap, and I'm going to pull the 1" spacer out of the IRO skid plate I have, because it isn't needed to clear things at this stage (we ended up not needing the 1" t-case drop). Also, I wanted to do the ZJ washer-bottle relocation and remove the fog lights, but it doesn't look like the bottle came in yet.


Day 2:

With the help of a old racing/car club buddy/neighbor I got it buttoned back up. Unfortunately I missed JCWages (my fault, not his) but certainly appreciated the offer to help. I didn't get many pics, because I got a late start (I wasn't turning a wrench until after 3 thanks to errands, some work, and the aforementioned car shopping for my girlfriend's business). Here's what it actually looked like pulled apart enough to get the easy-out in and basically where we started today:

View attachment 120054
(and yes, that's my first real trail-damage on it, the slightly-crushed exhaust tip and the scrapes on the lower bumper... oh well, it's a trail rig and I'll be upgrading the bumper eventually, it's not really noticeable if you're not looking at the bumper from below)

And a terrible shot, but it's all back together properly now:

View attachment 120053

A little test-drive and re-torque of lug nuts and such and it was good to go:

View attachment 120052


This time I did my best to clean out the bolt holes in the rear-end housing. I had been using WD-40 to help with the drilling and hopefully penetrate and make the broken bolts extract more easily. However, I didn't want the holes soaked in WD when I put it back together, just to cause this same issue again. I blasted the holes out with brake-cleaner, then with compressed air and did my best to get them nice and clean. I then used some red-loctite on the hardware (I'll probably hate myself for this when I take it all apart again in a few months for the rear long-arm... but such is life).


Also, I ended up not pulling skid-plate spacer out. I'll need to get hardware with a much shorter (or no) shoulder first.

-TJ
Very nice work!
I have a 99 myself, but not near as detailed as this build. That rear wishbone is a well known point of issue. Nice job