
Member III
- 2,771
- First Name
- Rolando
- Last Name
- Nispiros
- Member #
17011
- Ham/GMRS Callsign
- KN6JJS
Used the truck to pick up the Christmas tree and boxes of decorations. Added a decal to my rear window as well. 


Member III
17011

Enthusiast III
Maybe like 9K with everything.Have you decided what you will ask for the LRD2 ?
Member III
16986
Did you get your new rig yet ? Will the equipment you removed from the LRD be usable on your new rig ?Maybe like 9K with everything.
Enthusiast III
Not yet - I will be receiving it in May 2020. Most likely I will buy all new stuff for it. If I cant sell the LRD2 for what I'm asking, I'm just going to keep it and let my family/friends use it if they ever want to go 'overlandingxcamping'Did you get your new rig yet ? Will the equipment you removed from the LRD be usable on your new rig ?
Member III
16986
Good luck with both, I had no idea it took so long to get a new SUV these days of over production.Not yet - I will be receiving it in May 2020. Most likely I will buy all new stuff for it. If I cant sell the LRD2 for what I'm asking, I'm just going to keep it and let my family/friends use it if they ever want to go 'overlandingxcamping'
Amazon?I added a Dual USB port and Voltmeter in place of the cigarette lighter in my 5th Gen 4Runner. A bit of trimming to the hole in the cubby but nothing that can't be returned to stock if needed. View attachment 129954View attachment 129955View attachment 129956View attachment 129957View attachment 129958
Member III
19548
Enthusiast III

Enthusiast III
Enthusiast III


Member III
17011
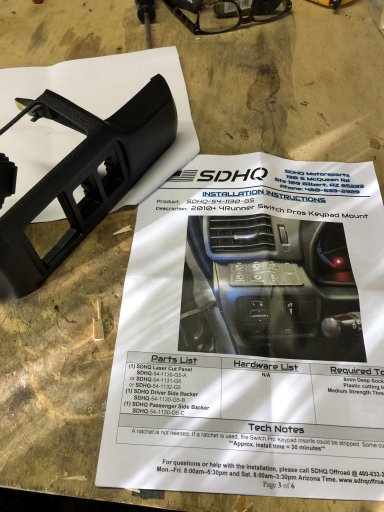
That’s an awesome mod. Nice and clean!There’s nothing better than working on the car in the garage during a torrential downpour, so i unboxed the SwitchPros SP9100 to add to my electrical panel. I had previously installed a relay/fuse box on a PowerTray panel, but I wasn’t excited about adding a lot of dash switches in the few blank panels i had available and the SwitchPros 8 switch panel seemed like an elegant solution. The PowerTray will continue to power accessories that have their own on/off switch like CB, HAM and Compressor, but I’ll be adding more lights soon so needed something neat and tidy on the dash. SDHQ offers a laser cut dash panel for the left side of the steering wheel on the 4Runner, so that was the deciding factor to move forward.
Starting with the SDHQ Dash panel
View attachment 130152
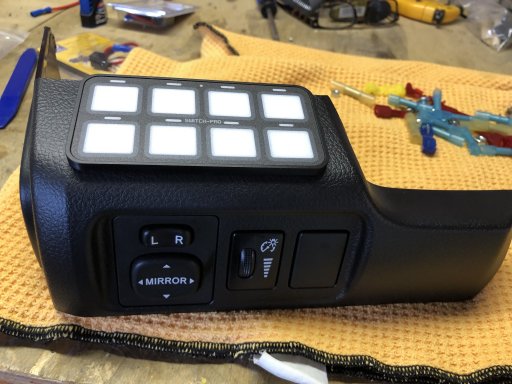
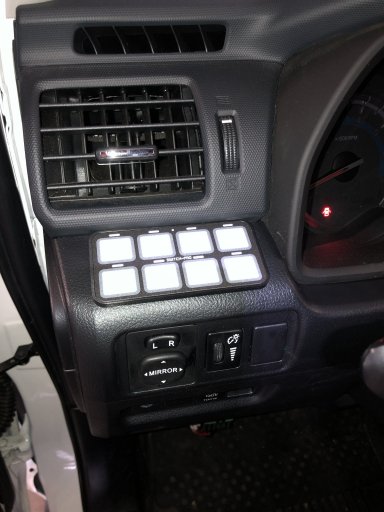
I assembled the switch pros pad and trimmed a bit off the opening in the dash to accept the new panel. The instructions were very clear and the SDHQ panel fit like stock.
View attachment 130155View attachment 130156
View attachment 130157
The previous panel installation included a 6x wiring harness through the firewall, so this accommodates the ignition and light trigger wires (blue and white) to bring them into the car to connect to circuits using two Add a Fuse connectors.
View attachment 130161
I velcroed a bus bar for the switch power connections to the top of the fuse box for lack of a better place to put it for now.
View attachment 130158
The Switch Pros panel is very easy to configure using the App, including changing the panel color to match the dash.
View attachment 130151
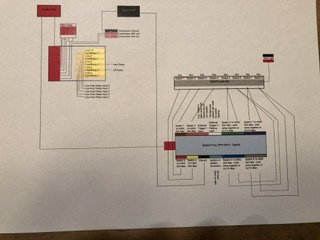
Here’s the wiring diagram. The only change I made was to wire the Ditch Light switch relay to a 20A pole (switch 1) instead of bypassing the relay off of a 35A pole. It’s a 45A relay, so I figured i still needed it.
View attachment 130160
it was a great afternoon project and wonderful to hear the rain pounding the roof while i worked. I hope everyone managed to stay dry or get really muddy!

Advocate III
20990

Advocate III
20990

Member II

Pathfinder I
Pathfinder I
Jealous. I need another OB campout. :)Yesterday, removed back seats and left rear jump seat from the Disco. Removed the rear carpet and pad (very heavy with water from when my rear sunroof stuck open).
Today, got a buddy heater and set up for this weekends OB camp-out/ meet.

Educator I
Today finally after a very long time and a couple months since our last trip I finally was able to clean out and vacuum the rig. Man it seems like these jeeps are hungry for anything that can fall under the carpet or the seats but finally gave her some TLC on the inside to get ready for the Tennessee trip this upcoming week.
Educator I
That was the other thing. I had to pull the front carpet out and hose the front half. I had a 44ounce cup literally full of limeade spill all over the floor earlier this week and I dam near had a conniption lol. So that was the main reason to pull the carpet out and hose her down but I hadn't cleaned out the rig in a really long time. Thats one thing I do love about the jeep I can section out the carpet I want to take out. In my pathfinder we spilled soda once on the rear carpet and it was a mission had to remove all the seats just to remove the damn carpet.It's not exclusive to Jeeps. When I had a Jeep I took the carpet out so I could pop the drain plugs and just hose it out. That was a TJ, so easy. Now I have 4Runner and i wish it had that option. Or at least a vinyl floor option.


