Subaru Owners Registry

  • HTML tutorial

Logan Hall

Rank II

Enthusiast III

Has anybody done anything major for their rear cargo area? I have zero use for the spare tire with the larger tires. So I’d like to utilize that extra storage space if I can. Also that floor boat hatch is so big, I nearly have to have the entire floor clear in order to open it...
perhaps someone has seen a compatible design or has ideas that could work in order to better utilize the limited space available.
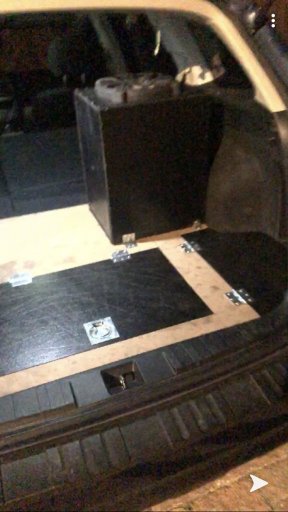
I attempted to design a floor out of some MDF but it’s pretty difficult to make it fit good enough and have the proper supports to keep from flexing. I have a decent sized subwoofer back there too so the vibration soon became pretty irritating with all the hinges and whatnot. Little bit of a slump job but it had the right idea I guess.
Not a good picture but it gives an idea
IMG_4039.JPG
 

Sasquatch SC

Rank VI
Launch Member

Member III

3,782
Jefferson County, Colorado, United States
First Name
Trey
Last Name
Hayes
Member #

17253

Has anybody done anything major for their rear cargo area? I have zero use for the spare tire with the larger tires. So I’d like to utilize that extra storage space if I can. Also that floor boat hatch is so big, I nearly have to have the entire floor clear in order to open it...
perhaps someone has seen a compatible design or has ideas that could work in order to better utilize the limited space available.
I attempted to design a floor out of some MDF but it’s pretty difficult to make it fit good enough and have the proper supports to keep from flexing. I have a decent sized subwoofer back there too so the vibration soon became pretty irritating with all the hinges and whatnot. Little bit of a slump job but it had the right idea I guess.
Not a good picture but it gives an idea
View attachment 122307
Mine is currently filled with recovery gear and tools. I am planning on putting two 6v AGM deep cycle batteries wired in series underneath there and using two trickle chargers to keep them charged up. I think I'll put a solar panel on the roof for one trickle charger and then use the 12v plug in the trunk for the second trickle charger to add charge while I'm driving.
 
  • Like
Reactions: Logan Hall

CurrentlyRockhoundin

Rank IV
Launch Member

Enthusiast III

1,310
Spokane, WA
First Name
Jared
Last Name
Goguen
Member #

20084

Has anybody done anything major for their rear cargo area? I have zero use for the spare tire with the larger tires. So I’d like to utilize that extra storage space if I can. Also that floor boat hatch is so big, I nearly have to have the entire floor clear in order to open it...
perhaps someone has seen a compatible design or has ideas that could work in order to better utilize the limited space available.
I attempted to design a floor out of some MDF but it’s pretty difficult to make it fit good enough and have the proper supports to keep from flexing. I have a decent sized subwoofer back there too so the vibration soon became pretty irritating with all the hinges and whatnot. Little bit of a slump job but it had the right idea I guess.
Not a good picture but it gives an idea
I removed my back seat and made an upholster sleeping platform and have a hatch where the spare tire was that is filled with tools, recovery gear, and emergency supply's.
 

Logan Hall

Rank II

Enthusiast III

I removed my back seat and made an upholster sleeping platform and have a hatch where the spare tire was that is filled with tools, recovery gear, and emergency supply's.
If you have pictures of this or are willing to write a brief description of the process that'd be awesome! sounds pretty cool.
I feel like a lot of people who come up with really innovative stuff rarely make threads or post about it.
 

Baipin

Rank IV

Enthusiast III

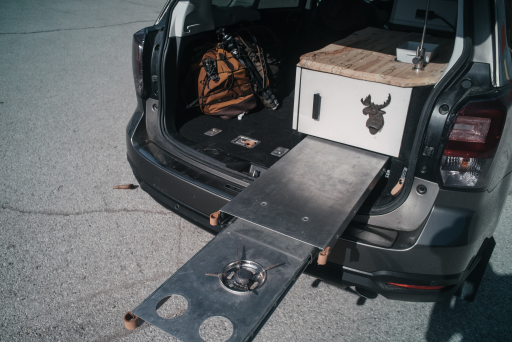
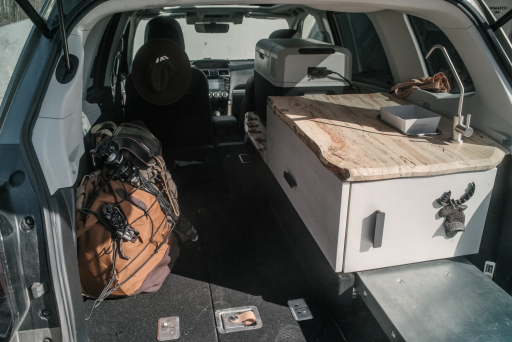
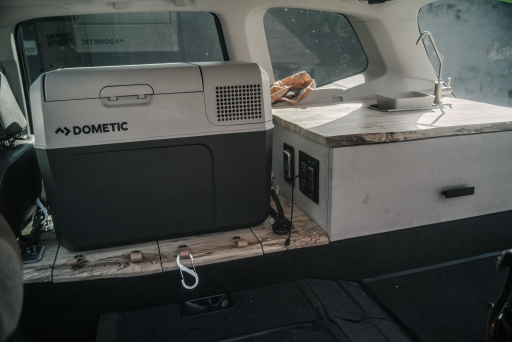
I "remodeled" much of the rear interior:

1571253071692.png

First thing I built was this slide-out stove and cabinet. It's proven really useful; especially the cabinet while using the rig as a daily driver running errands.

1571253125299.png

Took out the spare and will be mounting it on a welded bumper soon. There is a huge amount of room gained by removing that stuff. Like @CurrentlyRockhoundin said, removing the seats can help a lot too.

1571253166437.png
I use the cabinet and fridge for food and my photo gear (fridge is great for keeping my 4x5 film cool when it's hot out)! The sink is also one of my most-used things. It was more of an afterthought, but I find it super handy - great for washing your hands, giving fruit a rinse, water for stew, drinking water... etc.
 

CurrentlyRockhoundin

Rank IV
Launch Member

Enthusiast III

1,310
Spokane, WA
First Name
Jared
Last Name
Goguen
Member #

20084

If you have pictures of this or are willing to write a brief description of the process that'd be awesome! sounds pretty cool.
I feel like a lot of people who come up with really innovative stuff rarely make threads or post about it.
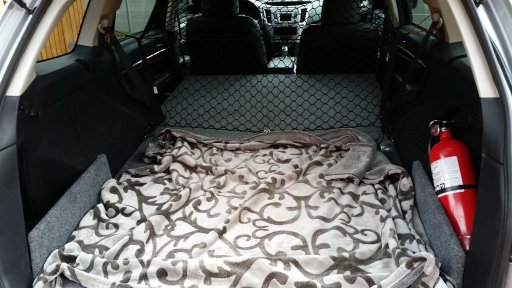
Yeah so I had a few design considerations when I ripped the back seat out.

We needed to have a space for the dog, a space for recovery / emergency gear, it needed to be flat, and it needed to look good ish.

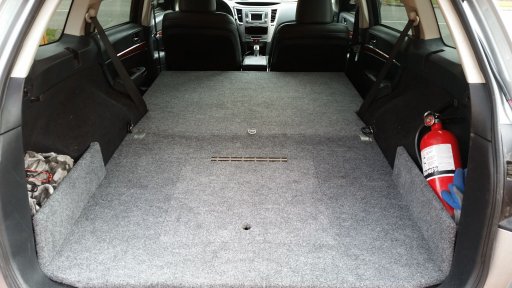
This is how it normally is setup with a blanket for the dog and a cargo net as a barrier.
1.jpg

With the blanket and cargo net out of the way you can see the whole platform which is 74" or 6''1" without sliding the seats forward which is nice since I'm 5' 9" and my wife is tiny.
2.jpg

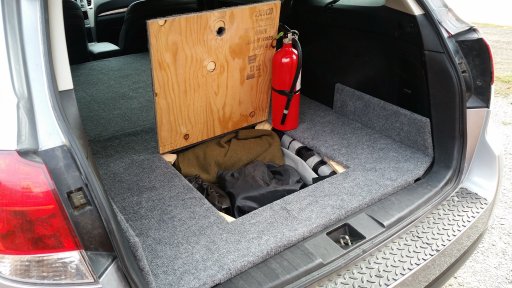
With the hatch open you can see a back up wool blanket, and all the tools, recovery, and emergency stuff.
3.jpg

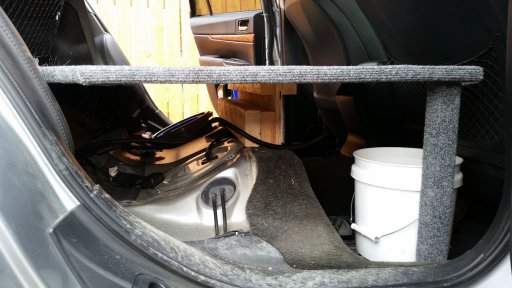
With the back seat gone you have a lot of new space for long things that go bang or a places to put things out of sight of someone passing by.
4.jpg

What's not pictured here is the two part high density foam mattress I made which fits the space perfect.
 

Jeffrey Dill

Rank VI
Launch Member

Member III

3,364
Greenville, SC, USA
First Name
Jeffrey
Last Name
Dill
Member #

15578

Ham/GMRS Callsign
W4FOZ
Yeah so I had a few design considerations when I ripped the back seat out.

We needed to have a space for the dog, a space for recovery / emergency gear, it needed to be flat, and it needed to look good ish.

This is how it normally is setup with a blanket for the dog and a cargo net as a barrier.
View attachment 122324

With the blanket and cargo net out of the way you can see the whole platform which is 74" or 6''1" without sliding the seats forward which is nice since I'm 5' 9" and my wife is tiny.
View attachment 122326

With the hatch open you can see a back up wool blanket, and all the tools, recovery, and emergency stuff.
View attachment 122327

With the back seat gone you have a lot of new space for long things that go bang or a places to put things out of sight of someone passing by.
View attachment 122328

What's not pictured here is the two part high density foam mattress I made which fits the space perfect.
Very clean. That looks awesome.
 

Baipin

Rank IV

Enthusiast III

Can anyone recommend a good hitch for a Forester, for off-road? I like their articulation, but is the smallest class III pintle/lunette setup overkill for a Subaru? I would be outfitting my Forester with a transmission intercooler (IIRC that should bring it up to Australian towing spec, at 4,000 lbs since I have a receiver built to their spec too). I don't expect to be towing more than 2,000 lbs. Just a utility trailer, maybe an adventure camper in the future with some kayaks on board.
 

Enthusiast III

1,212
Grand Falls-Windsor, NL, Canada
First Name
Steve
Last Name
Adams
Got this guy installed today, had to make up some brackets cause the ones it came with were just a little too tall and wide cause at 42" the light just barely fits.

Any suggestions on how to make entry with the wire?


View attachment 121649
Pop the plastic cover off the front of the roof rack. drill a small hole install a grommet into the hole run the wire and fill with urethane. pop the plastic cover back on. if you want to get super awesome with the install (like me ;-)) you can get a waterproof screw together connector and put one end on the light and the other into the plastic cover, so if you ever want to remove your light, it's just unscrew the connector and pop off the light. Everything is tidy, the plastic keeps more water out of the hole where the wire goes into the car. and if you sell, the hole is hidden to protect the roof of the car.
 
  • Like
Reactions: DoubleA_FL

CurrentlyRockhoundin

Rank IV
Launch Member

Enthusiast III

1,310
Spokane, WA
First Name
Jared
Last Name
Goguen
Member #

20084

Pop the plastic cover off the front of the roof rack. drill a small hole install a grommet into the hole run the wire and fill with urethane. pop the plastic cover back on. if you want to get super awesome with the install (like me ;-)) you can get a waterproof screw together connector and put one end on the light and the other into the plastic cover, so if you ever want to remove your light, it's just unscrew the connector and pop off the light. Everything is tidy, the plastic keeps more water out of the hole where the wire goes into the car. and if you sell, the hole is hidden to protect the roof of the car.
I ended up just going down through the hatch and taillight and the forward towards the drivers seat and through the firewall.
 

Sasquatch SC

Rank VI
Launch Member

Member III

3,782
Jefferson County, Colorado, United States
First Name
Trey
Last Name
Hayes
Member #

17253

Can anyone recommend a good hitch for a Forester, for off-road? I like their articulation, but is the smallest class III pintle/lunette setup overkill for a Subaru? I would be outfitting my Forester with a transmission intercooler (IIRC that should bring it up to Australian towing spec, at 4,000 lbs since I have a receiver built to their spec too). I don't expect to be towing more than 2,000 lbs. Just a utility trailer, maybe an adventure camper in the future with some kayaks on board.
Check out etrailer.com. All of theirs are pretty solid. My recommendation for one that will be taking abuse is after you have it bolted on per the instructions, get a solid bead weld on the bracket that attaches to the frame. I have a Wilco tire carrier in mine and then I hook my boat trailer to that. It's pretty solid. No complaints.
 

CurrentlyRockhoundin

Rank IV
Launch Member

Enthusiast III

1,310
Spokane, WA
First Name
Jared
Last Name
Goguen
Member #

20084

So one issue I see with all the hatch back Subaru's is where does the spare tire go. The donut it comes with is pretty useless and by ditching it you now have a really good interior space, so what are the options? Spare on the roof, custom bumper with tire carrier, hitched mounted swing out tire carrier, or hitched mounted tire carrier that folds down.

Spare on the roof: The main down side to this that I see is it really limits doing other stuff with your roof top space, with the spare on the roof you need a cargo basket which means you can't do anything else with the roof like a roof top tent or a cargo box which seem like an over all greater value you then just having a spare sitting in a basket, yeah other stuff can go in and on the basket but nothing really big.

Custom bumper with tire carrier: Likely the best option but also costs the most if you're hiring it out to someone else to fab it or it will cost you a bunch of time if you fab it yourself. Full builds from someone like Fullforce Metal Works can range between $1200 - $2500 that's a pretty penny for a bumper.

Hitched mounted swing out tire carrier: Things like the Wilco Offroad are a good option but depending on the bells and whistles you get you're looking at $500ish if you can find a used one or $800 - $1200 depending on the features you add.

Hitched mounted tire carrier that folds down: So this seems like the cheapest way to go since you can get these folding Foldable Hitch Mount Adapters on ebay for like $50 and add the tire carrier to it but the main draw back I see is if your in and out of your hatch a lot, like if you have dog its rather inconvenient to be folding the tire up and down all the time, not to mention the bad departure angle you now have.

That's when I came across the XT Tilting Spare Wheel Carrier ($499 Australian dollars is like $350 US) which the design is really good it seems and it would be pretty easy to copy and adapt the to $50 ebay folding hitch mount adapter by adding the gas struts for a simple, and affordable way to bring a full size spare on trips.

Thoughts on this subject? Perhaps I'm missing something?
 

Sasquatch SC

Rank VI
Launch Member

Member III

3,782
Jefferson County, Colorado, United States
First Name
Trey
Last Name
Hayes
Member #

17253

So one issue I see with all the hatch back Subaru's is where does the spare tire go. The donut it comes with is pretty useless and by ditching it you now have a really good interior space, so what are the options? Spare on the roof, custom bumper with tire carrier, hitched mounted swing out tire carrier, or hitched mounted tire carrier that folds down.

Spare on the roof: The main down side to this that I see is it really limits doing other stuff with your roof top space, with the spare on the roof you need a cargo basket which means you can't do anything else with the roof like a roof top tent or a cargo box which seem like an over all greater value you then just having a spare sitting in a basket, yeah other stuff can go in and on the basket but nothing really big.

Custom bumper with tire carrier: Likely the best option but also costs the most if you're hiring it out to someone else to fab it or it will cost you a bunch of time if you fab it yourself. Full builds from someone like Fullforce Metal Works can range between $1200 - $2500 that's a pretty penny for a bumper.

Hitched mounted swing out tire carrier: Things like the Wilco Offroad are a good option but depending on the bells and whistles you get you're looking at $500ish if you can find a used one or $800 - $1200 depending on the features you add.

Hitched mounted tire carrier that folds down: So this seems like the cheapest way to go since you can get these folding Foldable Hitch Mount Adapters on ebay for like $50 and add the tire carrier to it but the main draw back I see is if your in and out of your hatch a lot, like if you have dog its rather inconvenient to be folding the tire up and down all the time, not to mention the bad departure angle you now have.

That's when I came across the XT Tilting Spare Wheel Carrier ($499 Australian dollars is like $350 US) which the design is really good it seems and it would be pretty easy to copy and adapt the to $50 ebay folding hitch mount adapter by adding the gas struts for a simple, and affordable way to bring a full size spare on trips.

Thoughts on this subject? Perhaps I'm missing something?
I currently am running a Wilco because I couldn't let myself consider removing the rear bumper cover and modifying it with the car less than a year old. My thoughts on the one you posted from Australia are that I'd be concerned about gunk getting into that strut and it seizing up.
 

CurrentlyRockhoundin

Rank IV
Launch Member

Enthusiast III

1,310
Spokane, WA
First Name
Jared
Last Name
Goguen
Member #

20084

I currently am running a Wilco because I couldn't let myself consider removing the rear bumper cover and modifying it with the car less than a year old. My thoughts on the one you posted from Australia are that I'd be concerned about gunk getting into that strut and it seizing up.
That is a good point about adding struts.
 

Sasquatch SC

Rank VI
Launch Member

Member III

3,782
Jefferson County, Colorado, United States
First Name
Trey
Last Name
Hayes
Member #

17253

That is a good point about adding struts.
Before I went with the Wilco - I actually had a fabricator (Prepper Racks out of TX) working on a folding carrier that shouldn't effect the departure angles. He even added in a folding grill that attached to the back of the spare. I got the Wilco after I had already commissioned the custom one. I sold it to another guy in my area @johnniac57 but I don't know if he has gotten it hooked up yet.
 

CurrentlyRockhoundin

Rank IV
Launch Member

Enthusiast III

1,310
Spokane, WA
First Name
Jared
Last Name
Goguen
Member #

20084

Before I went with the Wilco - I actually had a fabricator (Prepper Racks out of TX) working on a folding carrier that shouldn't effect the departure angles. He even added in a folding grill that attached to the back of the spare. I got the Wilco after I had already commissioned the custom one. I sold it to another guy in my area @johnniac57 but I don't know if he has gotten it hooked up yet.
What prompted the switch?
 

Wawa Skittletits

Local Expert East Region USA
Staff member
Launch Member
Member

Expedition Master I

5,079
Wilkes-Barre, PA, USA
First Name
Drew
Last Name
Hawley
Member #

1537

Ham/GMRS Callsign
WRBZ674
Service Branch
USN veteran
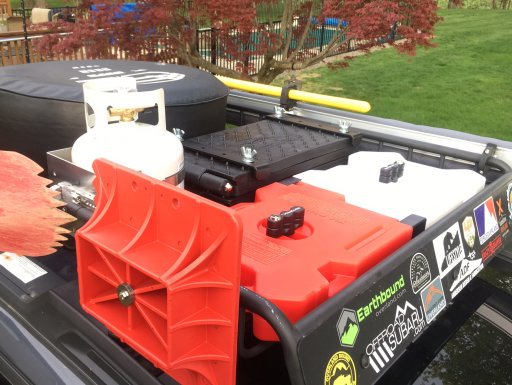
To each their own but having the spare on my roof has never limited what I put up there. I don’t like departure angle robbing attachments, I prefer the versatility of ground tent camping, and although I had originally planned to go with a custom swing out in the skin of the OE bumper cover I never found the need. Some people on here may recall that I actually used CAD to plan out my basket and I creatively use all of the available space in and around my basket. By the time pulling the wheel down is a problem this Outback will be long gone.

Old pictures but it gives you an idea. Everything is securely mounted and locked. No straps or bungees.

66DFB8BF-379D-40A0-BA22-C46A45CEAD38.jpegBD0CEF8A-E558-4C81-BBC1-E81EBDF19A8A.jpeg
 

Baipin

Rank IV

Enthusiast III

I too prefer the swing-away options. The swing-down ones get in the way if you're going to be doing anything out the back of your vehicle. They look clumsy to step around.

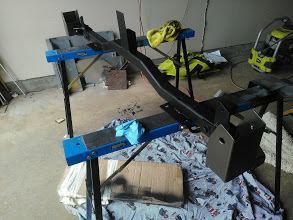
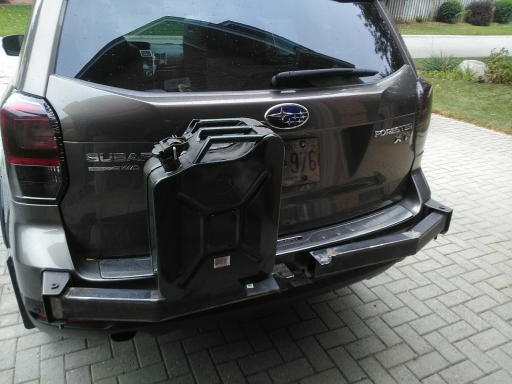
If you're at all good with a stick welder and an angle grinder, that's prett much all you need to make your own (other than the material itself). I opted for a bolt-on bumper of my own design that repalces the OEM crash bar. Yes, it is heavier, and a lot of work, but I did this for under $500 CAD. Probably closer to $300 by buying metal from the metal scrapper or metal wholesaler. I've tried roof-top stuff but it really killed my gas mileage, though a properly designed fairing would likely fix that. Likewise, a properly designed swing-away carrier shouldn't rob you of departure angle. My own design retains a few extra degrees of tolerance from the FXT's departure angle.

1571408864366.png
1571408925903.png

These pics are of it still as a WIP. I'll find mroe recent ones later.