
Influencer II
In the Rig Q&A section of this forum I asked the question "Who does their own electrics?". My point at the time was that perhaps it's seen as an easy thing to do, adding electric accessories to your chosen overlanding vehicle and those that might shy away from mechanics are happy to give it a go. Sure there are lots of great kits you can buy from some big name companies such at ARB, SPOD, Narva, Piranha Offroad that make it relatively easy to add lights, fridges and dual battery systems but it still helps to understand some of the principles of what's involved.
This isn't going to be a complete guide to auto electrics. Please feel free to add to it, I'm hoping it becomes a useful resource. Make sure you always consider consulting a professional auto electrician if you are unsure, leaving you vehicle stranded because your latest mod has just blown a main vehicle fuse is not fun... I know... I've done it. As you can probably tell this isn't an experts guide and shouldn't be taken as such but hopefully will give you some insight.
Fundamentals:
Two equations (I hate maths but these are simple enough that even I can manage)
1.) V = I x R This is what's know as Ohm's law. As it's written Volts = Current x Resistance and apparently means "The electrical current in a conductor is proportional to the potential difference applied to it provided the temperature remains the same!" If you know or can measure two of the values you can calculate the other. E.g. Current = Voltage/Resistance
2.) P = V x I Probably a calculation I use more often and useful when working out things like what gauge of wire to use, what rating of relay to use or selecting a fuse. This one says Power(Watts) = Volts X Current. So if you know that a nominally 12v bulb is rated at 100W you can calculate that the current will be 100/12 = 8.3Amps. This information you can then use when selecting a fuse, relay, connectors or wire gauge.
Selecting components to wire up an accessory:
Having performed that second calculation (above) you are ready to start selecting components to wire up your accessory. Maybe you will have been fortunate enough to have bought a kit to do this for you so the information will only be needed to help you select which one to buy.
If we take the above example it told us the current was 8.3 Amps for our 100W bulb. Great you say, so I need 8.3A fuse and a piece of cable rated at 8.3 Amps. Well there is another factor in the cable size which we need to consider.
Cable: In this case we are talking specifically about cables to carry power for accessories like lights or fridges and connecting batteries, not specialist cables for connecting things like CB antennas. Your choice of cable should actually also factor in the length over which you need to run it. There are various charts and online calculators to help you with this. You will need to pick one depending on your choice of imperial or metric units. You should also rate your cable higher than the current draw of whatever is connected to it as a margin of safety.
Fuses: First we need to consider the fuse's job. It's there to protect the weakest or least current rated component in the circuit. That might be a wire or a switch or connector. If you wire up your 100W spot lamp using a cable rated at only 5Amps you really need to be using a fuse rated at less than 5Amps to protect that cable! Obviously that's never going to work because the fuse will immediately blow but at least you won't have melted the cable and possibly started a fire! For your 100W lamp let's say you select 25Amp cable and all your other connectors and switches in the circuit are similarly rated. In that case a fuse of 15Amps could be selected. It's a margin above the draw of the lamp and below that of the cable.
Here we have been talking about a 100W lamp but often times the manufacturer will already have provided you with the required fuse rating for a device. This just leaves you to select the cable and components to connect that device. Sure, you could select 100Amp cable for that 100W lamp but 100Amp cable is also bulky and expensive.
Relays: Why use a relay? A relay is used to allow a low current circuit to switch a circuit that requires a much higher current. Perhaps you have a nice little switch you can fit on the dash for your 100W lamp but the switch is only rated at 2Amps, if you employ a relay rated at say 30Amps you can use this in the circuit with your 25amp cable but use your 2amp fuse to feed it. This is where those wiring kits with everything provided add value.
Example of using a relay.
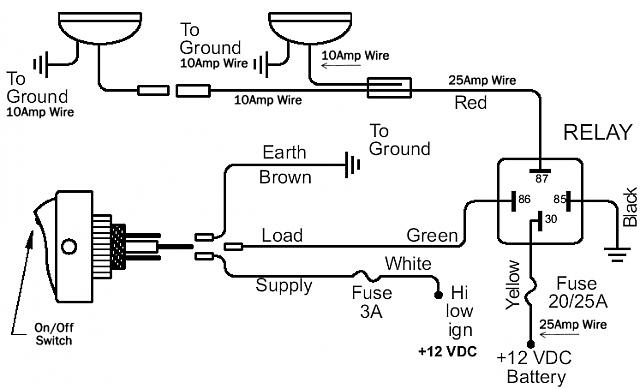
This example (below) does not use a relay and assumes that both the switch and cabling are capable of carrying the full draw (current) of the two lamps (NOTE: the earth connection on the switch is required because it has an indicator lamp).

Other tips:
Insulation: cable comes with insulation but it's important to add additional sleeving to at least any of your cabling that is connected to the positive side of the battery and device. This will make sure that if the cable rubs against the bodywork of the vehicle it won't wear through and 'short out'... hopefully just blowing a fuse but at worst starting a fire. Insulation can also provide protection from the elements.
If you've made a joint in the cable always insulate with either electrical tape or heatshrink sleeving.
Connectors: always make sure these are properly insulated and if exterior to the vehicle it helps to make sure they are sealed against moisture ingress that could corrode the wire and terminals. You can buy waterpoof connectors or use things like self-adhesive heatshrink for this.
Soldering v's Crimping (or both): 'Crimp and solder' was something I was taught many years ago. The crimping part meant you had a good mechanical connection and the soldering insured you had a good electrical connection. The soldering would also help prevent moisture ingress in the cable. As a rule I would still do that today when soldering high current connections like power plugs. Here's an example of soldering a power connector.
For doing repairs to looms I was taught to splice new cable in by splaying the ends of the old and new cable, twisting to form that mechanical connection and then soldering before insulating the joint. These days it's much easier to use heatshrink butt connectors that also contain glue, some even have solder to make the joint strong and sealed to the elements.
There are times where it may not be advisable to solder as well, such as connections that may be subject to vibration. Soldering the cable may make it brittle or less flexible. I was once fortunate enough to get a factory tour of a company that produced rally cars. I asked them about their wiring looms and how they made connections. They never soldered a joint but used waterproof crimped connections. He guy even told me that they rarely if ever had an electrical failure due to a broken connection and a loom was often tested and reused when a car was rebuilt.
Cable routing: think carefully about the route your cabling will take. I have already mentioned sleeving to protect cable against rubbing but also consider keeping it way from heat sources as well as any moving parts. Make sure you secure cable using cable ties or clips at suitable intervals to prevent it becoming damaged. Another teaching that was drilled into me was 'lose wires cause fires'. Also consider any flex in the vehicle that might cause a cable to stretch. You may also see the pro's leave something referred to as a 'service' loop. Basically this is a little extract cable that can be used if it a connection has to be remade or the run rerouted.
When it comes to routing your cables through metal sheet make sure you use a grommet to further protect the cable. I'm not a big fan of drilling holes in sheet metal so would always look to use existing grommets in the firewall (you will usually find a spare grommet or blank that can be used). Try not to force cables through grommets that are already at capacity with other cables as this may cause damage. If you are routing cables for roof mounted lights you may find you can use the snorkel to run the cables down to the engine bay. If you do need to drill a whole in the roof make sure it's a waterproof grommet that will give a good seal. Also be careful routing cables around door shuts and hinges in case they become trapped or sliced through.
Some final thoughts:
Modern vehicles are increasingly complex and their computers can be very sensitive. Modern vehicle or not, always try to install your accessories in a manner that they doesn't interfere with the original vehicle wiring or can be quickly disconnected in case of a problem. Many manufactures of aftermarket accessories such as lights or fridges have kits specifically to help you connect up their products. This is a great way to add these accessories safely.
Do also consider that you original equipment alternator and battery were designed to power the vehicle as it left the factory, expecting it to power high current accessories such as compressors and winches for long periods might also leave your stranded.
Do it right (The disclaimer):
As I said at the beginning of this article this isn't intended to be a complete guide to auto-electrics. The aim is to give the DIY enthusiast an insight that might help plan the installation of the many common 12V accessories to your overland vehicle. It's not possible to cover every scenario but I hope it gives you some ideas. I also hope it will give you some insight of what to look for when selecting someone to install your accessories for you. A garage that installs suspension or carries out servicing of your vehicle may not be the best choice for installing that dual battery solar system you have your heart set on. A mechanic may not also be an auto electrician. Please always consulate a professional before undertaking an upgrades. Your vehicle may not let you down now because of an oversight in your accessory wiring but it could just when you are miles from help!
Useful links:
Overland Vehicle Electrics
Electrical DIY Tips
Ultimate Dual Battery System Education Video
This isn't going to be a complete guide to auto electrics. Please feel free to add to it, I'm hoping it becomes a useful resource. Make sure you always consider consulting a professional auto electrician if you are unsure, leaving you vehicle stranded because your latest mod has just blown a main vehicle fuse is not fun... I know... I've done it. As you can probably tell this isn't an experts guide and shouldn't be taken as such but hopefully will give you some insight.
Fundamentals:
Two equations (I hate maths but these are simple enough that even I can manage)
1.) V = I x R This is what's know as Ohm's law. As it's written Volts = Current x Resistance and apparently means "The electrical current in a conductor is proportional to the potential difference applied to it provided the temperature remains the same!" If you know or can measure two of the values you can calculate the other. E.g. Current = Voltage/Resistance
2.) P = V x I Probably a calculation I use more often and useful when working out things like what gauge of wire to use, what rating of relay to use or selecting a fuse. This one says Power(Watts) = Volts X Current. So if you know that a nominally 12v bulb is rated at 100W you can calculate that the current will be 100/12 = 8.3Amps. This information you can then use when selecting a fuse, relay, connectors or wire gauge.
Selecting components to wire up an accessory:
Having performed that second calculation (above) you are ready to start selecting components to wire up your accessory. Maybe you will have been fortunate enough to have bought a kit to do this for you so the information will only be needed to help you select which one to buy.
If we take the above example it told us the current was 8.3 Amps for our 100W bulb. Great you say, so I need 8.3A fuse and a piece of cable rated at 8.3 Amps. Well there is another factor in the cable size which we need to consider.
Cable: In this case we are talking specifically about cables to carry power for accessories like lights or fridges and connecting batteries, not specialist cables for connecting things like CB antennas. Your choice of cable should actually also factor in the length over which you need to run it. There are various charts and online calculators to help you with this. You will need to pick one depending on your choice of imperial or metric units. You should also rate your cable higher than the current draw of whatever is connected to it as a margin of safety.
Fuses: First we need to consider the fuse's job. It's there to protect the weakest or least current rated component in the circuit. That might be a wire or a switch or connector. If you wire up your 100W spot lamp using a cable rated at only 5Amps you really need to be using a fuse rated at less than 5Amps to protect that cable! Obviously that's never going to work because the fuse will immediately blow but at least you won't have melted the cable and possibly started a fire! For your 100W lamp let's say you select 25Amp cable and all your other connectors and switches in the circuit are similarly rated. In that case a fuse of 15Amps could be selected. It's a margin above the draw of the lamp and below that of the cable.
Here we have been talking about a 100W lamp but often times the manufacturer will already have provided you with the required fuse rating for a device. This just leaves you to select the cable and components to connect that device. Sure, you could select 100Amp cable for that 100W lamp but 100Amp cable is also bulky and expensive.
Relays: Why use a relay? A relay is used to allow a low current circuit to switch a circuit that requires a much higher current. Perhaps you have a nice little switch you can fit on the dash for your 100W lamp but the switch is only rated at 2Amps, if you employ a relay rated at say 30Amps you can use this in the circuit with your 25amp cable but use your 2amp fuse to feed it. This is where those wiring kits with everything provided add value.
Example of using a relay.
This example (below) does not use a relay and assumes that both the switch and cabling are capable of carrying the full draw (current) of the two lamps (NOTE: the earth connection on the switch is required because it has an indicator lamp).
Other tips:
Insulation: cable comes with insulation but it's important to add additional sleeving to at least any of your cabling that is connected to the positive side of the battery and device. This will make sure that if the cable rubs against the bodywork of the vehicle it won't wear through and 'short out'... hopefully just blowing a fuse but at worst starting a fire. Insulation can also provide protection from the elements.
If you've made a joint in the cable always insulate with either electrical tape or heatshrink sleeving.
Connectors: always make sure these are properly insulated and if exterior to the vehicle it helps to make sure they are sealed against moisture ingress that could corrode the wire and terminals. You can buy waterpoof connectors or use things like self-adhesive heatshrink for this.
Soldering v's Crimping (or both): 'Crimp and solder' was something I was taught many years ago. The crimping part meant you had a good mechanical connection and the soldering insured you had a good electrical connection. The soldering would also help prevent moisture ingress in the cable. As a rule I would still do that today when soldering high current connections like power plugs. Here's an example of soldering a power connector.
For doing repairs to looms I was taught to splice new cable in by splaying the ends of the old and new cable, twisting to form that mechanical connection and then soldering before insulating the joint. These days it's much easier to use heatshrink butt connectors that also contain glue, some even have solder to make the joint strong and sealed to the elements.
There are times where it may not be advisable to solder as well, such as connections that may be subject to vibration. Soldering the cable may make it brittle or less flexible. I was once fortunate enough to get a factory tour of a company that produced rally cars. I asked them about their wiring looms and how they made connections. They never soldered a joint but used waterproof crimped connections. He guy even told me that they rarely if ever had an electrical failure due to a broken connection and a loom was often tested and reused when a car was rebuilt.
Cable routing: think carefully about the route your cabling will take. I have already mentioned sleeving to protect cable against rubbing but also consider keeping it way from heat sources as well as any moving parts. Make sure you secure cable using cable ties or clips at suitable intervals to prevent it becoming damaged. Another teaching that was drilled into me was 'lose wires cause fires'. Also consider any flex in the vehicle that might cause a cable to stretch. You may also see the pro's leave something referred to as a 'service' loop. Basically this is a little extract cable that can be used if it a connection has to be remade or the run rerouted.
When it comes to routing your cables through metal sheet make sure you use a grommet to further protect the cable. I'm not a big fan of drilling holes in sheet metal so would always look to use existing grommets in the firewall (you will usually find a spare grommet or blank that can be used). Try not to force cables through grommets that are already at capacity with other cables as this may cause damage. If you are routing cables for roof mounted lights you may find you can use the snorkel to run the cables down to the engine bay. If you do need to drill a whole in the roof make sure it's a waterproof grommet that will give a good seal. Also be careful routing cables around door shuts and hinges in case they become trapped or sliced through.
Some final thoughts:
Modern vehicles are increasingly complex and their computers can be very sensitive. Modern vehicle or not, always try to install your accessories in a manner that they doesn't interfere with the original vehicle wiring or can be quickly disconnected in case of a problem. Many manufactures of aftermarket accessories such as lights or fridges have kits specifically to help you connect up their products. This is a great way to add these accessories safely.
Do also consider that you original equipment alternator and battery were designed to power the vehicle as it left the factory, expecting it to power high current accessories such as compressors and winches for long periods might also leave your stranded.
Do it right (The disclaimer):
As I said at the beginning of this article this isn't intended to be a complete guide to auto-electrics. The aim is to give the DIY enthusiast an insight that might help plan the installation of the many common 12V accessories to your overland vehicle. It's not possible to cover every scenario but I hope it gives you some ideas. I also hope it will give you some insight of what to look for when selecting someone to install your accessories for you. A garage that installs suspension or carries out servicing of your vehicle may not be the best choice for installing that dual battery solar system you have your heart set on. A mechanic may not also be an auto electrician. Please always consulate a professional before undertaking an upgrades. Your vehicle may not let you down now because of an oversight in your accessory wiring but it could just when you are miles from help!
Useful links:
Overland Vehicle Electrics
Electrical DIY Tips
Ultimate Dual Battery System Education Video
Last edited:


