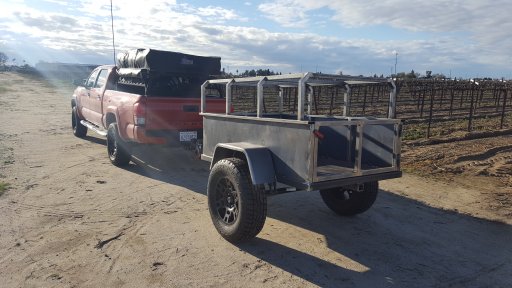
• HTML tutorial

Caddis

Rank V
Launch Member

Member III

2,741
Kingsburg, CA
First Name
Todd
Last Name
Regier
Member #

4827

So, as I get closer to finishing my trailer, I need some help. I hope someone can show me some pictures of their solar setup. I would like to see a more detailed pictures. I could be over thinking this. Really, all I the power I'll need is to run LED rope lights.20180315_173222.jpg
 
  • Like
Reactions: Luis Merlo

DoogieF18

Rank V
Launch Member

Enthusiast III

1,416
Fallon, NV
Member #

3516

Caddis

My $.02, don't over think it. I can get some pics and post them up, but solar isn't all that hard. I run 60W mounted on the roof rack of my trailer. Under normal circumstances (i.e., a decent amount of sun/day) this is enough to keep my battery charged running an ARB fridge and keeping an inordinate number of Apple products charged + a few LED lights when getting ready for bed. I use Anderson Power Pole connections for external sources and carry a 100w suitcase panel I can add to the system when required if sun/day is limited.

Easy answer: a 30W panel is probably enough for LED lights (I am assuming you have a battery). If you want more math for calculating the draw and solar recharge rate let me know. Relatively easy to calculate load and expected solar replacement rate.

I run a teardrop so a bit different than your (very nice) rig, but the principals are the same. Can post pix if you want but if you want to just chat about the math, let me know. Should be a simple proposition to get you powered sufficiently to enjoy the adventure without sweating the power.

John
 

Caddis

Rank V
Launch Member

Member III

2,741
Kingsburg, CA
First Name
Todd
Last Name
Regier
Member #

4827

Nicely put. Thank you. I know the LED light won't use much power. If you could send me pictures of the connections from the battery to the plugs for your lighting and auxiliary charging when you have time. I'm still out some time before I commit to the power.
 
  • Like
Reactions: The Lone Overlander

ArkansasDon

Rank V
Launch Member

Member I

My whole entire solar set up is Renogy. I have (2) 100 watt Renogy suit case panels (one only shown in photo) , my tongue box houses 125amp VMax battery, battery meter gage (auto shut off), Renogy 30amp Wandener Charge Controller, 20 ft. 10 agw cable, Renogy 30 amp fuse (between the solar panel & charge controller), & the Renogy Battery Temperature Sensor. Also I have rocker switch for lights on the tent rack, & 3 12v exterior socket outlets. I power the interior LED tent lights strip, & 2 filtered LED exterior lights on my tent rack, Engel 12v. 22 qt. fridge freez & Propex Heat Source H2000 tent furnace, Zodi Hot Shower system (that I converted to 12v.), Mighty Kool K2 12v. A\C unit.

I can run one single 100 watt suit case style panel(shown in photo for cooler weather camping) or run the second 100 watt suit case panel parallel "if" I need more charging wattage. I like this set up because of how much 12v equipment I want or need on that particular trip.

When I was building my M416 type trailer build, I've looked into every possible solar system available for a entire 6 months. Price isn't a problem or issue for me, I wanted reliability & clean power for the build I was doing which "I" wanted 100% offgrid camping & a rig I can take deep into bear hunting country that will get me their & give me the power I need for that hunting trip.
Renogy is what I chosen as a solar system. Their customer service is every bit of what I was hoping for as a great experience & their recommendations for what equipment I was going to use along with time frames & how long. Basically I have a fail safe system that is reliable for "me & the wife" that will fill our needs.
Renogy uses German built cells, anything built in Germany IMO or German technology is good & reliable long lasting. German cutlery, optics, crystal, firearms & etc. this goes for solar cells. My charger controller is in the nose box (tongue box) of my trailer. I ordered my charge controller separate from the panels for this reason, to keep my solar system weatherized or water proof.
Everyone has their preference in gear & equipment what they feel is ideal for them & their reasons why. If I can only stress one thing....that would be "don't cut corners on your electrical." Use fuse blocks, size your wiring up correctly, bus bars (positive & negative), size up your cables correctly, solder your connections & shrink wrap them, use a battery shut off switch, invest in a high quality battery (one that will give you 3 digital amp hours) like a VMax Tank. My battery has a 10 to 12 year life span as long as I do not run it down beyond discharged below 20% to 50% of the energy before recharging. A rock solid battery mount to keep your battery solid & the life of your battery & cells in tack from jarring & from vibration. The most important thing is make sure you run a ground to the trailer frame. AGM batteries are great for cold weather use, that is what I use. My system is a basic 12v system that supplies me plenty of power & keeps my battery @ a full charge.


007.JPG 004.JPG 043.JPG
 
Last edited:

1Louder

Rank VI
Launch Member

Member II

4,187
AZ
First Name
Chris
Last Name
K
Member #

1437

Ham/GMRS Callsign
K1LDR
I also have the Renogy suitcase and a controller inside of my trailer. At some point I will put a panel on the roof but portable works well. Since I don't always take my trailer on trips. 100 watts keeps my truck and trailer charged. Your setup sounds so simple you could mount a smaller panel if you wish. Many other threads on this topic so search the net and read through them. Lots of good ideas.

Another benefit of a portable setup is I share mine all the time with other folks who we group camp. It keeps them from wasting gas and running their engines.
 
Last edited:

Road

Not into ranks, titles or points.
Launch Member

Advocate III

3,379
On the road in North America
First Name
Road
Last Name
Dude
Member #

6589

@Caddis @nickburt

Here's what I've learned about hooking up solar panels to vehicles and trailers. I don't pretend to be an expert, but am happy to share what I've learned.

SHORT VERSION:
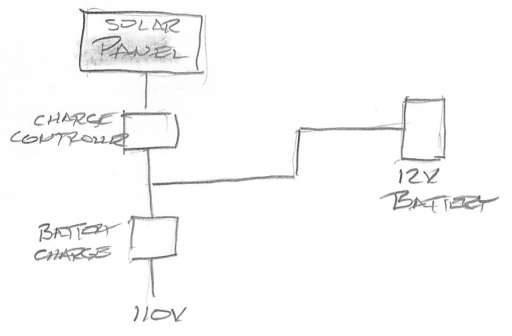
Hooking up a small solar system to your vehicle or trailer is really straightforward. Whether you have folding or mounted panels, they should go through a charge controller and then to your battery bank. From there all power to your led lighting, water pump, inverter, or air compressor, or whatever you want to hook up to power will be done just like wiring things without a solar system: power from battery to a fuse block, then out to the various circuits. Just like your vehicle wiring.

LONG VERSION:
Most folding panels and some mounted panels, like from Renogy, Overland Solar, Zamp or elsewhere will come with an inexpensive charge controller built-in on the back that shows battery status very simply, if at all; usually with LED lights.

If you prefer a charge controller with a digital LCD display, you can easily bypass the built-in controller (or get panels without one) and install your own more sophisticated controller showing voltage, charging current, charging capacity, battery types, when your battery is full, and fault codes. I prefer the digital readouts so I know more exactly what I'm pulling in for amps, what my batteries are storing, and how charged they are. Better charge controllers also have a 5 step system to charge and manage your batteries. All this may sound confusing to some, but using a controller with a digital readout will help you better understand it all.

To show a typical digital readout, here's a short vid of the charge controller I use, taken on a windy day with clouds moving fast across the sun, displaying charging current in amps:


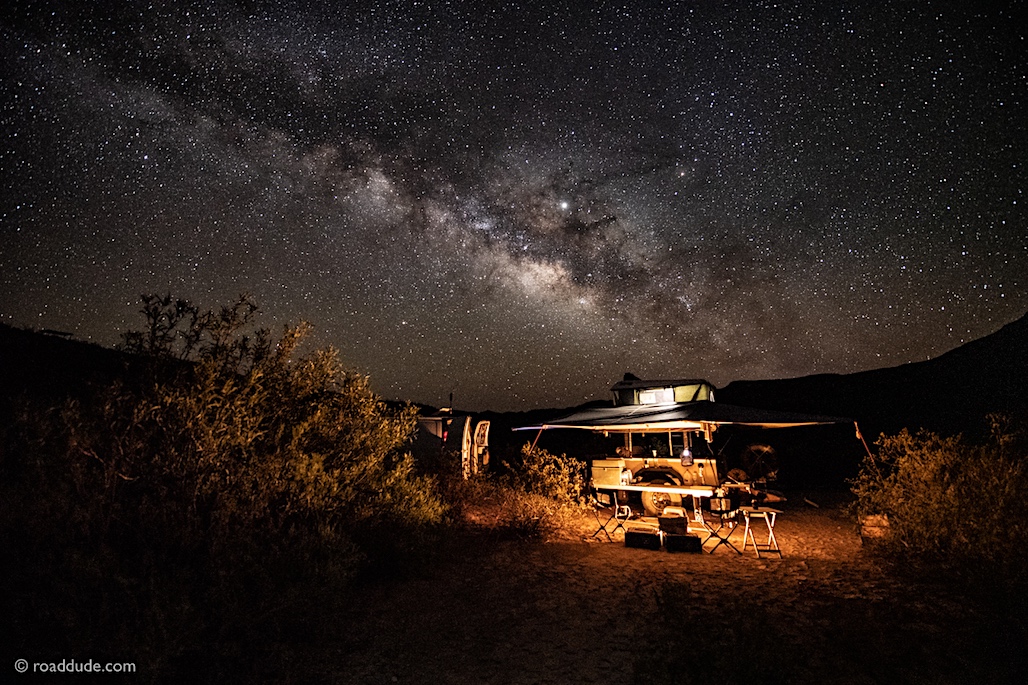
It rarely bounces around so much. It typically reacts much slower to shade or how directly it is pointed at the sun as the earth turns. That can be a big thing, by the way, maximizing the angle of your panels, both horizontally and vertically.

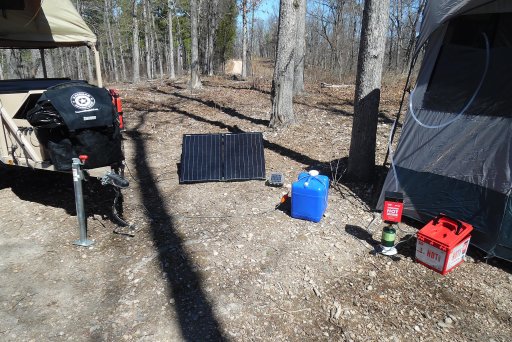
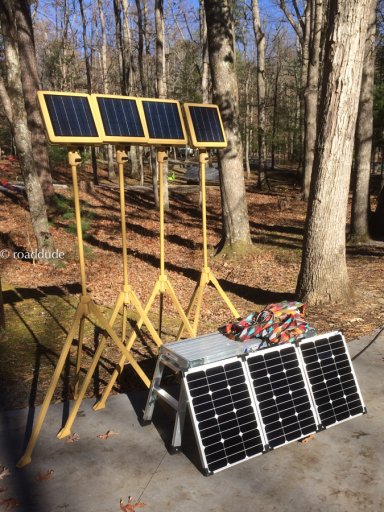
We bypassed the simple built-in controller on my panels in favor of the better one on my trailer. My panels came with a 10 gauge 15' fused cord with a standard SAE plug on the other end hooked up to wiring going to the controller. The controller was bypassed right on the back of the panel with Andersen plugs so the panels now feed directly into the 15' cord. This also makes it possible for me to add an extension between my panel and the fused 15' cord when I want.

I made a 30' extension from 10 gauge wire with an Andersen plug on each end, so now have a 45' radius from the trailer hook up to my panels. This makes it much easier to move my panels around camp to take advantage of openings in the canopy overhead or to aim them more directly at the sun to optimize solar gain.

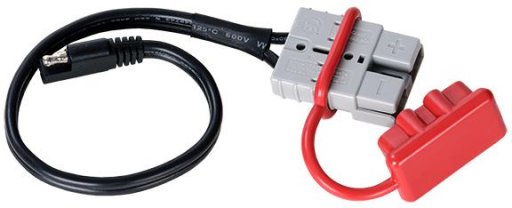
The other end of the cord from the Andersen plug has a standard SAE plug. Here's a shortened version of that (SAE on left, Andersen on right, for those unfamiliar) though you should add a fused link where necessary:

andersen-sae.jpg

The SAE connection plugs into the wires to the charge controller, which in many systems is mounted close to your battery or mounted in a spot where you can monitor things more closely. It's easier if that is in the nose box with your batteries or right inside your vehicle or trailer in an easily seen spot. If you have to keep going all the way out to your panel, then getting down on the ground or contorting around to see the back so you can see your controller readouts, you won't be checking it as often and therefore won't be maximizing solar gain.

For smaller solar systems like folding panels and most vehicle rooftop setups, you really only need a PWM (Pulse Width Modulation) charge controller. For larger systems, an MPPT (Maximum Power Point Tracking) charge controller can tweak more output from the panels. Here's a great explanation of that on the Victron site (look down to point 3): Which Charge Controller: PWM or MPPT?

For my 120w folding panels, I have a Zamp ZS-15AW charge controller mounted in the nose box of my trailer. It is a PWM charge controller and currently runs about $115.00. When I add more, and larger, panels, I'm considering getting an MPPT charge controller, partly for experimentation and comparison. I geek out on experimenting with different set ups for maximum efficiency for both base camping and off-grid living and have learned a lot playing with different systems and equipment.

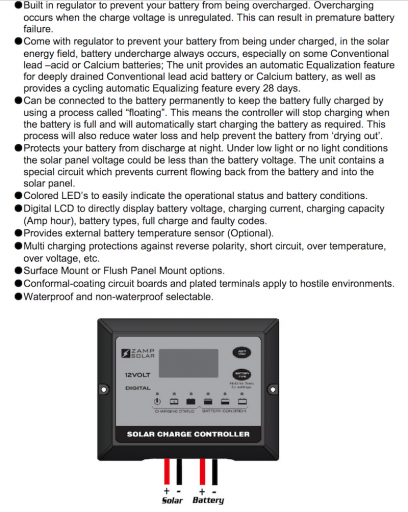
Hooking up the panels to the charge controller is super simple and straightforward with positive and negative leads. Again, with a fused positive. Then you have positive and negative from the charge controller to the battery bank, whether single, dual, or more batteries in the bank. Here's a page from the manual for my Zamp ZS-15AW charge controller:

ZampZS-15AW-manualpage.png

For those who would like to read more, here's the whole manual in .pdf.

Now you have your solar panel(s) hooked up to the battery through a charge controller. Solar is usually hooked up to your house (auxiliary) battery bank, not your cranking battery. Though my panels did come with a simple alligator clip set up that I can hook directly to my cranking battery in case I have a dead or low battery.

From there it's just normal wiring like you would if you didn't have a solar system, with a fuse box like Blue Sea ($20-50 or so, depending on number of circuits) or SPod - which can get crazy expensive depending on which one you want, how many circuits, and if you want to have a touch screen inside your vehicle to control the circuits.

I've seen guys use Siri on their phones, through the SPod bluetooth and an app, to control things like power to their air compressor by voice. Something much more simple like the Blue Sea fuse block above is the way to go for most of us. The one I have shown in the image below is the Blue Sea 6 Circuit with cover.
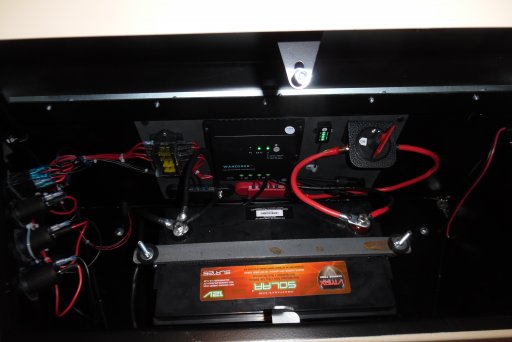
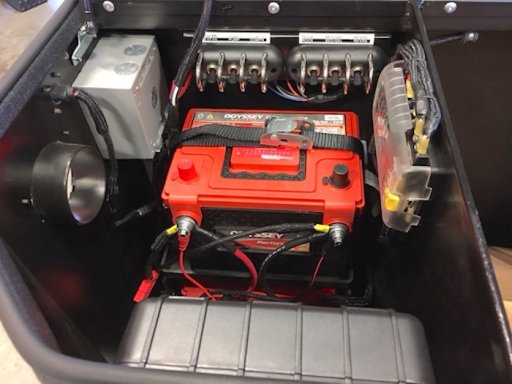
POWER CENTER:

PowerCtr_9429.JPG

From left to right and clockwise in the images shown above and below:

- The black circular tube in the cabinet wall at lower left is an opening w/cover through which I can feed extension cords or anything else I want going into or out of the nose box when the lid is closed.
- The small wiring above that is the exterior SAE connection in the nose box wall of the power center on my trailer. That's where the SAE end of the cord from the panels is hooked up.
- Behind that is the gray junction box that is simply a 110 In/Out and has nothing to do with the solar, but does lead to a NOCO battery tender. More on that if anyone is interested.
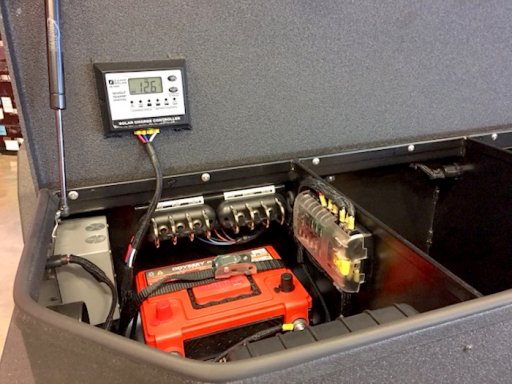
- To the right of the gas strut is the Zamp ZS-15AW charge controller mentioned above, with the wires from the solar panels (via the SAE connection) bundled together with the wires leading to the battery.
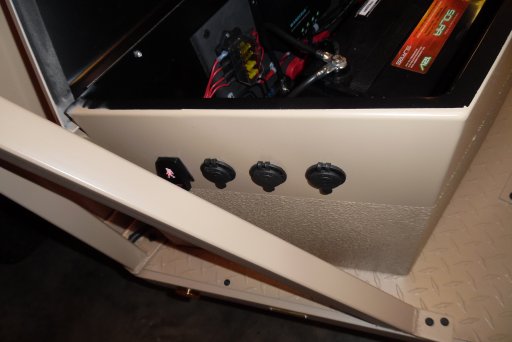
- On the back wall of the power center and under the charge controller are two sets of protected toggle switches that are wired to circuits on the fuse box. The toggle switches light up on the end when that circuit is powered. A very handy feature to show what you have on or not at any time and to minimize drain on your batteries. I have circuits for: rock lights under the trailer, galley lights over my kitchen area, side lights on my platform rack, cargo bay illumination, water pump, and air compressor.
- at far right is the Blue Sea 6 circuit fuse box.
- On the near wall, barely visible, is the NOCO Genius 2, which charges and maintains the batteries when hooked up to 110 shore power.
- In the middle, of course, are the batteries, one on its own shelf above the other.
- Also in that compartment now are a ZAMP 1000 W pure-sine inverter and an ARB CKMA12 air compressor.
- In the next compartment on the far right wall, and inside the tailgate on each side at the rear of the trailer, are protected 12v outlets. Handy for plugging in your fridge, other 12v accessories, or chargers for your mobile devices, etc.

PowerCtr_9941.JPG

A little better view of the wiring and side access hole.

LINKS:
Zamp Solar
Renogy Solar
Overland Solar
Blue Sea
SPod
NOCO
ARB Air Compressors
Victron: PWM or MPPT?
Solar Panels: What are the most efficient panels on the market?

Happy to answer any questions I can about the set up as I have it configured.

Road

 
Last edited:

nickburt

Rank VII
Launch Member

Creator III

5,613
Wallasey, Wirral. UK
First Name
Nick
Last Name
Burt
Member #

2714

All good stuff @Road thank you. I'm about to do two solar builds. One for an ex Army 24v Daf 4x4 overland truck and the other in my own Defender 130.
I've got loads of ideas for panels, MPPT controller, dc-dc charger, inverter, batteries and solar and battery monitors, bypasses and isolators - just need to sit down and make a few decisions :fearscream:
I've sketched up some wiring diagrams, just need to have a tidy up and make a bit more presentable (looking for some free elec cad software!!) and I'll start posting some design ideas.
 
  • Like
Reactions: Road

Road

Not into ranks, titles or points.
Launch Member

Advocate III

3,379
On the road in North America
First Name
Road
Last Name
Dude
Member #

6589

All good stuff @Road thank you. I'm about to do two solar builds. One for an ex Army 24v Daf 4x4 overland truck and the other in my own Defender 130.
I've got loads of ideas for panels, MPPT controller, dc-dc charger, inverter, batteries and solar and battery monitors, bypasses and isolators - just need to sit down and make a few decisions :fearscream:
I've sketched up some wiring diagrams, just need to have a tidy up and make a bit more presentable (looking for some free elec cad software!!) and I'll start posting some design ideas.
You're welcome, @nickburt - and awesome, looking forward to seeing more about what you're up to! Wish you were closer to hand. I've appreciated, and learned from, other posts you've made here on OB forums about batteries and such. Good example, really, of the good this site and forum can do for us all.

One of the things I'll be experimenting with is making a larger folding panel from panels meant to be mounted permanently. Also am working on a design for a simple slide under my trailer's platform rack for multiple panels, from which they can slide out and be adjusted on two axis to optimize solar gain or be removed altogether for placement around camp or off-grid living setup.

Haven't done as much research on the third project, but also want to look back at an off-grid set up I know about in West Texas that automatically tracks the sun throughout the day with an actuator that moves the panels. I have the set up and pieces to make a hinged platform that will move my camera at the same speed the earth turns to avoid star streaks in night photography, and know that could be adapted for a solar panel.

Let me know what you find for electric diagram CAD software; that would be lovely.

.
 

nickburt

Rank VII
Launch Member

Creator III

5,613
Wallasey, Wirral. UK
First Name
Nick
Last Name
Burt
Member #

2714

@Road - looks like we have similar ideas for solar panels, and the ability to learn from each other's ideas, knowledge and experience. Exactly what this forum is all about, as you've said.
I have space under the front of my roof rack that I want to make slide out mounts for the panels, so they can simply be pulled out, supported (at an angle, if needed) over the bonnet and left there to soak up the rays. Alternatively, they can be removed completely, and using extension leads, placed away from the rig, sat at an optimum angle to the sun, while the rig sits, hiding, in the shade. Exactly the same idea as you have to fit panels to the rack on the trailer.
This pic gives an idea of the space under the front of the rack, but I can also raise the rack by getting longer legs for it from Front Runner.


I'm basing the slides idea on the Front Runner under rack table slides, but will probably custom make to suit the solar panel sizes, unless the Front Runner slides happen to fit.
I'm hoping for 2 x 100, 120w or even 150W panels for my Defender 130, if I can find panels of the right dimensions to get two in side by side. Maybe more, or bigger for the 24v Daf, which has a huge, empty, roof space.
Here in the UK and a lot of mainland Northern Europe, long hours of sunshine is a rare thing, so I'm thinking bigger panels to get the best I can out of bright days, even if the sun isn't shining.

I've searched for free cad software and most of what's free is absolute rubbish. Anything that has reasonable symbols and ability to lay out properly is generally relatively expensive for what we need working on motor vehicles auxiliary systems.

@Caddis Hope some of this is giving you ideas and inspiration. In your OP you say you only really need power to run some LED rope lights. Believe me, once you get into building on board power supplies, you'll be looking for more, to run a fridge, battery charging, laptop, cameras etc...etc..., maybe even small tools and other 12v (and maybe even mains, inverter powered) kit. Given the right set up, you can run a whole host of things, and stay on top of maintaining a power supply. One of my base camp set ups is mains powered (240vac here in the UK) compressor fridge and freezer, both 60 litre and both can be left to run for a day or so without the need to run the rig's engine (assuming the sun isn't beating down, but that rarely happens here in the UK). With solar power added, that should extend a good deal.
As said before, it doesn't need to be complicated, just well thought out. The amount of power does depend on what you intend to run, but, for my sins, I'm of the "oversize and over engineer" school. That way, nothing is under undue stress, and you have capacity for future expansion without needing to redesign or rebuild and suffer the additional cost that goes with that. And I will always suggest the same to others.
 

Road

Not into ranks, titles or points.
Launch Member

Advocate III

3,379
On the road in North America
First Name
Road
Last Name
Dude
Member #

6589

@Caddis - yes, please let us know if this info is helpful or if you'd rather we spin it off in another thread. With your awesome fab skills, you may have some valuable input and ideas, and at the least may be able to glean other points for your own system.

I'm in complete agreement with @nickburt in that once you get out there with your trailer and have the capability to generate your own power, you'll be surprised how much you can do on just 12v (in the states, 24v UK).

I recently spent a full five weeks camping in the same spot unattached to any power other than what I could generate on my own with solar, and was able to keep up all with all my charging needs with the system I described above. Though it was augmented by my four solar powered Ready Lights, which each have four magnetic removable light pods. Pic below, though I explain them a bit more in this post.

This was in the woods, too, surrounded by hills, so not a full clear view of sky but a canopy of branches overhead, and later sunrise and earlier sunset because of it being in a cove in the mountains.

Anyway, I was able to provide sufficient power to keep multiple mobile devices charged (pic below), charge all the batteries for my cameras and flashlights and a couple 18v cordless power tool batteries, my power-hungry 17.5AmpHr eBike battery via the inverter, power my water pump and some LED circuits and, importantly, a great 12v portable power bank that I used on the fly to charge devices and power lights on my bike at night. I also used my four solar-powered Ready Lights though, too (as described above, seen in the image below), which were a huge boon to providing light in camp, so did not use the trailer's LED lights much.

chargingstation-smokies.png


roaddude_solar-3675.jpg

I ran my ARB 50 litre fridge/freezer mostly from my cranking battery in the van, as that's where I kept it. I plugged it in when going to town or out exploring the mountains, and would leave it plugged in 'til the temp got down around freezing, then leave it unplugged overnight and most of the next day. These fridge/freezers are so well engineered and insulated, and the daytime temps where I was reached only into the 50's or so Fahrenheit, that it kept everything nice and cold.

@nickburt - Yes, we have very similar ideas on panels going under the rack. I already have one of the Front Runner table slides meant to go under a rack, though gave the table to friends at Overland Expo East. It's sort of what started my thinking process on sliding panels under. I don't need my panels to charge the trailer or house batteries while driving, as I pointed out in this post (along with a bunch of other solar power info on folding vs flat-mounted panels) so don't need them harvesting power while I drive. They can rest and be happy sleeping under the rack on the trailer.

I think using solar anywhere, you'd want to have maximum gain with the best and most optimized panel, but it's even more important when you have shorter daylight hours up north like we have in Maine, or more overcast days such as you have in the UK. A friend of mine, a humor columnist, once said to me "My two favorite places in the world are Cincinnati and London, but London has too much fog."

Currently, as stated at the link I provided earlier to "Solar Panels: What are the most efficient panels on the market?" (scroll down to the two 'Exhibit' graphics), the most efficient photovoltaic cells are made by Sunpower; their Maxeon cells. Which, as far as I know, are only provided by Overland Solar in smaller panels like we use in camping and mobile applications.

It's one thing that justifies the slightly higher price for their straight mounted panels. As of this writing they are $229ea for 100w panels that are 41.5 X 22 inches. Haven't had great luck with Overland Solar's customer service to date, in following through with stuff they promised me at Overland Expo last fall, but I should give them a chance to respond to another email.

Two 100w panels at that size, that are more efficient that other panels, will be all I need, I believe, to do what I need with a larger battery bank in my van. Then I'll have a total of 320watts of Maxeon cells and two battery banks (one in the trailer and one in the van) to use with either panel set or both. Then I can leave base camp or an off-grid living situation set up and generating its own power while taking the other set with me on the road for the day, or week, or month.

That's enough for now . . .I could go on. As I wrote, I totally geek out on energy and off-grid self-sufficiency ideas.

I'll work up a sketch of sorts of my solar tray ideas for how I'd like it to work. Haven't seen anything out there yet quite like it, but there may be.

laterz. . . .

Road

edit: p.s. - I meant to mention how cool your Defender 130 is. I'm envious.

.
 
Last edited:

Caddis

Rank V
Launch Member

Member III

2,741
Kingsburg, CA
First Name
Todd
Last Name
Regier
Member #

4827

So far, this is very helpful. There are so many options out there. I really appreciate all your guys knowledge in the field of solar.
 
  • Like
Reactions: Road

nickburt

Rank VII
Launch Member

Creator III

5,613
Wallasey, Wirral. UK
First Name
Nick
Last Name
Burt
Member #

2714

What was that about getting carried away. Yup, know the feeling. Just need to make the time for the solar build now ........
 
  • Like
Reactions: Road

Steve

lost again...
Founder 500
Launch Member

Traveler III

4,312
Lorain County, OH, USA
First Name
Steve
Last Name
None
Member #

202

- On the near wall, barely visible, is the NOCO Genius 2, which charges and maintains the batteries when hooked up to 110 shore power.
@Road Do you connect your NOCO Genius *and* your solar charge controller to the battery at the same time? I'm looking at doing something like this, where the charge controller and Genius 1 are in the trailer's front box, and the battery and any distribution are at the rear.

Screen Shot 2018-04-16 at 7.15.41 PM.png
Please excuse the horrible hand lettering. Believe it or not, I was paid to print on drawings for many years, and now I sometimes cannot read my own writing...

Functionally, this is the same as connecting both directly to the battery. But I wondered if you have problems when using the Genius on a sunny day, whether the two chargers confuse each other.

If so, I could add an A-B switch at the junction, but that would leave the output of the solar charge controller unconnected to anything, and I don't think you are supposed to do that. Main components are:

Renogy 100W panel
Renogy 30A Wanderer PWM Charge Controller
NOCO Genius 1 10A shore power charger
Odyssey Group 31M-800 AGM battery.

Thanks for any input by any of our electrically inclined members.

[EDIT] Wanderer, not Traveller
 
Last edited:

Road

Not into ranks, titles or points.
Launch Member

Advocate III

3,379
On the road in North America
First Name
Road
Last Name
Dude
Member #

6589

@Road Do you connect your NOCO Genius *and* your solar charge controller to the battery at the same time? I'm looking at doing something like this, where the charge controller and Genius 1 are in the trailer's front box, and the battery and any distribution are at the rear.

View attachment 54021
Please excuse the horrible hand lettering. Believe it or not, I was paid to print on drawings for many years, and now I sometimes cannot read my own writing...

Functionally, this is the same as connecting both directly to the battery. But I wondered if you have problems when using the Genius on a sunny day, whether the two chargers confuse each other.

If so, I could add an A-B switch at the junction, but that would leave the output of the solar charge controller unconnected to anything, and I don't think you are supposed to do that. Main components are:

Renogy 100W panel
Renogy 30A Traveller PWM Charge Controller
NOCO Genius 1 10A shore power charger
Odyssey Group 31M-800 AGM battery.

Thanks for any input by any of our electrically inclined members.
Steve - I have the NOCO GENM2 Genius 8A and a Zamp 15A Solar Charge Controller, wired separately to the batteries. I don't think you want the NOCO wired directly to the Solar Charge Controller before going to the battery. . . that could potentially feed 110 to it. There's no need to, and probably bad to, actually.

The NOCO, of course, controls the 110 input to the batteries and the Solar Controller does the same for the solar input, but separately to the batteries. Not sure it would back feed through the battery from one to the other.

I never have them both hooked to power coming in at the same time, but suspect, depending on how your Renogy 30A controller works, between it and the NOCO it would sense the power and not compete with each other. I'm sure a lot of people with both stationary panels and 110 input, like many RV's and some off-road trailers, have both hooked up to power at the same time (such as overnight, then both are still hooked up in the morning), so it must be possible, but I'll bet they are wired to the battery separately.

But hook them both to the same wire before going back to the battery? I wouldn't, but others here with more experience may have more wisdom.

Not a very definitive answer, I know, but based on how my system is wired and what my experience is.

Here's an article about what happens when both are active:
https://roadslesstraveled.us/charging-rv-marine-batteries-solar-power-shore-power/

.
 
Last edited:

Steve

lost again...
Founder 500
Launch Member

Traveler III

4,312
Lorain County, OH, USA
First Name
Steve
Last Name
None
Member #

202

I don't think you want the NOCO wired directly to the Solar Charge Controller before going to the battery. . . that could potentially feed 110 to it.
I don't think this would be the case. The output of the NOCO is 12V DC, only the input is 110V AC.

I *think* having the output of the charge controller and the output of the Genius 1 connected at the far end of an 8 foot wire is the same as if they were both connected directly to the battery terminals. Unless the battery does some buffering between them in the latter case.

I'll read through the linked article in the morning. It has been 48 years since I last took an electronics class, so I may be a bit rusty.

Thanks!
 

Road

Not into ranks, titles or points.
Launch Member

Advocate III

3,379
On the road in North America
First Name
Road
Last Name
Dude
Member #

6589

I don't think this would be the case. The output of the NOCO is 12V DC, only the input is 110V AC.

I *think* having the output of the charge controller and the output of the Genius 1 connected at the far end of an 8 foot wire is the same as if they were both connected directly to the battery terminals. Unless the battery does some buffering between them in the latter case.

I'll read through the linked article in the morning. It has been 48 years since I last took an electronics class, so I may be a bit rusty.

Thanks!
Oh, of course it would be 12v coming out of the NOCO.

Thinking this through though, I still think it's likely better to have their controlled/converted charges sent separately to the battery. As you'll see in the article, the two devices sense the battery's state, then send what's needed, whether bulk, absorb, or float and the two devices may not apply their reading in the same way.

Having both devices hooked to active power at the same time, and wired together before sending it to the battery, may allow one to sense the power coming from the other before reading the battery's condition.

If your panel is mounted permanently and hooked to the solar charge controller all the time, and your tow vehicle is set to charge the trailer battery as well while driving, through the wiring harness at the hitch, you have the same situation, but wired separately to the battery.

I would think you want the controllers to see the battery before each other. Like two kids standing in line; get 'em too close and they'll keep stepping on each other's toes trying to be first. I could be completely misunderstanding the way it all works, though. Like I wrote at the top of my post above, I don't pretend to be an expert.

Might be that power separated all the way to the battery will step on each other's toes just as much once there as if it had been together the whole way.

The article doesn't say anything about wiring together or separately, but does help make sense of how the solar charge controller and 110 converter apply power to the battery. One interesting point it makes is that your solar charge controller may get stuck in float stage when it really should be applying more power.

Here's another article, from AM Solar in Oregon, who specializes in RV and camping applications. Frequent Questions: Charge Controllers - which doesn't answer the question either, but may help a bit in saying no switching is necessary.

I always get some good info, and a bit of a kick, out of this guy, too: Handy Bob's Solar: The RV Charging Puzzle - about a third of the way down is some interesting info on converters, inverter/chargers, and solar power.

Might be that a quick call to Renogy, who others have said is usually good about advice on the phone, will give you a much more definitive answer about wiring together or separately.

I'll be interested to see what you figure out and if it makes a difference. This is the sort of thing I enjoy setting up to figure out while doing extended base camp somewhere. Run separate lines then try one combined line and see if I can figure out what difference it makes.

Sorry I couldn't be of more help. I guess I need to stay in more Holiday Inn Expresses!
 
Last edited:

Steve

lost again...
Founder 500
Launch Member

Traveler III

4,312
Lorain County, OH, USA
First Name
Steve
Last Name
None
Member #

202

Sorry I couldn't be of more help.
Quite the contrary! You have been very helpful, and the linked articles were chock full of great information. I'd found Handy Bob's site last year, but apparently didn't bookmark it, and completely forgot about it. There is a lot of good information on that site!

I sent an email to NOCO last week asking about charging from two sources, but haven't heard back from them yet. I did find that Renogy has a user forum, and the consensus is to not bother writing to Renogy with questions, as they rarely respond. Probably overwhelmed with all the interest in solar and mass sales through Amazon.

Bottom line is that I can use multiple charging sources as long as each has its own charge controller/diode of some sort. It sounds like running the two sources through the same cable as I've illustrated is not a good idea.

I'll either put the NOCO charger in back with the battery, or put everything up front in the tongue box. I wanted to balance weights a bit, and also keep dirty stuff in the tongue box (chocks, extension cords, etc.)

I will not be using the truck's 7-pin connector to charge the trailer's battery. I'm keeping them completely separated. I do plan to run a power cable from the trailer battery directly to the fridge/freezer in the truck when parked for an extended time, so that I'm using the trailer's Odyssey battery rather than the truck's starting battery.

Thank you again for steering me in the right direction!
 
  • Like
Reactions: Road