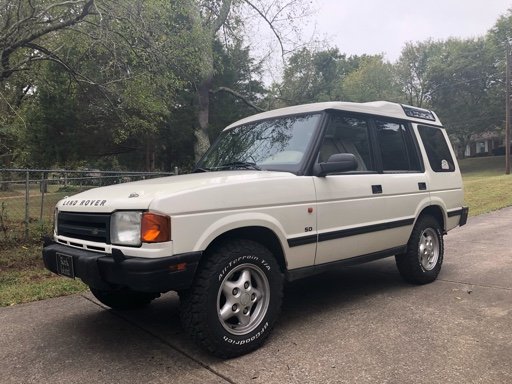
Refurbishing a cheap Disco 1

  • HTML tutorial

systemdelete

Rank V
Launch Member

Pathfinder I

1,798
Nashville, TN
First Name
Erik
Last Name
Rumbaugh
Member #

13761

Thank you for sharing your knowledge on this subject. I have removed many broken bolts where a drill and easy out could be used. This method of welding a nut on to a broken stud is new to me and very informative.. Still doing it from above or below the vehicles engine had to be a tough nut to crack. What would some of us do without the kind of knowledge you possess and willing to share it.
IMG_1148.JPG

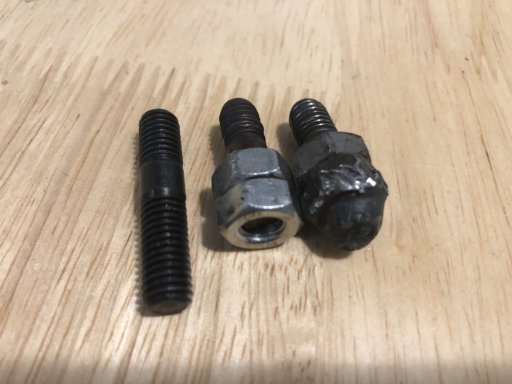
I took a picture for you, so as the sat they were flush with the “y” pipe flange. I removed the “y” pipe from under the vehicle to get access to the broken studs. This left me with short threaded stubs of studs. On those I filed the threads so bolts would go back on then locked one bolt against another. 2 of 3 came out with this method with a little coaxing and some penetrating oil. The third is on the far right, after having the spinning nuts welded to it. Grabbed it with vise grips just as it cooled from cherry red and began working back and forth while hitting the joint with the oil. As it eased up to turn, I spun it right on out. Took about 30 min from that point to reassemble the exhaust with new studs and lock bolts.


I’d love to act like these are all my great ideas/tools/products but I’ve been fortunate enough to have most of them shared with me at some point.
 

Lanlubber In Remembrance

Rank V
Launch Member

Member III

2,827
Mimbres, NM, USA
First Name
Jim
Last Name
covey sr
Member #

16986

Ham/GMRS Callsign
none - BREAKER BREAKER HAND HELD CB AND WALKIE TALKIE
View attachment 120974

I took a picture for you, so as the sat they were flush with the “y” pipe flange. I removed the “y” pipe from under the vehicle to get access to the broken studs. This left me with short threaded stubs of studs. On those I filed the threads so bolts would go back on then locked one bolt against another. 2 of 3 came out with this method with a little coaxing and some penetrating oil. The third is on the far right, after having the spinning nuts welded to it. Grabbed it with vise grips just as it cooled from cherry red and began working back and forth while hitting the joint with the oil. As it eased up to turn, I spun it right on out. Took about 30 min from that point to reassemble the exhaust with new studs and lock bolts.


I’d love to act like these are all my great ideas/tools/products but I’ve been fortunate enough to have most of them shared with me at some point.
I'm glad I don't have this problem but if it can happen to you it can happen to me or anyone else. I'm just glad the subject came up here for all of us to see. I'm still amazed at how you
Were able to reach it with a welder and see what you were doing since you had to be wearing a hood. Great fix, thanks for showing us.
 

systemdelete

Rank V
Launch Member

Pathfinder I

1,798
Nashville, TN
First Name
Erik
Last Name
Rumbaugh
Member #

13761

Well not much happening today other than a quick oil service.

While watching the rain I did update my spreadsheet on ownership costs to date(excluding fuel) I’m at $2576 in the original vehicle purchase, parts, fluids, and accessories. Not bad as it’s nearly ready to take over full time daily duties.
 

Enthusiast III

1,212
Nova Scotia
First Name
Marty
Last Name
Upham
I am considering picking up a 1997 Range Rover as a project but have been worried about how long it has been sitting. I know the owner and he took good care of the truck. It has not been on the road for about 10 years. If I do consider this rig I will have to make sure the engine or any major mechanical parts have not completely seized.
Should I pass on this truck?
Or is it worth looking into.
Has OME suspension that was installed about a year before he parked it. It doesn’t have hardly any rust but the paint is in poor condition.
I am able to handle just about any repairs except engine or transmission rebuild.
 

Lanlubber In Remembrance

Rank V
Launch Member

Member III

2,827
Mimbres, NM, USA
First Name
Jim
Last Name
covey sr
Member #

16986

Ham/GMRS Callsign
none - BREAKER BREAKER HAND HELD CB AND WALKIE TALKIE
I am considering picking up a 1997 Range Rover as a project but have been worried about how long it has been sitting. I know the owner and he took good care of the truck. It has not been on the road for about 10 years. If I do consider this rig I will have to make sure the engine or any major mechanical parts have not completely seized.
Should I pass on this truck?
Or is it worth looking into.
Has OME suspension that was installed about a year before he parked it. It doesn’t have hardly any rust but the paint is in poor condition.
I am able to handle just about any repairs except engine or transmission rebuild.
If it was properly stored, 20 years wouldn't hurt it that much. Was it up on blocks with deflated tires for that 10 year period. Had he drained the radiator and engine block of fluids. Was it stored indoors or out. How hot is the sun up there in Nova Scotia.
 

Enthusiast III

1,212
Nova Scotia
First Name
Marty
Last Name
Upham
It was just parked on gravel. Not on blocks and no fluids drained. It was supposed to only be sitting for a few months but I guess his plans changed. We don’t get too many hot days in our summers low 30c some days but mostly mid 20’s.
 
  • Like
Reactions: systemdelete

Lanlubber In Remembrance

Rank V
Launch Member

Member III

2,827
Mimbres, NM, USA
First Name
Jim
Last Name
covey sr
Member #

16986

Ham/GMRS Callsign
none - BREAKER BREAKER HAND HELD CB AND WALKIE TALKIE
It was just parked on gravel. Not on blocks and no fluids drained. It was supposed to only be sitting for a few months but I guess his plans changed. We don’t get too many hot days in our summers low 30c some days but mostly mid 20’s.
If the price is right anything can be a good buy. I cant believe he never bothered to drain the engine and radiator. If anything is ttuck it will be the water pump and thats an easy replacement. Engine and radiator probably needs a god hot chemical flush depending on how good the anti-freeze was in the engine.
 
  • Like
Reactions: systemdelete

systemdelete

Rank V
Launch Member

Pathfinder I

1,798
Nashville, TN
First Name
Erik
Last Name
Rumbaugh
Member #

13761

I may have to spend some time and see if I can turn over the engine by hand first. If that works I may try flushing out the fluids and see if it will run.
I should be able to buy it for very low price. I will post up some info and pictures if I decide to take on this project.
Thanks
I just take a good hard look at them and see if the frame and body are solid. Otherwise I’ll never hear the end of it from my body guy. lol

I’ve helped pull back MUCH older vehicles, that had sat for MUCH longer. Mechanical parts for these aren’t really hard to get your hands on, its way easier to call AB or Bearmach, or Ashcroft and have what you need in a few days typically.

14806673519_0a7fdf23d9_o.JPG
 
  • Like
Reactions: EXPO_D1

Lanlubber In Remembrance

Rank V
Launch Member

Member III

2,827
Mimbres, NM, USA
First Name
Jim
Last Name
covey sr
Member #

16986

Ham/GMRS Callsign
none - BREAKER BREAKER HAND HELD CB AND WALKIE TALKIE
I may have to spend some time and see if I can turn over the engine by hand first. If that works I may try flushing out the fluids and see if it will run.
I should be able to buy it for very low price. I will post up some info and pictures if I decide to take on this project.
Thanks
You could have found a diamond in the rough if it's cheap. I agree with @syetemdelete , If the body and frame are in good shape the mechanical is easy.
Those 90 model rabge rovers are tough trucks, I know in the lower 48 they are in big demand.
 

systemdelete

Rank V
Launch Member

Pathfinder I

1,798
Nashville, TN
First Name
Erik
Last Name
Rumbaugh
Member #

13761

This morning I walked out and decided I didn’t like the huge plastic air dam, so I removed it, and trimmed the side trim pieces to match. Mounted my front decorative plate to fill the existing holes in the plastic. Looks surprisingly more aggressive for as little work as it was.

IMG_1155.JPG


Also did my 4th drain and fill on the cooling system with distilled water. I believe it is nearly ready for a fresh coolant fill.
 

EXPO_D1

Rank V
Launch Member

Member II

1,963
Bakersfield, CA, USA
First Name
James
Last Name
Coyle
Member #

17468

This morning I walked out and decided I didn’t like the huge plastic air dam, so I removed it, and trimmed the side trim pieces to match. Mounted my front decorative plate to fill the existing holes in the plastic. Looks surprisingly more aggressive for as little work as it was.

View attachment 121245


Also did my 4th drain and fill on the cooling system with distilled water. I believe it is nearly ready for a fresh coolant fill.
This reminds me of my rig when u first got it! Keep up the good work and enjoy it. They arnt supposed to be driveway models[emoji16][emoji16]
 

Lanlubber In Remembrance

Rank V
Launch Member

Member III

2,827
Mimbres, NM, USA
First Name
Jim
Last Name
covey sr
Member #

16986

Ham/GMRS Callsign
none - BREAKER BREAKER HAND HELD CB AND WALKIE TALKIE
This morning I walked out and decided I didn’t like the huge plastic air dam, so I removed it, and trimmed the side trim pieces to match. Mounted my front decorative plate to fill the existing holes in the plastic. Looks surprisingly more aggressive for as little work as it was.

View attachment 121245


Also did my 4th drain and fill on the cooling system with distilled water. I believe it is nearly ready for a fresh coolant fill.
I haven't put my new tires on yet because what you did to your valence is what I need to do to get tire clearance on my LRD2. I think it looks a lot better (your rig) and will do for me until my new bumper is made.
 

Lanlubber In Remembrance

Rank V
Launch Member

Member III

2,827
Mimbres, NM, USA
First Name
Jim
Last Name
covey sr
Member #

16986

Ham/GMRS Callsign
none - BREAKER BREAKER HAND HELD CB AND WALKIE TALKIE
This morning I walked out and decided I didn’t like the huge plastic air dam, so I removed it, and trimmed the side trim pieces to match. Mounted my front decorative plate to fill the existing holes in the plastic. Looks surprisingly more aggressive for as little work as it was.

View attachment 121245


Also did my 4th drain and fill on the cooling system with distilled water. I believe it is nearly ready for a fresh coolant fill.
Did you use a Drimmel tool or a metal cutting disk on a grinder to cut it off.
 

EXPO_D1

Rank V
Launch Member

Member II

1,963
Bakersfield, CA, USA
First Name
James
Last Name
Coyle
Member #

17468

The next thing I would check in to/research is what is known as camel cut your rear arches for tire clearance. I believe it's only necessary for larger tires. I'm not certain on what size tire your running but it's worth checking out. I've watched people destroy the rear arch because they simply didn't know about trimming them. This may not apply right now but it's good info for the future if it doesn't apply now
 

systemdelete

Rank V
Launch Member

Pathfinder I

1,798
Nashville, TN
First Name
Erik
Last Name
Rumbaugh
Member #

13761

The next thing I would check in to/research is what is known as camel cut your rear arches for tire clearance. I believe it's only necessary for larger tires. I'm not certain on what size tire your running but it's worth checking out. I've watched people destroy the rear arch because they simply didn't know about trimming them. This may not apply right now but it's good info for the future if it doesn't apply now
I’m running 225/75r16 so not too extreme by modern standards. I doubt I’ll be flexing it much in the first few months either. Right now the entire focus is getting it road trip worthy. Most of its testing will be on tame logging roads and such.