Princess the 97 XJ...

  • HTML tutorial

Greg Galbo

Rank V
Launch Member

Enthusiast III

1,798
York, PA, USA
First Name
Gregory
Last Name
Galbo
Member #

2758

Any noticeable difference In the aftermarket header?


Sent from my iPhone using OB Talk
To be honest not a real noticable difference. Maybe a little bit at 3 grand or so. I just bought that one because the tubes were bent rather than welded together. I figured less weld = less crack haha and its more polished and now has a sick purple tone to it #racejeep
 

Overland-Indiana

Overland Bound - Midwest Regional Ambassador
Launch Member

Influencer II

3,316
Kokomo
Member #

0750

To be honest not a real noticable difference. Maybe a little bit at 3 grand or so. I just bought that one because the tubes were bent rather than welded together. I figured less weld = less crack haha and its more polished and now has a sick purple tone to it #racejeep
Mine has some weird big ball like thing that there is O2 sensors before and after on my header.
 
  • Like
Reactions: Greg Galbo

Greg Galbo

Rank V
Launch Member

Enthusiast III

1,798
York, PA, USA
First Name
Gregory
Last Name
Galbo
Member #

2758

Mine has some weird big ball like thing that there is O2 sensors before and after on my header.
Ya that makes sense. Jeep started using that manifold in 2000. Much tighter fit and a pain. I believe it might be 2 piece though. To solve he cracking problem.


Sent from my iPhone using OB Talk
 

Overland-Indiana

Overland Bound - Midwest Regional Ambassador
Launch Member

Influencer II

3,316
Kokomo
Member #

0750

Ya that makes sense. Jeep started using that manifold in 2000. Much tighter fit and a pain. I believe it might be 2 piece though. To solve he cracking problem.


Sent from my iPhone using OB Talk

Yeah I believe it is 2-piece. I have been thinking about putting a pre-2000 manifold on it and welding bungs in for the O2 sensors to get rid of cats. I plan to eliminate all 3 cats and then put a good exhaust system in.
Luckily Indiana doesn't have inspections or smog tests to deal with.
 

Greg Galbo

Rank V
Launch Member

Enthusiast III

1,798
York, PA, USA
First Name
Gregory
Last Name
Galbo
Member #

2758

Yeah I believe it is 2-piece. I have been thinking about putting a pre-2000 manifold on it and welding bungs in for the O2 sensors to get rid of cats. I plan to eliminate all 3 cats and then put a good exhaust system in.
Luckily Indiana doesn't have inspections or smog tests to deal with.
Ya I don't blame you on that decision I would probably do the same thing! It would be tough to not have a check engine light on all the time after that though.
 

Overland-Indiana

Overland Bound - Midwest Regional Ambassador
Launch Member

Influencer II

3,316
Kokomo
Member #

0750

Ya I don't blame you on that decision I would probably do the same thing! It would be tough to not have a check engine light on all the time after that though.
Supposedly when you put the O2 sensors in with the threaded bung it doesn't or at least isn't supposed to throw engine codes
 

Greg Galbo

Rank V
Launch Member

Enthusiast III

1,798
York, PA, USA
First Name
Gregory
Last Name
Galbo
Member #

2758

Supposedly when you put the O2 sensors in with the threaded bung it doesn't or at least isn't supposed to throw engine codes
Huh. That's interesting! You'll have to let me know how that goes! That would be awesome if it did. Also, I can't wait to see your high pinion swap! What brand are the seals at the end of the axle tubes?


Sent from my iPhone using OB Talk
 

Greg Galbo

Rank V
Launch Member

Enthusiast III

1,798
York, PA, USA
First Name
Gregory
Last Name
Galbo
Member #

2758

After my newest addition to my interior I decided now was a great time to give you guys a look at the interior of my XJ and what adjustments I have made over the years! I will include as many part numbers I can as well.

Starting with communication I went with a Uniden Pro Series CB radio pt#PRO520XL It is nice and compact and has all 40 channels as well has a PA speaker hookup.

Next for a radio I went with a Sony that has CD, USB and AUX.

For additional lighting for road use I replaced the factory 2 switch panel with a 3 switch panel from the junkyard so I can my LED fog lights under the bumper wired to it rather than the overhead switches.

My newest addition is a paracord wrap on my steering wheel. I chose to do this because my 20 year old leather wrapped steering wheel was turning my hands black and falling apart every time I drove it and I had finally had enough! I chose 100 ft. of black 550 paracord.

The cherokee comes with a pretty complete set of gauges especially for a 1997 but being that I have an automatic transmission I felt the need to monitor the temperature of during trips. I decided to do an A pillar mount so it is easily visible. I will do a full write up on the installation of the gauge. pt. #8349 by Auto Meter

And of course the good ol' cell phone holder which I'm pretty sure is a must to be considered an "overlander"
19149406_1543980125674083_274780867212242807_n.jpg

As for the back seat I love keeping it clean while I'm not on a trip!

19225235_1543980115674084_7701286710595665083_n.jpg

For the trunk I started by added a mag light mount for use on the campsite. I then decided to put all of my safety items in one place for ease of access so I mounted my complete first aid kit and fire extinguisher in the rear as well.

Finally, I mounted and wired a rear 12V AUX outlet.

I will be very excited to get a tire swing rear bumper to get my spare out of the trunk for additional room!

19114054_1543980109007418_5024235895054106964_n.jpg

Lastly, I added a overhead console from a 1998 Cherokee. This required some customization to the 1998 overhead console wiring harness to the fuse box and a sensor to be added under the front bumper. I then added 8 rocker switches to it to control my accessories. And finally I re covered my entire headliner in plaid! Also, I have 1 patch as of now from my favorite state on my last trip Vermont!

19260789_1543980119007417_8569684405281569721_n.jpg
 
Last edited:

Jason Galbo

Rank IV
Launch Member

Advocate I

1,402
West Chester, Pa
Member #

2759

Next up on the list of upgrades was finishing and installing my aux fuse/relay box I have been working on for ages! It is a factory fuse box pulled from a junkyard that has been gutted and rewired to have 12 fuses and relays pre-wired. at the moment they are pre-wired into the cab via a internet CAT-5 cable and a separate thicker gauge power and ground wire. With this system all I need to do when I add an accessory is run a power wire to my quick connect on the side of the fuse box and ground the accessory anywhere I like! At the moment i have two lights ran to the fuse box and the function great! Please don't hesitate to ask questions about this system!View attachment 25256
Your also welcome! ;) but seriously I'm glad that after all the time I put into rewiring that little box it didn't go to waste! I'm glad it's working well for you!
 
  • Like
Reactions: Greg Galbo

Greg Galbo

Rank V
Launch Member

Enthusiast III

1,798
York, PA, USA
First Name
Gregory
Last Name
Galbo
Member #

2758

As promised here is a full write up on the trans temp gauge.
Starting with the parts you need:

Gauge - pt#8349 This is actually a GM factory specific gauge that happens to match the 97-01 Cherokee cluster perfect. It has almost identical font and is green colored backlit and has an orange needle. If wired correctly it will dim with the factory gauges as well as mine does.

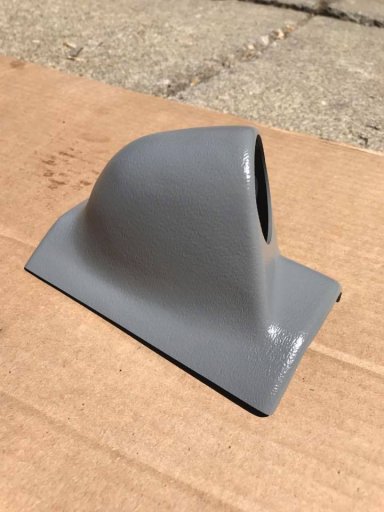
A-Pillar mount - pt#15211 This is for the single gauge pod Cherokee specific.

(For 97 or older) Adapter for the sending unit - pt#2267 This is a 1/8" NPT to M14x1.5 adapter.

And obviously wire and connectors. (I chose 14 gauge)

18486419_1507161189355977_2052702665326778763_n.jpg

18485684_1507161102689319_8164908022721696747_n.jpg

The A-Pillar mount comes black but I painted it with the closest matching paint to give it a more factory look. I used a satin light grey.

18882315_1524196600985769_1301438861618433078_n.jpg

As for the wiring.... the gauge has 5 terminals that need wired.
1.Ground to power the gauge
2. Ground for the light (I jumped mine together as you can see above)
3. Power for the light. I tapped into the 3 switch panel in my center console for this. You need to find a DIMMER wire if you want the Auto Meter gauge to dim with the factory interior.
4.Power wire for the gauge. I went to an ignition hot source in the inner fuse panel for this.
5. Sending unit wire coming from the sensor in the transmission.

19260274_1549681485103947_2672992098650061271_n.jpg

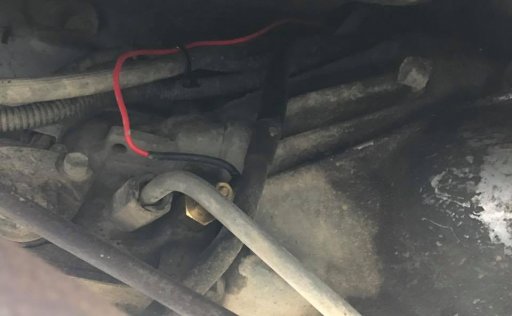
Here is a picture of where I installed my sensor. I want to stress that only a 97 OR OLDER Cherokee can do this. On the 99-01 AW4 Transmissions this plug is actually casted over. In that case you will have to cut into your hot line and add a sensor there. Which means you will not need the py#2267 adaptor like I did.

I chose to remove the plug in hopes of a more accurate PAN temperature of the trans. Like an average between the hot and cold line if you will. (It is a T-55 bit.) It was a very simple process and allowed me to avoid cutting into my trans lines (Which I already had anyways for the cooler lol). This is what you need the adaptor for.

18767745_1524203910985038_7999545151799495938_n.jpg

The finished product! Feel free to ask questions!
 

Attachments

Last edited:

Greg Galbo

Rank V
Launch Member

Enthusiast III

1,798
York, PA, USA
First Name
Gregory
Last Name
Galbo
Member #

2758

Well I haven't posted in a while so I figured I was due for an update! I finally received my OB patches and got them on as well as sanded and painted the entire rear axle!

20108338_1582399145165514_6747125878835448656_n.jpg

20139830_1582399101832185_4303082284034984482_n.jpg
 
  • Like
Reactions: Overland-Indiana

Greg Galbo

Rank V
Launch Member

Enthusiast III

1,798
York, PA, USA
First Name
Gregory
Last Name
Galbo
Member #

2758

Well there is a lot going on in my life right now so therefor not a lot going on with the Jeep! It has been perfectly reliable since the trip including a 3 day weekend at the Bantam Heritage Jeep Festival! My question is, if anybody takes the time to read this, what do you look for in a quality build thread? Is it better descriptions? More photos? Just a clean build? If you read this please let me know what you look for! Here is the Jeep in White Mountain National Forest on the Kancamagus Highway in New Hampshire!

20294476_1594324147306347_3550052440142022916_n.jpg
 
  • Like
Reactions: NightCrawler

Greg Galbo

Rank V
Launch Member

Enthusiast III

1,798
York, PA, USA
First Name
Gregory
Last Name
Galbo
Member #

2758

Since I have just recently started my senior year back at college progress has been slow. The only recent "upgrade" I have done is replaced the front shocks with ones from a JKU Rubicon for a better ride on bumpy, gravel roads. The difference is great and since they were free I would say the upgrade was completely worth it! One day I'll get a real lift haha

21192740_1634437126628382_3949009434555700953_n.jpg
 
  • Like
Reactions: Jimmy P

Overland-Indiana

Overland Bound - Midwest Regional Ambassador
Launch Member

Influencer II

3,316
Kokomo
Member #

0750

Since I have just recently started my senior year back at college progress has been slow. The only recent "upgrade" I have done is replaced the front shocks with ones from a JKU Rubicon for a better ride on bumpy, gravel roads. The difference is great and since they were free I would say the upgrade was completely worth it! One day I'll get a real lift haha

View attachment 33386

I have been considering this myself.. I have a 3in lift on my XJ but the generic white cheap shocks beat me to death. Is it a noticeable difference and they just bolt right in right??
 

Greg Galbo

Rank V
Launch Member

Enthusiast III

1,798
York, PA, USA
First Name
Gregory
Last Name
Galbo
Member #

2758

I have been considering this myself.. I have a 3in lift on my XJ but the generic white cheap shocks beat me to death. Is it a noticeable difference and they just bolt right in right??
I would say overall they are better. It is a noticeably improved ride on rougher surfaces such as gravel or dirt roads. However, I have noticed a bit more body roll on the road so that is something to keep in mind. And they are bolt on other than the fact that JK's do not use bar pins so I had to press out the metal sleeve from the JK shocks and press in my old bar pins from my original shocks (total pain) but that is all you need to do. Hope that helps!
 

bambamthexj

Rank 0

Traveler I

Just stumbled onto your build and I have to say Im loving it. Im also a 22 year old college student and trying to build a 99 XJ (daily driver too) on a budget, by the looks of it maybe even tighter than yours lol. But the thread is great and Im getting tons of ideas for my build and future thread/youtube channel
 
  • Like
Reactions: NightCrawler