Next phase: Expedition Trailer

  • HTML tutorial

VCeXpedition

Rank V
Launch Member

Off-Road Ranger I

2,932
Torrance, L.A., Cal., Earth
First Name
Dan
Last Name
Rich
Member #

0582

Ham/GMRS Callsign
K6DHR
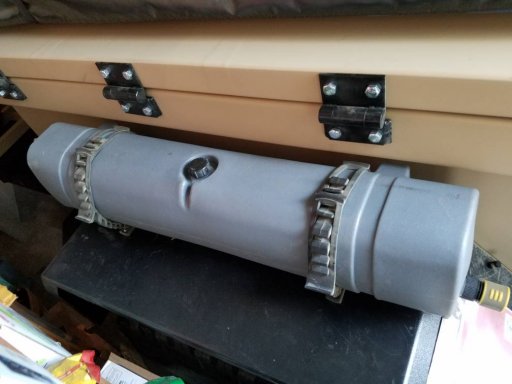
A couple other mods I've done, not too big but useful.

Mounted my Waterport on the driver side fender.
20171003_174118.jpg


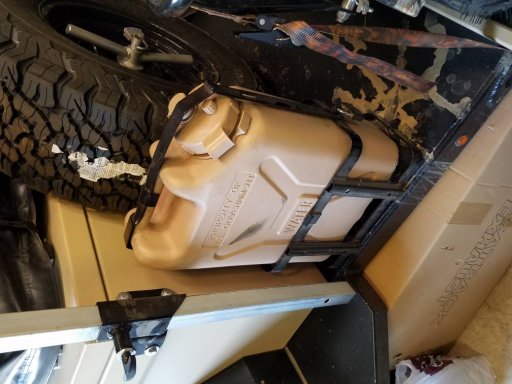
A 5 gallon water can next to the spare in the front.
20171003_174211.jpg


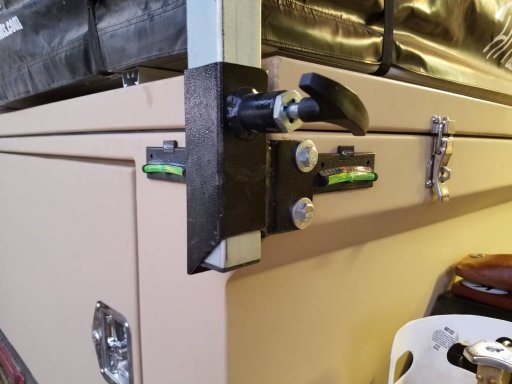
And filed under stupid simple but useful, levels to make sure I don't roll to the downhill side of the bed...
20171003_184154.jpg

Dan

PS: Not sure why my pics show sideways...?

Sent from my SAMSUNG-SM-G935A using OB Talk mobile app
 
Last edited:

VCeXpedition

Rank V
Launch Member

Off-Road Ranger I

2,932
Torrance, L.A., Cal., Earth
First Name
Dan
Last Name
Rich
Member #

0582

Ham/GMRS Callsign
K6DHR
As much as I would have liked to have been on a trail this weekend, circumstances did not allow, so the next best thing is to mod!

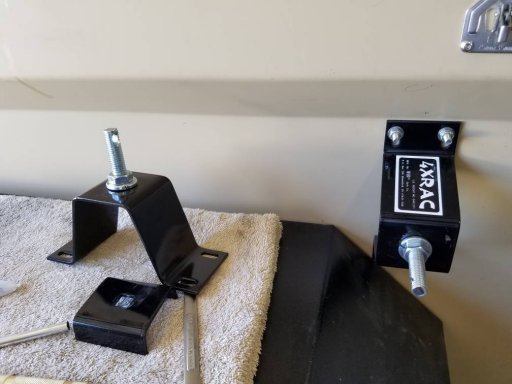
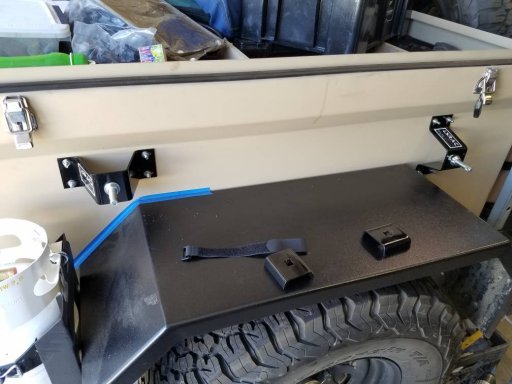
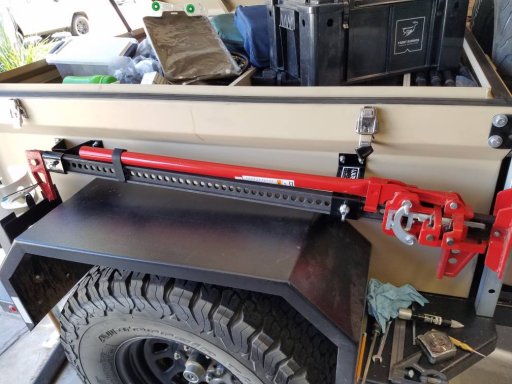
Today's project turned out to be mounting the farm jack [cheap hi-lift] on the trailer.

I can't tell you how hard it was for me to drill holes in a brand new trailer!

The choices for location were pretty limited, so after figuring that out, I bit the bullet and started drilling.

I was going to fab up a cool mount to use, but I looked at what I had and decided that the one from hi-lift would work great and save me some time.

20171007_123601.jpg

I positioned the front mount, (4 holes [emoji32]) and by that figured out the position for the rear mount (another 4 holes).

After drilling I've gotten in the habit of painting the bare metal with some touch-up, hoping to avoid future rust.

20171007_130153.jpg

Those with OCD issues may be bothered by the fact that the jack is not parallel with the fender but I'm a "form follows function" kind of guy and for a couple of reasons this was the best functional position.

20171007_130618.jpg

It took longer than I planned but I was moving a little slower than normal today.

Sent from my SAMSUNG-SM-G935A using OB Talk mobile app
 
Last edited:

VCeXpedition

Rank V
Launch Member

Off-Road Ranger I

2,932
Torrance, L.A., Cal., Earth
First Name
Dan
Last Name
Rich
Member #

0582

Ham/GMRS Callsign
K6DHR
Another couple of smaller mods took me the rest of today.

I used a Front Runner faucet that I got through Anchor Mountain Overland because it's just the coolest faucet.

The handle is a quarter-turn type, it locks and is meant to be mounted like this.

After finding the perfect spot for that, another, larger hole was drilled in the metal. It comes with special washers for either side of the hole and a large fitting on the inside - very robust.

20171007_143815.jpg

It's not straight you might say. That is correct, another choice to add functionality, I wanted that angle to improve access to the handle as well as make the hose easier to attach.

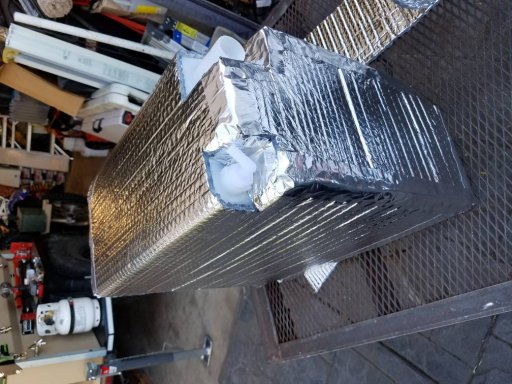
All this will connect to a 10 gallon water tank inside the box.

For that I got a tank from e-bay that matched my design.

To add a little insulation, maybe to keep the water cooler on those Mojave road runs, I wrapped it in Reflectix which is very useful stuff.

20171007_164318.jpg

I ran out of time to actually install the tank, that will wait for another day.

Lots of good garage therapy today [emoji41].

Sent from my SAMSUNG-SM-G935A using OB Talk mobile app
 

Bryan_FRO

Rank I
Launch Member

Traveler I

271
Agoura Hills CA
Member #

7932

Another couple of smaller mods took me the rest of today.

I used a Front Runner faucet that I got through Anchor Mountain Overland because it's just the coolest faucet.

The handle is a quarter-turn type, it locks and is meant to be mounted like this.

After finding the perfect spot for that, another, larger hole was drilled in the metal. It comes with special washers for either side of the hole and a large fitting on the inside - very robust.

View attachment 36529

It's not straight you might say. That is correct, another choice to add functionality, I wanted that angle to improve access to the handle as well as make the hose easier to attach.

All this will connect to a 10 gallon water tank inside the box.

For that I got a tank from e-bay that matched my design.

To add a little insulation, maybe to keep the water cooler on those Mojave road runs, I wrapped it in Reflectix which is very useful stuff.

View attachment 36530

I ran out of time to actually install the tank, that will wait for another day.

Lots of good garage therapy today [emoji41].

Sent from my SAMSUNG-SM-G935A using OB Talk mobile app

Awesome Mod! I like how you used our tap!

Bryan
 

JeffG98034

Rank V
Launch Member

Member II

2,431
Kirkland, Washington
Member #

9850

So I have been looking for quite a while at getting a trailer to move into a different phase of overlanding, and as I have done so, my priorities evolved quite a bit.

I had a very broad search criteria, everything from a ruggedized tent trailer like the Jayco Baja...
View attachment 25499

...to a homebuilt trailer off of either a Harbor Freight trailer or build it myself.

The absolute bomb would be something like a UEV440, along those lines...
View attachment 25501


Another awesome company is Patriot, but it will be too long before these are available in the US, if at all.
View attachment 25500

As cool as any one of those trailers would be, none of them quite fit my thoughts on how I would take my overland adventures to the next phase. Too heavy, too big, too complex.

I also decided that I didn't really want to spend the time to build it myself, a project this complex usually takes me way longer than I think it will and I wanted to spend my time USING it, rather than building it!

To get it straight in my head, I really needed to list up my real priorities to find the right rig.
These are from most to least important as I've thought about it.

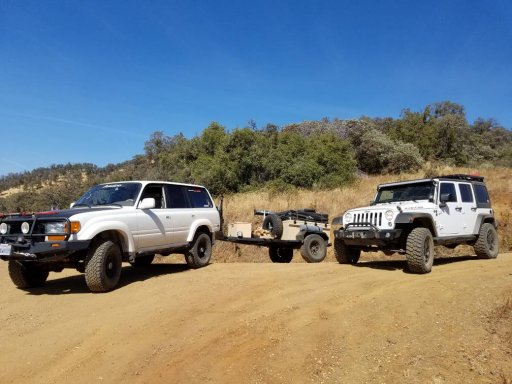
1. Towable behind my '80 series Landcruiser (weight is a real factor here)
2. Small & compact, lightweight to maneuver on tight trails
3. RTT capable, should be able to sleep 2-3, mostly it will be just me but I like a lot of room!
4. Wheel track similar to the 80
5. Configurable for a low Center of Gravity to minimize concerns when off-camber.
6. Able to design in additional utility to customize for my personal style and current equipment
7. Flexibility to add in 12Volt, 120Volt and probably Solar in the future without much trouble
8. Room for all of #7, battery, propane, compressor, CO2, etc.

On the "B" list...
1. Able to carry a light motorcycle - for those single track opportunities or as a backup transportation
2. Carry a bike rack with rear receiver that would double as a recovery point
3. Same hub / bolt pattern as the tow rig (6 on 5.5") for tire / wheel interchange

I did some homework, not ever quite ready to commit to one particular style or brand. Cost is not listed in the above priorities as I felt that if all these could be met, I would work out how I could afford it. After all, I was not going for luxury, but utility.

So... considering all of this, my search was reaching a point where if I didn't pull the trigger, I knew I would never do it.

Then along came Justin at Anchor Mountain Overland (@Anchor Mtn ) with what looked to me like the solution that would work for me.
Justin was willing to build the trailer that I wanted, a lot of the customization that I knew I wanted, he could build right in, or provide an easy way for me to customize like I wanted.
A few phone calls, some negotiation and discussion and I felt like he knew exactly what I wanted.
He provides a small-ish box, 4'x5' then can customize with a lid or a rack, a tongue box, and other various accouterments to make a solid base on which to build.

View attachment 25515
This is from his website, not exactly what I ordered but based on this photo, I knew that what I wanted, could happen! AND for the right price!


Here's what I ordered:
- standard box, 4'x5'
- rear trailer supports (provide easy leveling on any semi-flat site)
- tongue box
- spare tire mount, specified to be behind the tongue box
- rack/rail for one motorcycle! (this may be my favorite part!)
- aluminum lid
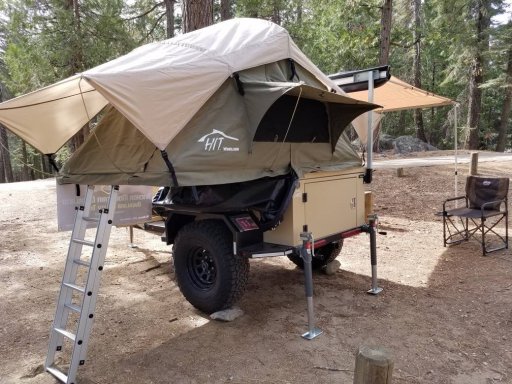
- I added a HiTents Jalama RTT to be bolted directly to the lid for low profile/low CG
- I opted to have Justin order a set of the same tires/wheels as on the tow rig for interchangeability.
(although this was not a high priority, he made it so easy to do this, I couldn't pass it up!)


Right now he's building the first run of production trailers on this platform with a projected finish date of around the first of July.

I'll post photos up here as I can get them, stand by for those as well as a reveal / review when it happens!


Thanks, Dan.
Very cool....
 
  • Like
Reactions: VCeXpedition

vegasjeepguy

Rank V
Launch Member

Advocate II

2,566
Gravette, AR, USA
Member #

1130

Great trailer build. I’ve got a CDN M101 trailer that has been a work in progress for almost 9 years. A few years ago I mounted my Hi-lift in the same position and it was tough to drill those first holes. Propane tank was added a few weeks ago. I would’ve preferred to mount it towardsthe rear like yours, but the rear mounted spare and backup lights made that impossible.

1661979B-ACD4-444B-8E0C-D66D204B7BB2.jpeg

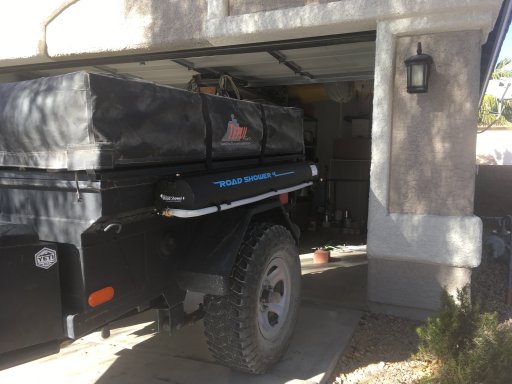
And this past year I mounted my Road Shower on the drivers side, but this time it was easier to drill those holes.

48687D19-42FB-46C9-B4C6-2B9615CCF0DE.jpeg
 
Last edited:
  • Like
Reactions: VCeXpedition

JeffG98034

Rank V
Launch Member

Member II

2,431
Kirkland, Washington
Member #

9850

Great trailer build. I’ve got a CDN M101 trailer that has been a work in progress for almost 9 years. A few years ago I mounted my Hi-lift in the same position and it was tough to drill those first holes. Propane tank was added a few weeks ago. I would’ve preferred to mount it in the rear like yours, but the rear mounted spare made that impossible.

View attachment 45223

And this past year I mounted my Road Shower on the drivers side, but this time it was easier to drill those holes.

View attachment 45224
Thats has been put on my bucket list, Road shower...
 

FireMedicPQ1

Rank V
Launch Member

Off-Road Ranger I

2,135
Rio Rancho, New Mexico
Member #

9354

Ham/GMRS Callsign
K5PCB
Just came across this thread. Great trailer and nice work on the mods. I will say this about AMO and Justin - great outfit and great guy to work with. I am just starting the process of purchasing a "project" trailer from Justin and I am excited to begin a similar journey. Justin has been amazing as a resource as he answers my myriad of questions and has enough patience to deal with my eagerness and ignorance. I will post up when I start and hopefully will have the same success as you've experienced. If you're looking for a trailer or other great gear, look at the AMO website https://anchormtnoverland.com/
 

VCeXpedition

Rank V
Launch Member

Off-Road Ranger I

2,932
Torrance, L.A., Cal., Earth
First Name
Dan
Last Name
Rich
Member #

0582

Ham/GMRS Callsign
K6DHR
@Paul Bearce, good to hear you've had the same experience. Justin was very helpful and he continues to be a good resource for the mods I've done.
Watch this space for a future walk-around video of my trailer as soon as I finish up the electrical portion and add the deep-cycle battery.

Sent from my SAMSUNG-SM-G935A using OB Talk mobile app
 
  • Like
Reactions: Anchor Mtn

VCeXpedition

Rank V
Launch Member

Off-Road Ranger I

2,932
Torrance, L.A., Cal., Earth
First Name
Dan
Last Name
Rich
Member #

0582

Ham/GMRS Callsign
K6DHR
Great trailer build. I’ve got a CDN M101 trailer that has been a work in progress for almost 9 years. A few years ago I mounted my Hi-lift in the same position and it was tough to drill those first holes. Propane tank was added a few weeks ago. I would’ve preferred to mount it towardsthe rear like yours, but the rear mounted spare and backup lights made that impossible.

View attachment 45223

And this past year I mounted my Road Shower on the drivers side, but this time it was easier to drill those holes.

View attachment 45224
Thanks @vegasjeepguy appreciate your comments. I looked carefully at yours during the build. You're close enough, it would be fun to get together and compare notes sometime.

Sent from my SAMSUNG-SM-G935A using OB Talk mobile app
 
  • Like
Reactions: vegasjeepguy

vegasjeepguy

Rank V
Launch Member

Advocate II

2,566
Gravette, AR, USA
Member #

1130

Thanks @vegasjeepguy appreciate your comments. I looked carefully at yours during the build. You're close enough, it would be fun to get together and compare notes sometime.

Sent from my SAMSUNG-SM-G935A using OB Talk mobile app
My wife is from the LA area and we head down to see family and friends fairly frequently. Usually find ourselves in Arcadia, Valley Village, Burbank and Santa Monica.
 
  • Like
Reactions: VCeXpedition

VCeXpedition

Rank V
Launch Member

Off-Road Ranger I

2,932
Torrance, L.A., Cal., Earth
First Name
Dan
Last Name
Rich
Member #

0582

Ham/GMRS Callsign
K6DHR
If you're following along on my Instagram feed (and why wouldn't you be? :tonguewink:), You've seen the latest mods for the trailer.

This time in the form of electrical work. I have done most of the cabinetry, still need to put on a finish, but I'm anxious to get the electrical sorted so I can have things like a water pump, lights and powered sockets.
This also adds a solar component, more on that later.

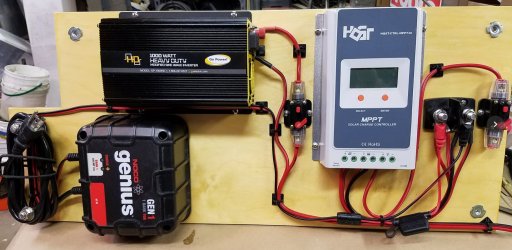
I started by making a back-board for the tongue box, and positioning the major electrical bits on there.
electrical_Board1.jpg
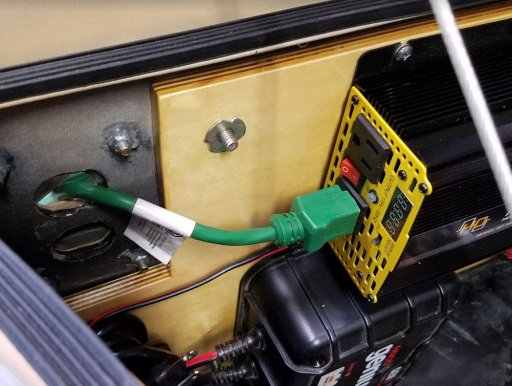
The two circuit breakers are: 1-100A breaker for the 1000 Watt inverter power, 1-40A breaker for the trailer load. I've had good luck with these, they seem very durable.


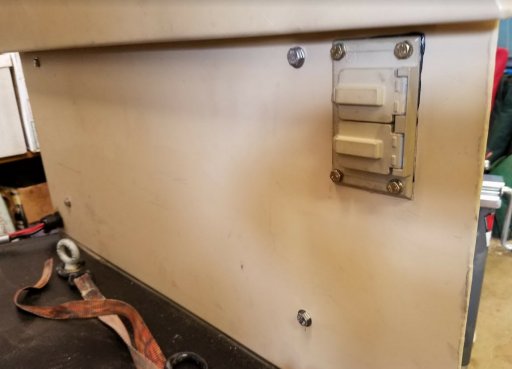
In the back side of the box, I needed a pass-through that was "water resistant". I went back and forth about how to do that, lot's of grazing on Amazon hunting for options, and finally decided that an outdoor electrical box cover was about all I needed. I was originally going to put in a plug, then wire the plug to the 12v/110v inverter directly, but I also needed to be able to run the cord for the Noco battery charger out to plug it in, or run an extension cord into the box to power that. So here's what I ended up doing.
cover_plate1.jpg
It's overkill, but I put that cover on with 4 bolts, gasket and silicone, it shouldn't go anywhere!

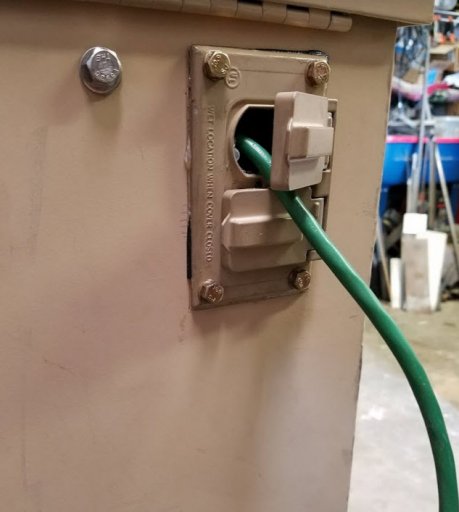
And I ended up with a convenient way to put the plug through the box.
cover_plate2.jpg

cover_plate3.jpg

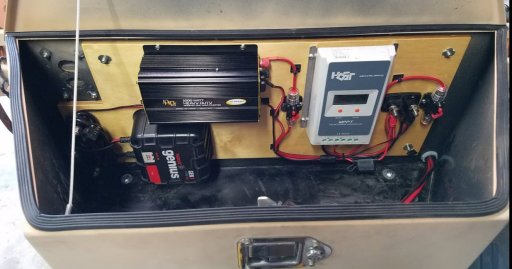
Here's almost the final version of what the interior layout of the box looks like.
box_interior1.jpg

You can see where the power comes into the box in the lower right of the box. That's the power in from the battery, and the power out to the trailer box.
I'll mount the battery outside the tongue box, more rearward on the trailer for better weight distribution. Turns out, a Group 31 Full River 115 Amp-hour battery is VERY heavy!
I'll update this post when I finish the battery install, I'm still waiting on a good Moroso battery box to put that in.

Also, more on the solar controller and panel set up later. It's all wired in, I'll have more detail on that soon.


Dan.
 
  • Like
Reactions: Anchor Mtn

Brian Glendenning

Rank V
Launch Member

Enthusiast III

1,473
Socorro, NM
First Name
Brian
Last Name
Glendenning
Member #

22408

So, I've done a few mods, thought I'd share them here to show some progress on my build.
[...]
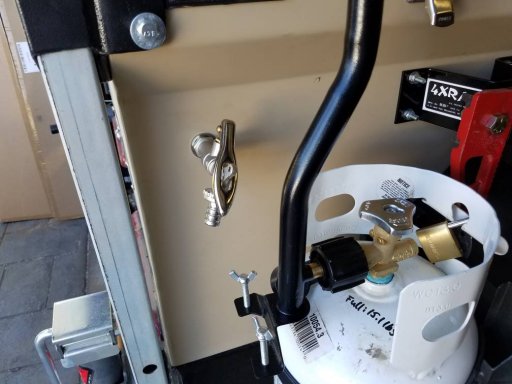
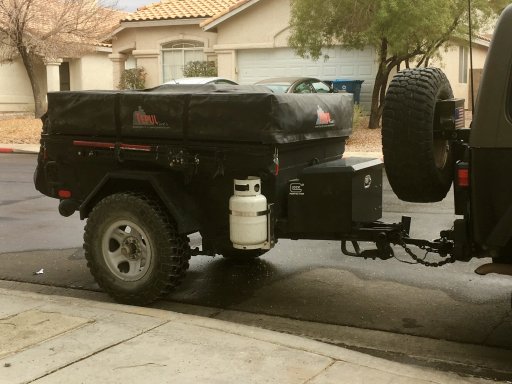
I needed to find a spot for the propane bottle, the rear fender near my kitchen at my tailgate seemed the best choice.
[...]
Hi - I've been looking to find "clips" like you have to tighten the strap in your propane holder. Where did you get this, and what are they called so I can google them. Thanks!
 
  • Like
Reactions: VCeXpedition

VCeXpedition

Rank V
Launch Member

Off-Road Ranger I

2,932
Torrance, L.A., Cal., Earth
First Name
Dan
Last Name
Rich
Member #

0582

Ham/GMRS Callsign
K6DHR
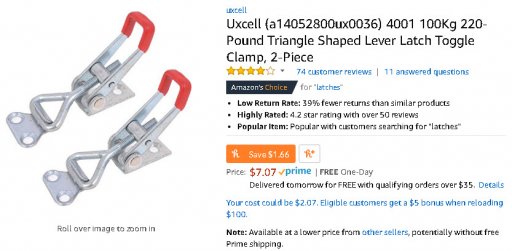
Hi - I've been looking to find "clips" like you have to tighten the strap in your propane holder. Where did you get this, and what are they called so I can google them. Thanks!
Something like this:

I'm not sure if this is exactly the piece I used, I believe I have a stainless latch.

over_center_latch.jpg


Dan
 
  • Like
Reactions: Kent R