"Nanuuq" my Land Rover Discovery 2 diesel swap, ...forever a project!

  • HTML tutorial

Tinker

Rank V
Launch Member

Off-Road Ranger I

2,357
West Michigan
First Name
Mike
Last Name
Klemish
Member #

5606

With the primary electrics done I can move on to the plumbing work.

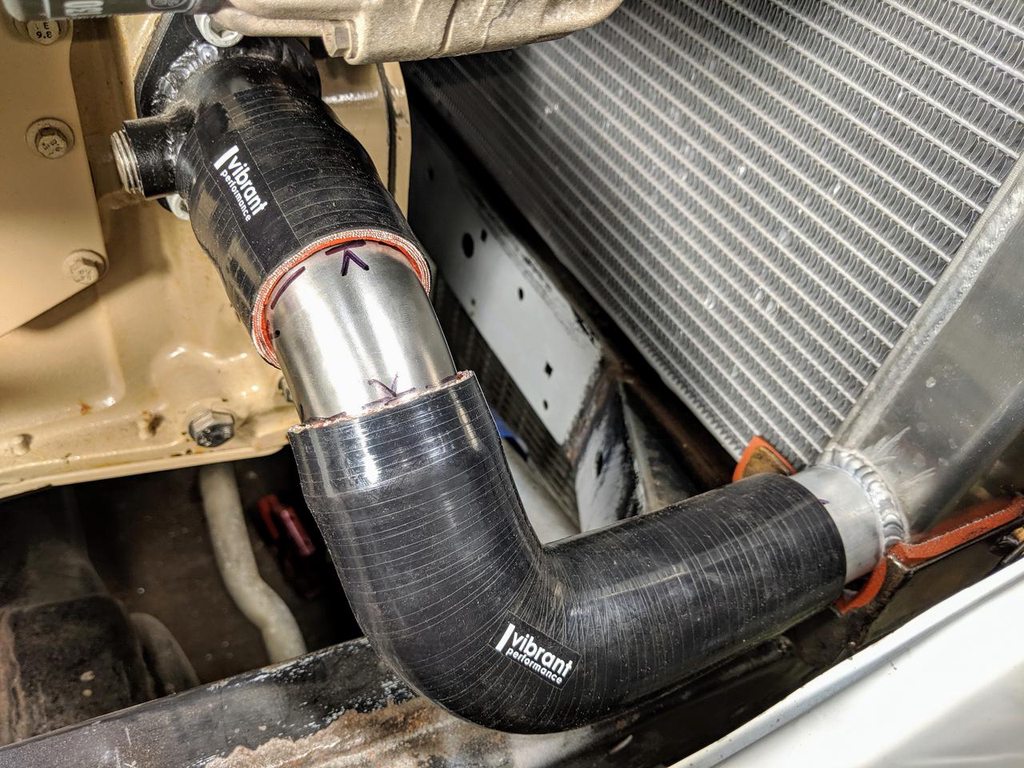
The upper coolant connection was straight forward thanks to the modifications to the radiator's inlet port, just a simple 45-degree 1.75" layered silicone hose with stainless t-bolt clamps that I'm using throughout:


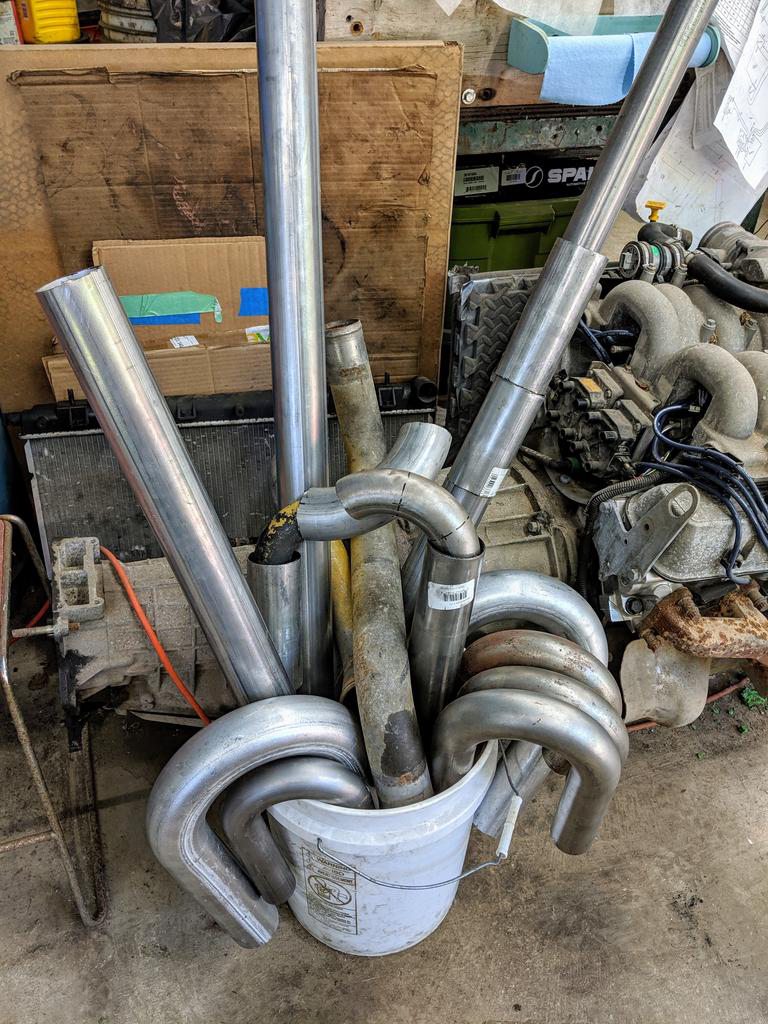
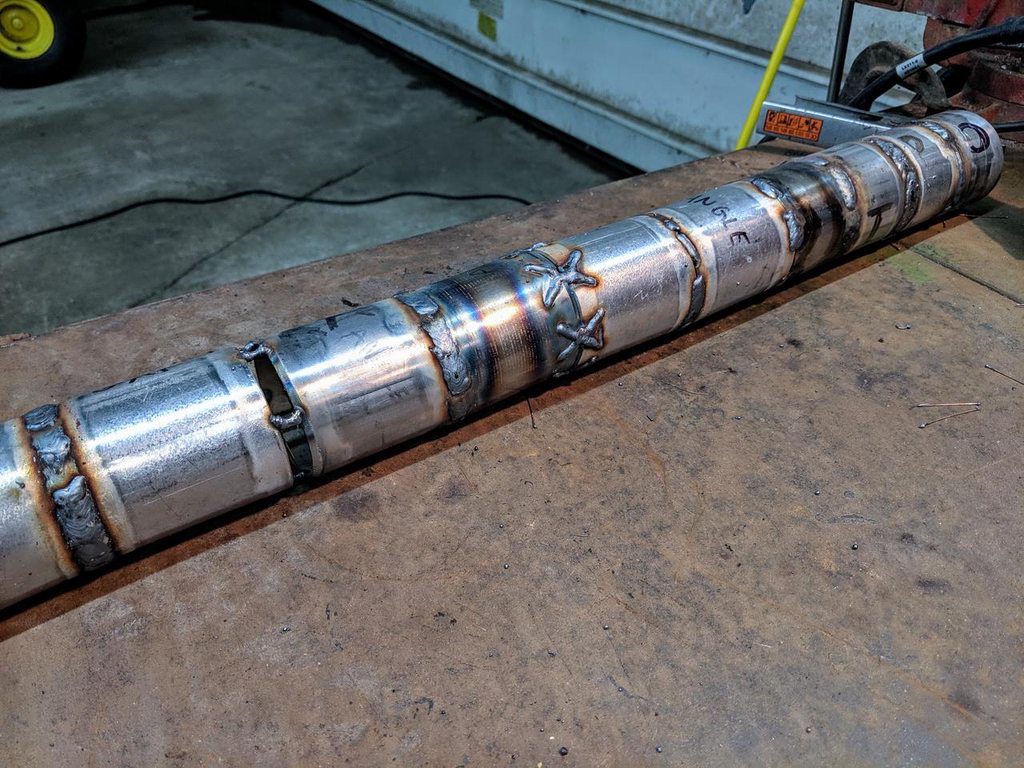
These "U" and "J" bends make fabrication easy, even without a bender, & with very smooth transitions thanks to the mandrel bending machine that makes them. I would like to use stainless steel tubing, but until I get my own TIG welder I'll use this heavy gauge steel exhaust pipe that I can easily MIG weld:


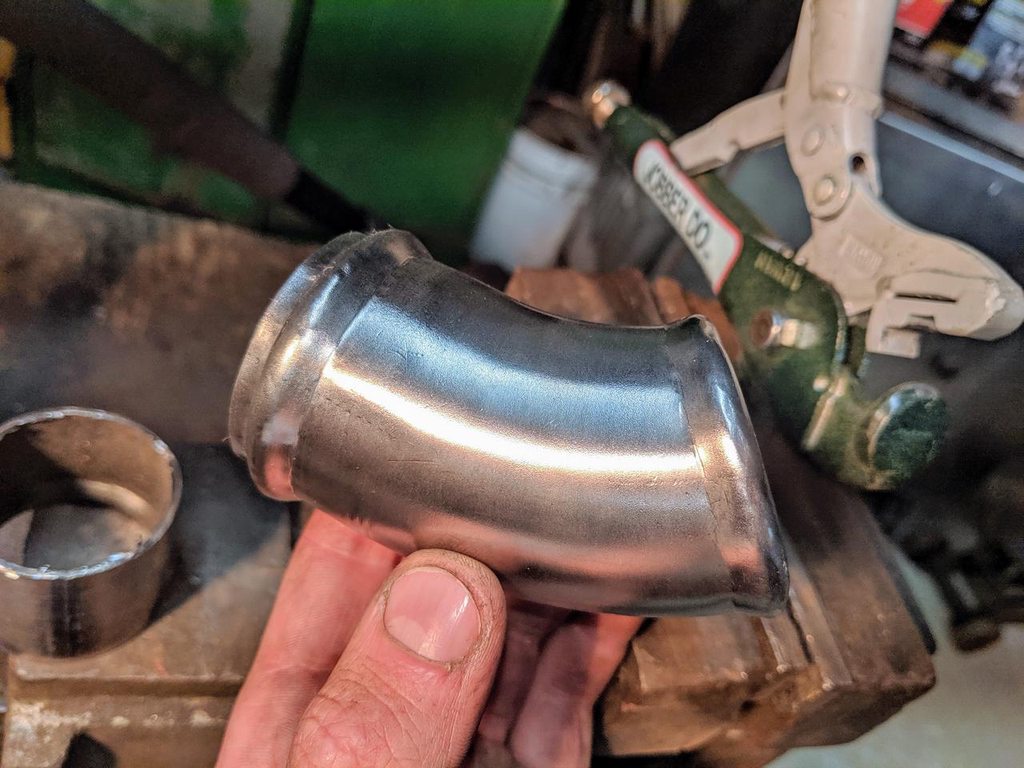
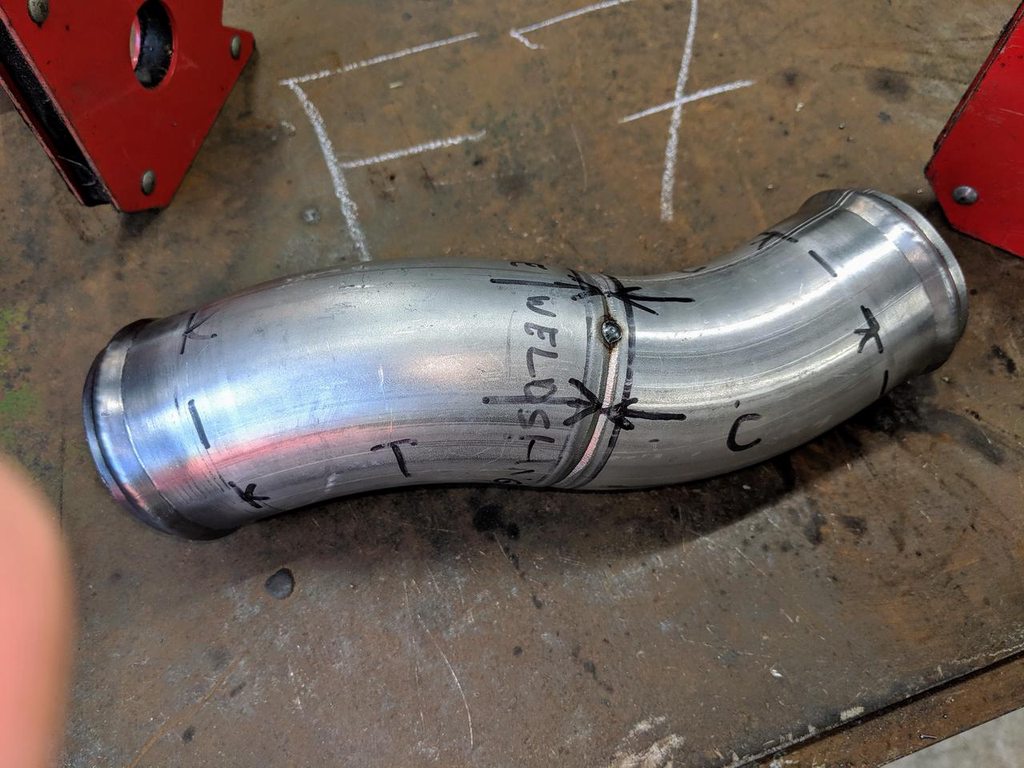
The lower coolant pipe I made is a 45-degree elbow with a short leg on 1 side to join the 2 hoses, with beads formed using the modified vise-grip:


The engine's new coolant inlet connection uses a short 2" diameter hose, then the new elbow, & down to the radiator with a 90-degree elbow hose:


Before I moved onto the charge piping I needed to do some welding experiments with different weld puddle techniques, tubing gauge, plated vs raw steel, gap vs flush, & taper angle in the joints between them (plus a not so subtle joke for a friend). Best welds I made were with .024" wire, a fast u-shape drag, 14 gauge unplated tube, 30-degree joint taper, & little to no gap:


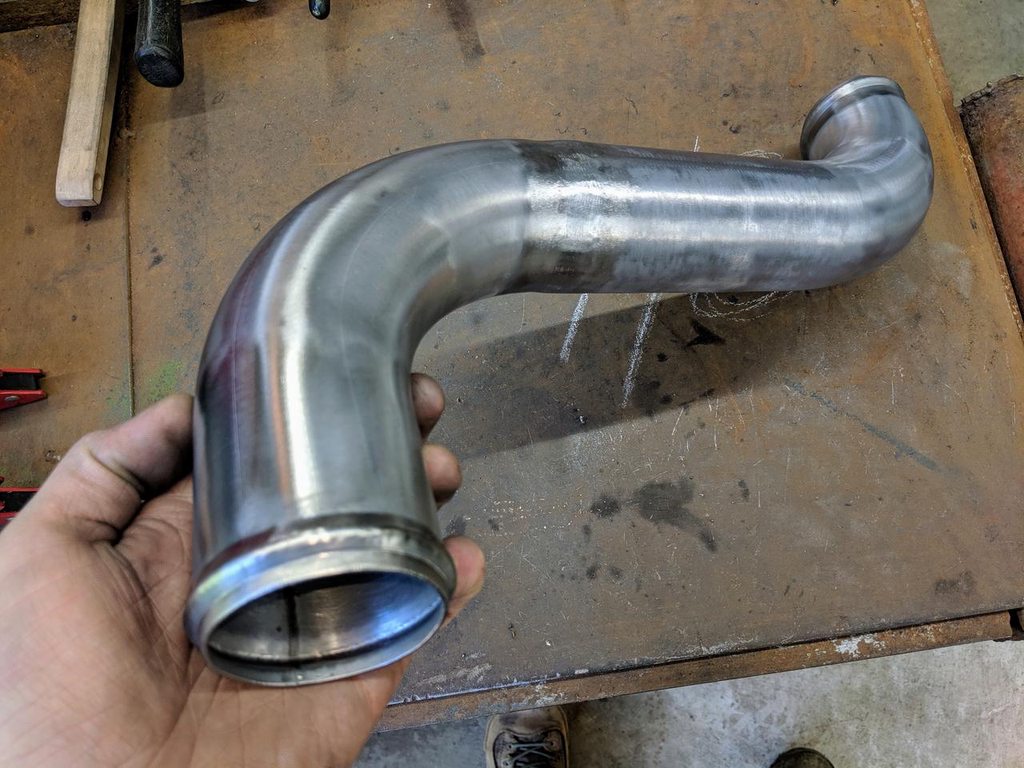
Plenty of figuring & marking to keep me from messing up as I started with the hot-side charge piping, all in 2.5" diameter. Glad I got a bunch of practice building a header & full exhaust system for another project before digging into this more detailed build:


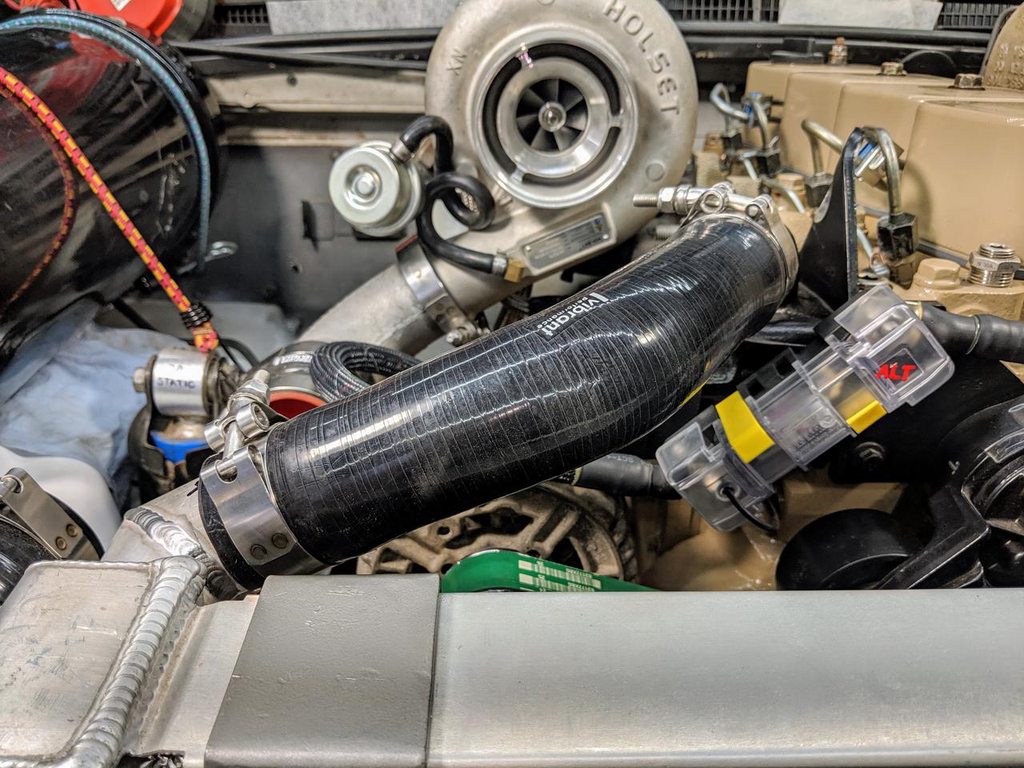
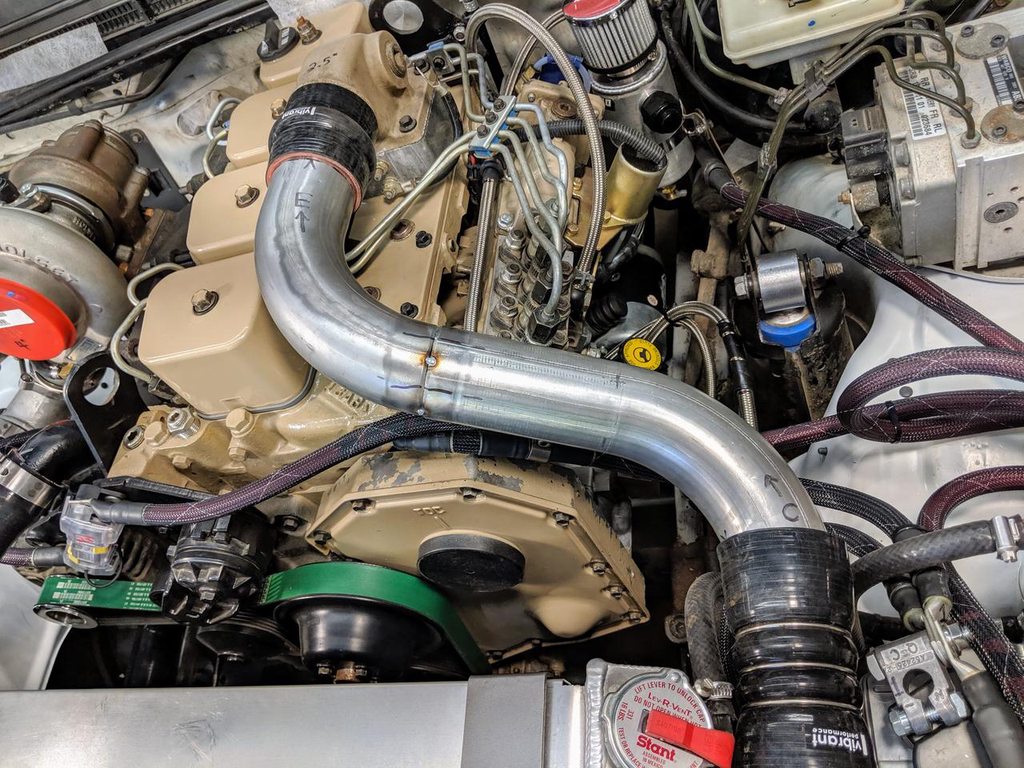
My hot-side pipe turned out as smooth & short as I could've hoped for. From a v-banded aluminum elbow off the Super HX30, to a silicone hump hose, then the new pipe, & into the Freightliner charge cooler with a reinforced silicone coupler:


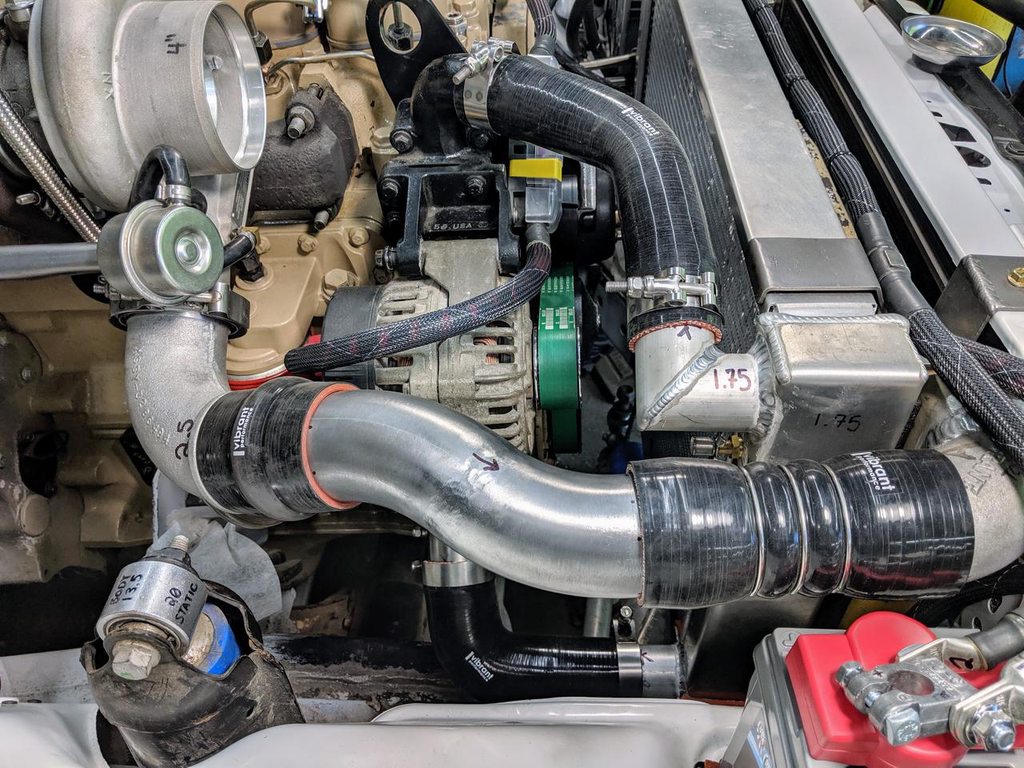
The cold-side charge pipe wasn't much more complicated on the other side of the engine, with pair of 90-degree bends linked together & the same compliment of hoses:


Grinding the welds back wasn't necessary, more for fun than anything... at least until I learn TIG that's more well suited for this kind of work:


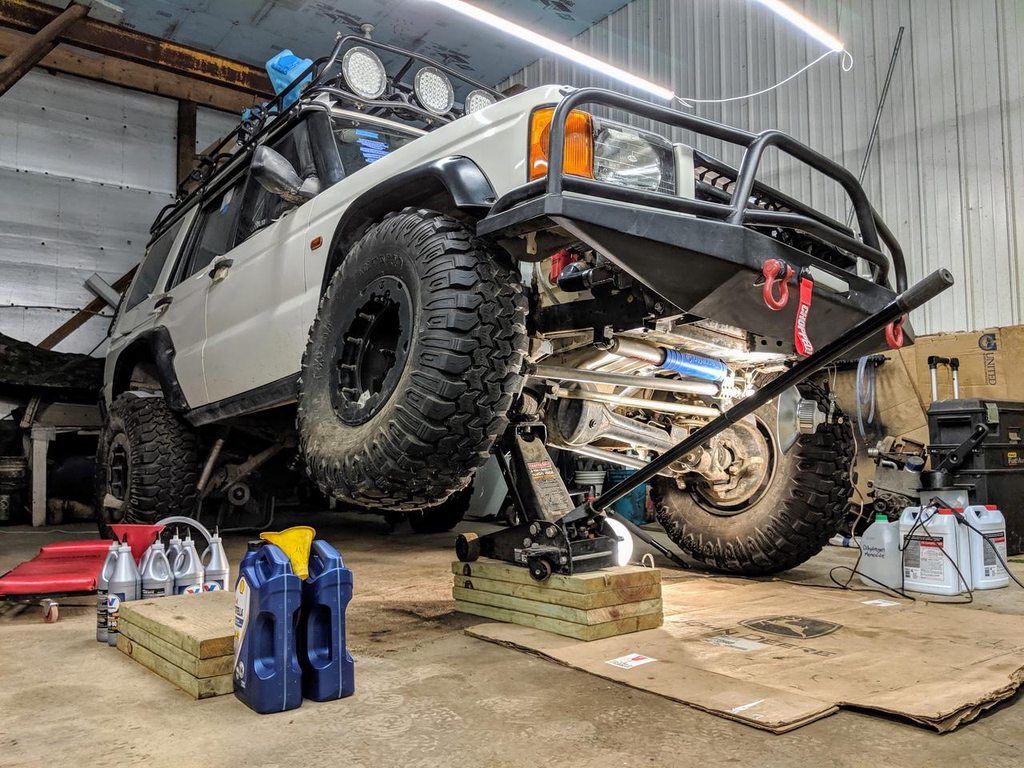
Next up I'll build a turbo dump pipe as paint dries on the new pipes, then it's on to fluid fill ups!
 

Tinker

Rank V
Launch Member

Off-Road Ranger I

2,357
West Michigan
First Name
Mike
Last Name
Klemish
Member #

5606

I scored a couple of vintage diesel books from a friend the other day that I'm looking forward to thumbing thru. This big one is packed with so many details + history up until it's printing in '73 that I'm getting the feeling it could've been a textbook:


As per usual my impatient paint work leaves something to be desired... fairly even & no big runs, but at least a dozen bugs & a fist full of grit stuck into it thanks to the wind picking up after I sprayed them in the open doorway of the shop:


Last bit of pipe I have to take care of is the turbo dump pipe. Not a lot of room to work with before running right into the firewall, & I only need a temporary exit to save from melting things, so I'll hack up the old mud pump's exhaust for now:


It's an oddball size flange if I remember right, although a 3" pipe does fit over it well enough. Far from pretty but gets the job done!


Next I have to double check my front diff -> oil pan clearance, & setup my oil pressure gauge. Unless I've forgotten something I think it's time to fill everything (including priming the turbo & injection pump) with fluids & give it a test start :D
 

adventure_is_necessary

Rocky Mountain Region Local Expert Kansas
Member

Traveler III

4,007
Bonner Springs, Kansas, United States
First Name
Lucas
Last Name
Antes
Member #

7082

Ham/GMRS Callsign
KE0ZXA
I scored a couple of vintage diesel books from a friend the other day that I'm looking forward to thumbing thru. This big one is packed with so many details + history up until it's printing in '73 that I'm getting the feeling it could've been a textbook:


As per usual my impatient paint work leaves something to be desired... fairly even & no big runs, but at least a dozen bugs & a fist full of grit stuck into it thanks to the wind picking up after I sprayed them in the open doorway of the shop:


Last bit of pipe I have to take care of is the turbo dump pipe. Not a lot of room to work with before running right into the firewall, & I only need a temporary exit to save from melting things, so I'll hack up the old mud pump's exhaust for now:


It's an oddball size flange if I remember right, although a 3" pipe does fit over it well enough. Far from pretty but gets the job done!


Next I have to double check my front diff -> oil pan clearance, & setup my oil pressure gauge. Unless I've forgotten something I think it's time to fill everything (including priming the turbo & injection pump) with fluids & give it a test start :D
This build it solid and is really coming together. Can't wait for it to finally be back on the road, doing what it was built to do.
 
  • Like
Reactions: Tinker and Hafaday

Tinker

Rank V
Launch Member

Off-Road Ranger I

2,357
West Michigan
First Name
Mike
Last Name
Klemish
Member #

5606

Plumbing work is complete!

This is definitely the first "exhaust system" that I've built that can fit in 1 hand. Also I think I may have made the slash-cut backwards... because on 1 hand it will do better this way to clear smoke & heat from the window, but on the other hand it misses out on the potential scavenging effects of the slash being cut the other direction. I don't intend to run it this way for long (because rain, noise, smoke, tampering, etc), but hopefully it's not too obnoxiously loud for now:


I know the 4BT's can wiggle around a fair amount, so I did my best to build in flexibility with everything running to it. Also I've had great luck with preserving exposed bolt threads by using a covering of grease + rubber caps, so most every clamp received that treatment:


Not sure I could've made the charge piping any shorter, in order to keep the total system air-volume at a minimum & response at a maximum. Thankfully it worked out like I planned to keep it all easy to work on as well. There won't be any engineers to curse at if the maintenance is a pain in the ass, "Curse you- err, me!"


This view didn't really get my attention until I dropped the phone away from my eye & had a good look at... exciting to see it this put together!!!
 

dolli310

Rank IV
Launch Member

Advocate I

1,402
Halifax, NS
First Name
Jason
Last Name
Dollimont
Member #

4162

You sir, are a mad genius! Can't wait to see this girl move under diesel torques.
 
  • Like
Reactions: Tinker

Tinker

Rank V
Launch Member

Off-Road Ranger I

2,357
West Michigan
First Name
Mike
Last Name
Klemish
Member #

5606

I gathered up all the fluids for the big fill up... and ouch can that get spendy fast! Oh & I accidentally put my winter oil in the photo instead of the T6 15W40 I'm running for the warm months:


When I was clearing things out of the way underneath for the start-up I realized I hadn't fixed the damaged crossmember mounting perches. Between the 16 bolts in the 2 crossmembers I had out of the way for the swap I managed to shear off 3 of the little 8mm bolts right in the perches on the frame. I was able to extract 1 on the front perches, but 2 of them on the middle pads I had to drill the captive-nut right out of there:


Thankfully all the other mounting pad's nuts cleaned up nice with some patient running in & out with a tap + plenty of lube. And for the damaged ones I prepared tapered holes so I could weld in new nuts & flush them up. The frame rails & coil springs did not appreciate how long it took me to resolve the major moisture issues in the shop, so they may not look pretty right now (surface rust's started peeling off the frame coating, but I have a plan for that after it's moving again) but I have to stay focused on the task at hand... a running project!


The front crossmember will need modifying to clear the front driveshaft thanks to the lift height over stock, but the middle one is ready to go back in under my divorced transfer-case subframe. It was already mostly prepared for paint, so I hosed it down with some Steel-It stainless flake spray:
 

13ADVXterra

Rank 0

Contributor I

60
PA
First Name
Aaron
Last Name
Moores
this thread is amazing. you are a very talented mechanic. This is the first build thread i've gone through and it didn't disappoint. I'm very interested to see your dual arm tire mount for the rear.
 
  • Like
Reactions: Tinker

Tinker

Rank V
Launch Member

Off-Road Ranger I

2,357
West Michigan
First Name
Mike
Last Name
Klemish
Member #

5606

this thread is amazing. you are a very talented mechanic. This is the first build thread i've gone through and it didn't disappoint. I'm very interested to see your dual arm tire mount for the rear.
Thanks & I still have a lot to learn! It's been a great project for getting me into things I've not tried before but always wanted to. I'm looking forward to building my own custom rear bumper with a dual swing out & also improving the not-so-great departure angle, that & probably a pair of sliders with tree bars at the same time.

Figured it wasn't a bad idea to get the crossmembers back under there, seeing as the engine will probably shake hard until I bleed the air out of the injection lines to get it running smooth on the 1st startup. The middle crossmember tucks in perfect under my divorced transfer case subframe, & the front is just temporary until I notch it to clear the front driveshaft. I didn't even use it after the lift kit install, but with all the new Cummins torque incoming it's probably the right time to get it modified & back in there:


I also started having a look thru the oil flow diagrams in the manual to plan out priming the engine for the start up. Maybe it's overkill, but it's been more than a year since it last ran, so why not a bit of overkill after all this work. I'm thinking I'll first run oil thru the drill pump into the oil filter plate's regulator valve, which should back feed oil into the engine's oil pump. Then switch the drill pump's output over to the oil filter threads so it'll push oil all thru the block, up into the heads, & up into the turbo. Then I'll move the drill pump's outlet to the turbo feed hose & make double sure it's lubed up. Lastly I'll pull the timing pin cover from the injection pump & pour in as much oil in there as I can manage. Then fill up the sump!
 

Hafaday

Rank V
Launch Member

Pathfinder I

2,271
Richmond, VA.
Member #

7455

You can do the same with the fuel as well. I don’t remember the filter set up on the 4BT, though. But is possible.

We used to use an old fuel cap, drilled and fitted with an air chuck fitting. Place cap on fuel tank or filler neck, pressurize with air (start low and raise pressure as needed) then crack the bleed screw at the filter (canister style) till all air was out and fuel was coming out in a steady stream. Then do the same at the nut at the injector one at a time.

If canister style. You would want to place the filter in, then pre fill it diesel as well.

If an old school inline filter..... pressurize, then crack lines at the injector.

Just throwing that out there.
 
  • Like
Reactions: Tinker

Tinker

Rank V
Launch Member

Off-Road Ranger I

2,357
West Michigan
First Name
Mike
Last Name
Klemish
Member #

5606

I've been dreading checking it for a while now, but before I can fill the engine with oil I need to check the oil pan to front differential clearance. Even though I tried to design the engine's mounting to take this into account (especially with bigger axles in it's future), it's always looked close to running into it at the corner where the drain plug & oil pump pickup tube reside... which is why I wasn't looking forward to the possibility of having to notch the pan. Not that it would be all that difficult, but time consuming & a big delay to starting it.


After jacking it up into the suspension's limit I was VERY happy to see there was still more than a finger gap between the nearest points. The coil sprung radius-arm suspension swings in a bit of an odd arc, which I wasn't 100% sure would swing away from the engine as much as I was estimating when laying out the position of the powertrain. And this is after bottoming out the shock shafts, not ideal. Before too long I need to deal with the lift height negating the original rubber bump stops, maybe just weld up extensions until I can get my hands on a set of hydraulic bump stops. The rubber bushings in the panhard bar could possibly let the diff get a little closer, but with a different plug I could get ~3/4" more clearance:


Oh & I managed to squish a fan in the process that was hanging out under the hitch in the back... oops.


I know maybe it's just a little thing, but pouring a bunch of diesel in this thing's tank for the first time made me pretty happy:
 
  • Like
Reactions: Hafaday

Tinker

Rank V
Launch Member

Off-Road Ranger I

2,357
West Michigan
First Name
Mike
Last Name
Klemish
Member #

5606

You can do the same with the fuel as well. I don’t remember the filter set up on the 4BT, though. But is possible.

We used to use an old fuel cap, drilled and fitted with an air chuck fitting. Place cap on fuel tank or filler neck, pressurize with air (start low and raise pressure as needed) then crack the bleed screw at the filter (canister style) till all air was out and fuel was coming out in a steady stream. Then do the same at the nut at the injector one at a time.

If canister style. You would want to place the filter in, then pre fill it diesel as well.

If an old school inline filter..... pressurize, then crack lines at the injector.

Just throwing that out there.
My lift pump has a plunger for priming that's supposed to get the lines filled up pretty quickly all the way to the injection pump, & great tip on filling the thread-on fuel filter!
 
  • Like
Reactions: Hafaday

Hafaday

Rank V
Launch Member

Pathfinder I

2,271
Richmond, VA.
Member #

7455

My lift pump has a plunger for priming that's supposed to get the lines filled up pretty quickly all the way to the injection pump, & great tip on filling the thread-on fuel filter!
Rite rite.

Just trying to save you some time, priming. Trust me when I say your thumb and palm will hurt after a short time priming. Haha.

Doing this on the larger 6 piston Cats, Detroit’s an Cummins sucks.

Also, same with the oil filter, pre fill if you can. It lessens the nerves and pain on start up, when she sounds like it about to fly apart.
 
  • Like
Reactions: Tinker

Tinker

Rank V
Launch Member

Off-Road Ranger I

2,357
West Michigan
First Name
Mike
Last Name
Klemish
Member #

5606

Rite rite.

Just trying to save you some time, priming. Trust me when I say your thumb and palm will hurt after a short time priming. Haha.

Doing this on the larger 6 piston Cats, Detroit’s an Cummins sucks.

Also, same with the oil filter, pre fill if you can. It lessens the nerves and pain on start up, when she sounds like it about to fly apart.
I appreciate the info since I'm such a noob with diesels, here I was under the impression it was just a few pumps & you're there. I'm so new with it that honestly I can't stop thinking "Man this looks so much like lightweight lube oil" whenever I'm handling the stuff.

We have a much better (more volume & a drier) compressor getting setup in the shop now so I might be able to give that a go. From what I understand the injection pump really does not appreciate being run dry, so I am all about priming that system too!

Oh yeah I'll be filling the oil filter for sure. I've never had an engine with a thread-in fuel filter before, kinda funny I didn't even make the connection until you mentioned it.
 
  • Like
Reactions: Hafaday

Hafaday

Rank V
Launch Member

Pathfinder I

2,271
Richmond, VA.
Member #

7455

I appreciate the info since I'm such a noob with diesels, here I was under the impression it was just a few pumps & you're there. I'm so new with it that honestly I can't stop thinking "Man this looks so much like lightweight lube oil" whenever I'm handling the stuff.

We have a much better (more volume & a drier) compressor getting setup in the shop now so I might be able to give that a go. From what I understand the injection pump really does not appreciate being run dry, so I am all about priming that system too!

Oh yeah I'll be filling the oil filter for sure. I've never had an engine with a thread-in fuel filter before, kinda funny I didn't even make the connection until you mentioned it.
Cool beanie weenies. Glad I could throw in an idea for yea.

You have a lot of us following this build, we want to see this baby go!

As for the fuel filter. Remember this... if you ever run out of fuel, you will get to know the priming bulb/plunger well.

Just when it gets harder to push, keep going and have a second person try to start it at the same time.

Not trying to scare you at all. Just my experience over the years on the larger diesels.

That said, keep the pre fill in the back of your head when it’s service time. Priming an empty fuel filter canister by hand takes a boat load of time that you will never forget.
 
  • Like
Reactions: Tinker

Tinker

Rank V
Launch Member

Off-Road Ranger I

2,357
West Michigan
First Name
Mike
Last Name
Klemish
Member #

5606

Cool beanie weenies. Glad I could throw in an idea for yea.

You have a lot of us following this build, we want to see this baby go!

As for the fuel filter. Remember this... if you ever run out of fuel, you will get to know the priming bulb/plunger well.

Just when it gets harder to push, keep going and have a second person try to start it at the same time.

Not trying to scare you at all. Just my experience over the years on the larger diesels.

That said, keep the pre fill in the back of your head when it’s service time. Priming an empty fuel filter canister by hand takes a boat load of time that you will never forget.
Thanks a bunch for the pointers! I was thinking to myself that it wasn't all that bad running the primer until just like you said it stiffened up on me... that was a workout hahaha!
 
  • Like
Reactions: Hafaday