Slowly but Shirlee the '91 Toyota Single Cab

  • HTML tutorial

genera_lee

Rank V
Launch Member

Enthusiast III

1,993
Reno/Tahoe Area
First Name
Trip
Last Name
Lee
Member #

10497

Ham/GMRS Callsign
KI5GPV
while i was working on the box and back wall, i also started patterning out the center console and some speaker rings. i wanted them angled but not sticking out too far from the door . so i opted for a 0.75:8 taper for the very scientific reason of it being convenient math. however, figuring out how to actually cut that taper out was a bit of a challenge.


i ended up building a jig to hold the glued up rings vertical on a band saw so i could slide them along the resaw fence. the jig had the correct taper, so all i had to do was clamp the ring on and push.


i added an extra trim ring after cutting the tapers. this is how it fits with the speaker and grill in it.


patterning out the parts for the center console.


i then transfered the cardboard template to a piece of underlayment board to make a router jig out of, cut out the templte on the bandsaw and sanded to final shape. the left and right panels for the console are the same except for the first ~5 inches, so i just made that piece swappable. worked out really well using the jig on the table router.


here you can see the sub box done, the back panel mounted, and the mock up of the center console in the cab. i'll have cup holders behind the sticks, and some panels going across to tie the whole thing together.


genera_lee

Rank V
Launch Member

Enthusiast III

1,993
Reno/Tahoe Area
First Name
Trip
Last Name
Lee
Member #

10497

Ham/GMRS Callsign
KI5GPV
thats all i was able to do in the funemployment time i had.

the back wall and center console will go for vinyl wrap once they're both done. it will match the door cars and dash.

then the box will get wrapped with carpet to match the cab.

i'll probably just bed line and then paint the speaker rings. they'll likely get remade sometime in the near future anyway. i like how they came out, but i want to make them from abs or x-pvc after talking to a pro installer about them.

once i get the rings painted, i'll start on cab sound treatment in earnest. as well as making baffles for the doors. then i can do all the wiring wnd get the new woofers and tweeters installed. oh and i need to finish the tweeter pod designs to have those mount nice and flush on the a pillars. i'll be designing and 3d printing those enclosures.

lots still to do!
 

genera_lee

Rank V
Launch Member

Enthusiast III

1,993
Reno/Tahoe Area
First Name
Trip
Last Name
Lee
Member #

10497

Ham/GMRS Callsign
KI5GPV
wow i really havent posted in this since may of this year...

I'll have to update soon. i moved back to Reno in June and have been doing a ton of camping/overlanding, and a little bit of work to the truck. pics will follow when i find a little time this weekend!
 

RoarinRow

Rank V
Launch Member

Member III

2,771
Elk Grove, CA, USA
First Name
Rolando
Last Name
Nispiros
Member #

17011

Ham/GMRS Callsign
KN6JJS
thats all i was able to do in the funemployment time i had.

the back wall and center console will go for vinyl wrap once they're both done. it will match the door cars and dash.

then the box will get wrapped with carpet to match the cab.

i'll probably just bed line and then paint the speaker rings. they'll likely get remade sometime in the near future anyway. i like how they came out, but i want to make them from abs or x-pvc after talking to a pro installer about them.

once i get the rings painted, i'll start on cab sound treatment in earnest. as well as making baffles for the doors. then i can do all the wiring wnd get the new woofers and tweeters installed. oh and i need to finish the tweeter pod designs to have those mount nice and flush on the a pillars. i'll be designing and 3d printing those enclosures.

lots still to do!
You've got skills!
 

genera_lee

Rank V
Launch Member

Enthusiast III

1,993
Reno/Tahoe Area
First Name
Trip
Last Name
Lee
Member #

10497

Ham/GMRS Callsign
KI5GPV
Lots of stuff has happened between May and now.
In summary:
  • took a new job that's remote so i can now work from anywhere I have internet
  • my partner/girlfriend graduated from grad school and got a job in Reno
  • I packed up my whole life and moved to Reno after finding an amazing house in a great area to rent
  • I HAVE MY OWN GARAGE! TOTALLY MINE
  • camped 5 or 6 times since we've moved here, enjoying the Sierras immensely
  • and truck stuff
  • met up with an overland bound contigent here and have been getting a little more involved with that. Even met @HappyOurOverlanding
Here's a couple of pics of me and the doggo moving across the country. Made the drive from central Texas to northern Nevada in 2 days. Rough 18 hour first day to Flagstaff for sure.


I'll have to make a post of just a Summer 21 recap with some pics of camping and hiking photos.

one day While driving around town, I ran across the camper top sitting on the side of the road. Initial reaction was "wow I can't believe someone is just getting rid of that; no way it would fit on my truck" but I turned around anyway to take a peek at it. My partner helped me pick it up and put it on the bed. IT FIT. WHAT. It was pretty clear by the way it fit against the cab that it wasn't for an 89-95 pickup(with how close it fits, I'm guessing it was made for a first gen Tacoma, though I'm not usre of which body style), but it was close enough and $free.99, so I went home and grabbed a few tools and got that bad boy bolted to my bed, real quick. It was definitely lacking in some areas, but it had the right stuff where it counted. There was no back glass, and not all of the mounting points were still there, but it came with some attachment hardware, a serial number, and hinges and ball stud mounts for the back glass, as well as intact glass and hardware everywhere else.


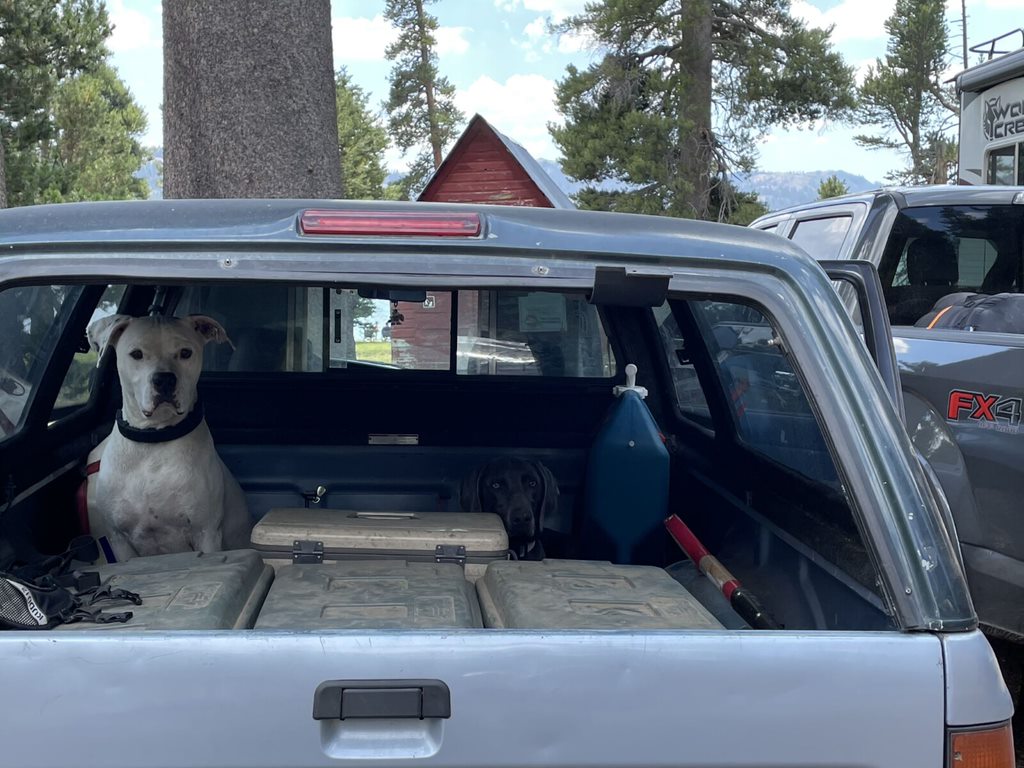
The dogs (and the girlfriend) enjoying the covered bed during a comping trip:


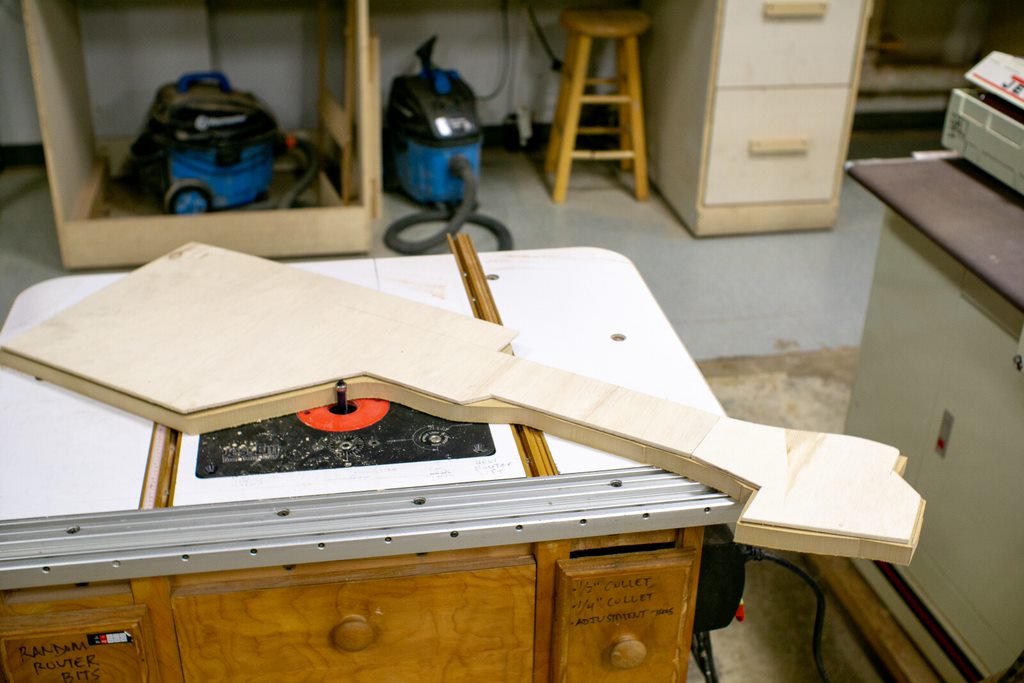
I had the Snugtop dealer in town search the serial number on it and get a hold of Snugtop to see if I could just buy a back window for this (definitely the preferred solution) but apparently they don't make this model of topper anymore and thus don't have any stock of the back window, typical. Like anything else worth doing, I figured I would just do it myself. Then I got to work making "glass" fore the back. I bought a piece of pseudo scrap plexiglass from a plastics supplier in town, then I made that into a pretty close match for back glass, but for much less. I'd worked with Makrolon in the past and knew it could be cut with standard woodworking tools, which is something else I'm into, and I'm a member at a makerspace in town now that has a full woodshop, so I made (relatively) quick work of mocking up the glass into a wood "mold" pattern that I then transferred to the acrylic/plexi. I ordered mounting hardware and then some generic locks from the Amazon, and got everything together and looking fresh.

initial fab:


mockup and mounting:


results:


And in use already:


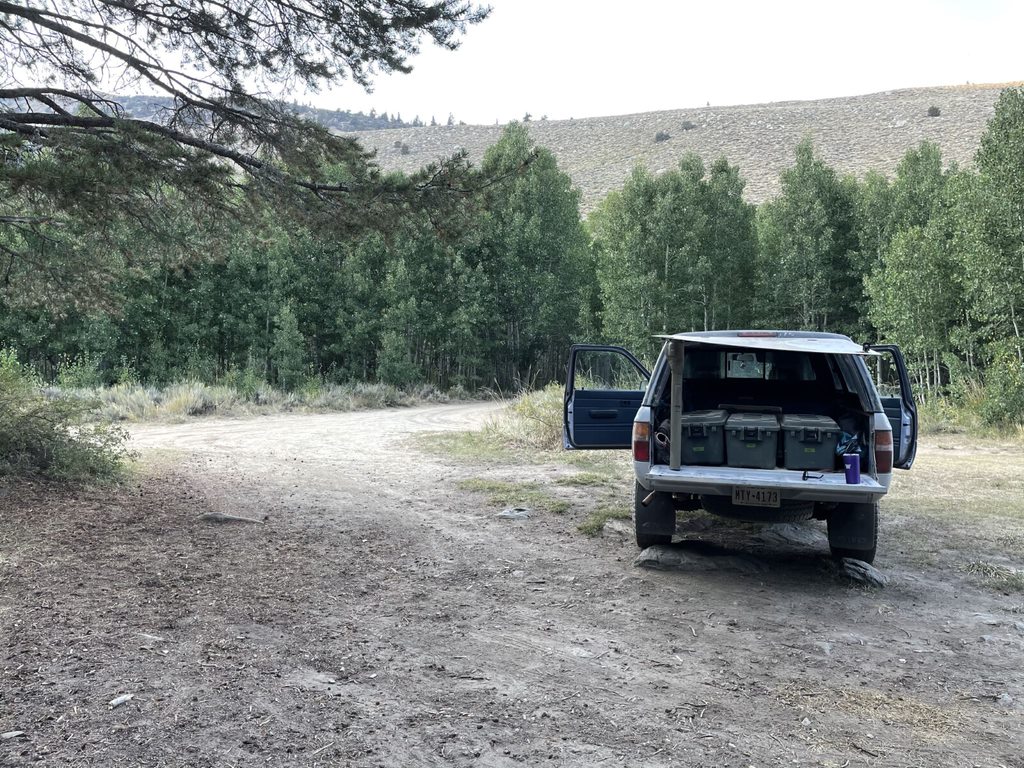
It's not fully done yet, I have a piece of aluminum deep c-channel on order(should be here in 2-3 days) that I'll be adding to the bottom of the window to stiffen it up substantially, as well as adding gas struts to it to make it stay open without a 2x4 :facepalm:. I think i'll glue and rivet that part in place, as well as paint it black, and then apply a piece of camper top window-specific weatherstripping to the back of it to seal the window to the tailgate. Other notable things done that I don't have pictures of, fixing all the wiring so the 3rd brake light works with the running light switch and wiring up the interior camper cab light to function as well. I had a trailer wiring thing under the truck from PO that I'd just zip-tied out of the way. I bought a trailer wiring plug thing and used the plug to wire in power from there, and all the lights are LEDs so I'm not concerned about blowing a fuse from the extra load. I still need to order a new perimeter seal and new mounting j-hooks for the cap to be 100% done, but i'll have less than $200 into it when all is said and done to get a fully functional camper top with all glass, working lights and all the mounting hardware.i also added a piece of pipe insulation across the top of the camper between the cab and camper. This is wedged in there (held onto the camper with gorilla tape) to block the wind from getting forced in between the top and cab; I think i'm going to do this all around the window now so it effectively seals the cab and camper top together. This will hold me over 'til I can get a Softopper in the next year or 2.

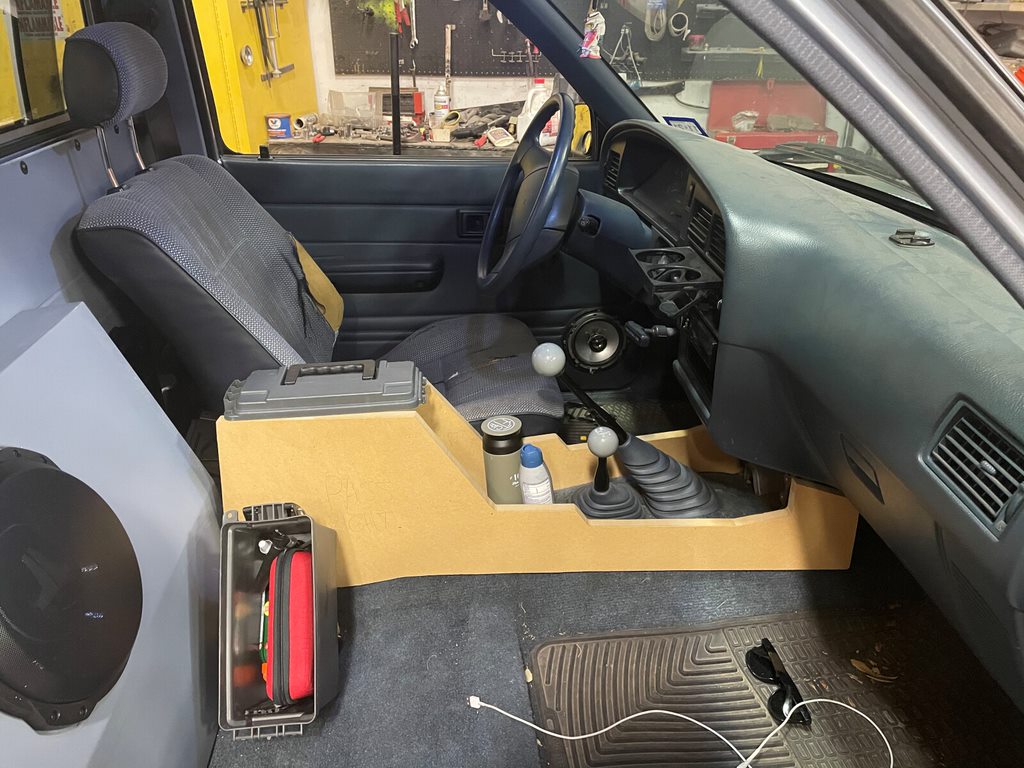
Lastly, I've had an awful intermittent buzzing from the left turn signal only, and I've been able to mostly ignore it for a while, but I have to get my truck inspected to get it registered here, and that won't fly if they can't get the blinker to work first try, tho it always works the second try. I'm currently in the middle of removing the lower dash panel to unplug the master dash plug so I can take apart the switch for the blink stalk and clean it, ugh. I search around and apparently you don't need a steering wheel puller to remove it from these trucks, and I'm glad I searched cause there was a tip in one of the threads about it that said to keep the nut on the steering column when removing the steering wheel. Glad I read that cause otherwise I would have 100% punched myself in the face with my steering wheel.


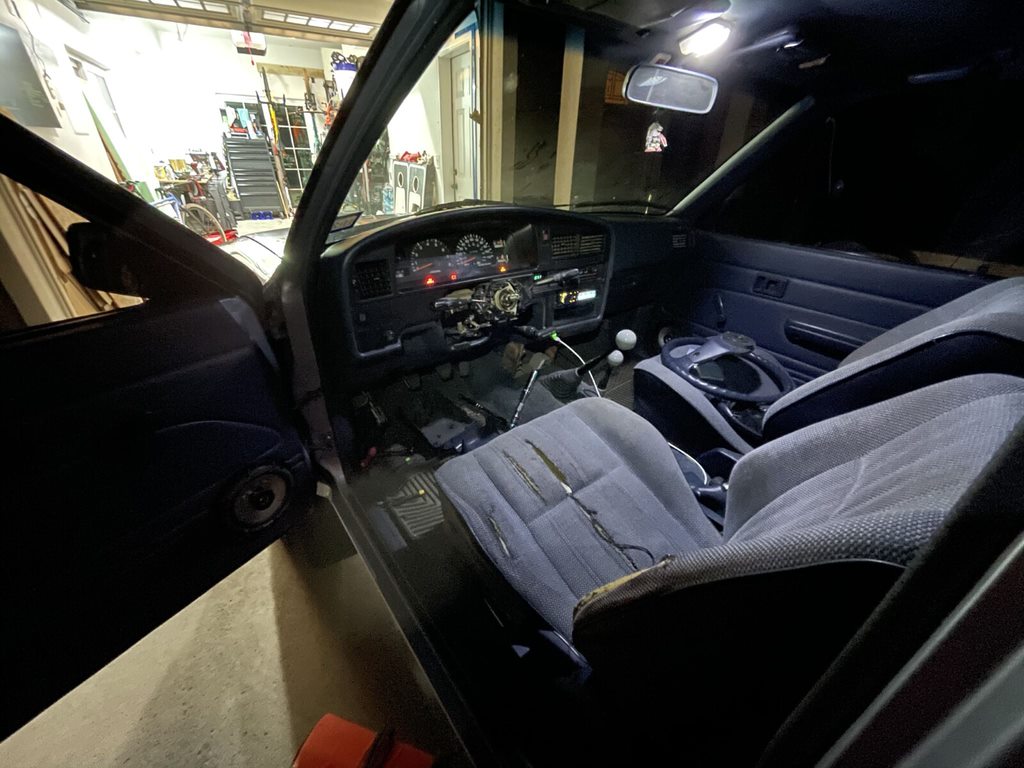
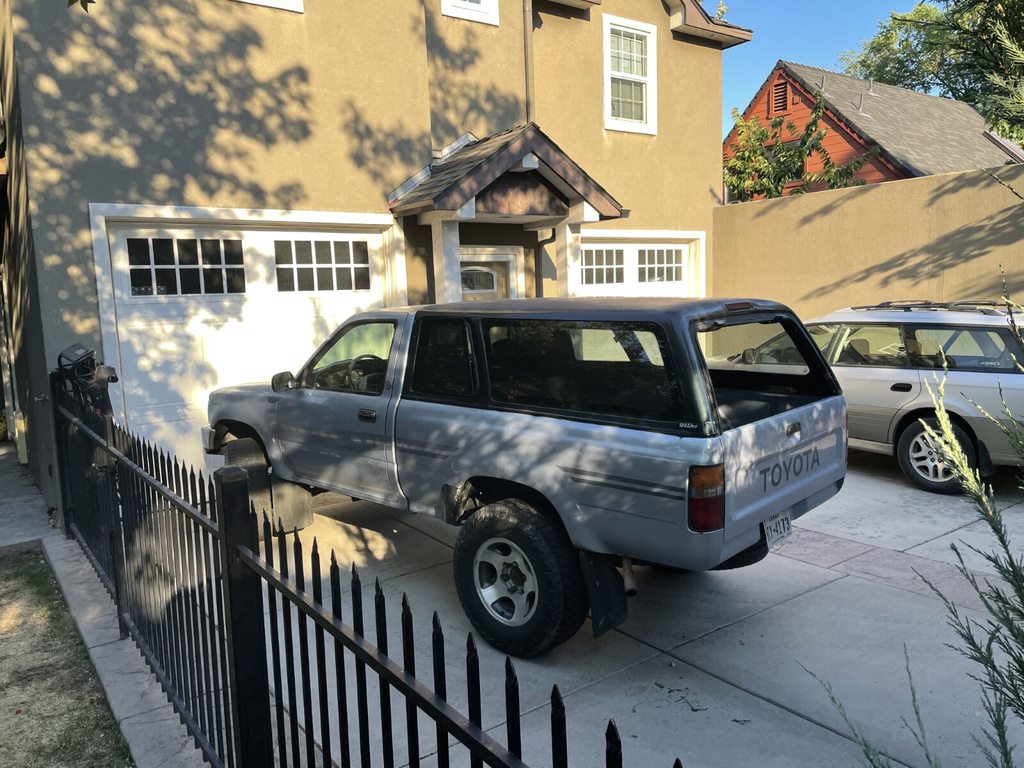
This is how the truck is currently sitting the driveway. I'll finish it up tomorrow. I'm pretty sure i can just clean the contacts in the switch and that should fix everything up good enough for the inspection.
 

genera_lee

Rank V
Launch Member

Enthusiast III

1,993
Reno/Tahoe Area
First Name
Trip
Last Name
Lee
Member #

10497

Ham/GMRS Callsign
KI5GPV
Oh I also forgot to add to this, i went to a wrecking yard in town this week and I scored a set of power windows, the full switch control panel and control box, power mirrors and their controls, wiring for everything, and some other truck odds and ends from a 94 4runner. i'll be installing all these when I do my center console install here coming soon. it'll be center console going in along with the rest of the sound system. i only want to have to take apart the interior one time to do all this stuff (sound deaden, wiring for windows and sound, speaker installs, amp and wiring install, changing some stuff on the back of the headunit, etc)
 
  • Like
Reactions: Offroadnutz

genera_lee

Rank V
Launch Member

Enthusiast III

1,993
Reno/Tahoe Area
First Name
Trip
Last Name
Lee
Member #

10497

Ham/GMRS Callsign
KI5GPV
I fixed my buzzing blinker issue! hopefully for good, we'll have to wait for that to be seen.

i had to remove the steering wheel to get to the multiswitch module behind it (of course i'd also removed the steering column trim panels). with the steering wheel removed, i could then unmount the switch thing from the steering column. it was at this point that i gave up last night, because I discovered that the lower drivers side dash panel also needed to be removed to be able to unplug the switch module from the steering column, as there isn't enough slack in the wires to to pull it off the end of the column without unplugging it. in hindsight, i'm glad this was the case, because this would've been about 400% more frustrating to do on the floormat of the truck.

i moved the whole assembly to the bench and was able to remove the blinker switch mechanism from the module with very little fuss. i was then able to, very carefully over multiple trys, pry the cover off the switch contactor box. it basically uses a small copper bridge to connect a single center power pin to either the left or right blinker circuits. on mine, the point where the left blinker pin makes contact with the sliding copper bar was divoted in and only making contact sometimes. so i cleaned up the whole switch contactor box and replaced all the grease with new dielectric grease. i then sanded down the contactor bar with some 400 grit sandpaper to get it flat and remove the divot if possible. turns out i got got cold feet. i felt the divot was too deep to full remove, so i settled for "good enough', polished it with some 1000 grit, and then reinstalled everything in reverse order. wouldnt you know it... it worked! no more buzzing left blinker. now i can get it inspected with no worries.

heres a few pics of the process and showing the wear on the bar as well as my fix for it.


the divot in the original bar:


contactor pins:


cleaned up as far as i was willing to go. i also stretched that little spring a bit to give it a bit more force on those contact pads and hopefully keep this from happening again:


this really wasnt as bad as i was anticipating. i was dreading the steering wheel removal, thinking i would need a specific tool, but nope, just a little wiggle back and forth and she popped right off. it was also fascinating learning how these switches work, and seeing just how simple each thing was on its own.
i also took apart the window control switch thing i just picked up and figured out how that so cool all the little mechanical devices they used to control motion of small pieces to generate and manipulate electrical signals.
 

genera_lee

Rank V
Launch Member

Enthusiast III

1,993
Reno/Tahoe Area
First Name
Trip
Last Name
Lee
Member #

10497

Ham/GMRS Callsign
KI5GPV
turns out i put my steering wheel on one notch to the right of center :facepalm:

in other news:
got some more work done on the center console. more to come this week too


  • Like
Reactions: Offroadnutz

genera_lee

Rank V
Launch Member

Enthusiast III

1,993
Reno/Tahoe Area
First Name
Trip
Last Name
Lee
Member #

10497

Ham/GMRS Callsign
KI5GPV
a few more pics from the progress from today. got it set to make the floor mounting brackets. lid will go on next week, and i'll start designing the cup holder, front panel, lid clasp, and console bucket so that i can print them out.


genera_lee

Rank V
Launch Member

Enthusiast III

1,993
Reno/Tahoe Area
First Name
Trip
Last Name
Lee
Member #

10497

Ham/GMRS Callsign
KI5GPV
Big news in this one, and some frustration.

Replaced both rod and main bearings in the truck, from the bottom, with the engine still mounted. It's doable, and not fun. An M4 rivnut is the perfect size to roll the main bearings out of the block.

Do yourself a favor and pull the block for this task. My dumb ass didn't and it took me 4 days working on it in the evenings to make it happen.

Pics to come of bearings.

I thought I had a rod knock, so I replaced all the bottom end bearings. Every single bearing land on the crank, rod or main, was smooth as glass, with no scoring or anything. But definitely glad I did it because the front main and rear main bearings were not long for this world. Everything was machined 10 thousandths under(as evidenced by the 0.010 on the old bearings, and replacing them with 0.010 bearings with them all plastigaging in spec for oil clearance), so I assume this engine had been gone through in its previous life, cause I doubt it would come like that from the factory.

The worst part about this whole thing is it only took away about half the noise. Just adjusted the valves to 0.007 and 0.011 hot, and brand new main and rod bearings with everything looking pristine and the valve train is still super noisy, to the point I thought I had a rod knock... timing chain was done about 50k ago by me, so possible that its timing chain rattle due to a bad tensioner(metal backed guides looked fine from the top and below), but it definitely sounds like it's coming from rockers for 3 or 4 when listening with my poor man's mechanic stethoscope (a piece of vacuum line). Could also be an exhaust leak but didn't feel anything substantial enough to be detected by hand or with the vacuum line.


Gonna adjust to 0.006 and 0.010 and see if it quiets down.

Painting the center console tonight, so it'll be protected 'til I can get it wrapped in vinyl. Also printing out all the parts for it hopefully this week, then adding power windows, locks, and mirrors!!

Then finishing the sound system and getting it tuned!!
 

genera_lee

Rank V
Launch Member

Enthusiast III

1,993
Reno/Tahoe Area
First Name
Trip
Last Name
Lee
Member #

10497

Ham/GMRS Callsign
KI5GPV
as promised, bearing pics:

rod bearings, rod side on left, cap side on right, 1 on top, 4 on bottom. looks like only one had worn totally thru the babbit layer in one small spot.


main bearings, same thing. block side on left, cap side on right, 1(closest to oil pump) on top, 5(rear main seal area) on bottom.


this one is definitely interesting, and possibly the source of the noise on startup. 1 and 2 had some wear in the area directly in line with the alternator and power steering pump. I don't have AC so those are the only off-center accessories. the wear is very clear in that direction. and on 5, the wear is pretty much on the opposite side of the bearings from #1 and 2. 3 and 4 looked pretty good (as in more evenly worn) but still glad I did this.


journals:


all con and main bearing journals were glass smooth and pristine looking, checked a few with my calipers (not calibrated recently but I trust them to ~ 0.0005") and they all seemed fine. thrust bearings also looked good but got replaced anyway, and crank endplay was fine with new bearings. plastigaged every journal for oil clearance and they all fell right in the middle of the tolerance zone with the new bearings.
And now the knocking on startup is totally gone, so it was worth it. I also fixed the major oil leak I had (possible culprit to all of this) so this shouldn't happen again.
 
  • Like
Reactions: Offroadnutz

genera_lee

Rank V
Launch Member

Enthusiast III

1,993
Reno/Tahoe Area
First Name
Trip
Last Name
Lee
Member #

10497

Ham/GMRS Callsign
KI5GPV
So do you think the belts were over tightened for to long?
I think my truck leaked enough oil that I didn't keep up with it well enough and and it allowed a bunch of wear on startup and idle to accumulate due to low low oil pressure. And the belt wear is just where it shows the most. Could be over tightened belts too but my money is on oiling system first, then belt tightness wear indication as a symptom
 

genera_lee

Rank V
Launch Member

Enthusiast III

1,993
Reno/Tahoe Area
First Name
Trip
Last Name
Lee
Member #

10497

Ham/GMRS Callsign
KI5GPV
Wow it's been over a year since I posted here. Honestly can't believe all the commercialization of this forum. I paid for it already though so here I am...

Anyways.

Lots has happened. I'll post more in the coming weeks. Build wise, a quick recap:

1. Refreshed interior and crushed the install of a bunch of sound deadening and whatnot in the cab. Plus install of some high end Focal component speakers and a tune.
2. Built a modular truck bed platform with a drawer. Proven out now, but still needs some refinement, as does my topper.
3. Rear diff ate a pinion bearing so I replaced the whole diff with one from another truck
4. Rear axle bearings also needed replacement, so I just took care of that
5. Picked up a 3.0L inline 6 from a '91 supra that I have started to tear down to eventually swap into the pickup

Upcoming things to be done:
1. Front end refresh, looks like my Pitman arm is starting to wallow out, and it's only a matter of time before the other tie rod ends and whatnot start to go.
1.1. Front wheel bearing assessment and possible r&r
2. Rear lift helper springs install
3. Front ball joint spacer lift, diff drop.
4. Tires, upsize, maybe new wheels. (Obligatory clearancing also)
5. Alignment
6. Wheel

More updates with pics to come. Mostly jusy copy paste from my main forum page...‍♂
 
  • Like
Reactions: GLOCKer

Offroadnutz

Rank VI
Launch Member

Member III

3,257
Texas/Missouri
First Name
Steven
Last Name
M
Member #

21045

Wow it's been over a year since I posted here. Honestly can't believe all the commercialization of this forum. I paid for it already though so here I am...

Anyways.

Lots has happened. I'll post more in the coming weeks. Build wise, a quick recap:

1. Refreshed interior and crushed the install of a bunch of sound deadening and whatnot in the cab. Plus install of some high end Focal component speakers and a tune.
2. Built a modular truck bed platform with a drawer. Proven out now, but still needs some refinement, as does my topper.
3. Rear diff ate a pinion bearing so I replaced the whole diff with one from another truck
4. Rear axle bearings also needed replacement, so I just took care of that
5. Picked up a 3.0L inline 6 from a '91 supra that I have started to tear down to eventually swap into the pickup

Upcoming things to be done:
1. Front end refresh, looks like my Pitman arm is starting to wallow out, and it's only a matter of time before the other tie rod ends and whatnot start to go.
1.1. Front wheel bearing assessment and possible r&r
2. Rear lift helper springs install
3. Front ball joint spacer lift, diff drop.
4. Tires, upsize, maybe new wheels. (Obligatory clearancing also)
5. Alignment
6. Wheel

More updates with pics to come. Mostly jusy copy paste from my main forum page...‍♂
I did a 7MGE in my 85, coupled it with a w56 and still went through a transmission every other year. Night and day difference in power though.
Curious to find out how your sound deadening went. I did a bunch on my 4runner with negligible results.