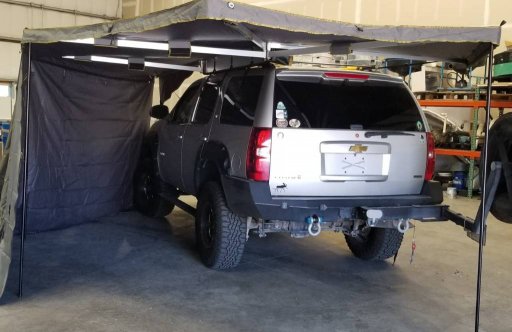
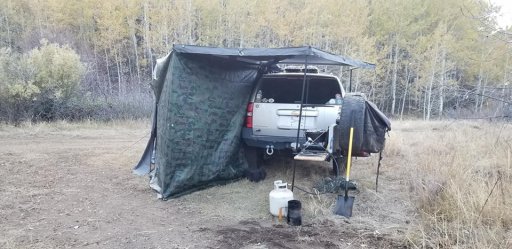
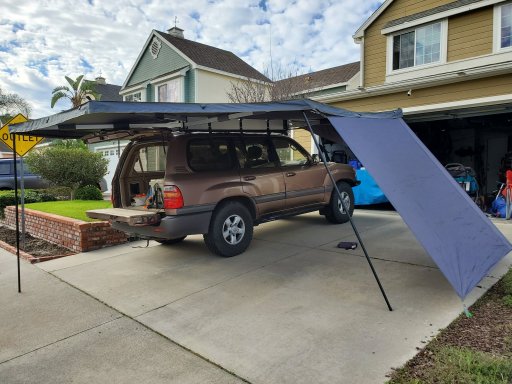
This looks like exactly what I'm looking for. I'll call Tuesday and we'll get one more in for the group buy!
Nomadic 270 degree awning form Overland Vehicle Systems
- Thread starter Charles M
- Start date

Enthusiast III
- 646
- First Name
- Justin
- Last Name
- Ackerman
- Member #
-
21138
I’m in! Sold my rhino rack batwing in favor of this. Like the option of not using poles if it’s light wind. I’ll be picking up at the warehouse.
I got mine! Got to install my prinsu rack this weekend and I'll be all set to mount it. Unfortunately had to return a Rhino pioneer rack since it can't support the weight.

Enthusiast III
- 646
- First Name
- Justin
- Last Name
- Ackerman
- Member #
-
21138
Mine will go on my Smittybilt Scout trailer. So weights not an issue.

Enthusiast III
- 646
- First Name
- Justin
- Last Name
- Ackerman
- Member #
-
21138
For those who have it, do you notice any sag in the hinges when not using the legs? OVS told me it can sustain winds up to 25mph without legs. Any real world comments would be great!!! Not many video reviews out there.

Member III
I don't see any sag in the hinges they have solid bushings and stainless steel bolts but, when I deploy mine I normally use the legs because they are already attached to three of the rafters so, each one would only take about 30 seconds to deploy it. If you had a lot of wind like some of the 50+ mph gusts mine has been up in you should put the extra poles on. Then I put up the standard 3 poles that are attached and also 3 (more poles that are supplied with the awning) on the remaining rafters and staked them down.For those who have it, do you notice any sag in the hinges when not using the legs? OVS told me it can sustain winds up to 25mph without legs. Any real world comments would be great!!! Not many video reviews out there.
The poles you see in this photo are always attached to the rafters (but they are removable) You can see how sturdy the rafters are on this awning.


Enthusiast III
- 646
- First Name
- Justin
- Last Name
- Ackerman
- Member #
-
21138
Do you have all the side panels? If you were to have just one of three which would you get??I don't see any sag in the hinges they have solid bushings and stainless steel bolts but, when I deploy mine I normally use the legs because they are already attached to three of the rafters so, each one would only take about 30 seconds to deploy it. If you had a lot of wind like some of the 50+ mph gusts mine has been up in you should put the extra poles on. Then I put up the standard 3 poles that are attached and also 3 (more poles that are supplied with the awning) on the remaining rafters and staked them down.
The poles you see in this photo are always attached to the rafters (but they are removable) You can see how sturdy the rafters are on this awning.
View attachment 137070

Member III
Right now I only have the first side panel I would like the second one too though. I have enclosed the awning with a tarp for some winter camping when hunting. The only reason I would not get the last panel is my cooking station does not fit inside it. The second section would end right at the pole by my table. I need to call and see if I can get a deal on just the second section.Do you have all the side panels? If you were to have just one of three which would you get??


Enthusiast III
- 646
- First Name
- Justin
- Last Name
- Ackerman
- Member #
-
21138
What vehicle was your pioneer mounted on? I’ve been looking at them for my 5th gen T4R.I got mine! Got to install my prinsu rack this weekend and I'll be all set to mount it. Unfortunately had to return a Rhino pioneer rack since it can't support the weight.

Contributor III
Hey! Love your description of this awning! Do you mind letting me know where you purchased it from for 750.00? Thank you!I have been looking at awnings for some time now there are so many to choose from.
I have seen awnings on trips that folded up like a taco from even a slight wind and many provided elusive to little shade. Some of the larger 270-degree units were either very weak or very expensive or both. I believe quality and good engineering are very important. I also did not want to pay too much money yet I do believe in “You get what you pay for” With several months of studying different types of awnings and visiting the Overland expo in Flagstaff and getting to see in person many of the offerings available. Manufacturers, pricing, quality and of course what fits my needs best went into my decision.
I came across a thread here on Overland Bound about awnings and someone mentioned a Nomadic 270-degree awning from Overland vehicle systems after asking the owner a million questions and hearing the right answers I decided to give the Nomadic 270-degree awning from Overland vehicle systems a try. It sells for $750 plus I decided to get the awning wall 1 for an extra $239 but the total was still under $1,000 shipped to my door. They have FREE shipping...
View attachment 116020
19519907 OVS Nomadic Awning 270 - Dark Gray Cover With Black Cover Universal
Installation was easy with heavy duty L-brackets and U-bolts supplied in the kit. They will easily fit most 1 1/2 inch or smaller cross bars. In my installation I used the L-brackets and drilled through my 3-inch-wide cross bars for a very solid mount. While working on it I learned something new about my Tahoe rack mount... They are NOT level the rear is 3/4 inch higher. I made my homemade cross overs months ago for my canoe but after measuring my side rail I found the rear is much lower. So, I made up a third crossover for mounting the awning 3/4 in. higher so the awning would be level with the ground. You can see in this photo the rear section has a much larger gap. My crossovers are wing shaped and too wide for the U clamps supplied with the awning. The L brackets are around a 1/4 inch thick.
View attachment 116021
The arms are very strong with clean welds and stainless hardware throughout it is a well-designed unit. Canvas is heavy and blocks all the sun, so you won’t feel much if any heat coming through it. This canvas is heavy duty so, I expect it to last a long time. The stakes look like very large nails with a plastic bar on top to hold the rope a lot like the heavy stakes you pay a buck or more for. Poles are strong screw adjustable yet very light weight.
The canvas is held in place on the rafters with large canvas straps you can see them in the photo below those straps also hold three support poles in place when they are not in use.
View attachment 116022
Opening it is fast and easy it takes about 15 minutes to open set three poles in place install wall1 and stake it out. The following is with awning wall 1 with the first section staked out with poles and side door opened up.
19519907 OVS Nomadic Awning 270 - Dark Gray Cover With Black Cover Universal
View attachment 116023
19519907 OVS Nomadic Awning 270 - Dark Gray Cover With Black Cover Universal
Pros; Strong, lots of shade, versatile, affordable, Right or Left side units are available, three wall sections available, ropes have reflective stripes in them with quick adjustments.
Cons; It takes a little more time and effort to get it stored away than it should. I would like to see them extend the length of the retaining straps so tightening them would be easier and making the outer cover slightly looser in the front so it might be easier to zip it up. Three outer walls cost almost as much as the awning.
I suggested they make another inner wall for this to section off part of it for more privacy. I highly recommend the Nomadic 270 degree awning it is a very good and usable product. It was certainly a hit with other members of Reno Overland bound.

Enthusiast III
- 646
- First Name
- Justin
- Last Name
- Ackerman
- Member #
-
21138
You can get it straight from OVS for that price. I’m picking mine up next week from their warehouse in Santa Fe Springs.Hey! Love your description of this awning! Do you mind letting me know where you purchased it from for 750.00? Thank you!

Member III
My price was last years price but, if you call right away they are doing a special for Overland Bound members that is very close to what I paid.Hey! Love your description of this awning! Do you mind letting me know where you purchased it from for 750.00? Thank you!
Finally. Finally got mine installed this week. I'll post photos when I get a field test going, but I popped it open in the driveway and I love it. The tent sides are thick and will protect from wind and rain. The awning is insanely stable even without the legs down. I can see packing it back up being a bit difficult in cold weather because it has to be folded/rolled very tightly to fit back into the bag. The 270 has enough room for easily 4, potentially 6, maybe even 8 people to hang out comfortably and stay dry during a rainstorm. It's actually more spacious than I thought.
A few things I learned:
A few things I learned:
- The height when collapsed is taller than most awnings, so check your garage height and if you opt for using rack mounting brackets from your roof rack manufacturer (I used some from Prinsu) know that they may not fit the height of the awning. Prinsu told me they will work on fabricating a taller bracket model.
- It's heavy! It took 3 to install. My wife on the roof aligning the bolts and me and a buddy holding it up. Could have done it with two, but it would have taken us twice as long.
- 4Runner owners: you won't be able to open your rear hatch. Anything that opens upward will encounter a support beam on the way up. Luckily we have the 4runner's rear rolldown window and I'm fine with just using that.
- Side panels: we opted correctly here from what I can tell. Got the 2 panels that cover the rear of the vehicle. I think this makes for cozy spot, but ultimately this comes down to preference.
- Passenger vs driver-side: I got the passenger side with the following rationale:
- I typically drive, so my wife can pop out and work on awning setup while I grab bins off the roof rack on my side. Efficiency.
- When backing into a typical campground site, the camp setup spot is on the passenger side. RVs and campers are set-up with doors on that side for the same reason. Awning is near the camp site.

Member III
Mine is a hatch back type opening, I lifted the awning an inch or two for some clearance some other tricks I use.
I tighten the front strap first pulling it forward.
I also use the poles to lift the awning up a little more.
I glued some carpet on the arm to protect my glass from getting scratched too...
Check out some of my photos. Good luck with it.
I tighten the front strap first pulling it forward.
I also use the poles to lift the awning up a little more.
I glued some carpet on the arm to protect my glass from getting scratched too...
Check out some of my photos. Good luck with it.

Enthusiast III
- 646
- First Name
- Justin
- Last Name
- Ackerman
- Member #
-
21138
Just picked my Nomadic 270 from the OVS warehouse. Also grab the number 3 panel as I can zip it in at any location for a wind or sun block. Thanks Sean for the hook up!! Once I get it mounted on my Smittybilt Scout trailer I’ll post pics.
Does wall three zip up to the Wall 1 areas as well? I am trying to figure out which wall I should get and was considering just getting Wall 1 and 2.Just picked my Nomadic 270 from the OVS warehouse. Also grab the number 3 panel as I can zip it in at any location for a wind or sun block. Thanks Sean for the hook up!! Once I get it mounted on my Smittybilt Scout trailer I’ll post pics.
I picked up my awning on Friday. The OVS team went out of their way to find one locally at another warehouse since the passenger side was out of stock in their HQ. Really impressed with their costumer service.

Enthusiast III
- 646
- First Name
- Justin
- Last Name
- Ackerman
- Member #
-
21138
Sean said it would.Does wall three zip up to the Wall 1 areas as well? I am trying to figure out which wall I should get and was considering just getting Wall 1 and 2.
I picked up my awning on Friday. The OVS team went out of their way to find one locally at another warehouse since the passenger side was out of stock in their HQ. Really impressed with their costumer service.
I installed my Nomadic 270 on my Land Cruiser 100 with a Prinsu rack. Thanks to trailRunner and all those on here for all the tips.
I mounted it at the highest point. My split hatch makes contact on the bars, but only on the metal and not on the glass, and it happens to hit just where it's padded. I also had an old 210D tarp that I was using with my previous awning and it works pretty well as a makeshift sidewall.
I ordered some stainless hardware that fit in the slots in my Prinsu 80/20 cross bars and spaced the mounts so it clears the side rails. Here's my parts list from McMaster Carr if anyone is in a similar situation. Last two are not absolutely necessary since you can reuse the washers from the original hardware kit that came with the awning.
92356A542
94407A104
91525A416
96765A140
After looking at the build and design more and more, I am pretty convinced these are similar and/or identical to the Darche Eclipse Gen 1.
Attachments
-
601.7 KB Views: 80
Last edited:
Did a little video review of the awning I’ll list below, but if you skip to the end you’ll see my tips on folding the awning back up. The first few times I tried it was a real PITA, but after talking with Sean and using his tips I found it’s not too bad to do by yourself.


