July '17: LED Reverse lights.
I’ve always liked having an auxiliary set of reverse lights on the Wrangler, and though the factory ones on the WK2 are as impressive as the headlamps, I wanted something I could switch on at any time, and looked sleek. While I wish that I could have used more Black Oak LED products for this, they unfortunately don’t offer a single-row unit for flush mount, instead as of this point only a 2x2 which wouldn’t work for my space. Because of this, I turned to Rigid for their flush-mount version of the SRM reverse light kit that I run on the TJ. Easily purchased on Amazon Prime, they cost about $150 for the kit. Picking a day that my friend Topher from our overland group could help me install them, I drove up to his newly built barn on the North Shore of Mass and we got to work.
First up was to remove the interior trim from the back of the trunk. I started by taking out the rear deck piece, and then removed the spare tire and its accessories. After unbolting the two tie-down mounts (8mm nut) from the rear-most trim piece, I popped that out to gain access to two bolts that hold the spare tire surround to the body of the Jeep. Those are a 10mm nut in the rear, then by folding the middle bench down I removed the snapped-in floor level piece to gain access to two Phillips head screws that hold the front of the tire surround in place. At that point I had free access to fold back the sound-deadening floor mat that lives under the spare tire, and got my first great view of the space I had to work with for wire routing.

Rigid SRM Reverse Kit by
2180miles

WK2 Trunk Space by
2180miles

Remove Floor Transition Piece by
2180miles

Empty Trunk Space by
2180miles,
I’ll point out the suspension’s air tank up behind the rear bench there… kind of neat to see.
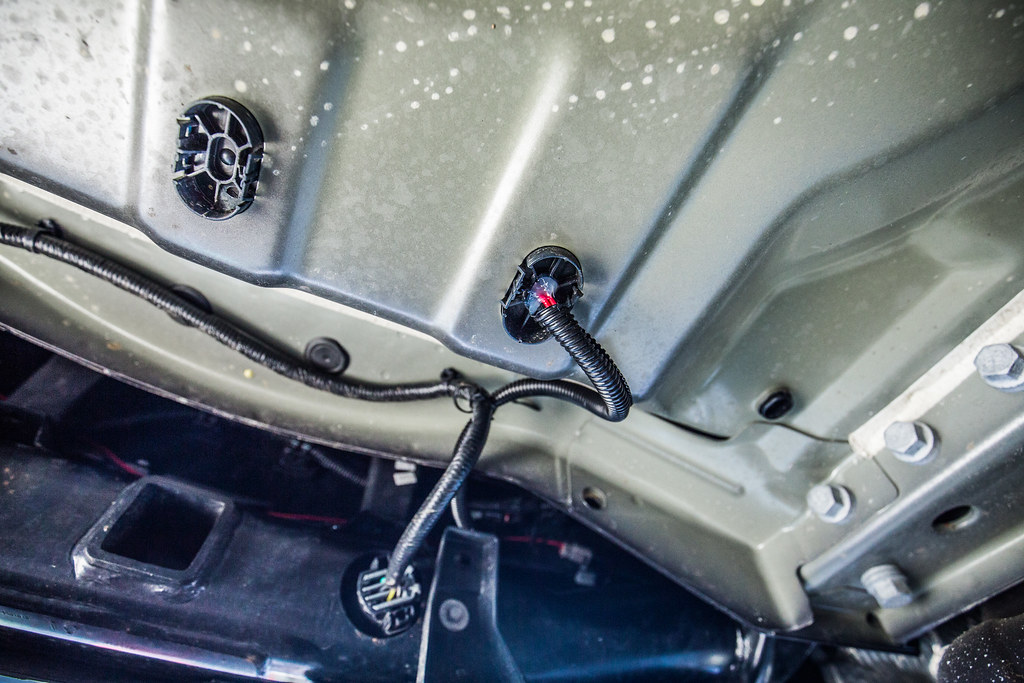
Comparing the trunk space with the vast amount of space underneath the body, I looked at three plugs that were towards the back of the vehicle. Utilizing a step-bit, I drilled the left-most one out to the width to accommodate the 4-wire harness that the reverse lights utilize. Once it was drilled out and cleaned up, I placed a grommet around the immense wire harness (seriously, props to Rigid for including what must have been +20’ of wire loom on this kit for those huge pick-up truck installations) and installed the grommet to the new hole in the Jeep’s floor, leaving enough slack underneath to allow the pre-made harness connections to reach the left and right sides of the rear bumper.
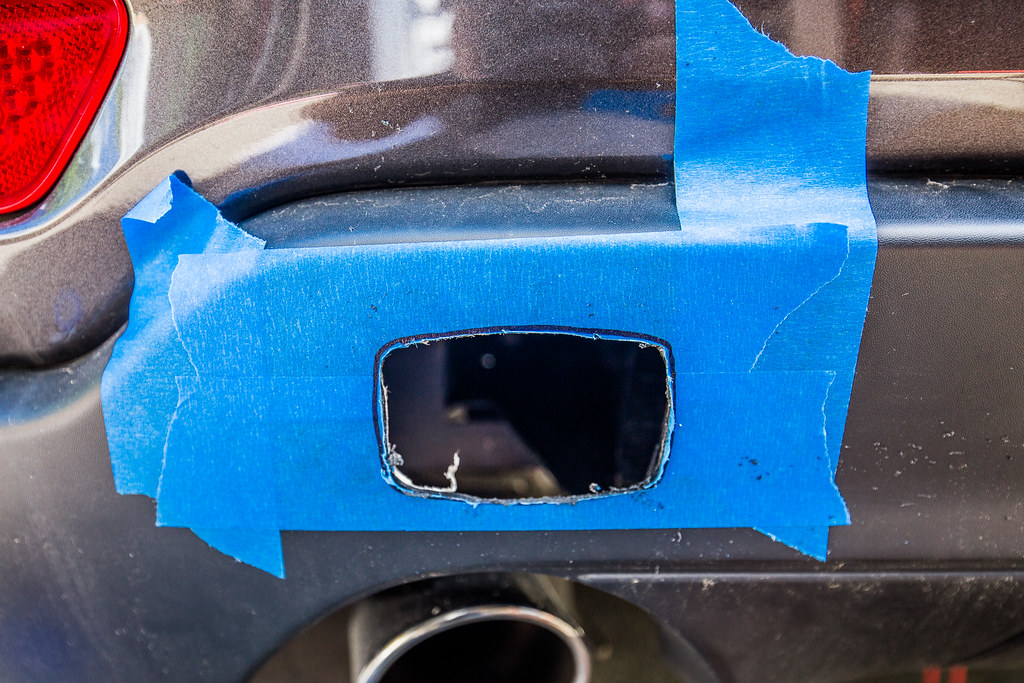
Next up was figuring out where the lights were going to go, though unfortunately with the WK2 there aren’t many options. The steel bumper/crossmember runs almost the entire width of the tailgate, leaving only 6” on either side of it (above the tail pipes) before running into heat shield. That settled that pretty quickly, the lights would live wide on the outside… probably better anyway, and where I had originally intended, but just so any future people know, there isn’t much room for options.
Covering each area with painter’s tape, Topher cut out the stencils and I applied them to the bumper, checking for center and level as I went to try and get it as close to perfect as possible the first time. I used my Dremel cut-off wheel (obviously a favorite tool in this build) to cut out the rough rectangular shape, then a sanding bit to shape it to the light itself. A couple test-fits and some additional sanding allowed the lights to slide in effortlessly and wiggle around a bit, leaving me with the final task of drilling the mounting holes in the lights final position.

Rigid Template 2 by
2180miles
Rigid Template Cut Out by
2180miles

Rigid Template Rear Cut Outs by
2180miles

Rigid SRM Test Fit by
2180miles
Topher had to meet with the new barn’s General Contractor, so I took some time to clean up my wire looms both inside and out of the vehicle. After finalizing the lengths needed for the water-tight connectors to reach the light fixtures on each side, I used some of the plastic wire-wrap Rigid included to get from the hole in the floor to the rear bumper where I zip-tied it to the existing trailer-wire harness. I cleaned up the runs on both sides to the lights, then worked on the inside of the vehicle to route them.
I followed along the lines of the Black Oak LEDs 30” bar on the roof, using the wire wrap once I was out from underneath the flooring carpet (not wanting it to bulge unnecessarily) then ran the loom to under the rear bench where I could again tie it into the electrical control panel.
At about that point, Topher came back and we were able to, albeit with some frustration, mount the hardware. I wish I’d triple checked my cut region when making the holes, as even a half-inch further outside on both ends would have allowed me to get the hardware in without issue. As it was I had to tape a loc-nut to a stubby wrench to hold the nut in place on each inside fastener. Lesson learned for next time, I guess…. Save yourself the struggle and triple check your measurements even after you’ve double-checked them.
Tightening them down securely, we checked to make sure the included grommet around the light had seated well, which it had. No issues with fitment or flushness with the plastic bumper, and the lights are nicely faced down a bit to illuminate the landscape behind the vehicle. I tied the wire into the control box, and tested the dash-mounted reverse light switch, finding that they worked brilliantly.
Total time on the install, including hanging out with his new puppy for a while and grilling burgers: about 3 hours.
Under Trunk Wiring by
2180miles

Rear Bumper/Crossmember Wiring by
2180miles

Trunk Grommet + Sealant by
2180miles

Wire Routing by
2180miles

Partial Trim Reinstallation by
2180miles


