Halley - WK2 Trailhawk Overland Build
- Thread starter 2180miles
- Start date
You are using an out of date browser. It may not display this or other websites correctly.
You should upgrade or use an alternative browser.
You should upgrade or use an alternative browser.


Off-Road Ranger I
Awesome job on the install, great write up as well, and it looks fantastic!
Great write up.
That is a super clean winch setup, outstanding!
Really like your mods so far, keep up the clean work.
Great build and write up!
Thanks all! Appreciate the kind words. Winch has been phenomenal thus far. More to come for sure!
Off-Road Ranger I
Also Last Spring...
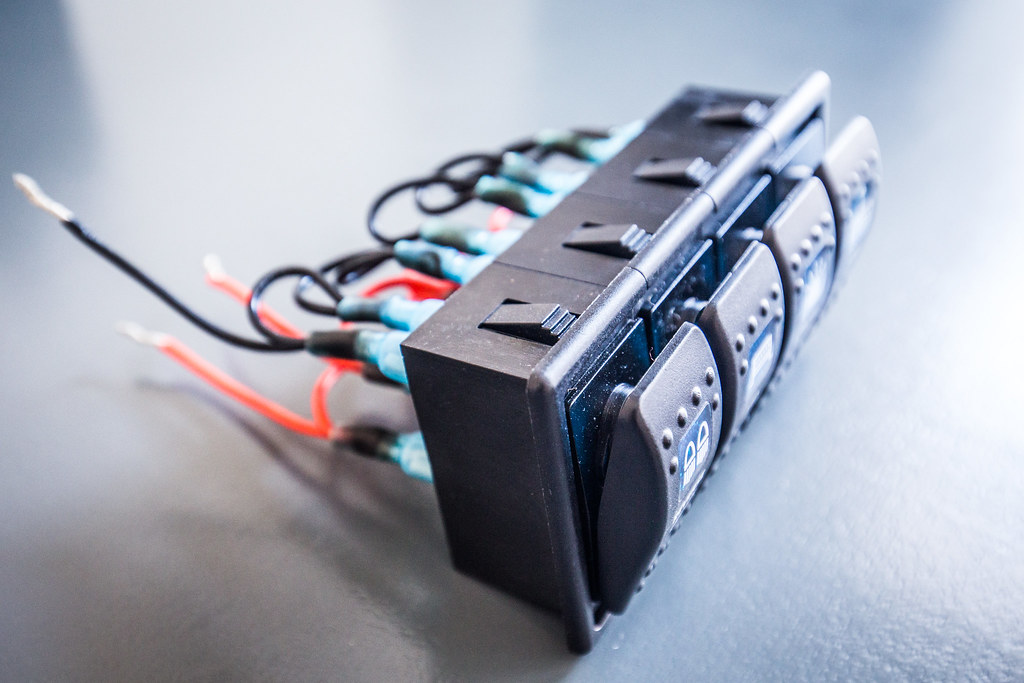
One of the most important things for me in vehicles is visibility. The TJ has a LOT of LED lighting, strobes, etc. - so the plan for the WK2 was bound to be pretty intricate as well. First step for any additional lighting is figuring out how it’s going to be controlled, and from where it’s going to be controlled. After Googling a fair amount of options, seeing if anyone had built vehicle-specific panels, I went ahead with my initial plan to install a switch panel to the lower left side of the steering column. There was a great write-up by a guy on JeepForum a few years ago that followed along the same lines as my idea.
I wanted/needed to keep the switches refined and purposeful, so I had to decide which each of the four Contura switch spaces would control. For me, reverse light is hugely important… second to that is forward facing light, so recessed driving lights or some kind of LED bar will get a spot. Third up in my mind is a strobe light system, as I’ve spent many years with one in the TJ and often find myself pulling over to help people on the side of the road, or utilizing them for other situations in bad weather and the like. Spot 4 then became a catch-all, or an expansion slot.
So:
Switch 1: Reverse LED Lights
Switch 2: LED Bar (likely roof mounted)
Switch 3: LED Strobe System
Switch 4: For the mean time, VHF radio power.
With a quick Amazon order for switches, wiring, heat-shrink crimp connectors, and the 4-space mount, I got to work. The VHF switch cover was from eBay for an extra seven bucks.

Switch Panel - Front by 2180miles

Switch Panel - Rear by 2180miles
Switch Panel - Side by 2180miles
One of the most important things for me in vehicles is visibility. The TJ has a LOT of LED lighting, strobes, etc. - so the plan for the WK2 was bound to be pretty intricate as well. First step for any additional lighting is figuring out how it’s going to be controlled, and from where it’s going to be controlled. After Googling a fair amount of options, seeing if anyone had built vehicle-specific panels, I went ahead with my initial plan to install a switch panel to the lower left side of the steering column. There was a great write-up by a guy on JeepForum a few years ago that followed along the same lines as my idea.
I wanted/needed to keep the switches refined and purposeful, so I had to decide which each of the four Contura switch spaces would control. For me, reverse light is hugely important… second to that is forward facing light, so recessed driving lights or some kind of LED bar will get a spot. Third up in my mind is a strobe light system, as I’ve spent many years with one in the TJ and often find myself pulling over to help people on the side of the road, or utilizing them for other situations in bad weather and the like. Spot 4 then became a catch-all, or an expansion slot.
So:
Switch 1: Reverse LED Lights
Switch 2: LED Bar (likely roof mounted)
Switch 3: LED Strobe System
Switch 4: For the mean time, VHF radio power.
With a quick Amazon order for switches, wiring, heat-shrink crimp connectors, and the 4-space mount, I got to work. The VHF switch cover was from eBay for an extra seven bucks.
Switch Panel - Front by 2180miles
Switch Panel - Rear by 2180miles
Switch Panel - Side by 2180miles
Off-Road Ranger I
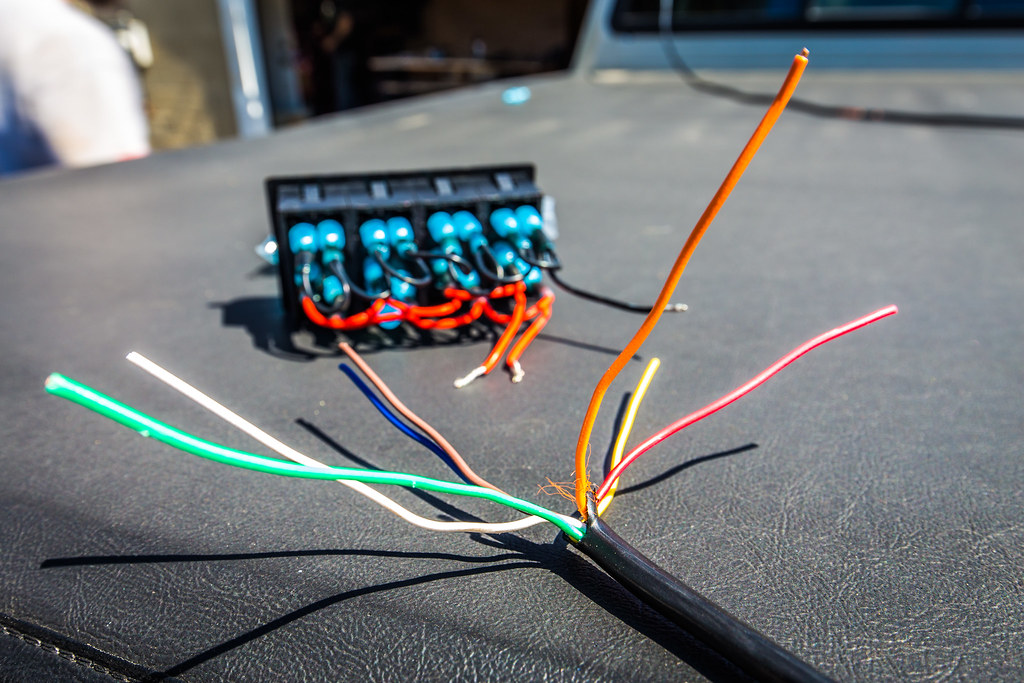
The Contura switches I bought were 5-pin versions… Inputs: +12v for the status light and power source, +12v for the locator light (to find the switch when it’s off), and a ground. Outputs: ground loop, +12v for the light itself. It took some research to find out the exact way to wire this, but once I knew I got to work on an 18awg wire loom for them all. The night I put it together I was sitting in my girlfriend’s office as she worked late and finally had to reassure her coworkers that I wasn’t building a bomb in their workplace. Final results were clean, I was happy.
From there I had to figure out what kind of wire loom I would use to get from the eventually-will-be-built control box (relays, fuses, flux capacitors, etc) to the switches. I knew each of the 4 switches would need an individual wire strand to trigger each respective relay, then all would need a +12v lead which they could share, and a ground which they could also share… this brings us to 6-strands of wire for those who can’t count fast.
I work in the live events industry; so 5 and 7 pin cable is a common thing in my life. The issue that I had was the fact that most of those wires, as well as DB9 data cable, are mainly 22-26 AWG, which although it’s okay to push ~0.33A down through, I didn’t want to mess with having to crimp 24 gauge cable to the switch pins. A quick run to Home Depot for 7-strand thermostat cable yielded me a more substantial 7-strand (solid core vs stranded) wire for sprinkler system installations. The other benefit of sprinkler versus thermostat is that the latter was brown, while sprinkler wire housing is black… cleaner to install and easier to hide.
Once I had the wire in hand, I cut each strand to the appropriate length. Red and White would be my hot and ground lines for easy decoding, and the color-coding of the rest would be easy enough to remember for when it’s time to install the control box. In order of (ROYGBIV) I continued past red with Orange on switch 1, Yellow on 2, Green on 3, and Blue on 4. I cut each of the wires to specific lengths to make the sprinkler loom sit cleanly against the switch panel, and then went ahead and crimped/heat shrunk the wires to mate with their female crimp-on ends. I added a separate +12v line made of a miscellaneous five foot section of 14awg wire to tie into an ignition-based +12v line to turn on the locator/indicator LEDs in the bottom of the Contura switches, separate of the ignition.
In laymen’s terms, I wanted the indicator lights to come on with the ignition of the vehicle, but the lights themselves (strobes/rev/LED) to be able to remain on even when the vehicle is turned off. The latter will get their +12v lead from a fuse panel directly tied to the battery.
The result was a rather clean switch panel, parallel grounds and +12v for the leads and switch LEDs, and a 15-foot wire-loom for the relays to be triggered by.
18-7 Sprinkler Wire by 2180miles

Switch Panel Template by 2180miles
From there I had to figure out what kind of wire loom I would use to get from the eventually-will-be-built control box (relays, fuses, flux capacitors, etc) to the switches. I knew each of the 4 switches would need an individual wire strand to trigger each respective relay, then all would need a +12v lead which they could share, and a ground which they could also share… this brings us to 6-strands of wire for those who can’t count fast.
I work in the live events industry; so 5 and 7 pin cable is a common thing in my life. The issue that I had was the fact that most of those wires, as well as DB9 data cable, are mainly 22-26 AWG, which although it’s okay to push ~0.33A down through, I didn’t want to mess with having to crimp 24 gauge cable to the switch pins. A quick run to Home Depot for 7-strand thermostat cable yielded me a more substantial 7-strand (solid core vs stranded) wire for sprinkler system installations. The other benefit of sprinkler versus thermostat is that the latter was brown, while sprinkler wire housing is black… cleaner to install and easier to hide.
Once I had the wire in hand, I cut each strand to the appropriate length. Red and White would be my hot and ground lines for easy decoding, and the color-coding of the rest would be easy enough to remember for when it’s time to install the control box. In order of (ROYGBIV) I continued past red with Orange on switch 1, Yellow on 2, Green on 3, and Blue on 4. I cut each of the wires to specific lengths to make the sprinkler loom sit cleanly against the switch panel, and then went ahead and crimped/heat shrunk the wires to mate with their female crimp-on ends. I added a separate +12v line made of a miscellaneous five foot section of 14awg wire to tie into an ignition-based +12v line to turn on the locator/indicator LEDs in the bottom of the Contura switches, separate of the ignition.
In laymen’s terms, I wanted the indicator lights to come on with the ignition of the vehicle, but the lights themselves (strobes/rev/LED) to be able to remain on even when the vehicle is turned off. The latter will get their +12v lead from a fuse panel directly tied to the battery.
The result was a rather clean switch panel, parallel grounds and +12v for the leads and switch LEDs, and a 15-foot wire-loom for the relays to be triggered by.
18-7 Sprinkler Wire by 2180miles
Switch Panel Template by 2180miles
Off-Road Ranger I
I apologize in advance for some of the photos seeming blurry, I was shooting this outside, handheld, with a very narrow depth of field to avoid a high/grainy ISO, and had nowhere to really bounce the flash off of in these tight spaces. I know most of you won’t care, but for the photographers in us, I wanted to preface by saying I know there’s a lot of unintentional bohek/obvious DoF.
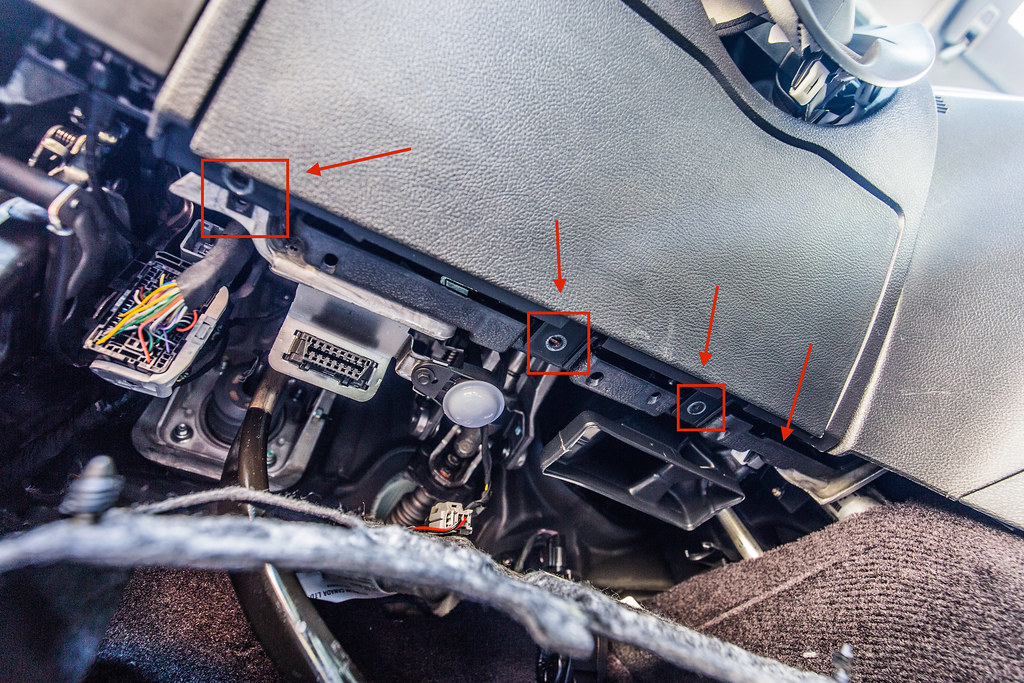
Next up came the actual dash install of the switches. This part was a bit unnerving, as removing the knee air bag panel from under the steering column required the removal of a fair bit of parts, and the FSM’s Interior Panel Removal section wasn’t really great at depicting exactly what I needed. I took a ton of photos for you to see, but I’ll detail this a bit more.

WK2 Lower Steering Column by 2180miles
WK2 Left Headlight Panel by 2180miles
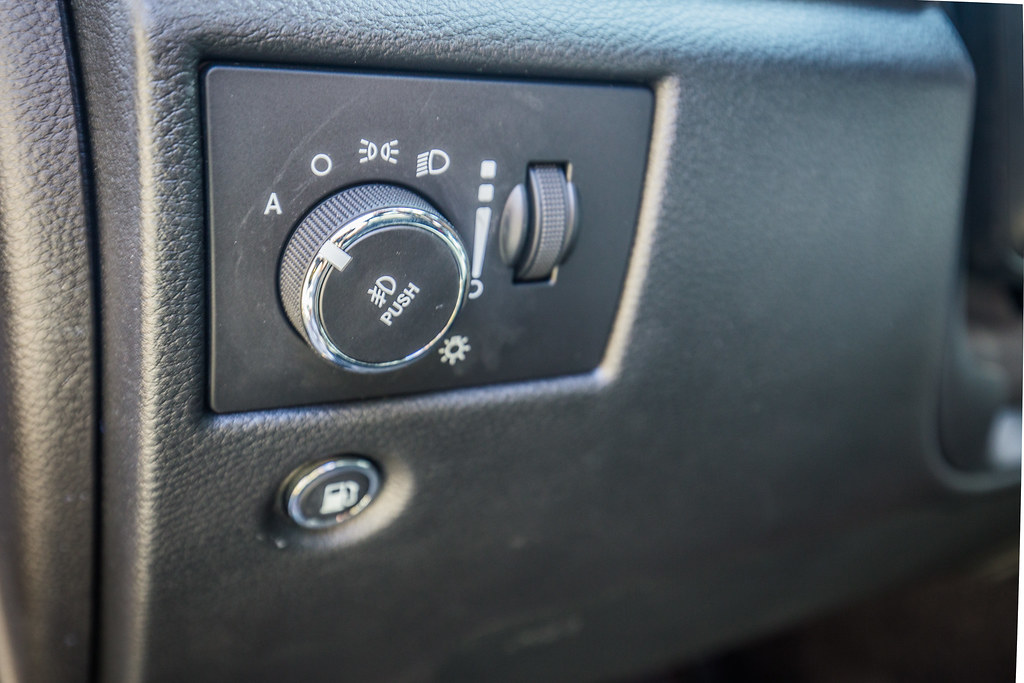
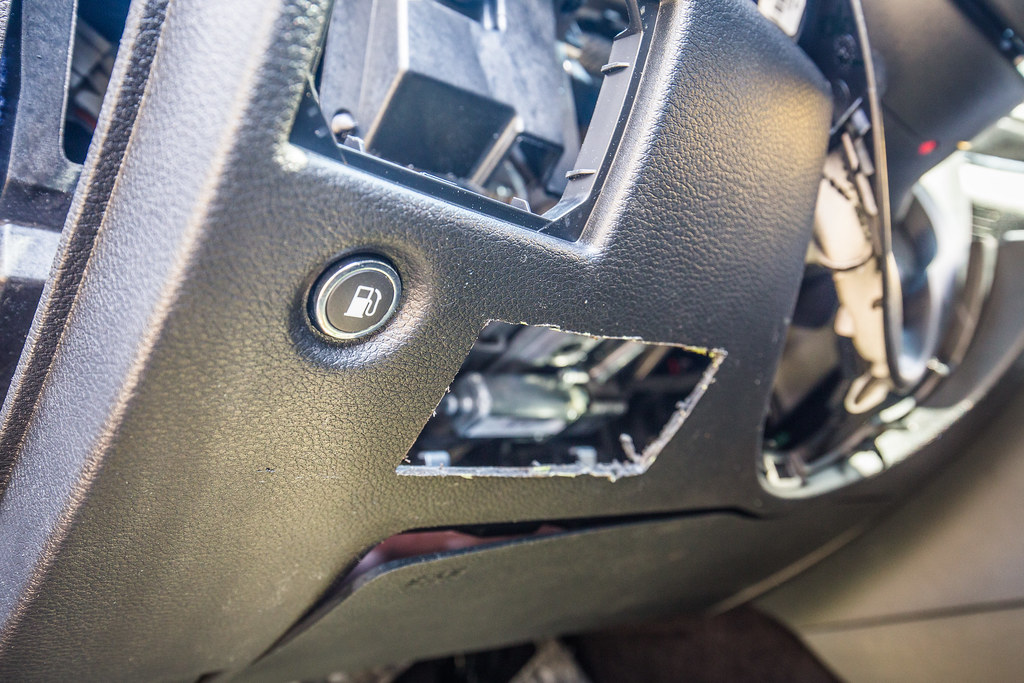
You can see the panel in the photos above that I’ll be working with, and the approximate area the switches will go into, below and to the right of the headlight selector switch and fuel tank door switch. *** DISCONNECT THE BATTERY TERMINALS BEFORE DOING THIS AS THERE IS AN AIR BAG UNDER THE STEERING COLUMN IN SOME MODELS! ***
The required tools here are a ¼” socket set, a Phillips head screwdriver, and a small interior trim pry tool.
1. Pry off the plastic cover to the left of the dash, between the door and dashboard
2. Pry off the steering column surround bezel till it’s loose at the top of the wheel
3. Remove the Phillips head screw to the top left of the steering column
4. Pry back the upper left and right of the large trim piece that covers the lower steering column from where it meets the upper dashboard (there are a few retaining clips, the tool will help)
5. Remove the plastic pop rivets holding the rug piece over the gas/brake pedal
6. Underneath the dashboard, remove 4 Phillips head screws (they’re roughly highlighted in the photo below)
7. At this point you should be able to pull the upper piece of the trim far enough off the dash to remove the airbag trim piece from around the airbag itself.

Lower Speedo Fastener Removal by 2180miles
Under Steering Column Fastener Location by 2180miles
At this point you should be able to pull the upper piece of the trim far enough off the dash to remove the airbag trim piece from around the airbag itself. If you do have the airbag, you might struggle here. I decided against removing the airbag itself, and instead just removed that trim, but only after I made the mistake of trying to remove the air bag panel with the pry tool (you’ll see tape in the last photos, I have to re-glue it back together……)
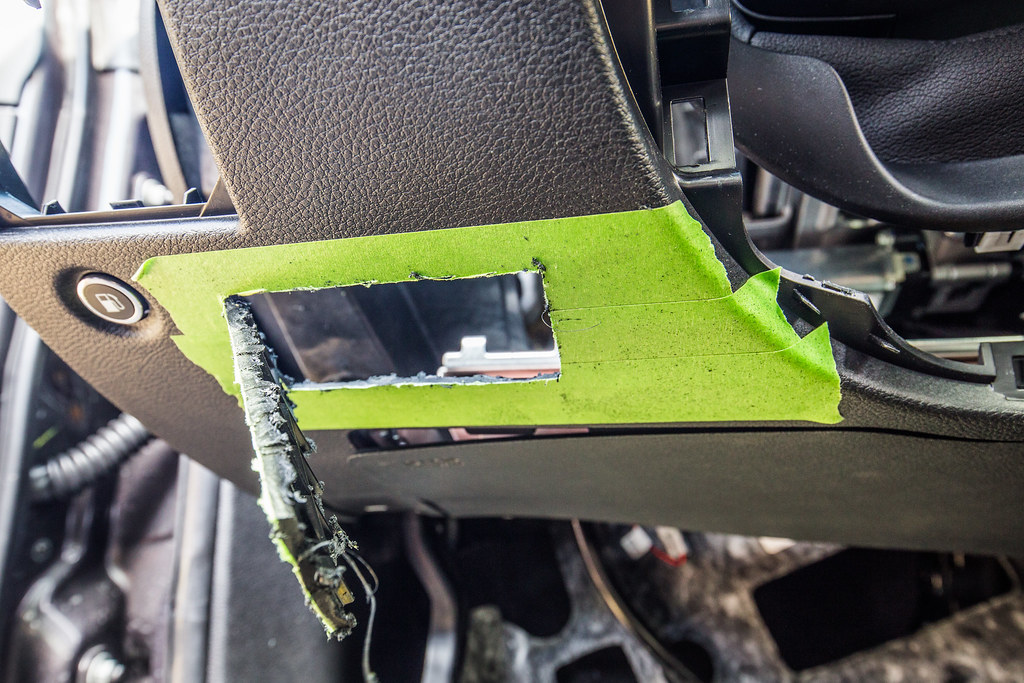
Once I got that done I was able to pull the panel forward and down enough to access the left side, removing the wiring harnesses from the fuel door button and headlight selector. I removed the headlight panel completely in order to better get the Dremel tool in there for trimming.

Removing Steering Column by 2180miles
After measuring the switch panel and comparing it to the rear support plastic behind the dash panel, I cut out an appropriate section to fit the depth of the switch into the dashboard. After that came making the template for the switch assembly itself, and then taping off the region in the panel in which I’d cut the hole. This was the most nerve-wracking part of the project, as I wanted to make sure that if anything, I undercut the hole so that I wasn’t trying to fill any extra space in if I cut it too large. With the painter’s tape in place, I used the honeycomb print in the dash plastic to make sure the Dremel cut was level and even.

Cutting Dashboard Trim by 2180miles

Trimmed/Cleaned Up by 2180miles

Steering Column Prep by 2180miles
Mid-Cut by 2180miles
Final Steering Column Cut by 2180miles
After the 2”x4” hole was cut I used a file to get the edges even and less rough, then did a few test fittings to make sure the switch panel itself would fit exceptionally snugly, which it did after a couple adjustments to the plastic of the dash. At this point I ran the 7-strand sprinkler wire harness through the Jeep and began plugging the crimp connections onto the switch panel to create the final product, leaving the +12v lead for the ignition lights coiled above the dash panel for me to work with at a later date.
Switch Panel Placed - 1 by 2180miles

Switch Panel Placed - 2 by 2180miles
I reassembled the harnesses for the headlights and fuel tank, then began piecing the dashboard back together by reversing the above disassembly procedures. Once everything was back together (note the green tape on the air bag panel that I’ll glue back together), I ran the 18-7 wire harness through the trim pieces along the driver’s doorsill, back behind the B-Pillar, and up to the rear bench. I’ve yet to decide where the actual control box for this will live, so at the moment the remaining 10-feet of loom is spooled under the rear bench until I get around to the final assembly of the control box and relays.
So that’s that… the incredibly nervous process of putting a gigantic hole in the dashboard of a brand new vehicle. I don’t know how the XOverland guys do this all the time, but here I am one step closer to getting this Trailhawk to where I want it to be!
Final install pics once everything was re-assembled, which I’ll replace with newer images once the dash has been fixed.

Switch Panel Installed by 2180miles

Wide Driver Compartment View by 2180miles

Switch Panel Installed by 2180miles
Next up came the actual dash install of the switches. This part was a bit unnerving, as removing the knee air bag panel from under the steering column required the removal of a fair bit of parts, and the FSM’s Interior Panel Removal section wasn’t really great at depicting exactly what I needed. I took a ton of photos for you to see, but I’ll detail this a bit more.
WK2 Lower Steering Column by 2180miles
WK2 Left Headlight Panel by 2180miles
You can see the panel in the photos above that I’ll be working with, and the approximate area the switches will go into, below and to the right of the headlight selector switch and fuel tank door switch. *** DISCONNECT THE BATTERY TERMINALS BEFORE DOING THIS AS THERE IS AN AIR BAG UNDER THE STEERING COLUMN IN SOME MODELS! ***
The required tools here are a ¼” socket set, a Phillips head screwdriver, and a small interior trim pry tool.
1. Pry off the plastic cover to the left of the dash, between the door and dashboard
2. Pry off the steering column surround bezel till it’s loose at the top of the wheel
3. Remove the Phillips head screw to the top left of the steering column
4. Pry back the upper left and right of the large trim piece that covers the lower steering column from where it meets the upper dashboard (there are a few retaining clips, the tool will help)
5. Remove the plastic pop rivets holding the rug piece over the gas/brake pedal
6. Underneath the dashboard, remove 4 Phillips head screws (they’re roughly highlighted in the photo below)
7. At this point you should be able to pull the upper piece of the trim far enough off the dash to remove the airbag trim piece from around the airbag itself.
Lower Speedo Fastener Removal by 2180miles
Under Steering Column Fastener Location by 2180miles
At this point you should be able to pull the upper piece of the trim far enough off the dash to remove the airbag trim piece from around the airbag itself. If you do have the airbag, you might struggle here. I decided against removing the airbag itself, and instead just removed that trim, but only after I made the mistake of trying to remove the air bag panel with the pry tool (you’ll see tape in the last photos, I have to re-glue it back together……)
Once I got that done I was able to pull the panel forward and down enough to access the left side, removing the wiring harnesses from the fuel door button and headlight selector. I removed the headlight panel completely in order to better get the Dremel tool in there for trimming.
Removing Steering Column by 2180miles
After measuring the switch panel and comparing it to the rear support plastic behind the dash panel, I cut out an appropriate section to fit the depth of the switch into the dashboard. After that came making the template for the switch assembly itself, and then taping off the region in the panel in which I’d cut the hole. This was the most nerve-wracking part of the project, as I wanted to make sure that if anything, I undercut the hole so that I wasn’t trying to fill any extra space in if I cut it too large. With the painter’s tape in place, I used the honeycomb print in the dash plastic to make sure the Dremel cut was level and even.
Cutting Dashboard Trim by 2180miles
Trimmed/Cleaned Up by 2180miles
Steering Column Prep by 2180miles
Mid-Cut by 2180miles
Final Steering Column Cut by 2180miles
After the 2”x4” hole was cut I used a file to get the edges even and less rough, then did a few test fittings to make sure the switch panel itself would fit exceptionally snugly, which it did after a couple adjustments to the plastic of the dash. At this point I ran the 7-strand sprinkler wire harness through the Jeep and began plugging the crimp connections onto the switch panel to create the final product, leaving the +12v lead for the ignition lights coiled above the dash panel for me to work with at a later date.
Switch Panel Placed - 1 by 2180miles
Switch Panel Placed - 2 by 2180miles
I reassembled the harnesses for the headlights and fuel tank, then began piecing the dashboard back together by reversing the above disassembly procedures. Once everything was back together (note the green tape on the air bag panel that I’ll glue back together), I ran the 18-7 wire harness through the trim pieces along the driver’s doorsill, back behind the B-Pillar, and up to the rear bench. I’ve yet to decide where the actual control box for this will live, so at the moment the remaining 10-feet of loom is spooled under the rear bench until I get around to the final assembly of the control box and relays.
So that’s that… the incredibly nervous process of putting a gigantic hole in the dashboard of a brand new vehicle. I don’t know how the XOverland guys do this all the time, but here I am one step closer to getting this Trailhawk to where I want it to be!
Final install pics once everything was re-assembled, which I’ll replace with newer images once the dash has been fixed.
Switch Panel Installed by 2180miles
Wide Driver Compartment View by 2180miles
Switch Panel Installed by 2180miles

Off-Road Ranger I
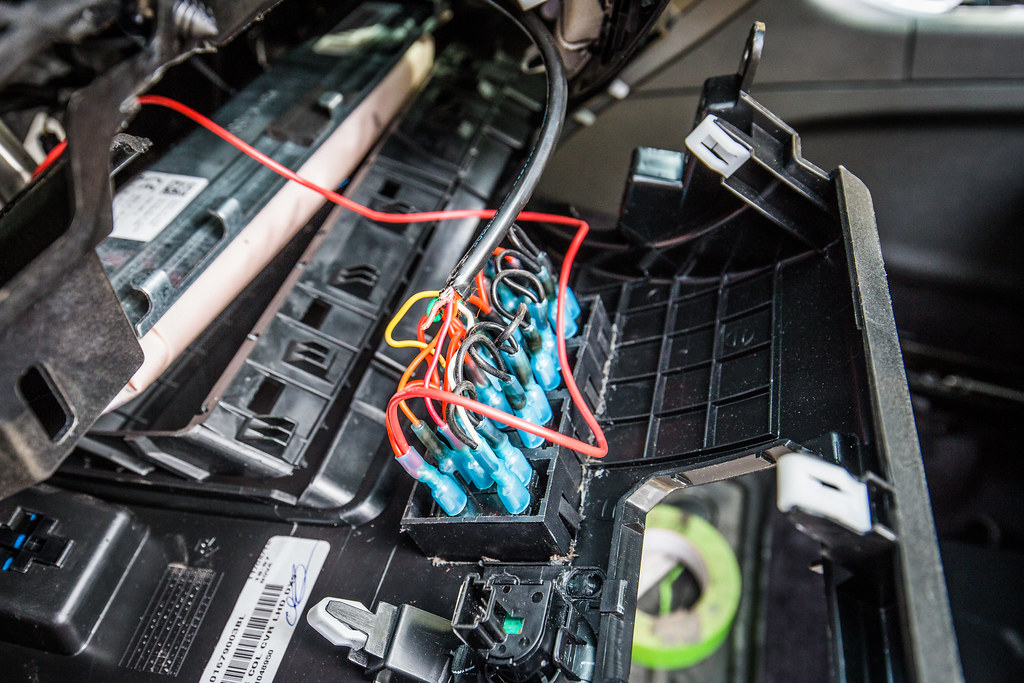
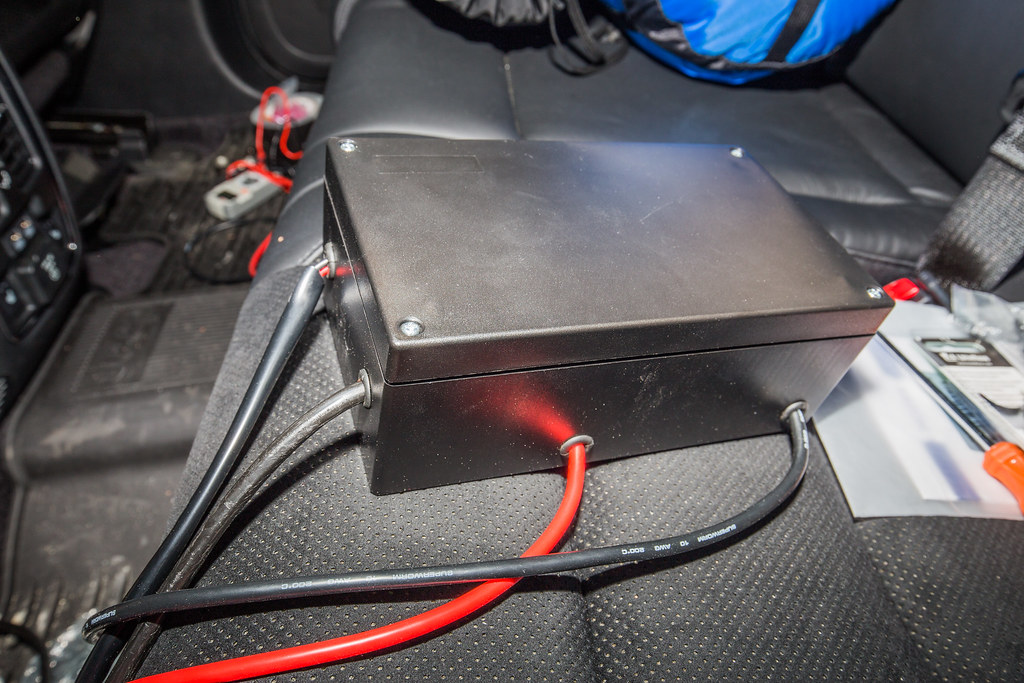
Continuing with the aux. lighting install... The 18-7 fire alarm wire acted perfectly a loom to get back to a control/relay box that I was building for the rear trunk area to house the electrical components of the system. It took a lot of trial and error for fitment of components, and the system isn't water-tight, but it's sealed well in the cabin of the vehicle.
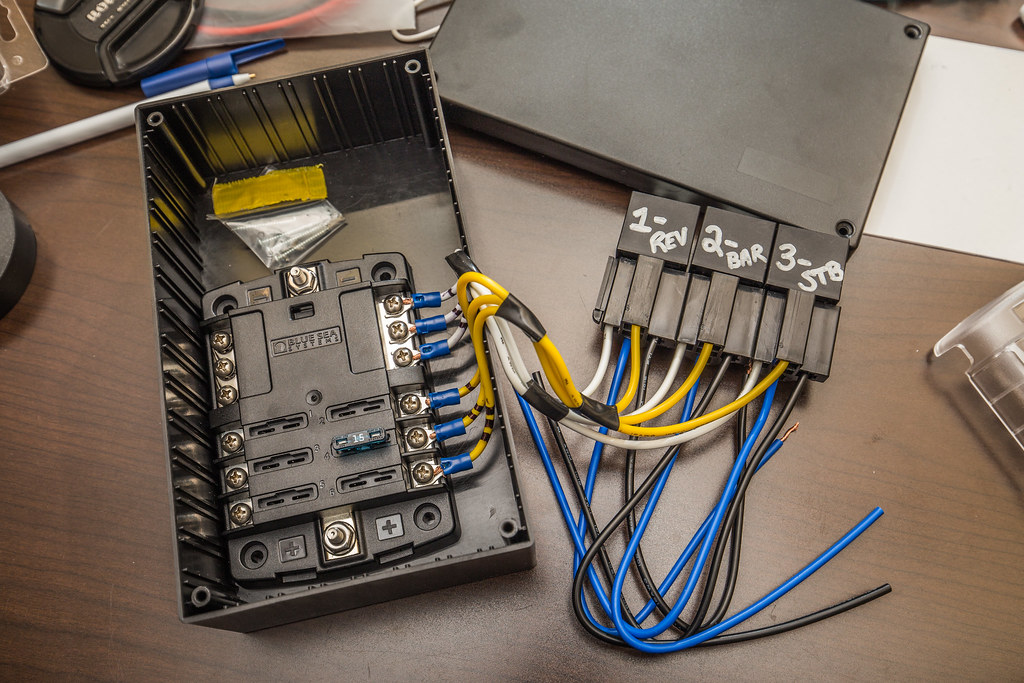
Hardware used:
- PI Manufacturing Project Box (ABS) – 7.6” x 4.51” x 2.95”
- Blue Sea Systems 5025 6 Blade Fuse Block
- Rigid Industries 40312 Strobe Flasher
- 4x 12v Relays (30A)
- 6A Blue Ox Saturn Diode Pack
- Misc. heat-shrink connectors
It was a tossup as to what project box would fit my components, but using Google SketchUp I built a few examples to see what the right option would be; even despite doing this I was still nervous that I got it right. Upon the delivery I breathed a sigh of relief as everything fit. Trimming and labeling the wires of the relay harnesses, I crimped my connectors and installed them to the Blue Sea Systems fuse panel accordingly. Labeling the “trigger” and “+12v” lead of the harness, I got everything ready for the installation of the lights themselves. With the interest of being able to remove the fuse panel, strobe controller, and relays from the box, but have them be secure and organized in the mean time, I used 3M adhesive Velcro to hold them to the project box itself. With everything installed and fitment checked, I removed the components and drilled out the sides of the project box for the 8AWG wire leads from the battery, and left two holes in the side for the 18-6 control loom and aux. lighting wiring.
The Project Box:
Project Box / Relays by 2180miles

Rigid Strobe Controller by 2180miles

Project Box w/ Power Leads by 2180miles
Once it had the grommets installed and the leads were crimped and heat shrunk, I brought the box out to the Jeep and fished the fire alarm wire out from under the rear bench seats where I had stored it in April when the switch panel was installed. Pulling the 18-6 wire through the grommet in the side of the project box, I went to work crimping and heat-shrinking the switch wires to the relay trigger leads and the +12v and ground switch wires to the Blue Sea fuse system, thereby activating the power and LEDs on the switch panel itself.
Once the switch leads were heat shrunk and everything was tucked away, I nestled the box itself under the rear bench and used HD Velcro to hold it in place. It ended up being a little further to the passenger side than the photo shows, but it is in a place and is small enough that the bench portions can fold completely flat without coming into contact with the control box. I ran the +12v lead/ground from the battery under the bench hardware trim piece, then under the OEM floor mat and into the battery compartment. It worked flawlessly and is VERY hard to find if you’re not looking for it. I might someday heat shrink that cable too, but for now they’re simply red and black as they run under the flooring. I ran some wiring out of the control box to my multimeter and then the light bar that’s going on the roof (install write-up to come) and was pleased to see that the switches activate each relay appropriately, and the light functions without issue.
One step closer! Next up will be the aux. lighting installations themselves.

WK2 Electrical Box Wiring by 2180miles

WK2 Project Box Components by 2180miles
WK2 Project Box Sealed by 2180miles
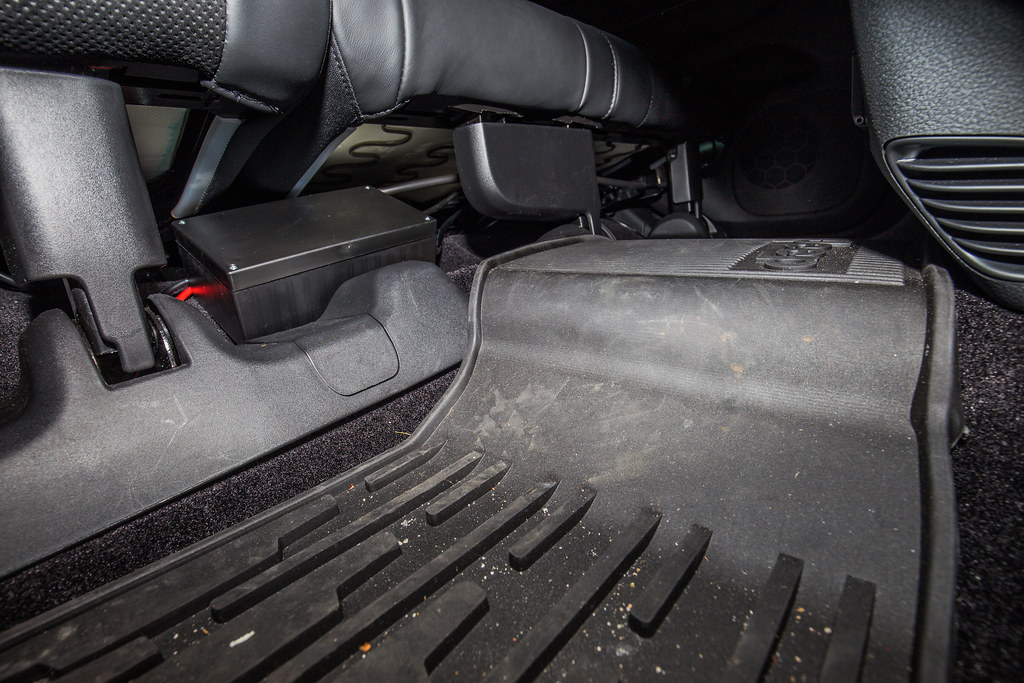
WK2 Project Box Under Bench Storage by 2180miles
Hardware used:
- PI Manufacturing Project Box (ABS) – 7.6” x 4.51” x 2.95”
- Blue Sea Systems 5025 6 Blade Fuse Block
- Rigid Industries 40312 Strobe Flasher
- 4x 12v Relays (30A)
- 6A Blue Ox Saturn Diode Pack
- Misc. heat-shrink connectors
It was a tossup as to what project box would fit my components, but using Google SketchUp I built a few examples to see what the right option would be; even despite doing this I was still nervous that I got it right. Upon the delivery I breathed a sigh of relief as everything fit. Trimming and labeling the wires of the relay harnesses, I crimped my connectors and installed them to the Blue Sea Systems fuse panel accordingly. Labeling the “trigger” and “+12v” lead of the harness, I got everything ready for the installation of the lights themselves. With the interest of being able to remove the fuse panel, strobe controller, and relays from the box, but have them be secure and organized in the mean time, I used 3M adhesive Velcro to hold them to the project box itself. With everything installed and fitment checked, I removed the components and drilled out the sides of the project box for the 8AWG wire leads from the battery, and left two holes in the side for the 18-6 control loom and aux. lighting wiring.
The Project Box:
Project Box / Relays by 2180miles
Rigid Strobe Controller by 2180miles
Project Box w/ Power Leads by 2180miles
Once it had the grommets installed and the leads were crimped and heat shrunk, I brought the box out to the Jeep and fished the fire alarm wire out from under the rear bench seats where I had stored it in April when the switch panel was installed. Pulling the 18-6 wire through the grommet in the side of the project box, I went to work crimping and heat-shrinking the switch wires to the relay trigger leads and the +12v and ground switch wires to the Blue Sea fuse system, thereby activating the power and LEDs on the switch panel itself.
Once the switch leads were heat shrunk and everything was tucked away, I nestled the box itself under the rear bench and used HD Velcro to hold it in place. It ended up being a little further to the passenger side than the photo shows, but it is in a place and is small enough that the bench portions can fold completely flat without coming into contact with the control box. I ran the +12v lead/ground from the battery under the bench hardware trim piece, then under the OEM floor mat and into the battery compartment. It worked flawlessly and is VERY hard to find if you’re not looking for it. I might someday heat shrink that cable too, but for now they’re simply red and black as they run under the flooring. I ran some wiring out of the control box to my multimeter and then the light bar that’s going on the roof (install write-up to come) and was pleased to see that the switches activate each relay appropriately, and the light functions without issue.
One step closer! Next up will be the aux. lighting installations themselves.
WK2 Electrical Box Wiring by 2180miles
WK2 Project Box Components by 2180miles
WK2 Project Box Sealed by 2180miles
WK2 Project Box Under Bench Storage by 2180miles
Off-Road Ranger I
Chief Products Hidden Winch Mount / Warn Zeon Platinum 10S Installation
Last spring, over the course of two afternoons and evenings, my buddy Rob and I dove into the installation of the Chief Products Hidden Winch system in the front end of my WK2 Grand Cherokee Trailhawk. I had been speaking with Bill Mackin, the owner of Australia-based Chief Products, since the beginning of March in regards to getting one of their mounts test-fitted in a 2017 Grand Cherokee to see what kind of adjustments, if any, would need to be made for the new generation grills and front-ends. I reached out to Warn to inquire as to sponsorships for a winch, and after speaking with someone from their Sponsorship team, was offered a steep discount on the 10-S Platinum for installation on the Trailhawk.
*It’s important to note that this installation is not representative the Chief Products final version of the Hidden Winch system, as they were still getting information from me about what does and does not work with the 2017 GC model I installed it on. This is especially important as it pertains to fitment and trimming. They have since updated the model and it is a flawless installation in the WK2s, M.Y. 2017+ included*
-----
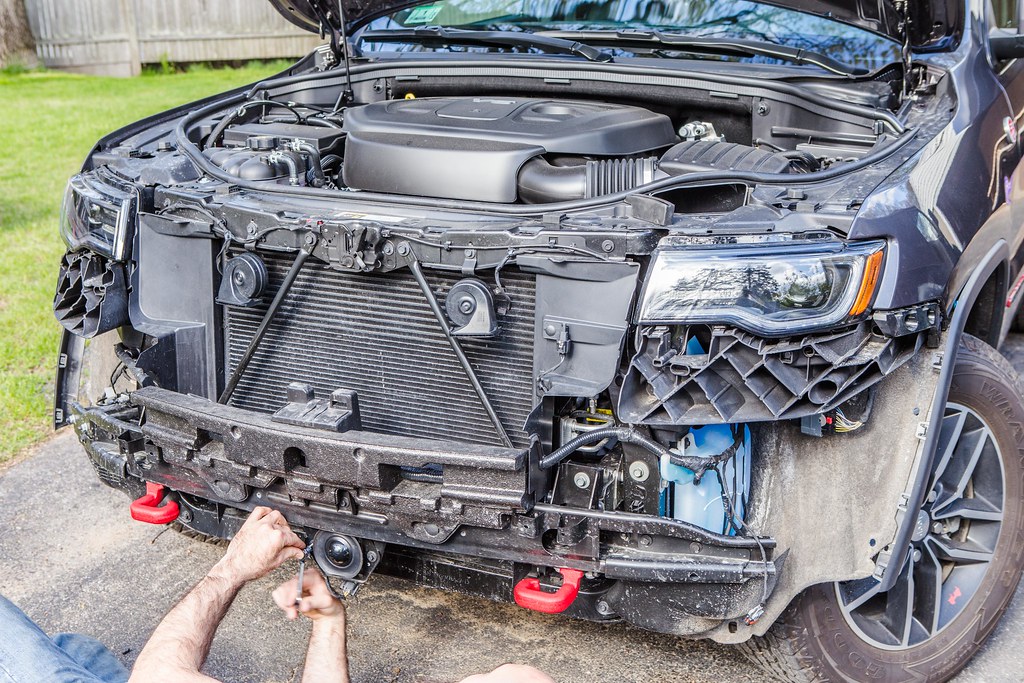
Having never taken the front end off of the Jeep before, and being used to the much more accessible front end of a Wrangler, I did some research as to what went into taking the lower fascia and the upper bumper off. Chief Products had a good write-up for the fascia, and a quick YouTube video showed how simple it was to remove the bumper… we were in business. It’s easy enough, with a few quarter-turn screws under the fascia, two plastic rivets per side in the wheel well, the fascia then pops off from the bumper. The bumper itself requires removing a small hex-head nut in each wheel well, and two small plastic rivets along the top of the radiator brace bar.
We decided to do the installation at Rob’s house, as I’m still in the process of getting my garage at home organized enough and he has a large driveway that easily accommodated our needs. I opened the shipping boxes and laid out our components on an old section of drywall he had in the shop, and we took inventory of what we had to work with.

Chief Products & Warn Zeon Platinum by 2180miles
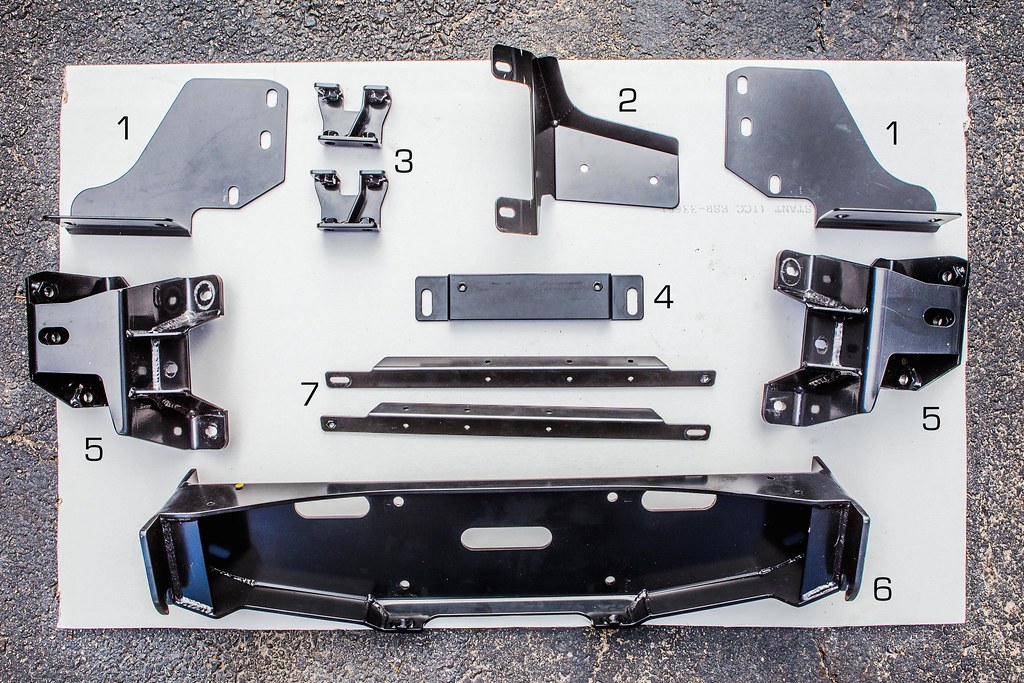
Chief Products Parts List by 2180miles
1. Left & right tow hook mounting bracket
2. Air compressor guard bracket
3. Left & right tow hook spacers
4. ACC camera mount bracket
5. Left & right frame mount brackets
6. Winch cradle
7. Left & Right radiator brace brackets

Lower Fascia Removal by 2180miles

Upper Bumper Fastener Removal by 2180miles
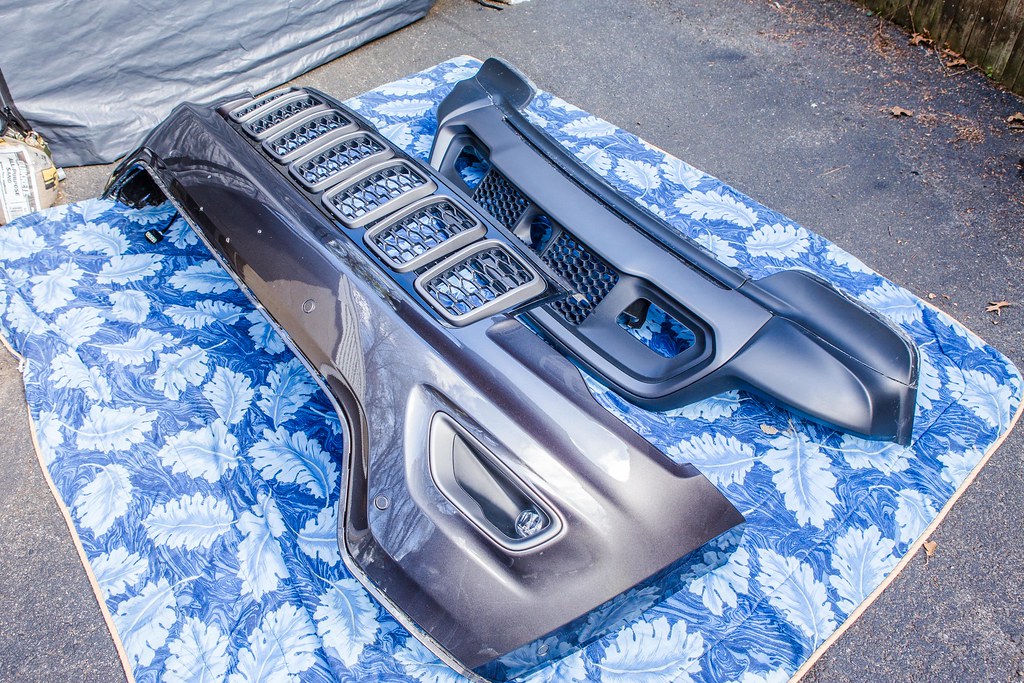
Bumper & Fascia by 2180miles
Front End Removed by 2180miles
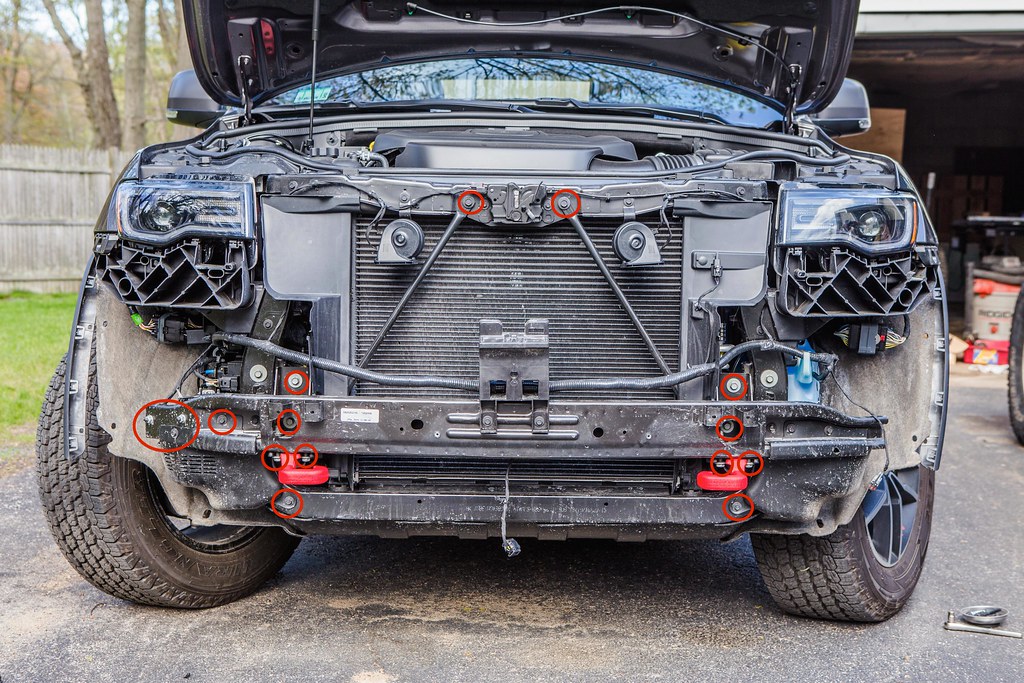
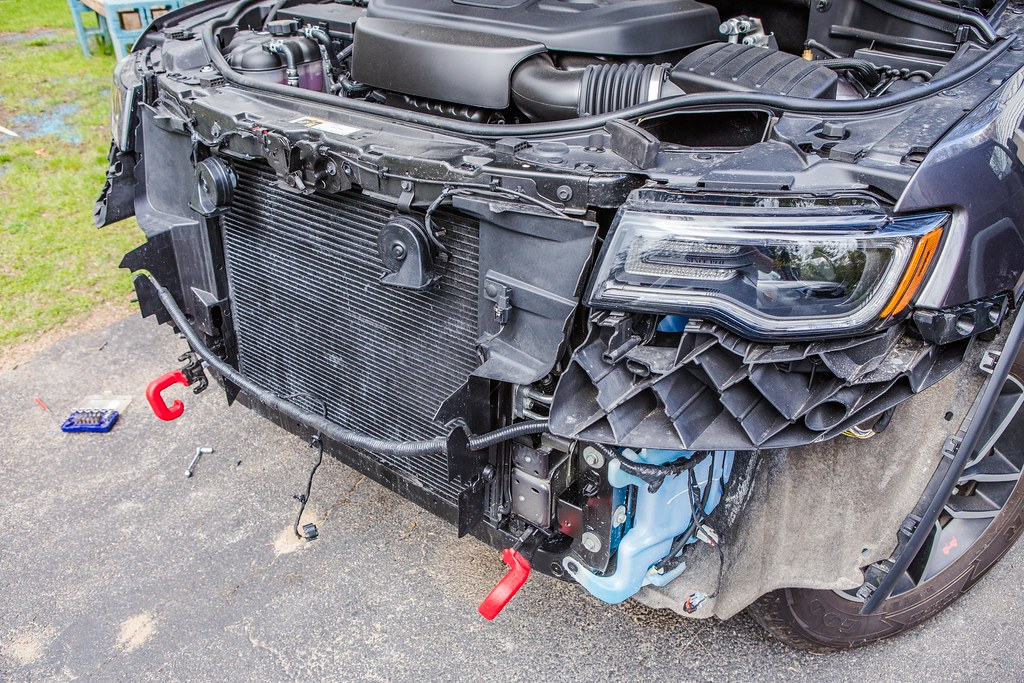
From there we disconnected the ACC camera via the two fasteners that hold it to the bottom of the OEM bumper. There’s a small wiring harness that needs to be unclipped, then it was placed to the side well out of harms way (I don’t want to know how much that camera costs). We then went about removing all of the fasteners that hold the OEM bumper to the Jeep itself, as highlighted by the red circles in the photo below. With the Styrofoam bar and metal backing removed, we took off the plastic protecting pieces from the air suspension system and the windshield washer fluid reservoir. Last to do here was remove the air duct pieces from in front of the radiator, and move the wiring looms as far out of the way as possible for access to the front end.
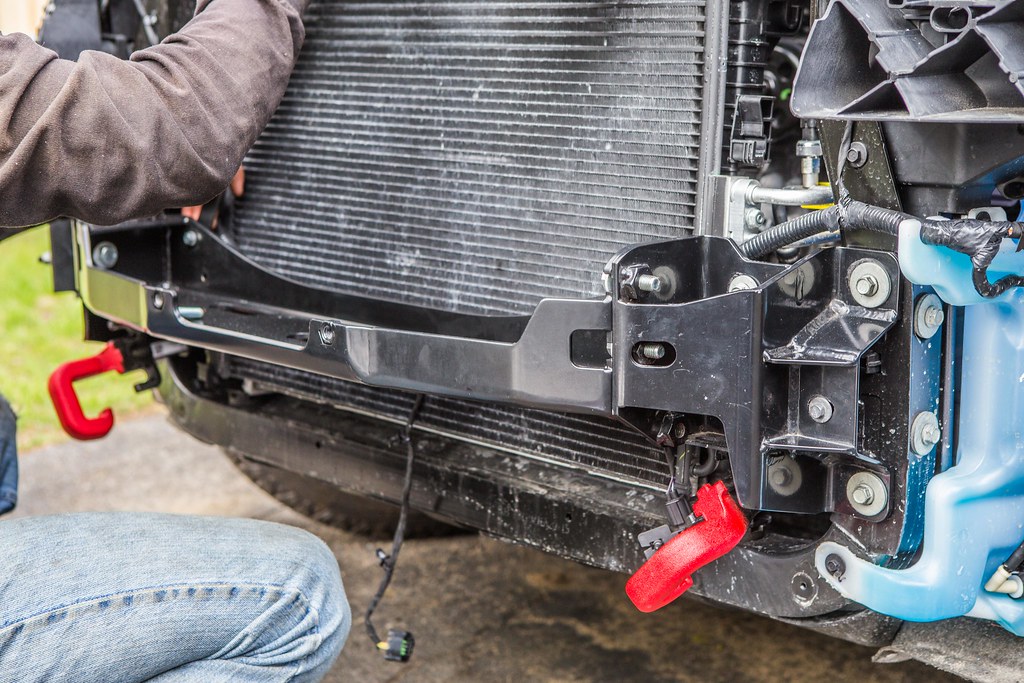
The majority of the Chief Products Hidden Winch system is comprised of 3 main pieces (comprised of 5 individual parts). The winch cradle spans the mid-section in front of the radiator, and holds the winch in place. There are two frame mount brackets, one for each side, and finally two tow-hook mounting brackets that sandwich between the cradle and frame brackets. By starting with the frame brackets, installing the mounting fasteners without tightening down, we were able to then install the tow hook pieces and the winch cradle without issue, putting the hardware in to hold the entire assembly together while we figured out how the other pieces assembled.
This was getting towards the end of our first day (night, actually… we were working by the light of the flood light in the driveway) and we were both pretty tired. We struggled for a while with the tow hooks before I called Bill at Chief Products and asked him if we were missing something. In hind sight, had we played around a bit more with the pieces we would have realized that the OEM tow hooks need to be swapped to the opposite side of their original installation location, and flipped over to work with the new brackets. Laymen’s terms: move the driver hook to the passenger side, passenger hook to the driver side, flip 180 degrees, and install to Chief Products tow hook spacers.
At that point we called it a night, put the front bumper and ACC camera back on without the lower fascia, and I drove home without incident or any pieces falling off.
Fasteners to Remove by 2180miles
OEM Bumper Removed by 2180miles

OEM Air Ducts Removed by 2180miles
Chief Products Cradle Installation by 2180miles
Chief Products Cradle by 2180miles
Cradle with Tow hooks by 2180miles
Last spring, over the course of two afternoons and evenings, my buddy Rob and I dove into the installation of the Chief Products Hidden Winch system in the front end of my WK2 Grand Cherokee Trailhawk. I had been speaking with Bill Mackin, the owner of Australia-based Chief Products, since the beginning of March in regards to getting one of their mounts test-fitted in a 2017 Grand Cherokee to see what kind of adjustments, if any, would need to be made for the new generation grills and front-ends. I reached out to Warn to inquire as to sponsorships for a winch, and after speaking with someone from their Sponsorship team, was offered a steep discount on the 10-S Platinum for installation on the Trailhawk.
*It’s important to note that this installation is not representative the Chief Products final version of the Hidden Winch system, as they were still getting information from me about what does and does not work with the 2017 GC model I installed it on. This is especially important as it pertains to fitment and trimming. They have since updated the model and it is a flawless installation in the WK2s, M.Y. 2017+ included*
-----
Having never taken the front end off of the Jeep before, and being used to the much more accessible front end of a Wrangler, I did some research as to what went into taking the lower fascia and the upper bumper off. Chief Products had a good write-up for the fascia, and a quick YouTube video showed how simple it was to remove the bumper… we were in business. It’s easy enough, with a few quarter-turn screws under the fascia, two plastic rivets per side in the wheel well, the fascia then pops off from the bumper. The bumper itself requires removing a small hex-head nut in each wheel well, and two small plastic rivets along the top of the radiator brace bar.
We decided to do the installation at Rob’s house, as I’m still in the process of getting my garage at home organized enough and he has a large driveway that easily accommodated our needs. I opened the shipping boxes and laid out our components on an old section of drywall he had in the shop, and we took inventory of what we had to work with.
Chief Products & Warn Zeon Platinum by 2180miles
Chief Products Parts List by 2180miles
1. Left & right tow hook mounting bracket
2. Air compressor guard bracket
3. Left & right tow hook spacers
4. ACC camera mount bracket
5. Left & right frame mount brackets
6. Winch cradle
7. Left & Right radiator brace brackets
Lower Fascia Removal by 2180miles
Upper Bumper Fastener Removal by 2180miles
Bumper & Fascia by 2180miles
Front End Removed by 2180miles
From there we disconnected the ACC camera via the two fasteners that hold it to the bottom of the OEM bumper. There’s a small wiring harness that needs to be unclipped, then it was placed to the side well out of harms way (I don’t want to know how much that camera costs). We then went about removing all of the fasteners that hold the OEM bumper to the Jeep itself, as highlighted by the red circles in the photo below. With the Styrofoam bar and metal backing removed, we took off the plastic protecting pieces from the air suspension system and the windshield washer fluid reservoir. Last to do here was remove the air duct pieces from in front of the radiator, and move the wiring looms as far out of the way as possible for access to the front end.
The majority of the Chief Products Hidden Winch system is comprised of 3 main pieces (comprised of 5 individual parts). The winch cradle spans the mid-section in front of the radiator, and holds the winch in place. There are two frame mount brackets, one for each side, and finally two tow-hook mounting brackets that sandwich between the cradle and frame brackets. By starting with the frame brackets, installing the mounting fasteners without tightening down, we were able to then install the tow hook pieces and the winch cradle without issue, putting the hardware in to hold the entire assembly together while we figured out how the other pieces assembled.
This was getting towards the end of our first day (night, actually… we were working by the light of the flood light in the driveway) and we were both pretty tired. We struggled for a while with the tow hooks before I called Bill at Chief Products and asked him if we were missing something. In hind sight, had we played around a bit more with the pieces we would have realized that the OEM tow hooks need to be swapped to the opposite side of their original installation location, and flipped over to work with the new brackets. Laymen’s terms: move the driver hook to the passenger side, passenger hook to the driver side, flip 180 degrees, and install to Chief Products tow hook spacers.
At that point we called it a night, put the front bumper and ACC camera back on without the lower fascia, and I drove home without incident or any pieces falling off.
Fasteners to Remove by 2180miles
OEM Bumper Removed by 2180miles
OEM Air Ducts Removed by 2180miles
Chief Products Cradle Installation by 2180miles
Chief Products Cradle by 2180miles
Cradle with Tow hooks by 2180miles
Off-Road Ranger I
When we picked up on day 2, we were determined to finish the project before it got late again. It was around 16h00 by the time Rob got home from work and we got started, but we made solid progress as the sun made its way across the sky.
Now that the tow hooks had been figured out, we were able to move forward with tightening the entire Hidden Winch system down, and began the process of test-fitting the OEM Trailhawk bumper. In comparing it with the Limited / Overland / Laredo bumpers it seems that the grills is much more sloped back. I can’t comment specifically because I do not own any of the other models, but I do know that the guy who installed my clear bra on the WK2 made a comment about it being different from any other grille he’d ever seen. As such, Bill and his team were intrigued to know whether or not this system would work on the new model.
As we re-installed the bumper and fascia, we noticed that there were parts of the winch cradle that were pushing out against the both trim pieces, to the point where they would not fit back into place. We looked at our options for trimming the back side of each piece, and “modified” the bumper by bending the mounting tabs for the parking sensor looms upwards, essentially lightly breaking them to alleviate some rubbing on the winch cradle. The cradle is fit with 6 mounting points for the bolts that attach to the frame mount brackets, with each of those 6 points being U shaped, opening towards the front of the Jeep. Due to the space in the U-shapes, Rob and I decided to push the entire cradle backwards ½” or so to fit better behind the bumper and fascia. In talking to Bill at Chief, their 2015 model did not have room in front of the radiator to move back the way that we were able to in the 2017.
Once it was pushed back, we re-installed the bumper without issue, and popped the fascia back in as well. Knowing it would all fit, we turned our sights towards trimming out space for the fairlead to rest against the winch cradle mounting points. Initially, I was under the impression that this would be alike the other Rocky Road winch mount, with the fairlead being in the middle of the bumper by the license plate bracket. To my delight, it barely touched the bumper, and instead the majority of trimming came out of the fascia. I made a small cut, maybe ½” tall into the bottom most portion of the bumper itself, and then went to work tracing the fairlead to the fascia. When they have a final fairlead design, Chief will include a template for future installers to use when making their cuts.
Chief Products Parts Labeling by 2180miles

Bumper Trimming by 2180miles

Bumper Trim Lines for Fairlead by 2180miles
Fascia Cuts & Removal by 2180miles

Final Fascia Cuts & Removal by 2180miles
Once we were comfortable with the trimming, we moved on to the installation of the winch. The Zeon 10-S Platinum is described by Warn as being “built for those who push the limits-with double the durability, 20% faster line speed, and extreme IP68-rated waterproofing. The Advanced Wireless Remote controls not only the winch, but also the clutch and other accessories. With a 10,000 lb. pulling capacity, high-performance motor package, and Spydura® Synthetic Rope, you'll be equipped to go places others only dream about.” – for this application, it’s perfect, especially with the electrically controlled clutch. Whereas my other winch sits on the open front of my Wrangler, I don’t have access on the WK2 to engage and disengage the electric vs. free-spool setting. With the remote, this makes the hidden factor of the winch all that more feasible.
We followed Warn’s instructions for mounting the winch and spooling the Spydura line, outfitting the end of the synthetic rope with my new Factor55 Flatlink winch hook. Rated with a breaking point far beyond what I’ll ever be utilizing, the easy D-ring attachment point and red powdercoating make it a sleek addition to the front end of the Grand Cherokee. Once the line was appropriately attached we spooled it in, maintaining tension on the line by hand and wrapping it cleanly. While I don’t currently have any auxiliary lighting planned for the grille of the Trailhawk, the Zeon Platinum offers 2x 12v ports to plug auxiliary lights into, to then be controlled on/off by the wireless remote. I may someday add some lights in there, at which point this will be a phenomenal way to avoid running wiring through the firewall.
I took a couple dozen shots of the front end from every angle I could think of, and then we moved forward with re-installing the ACC camera on a Chief Products supplied bracket to the rear bolts holding the winch into the cradle. We had to wallow out the mounting bracket holes a little bit to fit what I assume is a revised camera mount dimensions, but notes and photographs were taken to show the guys at Chief.
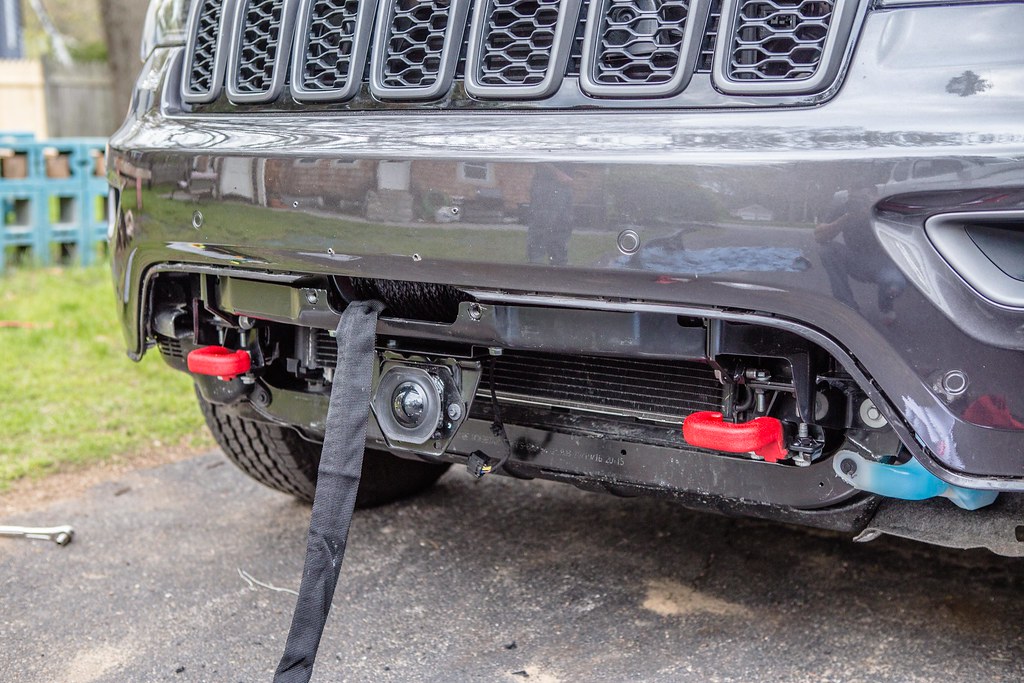
Once the camera was good to go and re-harnessed, we re-installed the front bumper securing it back into the wheel wells and above the radiator by reversing the removal process. Putting the fascia back on we realized we had a little more trimming to do to get the outer edges by the wheels to fit appropriately. We got it to fit that night, but after driving last week with regular use, I realized I have to go back and re-trim some of the area in front of the fairlead mount to get the clips to sit properly back in the bumper above the fascia.
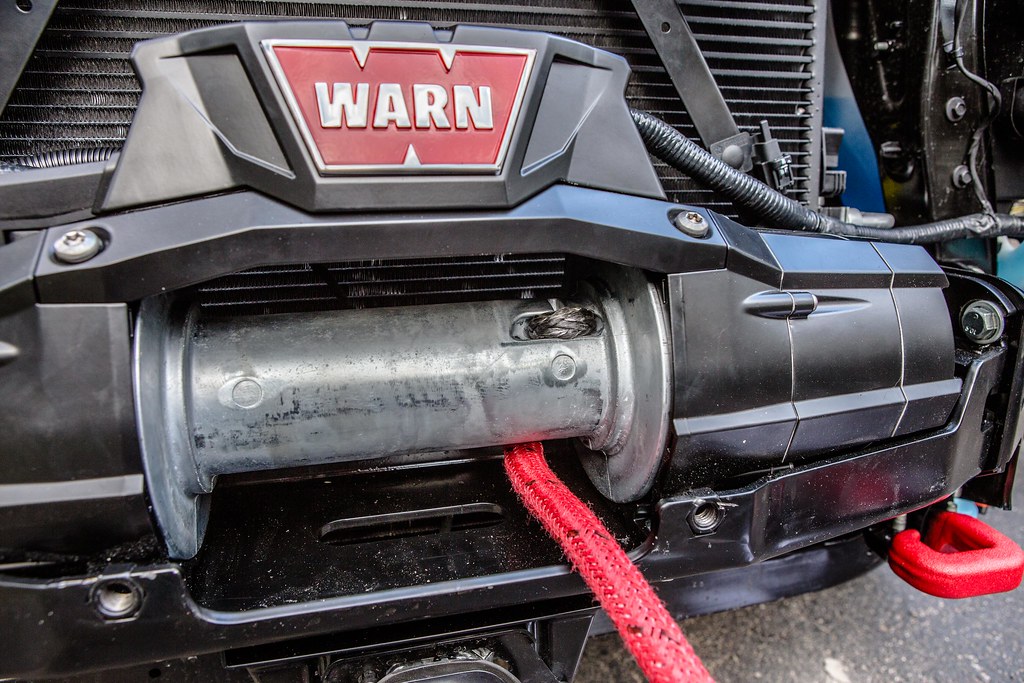
Warn Zeon Platinum 10-S Install by 2180miles

Spydura Synthetic Line Installation by 2180miles

Warn Zeon & Chief Products Hidden Winch by 2180miles
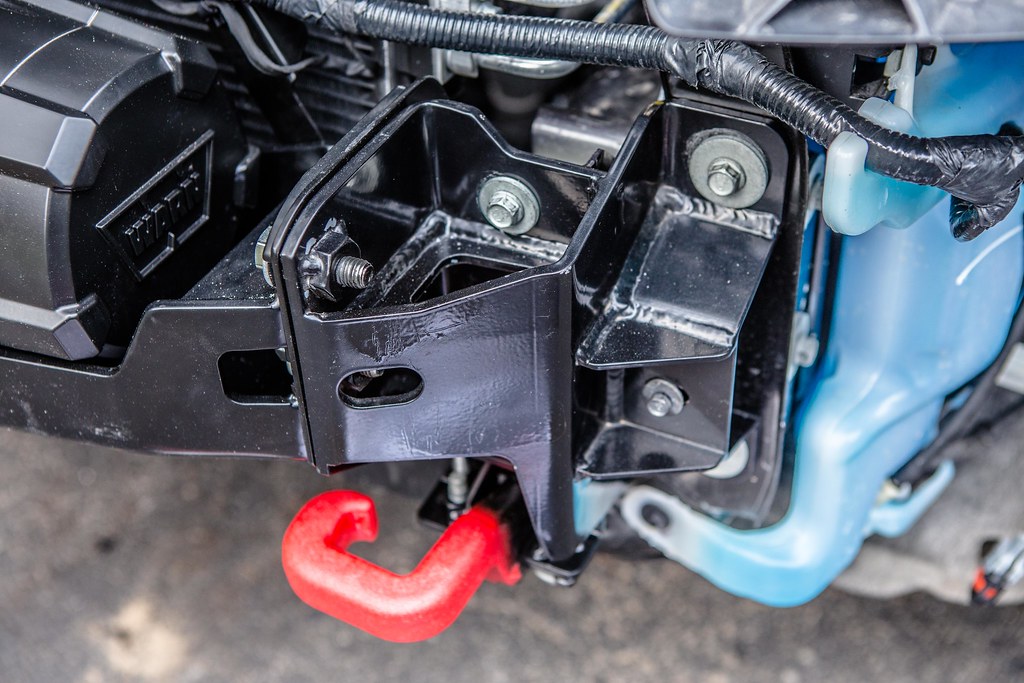
OEM Tow Hooks Re-Installed by 2180miles

Chief Products Front End View 1 by 2180miles
Front Bumper Re-Installed by 2180miles
Now that the tow hooks had been figured out, we were able to move forward with tightening the entire Hidden Winch system down, and began the process of test-fitting the OEM Trailhawk bumper. In comparing it with the Limited / Overland / Laredo bumpers it seems that the grills is much more sloped back. I can’t comment specifically because I do not own any of the other models, but I do know that the guy who installed my clear bra on the WK2 made a comment about it being different from any other grille he’d ever seen. As such, Bill and his team were intrigued to know whether or not this system would work on the new model.
As we re-installed the bumper and fascia, we noticed that there were parts of the winch cradle that were pushing out against the both trim pieces, to the point where they would not fit back into place. We looked at our options for trimming the back side of each piece, and “modified” the bumper by bending the mounting tabs for the parking sensor looms upwards, essentially lightly breaking them to alleviate some rubbing on the winch cradle. The cradle is fit with 6 mounting points for the bolts that attach to the frame mount brackets, with each of those 6 points being U shaped, opening towards the front of the Jeep. Due to the space in the U-shapes, Rob and I decided to push the entire cradle backwards ½” or so to fit better behind the bumper and fascia. In talking to Bill at Chief, their 2015 model did not have room in front of the radiator to move back the way that we were able to in the 2017.
Once it was pushed back, we re-installed the bumper without issue, and popped the fascia back in as well. Knowing it would all fit, we turned our sights towards trimming out space for the fairlead to rest against the winch cradle mounting points. Initially, I was under the impression that this would be alike the other Rocky Road winch mount, with the fairlead being in the middle of the bumper by the license plate bracket. To my delight, it barely touched the bumper, and instead the majority of trimming came out of the fascia. I made a small cut, maybe ½” tall into the bottom most portion of the bumper itself, and then went to work tracing the fairlead to the fascia. When they have a final fairlead design, Chief will include a template for future installers to use when making their cuts.
Chief Products Parts Labeling by 2180miles
Bumper Trimming by 2180miles
Bumper Trim Lines for Fairlead by 2180miles
Fascia Cuts & Removal by 2180miles
Final Fascia Cuts & Removal by 2180miles
Once we were comfortable with the trimming, we moved on to the installation of the winch. The Zeon 10-S Platinum is described by Warn as being “built for those who push the limits-with double the durability, 20% faster line speed, and extreme IP68-rated waterproofing. The Advanced Wireless Remote controls not only the winch, but also the clutch and other accessories. With a 10,000 lb. pulling capacity, high-performance motor package, and Spydura® Synthetic Rope, you'll be equipped to go places others only dream about.” – for this application, it’s perfect, especially with the electrically controlled clutch. Whereas my other winch sits on the open front of my Wrangler, I don’t have access on the WK2 to engage and disengage the electric vs. free-spool setting. With the remote, this makes the hidden factor of the winch all that more feasible.
We followed Warn’s instructions for mounting the winch and spooling the Spydura line, outfitting the end of the synthetic rope with my new Factor55 Flatlink winch hook. Rated with a breaking point far beyond what I’ll ever be utilizing, the easy D-ring attachment point and red powdercoating make it a sleek addition to the front end of the Grand Cherokee. Once the line was appropriately attached we spooled it in, maintaining tension on the line by hand and wrapping it cleanly. While I don’t currently have any auxiliary lighting planned for the grille of the Trailhawk, the Zeon Platinum offers 2x 12v ports to plug auxiliary lights into, to then be controlled on/off by the wireless remote. I may someday add some lights in there, at which point this will be a phenomenal way to avoid running wiring through the firewall.
I took a couple dozen shots of the front end from every angle I could think of, and then we moved forward with re-installing the ACC camera on a Chief Products supplied bracket to the rear bolts holding the winch into the cradle. We had to wallow out the mounting bracket holes a little bit to fit what I assume is a revised camera mount dimensions, but notes and photographs were taken to show the guys at Chief.
Once the camera was good to go and re-harnessed, we re-installed the front bumper securing it back into the wheel wells and above the radiator by reversing the removal process. Putting the fascia back on we realized we had a little more trimming to do to get the outer edges by the wheels to fit appropriately. We got it to fit that night, but after driving last week with regular use, I realized I have to go back and re-trim some of the area in front of the fairlead mount to get the clips to sit properly back in the bumper above the fascia.
Warn Zeon Platinum 10-S Install by 2180miles
Spydura Synthetic Line Installation by 2180miles
Warn Zeon & Chief Products Hidden Winch by 2180miles
OEM Tow Hooks Re-Installed by 2180miles
Chief Products Front End View 1 by 2180miles
Front Bumper Re-Installed by 2180miles
Off-Road Ranger I
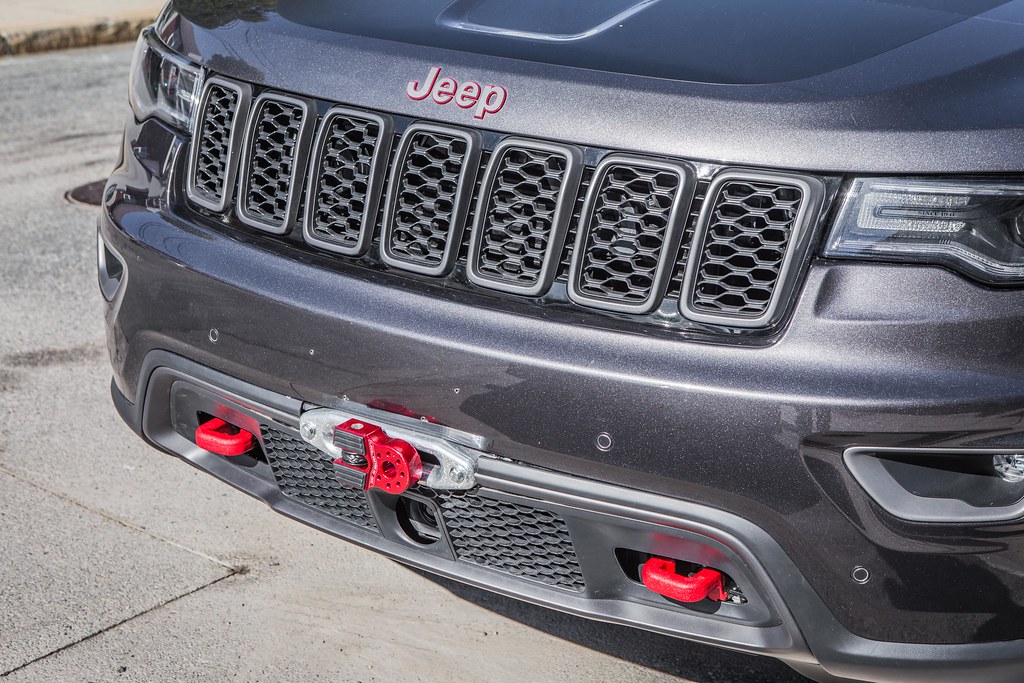
In the weeks - now months - after installing the Chief Products Hidden Winch system, I had no issues other than craning in my neck every time I turn around in the grocery store parking lot to check out the Jeep as I walk away. The pieces are secure, and the front end looks sexy as all get-out with the Factor55 FlatLink hinting that there’s a lot of pulling power under that front bumper.
I had an opportunity over Memorial Day Weekend to hook a tree-saver up to an Oak in my friend’s driveway and pull the WK2 uphill. While it wasn’t a stressful situation, the system, comprised of the mounting bracket, winch, hook, and remote performed flawlessly. I will go forward feeling more confident in the Jeep’s capabilities with this new self-recovery capacity in place. I still have some more trimming to do, but here are the photos taken in the days after we finished the installation. I’ll be sure to report back with notes from Bill and the great team at Chief, and will be sure to photograph the first opportunity I get to really put some stress on the system in a self-recovery scenario… not that I’m looking forward to that or anything ;-)
More photos to come in a less urban environment, but these will suffice for now.

Chief Products / Warn / Factor 55 Installation by 2180miles
Chief Products / Warn / Factor 55 Installation by 2180miles
WK2 Trailhawk w/ Chief Products & Warn by 2180miles

WK2 Trailhawk w/ Chief Products & Warn by 2180miles
I had an opportunity over Memorial Day Weekend to hook a tree-saver up to an Oak in my friend’s driveway and pull the WK2 uphill. While it wasn’t a stressful situation, the system, comprised of the mounting bracket, winch, hook, and remote performed flawlessly. I will go forward feeling more confident in the Jeep’s capabilities with this new self-recovery capacity in place. I still have some more trimming to do, but here are the photos taken in the days after we finished the installation. I’ll be sure to report back with notes from Bill and the great team at Chief, and will be sure to photograph the first opportunity I get to really put some stress on the system in a self-recovery scenario… not that I’m looking forward to that or anything ;-)
More photos to come in a less urban environment, but these will suffice for now.
Chief Products / Warn / Factor 55 Installation by 2180miles
Chief Products / Warn / Factor 55 Installation by 2180miles
WK2 Trailhawk w/ Chief Products & Warn by 2180miles
WK2 Trailhawk w/ Chief Products & Warn by 2180miles

Just started work on an '18 Trailhawk - saw all the Chief products and I'm really glad someone out there is ahead of me on the installs. How much of their kit are you planning on incorporating?
Off-Road Ranger I
Just started work on an '18 Trailhawk - saw all the Chief products and I'm really glad someone out there is ahead of me on the installs. How much of their kit are you planning on incorporating?
Love their products, and the team from "down under" is an amazing group to work with. I think the next step for the rig will be the WK2 Lower Front Guard/WK2 Recovery Points, and hopefully the WK2 Rock Rails once those become available...
If there's any questions about the Hidden Winch Mount I can answer for you, don't hesitate to ask.
Off-Road Ranger I
June 2017...
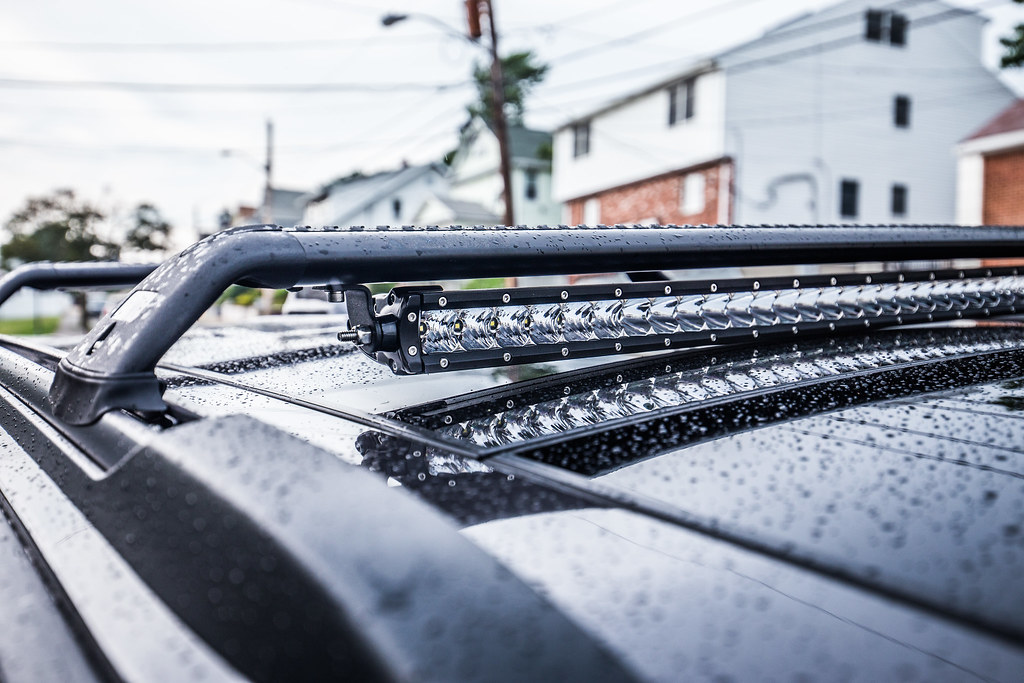
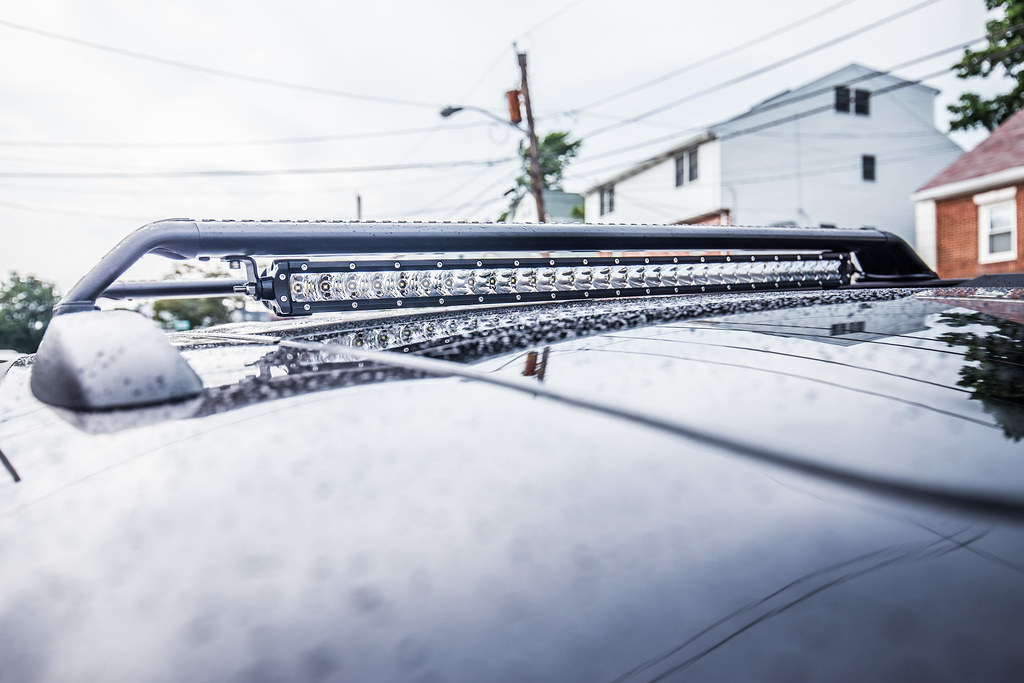
With the switch panel installed in the dashboard, Rhino roof rack in place, and electrical control box wired and mounted under the back seats, the time finally came to order and install the LED bar that I planned for the roof.
While I’ve always been a Rigid Industries guy (full disclosure, technically this vehicle will have one pair of their lights), a friend turned me on to a company called Black Oak LEDs out of Florida while he was working on his Tacoma build. I’d never heard of them before. I saw the quality of the product first, as Rob had 2x 4-LED pods on his front bumper, and learned of the incredible price point second. While the market for LED fixtures has quickly become flooded with cheap knock-offs and poorly assembled units at “affordable” prices on Amazon and other web portals, Black Oak manufacturers one impressively solid and powerful product. I reached out to their products team back in March and began speaking to them about my Trailhawk build, my interest in modifying the WK2 Grand Cherokee line in a way that not many others had done yet, and my intrigue into their larger scale LED product offerings. I was put in touch with a guy named Chris who was equally as interested in getting me on their list of sponsored vehicles, and after a month or so of talking, we got the ball rolling. Quick aside, if you’re interested in checking out Black Oak LED products for yourself, you can take an additional 10% off their web prices by applying the code “2180miles” at checkout.
Despite quite a bit of research into previous WK2 owner mounts/installations, it didn’t seem that anyone else had ever put a light bar on the roof. Plenty of other owners have done small light bars and pod fog lights in the lower fascia on either side of the ACC camera, though save for one minimally documented roof bracket, it seemed that I was again in uncharted territory for my installation. My plan/hope was to get as wide a light bar as possible, packing in as many lumens as possible, into a very sleek and minimally invasive housing. This without question limited me to a single-row kind of fixture at whatever width the roof rack crossbars would allow. My plan was to tap and drill the cross bar piece to the mounting pattern of the light bar brackets, and cross my fingers it would fit between the cross bar and the glass of the roof. In measuring out the Rhino Rack cross bar to 36” wide after installing it, I then went to work checking out Black Oak’s single-row series of lights, finding their 30” to measure in at 34” with the mounting brackets attached… perfect!
Placed the order on a Tuesday, the light bar shipped on Wednesday and was delivered on Friday with a hand written “Thank you” on the invoice. So far, Black Oak was winning my vote a hundred times over. I eagerly unboxed everything upon returning from a work trip and discovered that despite my attempt to pre-measure everything, there simply wasn’t enough height under the cross bar to allow for the light to fit. Ugh… dead in the water. So after some thought I took it to the local fabrication shop and had them shorten the height of the Black Oak stainless bracket by 3/8”, but that didn’t work either. So I called Black Oak and asked if they could custom make me a bracket, and after speaking with John on the other end he suggested I try their super-short-low-profile-fits-anywhere-awesome-bracket… for an easy to reason $15. It was delivered in 2 days and worked perfectly.
After all these pieces were in order, it took all of 20 minutes to get the cross bar tapped out and finagle my trimmed mounting hardware into the exceptionally narrow tolerance height of the cross bar.

Marking Center Measurements by 2180miles

Drilling Rhino Rack Crossbar by 2180miles
Narrow Tolerance Inside the Crossbar by 2180miles

LED Bar Mounted by 2180miles
With the switch panel installed in the dashboard, Rhino roof rack in place, and electrical control box wired and mounted under the back seats, the time finally came to order and install the LED bar that I planned for the roof.
While I’ve always been a Rigid Industries guy (full disclosure, technically this vehicle will have one pair of their lights), a friend turned me on to a company called Black Oak LEDs out of Florida while he was working on his Tacoma build. I’d never heard of them before. I saw the quality of the product first, as Rob had 2x 4-LED pods on his front bumper, and learned of the incredible price point second. While the market for LED fixtures has quickly become flooded with cheap knock-offs and poorly assembled units at “affordable” prices on Amazon and other web portals, Black Oak manufacturers one impressively solid and powerful product. I reached out to their products team back in March and began speaking to them about my Trailhawk build, my interest in modifying the WK2 Grand Cherokee line in a way that not many others had done yet, and my intrigue into their larger scale LED product offerings. I was put in touch with a guy named Chris who was equally as interested in getting me on their list of sponsored vehicles, and after a month or so of talking, we got the ball rolling. Quick aside, if you’re interested in checking out Black Oak LED products for yourself, you can take an additional 10% off their web prices by applying the code “2180miles” at checkout.
Despite quite a bit of research into previous WK2 owner mounts/installations, it didn’t seem that anyone else had ever put a light bar on the roof. Plenty of other owners have done small light bars and pod fog lights in the lower fascia on either side of the ACC camera, though save for one minimally documented roof bracket, it seemed that I was again in uncharted territory for my installation. My plan/hope was to get as wide a light bar as possible, packing in as many lumens as possible, into a very sleek and minimally invasive housing. This without question limited me to a single-row kind of fixture at whatever width the roof rack crossbars would allow. My plan was to tap and drill the cross bar piece to the mounting pattern of the light bar brackets, and cross my fingers it would fit between the cross bar and the glass of the roof. In measuring out the Rhino Rack cross bar to 36” wide after installing it, I then went to work checking out Black Oak’s single-row series of lights, finding their 30” to measure in at 34” with the mounting brackets attached… perfect!
Placed the order on a Tuesday, the light bar shipped on Wednesday and was delivered on Friday with a hand written “Thank you” on the invoice. So far, Black Oak was winning my vote a hundred times over. I eagerly unboxed everything upon returning from a work trip and discovered that despite my attempt to pre-measure everything, there simply wasn’t enough height under the cross bar to allow for the light to fit. Ugh… dead in the water. So after some thought I took it to the local fabrication shop and had them shorten the height of the Black Oak stainless bracket by 3/8”, but that didn’t work either. So I called Black Oak and asked if they could custom make me a bracket, and after speaking with John on the other end he suggested I try their super-short-low-profile-fits-anywhere-awesome-bracket… for an easy to reason $15. It was delivered in 2 days and worked perfectly.
After all these pieces were in order, it took all of 20 minutes to get the cross bar tapped out and finagle my trimmed mounting hardware into the exceptionally narrow tolerance height of the cross bar.
Marking Center Measurements by 2180miles
Drilling Rhino Rack Crossbar by 2180miles
Narrow Tolerance Inside the Crossbar by 2180miles
LED Bar Mounted by 2180miles
Off-Road Ranger I
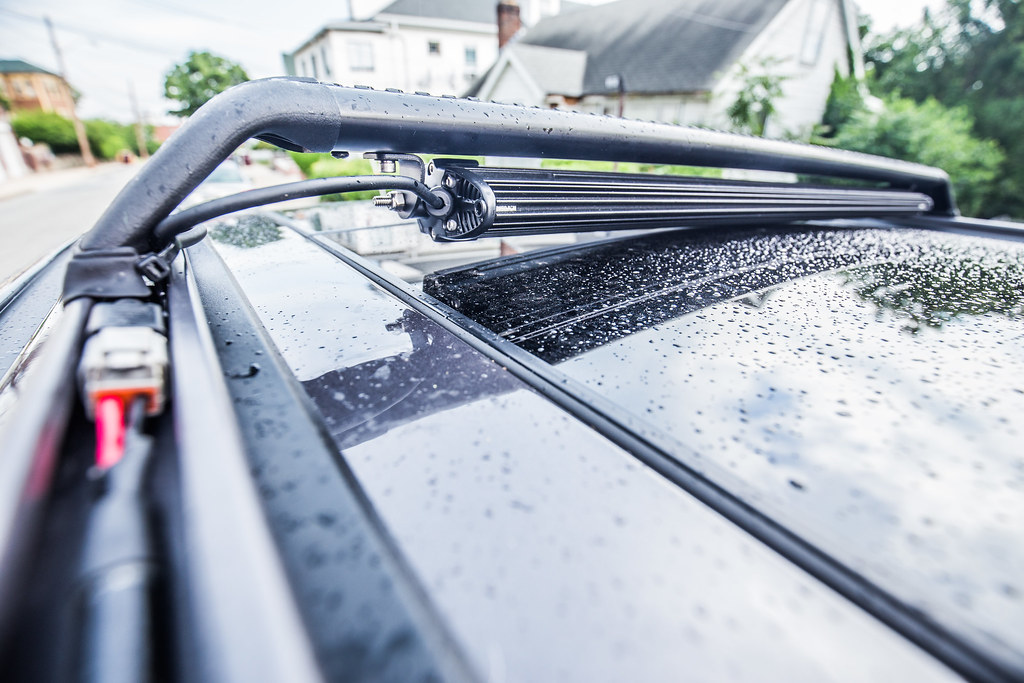
One of the more thought provoking parts of this project was figuring out how to cleanly get the wiring into the vehicle. I had almost no interest in drilling through the roof, nor removing the headliner for access to anything, so I moved on to Plan B. Utilizing the placement of the OEM roof mounting rails, I removed the factory rail and plastic trim pieces from the top of the Grand Cherokee and laid the Black Oak wire loom out along the length of the roof. By snaking their proprietary water-tight connection through the end of the roof rail trim piece, I was able to fit it down the length of the roof rail itself, right up to the point where the Rhino Rack cross bar bracket fastens down.
This will be easier to show with photos than to describe with words:
WK2 Roof Rail Removal by 2180miles
Black Oak Wire Harness Routing by 2180miles
Taking my trusty Dremel with a circular sanding bit at the end, I wallowed out a hole at the tailgate end of the plastic roof rail trim piece, just enough to let the 14-2 wire loom through without giving it too much room to play. I re-fastened the roof rail and trim pieces back to the driver’s side (I had decided early on that I wanted all the wiring on that side as that’s where the control box was living… less wire to run, less work to do, happier me)… By running it down the OEM metal roof rail piece, I was able to tuck it in there and secure it with the roof rack hardware pieces, eliminating any need for additional fasteners. It tucked away perfectly, and left me with the wire harness clip to live just behind the front of cross bar mounting bracket, right about where the light would drop it’s connection point.
Roof Rail Trimmed by 2180miles

Roof Rail Installation by 2180miles
WK2 Wire Harness Routing by 2180miles

Wire Harness Routing by 2180miles
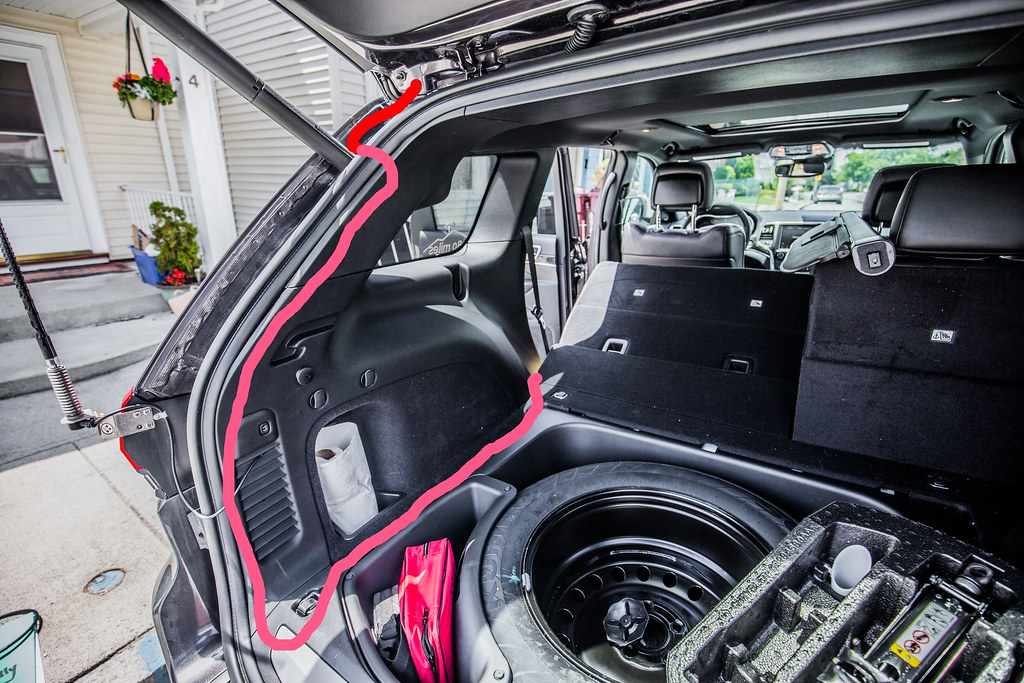
Once the wire was run through the new exit point from the trim piece, I began removing the rear upper trim pieces from the inside of the Grand Cherokee. I have to come to <i> very much </i> dislike removing trim pieces, but it’s the only way to do things cleanly and have myself feel like I’ve done a professional install job, which has become important to me while modifying this vehicle. I toyed with how to get it into the cabin, and ultimately decided to pull out the gasket that houses the controls for the hydraulic tailgate piston. It’s a gigantic gasket, and upon removal I saw that there was plenty of room to sneak the shrink-wrapped Black Oak harness inside of there.
I took the same dremel sanding bit and carefully trimmed back just enough of the gasket’s outer edge (lower edge, ideally to alleviate excess water from getting near it) and fed the wire harness through to the inside of the d-pillar. It’s important to note as you look at the photo below, that I went back later with clear silicone sealant and liberally applied it around the gasket to seal up whatever tiny openings may have arisen from my adjustment to the OEM seal. From there I ran the wire down the d-pillar to the bottom of the tailgate, unscrewing the factor internal cargo hook and running the wiring under the trim pieces and along the length of the spare tire trunk trim piece towards the middle bench.
You can see in the photo below that I highlighted the wiring harnesses external stretch in red, then the pink portion shows where it’s being run inside the vehicle.

Black Oak Wire Harness Routing by 2180miles
WK2 Roof Light Bar Wire Routing by 2180miles
The final bit here was tying the Black Oak harness into the control box I had just built and installed a week or so prior. FYI, for anyone trying this, I ordered one of the Black Oak 8’ extensions for the wiring harness, which I was VERY happy to have for this installation. Once the grounds and +12v leads were connected to the appropriate ground bus and relay, I tied the light bar into the waterproof connection point on the roof and tested the dashboard installed switch panel to activate the light.
HOLY BRIGHT.
That’s about all I can say. The specs on this 30” bar using the available 5w CREE LED’s is roughly 16,500 lumens. Let me tell you, even in broad daylight, this thing is blinding. I’ll be taking it out next week for a nighttime photo shoot to really show it off, but for now let me report that this thing is one of the brightest light fixtures I’ve ever seen… and that’s as someone who works in the concert production industry with some serious lighting systems. I’m exceptionally impressed with the build quality, customer service, and actual power of this light bar, and look forward to ordering more products from Black Oak in the future.
Here are the final close-up installation photos... more to come to show off the actual power this thing packs into such a small form factor. In the end, it wasn’t a huge pain to get this installed in what I truly believe is a very clean form, barely noticeable unless you’re really looking for it up there. Thankfully there’s a few millimeters of space under the light above the glass, and also enough room between the light and the cross bar to fit a mounting bracket for a RTT in the future if my path goes that way :)
That’s all for now – talk soon about some other neat stuff.
Mounted on WK2 by 2180miles
Black Oak 30” Single Row Wide by 2180miles

Black Oak 30” Single Row - Rear by 2180miles
Black Oak 30” Single Row - Rear Wide by 2180miles

Black Oak 30” Single Row by 2180miles
This will be easier to show with photos than to describe with words:
WK2 Roof Rail Removal by 2180miles
Black Oak Wire Harness Routing by 2180miles
Taking my trusty Dremel with a circular sanding bit at the end, I wallowed out a hole at the tailgate end of the plastic roof rail trim piece, just enough to let the 14-2 wire loom through without giving it too much room to play. I re-fastened the roof rail and trim pieces back to the driver’s side (I had decided early on that I wanted all the wiring on that side as that’s where the control box was living… less wire to run, less work to do, happier me)… By running it down the OEM metal roof rail piece, I was able to tuck it in there and secure it with the roof rack hardware pieces, eliminating any need for additional fasteners. It tucked away perfectly, and left me with the wire harness clip to live just behind the front of cross bar mounting bracket, right about where the light would drop it’s connection point.
Roof Rail Trimmed by 2180miles
Roof Rail Installation by 2180miles
WK2 Wire Harness Routing by 2180miles
Wire Harness Routing by 2180miles
Once the wire was run through the new exit point from the trim piece, I began removing the rear upper trim pieces from the inside of the Grand Cherokee. I have to come to <i> very much </i> dislike removing trim pieces, but it’s the only way to do things cleanly and have myself feel like I’ve done a professional install job, which has become important to me while modifying this vehicle. I toyed with how to get it into the cabin, and ultimately decided to pull out the gasket that houses the controls for the hydraulic tailgate piston. It’s a gigantic gasket, and upon removal I saw that there was plenty of room to sneak the shrink-wrapped Black Oak harness inside of there.
I took the same dremel sanding bit and carefully trimmed back just enough of the gasket’s outer edge (lower edge, ideally to alleviate excess water from getting near it) and fed the wire harness through to the inside of the d-pillar. It’s important to note as you look at the photo below, that I went back later with clear silicone sealant and liberally applied it around the gasket to seal up whatever tiny openings may have arisen from my adjustment to the OEM seal. From there I ran the wire down the d-pillar to the bottom of the tailgate, unscrewing the factor internal cargo hook and running the wiring under the trim pieces and along the length of the spare tire trunk trim piece towards the middle bench.
You can see in the photo below that I highlighted the wiring harnesses external stretch in red, then the pink portion shows where it’s being run inside the vehicle.
Black Oak Wire Harness Routing by 2180miles
WK2 Roof Light Bar Wire Routing by 2180miles
The final bit here was tying the Black Oak harness into the control box I had just built and installed a week or so prior. FYI, for anyone trying this, I ordered one of the Black Oak 8’ extensions for the wiring harness, which I was VERY happy to have for this installation. Once the grounds and +12v leads were connected to the appropriate ground bus and relay, I tied the light bar into the waterproof connection point on the roof and tested the dashboard installed switch panel to activate the light.
HOLY BRIGHT.
That’s about all I can say. The specs on this 30” bar using the available 5w CREE LED’s is roughly 16,500 lumens. Let me tell you, even in broad daylight, this thing is blinding. I’ll be taking it out next week for a nighttime photo shoot to really show it off, but for now let me report that this thing is one of the brightest light fixtures I’ve ever seen… and that’s as someone who works in the concert production industry with some serious lighting systems. I’m exceptionally impressed with the build quality, customer service, and actual power of this light bar, and look forward to ordering more products from Black Oak in the future.
Here are the final close-up installation photos... more to come to show off the actual power this thing packs into such a small form factor. In the end, it wasn’t a huge pain to get this installed in what I truly believe is a very clean form, barely noticeable unless you’re really looking for it up there. Thankfully there’s a few millimeters of space under the light above the glass, and also enough room between the light and the cross bar to fit a mounting bracket for a RTT in the future if my path goes that way :)
That’s all for now – talk soon about some other neat stuff.
Mounted on WK2 by 2180miles
Black Oak 30” Single Row Wide by 2180miles
Black Oak 30” Single Row - Rear by 2180miles
Black Oak 30” Single Row - Rear Wide by 2180miles
Black Oak 30” Single Row by 2180miles
Off-Road Ranger I
Hey all!
So I found out the other day that one of my photos (below) was voted into the Overland Expo Photo Contest, and was then chosen by judges as one of the top 8 images. I was hoping you all might take a chance to vote for it - I'd greatly appreciate it! By their rules you can vote once per day, per IP address.
Thanks so much for the consideration, and perhaps even your vote!
Here's the link:
Overland Expo Photo Contest
Here's the story:
While winter wheeling with a friend in New Hampshire’s White Mountains my Jeep broke through thick ice of a frozen-over river, requiring recovery from my buddy’s JKU. I took a moment to photograph him pulling the FlatLink at the end of his winch line towards the Grand Cherokee to pull me back safely. The photo was handheld, taken at ISO400, f/2.8, 1/50" exposure.
And here's the image:
Epic Winchline Pull - OverlandExpo Contest by 2180miles

Contributor II
Off-Road Ranger I
Cool build, I really like your approach to wiring your lights.
Greatly appreciate it man! I've got a tad bit of OCD so when it comes to these installs I do my best to map it all out ahead of time and keep it as clean as possible. There are a few more lighting installs to come, so keep an eye out.
Off-Road Ranger I
So a little while after it was installed, I was finally able to get night photos of the 30" Black Oak LED light bar.
I unfortunately wasn't able to get a super long-distance shot, but these photos should adequately convey how bright this thing is. For those who are photo-friendly, these were taken at identical exposure settings... f/4, ISO100, with a 6" exposure time on a Canon EOS6D with a 24-70 f/2.8L lens.
Pic 1: Low Beam
Pic 2: Low + High Beam
Pic 3/4/5: Low + High + LED Bar Combined

WK2 Low Beam by 2180miles

WK2 Low Beam + High Beam by 2180miles

WK2 Low/High + Black Oak 30" LED Bar by 2180miles

Trailhawk Auxiliary Lighting - Front by 2180miles

Trailhawk Auxiliary Lighting - Rear by 2180miles
I unfortunately wasn't able to get a super long-distance shot, but these photos should adequately convey how bright this thing is. For those who are photo-friendly, these were taken at identical exposure settings... f/4, ISO100, with a 6" exposure time on a Canon EOS6D with a 24-70 f/2.8L lens.
Pic 1: Low Beam
Pic 2: Low + High Beam
Pic 3/4/5: Low + High + LED Bar Combined
WK2 Low Beam by 2180miles
WK2 Low Beam + High Beam by 2180miles
WK2 Low/High + Black Oak 30" LED Bar by 2180miles
Trailhawk Auxiliary Lighting - Front by 2180miles
Trailhawk Auxiliary Lighting - Rear by 2180miles
Off-Road Ranger I
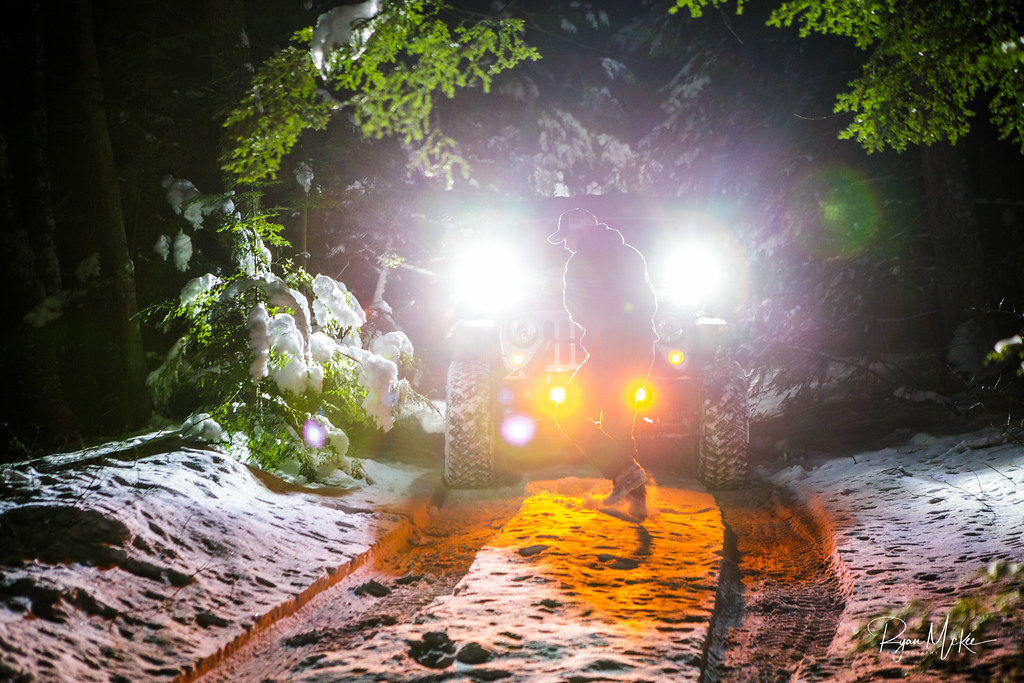
Had a chance to get the Trailhawk into the woods after this week's Nor'easter, as it was a prime time for a photo shoot. I used to take the Wrangler out for moments like this all the time but haven't as much with the WK2. Since most of the posts are technical write-ups for the build, I thought I'd spam my own thread with some photos of her.
Enjoy :)

by 2180miles

WK2 Front Stance by ]2180miles[/url], on Flickr

by 2180miles, on Flickr

by 2180miles, on Flickr
Enjoy :)
by 2180miles
WK2 Front Stance by ]2180miles[/url], on Flickr
by 2180miles, on Flickr
by 2180miles, on Flickr
Off-Road Ranger I
Custom Rear Deck / Dometic CFX-35 Installation
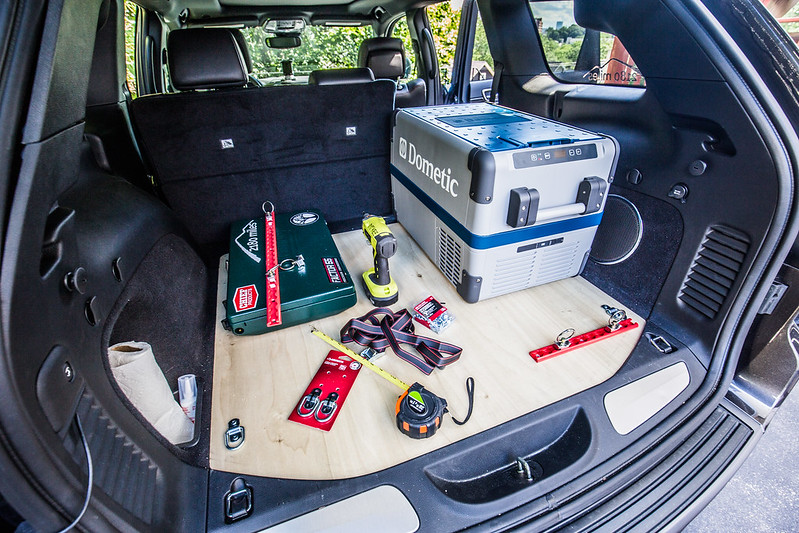
One of the most integral additions of gear to the Trailhawk has been the Dometic CFX-35 fridge/freezer… I had hesitated at the cost initially but the value this thing brought to our trip as a whole cannot be conveyed. Once I had decided to purchase one (ended up just getting it on Amazon, paid something in the range of $550.00) it became a task of designing a way to have it held down. While I had initially wanted to put it on a slider, spending the extra $200 to buy the kit from Dometic just wasn’t in the budget that close to our departure, so I decided to flat mount it directly to the deck. This is where the need for some kind of secure deck came from.

OEM WK2 Trunk Deck by 2180miles
*please excuse the mess... it's the plastic wrap from the OEM deck that started falling apart
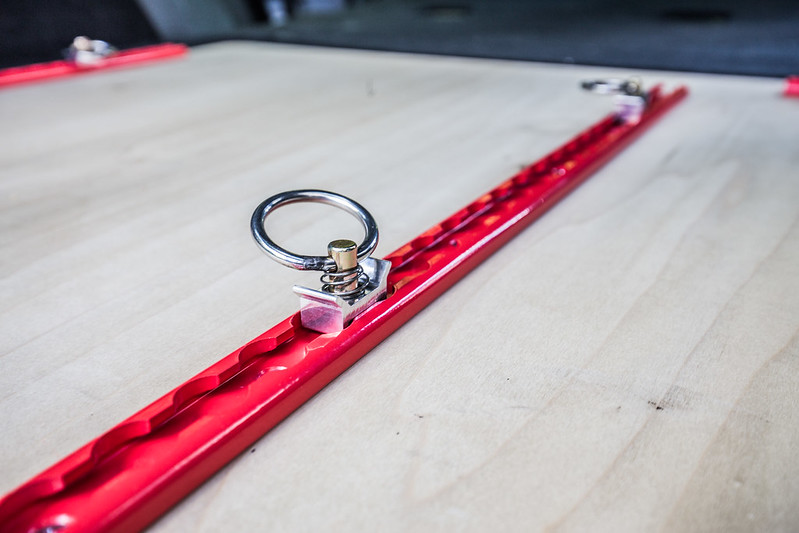
A while back I had seen a thread where a guy used his OEM deck cover and attached mounting hardware to it to tie things down. While the idea was great, I didn’t necessarily want to attach all that weight to the plastic deck that simply “clipped” into place in the back of the Jeep. Measuring the OEM deck to roughly 7/8” tall, I decided that ¾” cabinet plywood would come close enough to be nearly flush. Thinking out the layout I wanted to achieve, I ordered some aircraft L-Track tie-down hardware from US Cargo Control with round tie-down points. These are great because they can slide anywhere on the track and fasten in every 2” as you move down. Total cost from USCargo was $89 delivered.
Parts List:
First up in this process was to remove the OEM deck and trace it against the plywood. Discussing this design with my buddy Shaun who is also a WK2 guy, I offered to make him one as well while we were at it. I used my jigsaw to follow the curvature of the deck, and an orbital sander to clean it up and take down extra material where necessary. It took two or three test fittings before things were great, then we repeated the process on the second deck.

Tracing OEM Deck by 2180miles

2x Deck Stencils by 2180miles
Shaun’s Dometic was living on the sliding deck, so we built a riser out of 1x3s to get it up enough to clear the rear trunk lip. While he went to work bolting the fridge into the tray - a heck of a process, it seemed - I began laying out my L-tracks. My initial thoughts were to have the fridge be on the 40% fold side of the rear bench, as it’s exactly the same width of the fridge itself. This would obviously allow me to utilize the 60% side if (when) I need to sleep in the back, add some lumber, or store whatever needs to be stored. On the left side of the rear deck I spaced the L-Track far enough apart to fit in stacked Pelican 1610 and 1620 cases that store our camp and cook gear during overland trips. *This may eventually change, as Dani and I have discussed a move towards a drawer system for wherever we go next.
I took some time in the week after to add a bed-liner paint job to the new deck, using a rough, sandpaper like base to it to help things not slide as much. The paint held up pretty well over the course of the summer trip, but wore down a little bit from the Pelicans sliding here and there underneath their ratchet straps.

Test Fitment by 2180miles
WK2 Trunk Deck Layout Test by 2180miles

Hardware Fastened by 2180miles
Airline Fastener Rails by 2180miles
I ran power for the fridge through the trunk trim and down to my auxiliary control box under the rear bench, and it functioned absolutely flawlessly during our trip. I had hesitated initially to drop the cash on it, but cannot imagine doing what we did without having the Dometic for fruit, veggies, meats, cheeses, and the occasional cold hard cider. The Pelican cases would move an inch or two over the course of an overlanding day, but the occasional yank on their straps would fix that for a few hours. The fridge never moved an inch, and ran 24/7 from a few days before our departure until I thawed it out upon arriving back in Boston. For the $110 investment into a solid way to secure things down, this plan worked perfectly for both my Trailhawk and Shaun’s Summit.
The final photo below is how the Jeep looked fully loaded, the morning we departed for the QB-5 Overland Adventure in Ontario/Quebec back in July.

Dometic Test Fit 2 by 2180miles

Loaded & Strapped Down by 2180miles
One of the most integral additions of gear to the Trailhawk has been the Dometic CFX-35 fridge/freezer… I had hesitated at the cost initially but the value this thing brought to our trip as a whole cannot be conveyed. Once I had decided to purchase one (ended up just getting it on Amazon, paid something in the range of $550.00) it became a task of designing a way to have it held down. While I had initially wanted to put it on a slider, spending the extra $200 to buy the kit from Dometic just wasn’t in the budget that close to our departure, so I decided to flat mount it directly to the deck. This is where the need for some kind of secure deck came from.
OEM WK2 Trunk Deck by 2180miles
*please excuse the mess... it's the plastic wrap from the OEM deck that started falling apart
A while back I had seen a thread where a guy used his OEM deck cover and attached mounting hardware to it to tie things down. While the idea was great, I didn’t necessarily want to attach all that weight to the plastic deck that simply “clipped” into place in the back of the Jeep. Measuring the OEM deck to roughly 7/8” tall, I decided that ¾” cabinet plywood would come close enough to be nearly flush. Thinking out the layout I wanted to achieve, I ordered some aircraft L-Track tie-down hardware from US Cargo Control with round tie-down points. These are great because they can slide anywhere on the track and fasten in every 2” as you move down. Total cost from USCargo was $89 delivered.
Parts List:
- 4x8’ sheet of ¾” plywood cut to size
- 2x 24” Airline Track
- 2x 12” Airline Track
- 8x 2” Round Stud Fittings
- 6x Home Depot Fastener Straps
First up in this process was to remove the OEM deck and trace it against the plywood. Discussing this design with my buddy Shaun who is also a WK2 guy, I offered to make him one as well while we were at it. I used my jigsaw to follow the curvature of the deck, and an orbital sander to clean it up and take down extra material where necessary. It took two or three test fittings before things were great, then we repeated the process on the second deck.
Tracing OEM Deck by 2180miles
2x Deck Stencils by 2180miles
Shaun’s Dometic was living on the sliding deck, so we built a riser out of 1x3s to get it up enough to clear the rear trunk lip. While he went to work bolting the fridge into the tray - a heck of a process, it seemed - I began laying out my L-tracks. My initial thoughts were to have the fridge be on the 40% fold side of the rear bench, as it’s exactly the same width of the fridge itself. This would obviously allow me to utilize the 60% side if (when) I need to sleep in the back, add some lumber, or store whatever needs to be stored. On the left side of the rear deck I spaced the L-Track far enough apart to fit in stacked Pelican 1610 and 1620 cases that store our camp and cook gear during overland trips. *This may eventually change, as Dani and I have discussed a move towards a drawer system for wherever we go next.
I took some time in the week after to add a bed-liner paint job to the new deck, using a rough, sandpaper like base to it to help things not slide as much. The paint held up pretty well over the course of the summer trip, but wore down a little bit from the Pelicans sliding here and there underneath their ratchet straps.
Test Fitment by 2180miles
WK2 Trunk Deck Layout Test by 2180miles
Hardware Fastened by 2180miles
Airline Fastener Rails by 2180miles
I ran power for the fridge through the trunk trim and down to my auxiliary control box under the rear bench, and it functioned absolutely flawlessly during our trip. I had hesitated initially to drop the cash on it, but cannot imagine doing what we did without having the Dometic for fruit, veggies, meats, cheeses, and the occasional cold hard cider. The Pelican cases would move an inch or two over the course of an overlanding day, but the occasional yank on their straps would fix that for a few hours. The fridge never moved an inch, and ran 24/7 from a few days before our departure until I thawed it out upon arriving back in Boston. For the $110 investment into a solid way to secure things down, this plan worked perfectly for both my Trailhawk and Shaun’s Summit.
The final photo below is how the Jeep looked fully loaded, the morning we departed for the QB-5 Overland Adventure in Ontario/Quebec back in July.
Dometic Test Fit 2 by 2180miles
Loaded & Strapped Down by 2180miles
