
Hello! I wanted to share my DIY Onboard Water System. I'd love any tips, feedback or thoughts on things you would change or improve! I originally posted this at our blog, You Me & The Jeep, and you can find a materials list there as well.
We were so inspired by Dan Grec from The Road Chose Me and his “DIY 4×4 Water Tank, Pump, Filtration and Treatment” walkthrough that we designed our own onboard water system, documented it and have created a tutorial to show you how to build your own (Yes it’s different than Dan’s setup!).
When we first set out to add onboard water to our Jeep, we figured it would be pretty straightforward. Purchase the parts, mount the tank, install it and ta-da running water. And although that overall gist of the installation is that easy, the actual work and thought that has to go into the system is a LOT more involved. Before setting out to add your own system, make sure you have a clear understanding of what you’re going to be modifying. Some of the modifications in this tutorial are permanent and require drilling into your vehicle. That being said, having potable hot running water is AMAZING and for us it’s completely worth the effort and challenge.
There are many ways to get onboard water on your vehicle. When we built our system we had a few things we needed:
The Build
Time: 25+ Hours
Cost: ~$1000
Complexity: Medium. If you follow this guide, it’s mostly assembly, if you vary or do something more custom you’ll need to have some knowledge of plumbing.
Materials
The materials for this build are listed on the original blog on our website. I try and link to the exact products I used, otherwise I use the closest alternative. We also offer a DIY Water Tank Kit with all the materials needed to install your own water system on your rig with detailed instructions on how to design your own system.
Design
We shamelessly trusted in Dan’s base water system design. What we love about this design is the double filtration scheme. In fill mode, the water goes through the filter and pump, then into the tank. Then on use mode, the water from the tank goes through the filter a second time and then out to be consumed. We wanted the ability to have hot water, so we added a hot water line using a heat exchanger.

Double filtration water system design
Prep Work
Before purchasing anything else, or doing any additional research, start by sourcing a tank that will fit in or under your vehicle. The JKU does not have much room for a water tank unless you move the stock Evap Canister. This is a pretty straight forward modification, a kit is required, but a vital first step to clear enough room for a tank. For our 2011 JKU we found the Ronco Plastics RV23W to be a great fit for this newly created space.
You’ll also need to plan out about 1-2 square feet for the pump, filter, and hoses in your vehicles cabin.
Construction
Prepping the Tank
Once you source your water tank, make sure you get 4 holes drilled into your tank; a 1/2″ female inlet (placed near the top of the tank), a 1/2″ female outlet (placed near the bottom of the tank), a 1/2″ female breather hose and a hole to place a depth sensor so you can tell how much water is in the tank.
Since we’re mounting the tank to the underside of the vehicle and exposing it to the elements, we’re going to want to do our best to seal it up and protect it. To insulate the tank, we wrapped it, on all four sides, in Reflectix or any other bubble reflective foil, using gorilla tape to secure it to the plastic. This is not enough to keep the tank from freezing in harsh weather, but will help.

Water tank wrapped in Reflectix for insulation

Water tank ready for placement in the sheet metal casing.
To protect the tank from rocks or other objects, we cut and wrap the tank in a thin piece of sheet aluminum. This is not enough protection if you bottom the tank out rock crawling, but it will prevent any rocks from getting kicked up and causing a hole and leak.

To keep the tanks shells together, I wrapped the entire top in gorilla tape
Mounting the Tank
Now that we’ve wrapped the tank, we can measure the new outer dimensions and ensure the tank is still going to fit in the space under the vehicle. The padding, aluminum and tape can add up and increase the size of the tank. With these new dimensions, let’s figure out how to make a mount!
We had a few different ideas on how to mount the tank under the vehicle and ultimately narrowed it down to either hanging the tank or strapping it to the bottom using preset bolts. After building an entire cage for the tank and getting it under the Jeep, we decided strapping it to the bottom would be more reliable, stronger, and overall the better choice.
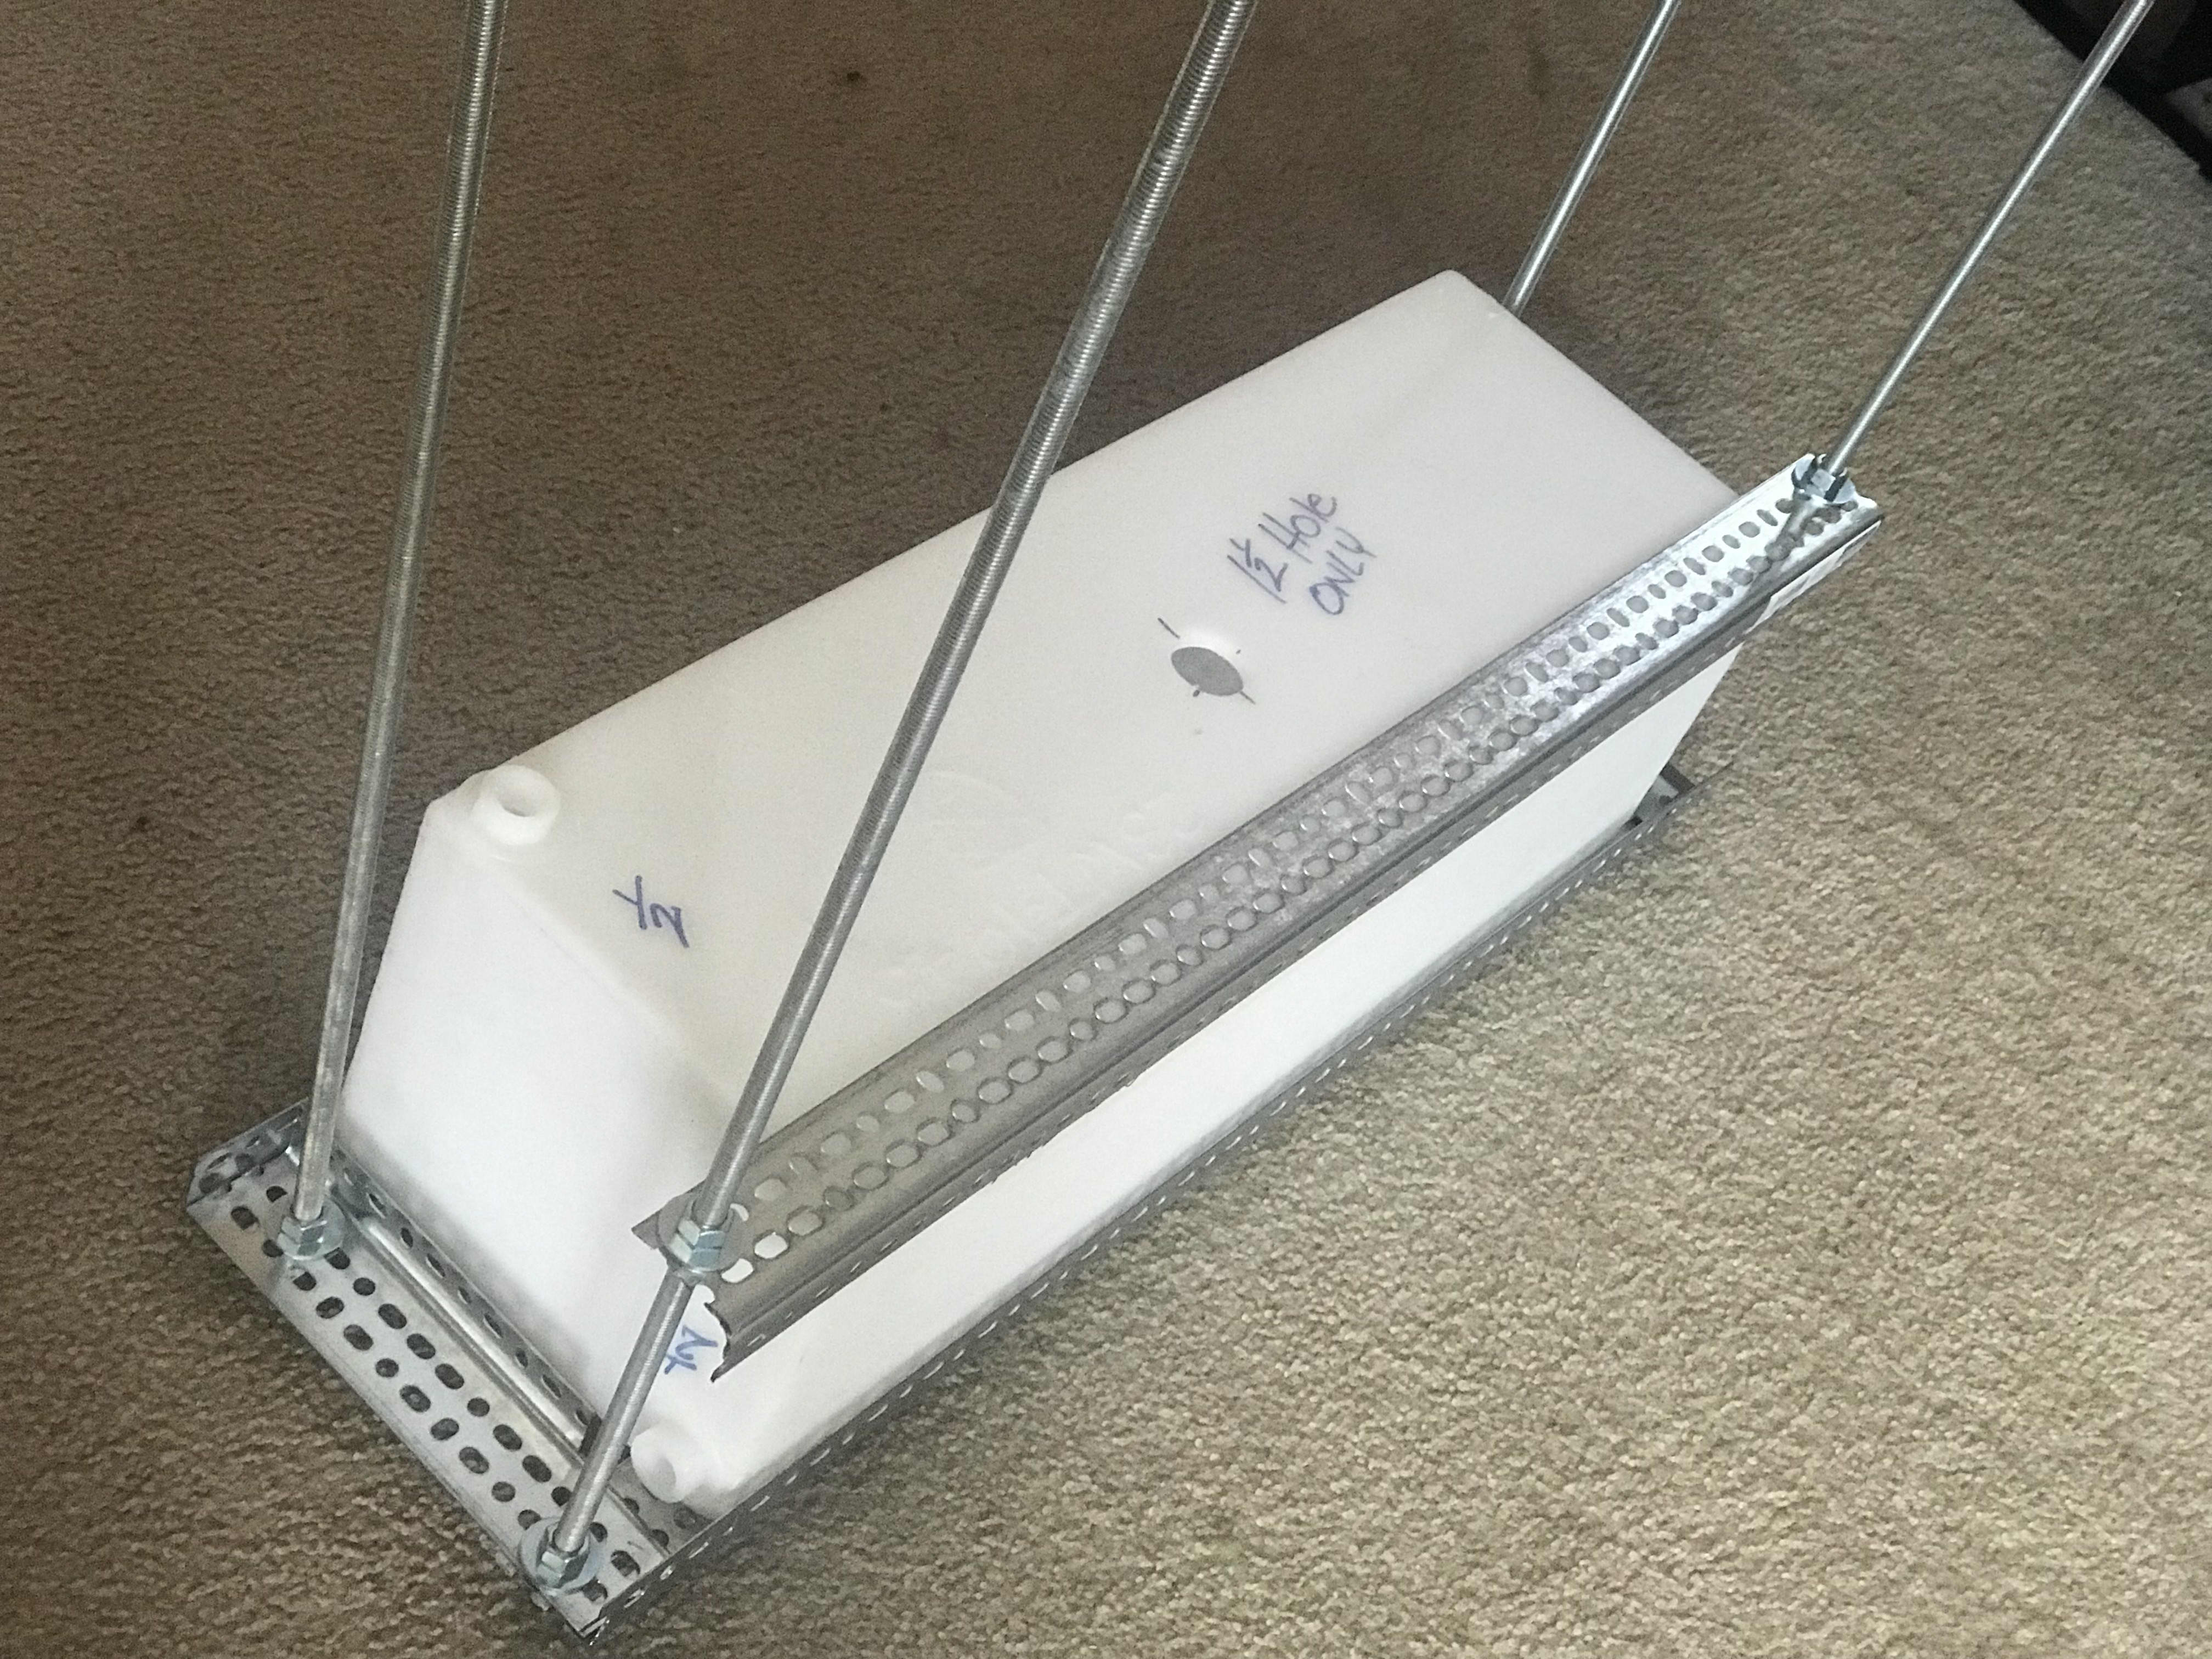
The first version of the tank holder. This version would have hung below the body and swayed. We moved away from this design.
The only challenge with strapping it to the bottom are making the straps. One option is fabricating custom straps using steel and a welder. We don’t have enough experience with welding to confidently make our own straps, so we had to find a solution using parts from hardware stores. If you have welding experience, you should defiantly look at welding together your own as it will allow your tank to sit more flush with the undercarriage of the vehicle.

Right angle brackets in Lowes

Sheet metal also in Lowes
We found some large right angle brackets at the hardware store and fashioned them together into a steel bracket that will hold the weight of the tank (and then some). This is not the prettiest or easiest solution, but it is the best we could come up with using goods from a hardware store. We’re taking a welding class in a few weeks so we plan on improving this design in the future, but for now this is a solid way to mount the water tank!

Bracket installed under the Jeep’s body. You can see the loss of 1-2″ because of the bolts and overhead brackets
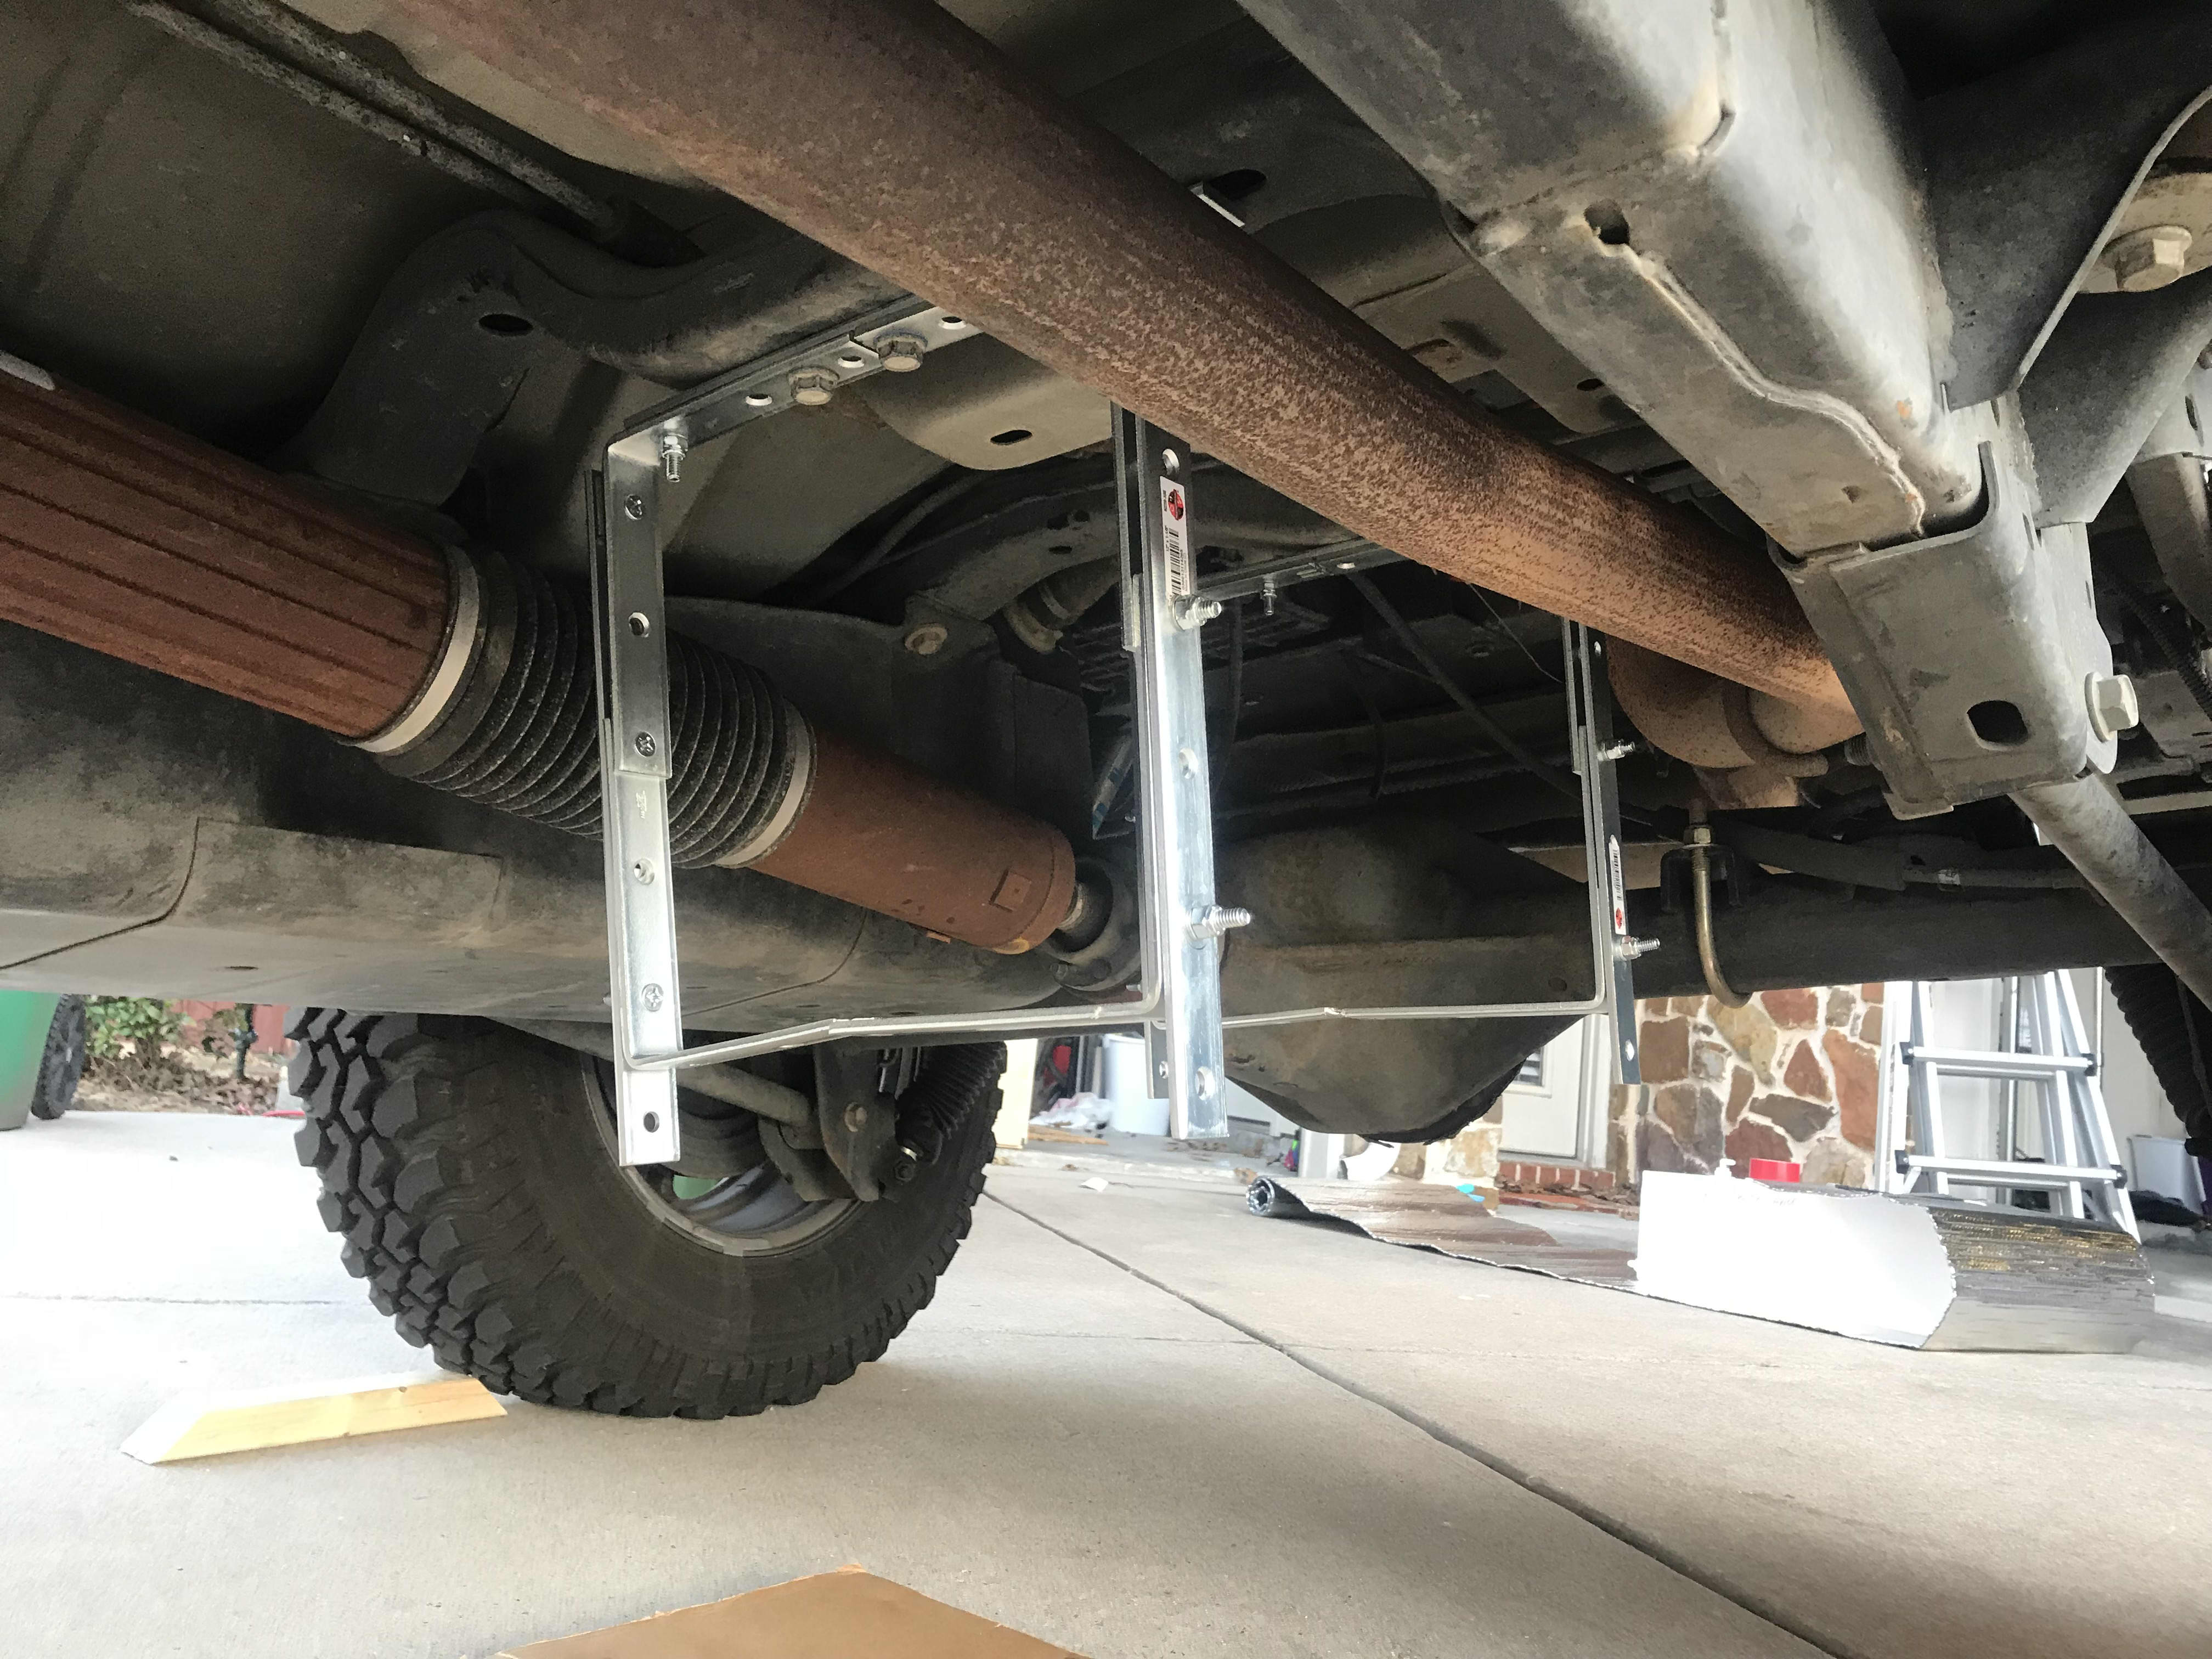
Both water tank brackets mounted under the Jeep using factory bolts.
After mounting the brackets, you should be able to slide the tank into position under the vehicle! Before continuing any further, this is a great time to fill the tank with water and test for any leaks. It can be difficult to remove the tank from this position, so its best to get it right early on!

You can see the tank slants down a bit to the front, this is a good thing as it helps get all the water out.
Now that the tanks mounted, you’ll notice the tank sits about 3 inches lower than the gas tank plate. Although this is a bit lower than we’d like for the future, it will be moved up 1-2 inches once we make our custom welded straps. This is still a lower than the standard base for a JKUR, so we will be adding a full 1/4″ skid plate at a later time (we’ll be custom welding that too!).
Prepping the Pump & Filter
Now we get to the technical part! Creating a nicely designed and tidy pump and filter lines is essential to making your entire water system function efficiently and leak free. We recommend attaching your pump and filter to a piece of wood. You’ll want to secure each line and avoid over bending any line using right angles when necessary.

Our custom DIY base platform allows us to attach our solar, signal booster and water pump right to the bottom.
Place a strainer before your water pump to ensure it doesn’t suck up any objects, I’ve included the surflow strainer in the materials list.
Inlets & Outlets
Up to this point, we haven’t mentioned how we’re planning on filling the tank or consuming the water from the tank. As it turns out there are a lot of options!
From an inlet standpoint, were currently going to rely on city water hookups for bringing water onboard. We went to camping world and found an RV inlet thats perfect for hooking into our system. We installed the inlet in the rear-passenger side corner of the Jeep, right below the tail-light. If you take the tail-light out, you’ll see a lot of empty space that is perfect for routing a few hoses and installing our inlet! Installation is pretty straight forward, drill a hole, place the inlet into the hole, secure and connect the water line that runs into the pump/filter system (remember, we want to filter the water before it gets into the tank). Depending on the type of inlet you get, a ball-valve might be required to prevent the pump from loosing pressure on one side of the system.
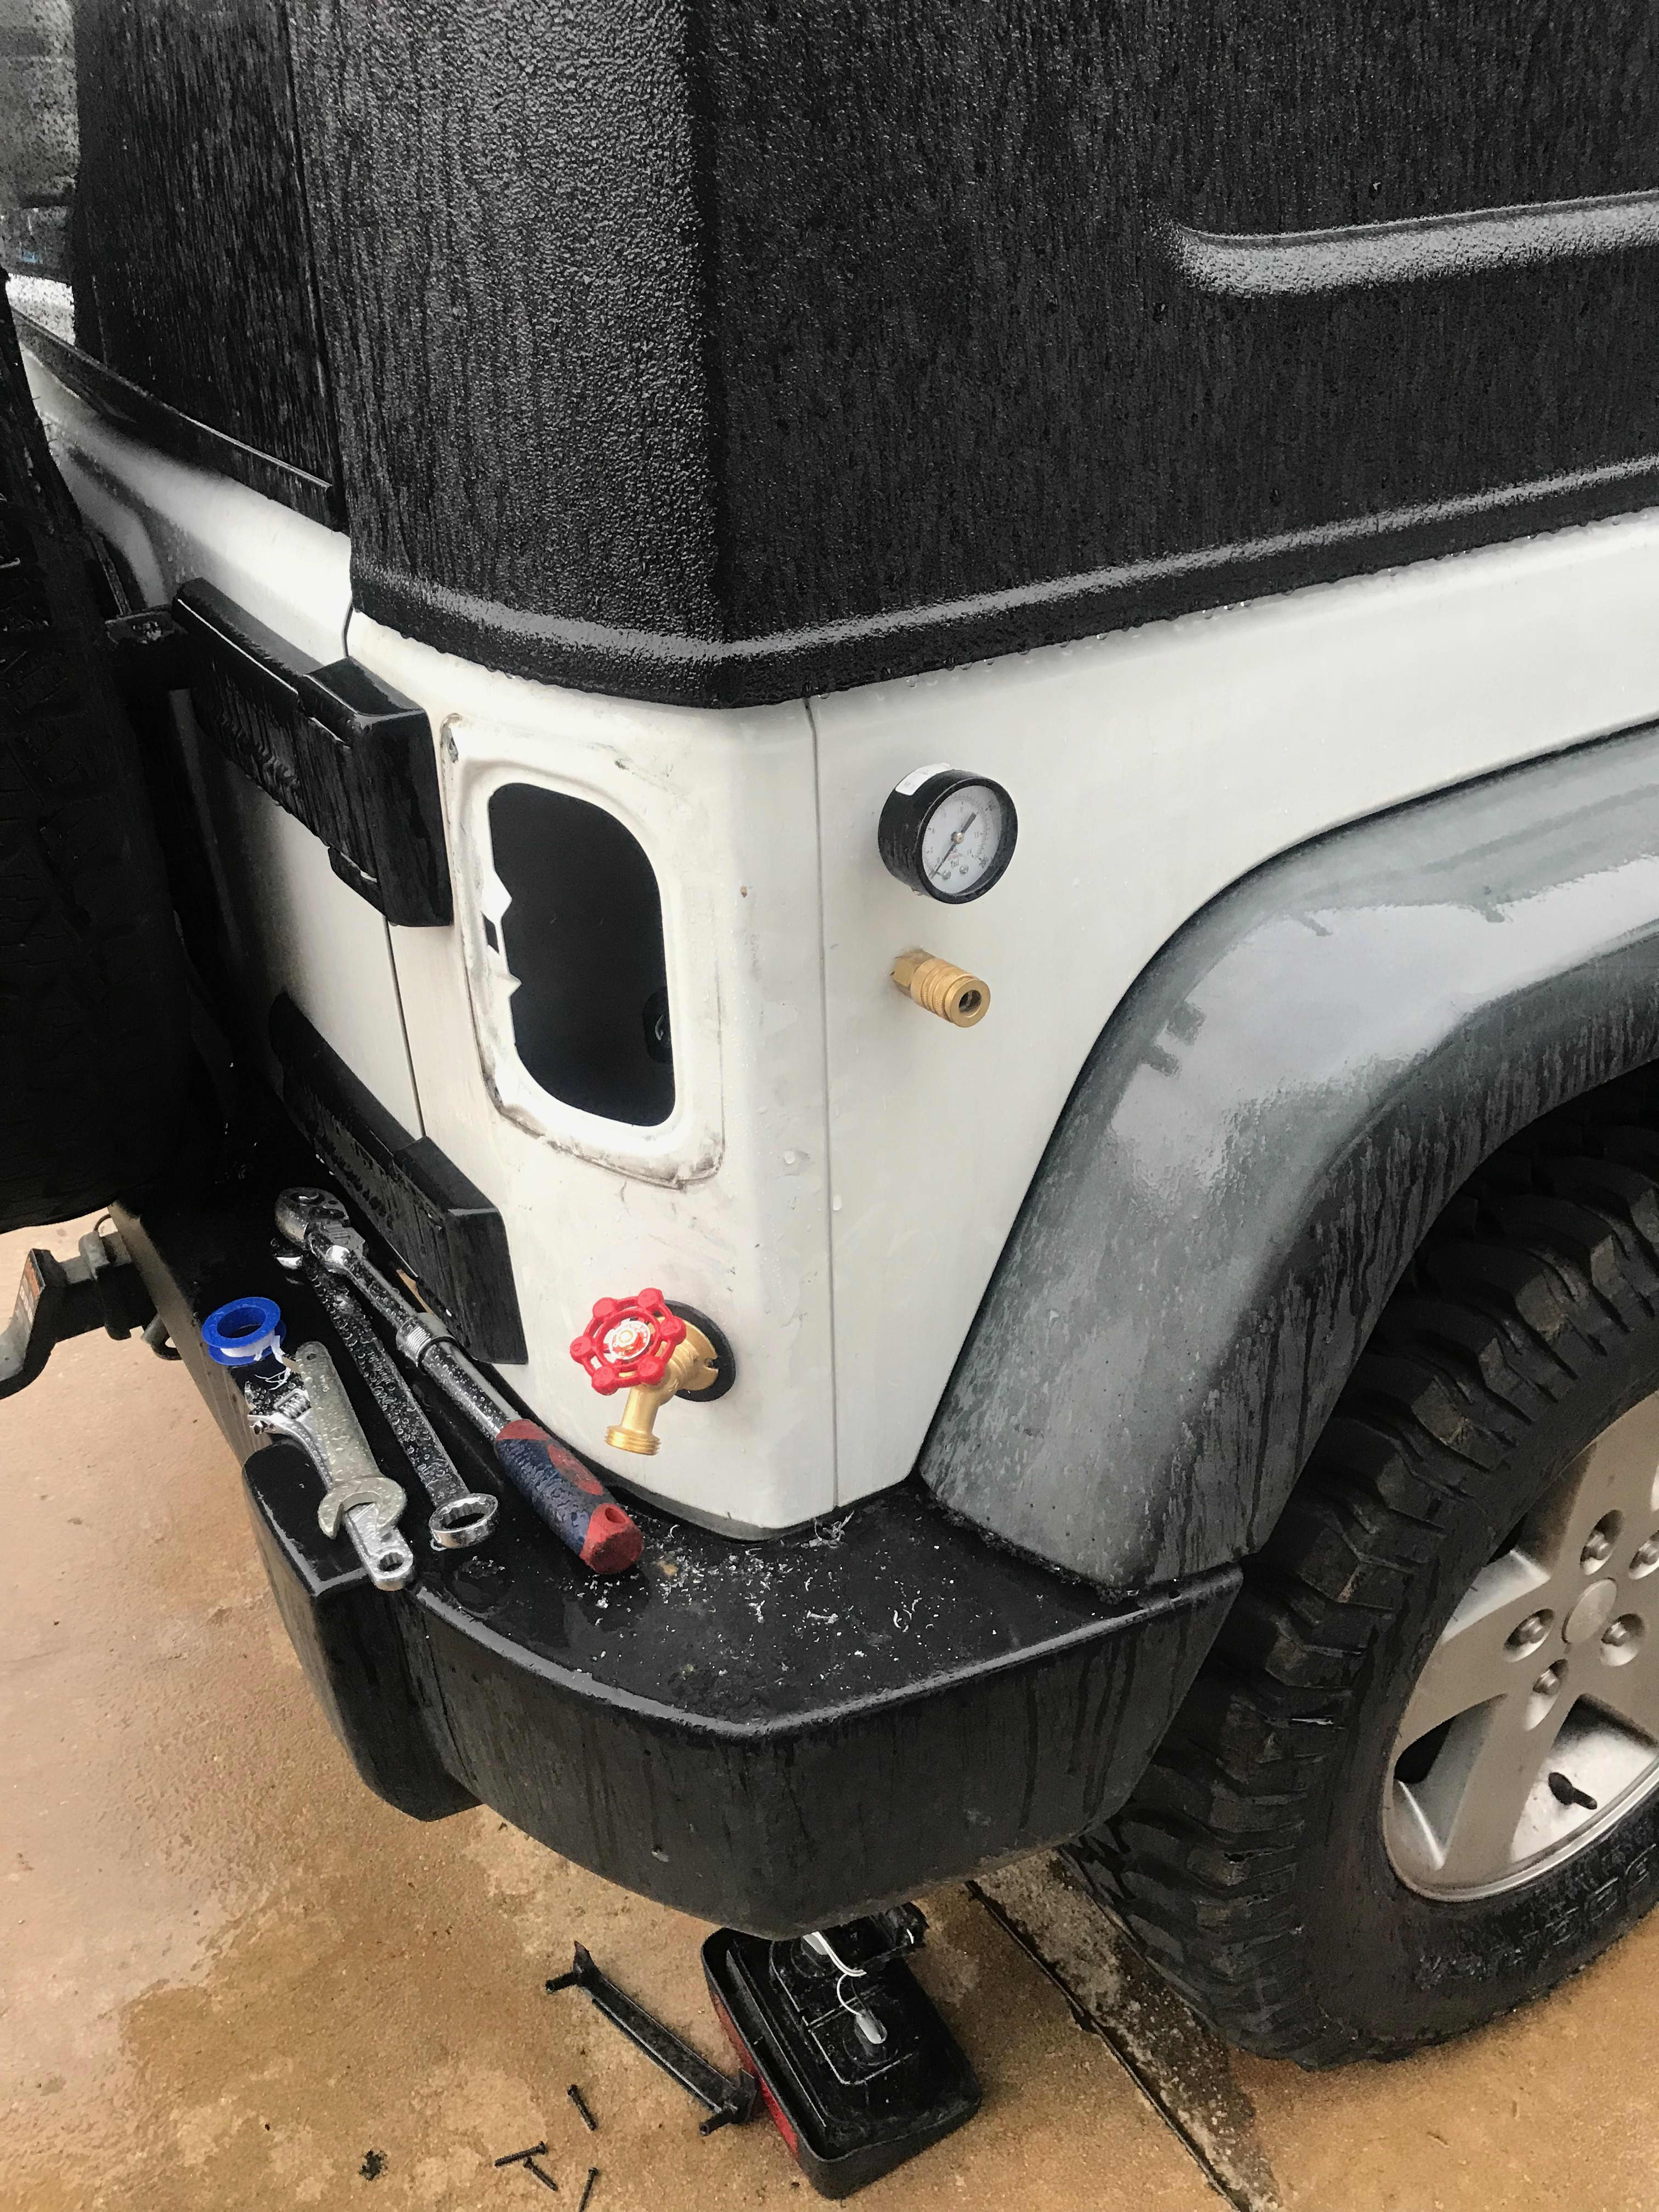
The rear light removed to install the inlet and outlet. In retrospect, we should have moved the outlet up another inch or so… measure twice cut once! Whoops.

The inlet (top) and outlet (bottom) right next to one another. We recommend moving the inlet up another inch or two.
To get the water out of the tank, we are starting off really simple and using a standard house water spigot. We picked up some nylon washers to give it a little padding against the Jeeps body. The outlet gets connected to the other side of the water pump/filter line, using a T splitter. There is no need to have a ball-valve on the outlet since the outlet itself is a valve.
Drilling & Hookup
We’re almost done, it’s hookup time! We have the hoses ready with the tank mounted outside the vehicle, and we have the pump/filter system ready on the inside. To get the system working, we need to obviously hook them up together. In order to do this, we need to drill a few holes… We never take drilling lightly, its a permanent change to the vehicle, but theres no way to get a bunch of 1/2″ hoses into the body otherwise.
We elected to drill three holes right next to the passenger side door as our pass-throughs. Although we could have just passed our hoses through a grommet and through the floor, we wanted to have hard and fixed points to connect the in and outside hoses together. We got a 2″ threaded pipe and pushed it through the new hole inside a grommet and screwed on a 1/2″ female to male hose barb on both sides. Make sure these threads have enough teflon on them, this is the only place we had go back and tighten because of a light leak.

Drilling into the bottom of the Jeep. The bit shown is a MUST for drilling into sheet metal.

Holes drilled, grommets set, and the brass fittings installed!
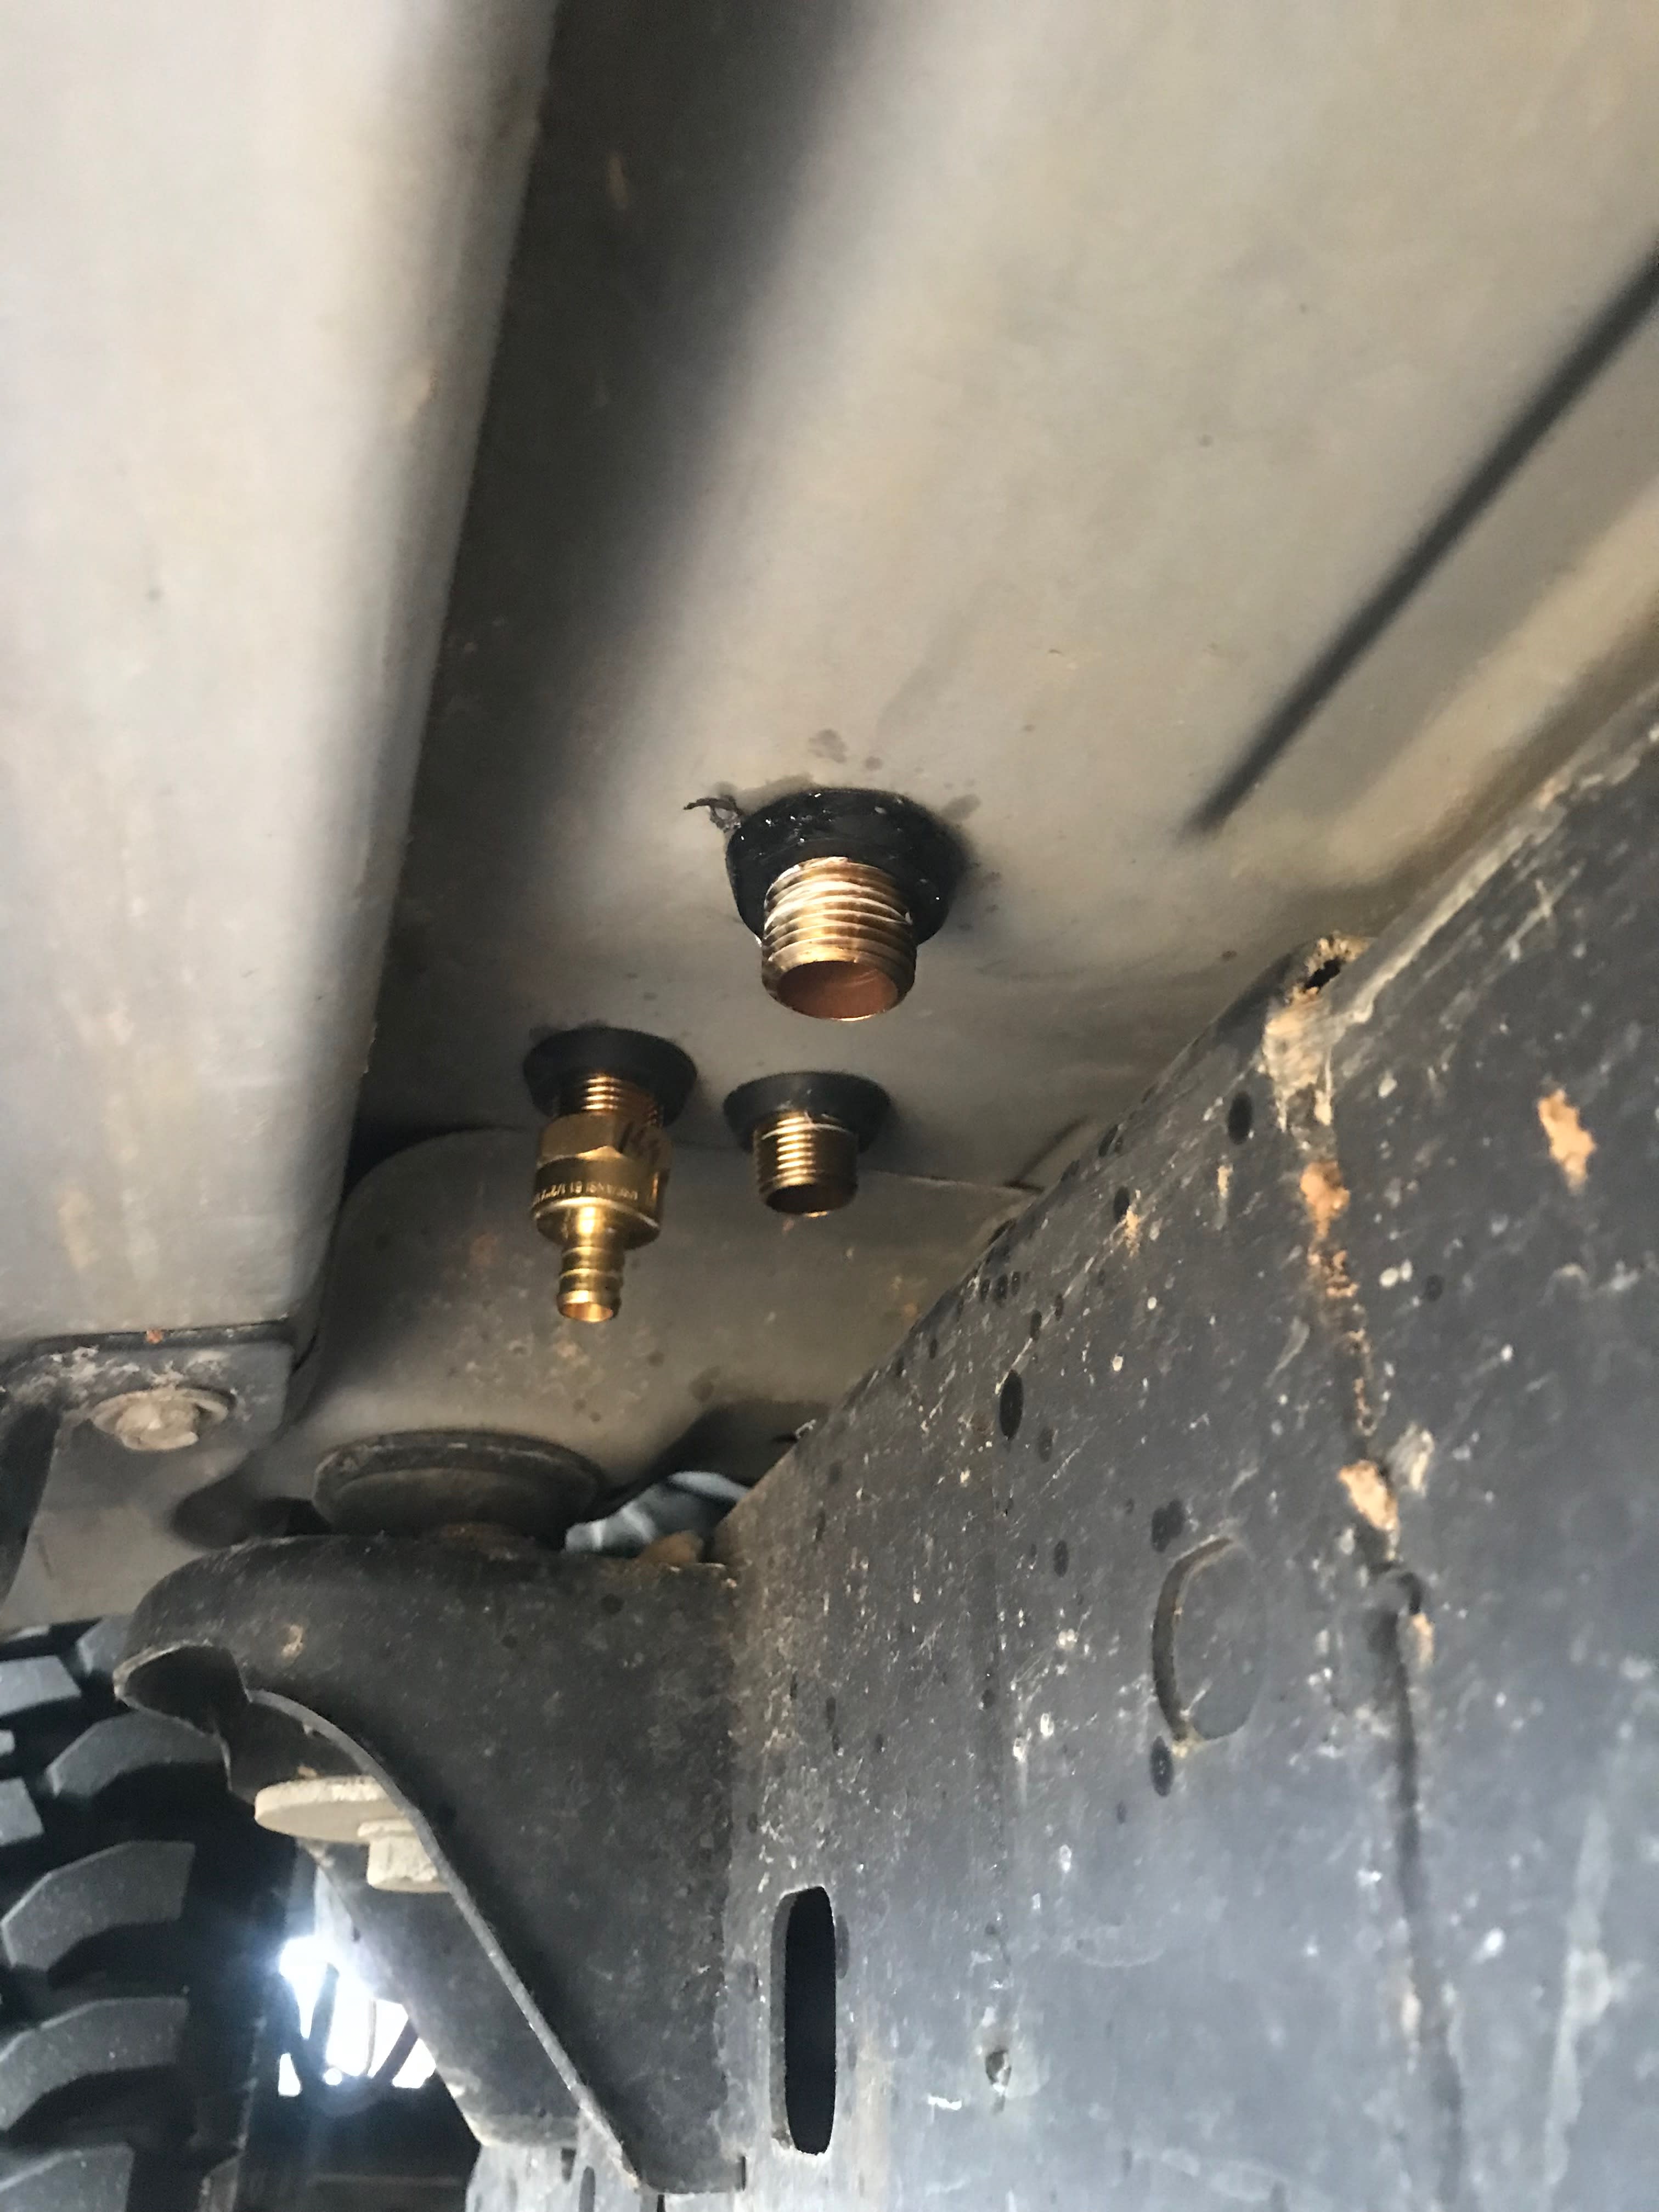
The bottom of the brass fittings on the underside of the Jeep.
Now lets hook everything up, double check everything goes to where its suppose to!

The pump, and hoses fully installed and connected to the hard brass fittings.
Now all thats left is to test the full system out! First go fill the tank, plug in the pump and open up the ball valves to see if the pump kicks in and cycles the water! Check for leaks and fix wherever found. To verify your pump is not loosing any pressure and working at full capacity, grab a bucket of known size, 1-3 gallons ideally. Turn on the pump, start a timer, and let the water pull from the tank and out into the bucket, once the bucket fills, stop the timer. Calculate how many GPM the pump pulled from the tank and into the bucket. If using the recommended pump, it should be around 3 GPM. If its lower, check to see if theres a place pressure is being lost and fix.
Completion
As we’ve already mentioned, there are a few things we’ve left out of this install for now; the hot water exchanger requires cutting into the heater hose, insulation of the water lines, full installation of the gauges and rocker switches for the water pump. We will go back and finish these final touches and update the guide when appropriate. If you have any questions, leave a comment below!
Tips
We were so inspired by Dan Grec from The Road Chose Me and his “DIY 4×4 Water Tank, Pump, Filtration and Treatment” walkthrough that we designed our own onboard water system, documented it and have created a tutorial to show you how to build your own (Yes it’s different than Dan’s setup!).
When we first set out to add onboard water to our Jeep, we figured it would be pretty straightforward. Purchase the parts, mount the tank, install it and ta-da running water. And although that overall gist of the installation is that easy, the actual work and thought that has to go into the system is a LOT more involved. Before setting out to add your own system, make sure you have a clear understanding of what you’re going to be modifying. Some of the modifications in this tutorial are permanent and require drilling into your vehicle. That being said, having potable hot running water is AMAZING and for us it’s completely worth the effort and challenge.
There are many ways to get onboard water on your vehicle. When we built our system we had a few things we needed:
- Holds 10 or more gallons – You use more water each day than you think, and there’s two of us!
- Potable – We want to be able to drink it if we wanted & needed to.
- Pressurized – So we can use it just like we’re at a house.
- Hot! – Taking a shower is nice, but we don’t want to give up our hot showers.
- Natural – Adding or removing water from the system shouldn’t be a chore.
The Build
Time: 25+ Hours
Cost: ~$1000
Complexity: Medium. If you follow this guide, it’s mostly assembly, if you vary or do something more custom you’ll need to have some knowledge of plumbing.
Materials
The materials for this build are listed on the original blog on our website. I try and link to the exact products I used, otherwise I use the closest alternative. We also offer a DIY Water Tank Kit with all the materials needed to install your own water system on your rig with detailed instructions on how to design your own system.
Design
We shamelessly trusted in Dan’s base water system design. What we love about this design is the double filtration scheme. In fill mode, the water goes through the filter and pump, then into the tank. Then on use mode, the water from the tank goes through the filter a second time and then out to be consumed. We wanted the ability to have hot water, so we added a hot water line using a heat exchanger.
Double filtration water system design
Prep Work
Before purchasing anything else, or doing any additional research, start by sourcing a tank that will fit in or under your vehicle. The JKU does not have much room for a water tank unless you move the stock Evap Canister. This is a pretty straight forward modification, a kit is required, but a vital first step to clear enough room for a tank. For our 2011 JKU we found the Ronco Plastics RV23W to be a great fit for this newly created space.
You’ll also need to plan out about 1-2 square feet for the pump, filter, and hoses in your vehicles cabin.
Construction
Prepping the Tank
Once you source your water tank, make sure you get 4 holes drilled into your tank; a 1/2″ female inlet (placed near the top of the tank), a 1/2″ female outlet (placed near the bottom of the tank), a 1/2″ female breather hose and a hole to place a depth sensor so you can tell how much water is in the tank.
Since we’re mounting the tank to the underside of the vehicle and exposing it to the elements, we’re going to want to do our best to seal it up and protect it. To insulate the tank, we wrapped it, on all four sides, in Reflectix or any other bubble reflective foil, using gorilla tape to secure it to the plastic. This is not enough to keep the tank from freezing in harsh weather, but will help.
Water tank wrapped in Reflectix for insulation
Water tank ready for placement in the sheet metal casing.
To protect the tank from rocks or other objects, we cut and wrap the tank in a thin piece of sheet aluminum. This is not enough protection if you bottom the tank out rock crawling, but it will prevent any rocks from getting kicked up and causing a hole and leak.
To keep the tanks shells together, I wrapped the entire top in gorilla tape
Mounting the Tank
Now that we’ve wrapped the tank, we can measure the new outer dimensions and ensure the tank is still going to fit in the space under the vehicle. The padding, aluminum and tape can add up and increase the size of the tank. With these new dimensions, let’s figure out how to make a mount!
We had a few different ideas on how to mount the tank under the vehicle and ultimately narrowed it down to either hanging the tank or strapping it to the bottom using preset bolts. After building an entire cage for the tank and getting it under the Jeep, we decided strapping it to the bottom would be more reliable, stronger, and overall the better choice.
The first version of the tank holder. This version would have hung below the body and swayed. We moved away from this design.
The only challenge with strapping it to the bottom are making the straps. One option is fabricating custom straps using steel and a welder. We don’t have enough experience with welding to confidently make our own straps, so we had to find a solution using parts from hardware stores. If you have welding experience, you should defiantly look at welding together your own as it will allow your tank to sit more flush with the undercarriage of the vehicle.
Right angle brackets in Lowes
Sheet metal also in Lowes
We found some large right angle brackets at the hardware store and fashioned them together into a steel bracket that will hold the weight of the tank (and then some). This is not the prettiest or easiest solution, but it is the best we could come up with using goods from a hardware store. We’re taking a welding class in a few weeks so we plan on improving this design in the future, but for now this is a solid way to mount the water tank!
Bracket installed under the Jeep’s body. You can see the loss of 1-2″ because of the bolts and overhead brackets
Both water tank brackets mounted under the Jeep using factory bolts.
After mounting the brackets, you should be able to slide the tank into position under the vehicle! Before continuing any further, this is a great time to fill the tank with water and test for any leaks. It can be difficult to remove the tank from this position, so its best to get it right early on!
You can see the tank slants down a bit to the front, this is a good thing as it helps get all the water out.
Now that the tanks mounted, you’ll notice the tank sits about 3 inches lower than the gas tank plate. Although this is a bit lower than we’d like for the future, it will be moved up 1-2 inches once we make our custom welded straps. This is still a lower than the standard base for a JKUR, so we will be adding a full 1/4″ skid plate at a later time (we’ll be custom welding that too!).
Prepping the Pump & Filter
Now we get to the technical part! Creating a nicely designed and tidy pump and filter lines is essential to making your entire water system function efficiently and leak free. We recommend attaching your pump and filter to a piece of wood. You’ll want to secure each line and avoid over bending any line using right angles when necessary.
Our custom DIY base platform allows us to attach our solar, signal booster and water pump right to the bottom.
Place a strainer before your water pump to ensure it doesn’t suck up any objects, I’ve included the surflow strainer in the materials list.
Inlets & Outlets
Up to this point, we haven’t mentioned how we’re planning on filling the tank or consuming the water from the tank. As it turns out there are a lot of options!
From an inlet standpoint, were currently going to rely on city water hookups for bringing water onboard. We went to camping world and found an RV inlet thats perfect for hooking into our system. We installed the inlet in the rear-passenger side corner of the Jeep, right below the tail-light. If you take the tail-light out, you’ll see a lot of empty space that is perfect for routing a few hoses and installing our inlet! Installation is pretty straight forward, drill a hole, place the inlet into the hole, secure and connect the water line that runs into the pump/filter system (remember, we want to filter the water before it gets into the tank). Depending on the type of inlet you get, a ball-valve might be required to prevent the pump from loosing pressure on one side of the system.
The rear light removed to install the inlet and outlet. In retrospect, we should have moved the outlet up another inch or so… measure twice cut once! Whoops.
The inlet (top) and outlet (bottom) right next to one another. We recommend moving the inlet up another inch or two.
To get the water out of the tank, we are starting off really simple and using a standard house water spigot. We picked up some nylon washers to give it a little padding against the Jeeps body. The outlet gets connected to the other side of the water pump/filter line, using a T splitter. There is no need to have a ball-valve on the outlet since the outlet itself is a valve.
Drilling & Hookup
We’re almost done, it’s hookup time! We have the hoses ready with the tank mounted outside the vehicle, and we have the pump/filter system ready on the inside. To get the system working, we need to obviously hook them up together. In order to do this, we need to drill a few holes… We never take drilling lightly, its a permanent change to the vehicle, but theres no way to get a bunch of 1/2″ hoses into the body otherwise.
We elected to drill three holes right next to the passenger side door as our pass-throughs. Although we could have just passed our hoses through a grommet and through the floor, we wanted to have hard and fixed points to connect the in and outside hoses together. We got a 2″ threaded pipe and pushed it through the new hole inside a grommet and screwed on a 1/2″ female to male hose barb on both sides. Make sure these threads have enough teflon on them, this is the only place we had go back and tighten because of a light leak.
Drilling into the bottom of the Jeep. The bit shown is a MUST for drilling into sheet metal.
Holes drilled, grommets set, and the brass fittings installed!
The bottom of the brass fittings on the underside of the Jeep.
Now lets hook everything up, double check everything goes to where its suppose to!
The pump, and hoses fully installed and connected to the hard brass fittings.
Now all thats left is to test the full system out! First go fill the tank, plug in the pump and open up the ball valves to see if the pump kicks in and cycles the water! Check for leaks and fix wherever found. To verify your pump is not loosing any pressure and working at full capacity, grab a bucket of known size, 1-3 gallons ideally. Turn on the pump, start a timer, and let the water pull from the tank and out into the bucket, once the bucket fills, stop the timer. Calculate how many GPM the pump pulled from the tank and into the bucket. If using the recommended pump, it should be around 3 GPM. If its lower, check to see if theres a place pressure is being lost and fix.
Completion
As we’ve already mentioned, there are a few things we’ve left out of this install for now; the hot water exchanger requires cutting into the heater hose, insulation of the water lines, full installation of the gauges and rocker switches for the water pump. We will go back and finish these final touches and update the guide when appropriate. If you have any questions, leave a comment below!
Tips
- Whenever you drill into metal, use an oil on your drill-bit to keep it cool and sharp.
- If you have to drill a hole larger than your bit allows, get a small drill bit and drill holes in a circle. If the drill bit slips, get a smaller bit and fill in the gaps until the full circle is cut.
- Support your local hardware store, often they will help consult you! (Yes we used Lowes for the brackets but the other 90% of our shopping was done at our local family owned hardware store).


