• HTML tutorial

b0wfin

Rank IV

Enthusiast III

2007 Honda Pilot Off Road Build


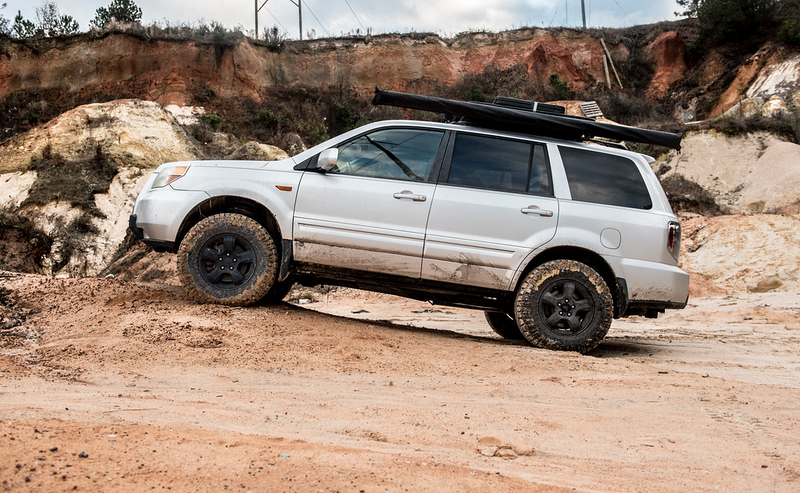
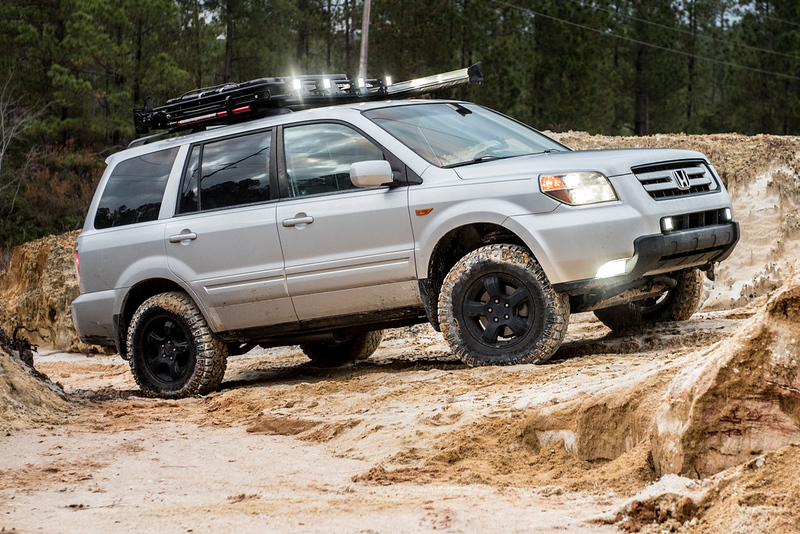
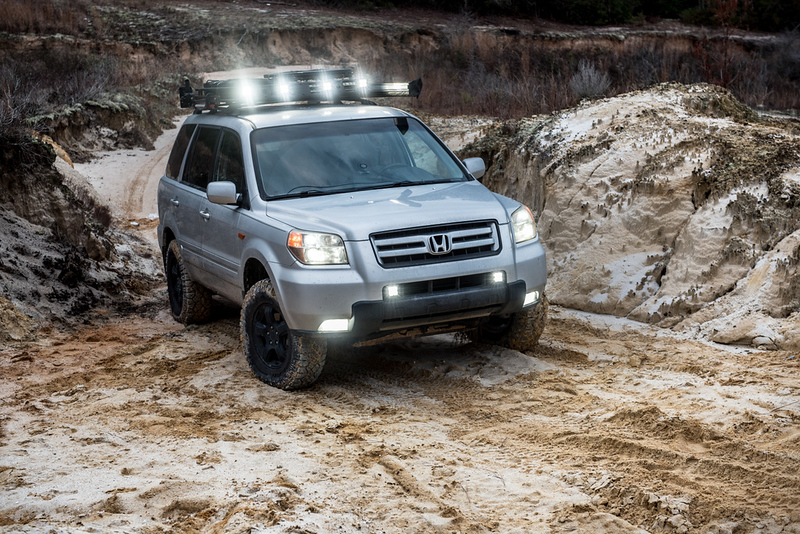
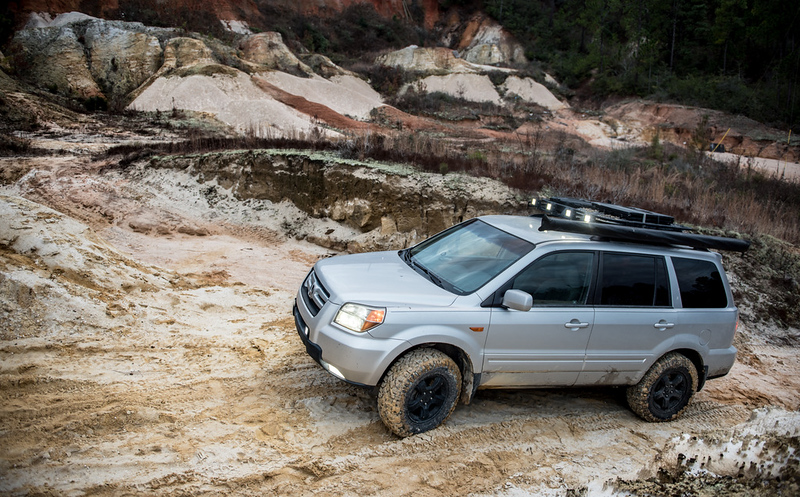
2007 Honda Pilot Upgrades


• Led Headlights and fog lights

• Weather Tech floor mats

• Transmission Cooler

• 2 in front lift

• Front cam bolts

• 1.5 in rear lift

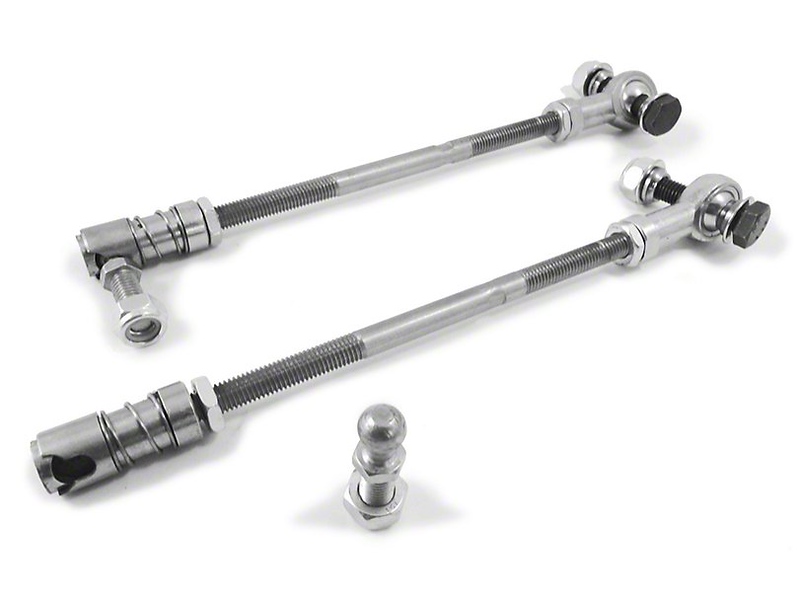
• Adjustable rear camber control arms

•Rear swaybar delete

• Front skid plate

• Firestone W237604135 Coil-Rite Kit

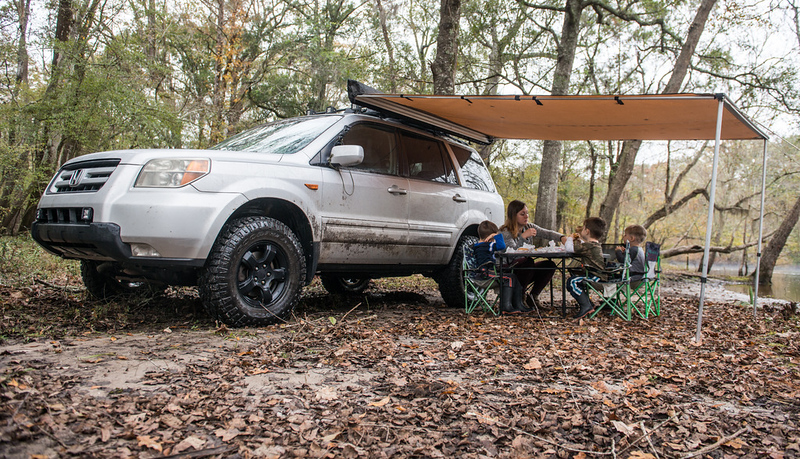
• Smittybilt Defender one-piece roof basket

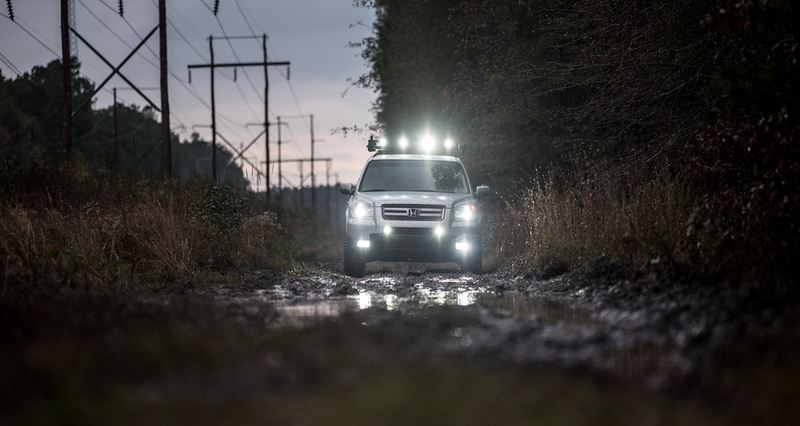
• Pro Comp Explorer Spot Beams x8

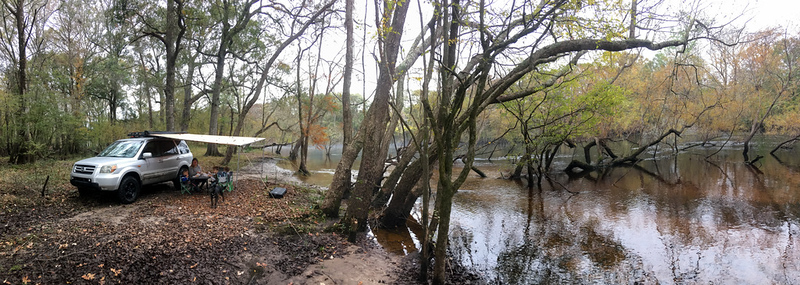
• Tentproinc 8x9.5 awning

• Hi-LIft Jack

• 4-Ton Dual Gear Power Puller

• Shackle hitch receiver

• Front Shackle mod

• Plano Gun Guard All Weather 36" Box

• 5 camping chairs held in gun box in roof basket

• Folding table stored on top of traction pads in roof basket

• 4x X-Bull traction mats

• 4x Goodyear Duratrac 245-75-r16

• Full size spare wheel 245-75-r16

• Jumper cables under driver seat

• Toolbox under passenger seat

• Modified trunk area to hold recovery gear

o Viair 88P Air Compressor

o Tire patch kit

o Shovel

o Axe

o 2.5lb sledge hammer

o DIY Hi-Lift Recovery Kit

o Hi-Lift Jack Mate

o 20’ x 2” Pro Grip recovery straps X2

o 50’ Synthetic Winch Line

o EZ Tire Deflator

o 2x wheel chocks

o Tools/ spare parts

o First Aid Kit

o Wd-40


Future projects


• DIY rear dif skid plate

•Front swaybar disconnect

• Receiver mounted winch setup

• 2” rear lift

• Snorkel
 
Last edited:

b0wfin

Rank IV

Enthusiast III

I finally got around to starting my skid plate protect. I started this project with an old fuel tank skid plate that I found at a junk yard for $30. (I think it was an f250 skid plate) As long as you can find a skid plate longer than the subframe bellow the Pilot you basically just cut to fit and bolt it up. On the passenger side I drilled a 1/2 hole through the subframe's 2 existing holes. On the driver side I used a u-bolt through two of the big holes in the subframe. I made sure to cut a rectangle out in the right place so I can change the oil without removing the plate. All of the bolts are secured with split washers to prevent them rattling loose. My next phase will be to create a front portion so the plate slides up and over terrain. It is a little crude, but it is better than nothing.


Last edited:

b0wfin

Rank IV

Enthusiast III

I bought my lift on Ebay. The hardest part of the upgrade was getting the rear aligned. There are adjustment bolts that rust to the rear lower control arms bushings. You have to cut them out and replace the bushings, or replace the whole control arm. Here are all of the parts I used to get the vehicle lifted and aligned.

Front Spacers: $99.99 https://www.ebay.com/itm/For-Honda-Pilot-2003-2008-Steel-Front-2-Lift-Kit-With-Sway-Bar-Link/181996029896?fits=Model%3APilot%7CMake%3AHonda&hash=item2a5fcf07c8:g:AWsAAOSwTuJYnZL~:rk:35:pf:0

Front Camber Bolts: $16.48 https://www.ebay.com/itm/Moog-Chassis-K90476-Alignment-Cam-Bolt-Kit/231668397017?fits=Model%3APilot%7CMake%3AHonda&epid=115145496&hash=item35f08333d9:g:jk0AAOSwJWla1L5x:rk:39:pf:0

Rear Spacers: $175.00 https://www.ebay.com/itm/For-Honda-Pilot-2003-2008-Nylon-Rear-1-5-With-Camber-Arm-Leveling-Kit/142707777479?fits=Model%3APilot%7CMake%3AHonda&hash=item213a0bdfc7:g:nEgAAOSwXvdamJ2Y

Rear Adjustment Bolts: $47.95
HONDA OEM Rear Suspension-Lower Control Arm Adjust Bolt 52387S0XA01 | eBay

Rear Control Arm Bushings: $20.67 x2 https://smile.amazon.com/gp/product/B00HAPPOGS/ref=oh_aui_search_detailpage?ie=UTF8&psc=1

Upper Rear Camber Control Arms Pair for Honda Pilot 2003-08 Adjustable Kits Set: $53.99 https://www.ebay.com/itm/Upper-Rear-Camber-Control-Arms-Pair-for-Honda-Pilot-2003-08-Adjustable-Kits-Set/352476110610?fits=Year%3A2007%7CModel%3APilot%7CMake%3AHonda&epid=6025204448&hash=item5211369f12:g:C6IAAOSweTlbrf3e

Firestone W237604135 Coil-Rite Kit $99.42 https:/smile.amazon.com/Firestone-W237604135-Coil-Rite-Kit/dp/B000JK0XKI
 
Last edited:

b0wfin

Rank IV

Enthusiast III

Here are some of the latest adventures the Pilot has carried us through.


Honda Pilot Overland: Epic Picnic with Mud, Water, and Sand:
Honda Pilot Overland: Into the Badlands, Exploring a Sandy Ravine:
Honda Pilot Overland: Getting the Shot, Francis Marion National Forest:
Honda Pilot Overland Stuck in the Mud!:
Are We Lost? Honda Pilot Overland:
 

b0wfin

Rank IV

Enthusiast III

Dude, hell yeah! I’ve seen a few killer Pilot builds. I’ll add this one to the list. Kudos on the rig mate. Love the the ones outside the box [emoji1598][emoji1598][emoji1598][emoji6]
Overland_Mitsu, Thanks! I really like all the fabrication work you have been doing on your rig. Your bumpers really turned out great. At some point I might take my build in a similar direction.
 

Pathfinder I

1,685
Bellingham
Overland_Mitsu, Thanks! I really like all the fabrication work you have been doing on your rig. Your bumpers really turned out great. At some point I might take my build in a similar direction.
Thanks man! I appreciate that [emoji106] I’m always one the fence on making new bumpers for it instead of the tube design. Once you hit a deer at mangle up the front that’s when it’s time to start building haha. [emoji12]
 

b0wfin

Rank IV

Enthusiast III

If you do research most people will tell you that you can not disable VSA (Traction Control) on a Honda Pilot while the TPMS light is on. This weekend I set out to test this and found a surprising result... I was still disable VSA while my TPMS light was on (tires aired down). This may not be true for all Pilots, but it is definitely true for my 07. While we were making the video we got high centered. Check out the video to see how we made it out.


SomeGuyNamedPaul

Rank V
Launch Member

Enthusiast III

1,626
Little Rock, AR, USA
First Name
Paul
Last Name
Hurn
Member #

20091

Ham/GMRS Callsign
KF5DFZ
I love this!
My family owns a 2006 Honda Pilot and I’ve put a 2” lift and other overlanding mods on as well.
I look forward to seeing more adventures!
 
  • Like
Reactions: Werlyb23

Niels

Rank I
Launch Member

Traveler I

233
Rankin, ON, Canada
Member #

16002

I love this!
My family owns a 2006 Honda Pilot and I’ve put a 2” lift and other overlanding mods on as well.
I look forward to seeing more adventures!
I have a 2004 toyota highlander and ive been considering a 40mm lift they sell for the kluger in australia since the highlander and pilot are fairly similar how did it change the ride? And what type of kit did you go with and what is it made out of?
 

SomeGuyNamedPaul

Rank V
Launch Member

Enthusiast III

1,626
Little Rock, AR, USA
First Name
Paul
Last Name
Hurn
Member #

20091

Ham/GMRS Callsign
KF5DFZ
I have a 2004 toyota highlander and ive been considering a 40mm lift they sell for the kluger in australia since the highlander and pilot are fairly similar how did it change the ride? And what type of kit did you go with and what is it made out of?
Here’s what I did,
2" lift in the front, 1" in the rear.
Front lift:
For Honda Pilot 2003-2008 Steel Front 2" Lift Kit With Sway Bar Link | eBay

Rear Lift:
For Honda Pilot 2003-2008 Nylon Rear 1" With Camber Arm Lift Kit | eBay

To install the lift, I simply used the ready lift installation instructions.
https://www.readylift.com/media/inst...s-5-17-BMC.pdf

Tires,
265/70/R16 Hankook Dynapro AT-M.
Hankook Dynaro AT-M Tires P265/70R16.
https://www.tirerack.com/tires/tires...omCompare1=yes

My build is not as nice as his ‘07 pilot so take from it what you will. He lists more parts but this is all I did. The ride seems perfectly fine to me but I don’t have a good way to compare it. I bought my pilot with rotten tires and did work to it as soon as parts arrived.
 

Niels

Rank I
Launch Member

Traveler I

233
Rankin, ON, Canada
Member #

16002

Thanks for the reply the lift for mine is poly something or other i dont know how i feel about a plastic lift kit how is your holding up?
 

SomeGuyNamedPaul

Rank V
Launch Member

Enthusiast III

1,626
Little Rock, AR, USA
First Name
Paul
Last Name
Hurn
Member #

20091

Ham/GMRS Callsign
KF5DFZ
The front lift is a steel spacer that bolts in. Since it holds the strut, it makes perfect sense. The rear spacer is simply a nylon disc on the coil. Body mounts for trucks have been nylon for decades to reduce frame noise transferring to the body so I don’t see any reason a coil spacer can’t do the same.
Of course you’re right it’s technically not as good as a longer spring, but I haven’t tracked down a better cost effective option.
 
  • Like
Reactions: Niels

b0wfin

Rank IV

Enthusiast III

Greetings my Honda brother! :D Love your build. Very nice. Seems like you maybe had the same plan I did with the wheels - painted em?
Sorry for the lack of response everyone. For some reason I was not notified about these comments.

Yes I painted them with satin black spray paint. When they get scratched I just repaint. I would love to buy a nice set of 16x6.5 black wheels, but I am having a hard time finding a look that I like with an offset that isn't too wide. With my rear swaybars disconnected I am worried that a wider offset will rub the top of my wheel well.
 

b0wfin

Rank IV

Enthusiast III

@b0wfin How did you setup your sway bar disconnects? Did you use a kit of some kind?
Right now I have the rear sway bar links removed with the swaybar suspended in the sweet spot where the tire won't rub it a full droop or compression. It took a bit of trial and error to find this location. Body roll isn't too bad as long as my rear airsprings have good pressure. I am looking into options for swaybar disconnects.

I have been looking at these sway bar links as an option for the front. I am not sure if there is enough room in the rear for a similar solution.

https://www.extremeterrain.com/steinjager-rear-sway-bar-disconnect-end-link-kit-for-2-lift-9706-tj-1.html?utm_content=XT Handling - Swaybars and Disconnects|Steinjager&T5_Var4=J125195&intl=0&utm_campaign=XTW+Wrangler+Brands+Medium&dialogtech=ppc&utm_source=google-pla&utm_medium=shopping&T5_Var2=shopping&T5_Var3=orange&gclid=Cj0KCQiAj4biBRC-ARIsAA4WaFjgkE67RhljRA5piyS_g6OjusHSo02fLkJbtU9MwM_8Rgk3kMYqFmEaAgZSEALw_wcB&gclsrc=aw.ds
 
Last edited: