2005 Sequoia Build

  • HTML tutorial

jcx03

Rank III
Launch Member

Enthusiast III

646
los angeles
First Name
joseph
Last Name
c
Member #

23877

Skid Project Update

Finally finished the install of the last plate (tcase + rear cat). It's like 95% there. There are a lot of changes that need to be done to make it better to install.

Overall, 9 nutserts are required for this install & there are a few optional ones to help with extra fitment.
- 1 nutsert for oil pan skid to mount
- 2 nutserts for transmission / cat skid plate
- 6 nutserts for tcase skid.

1630118680748.png
1630118717753.png
 
Last edited:

jcx03

Rank III
Launch Member

Enthusiast III

646
los angeles
First Name
joseph
Last Name
c
Member #

23877

Skids Project Update - Closing the books for now.

For now, the skids project is done. I was planning to run a small batch of them, but overall the cost to produce them is too high, and after running the numbers, it doesn't seem viable to run for a reasonable price. Too much risk and liability for a few bucks.

But I'm very happy that I got to get my V1 set, but may look at doing a V2 set with some updated elements, and then selling the set I have off.

For now, I'll close the book, and work on some other projects.

Light Bracket Project

I recently bought a midland shortie antenna, and made a mockup for a light bracket that can be installed on the passenger side. It'll be made from 3/16" 5052.

Did a test fit, but it needs a few updates to it to make it perfect fitment.

1630400889444.png


Center Console Project!

One of my biggest gripes with the Sequoia is the non-flat center console top, low wall cup holders, non-dividing center console compartment, and the weird shaped "tray" closer to the dash. The whole thing is basically a mess for space optimization.

I'll be making a new center console out of aluminum or steel that also has compartments to get a little more organized.

One of which will be the Midland Headunit. Got it scanned and I'm very excited to get started on this project.

Some Features I'll be getting into this:
1. Locking center console
2. Flat Top on Console
3. Taller Wall Cup Holders
4. Side Molle Panels for extra stuff.
5. Dividers for the Center Console
6. Dedicated slot for Midland MXT400 (via adapter).
7. Some type of 3D Printed Coin Tray.
8. Interior 12v (charging items inside the center console, like a headlamp or m12 battery).
9. Light interior for console itself.
10. A way to integrate the current HVAC controls for rear + power window + heat seat switches.
11. Center Console Upper Tray Organizer (like from amazon); Example
1630401983059.png

12. Triple Drink holders for the Rear (because there are 3 seats, but only 2 cup holders?!

Very excited to get this going. Just need to scan in my winch controller so I can make a slot for it and then take the center console apart to scan it.

1630401107457.png
 

jcx03

Rank III
Launch Member

Enthusiast III

646
los angeles
First Name
joseph
Last Name
c
Member #

23877

The build goes on! Bumper Locking Pins

Recently, I saw Brute Force Fab release these beautiful 6061 handles for their bumpers. Currently, I have no desire to spend the coin on these, but I do like the locking pin. Billy at BFF did inform me that I could lock it, but I think the pin system is better just for added redundancy in case the latch fails.


I did some searching around, and found some working part numbers for the pin system & the handle. They're listed below for anyone who wants to also just get the pin system parts. I didn't find the exact parts, so the part # for the lanyard might not include the plastic cover for the SS cable, but it does state it's coated with NYLON PLASTIC, so I assume it's correct.

PARTS
2x - McMaster-Carr // REQUIRES DRILLING HOLE TO 5/16 DIAMETER.
2x - McMaster-Carr // Has spring loaded ball. Should work just fine to hold the pin in place from vertical movement. You can get a longer pin, but the minimal usable length should be 0.72" for the southco latches included with BFF bumpers.

The original latches that are used, Southco part# A2-10-501-21

If you want to ball out, and get something better, McMaster-Carr has a ALU380 T handle, lanyard included, & is made of SS. This one is longer by 1/2" for the pin, but I figure it'd help with aiming to lock it.

I'll have photos of this built out once I hit checkout.

Replacing my Hi-Lift

Wanted something safer & more compact. I chose to go with the safe-jack. I also bought the 6ton omega jack separately and saved a few bucks.

Overall, it works great, and is stout. The interior of the shafts aren't coated like the exterior, but I'll just spray paint it. It also fits inside OEM location with the included bag. I may remove the bag & design a base plate system that can dig into the ground to get a more grip, but this will do for now.


Propane Bottles

Turns out a 1lb propane bottle fits in the molle bags I had laying around. So that's awesome. I keep 1lbers for emergencies for when my 5lb (shown below) is out.

The 5lb is the ignik 5lb tank. I wish I had the 6lb vertical tank, but the 5lb was better priced. Definitely go for the 5lb tanks if you want to save $$ on propane & use something that is reusable unlike the 1lb Coleman bottles (the one pictured is one of the last few I had :p).


jcx03

Rank III
Launch Member

Enthusiast III

646
los angeles
First Name
joseph
Last Name
c
Member #

23877

Update: 10/2/21, if you're looking to change the bulbs, please refer to this post. It links a better bulb / mini h4 projector that you should use over the Beamtech ones.
The ones linked have a hard cut off which is needed for other vehicles.

New Headlights

The headlights bulbs that I purchased my vehicle went out & the headlights themselves were in really bad shape. I decided to swap them with some eBay specials & LED lights by Beamtech. Difference is about 4-6x brighter than halogen. I was relying on the BD fogs for the lights prior to this install. Now the LED is brighter than the fogs.

Resistor required for FOGS to work. Message beamtech & they'll ship it to you.

Guide:

1. Remove the Screw (left side of image) & inner reflector thingy.
PEQZOpI.jpg


2. This is the reflector thingy

6KyvM63.jpg


3. Install the beamtech lights as per the beamtech instructions with the rear rubber bulb piece. Beamtech LED has this plastic piece that you just twist off.

QFrYK1Z.jpg
1ea6U9J.jpg


4. Lift up the rubber so you can insert the LED & lock it in with the locking clip & make sure to push the rubber piece in so it's tight (for water protection).

eUQkbgC.jpg


5. Installed LED.

g8rpa1D.jpg


6. No installation photos, but it's just a few 10mm bolt + a plastic clip.

Here it is installed and here are some notes.
The 3 other bulbs are reused. The plastic clips that hold the bulb for the turning signal lights are reused from the OEM ones because I reused the bulbs. For some reason, the new plastic clip uses a different bulb (you can see the new clips on the bumper, just sitting there).

The lights out of the box are fairly well aligned. A good measure to align them is you want a 2inch drop at 25 ft. Here's the adjustment instructions as per OEM instructions

w3P7jd9.png


92DwQAI.jpg
zsjO8Al.jpg
 
Last edited:

jcx03

Rank III
Launch Member

Enthusiast III

646
los angeles
First Name
joseph
Last Name
c
Member #

23877

Update: 10/2/21, if you're looking to change the bulbs, please refer to this post. It links a better bulb / mini h4 projector that you should use over the Beamtech ones.
The ones linked have a hard cut off which is needed for other vehicles.

Before and after adjustment. From the ground it's final center point is 95cm at 9ft away. Then the headlights from ground to center of headlight is 110cm. The right beam in the final photo can't be adjusted anymore without scattering the light like crazy.

Should be good from here I think, but will tinker a little more with the adjustment this week. This looks to be the convergence point where the light won't scatter all over the place.

IMG_20210921_033653.jpg
IMG_20210921_035606.jpg
 
Last edited:

jcx03

Rank III
Launch Member

Enthusiast III

646
los angeles
First Name
joseph
Last Name
c
Member #

23877

Brute Force Fab smol Update.

Overall, I love the BFF front bumper. It's the best design & quality for the first gen, but my biggest gripe of it is that the powdercoating quality isn't up to snuff. It's not powdercoated in house, so I think it's more with the coat shop but it's disappointing that the coating is paper thin. I remember prior to ordering, a few people said the coat quality isn't great, so I was hesitant to get it Coated, but I didn't want to install it myself. ‍♂

Just some considerations - I live in California and the vehicle is in a car port when parked, but this is a weird spot to have it fade. It's on the top of the front bumper which is whacky since it doesn't come into contact with anything hard.

I discovered the spot after I washed the car today and thought it was embedded bird shyt (the white blotches) but it turns out to be faded coating. The spots behind it on the right side is probably dirt, but I have to remove the grill trip to access it (too lazy today). I'll have to fix it with a couple sprays of paint - nbd.

I realize it's nitpicky, but something to be aware of when getting it coated with BFF. Otherwise, the bumper is great and the best on the market.


jcx03

Rank III
Launch Member

Enthusiast III

646
los angeles
First Name
joseph
Last Name
c
Member #

23877

Oil Change with my custom Skid Plates

Overall, the task was more difficult with the skids. The limited amount of wiggle room made it a bit more difficult, but I was able to get through it still without removing the skids - I still didn't have to lift the vehicle to do the oil change still.

The oil filter was removed with a C-Clamp & by loosening it & allowing the oil to drip out, no oil went onto the skid. The drain plug was easy to remove via the access port, & using a funnel helps to not drip oil onto the skid.

I may be inclined to install a fumoto valve to make oil changes easier. Leaning towards F133S because there are less points of failure, and I don't think I need the pivoting feature. It's low profile and just gets straight to the point and shoots straight down.


IMG_20210923_202631.jpg
IMG_20210923_202522.jpg
IMG_20210923_202512.jpg
 
Last edited:

jcx03

Rank III
Launch Member

Enthusiast III

646
los angeles
First Name
joseph
Last Name
c
Member #

23877

Transmission Oil Drain & Flush with Skids

The drain was easy but removing the fill bolt was the difficult task. I need maybe 2 more inches of room on the bottom towards the passenger side to access the bolt from the bottom + I need a longer ratchet (only had my 3/8" 12 inch long ratchet). I was able to access it from the rear which I think is easier with leverage without having to lift the vehicle.

Used valvoline atf max life instead of Toyota WS. If anyone is looking to do this job, a transfer pump is highly recommended. The orange one from harbor freight, or the Walmart hyper tough brand one will work ($9). Then I just use a $1 sterlite box to keep it & wrote ATF on it, so I don't use it for something else.


Jim SoG

Forums Manager
Staff member
Moderator
Member
Investor

Educator I

10,890
Reno, NV, USA
First Name
Jim
Last Name
Bro
Member #

12989

Service Branch
USAF DAV
Love those skid plates.... You make them?
 

jcx03

Rank III
Launch Member

Enthusiast III

646
los angeles
First Name
joseph
Last Name
c
Member #

23877

Safejack FTW.

Ended up having a nail / leak in the tire. Jacked up the axle with their "u" type adapter, with no extension, and it lifted the Sequoia enough to get the tire off. This was via the axle, so lifting the frame or via sliders would have been different and I'd have to use more extensions. Definitely safer with the axle in this case.

I also carry a 3/8" impact wrench, sockets, & torque wrench to make sure everything is on proper.

Highly recommend the safejack! Very safe and correctly spec'd.


ZRex

Rank VII
Launch Member

Explorer I

5,830
Elizabethton, TN
First Name
Mike
Last Name
Klepp
Member #

15512

That Safejack looks like a real winner! I was just thinking about adding a bottle jack to my list since I don't like the idea of using the highlift for such an instance and the factory jack is no longer useful. I'll have to take a gander at Safejack and add one to my list. Thanks for sharing!
 
  • Like
Reactions: jcx03

jcx03

Rank III
Launch Member

Enthusiast III

646
los angeles
First Name
joseph
Last Name
c
Member #

23877

That Safejack looks like a real winner! I was just thinking about adding a bottle jack to my list since I don't like the idea of using the highlift for such an instance and the factory jack is no longer useful. I'll have to take a gander at Safejack and add one to my list. Thanks for sharing!
I used to have a hilift and used it twice - I did not like it one bit. It may be safe for the right person, but it required so much force to lift up a corner that I didn't feel safe about it personally.

Safejack, and maybe one of their mounts will be fantastic. I think I may just design my own stabilizing mount with some feet that can dig into the ground.
 
  • Like
Reactions: ZRex

ZRex

Rank VII
Launch Member

Explorer I

5,830
Elizabethton, TN
First Name
Mike
Last Name
Klepp
Member #

15512

I used to have a hilift and used it twice - I did not like it one bit. It may be safe for the right person, but it required so much force to lift up a corner that I didn't feel safe about it personally.

Safejack, and maybe one of their mounts will be fantastic. I think I may just design my own stabilizing mount with some feet that can dig into the ground.
I think the High-Lift is a great piece of kit because of it's versatility, but when it comes to changing tires I definitely think there are better options.

I think the Safejack Starter Recovery kit should work great for me, I've added it to my list. Thanks again for sharing!
 

jcx03

Rank III
Launch Member

Enthusiast III

646
los angeles
First Name
joseph
Last Name
c
Member #

23877

ARB Compresor Install Notes.

Forgot to post this sooner.

The compressor is actually very easy to install. The wiring loom makes it look daunting, but that's because it has a lot of features.
For the purposes of this install, the contents will only include installation without the included ARB compressor switch, and into a SPOD, or AUXBEAM or 8GANG switch unit, etc.
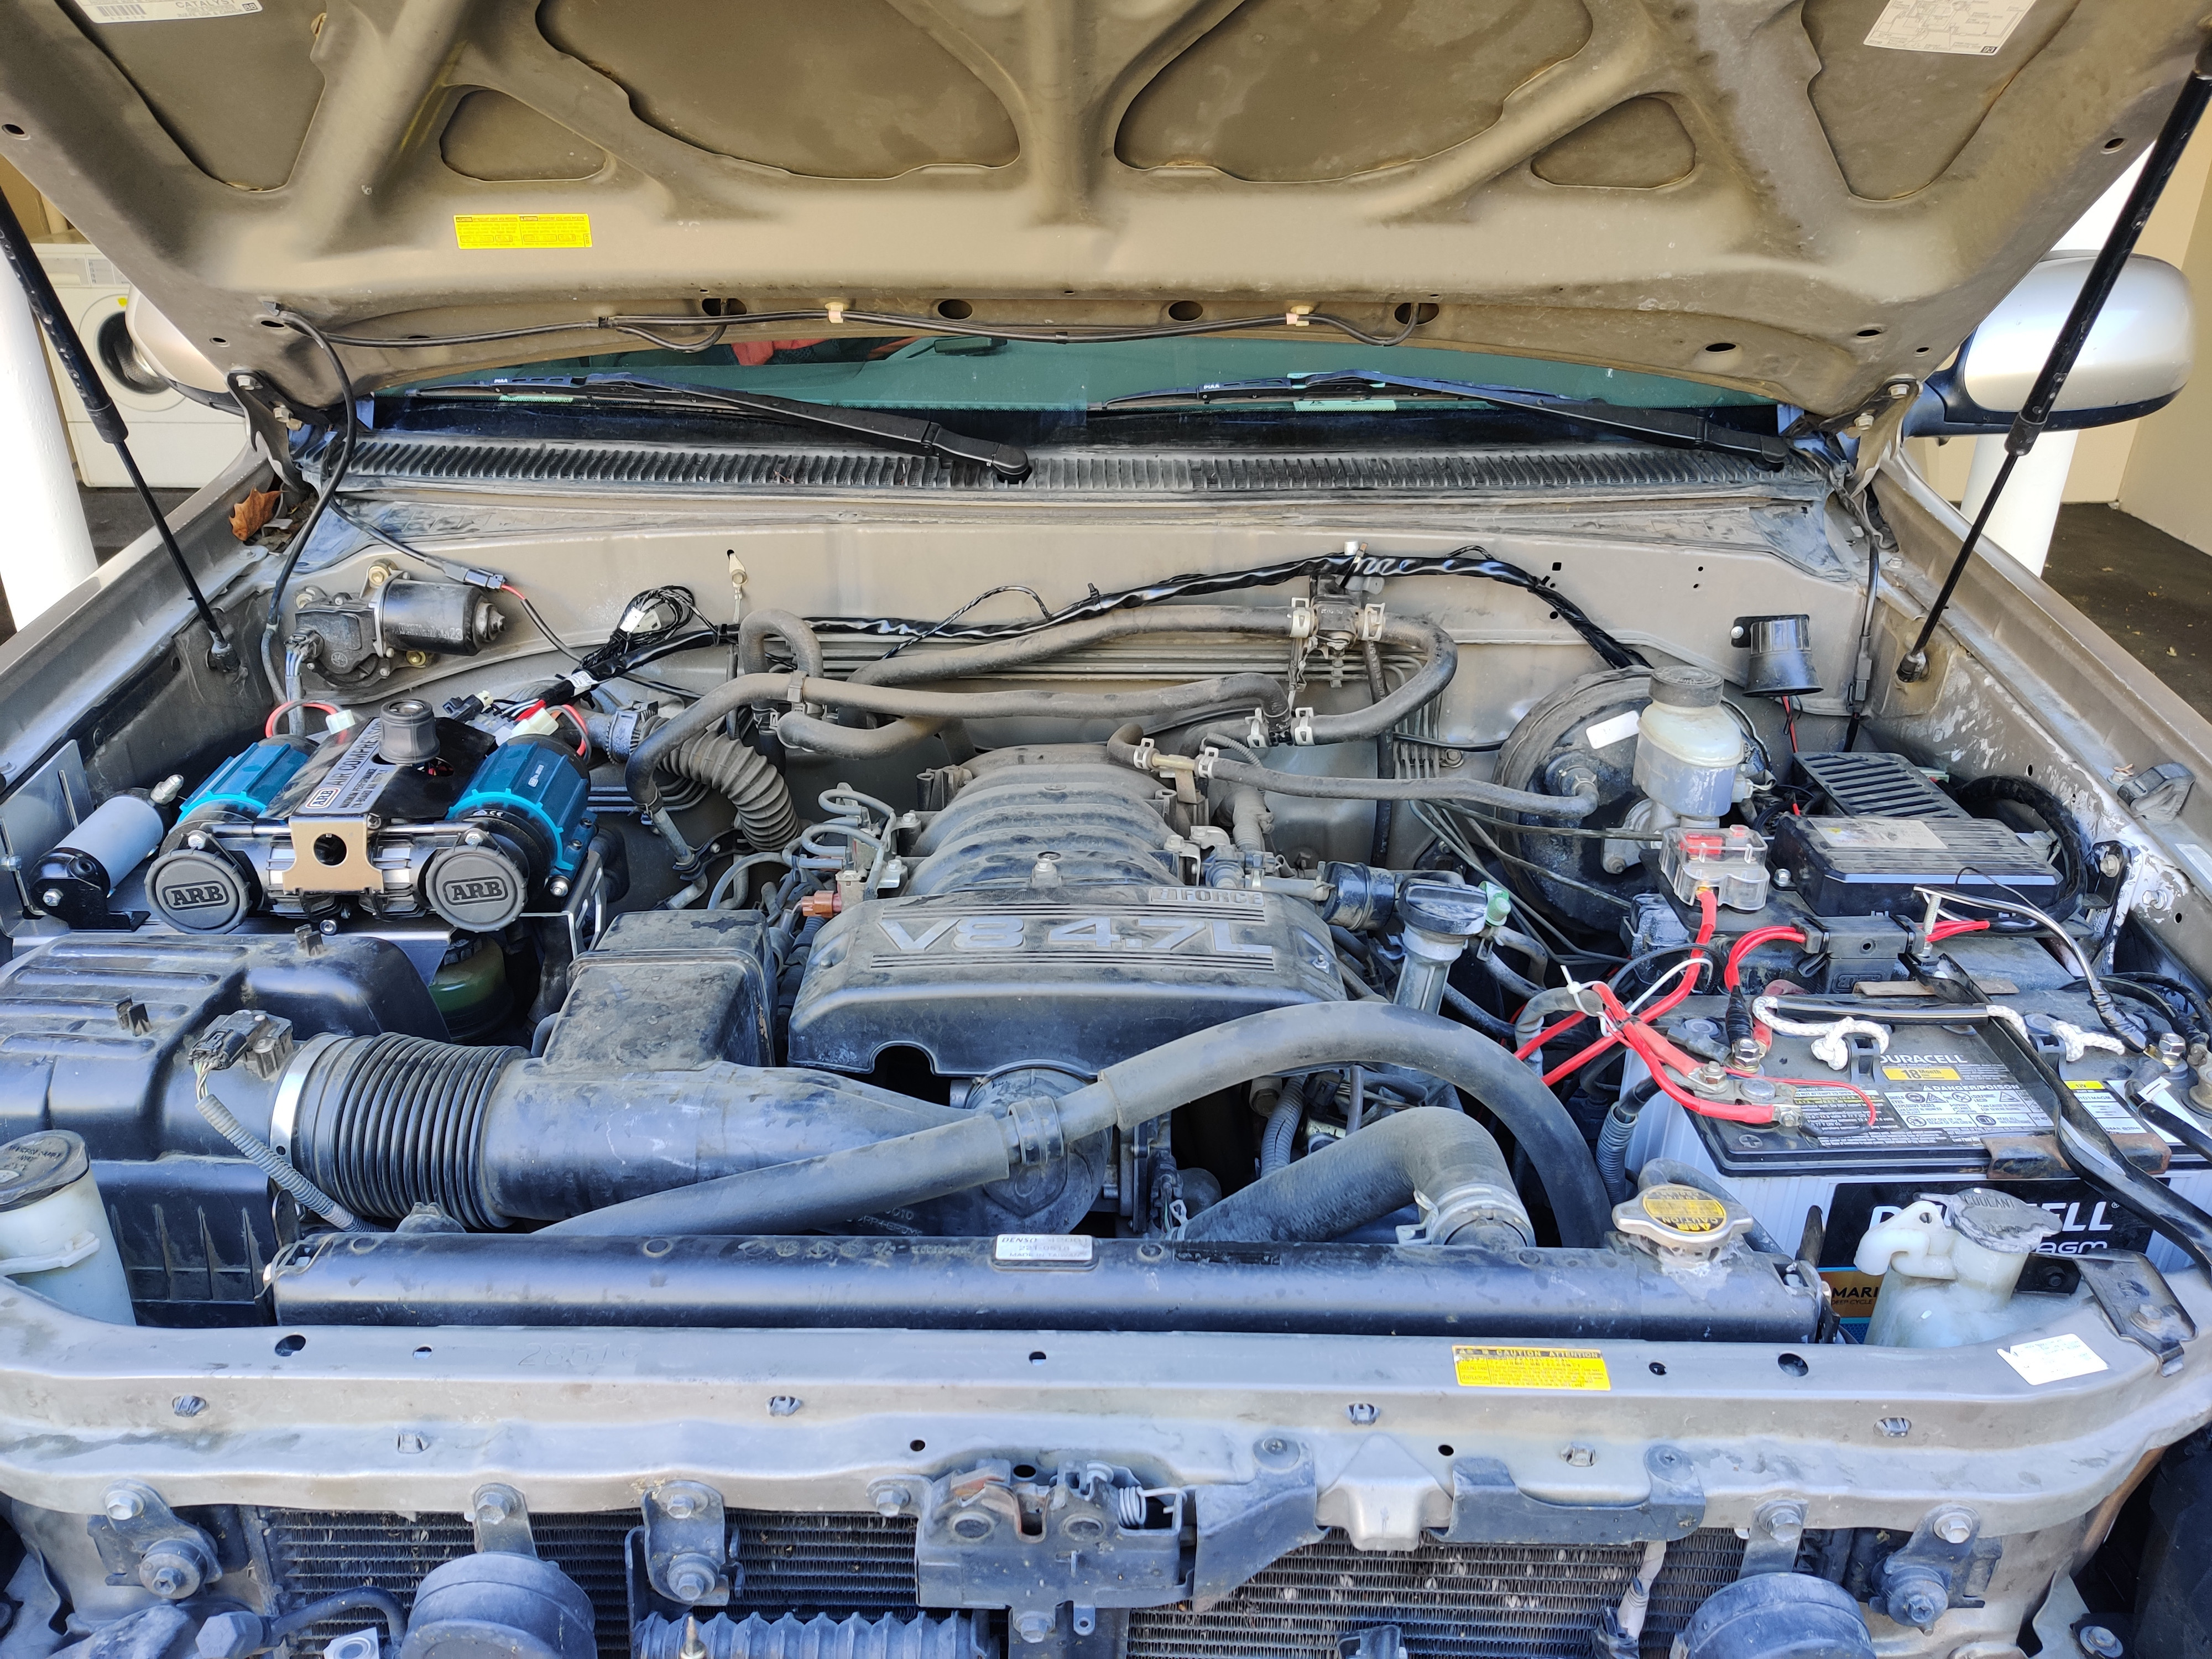
Final Photo


Basic Instructions
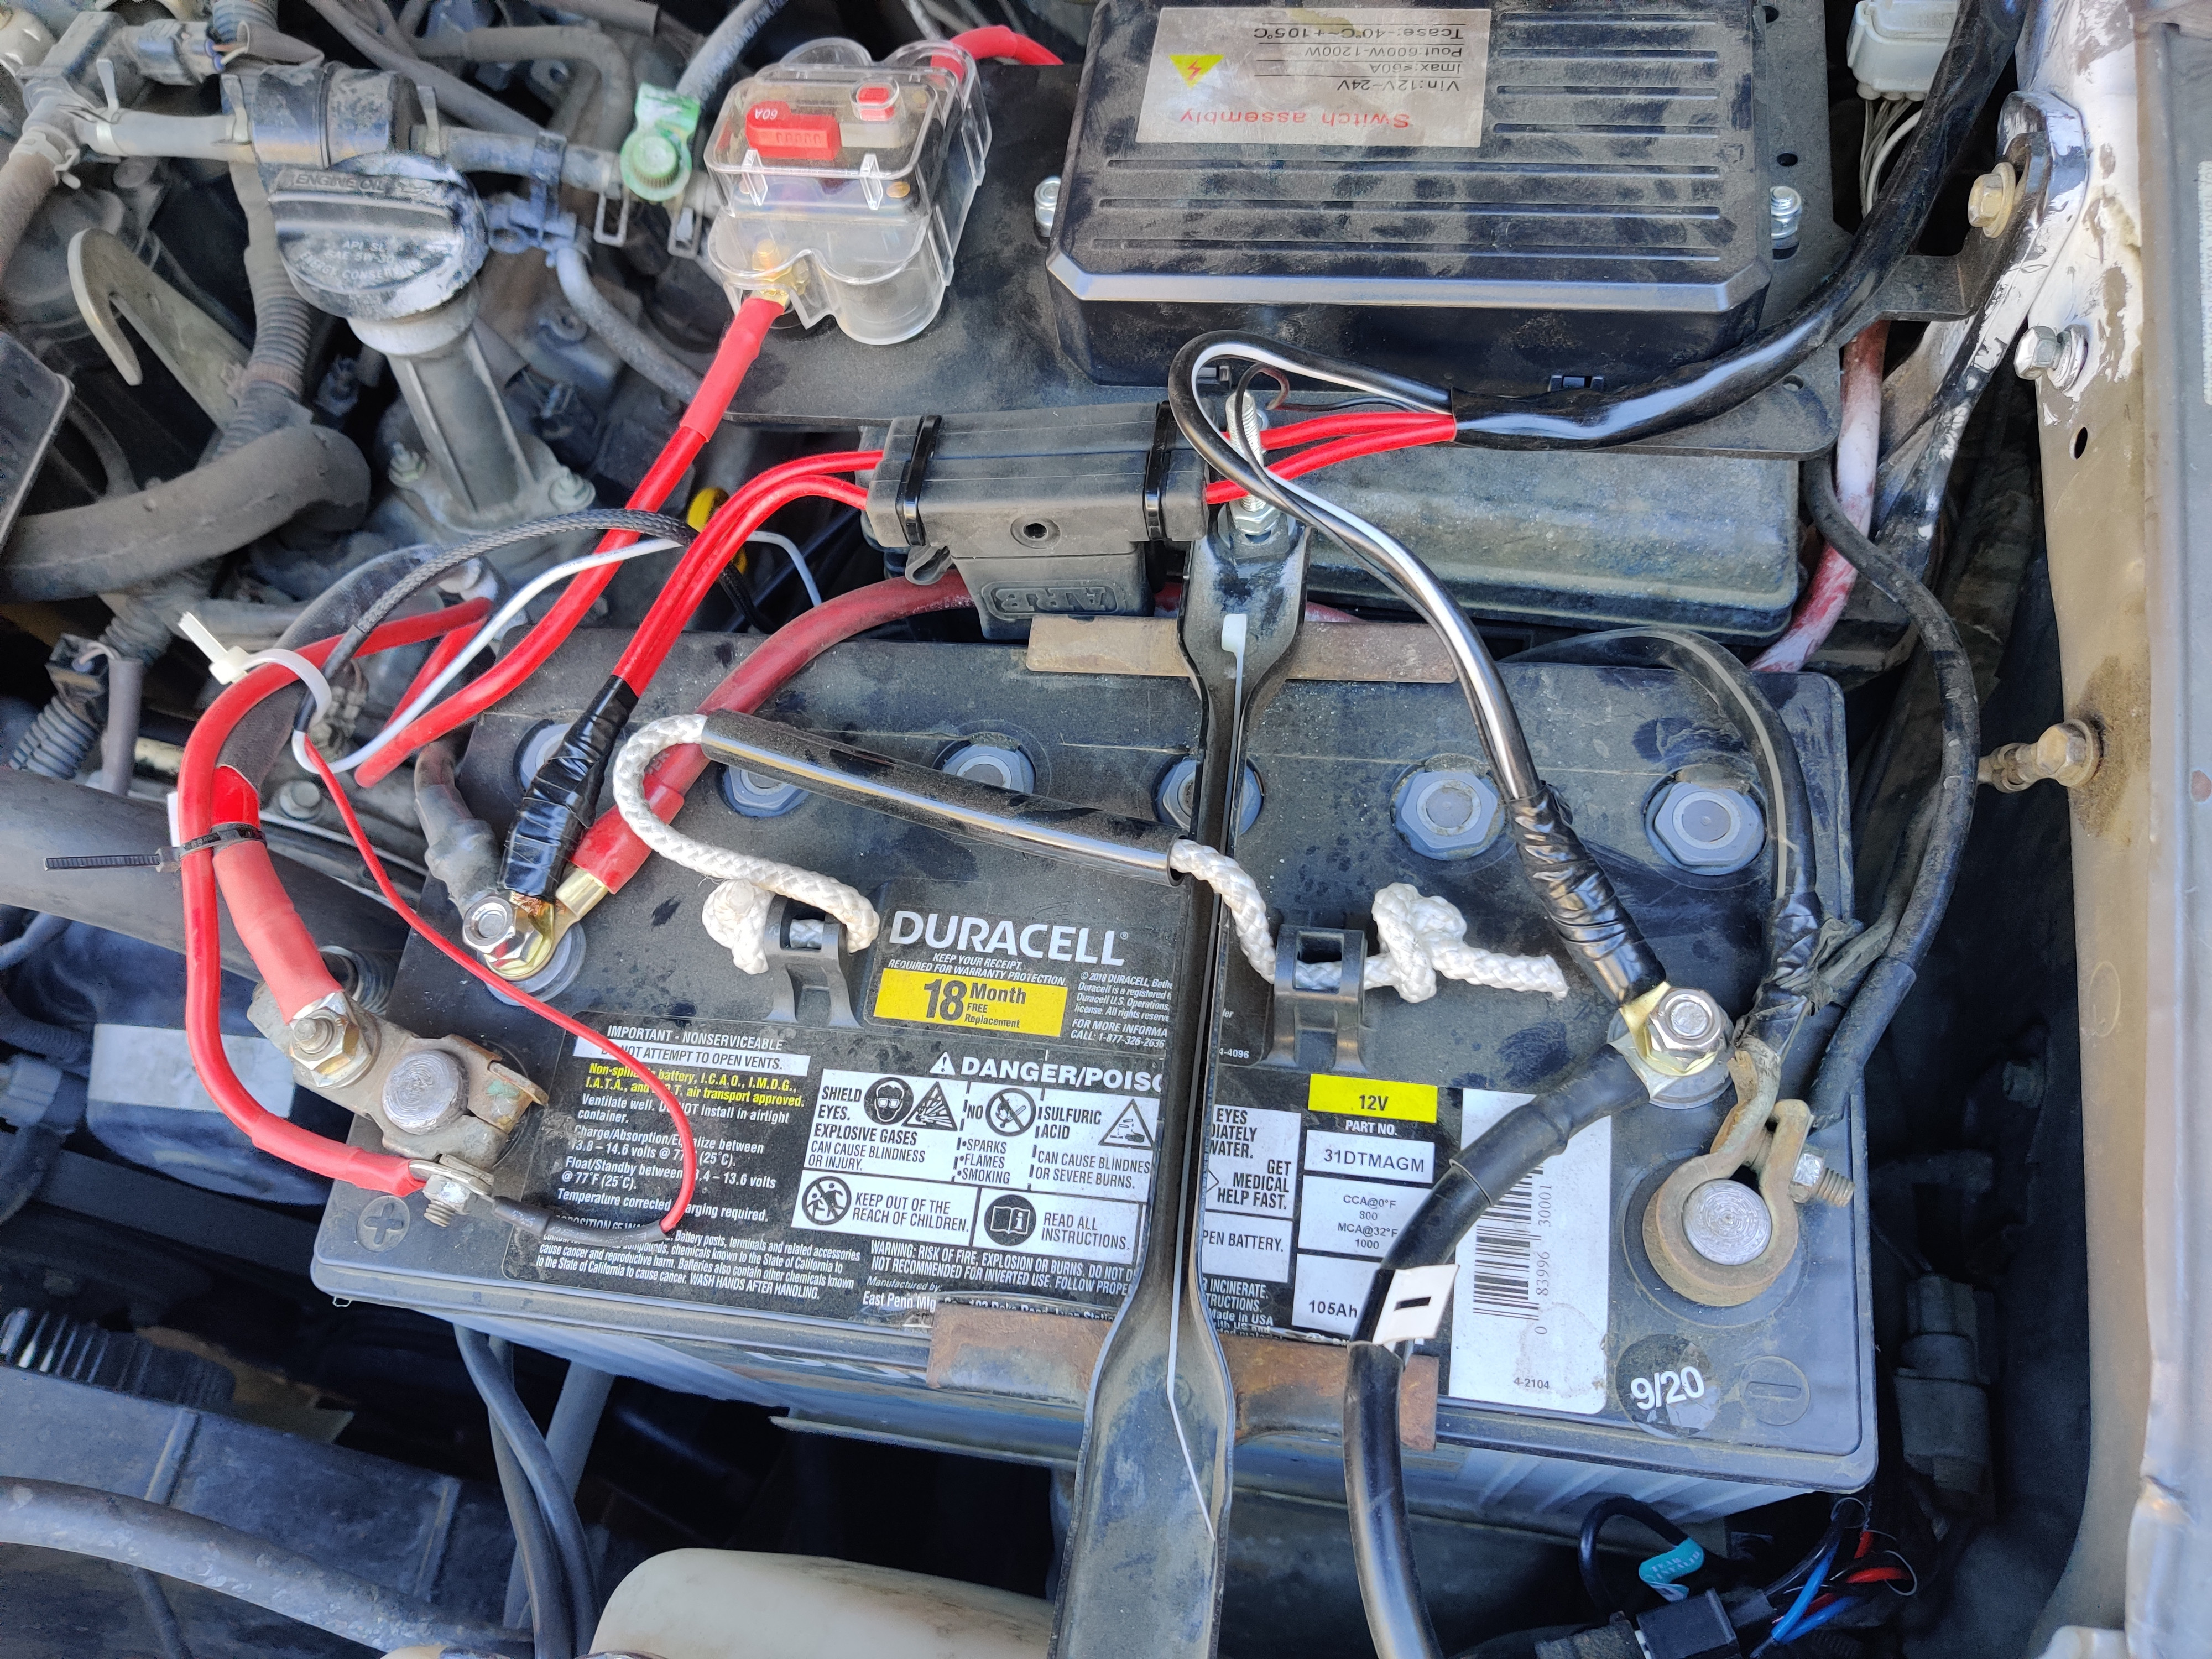
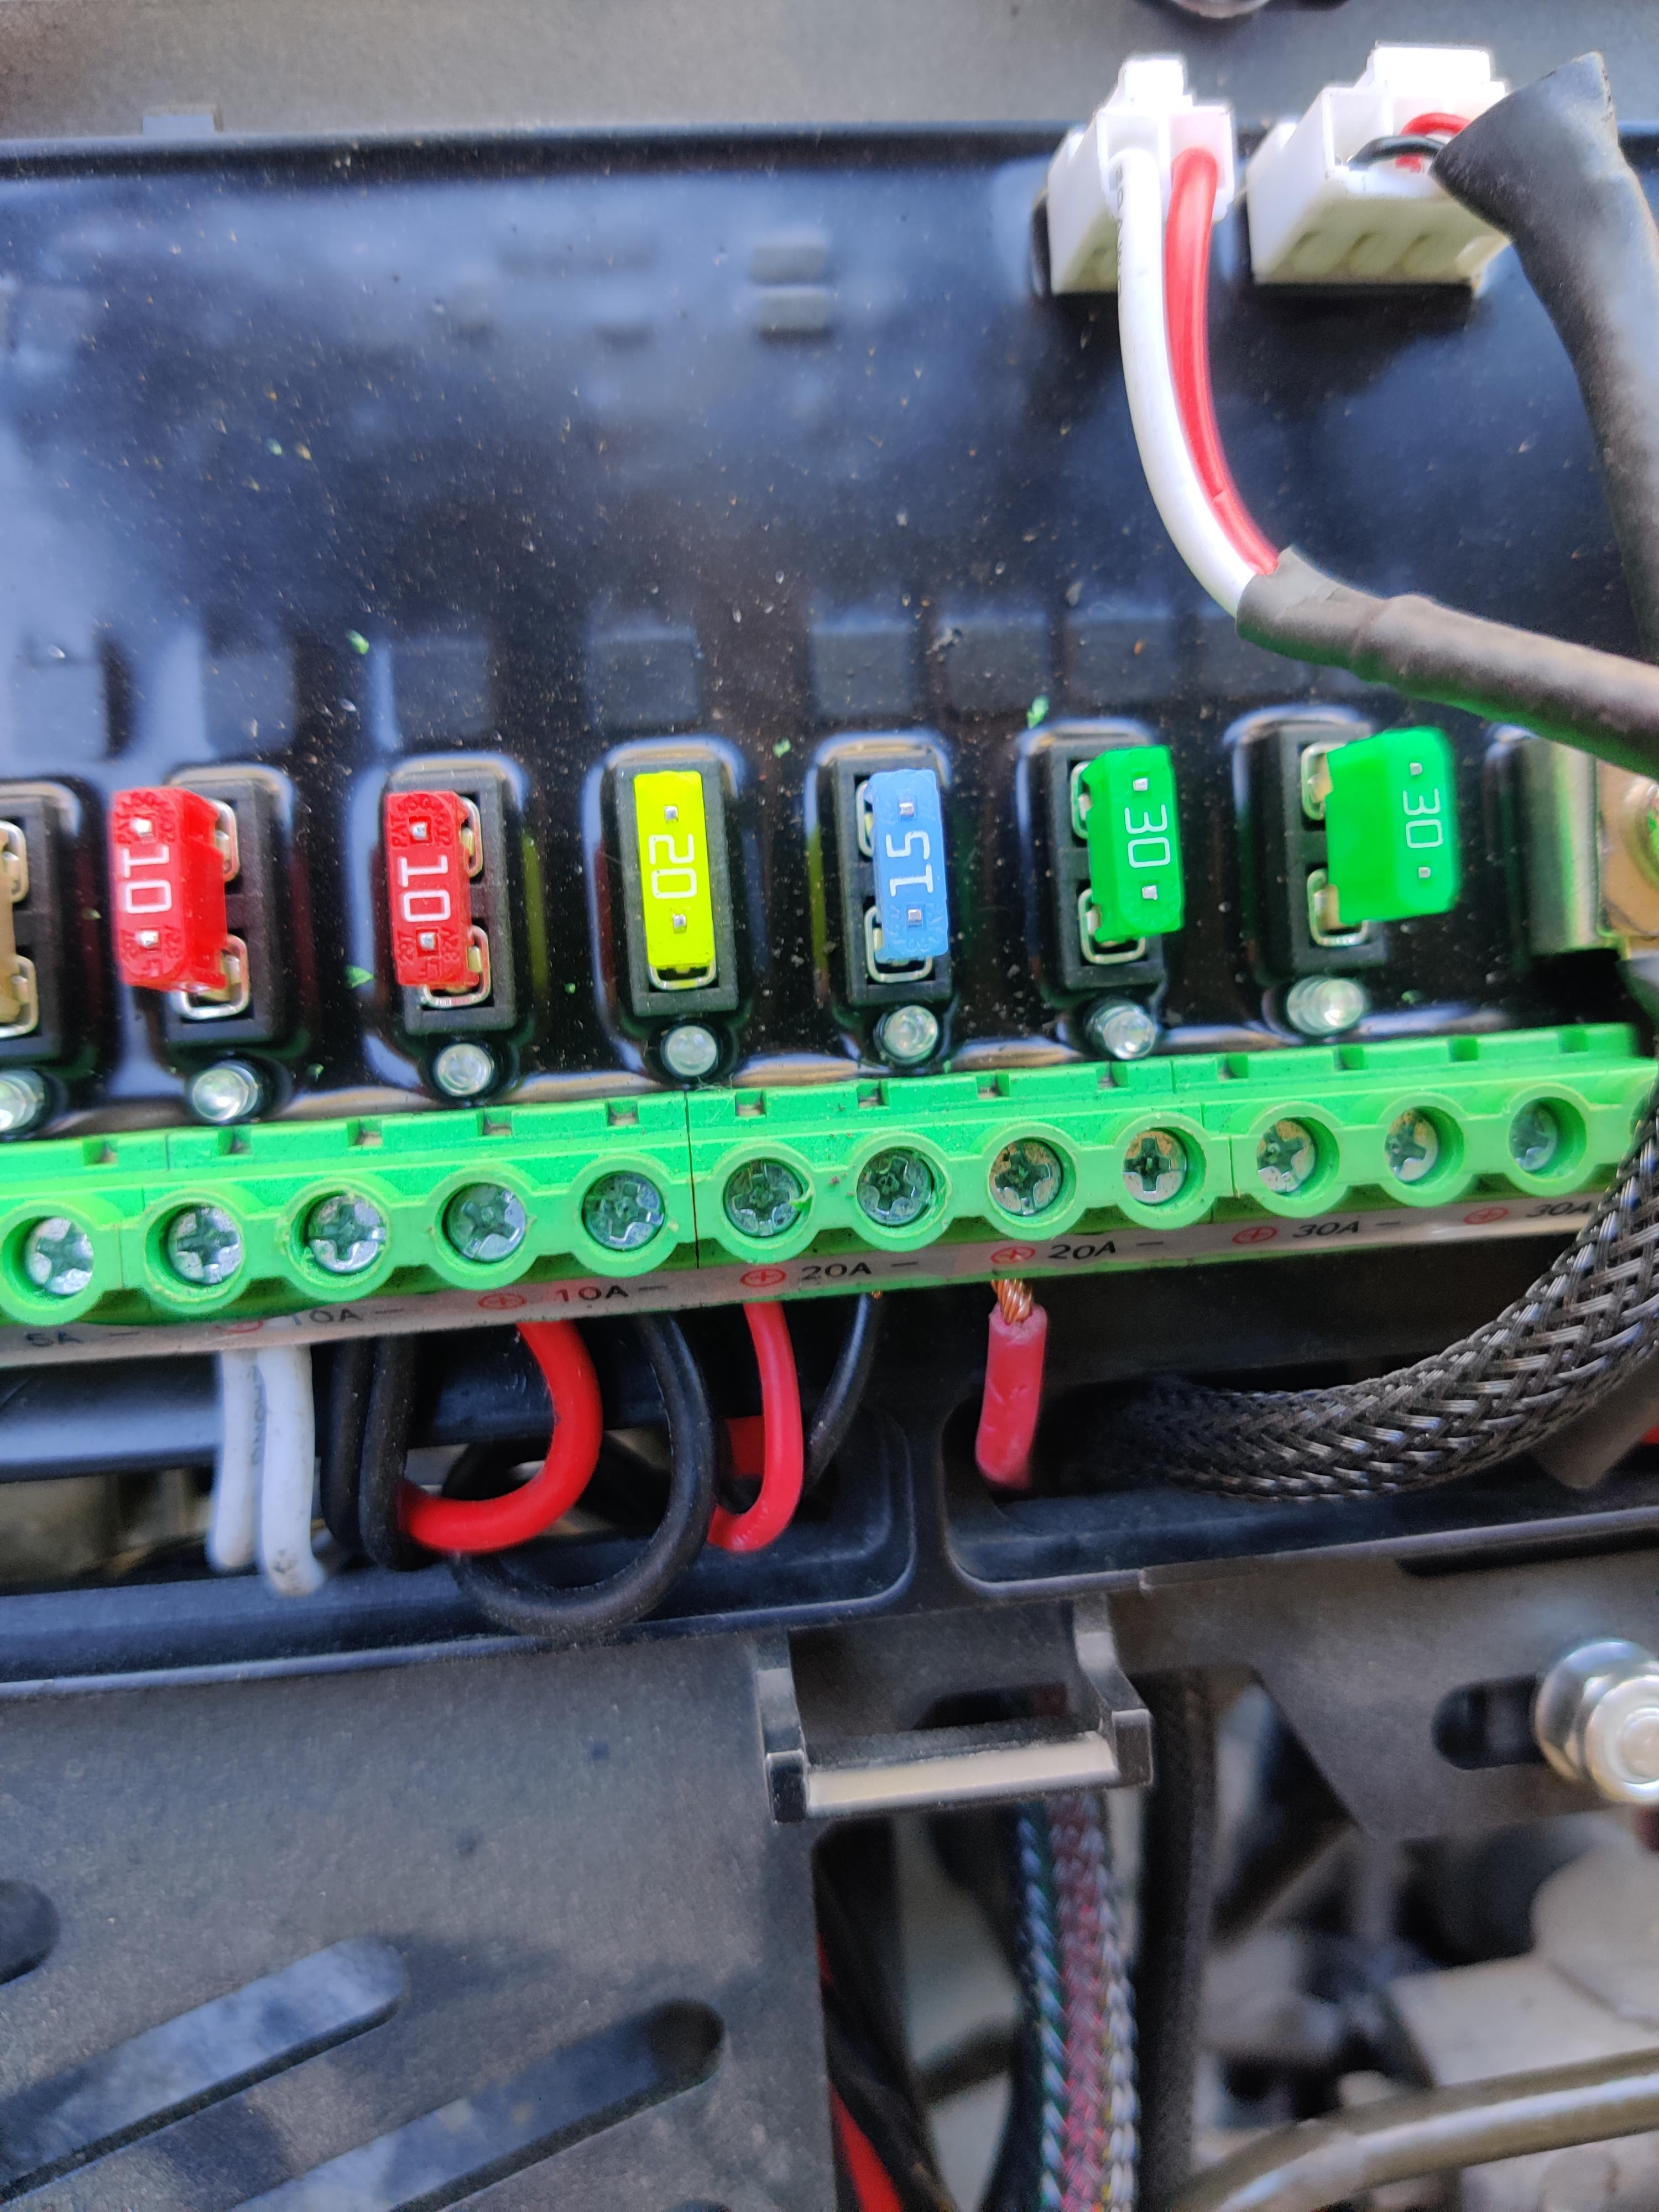
1. Power wiring loom:
Crimp the 2 thick red wires (with the big fuse) together with an end terminal. Heatshrink etc. You can use locking pliers to crimp it together. Just make sure it's tight, and retighten it as you go to make it tighter.

2. Power wiring loom:
Crimp the 1x thick black wire with the 1x skinny black wire together. I did cut about 1/4inch of the thick black wire off, so I could wrap the skinny (18awg?) wire's copper around the thicker wire's copper.

3. Power wiring loom:
Hook the thick power wiring loom to arb compressor via red 12v positive, then ground to battery.

Picture of the Power Wiring Loom & the Mess.


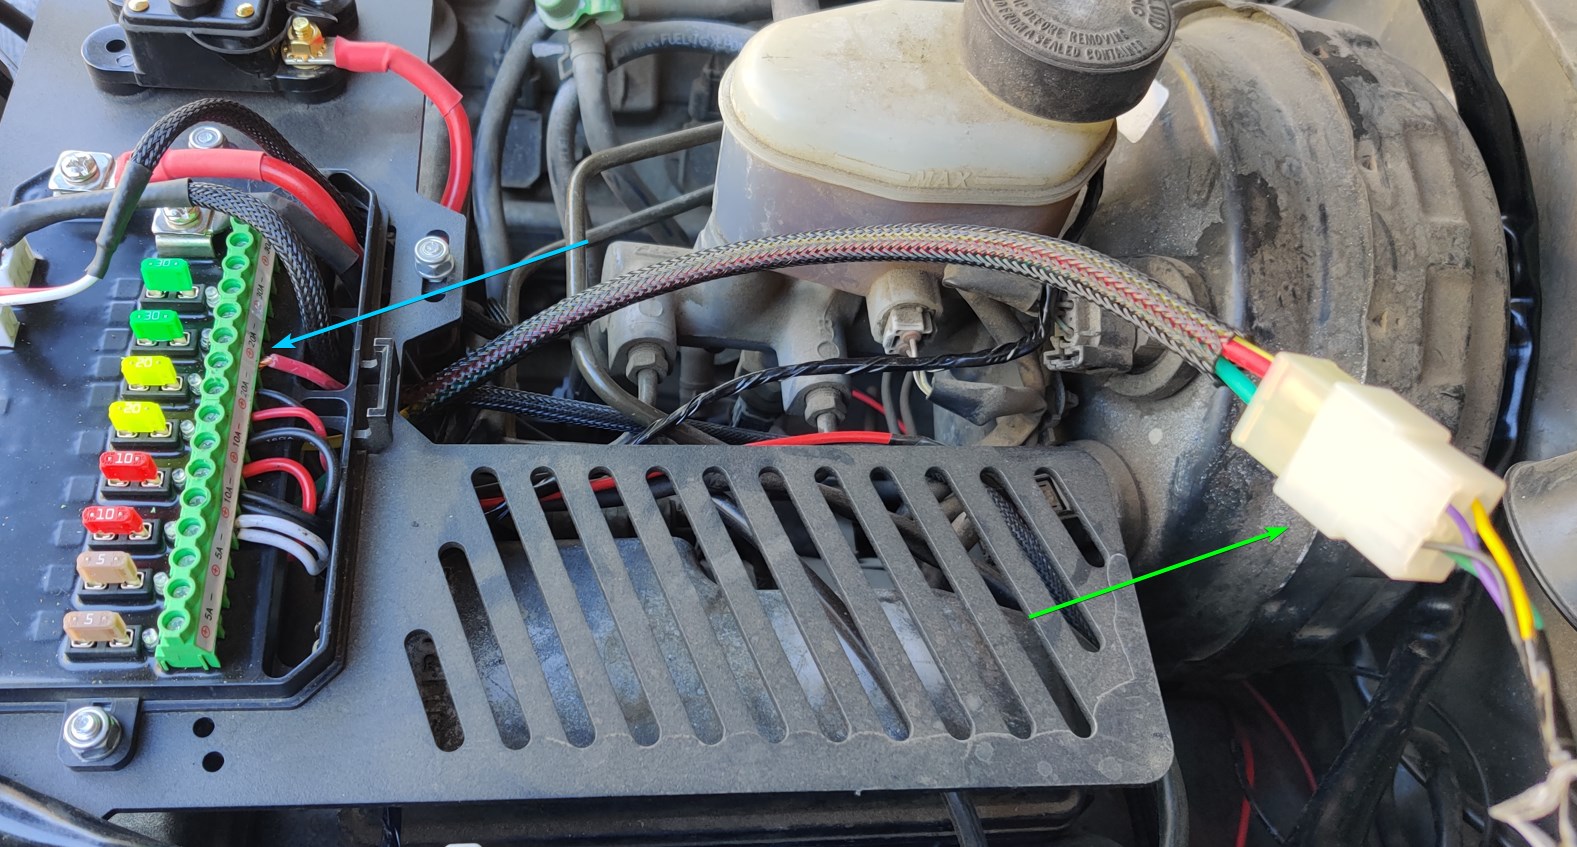
4. Activation Harness:
The other included harness (with lots of skinny wires) is for the switch + activating the compressor & the front / rear locker (if applicable).

4A: Not buying another harness & spicing the wire.
On the unattached plug (pointed out by the green arrow below), there are 4 plugs you can attach directly to the SPOD or relay light system switch you have.

Purple: Power for Switch to activate the Compressor
Yellow: Rear Air Locker Activation
Green: Front Air Locker Activation
Black: Ground for LED for included ARB switch(s)


Splice the spade terminal at the end of the purple & hook it up directly to up a 15A fuse positive on your SPOD/AUXBEAM,ETC, relay system.
Off to the races.

4B: Buying a 3RD PARTY HARNESS so you don't have to splice.
SPOD 4x4 Harness
- Note, you'll need to splice off the spades on this lol.
3RD Party Harness that works just fine.
- Note, it lacks the black wire, but it's not needed as that is for the ground for the LEDs of the switches. If you want to use their included switch, just use the included harness.
- Note2, it uses a RED wire instead of purple, so hook up the red to the purple. Hook up other 3 terminals for cleanliness,

Just plug that into the terminal as noted above by the green arrow & plug the power wire for activation (red or purple, depending on the harness you bought) to the SPOD/AUXBEAM/RELAY SYSTEM.

Green Arrow is the same plug as noted in the screenshot above.
Blue arrow is where the RED wire plugs in from that wiring loom. Again, the red wire is attached to the purple wire in the ARB activation wire loom.


And make sure to swap the fuse.


5. Attach ARB hose connection with teflon tape so it doesn't leak & test.

6. Clean up wires, zip ties, etc.

Install Note for the Fuse:
ARB's included switch is rated for 15A. After a chat with the ARB Tech team, they informed me it's best to use 15A. Usually these activations via relays should take less than 1A, but I followed their recommendation.

Closing Notes
I called up SPOD 4x4, which I thought I bought the harness from, but I actually bought the 3rd party one I linked above (without black wire). They were extremely helpful via phone despite not purchasing their harness. 5/5 for service. I love the fact that I was able to call them and got to someone in 5 minutes.

ARB USA was also very helpful and informative about install. 5/5 for them as well. Took about 6 minutes to get to someone, but they were extremely helpful.
 
Last edited:
  • Like
Reactions: ZRex

jcx03

Rank III
Launch Member

Enthusiast III

646
los angeles
First Name
joseph
Last Name
c
Member #

23877

Update on the Headlight / Lightbulb Replacement

Turns out the headlights I bought off ebay are from Spyder Auto in SoCal. $150 for the pair.

But I went and replaced the LEDs that I previously recommended/purchased. After more research, a good bulb has a hard light cut off.

I went and replaced the bulbs with these & they work 100% better. I'm absolutely shocked at how much of an improvement it is.

Install Photos.

The procedure is same as before, and it's fairly straight forward.

1. Remove the rubber+ internal reflector included with the headlights with a + screwdriver.
PEQZOpI.jpg
6KyvM63.jpg


2. Remove fan on the LED & Install LED. Make sure it's the correct orientation.
Open space section facing DOWN.


3. Unplug the connector that is connected to the 3prong. Add the rubber cover & push it flush down.

It should now look like below.


4. Add the fan & plug the cable back in, and also plug into the resister (not included).


5. Test light & adjust the bulb.

I still have to adjust it tomorrow after I turn the car around and face the white wall, but you can notice how much better it is.

- Hard LED cut off
- $48, which is ONLY $8 more than the other one I installed & it's way better.


jcx03

Rank III
Launch Member

Enthusiast III

646
los angeles
First Name
joseph
Last Name
c
Member #

23877

Torque Pro & OBD Fusion

Having an OBD2 scanner on hand is a really power asset to have every day on the road. It provides so much information that the dash doesn't provide.

I've had a BAFX OBD2 reader (ELM327 v1.5) for years now, and used it to read transmission temp (PID found below), and discovered that you can get more information by having a OBD2 reader that has ELM327 V2.0+ which allows you to scan enhance networks such as ABS & Body Control Module. There's probably a way to do this with Torque Pro, but with OBD Fusion, you can just pay for the PIDs. This information isn't that useful for every day use, but nonetheless, a discovery.

OBD2 readers with BT that have ELM327 V2.0+ (There are prob more)
OBDLink MX+ ($100) // OBD Fusion's customer support recommended this one as genuine).
Veepeak ($41) // This one worked.

Veepeak has a 40 polling rate, vs 60 on OBDLink MX+, i.e. higher polling = more data in real time.

Cost Breakdown for Software.
Torque Pro - $5 (Android only)
OBD Fusion - $5 (iOS or Android)
OBD Fusion PIDS - $10

OBD Fusion


ABS Network Reading:


Troubleshooting Connection with OBD Fusion
Generic OBD2 network can be connected to with the key in the "ON" position.
Network A can also be accessed with the key in the "ON" position.
ABS, TPMS, BODY all need to be accessed with the engine on.

If you connected to a network, and want to disconnect and connect to another, you need to turn the vehicle off, and turn it back on & also exit the app (via bottom left corner "exit", not just swiping to close the app). ABS, TPMS, and BODY take extra time to connect to.

You cannot be connected with Torque Pro & OBD Fusion at the same time. Choose 1, and completely exit/quit the other app.

Conclusions
OBD Fusion has customer service with their purchase & they respond the next day with useful responses. It also has a better UI and is offered in iOS & Android, and offering the additional PIDs/ access is a pro+con since it costs $$.

Torque pro is a good value still, but the 2008 style UI is very meh.

Veepeak is the ticket if you just want that little extra data, but it will never be close to a bi-directional scan tool.

If you're looking for basic functions, get a $10 OBD2 scanner & OBD Fusion for $5. It can read A/T temp, which is the main metric that people use these scanners for. It's useful in towing, and checking that you don't overheat the transmission.

Reading A/T Temps with Torque Pro

Credit: CodyP


jcx03

Rank III
Launch Member

Enthusiast III

646
los angeles
First Name
joseph
Last Name
c
Member #

23877

Windshield Wiper Motor Replacement

The wipers started to work intermittently and wasn't reliable. After a few tests for 12v on the motor and wires, I didn't feel that the motor was activating. I decided to parts cannon it and got a Cardone replacement, part (85-2026).

Replacement was fairly easy. Decided not to take out the cowl etc. Was just fine.

1. Manually push the wipers to the up position
2. Remove plug
3. Remove 4x 10mm bolts attached to motor in vehicle.
4. There's a 12mm bolt attached to a bracket in the back of the motor that rotates.Take note of the position of the bracket as you'll need to reinstall this later.
5. Jiggle the bracket with the 12mm bolt out. You can see the 12mm bolt near the red circle.
6. Using a pry bar, pop off the bracket from the wiper linkage (the bracket has the ball). The ball will be attached to the linkage around the red circle. No good photo unfortunately.
7. Reinstall with a plier to pop the ball in and make sure the bracket is in the correct position.

IMG_20211007_164428__01.jpg


IMG_20211007_163936.jpg


Pins for Brute Force Fab.

Ended up getting the orange handle ones. They're awesome. The pin is zinc Coated 1144 steel. The handles are rubberized in with high vis orange.

It is an extra step to undo the bumper but it's a nice little safety measure & isn't that bad. The pin fits in with a lot of wiggle and feels very secure.

Orange high vis handle makes it easy to see and catch, and it hangs, so nothing to forget.

IMG_20211006_171701.jpg
 

jcx03

Rank III
Launch Member

Enthusiast III

646
los angeles
First Name
joseph
Last Name
c
Member #

23877

Upgrading Sunglasses Switch Holder

Decided to upgrade the 8Gang Sunglasses Switch Panel Holder to an industrial finish. It was 3D printed upside down prior via FDM in PETG, but the finish wasn't great & I didn't feel like sanding it down, etc.

This one is made from Nylon 12 via MJF printing. Very happy with this little upgrade.

SOLDOUT
At the time of writing this, I have a few left if you're interested in them - $90 w/ shipping CONUS.

iGdXsFM.jpg


FmtRssx.jpg


3CGQqHk.jpg


EgEDNcs.jpg


gI5tmq3.jpg
 
Last edited: