Advocate I
I'm glad you brought up the fan control piece as well. My PWM-style unit instructed to mount it on the cold side of the radiator, as you noted above. I did, and it seems like it's regulating the temp of the Jeep very well, though I'm still playing with settings. My first go I waited until I felt the t-stat open, then brought the adjustment down in temp (counter-clockwise) until the fan kicked on very low. This worked okay, but really was just too low. The instructions for my exact PMW don't actually give a turns of adjustment to temp change mapping, but I found other Derale units that suggested about 3.5 degrees temp for every 1 turn. I ran it clockwise 2 turns the other day and I think I'm happier. The fans start to come on around ~195, I have a 180 t-stat in it and "conventional wisdom" is to have about a 15 degree spread between t-stat and fan turn-on. I don't think I've seen it make it over 200 yet... it barely needs any fan cycle to come back down with this giant AL radiator and what would seem to be very efficient fans/shroud at this point. That said, this is all going from gauge on the dash.
Chrysler, like everybody else that actually gives you numbers on a temp gauge seems to make you want to do non-obvious math to figure out what the tick-marks mean, and doesn't give you all too many tick-marks. I suppose that's better than some GM stuff, like my '11 Silverado or '99 Z/28 (but not my '02 Z06) I had previously where everything from ~160-240 degrees just reads at 210 on the gauge. The "story" with GM goes that when they released the LS1 Fbodies (Camaro/Firebirds) for the '98 model year the temp gauge was accurate. I can attest to this from seeing friends' '98s. However, they got so many people bringing them in for service because the "temperature fluctuates drastically" that they just dumbed-down the gauge into a glorified idiot-light where it's set to display ~210 across a wide variety of actual temps. I have a tuner/gauge setup in my truck that allows me to see real temps, and it's pretty sad comparing to the factory gauge (strangely, the trans-temp GM gives you in the Driver's Information Center is spot-on).
Anyway, back to Chrysler, they have numbered marks at 100, 210, and 260 in the WJ. The distance between 100 and 210 is the same as between 210 and 260, so on the same gauge in the same sweep on one side you cover 110 degrees, on the other side you cover 50 degrees. I can only assume it's programmed to be accurate and somewhat linear in a given range of sweep, but that the distance swept for temp changes across the gauge display (and that it's all run from the PCM vs. being sending unit direct to gauge). Ignoring the land beyond 210 for now, there are 3 tick-marks between 100 and 210. One is halfway between them... so I assume that's about 155 [(210 - 100) / 2]. There is another tick on either side of that "155" tick that divides that space in half, so I assume the one clockwise past "155" is about 182.5 [(210-155) / 2 + 155]. I have a 180 t-stat, and it does seem like it opens very close to this tick-mark, supporting my assumption. Finally, there is no additional tick past the "182.5" mark before 210, but if you visually split that space, it'd be about 196.25 [(210 - 182.5) /2 + 182.5] which seems to be about where my fans kick on now. So, all of that to say I want to get one of those USB OBD-II dongles and a decent app to measure REAL ECT (and trans temp, among other things) before I bother trying to adjust too much more... oh and I need to see what it does creeping down a trail when it's 100 degrees outside and there's no natural air-flow. I've never seen the other side of 210 with this setup, and barely saw it previously, but using the same type of logic I assume the ticks are 235 for the big tick dead-center between 210 and 260 with the two ticks on either side of "235" being 222.5 and 247.5 respectively. With a 4.7 if I ever saw anything beyond that 222.5 tick I'd start to worry indeed.
Also AC over-ride definitely works (it runs the fans at 60-100% whenever the AC is on, depending on temp) but it seems like it short cycles to high operation for maybe 10 seconds every minute or two... perhaps in hotter weather the high run will be longer and it won't seem so odd, but I'm not sure I love that. Finally, the big AL radiator and 180 t-stat mean it stays riiiiiight on that 182-ish tick mark anytime it's on the freeway, but again the hottest day I've run it was in the mid-70s. So when it's 30 degrees hotter out, we'll see what changes.
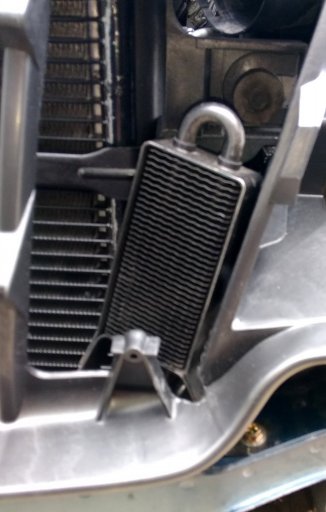
So, sorry having wrote all of that I realized I got a bit specific to my build, I'll copy-paste that stuff in my thread, but you might find it useful. Back to yours, so far everything looks like it's fitting nicely and very clean work. Bummer on the mechanical fan delay, but at least that gives you a little break. Looking forward to hearing how using the former PS cooler for the trans works out. As I mentioned above I plan to get a BT-OBD-II plug setup and an app (haven't researched which is 'best' yet for the app) to monitor trans temp, among other things, soon. I'll be very curious to see if I end up needing an aux trans cooler setup. I don't intend to tow heavy, but I could see towing my 10' flat-deck trailer with my 2-seat RZR on it at some point, which is probably in the low 2k range (RZR itself is prob 1700-1800lbs).
-TJ
Chrysler, like everybody else that actually gives you numbers on a temp gauge seems to make you want to do non-obvious math to figure out what the tick-marks mean, and doesn't give you all too many tick-marks. I suppose that's better than some GM stuff, like my '11 Silverado or '99 Z/28 (but not my '02 Z06) I had previously where everything from ~160-240 degrees just reads at 210 on the gauge. The "story" with GM goes that when they released the LS1 Fbodies (Camaro/Firebirds) for the '98 model year the temp gauge was accurate. I can attest to this from seeing friends' '98s. However, they got so many people bringing them in for service because the "temperature fluctuates drastically" that they just dumbed-down the gauge into a glorified idiot-light where it's set to display ~210 across a wide variety of actual temps. I have a tuner/gauge setup in my truck that allows me to see real temps, and it's pretty sad comparing to the factory gauge (strangely, the trans-temp GM gives you in the Driver's Information Center is spot-on).
Anyway, back to Chrysler, they have numbered marks at 100, 210, and 260 in the WJ. The distance between 100 and 210 is the same as between 210 and 260, so on the same gauge in the same sweep on one side you cover 110 degrees, on the other side you cover 50 degrees. I can only assume it's programmed to be accurate and somewhat linear in a given range of sweep, but that the distance swept for temp changes across the gauge display (and that it's all run from the PCM vs. being sending unit direct to gauge). Ignoring the land beyond 210 for now, there are 3 tick-marks between 100 and 210. One is halfway between them... so I assume that's about 155 [(210 - 100) / 2]. There is another tick on either side of that "155" tick that divides that space in half, so I assume the one clockwise past "155" is about 182.5 [(210-155) / 2 + 155]. I have a 180 t-stat, and it does seem like it opens very close to this tick-mark, supporting my assumption. Finally, there is no additional tick past the "182.5" mark before 210, but if you visually split that space, it'd be about 196.25 [(210 - 182.5) /2 + 182.5] which seems to be about where my fans kick on now. So, all of that to say I want to get one of those USB OBD-II dongles and a decent app to measure REAL ECT (and trans temp, among other things) before I bother trying to adjust too much more... oh and I need to see what it does creeping down a trail when it's 100 degrees outside and there's no natural air-flow. I've never seen the other side of 210 with this setup, and barely saw it previously, but using the same type of logic I assume the ticks are 235 for the big tick dead-center between 210 and 260 with the two ticks on either side of "235" being 222.5 and 247.5 respectively. With a 4.7 if I ever saw anything beyond that 222.5 tick I'd start to worry indeed.
Also AC over-ride definitely works (it runs the fans at 60-100% whenever the AC is on, depending on temp) but it seems like it short cycles to high operation for maybe 10 seconds every minute or two... perhaps in hotter weather the high run will be longer and it won't seem so odd, but I'm not sure I love that. Finally, the big AL radiator and 180 t-stat mean it stays riiiiiight on that 182-ish tick mark anytime it's on the freeway, but again the hottest day I've run it was in the mid-70s. So when it's 30 degrees hotter out, we'll see what changes.
So, sorry having wrote all of that I realized I got a bit specific to my build, I'll copy-paste that stuff in my thread, but you might find it useful. Back to yours, so far everything looks like it's fitting nicely and very clean work. Bummer on the mechanical fan delay, but at least that gives you a little break. Looking forward to hearing how using the former PS cooler for the trans works out. As I mentioned above I plan to get a BT-OBD-II plug setup and an app (haven't researched which is 'best' yet for the app) to monitor trans temp, among other things, soon. I'll be very curious to see if I end up needing an aux trans cooler setup. I don't intend to tow heavy, but I could see towing my 10' flat-deck trailer with my 2-seat RZR on it at some point, which is probably in the low 2k range (RZR itself is prob 1700-1800lbs).
-TJ