1988 ('06) E350 Van Build
- Thread starter Built By Fluffy
- Start date


Influencer II
Yes, a ZF-5 manual transmission from a 2000-ish Ford F-250. I'll be doing a manual swap at the same time as the 4x4 conversionA transmission?

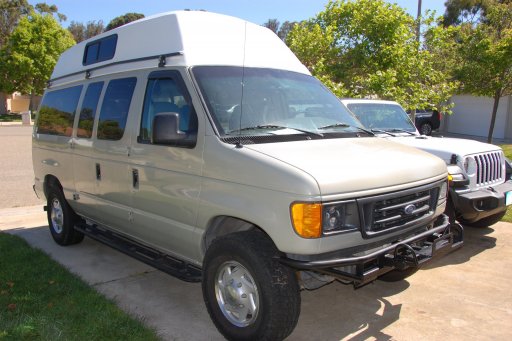
I have been wanting to build something like this for my extended photo trips into the backcountry. Great job and it looks incredible
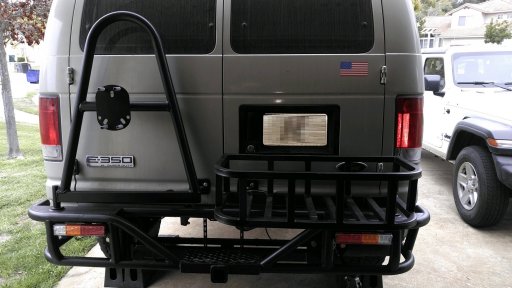
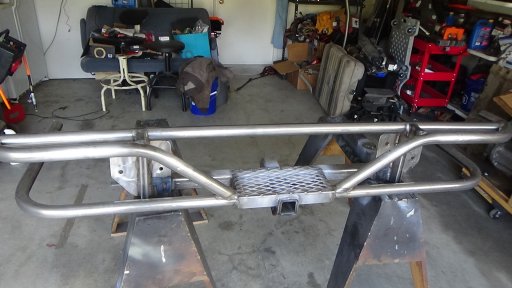
Been a while since I've updated, but I've made some progress. Van is getting a new bumper made!
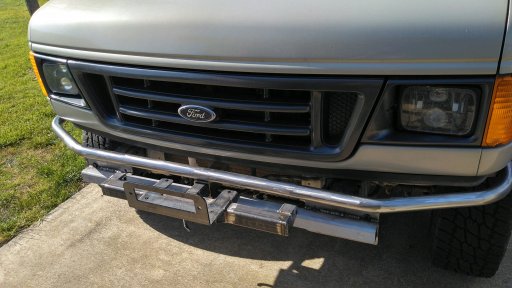
It'll be a close in tube bumper with a custom hitch winch mount. Reason for the hitch mounted winch is three fold: 1) I can attach it to my other vehicles, 2) I can attach it to the rear of my vehicles, and 3) I don't need to store it on any of them while I'm daily driving.
Usual problem with hitch mounted winches is the pulling limit of the hitch or torquing it to the side, I've made this mound based off of my CJ-5's bumper however which has the center hitch and two other brackets for a tow bar. I'm betting all three combined should alleviate the normal issues with a hitch winch.
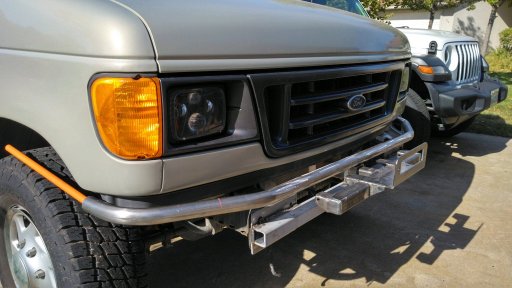
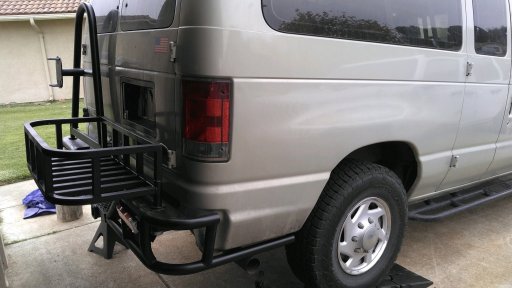
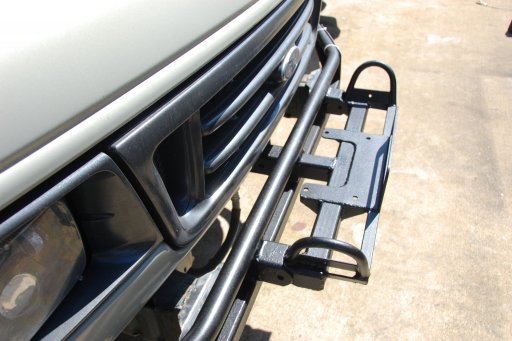
Here it is without the winch mount
I should have this project wrapped up by the weekend. It'll have another bent tube going around the bottom and meeting up with the top tube at the corners under the turn signals. I'll be adding mounting points to the empty spaces in the bumper so I can add light bars at a later date
It'll be a close in tube bumper with a custom hitch winch mount. Reason for the hitch mounted winch is three fold: 1) I can attach it to my other vehicles, 2) I can attach it to the rear of my vehicles, and 3) I don't need to store it on any of them while I'm daily driving.
Usual problem with hitch mounted winches is the pulling limit of the hitch or torquing it to the side, I've made this mound based off of my CJ-5's bumper however which has the center hitch and two other brackets for a tow bar. I'm betting all three combined should alleviate the normal issues with a hitch winch.
Here it is without the winch mount
I should have this project wrapped up by the weekend. It'll have another bent tube going around the bottom and meeting up with the top tube at the corners under the turn signals. I'll be adding mounting points to the empty spaces in the bumper so I can add light bars at a later date
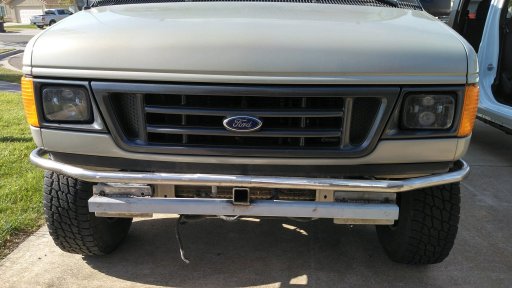
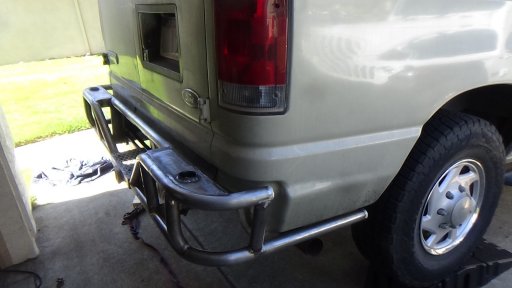
And it's done! Finished welding, epoxy primed and spray can truck bed liner to coat it. Just need a winch now...
With the winch plate on
Close up of the three connections for the winch mount
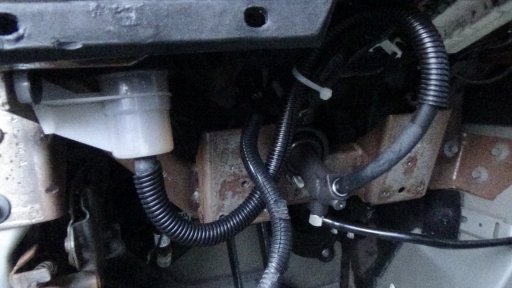
I plan on just adding the extra tabs to the rear tow hitch. When I relocate our spare tire to a carrier, a battery bank will be place underneath the rear instead so it should be easy to wire connections for the winch.
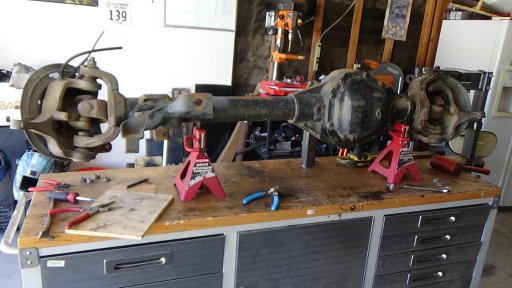
Now that that's done, I'll be focusing on the axle rebuilds for the 4x4 conversion. I have the Sterling 10.5 currently disassembled, it'll get 4.30 gears and a truetrack put in hopefully this week.
With the winch plate on
Close up of the three connections for the winch mount
I plan on just adding the extra tabs to the rear tow hitch. When I relocate our spare tire to a carrier, a battery bank will be place underneath the rear instead so it should be easy to wire connections for the winch.
Now that that's done, I'll be focusing on the axle rebuilds for the 4x4 conversion. I have the Sterling 10.5 currently disassembled, it'll get 4.30 gears and a truetrack put in hopefully this week.
Creator III
Really glad to see this thread, this is very much like the build we are working on right now. I'm working on a 2000 E350, short body V 10.
Your van looks really clean, but did you pull out the carpet and check the floor? Mine (cargo van, from Portland) had two small rust spots under the mat, and quite a bit of surface rust in the low places.
Nice build you got there!
Your van looks really clean, but did you pull out the carpet and check the floor? Mine (cargo van, from Portland) had two small rust spots under the mat, and quite a bit of surface rust in the low places.
Nice build you got there!
Thanks!Really glad to see this thread, this is very much like the build we are working on right now. I'm working on a 2000 E350, short body V 10.
Your van looks really clean, but did you pull out the carpet and check the floor? Mine (cargo van, from Portland) had two small rust spots under the mat, and quite a bit of surface rust in the low places.
Nice build you got there!
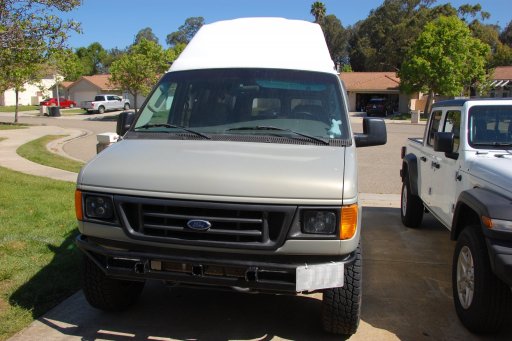
My van was as base a model as Ratheon could possibly purchase in passenger form. Came with the plastic floor liner and a whole lot of fine desert dust in the AC and headliner, but spending it's life in the desert it has no rust on the frame or body. We plan on pulling out the plastic liner (dogs keep slipping on it) and bedlining the interior floor front to rear.
Kind of wish I could have found a V10 in the same condition, more power is always nice and the transmission is way easier to convert to 4x4
Creator III
Yep, the stars aligned for me when I found ours, got everything I was looking for (cargo with door windows, V10, 4:10 post full-floating dana 60, manual windows, tilt/cruise, and everything works) and I bought it below budget.
I'm interested to see how your manual swap is going to turn out. Probably wind up with an interesting shift lever!
I've been stripping and sanding the inside of mine for the last two weeks, just shot the first coat of bully liner about an hour ago. Of course it's raining now, so the second coat will have to wait 'till tomorrow.
Sterling 10.5, 4.30 gears, and a truetrack... I think I have the pattern as close as I can get it, but for whatever reason it wants to stay towards the heel on the drive side of the gear and toe of the coast side no matter how many shims I add or take away from the pinion. Still, got this pattern which has plenty on contact on the drive side and closest to the center as I can get with 9 thousandths of backlash. If anyone has advice they can give I'd appreciate it
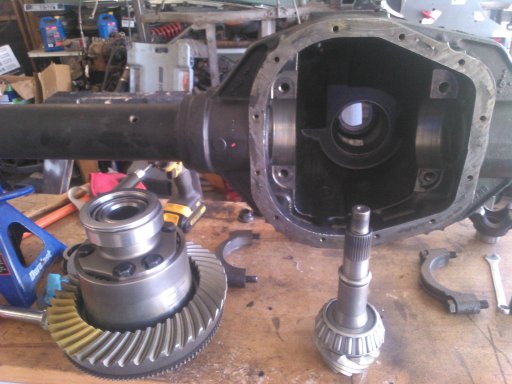
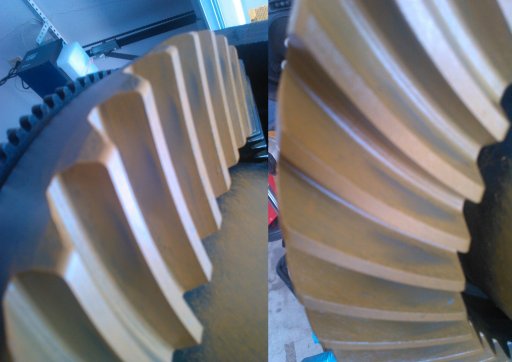
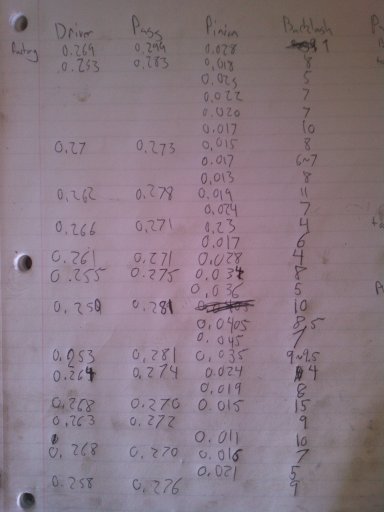
I started out with factory shims, pretty much immovable. Got the carrier preload just about right and then proceeded to run the gambit on all combinations of shims, this is about the best or 2nd best pattern I've been able to achieve.
I started out with factory shims, pretty much immovable. Got the carrier preload just about right and then proceeded to run the gambit on all combinations of shims, this is about the best or 2nd best pattern I've been able to achieve.
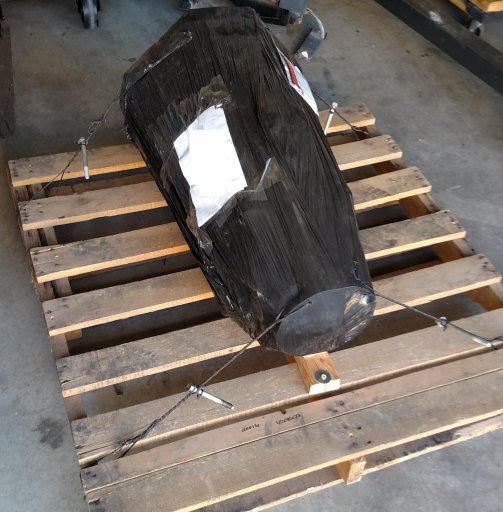
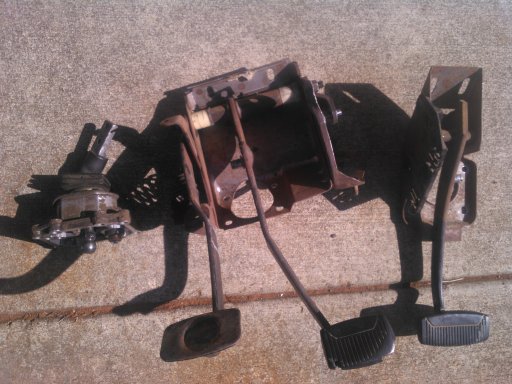
More parts! The last(ish) I needed for the transmission swap.
My county opened up a bit from the plague lockdown so I was able to go to the closest junkyard to pull the shifter tower I've needed, a clutch brake pedal assembly from an old ford truck, and a spare van brake pedal assembly I can hack together with the truck pedals.
My county opened up a bit from the plague lockdown so I was able to go to the closest junkyard to pull the shifter tower I've needed, a clutch brake pedal assembly from an old ford truck, and a spare van brake pedal assembly I can hack together with the truck pedals.
New Overland Vehicle Systems Awning!
Just came in, modified the roof rack today to hold it and popped off the old ARB small awning. This one puts a whole lot of coverage around the side and back of the van (not many awnings are big enough) and actually cools down the interior by a noticeable amount
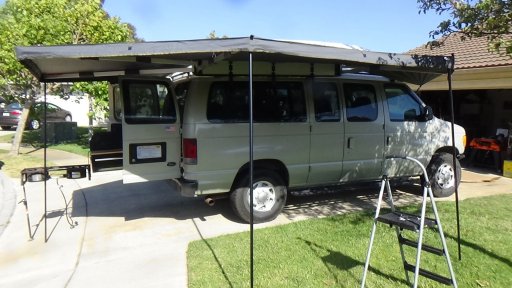
One of the poles does come down right next to the stove, but I think we're going to be redoing the kitchen soon so that won't be a big deal (or I can just leave it up). We still get great coverage over the pullout kitchen with just the last burner being outside the coverage of the awning.
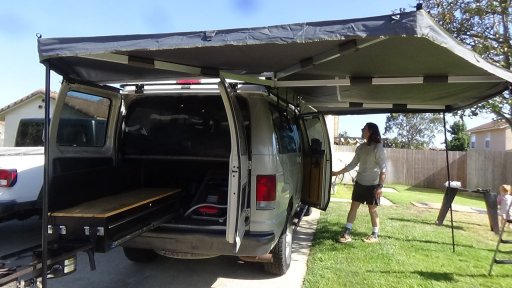
Closed up it doesn't take up much length of the van, just 7 ft. It is rather thick though
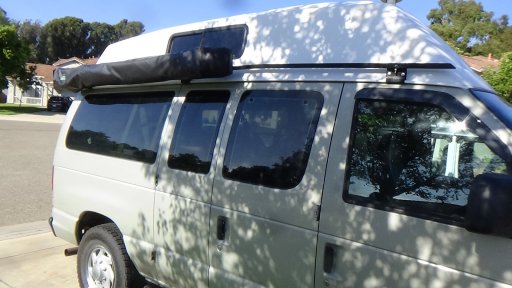
Overall we're very happy with the new awning and how it works. Construction seems stout, welded aluminum hinges and it was holding up well to the wind while we were deploying it. Definitely looking forward to testing it out camping soon, but BBQing with neighbors on the 4th of July will have to suffice for it's first test run :)
We also got started on rebuilding and regearing the Dana 60. Just started tearing it down and cleaning it off
Just came in, modified the roof rack today to hold it and popped off the old ARB small awning. This one puts a whole lot of coverage around the side and back of the van (not many awnings are big enough) and actually cools down the interior by a noticeable amount
One of the poles does come down right next to the stove, but I think we're going to be redoing the kitchen soon so that won't be a big deal (or I can just leave it up). We still get great coverage over the pullout kitchen with just the last burner being outside the coverage of the awning.
Closed up it doesn't take up much length of the van, just 7 ft. It is rather thick though
Overall we're very happy with the new awning and how it works. Construction seems stout, welded aluminum hinges and it was holding up well to the wind while we were deploying it. Definitely looking forward to testing it out camping soon, but BBQing with neighbors on the 4th of July will have to suffice for it's first test run :)
We also got started on rebuilding and regearing the Dana 60. Just started tearing it down and cleaning it off
Axles! Between family, school, work and repeated mistakes, they're finally finished:
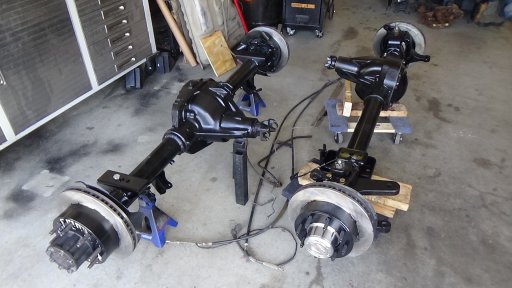
Sterling 10.5 rear, D60 front, 4.30 gears and truetracks each with Yukon locking hubs up front. Now I just need to plan out the installation. I figured axle and suspension swap first followed by the transmission.
From there I can order a custom rear driveshaft and leave the front alone till I reroute the exhaust. Finish the install with the fuel tanks and the 4x4 conversion is within grasp!
We've already started replanning the interior build out. I'm a big fan of the pull out kitchen but we want to rotate it 90 degrees to come straight out, and tbh it's not the best for rain or cold mornings. We found clip in captains chairs for the second row, I think I will route propane through the vehicle to add a kitchen that can clip in and out of those same brackets. That'll also afford us the ability to run a propane heater of some sort and possible lights, definitely would be nice in the colder temps we've camped in.
Creator III
Initially keeping my 33s, since they're low mileage, but we plan on moving up to 35s. Considering the weight of the vehicle and the possibility of towing in the future I figured 4.30 or 4.56 appropriateWhat size tires are you going to use with the 4:30s?
AND THE HARD PART IS DONE!!! Kinda...
Tricky thing about the 4th gen Econoline if you want a manual trans is that they never came with one, and no one makes a kit so you've got to custom fabricobble everything yourself.
Only a few other people online have been hard-headed enough to try it, and now I can tell you why: it's a PITA trying to fit everything in the footwell! I do not regret being hardheaded though, turned out great and now all of my vehicles will be stick and three pedals :)
Having no luck finding any good tutorials anywhere else, I'll try and be as detailed as possible here for anyone who wants to try
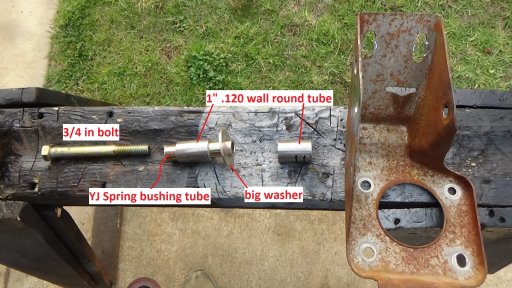
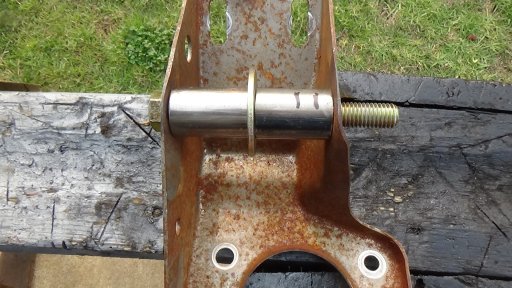
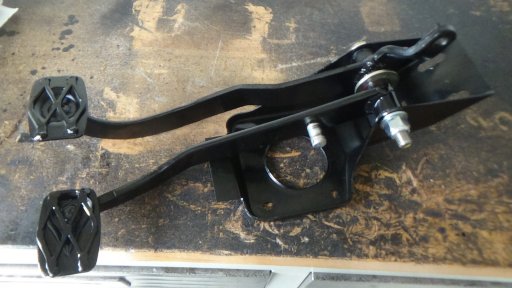
First, I started with the two pedal assemblies from earlier (old ford truck and another econoline). After a lot of mock up and finagling I found out that YJ spring hanger bushings (the metal bit) will fit right in between an econoline brake pedal assembly bracket. So I ground out the old pedal pivot axle and, suprise suprise, the bolt fits too:
This makes the basis of two swing pivot things. I then heavily modified the two pedals from the truck pedal assembly to get the pedals in the right spot. Brake pedal was shortened and brought forward to be a little less than 1" closer to the gas pedal than the original brake pedal was. I also had to grind out the stud, pop it out and flip it so it's the right side. The clutch pedal was cut just above the curve and flipped around, plus cut down at the top so it matched the length of the brake pedal. I also cut some expanded sheet metal and welded it on for texture:
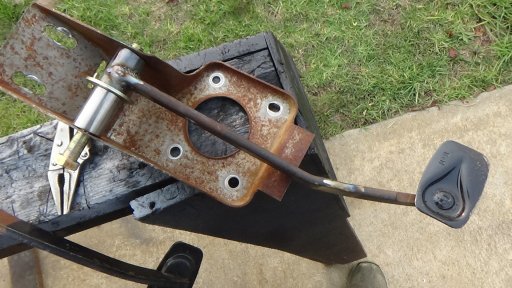
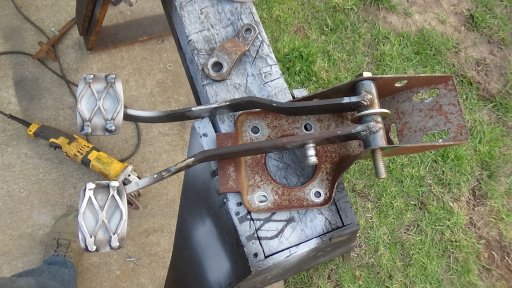
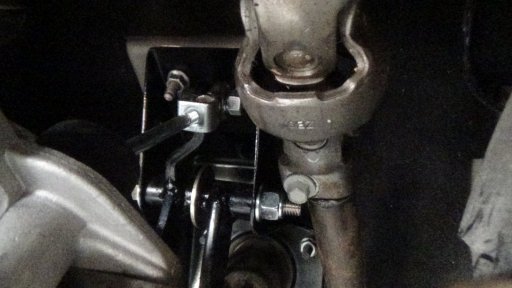
From here I measured how far away the stud was from the face of the pedal assembly on my van's current brake setup. That let me set the orientation of the pedals to I could weld the clutch throw arm parallel to the rear face of the bracket. To come out right in the correct spot the pivot arm needed to line up directly over the brake pedal arm. Finally paint and assembly:
Now you can probably tell that I'm putting in a reverse clutch master cylinder. I have no idea what this cylinder is out of, I just picked one at the auto parts store that looked like it'd work. It'll mount to the Dash under-skelleton where the center spike of kill-you-in-a-crash used to be...
And I mean that, under the dash right under the steering wheel is a sharpened spike bolted in an orientation facing your bollocks. There seems to be no purpose to it, and it's just a spike...
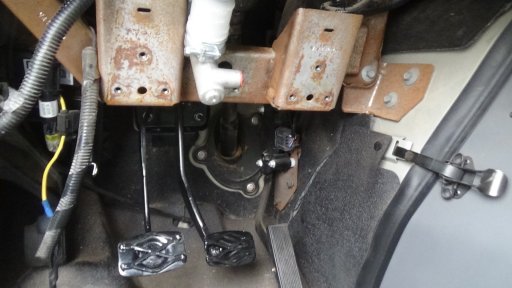
The bottom mounding bolt goes straight through that metal structure. I did have to weld a bracket for the top bolt of the master cylinder but light was getting dim and I couldn't get a good picture. I'll add more tomorrow.
However, test drove the new brake/clutch pedal assembly and it worked out great. I'm even still able to keep the electrical connection box fixed to it's stock location, clipped onto the side of the pedal assembly bracket. Clutch goes all the way down but it does slightly scrape the plastic liner, importantly though, not the metal underneath.
I do still need to add a return spring on the clutch pedal but for now I'm saying the job is done. Hopefully everything else will be much less custom or tight fitting
=========================================================================================================================================
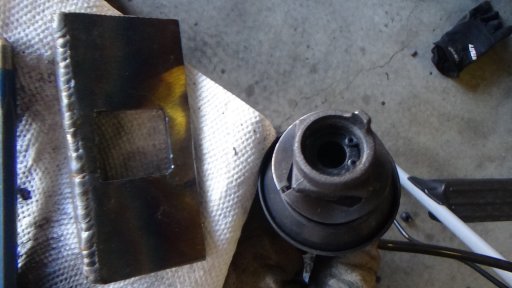
Addendum, needed to change the clutch master cylinder.
The Ford "all in one" package lines were held in by rolled pins, rather than butchering it to get it to work with my original Master Cylinder I just modded my bracket to accept the Ford factory stuff:
Tricky thing about the 4th gen Econoline if you want a manual trans is that they never came with one, and no one makes a kit so you've got to custom fabricobble everything yourself.
Only a few other people online have been hard-headed enough to try it, and now I can tell you why: it's a PITA trying to fit everything in the footwell! I do not regret being hardheaded though, turned out great and now all of my vehicles will be stick and three pedals :)
Having no luck finding any good tutorials anywhere else, I'll try and be as detailed as possible here for anyone who wants to try
First, I started with the two pedal assemblies from earlier (old ford truck and another econoline). After a lot of mock up and finagling I found out that YJ spring hanger bushings (the metal bit) will fit right in between an econoline brake pedal assembly bracket. So I ground out the old pedal pivot axle and, suprise suprise, the bolt fits too:
This makes the basis of two swing pivot things. I then heavily modified the two pedals from the truck pedal assembly to get the pedals in the right spot. Brake pedal was shortened and brought forward to be a little less than 1" closer to the gas pedal than the original brake pedal was. I also had to grind out the stud, pop it out and flip it so it's the right side. The clutch pedal was cut just above the curve and flipped around, plus cut down at the top so it matched the length of the brake pedal. I also cut some expanded sheet metal and welded it on for texture:
From here I measured how far away the stud was from the face of the pedal assembly on my van's current brake setup. That let me set the orientation of the pedals to I could weld the clutch throw arm parallel to the rear face of the bracket. To come out right in the correct spot the pivot arm needed to line up directly over the brake pedal arm. Finally paint and assembly:
Now you can probably tell that I'm putting in a reverse clutch master cylinder. I have no idea what this cylinder is out of, I just picked one at the auto parts store that looked like it'd work. It'll mount to the Dash under-skelleton where the center spike of kill-you-in-a-crash used to be...
And I mean that, under the dash right under the steering wheel is a sharpened spike bolted in an orientation facing your bollocks. There seems to be no purpose to it, and it's just a spike...
The bottom mounding bolt goes straight through that metal structure. I did have to weld a bracket for the top bolt of the master cylinder but light was getting dim and I couldn't get a good picture. I'll add more tomorrow.
However, test drove the new brake/clutch pedal assembly and it worked out great. I'm even still able to keep the electrical connection box fixed to it's stock location, clipped onto the side of the pedal assembly bracket. Clutch goes all the way down but it does slightly scrape the plastic liner, importantly though, not the metal underneath.
I do still need to add a return spring on the clutch pedal but for now I'm saying the job is done. Hopefully everything else will be much less custom or tight fitting
=========================================================================================================================================
Addendum, needed to change the clutch master cylinder.
The Ford "all in one" package lines were held in by rolled pins, rather than butchering it to get it to work with my original Master Cylinder I just modded my bracket to accept the Ford factory stuff:
Last edited:
So, 4x4 is on hold for a bit. Was talkin with my wife and with all our trips planned from now through the beginning of December we decided it best not to have the van down from Sept through Thanksgiving. Will hopefully continue with the 4x4 and trans swap during Christmas time
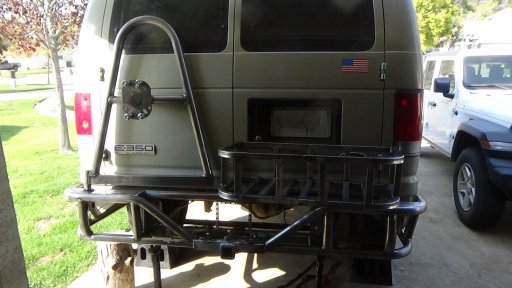
That being said the project hasn't been idle, I've been taking care of the caboose! First draft of the rear bumper, tube runs all the way to the tires to protect the quarter panels and I also integrated a tow hitch with frame tie-ins:
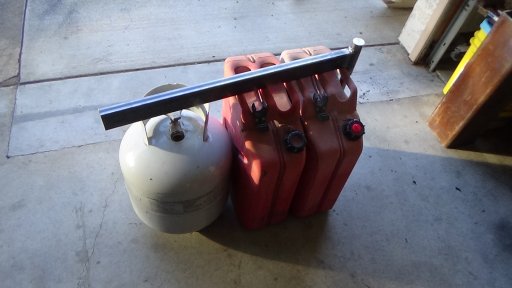
Swing outs started, the tire carrier is just barely enough for a 35" tire and the basket will hold jerry cans and our propane tank
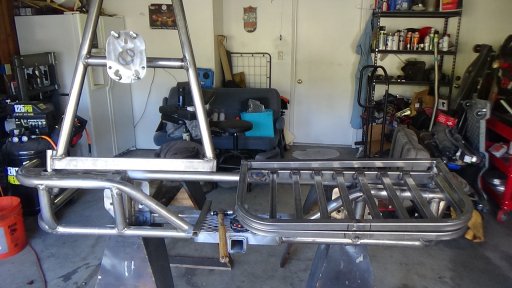
Final product prior to paint. I also made links and brackets that attach to the doors, so there's no lock outs and all we have to do is open the doors as normal. Once painted tomorrow we'll add lights to the square sections just under the swing outs

The plan is to utilize the space where the spare used to be for something else, possibly an aux tank. Once we add a propane system to the van we'll just mount a dual stage reg under the passenger-side rear lights and use a flex line to hook up the 20 lb tank.
Just finished all the welding tonight. Going to prep the metal and paint it tomorrow and will post finished pics once we've done the final install on the van.
That being said the project hasn't been idle, I've been taking care of the caboose! First draft of the rear bumper, tube runs all the way to the tires to protect the quarter panels and I also integrated a tow hitch with frame tie-ins:
Swing outs started, the tire carrier is just barely enough for a 35" tire and the basket will hold jerry cans and our propane tank
Final product prior to paint. I also made links and brackets that attach to the doors, so there's no lock outs and all we have to do is open the doors as normal. Once painted tomorrow we'll add lights to the square sections just under the swing outs
The plan is to utilize the space where the spare used to be for something else, possibly an aux tank. Once we add a propane system to the van we'll just mount a dual stage reg under the passenger-side rear lights and use a flex line to hook up the 20 lb tank.
Just finished all the welding tonight. Going to prep the metal and paint it tomorrow and will post finished pics once we've done the final install on the van.
Trail Blazer III
Wow that bumper looks great! I've been thinking of building my own bumper too. What are you using for the pivot on the gates? Can't wait to see how how your project turns out
I'm using a spindle rear tire carrier kit, they're offered by shops like EMS Offroad, Barnes4WD, and Ruffstuff Offorad. They provide a 2" tube that's been machined to accept bearing races and a steel rod that was turned down to fit withing the cooresponding bearings.Wow that bumper looks great! I've been thinking of building my own bumper too. What are you using for the pivot on the gates? Can't wait to see how how your project turns out
And final install!! Kindof, I still need to wire the lights, trailer connections, and add a rubber stop for the swing outs. But it looks good :)