Biohazard Bumper build project

John~SWNM

Rank IV
Launch Member

Enthusiast III

1,308
Las Cruces, New Mexico, USA
First Name
John
Last Name
Holloway
Member #

10992

I have been trying to stay busy during the lockdown by finally getting around to building the rear bumper for my Tacoma that Ihave been acquiring parts & materials for for a while now.

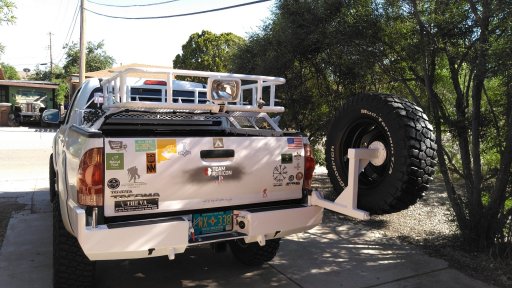
It's 4 weeks or so in (I have had to take a day or so off now and then for arthritis elevations) but it's shaping up pretty nicely. Yesterday I got the bumper itself and the right swing arm spare tire carrier test mounted onto the truck to check for & clearances. The hinges are trailer stub-axles & bearings and there is a half-inch spring pin on each arm to hold it in the closed & open positions. There will also be a redundant latch on the end of each arm for safety once it's all done.

Next step (starting tomorrow) is to start the fab-work on the fuel cans mount on the left swing arm.

KIMG1144.JPGKIMG1143.JPGKIMG1142.JPG
 
That is looking great! I am wanting to build something similar to that for my bronco and I have a couple of questions if you don't mind! Do you have an inner support structure or is it just the outside welded? I am also wondering how thick of material you are using.
 
  • Like
Reactions: John~SWNM
That is looking great! I am wanting to build something similar to that for my bronco and I have a couple of questions if you don't mind! Do you have an inner support structure or is it just the outside welded? I am also wondering how thick of material you are using.

Since Im on a budget Im using about 90% of material I already had on-hand left over from other projects.. Overkill, probably.

The core is 2x4x1/4 in wall tubing stacked on top of 2x2x1/4 wall tubing with 3/8 plate for the mounting plate that bolts to the factory ( and modified) trailer hitch receiver frame. It also has support tie-in's connecting the sides to the frame. The end caps are 1/8 inch sheet. So yeah, it's stout. I'm debating whether or not to cut some out of the inside, but I think I'd only save a couple pounds at most. Regardless, I pitty the guy who rear-ends me at a stop light ;) I'll take some pics later if I remember.
 
Last edited:
  • Like
Reactions: TexasGMG and Atruck
Made a lot of progress the last week or so. A couple days ago I got the bumper & tire carrier painted and got them on the truck today. All I have left to do is finish up & paint the fuel can carrier on the driver's side swing arm and get that installed. As My next project is an onboard air system Itook this opportunity & mounted the air chuck and pressure gauge in the bumper so that will only need to be hooked up once the compressor & tank are in. KIMG1162.JPGKIMG1163.JPG KIMG1164.JPGKIMG1163.JPGKIMG1166.JPGKIMG1161.JPG
 

Attachments

  • KIMG1165.JPG
    KIMG1165.JPG
    504.4 KB · Views: 16
I like the shit outta this. Looks good. Ya got skills.

I like the VA sticker, too
 
  • Like
Reactions: M Rose
Finally got it all completed. The tray will carry 2-5 gallon fuel cans. While I was in the process of the build and since the onboard air system in going in as well I told the opportunity to install the air hose quick-disconnect and tank pressure gauge in the bumper.

Overall this project cost me about $400 in assorted parts ( like the himges) , some new steel and paint. The rest was materials Ialready had on-hand leftover from other projects.
A few of the angles are slightly off and a couple of the measurements are off by as much as 1/8 inch, but I'm very happy with the final product.

Now, to get the heck out of town & into the mountains for some "stres testing" in the backcountry....

( oh, since I built it during the lockdown & dubbed it the Biohazard Bumper I couldnt resist putting the decal on the tire carrier ;) )

KIMG1176.JPGKIMG1170 (1).JPGKIMG1170.JPGKIMG1172.JPGKIMG1167.JPGKIMG1169.JPG