


Benefactor
One of the great things about Warn winches is their serviceability. When I first got my XD9000i it wouldn't go into freespool. The entire planetary gear assembly was removed, cleaned and got a fresh coating of grease and hasn't had an issue in over 7 years of ownership.
Late last Fall there were times when the winch started to not power out. You could hear the solenoids click, but the drum wouldn't rotate. A good whack on the cover would usually get the coils to energize and make the drum turn. The last thing you want is a partially working winch, so it was time to tackle replacing the solenoids.
With the aid of a multimeter, you can determine if a solenoid needs replacement, but for ~$15 each it was easier to just replace all four of them at once. Two solenoids are used for powering out and the other two are for winching in.
The procedure itself is pretty straight forward. Most of the work will probably be the removal of the winch. You'll first want to remove the line from the drum, disconnect the leads from the battery and remove any other parts like the grille, headlights, etc. and get the unit on a bench.
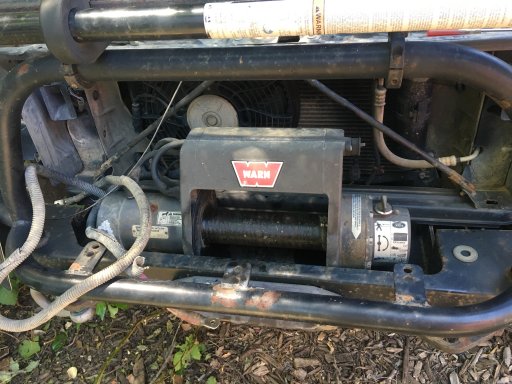
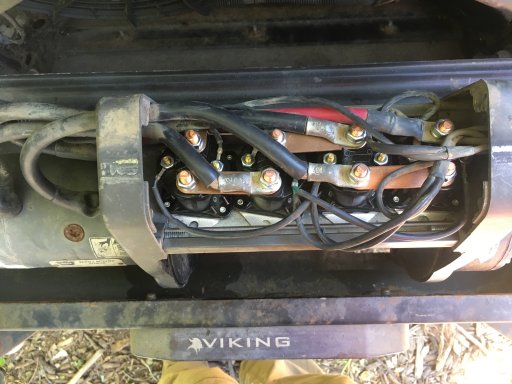
The "i" for this model stands for integrated, meaning the solenoids are integrated with the rest of the winch. The non "i" model has a separate box that allows you to mount it in different locations. To get to the solenoid tray, you just need to remove one side of the case, which is held in place with 3 Allen head bolts. I didn't want to worry about the internal brake coming apart, so I took the planetary gear side off. Actually it didn't come all the way off because of the socket connector where the controller plugs in. It only needs to pull away about a 1/4" so there's enough room to remove the solenoid tray.

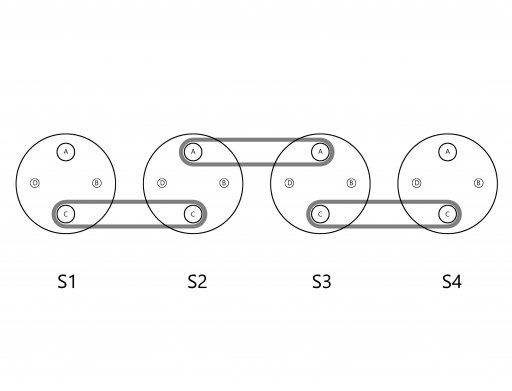
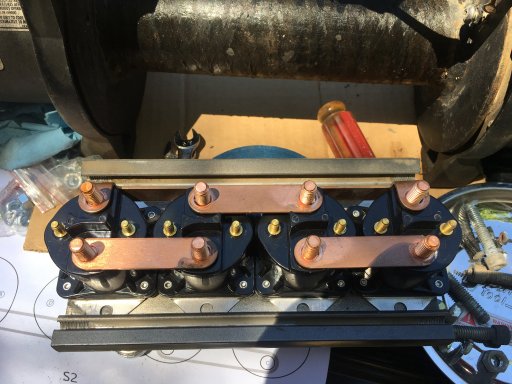
Once the cover is removed you can see what lies ahead. A lot of wires and connectors that must go back to the same positions. Before removing any wires, you want to have a schematic, and use tape to make a label for each connection. The schematic doesn't need to be made by an EE. I made my own so I knew how to label everything. Each solenoid was named S1 through S4, and each post was given a letter designation of A-D. I also noted the position of the 3 copper straps that connect the solenoids into pairs. There is one long copper strap the connects S1A with S4A which isn't marked below.
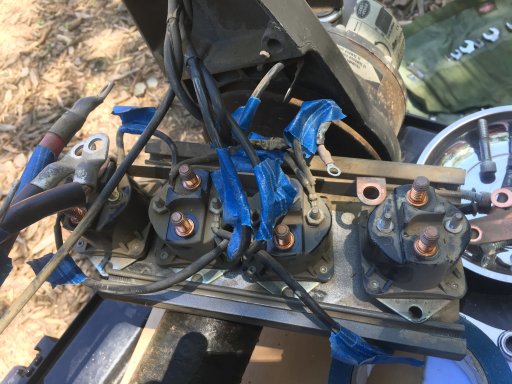
Remove the wires one at a time, and immediately label it with the tape. It's also a good practice to at least take a picture before tearing into things. A video can work as well. One good thing is that the wires have set their position and pretty much only fit one way, but still be sure you know where they go. Here are the labeled wires and straps removed.
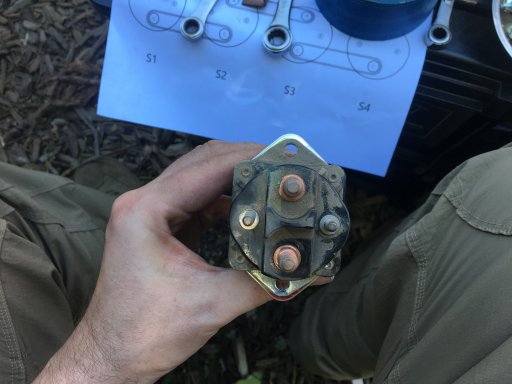
There's one slight modification that needs to be made to the baseplates of the solenoids. Even though they were supplied by Warn, over the years they have gotten a little bigger, by about 1/4". They are retained to the tray by sliding into to grooves at the front and back, so that means a little trimming is needed. A hacksaw wouldn't be too bad. Metal shears might deform the metal and not fit the grooves, and a file will take a while. Your best bet is to use a powered grinder. It should only take a few minutes to made the needed cuts. Use the old baseplate to make your marks. Cut it too short and the solenoid won't be retained properly. Measure twice, cut once!
Once all four solenoids fit the tray, make sure to clean up the copper parts and begin re-assembly. I removed the thick wires first, so the small wires go on first.
Once you have everything connected, double check against the schematics and test the functionality. You don't want to go through the process of buttoning everything up and take it all apart again if you missed something. It's also faster to spot blue smoke if the cover is still off!
When the drum rotates as expected it's time to re-install everything and enjoy your favorite cold beverage:)
Late last Fall there were times when the winch started to not power out. You could hear the solenoids click, but the drum wouldn't rotate. A good whack on the cover would usually get the coils to energize and make the drum turn. The last thing you want is a partially working winch, so it was time to tackle replacing the solenoids.
With the aid of a multimeter, you can determine if a solenoid needs replacement, but for ~$15 each it was easier to just replace all four of them at once. Two solenoids are used for powering out and the other two are for winching in.
The procedure itself is pretty straight forward. Most of the work will probably be the removal of the winch. You'll first want to remove the line from the drum, disconnect the leads from the battery and remove any other parts like the grille, headlights, etc. and get the unit on a bench.
The "i" for this model stands for integrated, meaning the solenoids are integrated with the rest of the winch. The non "i" model has a separate box that allows you to mount it in different locations. To get to the solenoid tray, you just need to remove one side of the case, which is held in place with 3 Allen head bolts. I didn't want to worry about the internal brake coming apart, so I took the planetary gear side off. Actually it didn't come all the way off because of the socket connector where the controller plugs in. It only needs to pull away about a 1/4" so there's enough room to remove the solenoid tray.
Once the cover is removed you can see what lies ahead. A lot of wires and connectors that must go back to the same positions. Before removing any wires, you want to have a schematic, and use tape to make a label for each connection. The schematic doesn't need to be made by an EE. I made my own so I knew how to label everything. Each solenoid was named S1 through S4, and each post was given a letter designation of A-D. I also noted the position of the 3 copper straps that connect the solenoids into pairs. There is one long copper strap the connects S1A with S4A which isn't marked below.
Remove the wires one at a time, and immediately label it with the tape. It's also a good practice to at least take a picture before tearing into things. A video can work as well. One good thing is that the wires have set their position and pretty much only fit one way, but still be sure you know where they go. Here are the labeled wires and straps removed.
There's one slight modification that needs to be made to the baseplates of the solenoids. Even though they were supplied by Warn, over the years they have gotten a little bigger, by about 1/4". They are retained to the tray by sliding into to grooves at the front and back, so that means a little trimming is needed. A hacksaw wouldn't be too bad. Metal shears might deform the metal and not fit the grooves, and a file will take a while. Your best bet is to use a powered grinder. It should only take a few minutes to made the needed cuts. Use the old baseplate to make your marks. Cut it too short and the solenoid won't be retained properly. Measure twice, cut once!
Once all four solenoids fit the tray, make sure to clean up the copper parts and begin re-assembly. I removed the thick wires first, so the small wires go on first.
Once you have everything connected, double check against the schematics and test the functionality. You don't want to go through the process of buttoning everything up and take it all apart again if you missed something. It's also faster to spot blue smoke if the cover is still off!
When the drum rotates as expected it's time to re-install everything and enjoy your favorite cold beverage:)


