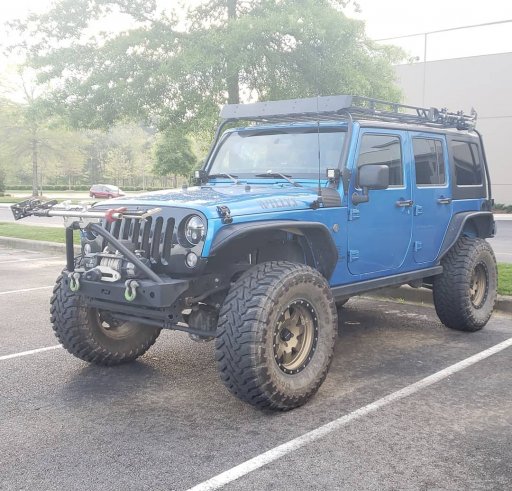
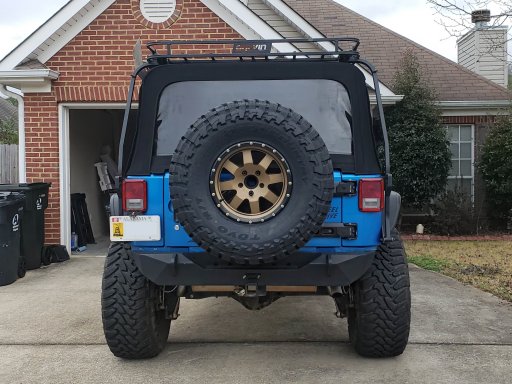
Nice! Thanks! So this does help....not my wallet...but it helps! haha!!!OEM MOPAR 2007-2016 JEEP WRANGLER JK OUTSIDE SPARE TIRE CARRIER CAST ALUMINUM TAILGATE HINGE SYSTEM 82214770
Teraflex 4838130 Adjustable Tire...
TeraFlex 1055005 JK HD Adjustable...
Hope this helps!
My Willy is going Overlanding
- Thread starter RKTJeep
- Start date
-
Guest, we are migrating the site today. There may be interruption of service.

Traveler I
So the whole idea for me was to be able to put a 35” tire without warping or bending the door. I also did not want to get a new bumper with a swing gate and this was the alternative. It is very sturdy! I could not have been happier with how well it functions and keeps the stock feel. Yes price sucks but buying a new gate would be worse. I’ve heard the horror stories of people having to buy new ones and can’t imagine having that headache.Nice! Thanks! So this does help....not my wallet...but it helps! haha!!!
i love this. what a functional build. i sold my JKU when i was laid off and bought the ram at that time, and really miss my wrangler. im trying to make this ram into what i want, but it's more of a challenge.
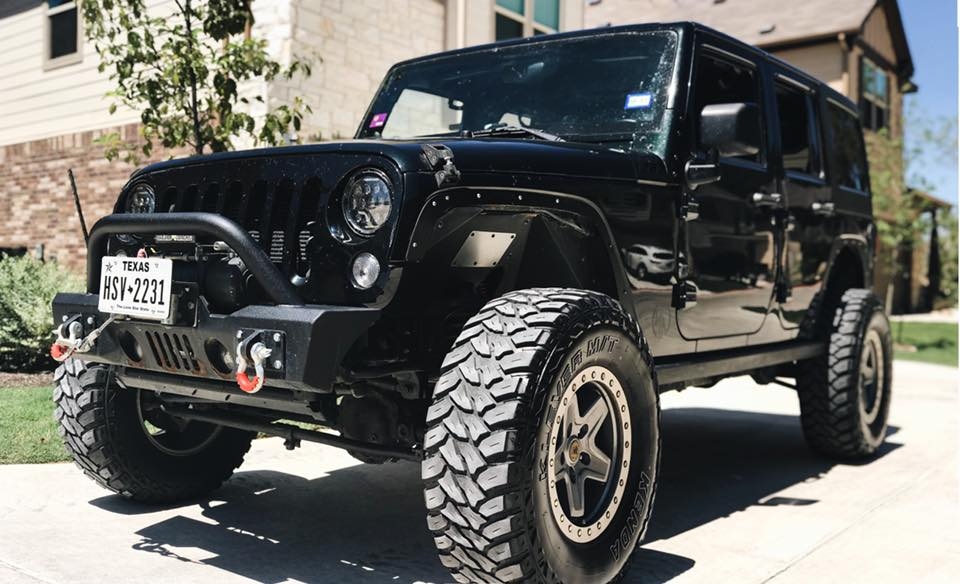
my jku was built less for functionality like yours and more for getting over things without destroying stuff....miss it all the time.

my jku was built less for functionality like yours and more for getting over things without destroying stuff....miss it all the time.
Well last week I had off a day, and it was a nice 60 degrees and sunny out! I decided it was time to get my ARB Air Compressor in the Jeep.
I first started with the switch panel. I saw a YouTube video of a guy who had a similar setup right above the speaker vent and I thought it was a great spot to put a switch panel. LET ME TELL YOU! I didn't realize the plastic trim was literally the WHOLE DASH!!! :| So I measured and traced the panel, and took an safety blade to the plastic. Luckily the plastic was soft enough it glided thru no problem.
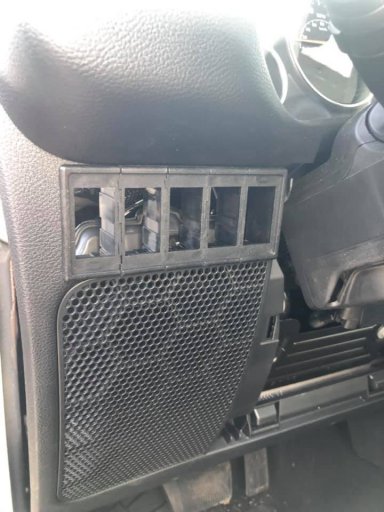
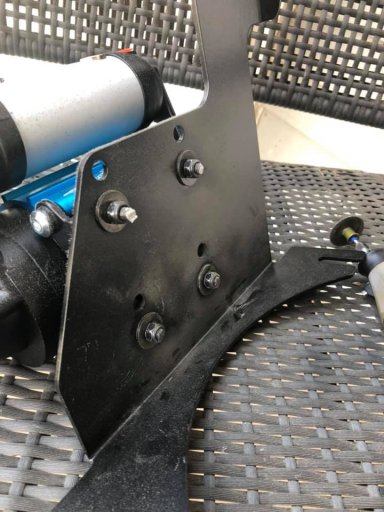
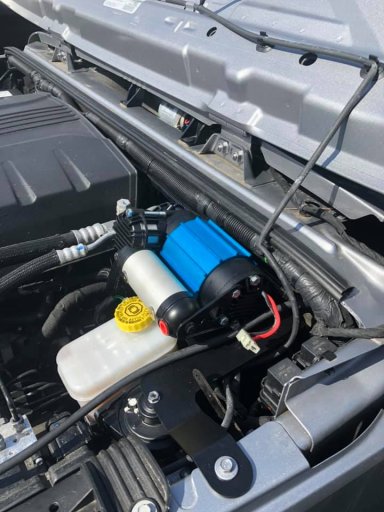
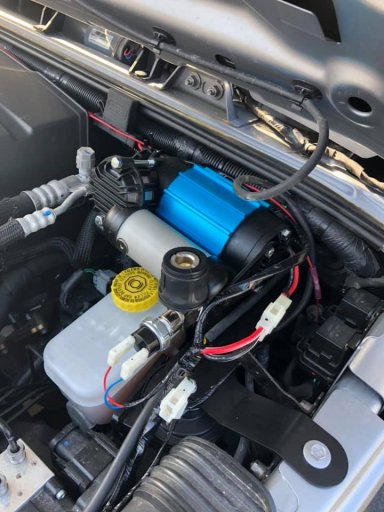
With that being done and me getting over the fact I just put a hole in a $35k+ Jeep it was on to the compressor! I mounted it and read that you needed to cut the screws down because they are too long. Apparently they hit the Master Cylinder:
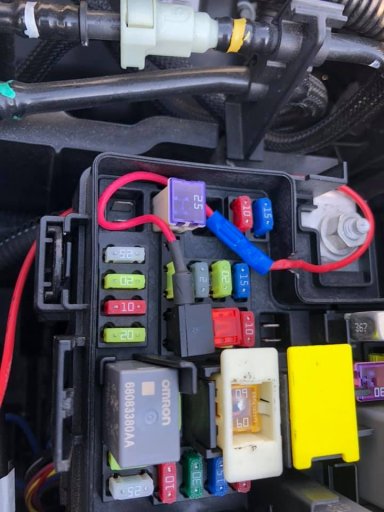
Next up was the wiring. I've done this before in my old TJ and I remembered it went pretty smooth. So I followed the directions and it was going well. I got to the last wire, the Ignition wire. In the TJ I just spliced it to the cigarette outlet wire and I was good to go. From what I read that could be a little dangerous, so instead I ended up going to my Fuse box and found a fuse I wasn't using (Rear heated seat fuse). I ran the wire to it, put a 10amp fuse in it and plug it in. Needless to say, the $7 part from Auto Zone worked!
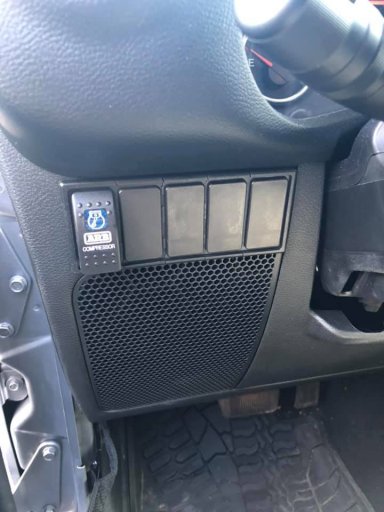
With all that done, I put the switch in its new home. I added blank covers to the other holes, for future switches and accessories. I think it looks pretty clean and somewhat stock-looking:
Final photo is the complete compressor all hooked up. I can now air my tires and whatever I need. There are wires and spots for air lockers for the future, still don't know if I'll go that crazy though lol:
I first started with the switch panel. I saw a YouTube video of a guy who had a similar setup right above the speaker vent and I thought it was a great spot to put a switch panel. LET ME TELL YOU! I didn't realize the plastic trim was literally the WHOLE DASH!!! :| So I measured and traced the panel, and took an safety blade to the plastic. Luckily the plastic was soft enough it glided thru no problem.

With that being done and me getting over the fact I just put a hole in a $35k+ Jeep it was on to the compressor! I mounted it and read that you needed to cut the screws down because they are too long. Apparently they hit the Master Cylinder:


Next up was the wiring. I've done this before in my old TJ and I remembered it went pretty smooth. So I followed the directions and it was going well. I got to the last wire, the Ignition wire. In the TJ I just spliced it to the cigarette outlet wire and I was good to go. From what I read that could be a little dangerous, so instead I ended up going to my Fuse box and found a fuse I wasn't using (Rear heated seat fuse). I ran the wire to it, put a 10amp fuse in it and plug it in. Needless to say, the $7 part from Auto Zone worked!

With all that done, I put the switch in its new home. I added blank covers to the other holes, for future switches and accessories. I think it looks pretty clean and somewhat stock-looking:

Final photo is the complete compressor all hooked up. I can now air my tires and whatever I need. There are wires and spots for air lockers for the future, still don't know if I'll go that crazy though lol:


Traveler III
Looks great! Nice job on the switch panel install. It does look totally factory.Well last week I had off a day, and it was a nice 60 degrees and sunny out! I decided it was time to get my ARB Air Compressor in the Jeep.
I first started with the switch panel. I saw a YouTube video of a guy who had a similar setup right above the speaker vent and I thought it was a great spot to put a switch panel. LET ME TELL YOU! I didn't realize the plastic trim was literally the WHOLE DASH!!! :| So I measured and traced the panel, and took an safety blade to the plastic. Luckily the plastic was soft enough it glided thru no problem.
View attachment 89907
With that being done and me getting over the fact I just put a hole in a $35k+ Jeep it was on to the compressor! I mounted it and read that you needed to cut the screws down because they are too long. Apparently they hit the Master Cylinder:
View attachment 89909
View attachment 89910
Next up was the wiring. I've done this before in my old TJ and I remembered it went pretty smooth. So I followed the directions and it was going well. I got to the last wire, the Ignition wire. In the TJ I just spliced it to the cigarette outlet wire and I was good to go. From what I read that could be a little dangerous, so instead I ended up going to my Fuse box and found a fuse I wasn't using (Rear heated seat fuse). I ran the wire to it, put a 10amp fuse in it and plug it in. Needless to say, the $7 part from Auto Zone worked!
View attachment 89911
With all that done, I put the switch in its new home. I added blank covers to the other holes, for future switches and accessories. I think it looks pretty clean and somewhat stock-looking:
View attachment 89912
Final photo is the complete compressor all hooked up. I can now air my tires and whatever I need. There are wires and spots for air lockers for the future, still don't know if I'll go that crazy though lol:
View attachment 89913
Thanks! So with TJ's and YJ's I always liked the out of place look of switches and things that added a little character to them. With a JK, the interior is just TOO NICE, so I want to keep it looking nice with a bunch of things that make people think its factory. Thats my goal at least lol.
Hey guys, so I've been having a CRAZY last few weeks. Wife and I decided to put the condo up for sale, and try and buy a house all before our road trip in June! O_O Because why not? lol Anyway, we moved our stuff to a relatives house for now and decided that since I had some downtime, I will at least get this rack built. I've had this Front Runner roof rack in its boxes for about 5 months, and now it will see the light! I want to try and get this completed and bolted on the Jeep before we move in to our new home. First reason because it's literally the one thing I need another person to help me with, and secondly I can use it to move stuff back and forth from Home Depot in the upcoming weeks.
I laughed when it said 30minutes to build:
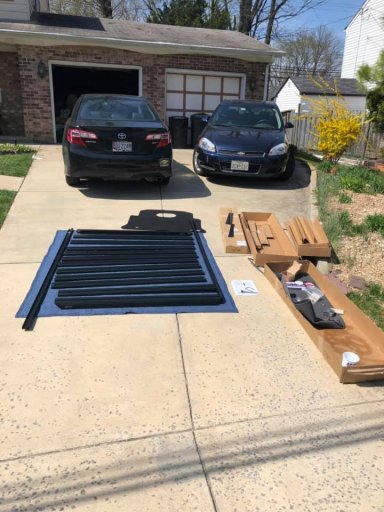
But in reality it took about 40minutes lol:
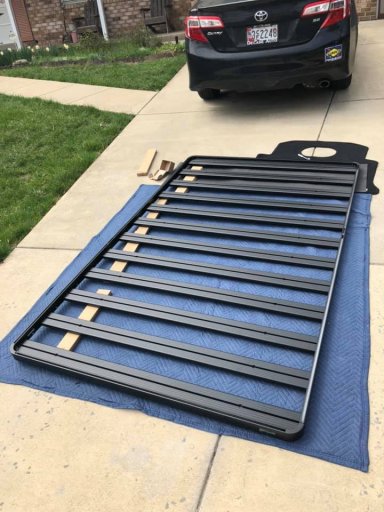
This thing is HUGE! I have all this room for things!!! Now I just need a nice day and an extra pair of hands (To help with hardtop removal/put back on) to get the mounts bolted to the Jeep and I can complete this part of the build!!!
I laughed when it said 30minutes to build:

But in reality it took about 40minutes lol:

This thing is HUGE! I have all this room for things!!! Now I just need a nice day and an extra pair of hands (To help with hardtop removal/put back on) to get the mounts bolted to the Jeep and I can complete this part of the build!!!

Influencer I
Is it possible to put it on the Jeep without removing the hardtop? From what I can tell the mounts look like they can be put on with the hardtop still on. I could be wrong though.I love my Slimeline 2 rack. Lots to be done with it.

Advocate III

Influencer I
You have to drill through the hard top to attach the mounts as they attach to the roll bar just behind where the seat belts for the rear seats attach.Is it possible to put it on the Jeep without removing the hardtop? From what I can tell the mounts look like they can be put on with the hardtop still on. I could be wrong though.
Yea I understand that, but I saw in the instructions they recommend taking off the hardtop...I think thats so it's easier to drill through. If thats the case I'll just get a small ladder, I'm pretty confident I don't need to take off the whole top. Hopefully I can get this knocked out next week!You have to drill through the hard top to attach the mounts as they attach to the roll bar just behind where the seat belts for the rear seats attach.

Influencer I
I paid to have mine installed as I don't really have an area where I can work and the apartment complex I live at doesn't allow major car work in their parking areas.Yea I understand that, but I saw in the instructions they recommend taking off the hardtop...I think thats so it's easier to drill through. If thats the case I'll just get a small ladder, I'm pretty confident I don't need to take off the whole top. Hopefully I can get this knocked out next week!
I know the struggle. I'm currently getting out of my condo and in to a house. Had neighbors call the Condo HOA quite a few times while working on my Jeep in the past 10 years or so...I mean axle swaps are easy, come on!!I paid to have mine installed as I don't really have an area where I can work and the apartment complex I live at doesn't allow major car work in their parking areas.
Well it was a nice day out so I decided to get this Rack on the Jeep! It went together well and they do give you a bit of room for error on some of the mounts for the holes to line up right. I'm pretty happy with the way it turned out. I did it by myself, I do not recommend this, an extra pair of hands could easily cut the time down in half just by holding a 2nd wrench. I didn't put the plastic caps over the nuts and bolts just yet, I want to drive around a bit first and see if anything comes loose.
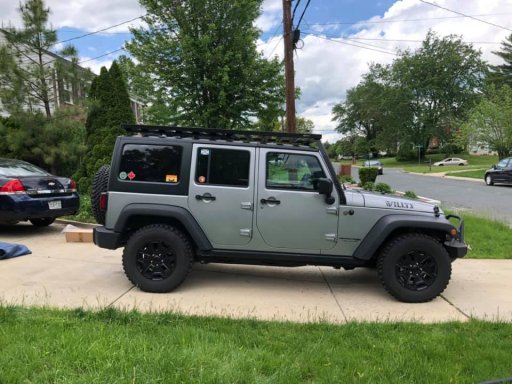
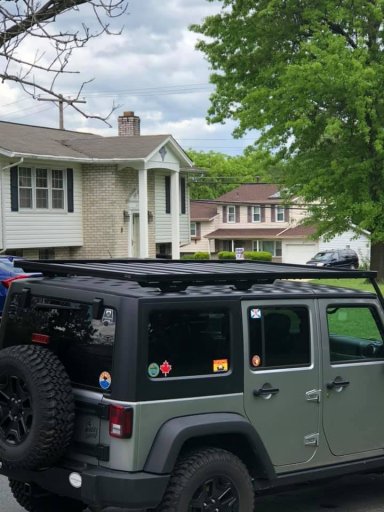
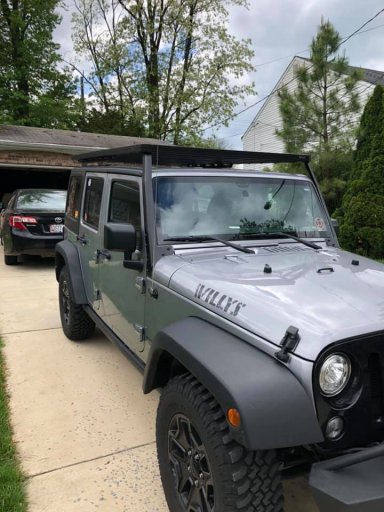
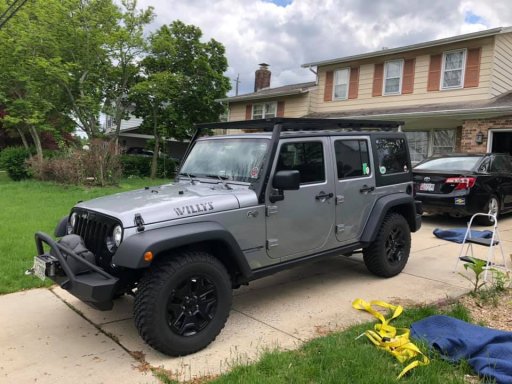
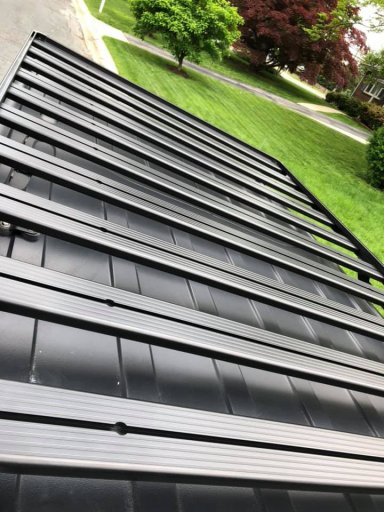
If you guys need any other pictures on how this mounts let me know, I'll be more then happy to snap more shots. The best way to do this is make sure all the mounts are on LOOSE and get the bolts in them. If you tighten everything up and then try to run the bolts thru you will be wrestling with the metal and its no fun.


If you guys need any other pictures on how this mounts let me know, I'll be more then happy to snap more shots. The best way to do this is make sure all the mounts are on LOOSE and get the bolts in them. If you tighten everything up and then try to run the bolts thru you will be wrestling with the metal and its no fun.
So apparently the wonderful aerodynamics of a Jeep Wrangler paired with a very squared roof rack not only whistles down the road (I'm fine with that) but it sounds like a 747 landing on my roof. Around 60mph it goes away. Frontrunner states my kit should have come with some sort of wind fairing, I did not see any in the boxes. So I'm off to Home Depot to make my own, which I kind of was thinking on doing anyway. I'll report back with my success or failure later today lol.

Traveler III
- 4,007
- First Name
- Lucas
- Last Name
- Antes
- Member #
-
7082
- Ham/GMRS Callsign
- KE0ZXA
I'd see if they'd shoot you the fairing for free if it was in fact supposed to come with one. No sense in paying for something if they'll make it right for no cost to you. As a temp fix, I've heard if you wrap some rope around the front of the rack that it'll diffuse the air enough to help with the noise and aero (or lack thereof). Worth a shot as a temporary solution if Frontrunner will make it right.So apparently the wonderful aerodynamics of a Jeep Wrangler paired with a very squared roof rack not only whistles down the road (I'm fine with that) but it sounds like a 747 landing on my roof. Around 60mph it goes away. Frontrunner states my kit should have come with some sort of wind fairing, I did not see any in the boxes. So I'm off to Home Depot to make my own, which I kind of was thinking on doing anyway. I'll report back with my success or failure later today lol.

Influencer I
They make them, mine came with one on it when I had it installed. My only issue is some slight rattling of my Hi-Lift jack I have mounted on the rear passenger side of the Jeep.I'd see if they'd shoot you the fairing for free if it was in fact supposed to come with one. No sense in paying for something if they'll make it right for no cost to you. As a temp fix, I've heard if you wrap some rope around the front of the rack that it'll diffuse the air enough to help with the noise and aero (or lack thereof). Worth a shot as a temporary solution if Frontrunner will make it right.
Thanks for all the suggestions, I'm sure frontrunner would make it right. Unfortunately the rope around the front did not work to help the vibrations. I have to drive a lot in the next few days and I can't just sit around and wait for a company to send me a new part from California. I tried to cut out a piece from some plexiglass I had laying around and it literally shattered when I was sawing thru it. So I used a hand saw and the same result. At this point in my great temper I thru the plastic out of the garage and into the street where it shattered into 1000s of pieces. After cleaning up the mess I said "Screw it" so I crawled my way to the nearest REI and got a Yakima wind fairing. Probably should have done this first, I also went to Home Depot to get some hardware. Fixed my problem, doesn't look too shabby.
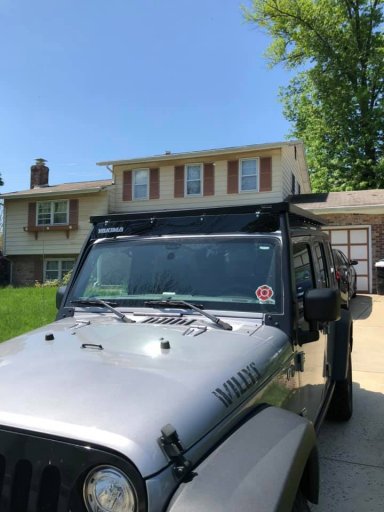
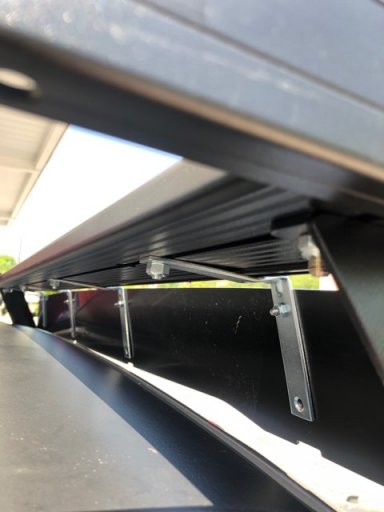
Now I had to cover that Yakima logo of course because it just doesn't feel right....
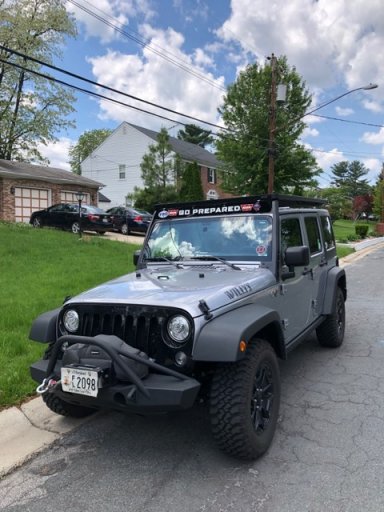
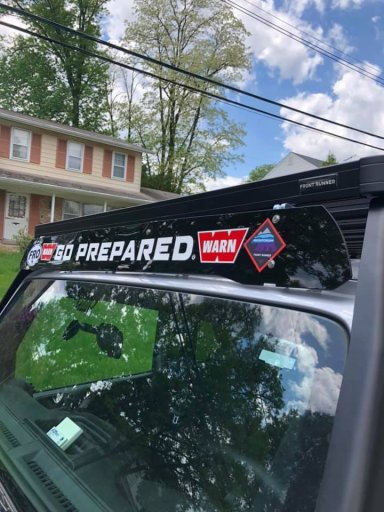
Luckily FrontRunner gives you 2 pages worth of decals to sticker all over your vehicle or whatever. I had the Warn "Go Prepared" sticker for a while, figured it should go there.


Now I had to cover that Yakima logo of course because it just doesn't feel right....


Luckily FrontRunner gives you 2 pages worth of decals to sticker all over your vehicle or whatever. I had the Warn "Go Prepared" sticker for a while, figured it should go there.

Traveler III
- 4,007
- First Name
- Lucas
- Last Name
- Antes
- Member #
-
7082
- Ham/GMRS Callsign
- KE0ZXA
Looks good! Hope it works well for you.Thanks for all the suggestions, I'm sure frontrunner would make it right. Unfortunately the rope around the front did not work to help the vibrations. I have to drive a lot in the next few days and I can't just sit around and wait for a company to send me a new part from California. I tried to cut out a piece from some plexiglass I had laying around and it literally shattered when I was sawing thru it. So I used a hand saw and the same result. At this point in my great temper I thru the plastic out of the garage and into the street where it shattered into 1000s of pieces. After cleaning up the mess I said "Screw it" so I crawled my way to the nearest REI and got a Yakima wind fairing. Probably should have done this first, I also went to Home Depot to get some hardware. Fixed my problem, doesn't look too shabby.
View attachment 97143
View attachment 97144
Now I had to cover that Yakima logo of course because it just doesn't feel right....
View attachment 97145
View attachment 97146
Luckily FrontRunner gives you 2 pages worth of decals to sticker all over your vehicle or whatever. I had the Warn "Go Prepared" sticker for a while, figured it should go there.

