My teardrop project v1.0

  • HTML tutorial

smritte

Rank V
Launch Member

Member III

2,827
Ontario California
First Name
Scott
Last Name
SMR
Member #

8846

Ham/GMRS Callsign
KO6BI
Last weekend i installed an EPDM sheet over the roof. The outside panels are 5mm plywood to save weight. Looking back, i should have gone one size thicker. The seams so far are sealed with silkaflex 291. Its an adhesive and sealer. This is what most of the trailer is glued together with. The outside right now is covered with a coat of epoxy primer. The paint is going to be a lite blue/grey Monstaliner. I'm going to use a body filler for the bigger imperfections before i paint.
 

665.0coupe

Rank I

Enthusiast I

261
Central, KS, USA
First Name
XXX
Last Name
XXX
Ham/GMRS Callsign
KE0ZLR
Last weekend i installed an EPDM sheet over the roof. The outside panels are 5mm plywood to save weight. Looking back, i should have gone one size thicker. The seams so far are sealed with silkaflex 291. Its an adhesive and sealer. This is what most of the trailer is glued together with. The outside right now is covered with a coat of epoxy primer. The paint is going to be a lite blue/grey Monstaliner. I'm going to use a body filler for the bigger imperfections before i paint.
Thanks for the info. Did you put plywood under the EDPM and then glue it down?
 

smritte

Rank V
Launch Member

Member III

2,827
Ontario California
First Name
Scott
Last Name
SMR
Member #

8846

Ham/GMRS Callsign
KO6BI
The whole box is plywood inside and out. The roof is thick enough to walk on.

I misspoke. The roof is PVC not epdm.
RecPro
 

smritte

Rank V
Launch Member

Member III

2,827
Ontario California
First Name
Scott
Last Name
SMR
Member #

8846

Ham/GMRS Callsign
KO6BI
Well, I had planned on finishing the outside this weekend but, my dumb ass didn't order enough angle to do the trim. Sigh.
Next week i'll pick up two more pieces and finish it. What I was short would have done the driver side rear vertical and the rear center. The rear compartment doors have to go on after the trim.
I don't like my steps. I left the diamond plate shiny and I think it clashes with the black . I haven't mounted them yet and don't really want to paint them black. I left them shiny so they wouldn't be hot. Not sure what i'm going to do there.

What I completed this weekend.
1.paint. I wanted something more "blue" what I got was a kind of blue/grey and it ended up more grey than blue.
2. mount windows and doors
3.install most of the aluminum trim


List of things to do
1. buy two more angle, paint them and install.
2. mount rear compartment doors.
3. mount solar panel. I cant mount until both roof/side trims are on.
4. wire front box
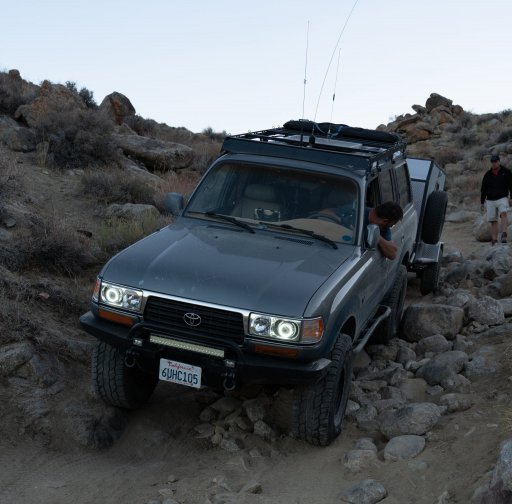
5. do spring over and get my height back
6. Buy black screws for doors
7. uhhh. things i forgot?

Im still trying to figure out my bed/couch. I may get two narrow tri fold beds. That way I could have a couch and bed open at the same time. If I needed more room, i could fold the second down. I want to complete the box first though.

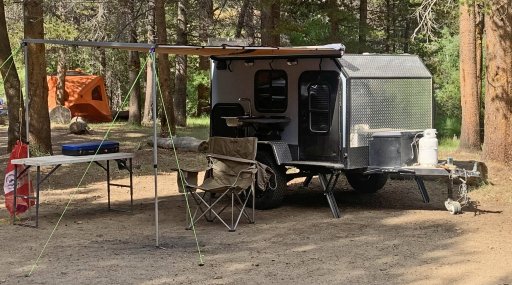
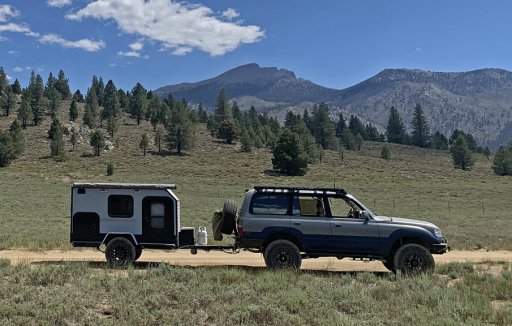
Here's my latest pictures.

Pass 9-7 web.jpg
Here's what its going to look like on both sides. The bar under the window is a mount for a removable table. The rear vent is for the fridge. I have an intake low in the back. There is a large gap next to the rear shelving. Hopefully the heat from the fridge will have a chimney effect and go out the upper vent. I have a power wire there in case i need to add in a thermal switch and fan to help it.
When I do the spring over, it will get me 4 inch's more height and that will put my clearance back to where I want it.


driver 9-07 web.jpg
Just doesn't look right without the trim done. I'm also considering a bold stripe, diagonal from the fender to the rear upper corner. Something to break up the rear, maybe something in blue.

That's all for now.
 
Last edited:

smritte

Rank V
Launch Member

Member III

2,827
Ontario California
First Name
Scott
Last Name
SMR
Member #

8846

Ham/GMRS Callsign
KO6BI
Well, its done except for some finish work and figuring out my couch/bed. I have all the rivnuts installed in the roof for my roof rack. I'm going with a low profile T-Slot aluminum. That will be in a few months.
Here's some pictures. Oh....I still need to wash it.

driver side 9-20.jpg Passenger side 9-20.jpg
Added some air springs to fix my sag. This is with 30 psi. I was thinking about adding them in the beginning. It would have been way easier. My water fill door is going to get either grey or black plastic paint.

front 9-20.jpg Box 9-20.jpg
Here's the front. I need to do something here. It looks unfinished. Maybe a black stripe across the top. I have a piece of diamond plate cut out. still undecided there. The cargo box side has the main power disconnect and shore power plug. In front of it you can see my two air spring fill valves. I have my propane line run under the front. I need to install the mount still. Its going to go in front of the box.

battery 9-20.jpg
I ran out of split loom here. The wires will be covered, tied back and a divider placed so anything in here wont hit the wires. I kept this simple. Two resettable breakers. One for the solar and the other for the main feed inside. The feed from my truck is fused also. The Genius smart charger has enough output to charge the battery and run my fridge. The solar controller has bluetooth so I didn't see the need for a voltmeter here. The battery is a group 24. I had it in my other trailer and it was good for a few days. I mounted it back, leaving enough room if I wanted to add in a second one in front of it.

I took some pictures of the rear cargo and the solar but, they didn't come out right.

Next week is test drive.
 

MMc

Rank V

Influencer II

1,749
San Dimas, Ca.
First Name
Mike
Last Name
McMullen
Member #

18647

Very cool. The hand break is on the left up front? It looks great.
You could get a cut vinyl for wrap for that big bald spot up front. They would be time consuming to put out on the diamond plate.
 

smritte

Rank V
Launch Member

Member III

2,827
Ontario California
First Name
Scott
Last Name
SMR
Member #

8846

Ham/GMRS Callsign
KO6BI
Decided to update this.

1. the test "drive" was good, the test "stop" failed. The brakes were barely engaging, even with the override lever pulled. Long story short, the new brakes were actually used damaged brakes. I don't know why I didn't notice this in the beginning when I assembled them. The trailer shop is making good and my new ones should be here by tomorrow.
2. Note to self......test water system before final assembly. Fortunately, I made everything accessible. I just had to unbolt a bunch of panels. I used "push in" water fittings. I use these on all of my builds and I have never had one leak let alone all of them leak. The difference was, these were bought from Home Depo and not my normal place. Terrible quality. I replaced them all with barbed and called it good. no leaks.

That's it for the failures.
I mounted my porch lights. They are solar, led, motion sensing. I saw these on a rig back in December and I liked the way it worked out. I used 2 on the side with my kitchen and one on the other side. They are set up so I can remove them easily and I hope they work well.
My bed/couch foam is suppose to be here soon that will finish the interior and I need to finish my propane tank mount. Unless something else happens, its done and ready for camping. I'll take some more pictures this weekend.
 

smritte

Rank V
Launch Member

Member III

2,827
Ontario California
First Name
Scott
Last Name
SMR
Member #

8846

Ham/GMRS Callsign
KO6BI
Still waiting on brakes to get here. Got a few more things done. Still need to build propane tank mount and a few small things. If the brakes were here, it would be ready to camp. Got the bed installed, my "chair" platform but need to make/buy a seat cushion. Added more diamond plate to the top front and going to trim it with 1.5 inch striping tape.
Pictures.

inside 1.jpg inside 2.jpg
Its hard to take a good picture here. The bed is an 8 inch thick memory foam mattress sitting on a 6 inch pedestal. The front of the bed hinges up to access the front hatch storage. Off to the side is my chair base. If I wanted a full bed, I add in a second platform and mattress. In the bottom of the picture you can see my hatch handle.

driver side 10-11.jpg pass side 10-11.jpg
The sides now have the porch lights added in and my propane tank mocked up where it's going to be mounted. On the front diamond plate you can see where I was playing with masking tape to mimic the striping tape. I realized I didn't do a black lower border in the front. I think that and outlining the top should look good.

rear closed.jpg rear open.jpg
Rear Storage. Was playing around with different containers trying to figure out if I have ones that fit or if I have to buy more. On the right upper picture, the bottom two shelves were made to hold my stove, water heater and folding table.

That's it for now.
 

smritte

Rank V
Launch Member

Member III

2,827
Ontario California
First Name
Scott
Last Name
SMR
Member #

8846

Ham/GMRS Callsign
KO6BI
Did a final test drive of about 50 miles. As far as I can see, it's done. Towed great, backs up great and seems to track inline with my Cruiser. I added a rear facing wireless camera. Its nice to see who/what is right behind you. Towing in the dark brought out something I didn't think of. My outside lights are motion sensitive. As soon as you drive, they turn on. I did make them removable, I will be taking them off while I travel.

Brought it to work today to check its weight. I have a couple sets of corner balance scales we use to help us tune suspensions. Ok its not a track car, its a trailer. What was nice was playing with my airbag pressure to shift weight. As it is, I calculated my weight around 2000# loaded with about 150# tongue weight.
As you can see below, I got pretty close. The only thing missing is food and about 5 gal's more water.
The "LF" is the tongue at 169. LR, RR are 13# difference, I made them even by adding 10 psi more to the right side air bag.
What I didn't do was take a picture with it hooked to the Cruiser. The weight is about the same.

Trailer weight.JPG

All I have left now is go camping. Total time spent, including two months of not working on it due to COVID and parts availability came to 10 months.
I'll upload a picture of it out camping when I go out next.

My next project is going to be, rebuilding my M-100. I'm going to be selling off that and my RTT. I've had the M-100 for decades. It started life as my AAT trailer. We used it to haul gear and load's of rock into our adapt a trail. It got pretty battered. About 15 odd years ago I saw someone put a lid on one and set a RTT on it. I copied that and its worked great . What I should have done was replace the bed on the trailer. I didn't think I would enjoy it as much as I did and I expected to convert it back to a gear hauler.
Rebuild and see where to go from there.
 
Last edited:

smritte

Rank V
Launch Member

Member III

2,827
Ontario California
First Name
Scott
Last Name
SMR
Member #

8846

Ham/GMRS Callsign
KO6BI
I never realized I hadn't updated the thread once I started using the trailer.
I need to take some pictures of the interior and my storage. I added some wire shelves in storage and a few small pockets in the interior. I miscalculated my spring rate. I will be getting new springs soon. At this stage, I have been taking it out and finding I need to make small changes. I ordered a small usb fan for inside. That will be used on my next trip. My water/propane fittings are poorly placed and need to be moved. When I plug in with my sink or stove, I cant shut the fridge door. I don't know how I didn't see that coming. Moving that isn't hard, I just don't know where to put them.

I have pulled it through some rock piles, ruts, v-notch's, smooth and rough roads. It tracks beautifully. As i mentioned, I need more spring rate and at higher speeds on dirt, it needs a bit more shock. My air bags are making up for my springs but their purpose is load balancing. More tweak's needed.

Here's a few trip pics and one camp pic. I haven't taken very many vehicle trailer pic's. Mostly I just take pictures of what I go explore.


IMG_3174.jpgCruiser Trailer DV.jpgMengo Pass.jpgMonache.jpg
 

Attachments

smritte

Rank V
Launch Member

Member III

2,827
Ontario California
First Name
Scott
Last Name
SMR
Member #

8846

Ham/GMRS Callsign
KO6BI
I was asked for an interior pic and one of my storage. Getting a good interior would mean removing the front. I did the best I could.

Inside, I have a usb chargeable clip fan, velcro strips under the bed to keep everything from sliding out. I had discovered that veclro sticks to the carpet very well. You cant see it but, just inside the door is a first aid kit and a "misc" toiletries bag, stuck to the wall.

The other is a shot of the storage using wire shelving. I set it so the shelves can be moved if needed. I chose these plastic bins because I get a fine powder dust inside and I wanted clear sides. These keep the dust out where my old ones didn't. next I need to get a label maker. The dark area in the right compartment, top left corner is where my cast iron pans are. You cant see them in the shadow.

interior2.jpg Rear storage.jpg
 

Danno

Rank 0

Contributor I

60
Arizona
First Name
Dan
Last Name
Salazar
I was asked for an interior pic and one of my storage. Getting a good interior would mean removing the front. I did the best I could.

Inside, I have a usb chargeable clip fan, velcro strips under the bed to keep everything from sliding out. I had discovered that veclro sticks to the carpet very well. You cant see it but, just inside the door is a first aid kit and a "misc" toiletries bag, stuck to the wall.

The other is a shot of the storage using wire shelving. I set it so the shelves can be moved if needed. I chose these plastic bins because I get a fine powder dust inside and I wanted clear sides. These keep the dust out where my old ones didn't. next I need to get a label maker. The dark area in the right compartment, top left corner is where my cast iron pans are. You cant see them in the shadow.

View attachment 203858 View attachment 203860
Read the whole build thread. Looks awesome!
 

Danno

Rank 0

Contributor I

60
Arizona
First Name
Dan
Last Name
Salazar
10 Gal water tank on order. Its going to be 5" high. I will mount it in front of the axle as close as possible. It should hang down about 1.5" below the frame counting the skid plate. I'm considering moving it as far as possible to the drivers side. My kitchen will be mostly passenger side. I'm hoping this somewhat offsets it. Lead time is 3-4 weeks. I should be done with the rest of the frame mod's by then (I hope).
Do you recall where your ordered the water tank from?
 

smritte

Rank V
Launch Member

Member III

2,827
Ontario California
First Name
Scott
Last Name
SMR
Member #

8846

Ham/GMRS Callsign
KO6BI
Do you recall where your ordered the water tank from?
I looked at my links and didn't find it. I remembered google searching for a bit to get the best price and dimensions I needed. Its a poly tank and I used "RV water tank" as one of my search words. Some of the places put the fittings in to order and some have DIY fittings. I opted for them already installed.
 
  • Like
Reactions: Danno

Danno

Rank 0

Contributor I

60
Arizona
First Name
Dan
Last Name
Salazar
I looked at my links and didn't find it. I remembered google searching for a bit to get the best price and dimensions I needed. Its a poly tank and I used "RV water tank" as one of my search words. Some of the places put the fittings in to order and some have DIY fittings. I opted for them already installed.
Awesome! Just did a search and a few different places came up.
 

SJ.Overland

Rank VII
Member

Trail Blazer I

6,140
Beavercreek, OH, USA
First Name
Shaun
Last Name
Johannes
Member #

15310

Ham/GMRS Callsign
KE8TDZ
Awesome Build! Your attention to detail and craftsmanship is impeccable. I only dream I could do this (at least at this stage in life). I really like the Interior as well. Comfortable yet utilitarian enough for my taste.
 

665.0coupe

Rank I

Enthusiast I

261
Central, KS, USA
First Name
XXX
Last Name
XXX
Ham/GMRS Callsign
KE0ZLR
View attachment 170763
I ran out of split loom here. The wires will be covered, tied back and a divider placed so anything in here wont hit the wires. I kept this simple. Two resettable breakers. One for the solar and the other for the main feed inside. The feed from my truck is fused also. The Genius smart charger has enough output to charge the battery and run my fridge. The solar controller has bluetooth so I didn't see the need for a voltmeter here. The battery is a group 24. I had it in my other trailer and it was good for a few days. I mounted it back, leaving enough room if I wanted to add in a second one in front of it.
Could you tell me a little more about your charging setup? If I understand correctly, you can charge the battery from your truck, solar, or shore power? Do all of these run through the Genius charger or do they feed the battery separately? If they are separate do you have them isolated from each other?