My 05 Cummins original build plus some new stuff

  • HTML tutorial

BensonSTW

Rank III

Enthusiast III

I’ve posted up pictures of my 05 ram 2500 in the Let’s see the rams thread, but I have never had a build documented on it. I bought it brand new when I was 23. My first and only brand new vehicle. 5BAD9199-B9E8-475A-A42D-5394CD038251.jpeg
I owned it for about 2 weeks when I lifted it 4 inches and put a set of 35s on it. This picture was on a trip looking for bighorn sheep. I have always been a gear head and never could leave anything stock. Started simple with a programmer, cold air intake and 5 inch exhaust. Once I started seeing what my Cummins was capable of I got addicted. First up was the silver 62 turbo. Then new intercooler before the end caps on the stock one had a chance to separate. Then a double disc clutch from southbend. That’s when the front end problems began. Cure for that was Carli ball joints and a free spin hub kit. I was supposed to be finished at this point as my truck was still being used for camping and hunting and fishing. And to make camping a little better I ordered an ARE shell.B30362CA-B74A-4620-8AF2-9A26CB35F89E.jpeg
I threw a home made road shower on top and was set for camping. I started having some egt issues and wound up putting in a set of 100 horse dynamite diesel injectors. Also installed a 150 gph Fass lift pump. Truck ran great. It would smoke most cars and still did awesome in the mountains. Then a guy I worked with decided he needed to race my truck with his on the way home from work. The first attempt he made I out ran him bad. I slowed down to speed limit and he made a second run at me. When I stood on it again it popped and surged then cleared up and left him behind again, but the popping and surging had me concerned. A few test runs with a fuel rail gauge proved I was running my fuel rail dry. A new 30% over cp3 pump and a Smarty touch tuner gave me more fuel than I could need and the correct tuning, turned my truck into a whole new animal, and put me in the 600-650 horsepower range.Then my camper shell began to fall apart after only 2 years of use. I had just met the wife and she loved camping with me in the back of the truck. So a new shell was ordered.D6D9F769-0B86-41CF-92ED-9B64091F91B8.jpeg
Caravan camper. This is the shell I wanted in the first place but cheaped out and bought the ARE. 3 times as expensive but to me worth every penny. The Dodge was perfect. Took us everywhere we want to go and no issues anywhere. 7BF16A8A-0A5B-41DF-A72B-3174F58AAB70.jpeg
Jarbidge, Nevada
5C7F7329-470A-4E83-B29C-F62096FAB3D4.jpeg
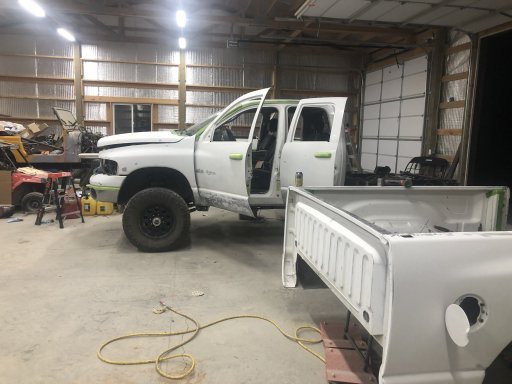
The Ruby Marsh, Nevada. This is the way everything sat at the end of 2020. Stay tuned more to come.
 
Last edited:
  • Like
Reactions: SS308 and MazeVX

BensonSTW

Rank III

Enthusiast III

Summer of 2020 I wired in a second battery on a voltage sensing relay, and power outlets in the camper shell of my brothers truck. I liked the way it turned out. The thing I didn’t like was he packed a couple extra batteries in case we camped somewhere for a few days and didn’t run the truck to charge the camper battery. My solution was third battery in my truck with solar panels on the shell. And since I’m building a place to house a battery, why not add onboard air as well. And since a 35 inch spare doesn’t fit with 5 inch exhaust....
079513D9-C1A3-4EE8-B160-194B71998FBA.jpeg
EDFC3172-DA5E-479E-8EE0-2CB255C129AE.jpeg
The 3rd battery is also ran on a voltage sensing relay, so it will charge via solar and the alternator. There will be a fuse block inside the shell for the air compressor, power outlets, and inverter. I’be also got the led reverse lights on the shell wired off the fuse block with a switch and a relay between the original reverse lights and the camper reverse lights. This way with the switch on the draw power from the 3rd battery without draining the starting battery, but will still come on when the truck is backing up. Now the camp light issue is solved. So while I have the bed off now is a good time to install the new bed I had picked up since mine had a few cosmetic flaws. Problem is the new bed doesn’t have the chrome rocker covers. Time to get rid of the ones on the cab and bed line my rocker panels.5C914B82-2350-460C-BCDD-3EC6005725D1.jpeg
This is a month and a half ago. Notice the sweet fender flares. When they come off there is a perfect outline of them all the way to bare metal. And there are a bunch of holes drilled in the floor. How is that going to keep the dust out? I walked away for a week. No clue which direction I wanted to go to make the truck look good again. Thought about it all week and decided to fix the old bed. Got my dent fixed. Popped all the dents inside the bed from it being used as a truck for 15 years. But now it’s straight but still looks bad. So...
 

Attachments

Last edited:
  • Like
Reactions: MazeVX

BensonSTW

Rank III

Enthusiast III

Today...
FAA1A49F-CD77-4EBE-8189-11D041170BF0.jpeg
3AB26DB0-E81C-4A21-BFA7-14D94C584628.jpeg
552E2053-60FD-4FB7-91B9-4BA3D61F1564.jpeg
Monstaliner it is. My plan is to let it cure the next couple of days and then put all the trim and lights and weather stripping back on as well as what I had to tear apart to do the door jams as well. Tomorrow the new Carli torsion bar will go in. Tuesday night when I can get a couple extra sets of hands the bed will go back on. I have a gallon of raptor liner in black from when I was going to do the rocker panels that will now be used inside the bed. And I have an extra gallon of monstaliner to do the shell to match the rest of my truck. But I have to have more primer before I can go any farther. Then, Install the rear bumper, run 2 air hoses and connect my wiring and my truck will be ready for a few more years of adventures. It’s been down for about 2 1/2 months right now. After a major unplanned project, there’s finally a light at the end of my tunnel. Until I figure out the next upgrade that the dodge “has to have baby, I swear!!! It’ll be the last project, I swear!!!”
 
Last edited:

BensonSTW

Rank III

Enthusiast III

I am sure there are somethings I have forgotten. And my timeline maybe a little skewered. But when I talk about my truck I tend to ramble on. Thanks for reading it all. I’ll continue to update as it goes back together and beyond.
 

BensonSTW

Rank III

Enthusiast III

D1440893-E2FB-40AF-A902-7ADCEBC4954B.jpeg
The cab is completely reassembled. I just finished bolting my nerf bars back on. I’ve got about 2 hours until helping hands show up to put the bed back on.
6A05C031-063F-4223-8A6F-E1BEBA3A269C.jpeg
Couldn’t help myself. I had to back it out of the shop and check the color in the sunlight. The color turned out exactly what I wanted it to be.
 
  • Like
Reactions: MazeVX

ptgarcia

Rank III

Enthusiast III

503
Alta Loma, CA
First Name
Paul
Last Name
Garcia
Ham/GMRS Callsign
KN6PSF
Looking good! I like where you mounted the 3rd battery and air compressor.
 

BensonSTW

Rank III

Enthusiast III

It was a huge struggle trying to find the right spot. I thought about a bed box system like decked, but home made. I just couldn’t make myself like the idea of something permanently taking up space in my truck bed. When I gave my stock spare tire away I had new found space. The box hangs no lower than the factory receiver hitch. The only thing I don’t like is, there is no easy way to get the third battery in and out. It fits fine. It’s the awkward weight and having to turn it as you go in with the battery. And the box is solid enough to hold up the weight of the truck.
 

BensonSTW

Rank III

Enthusiast III

C4413D5E-A36D-4E90-93E7-982E5FE8530D.jpeg47D6FE36-2014-40B9-A60C-585BA2593AE1.jpeg
I got the inside of my bed lined today. Then I got the lights and bumper installed. Tomorrow I should be able to finish sanding the camper and get it lined as well.
 

BensonSTW

Rank III

Enthusiast III

So today I was supposed to bed line the camper shell. I wasn’t sure if I wanted the solar panel mounts done in the same color as the camper shell or if I wanted them black. Ultimately I wanted them painted to match but didn’t know how I wanted to build them. After a trip to the hardware store and this is what I came up with.
5BDB78E3-5560-4B27-9B0D-421FCAFDAB9E.jpeg
752A3F03-7B3C-4149-8990-961A416B8CB2.jpeg
Thinking it’s gonna be real simple to build a hilift mount off of the slotted angle iron and still have the back half of the camper to build off of. Maybe mounts for some traction boards.
 
Last edited:
  • Like
Reactions: Mekcanix

BensonSTW

Rank III

Enthusiast III

323AA7E6-3B76-4066-8128-4A36607205B3.jpegC6DCF9A3-F103-4CE7-A983-5E6A490F67DB.jpeg08408452-10D1-4C1A-A90D-882FBF8F2343.jpeg
Productive day. Sanded and bed lined my camper. Hooked up my diff and fuel tank breathers. Pulled power and air into the bed for the camper shell when it goes back on. Ram the breather hose for the compressor into the bed as well. Clean air and easy to change the filter.
 
  • Like
Reactions: Neuvik

BensonSTW

Rank III

Enthusiast III

Installed my Carli sway bar. I seriously doubted my sanity spending $700 dollars on a sway bar. First impression after driving it... I WILL NEVER OWN ANOTHER DODGE WITHOUT IT!!! Night and day difference in the ride. Also mounted my air chuck to the hitch and bent up some brackets for my 12 volt power sources in the bed.
 
  • Like
Reactions: Neuvik and MazeVX

Vadim

Rank IV
Launch Member

Contributor III

1,402
Sacramento, CA
Member #

8234

Great job on your build!! I love the look of bedlined trucks. I did it to my 98 K2500 and I am planning to do it to my current ram as it is in need of a paintjob and raptor liner is much cheaper and easier to DIY.
 

BensonSTW

Rank III

Enthusiast III

Great job on your build!! I love the look of bedlined trucks. I did it to my 98 K2500 and I am planning to do it to my current ram as it is in need of a paintjob and raptor liner is much cheaper and easier to DIY.
Thank you. I honestly did it as a last option. I wanted my truck repainted. I called like 40 different paint shops trying to get my truck sprayed. I wanted it root beer brown metallic. I was willing to pay the ten grand and deliver it stripped and sanded. But I couldn’t get anyone between Reno and Salt Lake City that would touch it. I guess all they want to do is insurance quick and easy jobs. But I really love the way it turned out. I have a feeling my 79 bronco will be getting monstaliner, as will my cj7 when it is done.
 

BensonSTW

Rank III

Enthusiast III

So I hit the lottery. I drew a nevada bighorn sheep tag. I spent the first of my days off looking at sheep and learning my area. Then family showed up. So today I decided I need this thing finished. I put power outlets on the shelf in my camper. 2 USB ports a cigarette lighter plug and a volt meter with an on/off switch. One for the wife and one for me.82FF1653-D99B-4154-BD65-526F160FE2C2.jpeg
5CC23A6C-A871-47EC-BE19-5FAE311A8283.jpeg
Wired in the reverse lights on my camper with a relay between the truck back up lights and the ones on the camper. Now I have camp lights on the back that work in reverse and don’t affect starting batteries.
DA6CE71A-135C-452B-AD82-41468941B28C.jpeg
Rewired the interior light.
5A455666-3426-41A1-9B92-A23AAC4A941D.jpeg
 

BensonSTW

Rank III

Enthusiast III

Then I installed the gauge and switch for my onboard air.
ABAE57BC-A8B2-439D-92CD-BF11D16A14C4.jpeg
Everything draws power from a blue sea fuse box. Installed my solar charge controller. Ran it through a fuse in the fuse holder and it should charge the battery still and offer some circuit protection.55F9C245-FAC9-43E8-B5C9-19D8615233CE.jpeg
Still need to clean a few things up. Clip some zip ties. But worst case scenario, if I don’t have time to get through it, it will keep me powered and camping during sheep season. I have a few more days to clean it up and tackle a project or 2 for the wife. July and August we will be scouting every set of days off. Hunt starts September 1st. It’s going to be an epic year.
 
  • Like
Reactions: Mekcanix

BensonSTW

Rank III

Enthusiast III

My solar controller does not say whether or not it is protected from back feeding when the alternator is charging my 3rd battery. Without having much knowledge about solar panels, and kind of learning as I go, I don’t trust the controller to be protected. So I am now waiting for 2 diodes to show up, that way I know for a fact that I will not have a controller or panels go in to melt down.

Since I had a few hours today, I cleaned up my wiring. Cut all my zip ties. Finally got my quart of monstaliner and finished all my touch ups. I installed my home made road shower. Then I took it for a drive. Topped it off with some fresh go juice. 2 diodes and this project is finished until after elk season.
F9EC8DEE-8330-412A-82FD-B7FD32922742.jpeg
Next step, thorough shop clean up!!!
 
  • Like
Reactions: SS308 and Mekcanix