Modular cargo conversion

  • HTML tutorial

bgenlvtex

Rank V
Launch Member

Member III

2,268
Texas and Alaska
First Name
Bruce
Last Name
Evans
Member #

19382

i'll admit...there are some very high end RVs out there, but i doubt any of them will have matching pillow cases, seat cushions and shower curtains...
the wife was wanting to go shopping for a nature themed fabric this weekend...but amazon prime beat her to it! :sunglasses:
Oh yes, those are very nice.
 
  • Like
Reactions: grubworm

deagle

Rank I

Contributor III

201
Colorado, USA
First Name
Tbird
Last Name
Smith
not to make this overly complex, but these are GREAT posts and really could be an important thing to address. i have the cam action lever lock on my side door as well as the lockable RV type door lock. if i remove the bar lock, the door wont seal right. i closed the door the other night and didnt use the cam bar lock and the door was still secured with the RV lock, BUT the door can only be shut tight by the bar lock. it rained and a lot of water went in because the door was secure, but not tight against the weather seal.

View attachment 237117 i considered opening the bar lock and then drilling a hole thru the hinge where i could pin it in the open position for the night while im in there. i like the idea of being able to unbolt from the inside, but this appears to be a self tapping fastener? there is not a nut on the inside to get to.
i dont know...after the wife mentioned that, i do feel that i need to address this. even if i end up doing an egress window later, i still need a fix for the interim.

it definitely would suck to get locked in the trailer and even WAY worse would to be locked in there with my redheaded wife hollering "I TOLD YOU SO" for endless hours until help arrived. i dont think i could chew thru metal, but....
My trailer has some flashing as a "gutter" over the top of the door to keep rain from running down the trailer wall under the top of the door frame and leaking in, which might be something to look at if your trailer doesn't have that feature. It does seem like the door should fit snugly against the weatherstripping when it's latched though. Might be able to adjust the strike plate on the frame side to get it latch more snuggly, not sure.
 
  • Like
Reactions: grubworm

grubworm

Rank V
Launch Member

Member III

2,358
louisiana
First Name
grub
Last Name
worm
Member #

17464

Service Branch
USN-Submarines
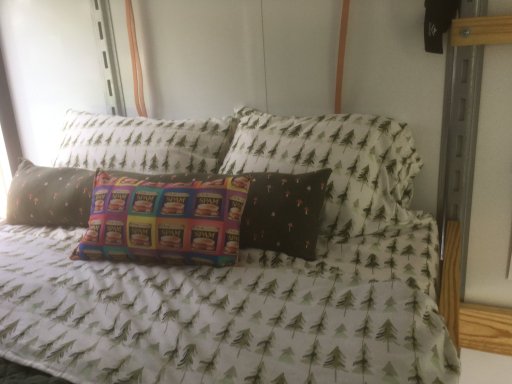
well...the wife still went on and got tree and mushroom fabric and made pillow cases and sheets and some weird long mushroom pillow, BUT since she is an artist and my SPAM fabric looked a lot like something Andy Warhol would do, i did get somewhat of a pass and ended up with a SPAM pillow. the SPAM shower curtain is apparently off the table, but she does have a credit card statement coming due and once i explained how my "generosity" might be contingent on a SPAM seat cushion, i think the odds are once again in my favor...:grinning:

IMG_2343.JPG

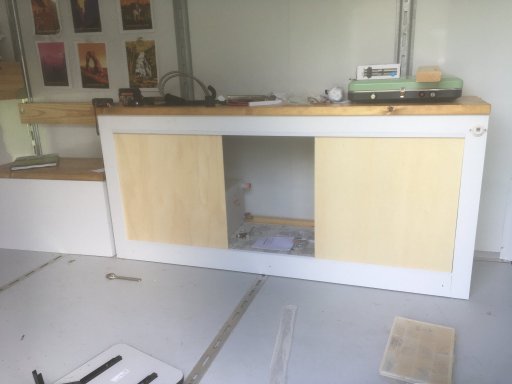
got the sliding doors cut to size for the kitchen module and the sliding track idea is good because i wont have to rely on having the middle area free and clear for cabinet door to swing open. its a double track, so i will have the middle section in the front track and the sides in the rear track for good access

IMG_2344.JPG

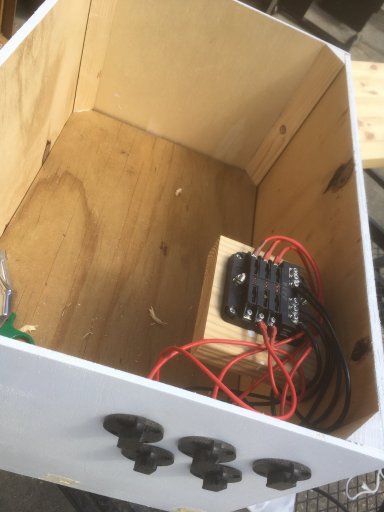
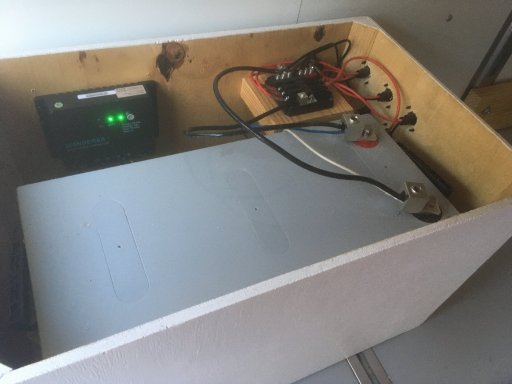
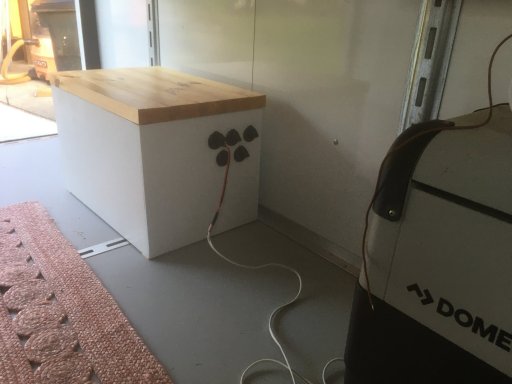
the battery box is coming along. i'm using a 200ah renogy AGM battery to power pretty much everything except the ac unit. the battery is 130 pounds...heavy as hell, so i beefed up the box and then just went with a 6 circuit fuse box and SAE connectors. for example, the kitchen module has a 12v pump, 2 USB ports and an LED light. the module has a 10' cord with a male SAE end that will just plug into the battery box and get its power. other items will be on other circuits. since most items are very low current, i'm running 10a fuses for everything and using 14g wire, so the fuse is definitely the weak link should a short occur.

IMG_2345.JPG
 

deagle

Rank I

Contributor III

201
Colorado, USA
First Name
Tbird
Last Name
Smith
well...the wife still went on and got tree and mushroom fabric and made pillow cases and sheets and some weird long mushroom pillow, BUT since she is an artist and my SPAM fabric looked a lot like something Andy Warhol would do, i did get somewhat of a pass and ended up with a SPAM pillow. the SPAM shower curtain is apparently off the table, but she does have a credit card statement coming due and once i explained how my "generosity" might be contingent on a SPAM seat cushion, i think the odds are once again in my favor...:grinning:

View attachment 237326

got the sliding doors cut to size for the kitchen module and the sliding track idea is good because i wont have to rely on having the middle area free and clear for cabinet door to swing open. its a double track, so i will have the middle section in the front track and the sides in the rear track for good access

View attachment 237327

the battery box is coming along. i'm using a 200ah renogy AGM battery to power pretty much everything except the ac unit. the battery is 130 pounds...heavy as hell, so i beefed up the box and then just went with a 6 circuit fuse box and SAE connectors. for example, the kitchen module has a 12v pump, 2 USB ports and an LED light. the module has a 10' cord with a male SAE end that will just plug into the battery box and get its power. other items will be on other circuits. since most items are very low current, i'm running 10a fuses for everything and using 14g wire, so the fuse is definitely the weak link should a short occur.

View attachment 237328
Looking good! I love the way the e track is flush mounted on the floor too.
 
  • Like
Reactions: grubworm

Mekcanix

Rank V
Launch Member

Enthusiast III

2,191
Winnipeg, Manitoba, Canada
First Name
John
Last Name
McLaughlin
Member #

9656

I am really loving this thing Grubworm. I will be honest I would loose my marbles without windows:tonguewink:, as thats one of the main loves I have with my camper, but I completely understand. I was in the Canadian Army, I couldn't imagine living in a sub, so I do think I understand your not needing them.
Thanks to you I am starting to eye up cargo trailers. My wife is not amused. LOL

John
 
  • Like
Reactions: grubworm

grubworm

Rank V
Launch Member

Member III

2,358
louisiana
First Name
grub
Last Name
worm
Member #

17464

Service Branch
USN-Submarines
I am starting to eye up cargo trailers. My wife is not amused.
ha! well, maybe you just didnt present it to her properly...you have to emphasize that a cargo trailer is essentially a "blank canvas" and that her input building it out would be much welcomed. once you buy it and its in your driveway...THEN you can start developing amnesia. :grinning:

my wife is an artist and has a studio, so i build a lot of stuff for her and we even combine skills where she makes something out of pottery and i'll turn a wooden base for it on my lathe, etc. she sells a good bit of paintings and i make custom frames for her. we work together a lot, so a build like this is actually fun and easy for us.

i hear ya on the windows. with the exception of a big window as an emergency means of escape, we really have no reason for windows...BUT if we did spend more time in there like a lot of folk do, then i would definitely want windows. if i were to go that route, i would have the trailer special ordered and have factory installed windows. if i were to install my own windows, then i would want the inside walls unfinished where i could weld and make a sturdy frame for the window to mount. with the the interior finished, that is not really an option, so i'm going this route. besides, i like it looking stealthy and without windows and exterior ac, etc, it doesnt look like an RV.
 
Last edited:

deagle

Rank I

Contributor III

201
Colorado, USA
First Name
Tbird
Last Name
Smith
@grubworm I gave your great homeade t nut from carriage bolt idea a try. Turns out unlike your e track, mine has a bit of a flange on the underside of the slot, so I don't have enough clearance to insert the bolt past the shoulder to turn it sideways. Ah well.

Your build seems to be coming along nicely. Looking forward to seeing it progress.
 
  • Like
Reactions: grubworm

grubworm

Rank V
Launch Member

Member III

2,358
louisiana
First Name
grub
Last Name
worm
Member #

17464

Service Branch
USN-Submarines
@grubworm I gave your great homeade t nut from carriage bolt idea a try. Turns out unlike your e track, mine has a bit of a flange on the underside of the slot, so I don't have enough clearance to insert the bolt past the shoulder to turn it sideways. Ah well.

Your build seems to be coming along nicely. Looking forward to seeing it progress.
thanks

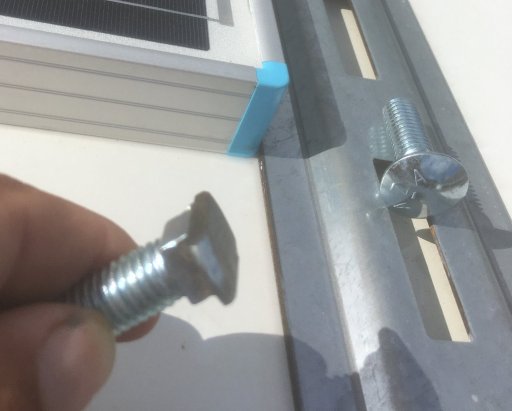
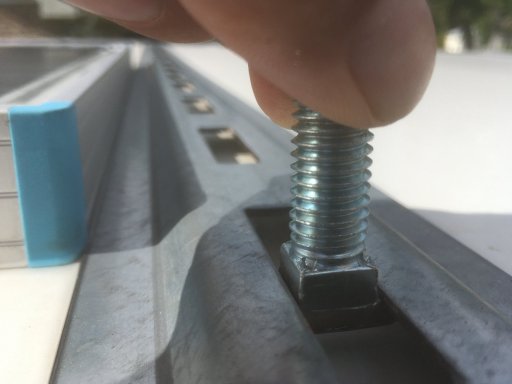
i have the same thing. i mentioned in the post that i ground the sides to get the "T" and then ground off some of the dome on the carriage bolt head to flatten it so it would go down into the slot a hair further so that the square shoulder can go down past the slot and then be rotated so that the square shoulder of the bolt locks into the slot when raised up. its a little work, but not bad. about 3 minutes grinding per bolt and they do work extremely well. depending on what you are doing, you can get a longer carriage bolt and grind it down and install it in the track and then put a washer and nut and tighten that down really tight and now you have a rigid 1/2" post that you can use wingnuts to quickly attach and detatch items. if you look at the last picture, when the bolt is pulled up tight, the square shoulder of the bolt sticks up past the e-track a bit. if you just put a nut on and tightened, the nut would bottom out on the shoulder without the bolt head being pulled tight against the track. add a thick washer with a hole that will go over the shoulder and now you have shimmed that distance and can tighten the bolt and make a very strong mounting post that wont move around any. i like this better than i do my rhino and yakima tracks. with those, you have a t-slot threaded washer down in the track and then you attach to that with with a bolt...i much rather the bolt is in the track and i can attach to it with a nut or wing nut. the yakima and rhino mounts use the really thin threaded washer insert that only have a couple threads to engage because the washer is so thin. i can engage all the threads of a 1/2" nut this way.

but yeah, try grinding the dome off the top of the bolt and get it thinner and flatter like the pic below

IMG_2332 (2).JPG

IMG_2335.JPG
 
Last edited:

kunstmilch

Rank V
Member

Advocate II

1,597
Pomona, CA, USA
First Name
Erich
Last Name
Wise
Member #

29953

Ham/GMRS Callsign
GMRS call sign: WRFL229
well, one thing to note for those out there that are doing builds or even modifying something already existing...DO YOUR RESEARCH!

not to get on a soapbox...but if i did, i would want to build the soapbox myself because if i ordered it off amazon, i'd probably fall thru it.
one thing that has immediately caught my attention is that by putting "RV" or "Marine" on an item, it automatically gets a minimum 50% markup placed on it. anyone who has owned a boat knows that a stainless screw at lowes is $1 and the same screw in a package that has "marine grade" on it will be $2. it gets even worse when moving up to items like pumps and blowers, even though the same item can be found elsewhere a good bit cheaper, so just because a RV site has an item, it doesnt mean it cant be found elsewhere. somethings are going to be unique, like a sliding step for a camper. that is going to be specific to RVs and you'll just have to bite it on items like that.

i've also noticed a distinct pattern where quality of most things have simultaneously dropped in the last five years. people doing reviews are talking about replacing a pump or blower that has lasted 20 years only to buy a new one that might go one to two years at best. fairly consistent reviews of quality dropping off at a rapid rate. i needed a water pump and immediately checked out the Sure-flo brand because i had great experience with them in the past. even the ones listed as the better series were getting some consistent flak in the reviews, so brand loyalty needs to be re-evaluated now.

amazon is getting a LOT of third party vendors that are really shady and apparently amazon isnt responsible for these people even though they are using the amazon platform. from reading reviews and complaints, it appears that a lot of the vendors on amazon that have the lower prices are ripping people off and amazon gives them a pass since amazon is still getting paid. a different subject, but the wife was looking a some kind of fancy skin cream and was telling me how she was reading a ton of complaints on how third party vendors are somehow taking the expensive bottles and putting regular hand lotion in it and selling it for $40 and amazon says they arent responsible for what third party vendors are doing...well, as long as amazon gets their cut of course. so yeah, really have to pay attention. back in the day, if i saw an item on amazon that i wanted, i just clicked and that was it. not anymore. i recently needed a milwaukee 18v battery and noticed one a lot cheaper than the others. it was a knock off. i looked at the seller and saw that it was some weird name like happyfuntime27 somewhere in china. the 5 star reviews were actually 2 reviews done in broken engrish which i would say were fake, but it still gave the item a 5 star rating when glancing at the product initially.

DECEPTION is the soup-de-jour when it comes to online ordering. (ha! i remember online dating was equally bad. meet a hot chick on Match and later go meet up at Waffle House in real person only to find out she has a peg leg and facial hair. and just because i went home with her didnt mean i wasnt disappointed...)

anyway, i guess just check reviews really close and who the actual vendor is and then cross check reviews on other platforms. it doesnt look like there are many great products out there anymore, but some will be better than others. and my biggest lesson learned is to make things easy to get to. if i had a pump that i knew would last 20 years, i would mount it in a hard to reach, out of the way place under the tank. well, i'm probably going to have to change items like that out now fairly often, so put them in an easy to access place.
Some of us like peg legs and facial hair! No judgement. (but deceptions are never good)
 

grubworm

Rank V
Launch Member

Member III

2,358
louisiana
First Name
grub
Last Name
worm
Member #

17464

Service Branch
USN-Submarines
between the excessive rain and other projects vying for my immediate attention, the trailer build is now about as slow as the IRS is when issuing a refund....:confused:

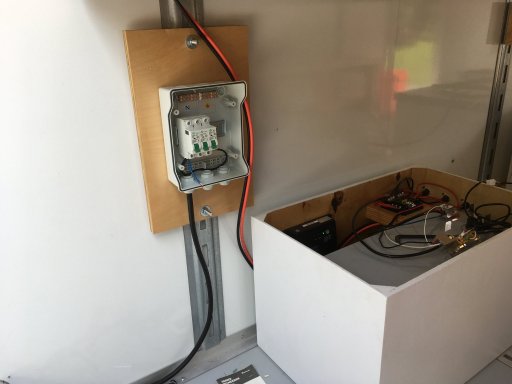
i did get the power box done and i'm running two 200w panels on the roof to charge a 200ah agm battery. i'm using a simple pwm controller and routing power thru a 6 circuit fuse box terminating with SAE bulkhead connectors. each module has an extension cord with a SAE end on it and that way i can plug and unplug components as needed.
im using 14awg wire and 10a fuses to ensure that the fuse is the weakest link...im installing very low amp equipment and 14 awg wire wont pop until after 20 amps, so im going with fuse values based on my loads. most folk i know would fuse this based off of the rated current the wire can handle, but not a good idea here where my biggest load will be 4-5 amps on the water pump. if any of my loads ever draw 10 amps, there is a serious problem.
i really would like to install a battery monitor, but it seems that most of the monitors have some bad reviews. in order to track battery usage, the circuit will need a shunt and it seems that a lot of the issues with battery monitors are because of shunt failures. i'll probably just go with a voltage gauge and let my voltage drop be the indicator of what i roughly have concerning battery percentage. i've never used a battery monitor in the past and have had zero problems, so might as well keep with what works.

our power usage is pretty small. LED lighting, phone charging and some 12v fans. the water pump is minimal and i will have a 30a hookup so i can run an air conditioner for those times we do stay in a campground.

IMG_2371.JPGIMG_2369.JPGIMG_2374.JPG
 
Last edited:

grubworm

Rank V
Launch Member

Member III

2,358
louisiana
First Name
grub
Last Name
worm
Member #

17464

Service Branch
USN-Submarines
i've spent most of this thread talking about how i want to keep from making holes in the trailer, especially in the roof, but i had to run my solar cables and ended up punching the first hole, which of course is in the roof....

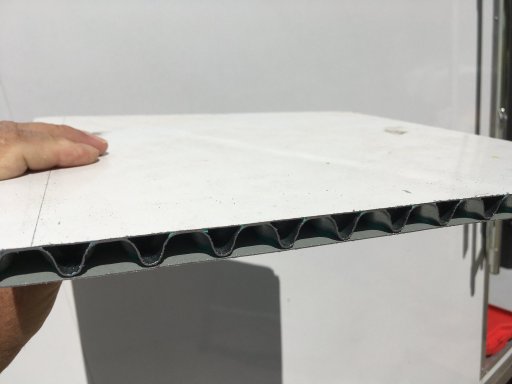
most cargo trailers are built with 1" square tubing ribs with extremely thin sheet metal panels for walls and roof. these are difficult to seal well, especially the roof, because the metal is extremely thin and flexes a lot and most of these type trailers have a convex roof, so the bigger the hole, the harder it is to have a flat area to work with. anyway, i went with a new trailer that has aluminum composite panels and no framing members. it even has a flat roof.

these new panels are great. i got on the roof and popped a 3/4" hole and there was zero flex. very nice.
i ran the 10awg cables thru the hole and then sealed the hole with a polyurethane flashing sealant. (i used that because its a good product and i already had a tube open)
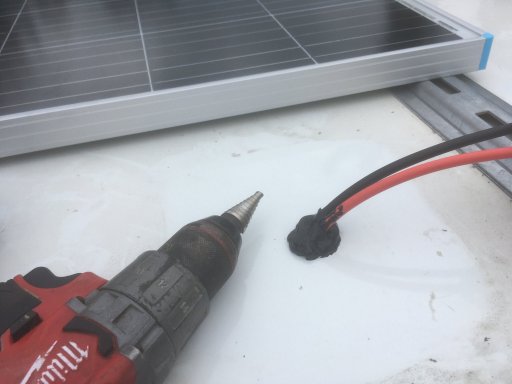
IMG_2400.JPG

i then applied the same sealant to the bottom of a gland box and stuck it to the roof...
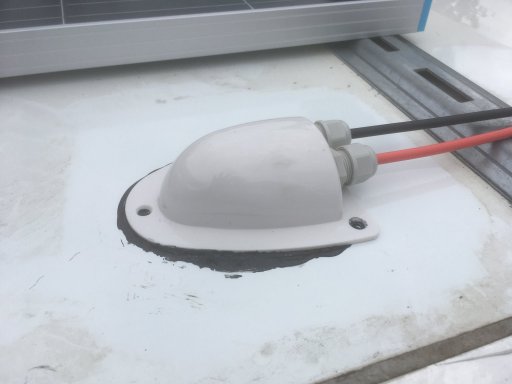
IMG_2401.JPG

i then went around the box with Uniflex seal tape. when i had my construction company, we did a lot of sealing on commercial metal roofs and this seal tape has worked extremely well for the past 15 years. it is a very sticky tape that has a cloth back that readily accepts sealant coatings, like Dicor and Flex Seal. there are roof sealant tapes out there that are really good and have a membrane already built in to the tape. these are good and last a long time, but i prefer to use this type of tape and then apply my coating after i have the tape applied and all air bubbles removed.
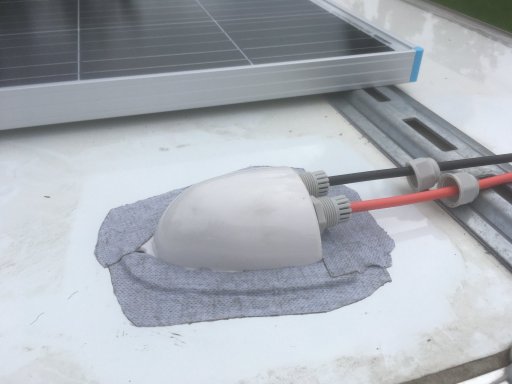
IMG_2402.JPG

next, applied a polyurethane seal coat and after that cures, i'll go around it with Dicor self-leveling sealant for a nice smooth finish
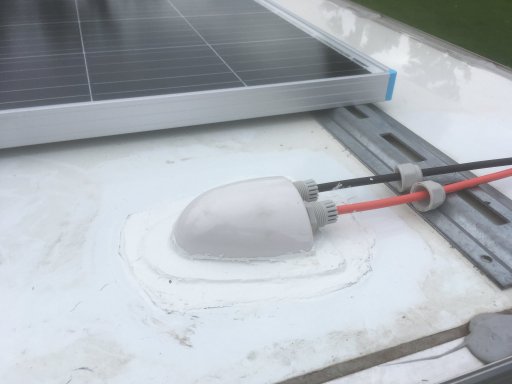
IMG_2403.JPG

i dont mess with products like Flex Seal or really any product found in home depot or lowes. some of the products are pretty good, but since i did commercial construction, i just stay with the better products. sherwin williams has the Uniflex tape and also a Uniflex liquid sealant. most of the good commercial sealants come in a 5 gal bucket, so they are usually a no-go for most folk who only need a quart at best. that is when i go with products from Dicor and Sika, which have commercial grade products in smaller quantities.

after seeing how rigid these panels are and how there are no framing members to worry about, i might just go ahead and pop a hole big enough for a Mr Fantastic roof vent fan or just install a Dometic ac unit since the cut out is the same size. i'm even ready to cut out for a window now! :grinning:

i guess its like babying a new truck and then after you get that first scratch, it doesnt matter anymore. after popping that first hole, i feel the same way now
 

socal geek guy

Rank IV
Launch Member

Enthusiast III

1,116
San Diego, CA, USA
First Name
Chris
Last Name
Walker
Member #

19531

not to make this overly complex, but these are GREAT posts and really could be an important thing to address. i have the cam action lever lock on my side door as well as the lockable RV type door lock. if i remove the bar lock, the door wont seal right. i closed the door the other night and didnt use the cam bar lock and the door was still secured with the RV lock, BUT the door can only be shut tight by the bar lock. it rained and a lot of water went in because the door was secure, but not tight against the weather seal.

View attachment 237117 i considered opening the bar lock and then drilling a hole thru the hinge where i could pin it in the open position for the night while im in there. i like the idea of being able to unbolt from the inside, but this appears to be a self tapping fastener? there is not a nut on the inside to get to.
i dont know...after the wife mentioned that, i do feel that i need to address this. even if i end up doing an egress window later, i still need a fix for the interim.

it definitely would suck to get locked in the trailer and even WAY worse would to be locked in there with my redheaded wife hollering "I TOLD YOU SO" for endless hours until help arrived. i dont think i could chew thru metal, but....
great seeing your progress and a fellow cargo trailer modular camper guy on here. i have a little 5x8 and love it, has come in very handy for helping people move and moving stuff i didn't want to put in my suv. camping in it has been nice too.

i have the same bar locks as you and one thing i did was get another lock latch to put on the side of the trailer to lock the bar in the open position when you are in the trailer. i did put in an rv style latch/lock/handle and it was a good idea, but if i had to do it over, i would skip it. i also put in dead bolts for both the side and rear doors that work great. i like the security of the dead bolts and the bar locks together when you're traveling with the trailer or in case you leave the trailer while out camping.


another thing that i was cautious about was window location. i put in a window in a spot fare enough away from the doors that even if someone broke the window, they couldn't just reach the door locks from the inside. like you i have been cautious about making too many opportunities for water leaks, but after camping in the trailer for a year, i ended up adding a second window for a little additional natural light if caught inside due to weather along with creating a cross flow for air.

when it comes to the roof, you should check out this rubberized roof coating. i haven't done it to mine yet, but i plan on it. figure its a good thing to put on there as an added level of protection against water intrusion. this would work great after you finalize the cable pass through in the roof.

 
  • Love
Reactions: grubworm

grubworm

Rank V
Launch Member

Member III

2,358
louisiana
First Name
grub
Last Name
worm
Member #

17464

Service Branch
USN-Submarines
great seeing your progress and a fellow cargo trailer modular camper guy on here. i have a little 5x8 and love it, has come in very handy for helping people move and moving stuff i didn't want to put in my suv. camping in it has been nice too.

i have the same bar locks as you and one thing i did was get another lock latch to put on the side of the trailer to lock the bar in the open position when you are in the trailer. i did put in an rv style latch/lock/handle and it was a good idea, but if i had to do it over, i would skip it. i also put in dead bolts for both the side and rear doors that work great. i like the security of the dead bolts and the bar locks together when you're traveling with the trailer or in case you leave the trailer while out camping.


another thing that i was cautious about was window location. i put in a window in a spot fare enough away from the doors that even if someone broke the window, they couldn't just reach the door locks from the inside. like you i have been cautious about making too many opportunities for water leaks, but after camping in the trailer for a year, i ended up adding a second window for a little additional natural light if caught inside due to weather along with creating a cross flow for air.

when it comes to the roof, you should check out this rubberized roof coating. i haven't done it to mine yet, but i plan on it. figure its a good thing to put on there as an added level of protection against water intrusion. this would work great after you finalize the cable pass through in the roof.

love it! the added dead bolt is a great idea...i wouldnt have thought of it, but i'm going to tell the wife it was my idea for her safety and see what kind of brownie points i can get :grinning:

what kind of windows did you use? im feeling pretty good about cutting and sealing now, so i'll probably end up doing a window or two.
 

socal geek guy

Rank IV
Launch Member

Enthusiast III

1,116
San Diego, CA, USA
First Name
Chris
Last Name
Walker
Member #

19531

i went with these windows. they fit between what i'll loosely call the metal "wall studs" and they were the right thickness for my walls.


a couple recommendations for cutting the holes for the windows is first to use painters tape and give yourself at least 2 inches on each side of the line for the window hole. the finish on the exterior sheet metal scratches so easy and i had a lot of scratches from the base plate of the jigsaw.

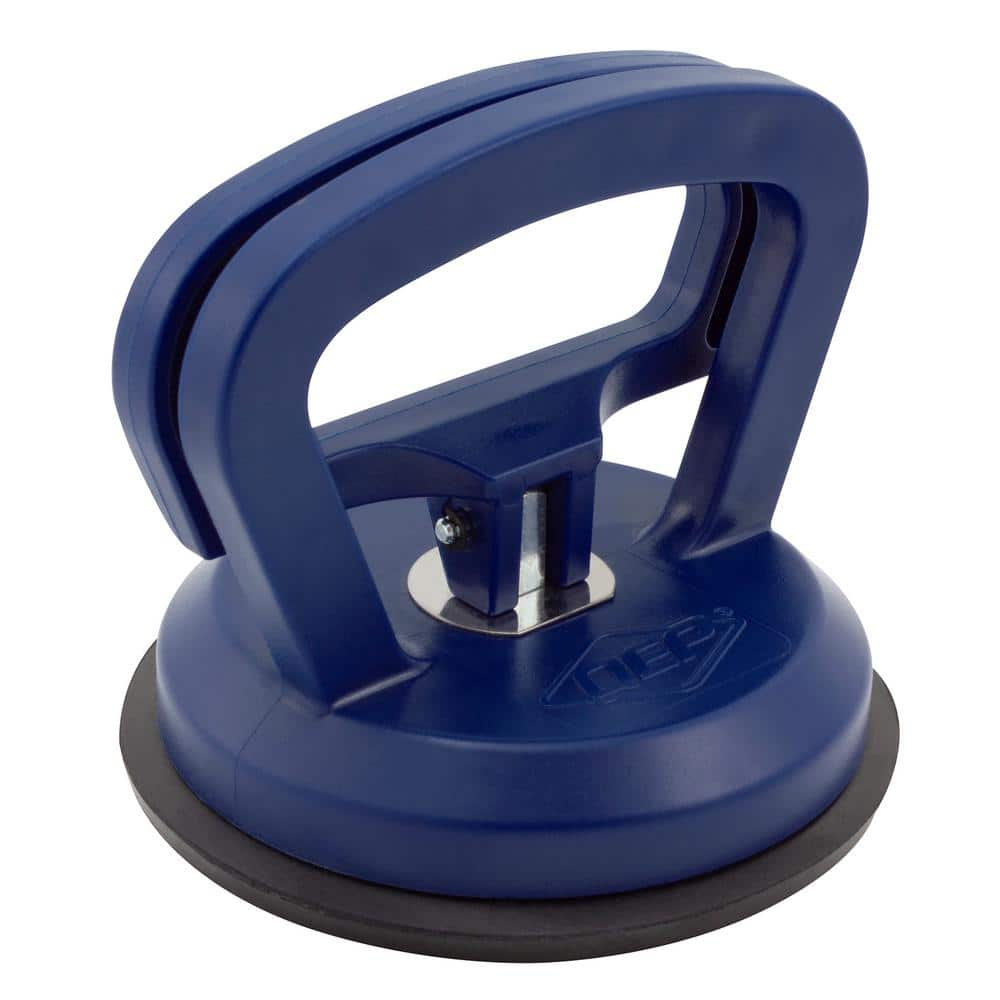
second is to get a suction cup like this if you don't already have one. putting the suction cup on the middle part of the cut out will allow you to keep tension on the sheet metal. if you don't keep tension on the sheet metal, the jig saw will jump around and the sheet metal will be flopping around. makes for a cleaner cut and also speeds up the process.


something else that i did was before i put my insulation back in, i went nuts with silicone caulk on the inside of the trailer where the window mounts up to the exterior skin. the butyl tape was mediocre and i didn't want to rely 100 % on the butyl tape. i did a fine bead of clear caulk with low temperature rating around the exterior edge of the window on the outside. lots of overkill, but i don't want water leaks.

Here's the link to my build with pics.


another thing i did was use some 1 inch steel box tube and butted it up to the bottom of the window. i put this in as an added brace, kind of like how in houses when they use 2x4's to frame in a window. i figured it wouldn't hurt to add in a little more rigidity. while i won't be going on crazy trails with the trailer, i do go on some moderate trails and want it to hold together as good as possible.
 
  • Like
Reactions: grubworm

grubworm

Rank V
Launch Member

Member III

2,358
louisiana
First Name
grub
Last Name
worm
Member #

17464

Service Branch
USN-Submarines
been dragging ass on the build...have a lot of other irons in the fire at the same time...:confused:

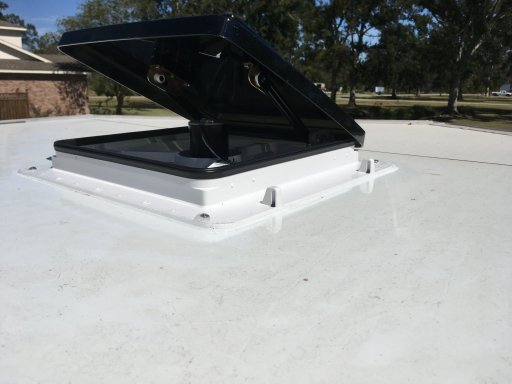
anyway, i installed a powered vent and really like it. went with Maxxair and its the version that will exhaust when the vent is open and recirculate when the vent is closed. only model i saw that had the recirc option, so i went with it. the cargo trailer is made with corrugated panels and they are extremely strong and easy to work with. there are no framing members, just the corrugated panels, so cutting openings are pretty easy to do. here is a pic of the 14x14 opening i cut out of the roof.

if anyone is looking to build using an enclosed trailer, i definitely recommend this style wall/roof panels

IMG_2482.JPGIMG_2480.JPG
 
Last edited:

grubworm

Rank V
Launch Member

Member III

2,358
louisiana
First Name
grub
Last Name
worm
Member #

17464

Service Branch
USN-Submarines
found a nice breaker box on amazon. 6 circuit, but i'll probably only use 3 and can always add later if needs be
here's a link for anyone needing one...$20, so not a bad deal at all and it comes with 2 solid copper bus bars for neutral and ground

IMG_2490.JPG

 
  • Like
Reactions: Sparksalot

grubworm

Rank V
Launch Member

Member III

2,358
louisiana
First Name
grub
Last Name
worm
Member #

17464

Service Branch
USN-Submarines
haven't posted much lately as the build has dropped down to a snail's pace, but we got invited for a weekend on the mississippi coast and so i took the 40% completed cargo trailer on its maiden voyage.

one thing i found out is where the "control center" should be. i initially thought that as you walk in the door, it would make sense to have all the switches right next to the door as you enter.
WRONG!

i am now rewiring this to go right next to my side of the bed....5 switches, 2 USB ports and a voltmeter

cp.jpg

now when the wife wakes up at 2am cold and wants the fan off...instead of me getting up out of bed, tripping over the sleeping dog, stubbing my toe on the chair and banging my head on the cabinet on the way to the switch...i can simply roll over and hit a switch. then at 2:15am when she is hot again, i can easily hit the switch again. then at 3am when she is up and thrashing thru the blankets looking for her nose spray, i can roll over and click the inside light so she can find it. then at 3:30am when she hears a noise, i can roll over and flip the switch for the outside light to come on and scare away the 'intruder'. then when she wakes up at 4am to see what time it is on her phone, instead of her thrashing around looking for a charge cord and place to plug in because the phone died, i already have the phone charging with the included USB ports.


yeah, i know. ive thought about it...


1666616275216.png
 
Last edited: