

Great build on the FJ so far!! I have always like the looks of these and would love to have one some day when funds allow.
Little Girl the 2007 Toyota FJ Cruiser
- Thread starter theBROFESSOR
- Start date
-
Forum Upgrades: Whats Going On? Video

High Lift Jack Mounts
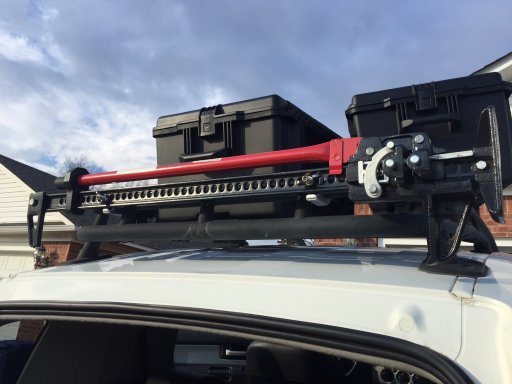
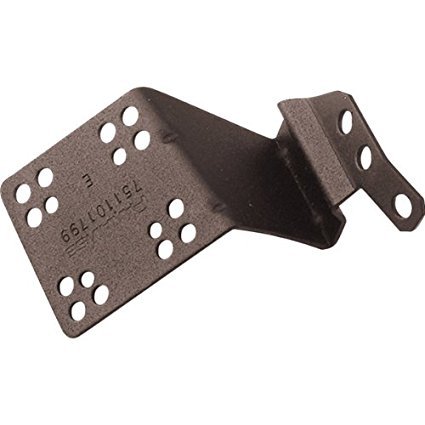
I bought some (what I thought was) cheap high lift jack brackets off www.purefjcruiser.com
http://www.purefjcruiser.com/warrior-products-c-682/rack-systems-c-682_684/warrior-products-fj-cruiser-hilift-jack-mount-for-oem-rack-p-2637.html
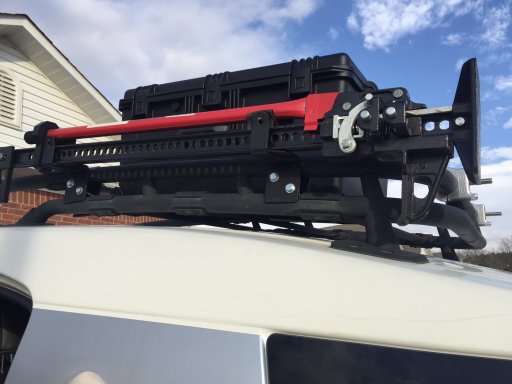
I hated them. They sent the wrong parts. The wing nuts and bolts were wrong size. The Carriage Bolts supplied did not work well because the holes in the mounts are round and apparently they didn't realize that a square head won't fit in a round hole so you couldn't get the jack tight. It rattled like crazy going down dirt roads and I hate rattles.
Then a really nice member on OB posted some Demello High Lift Jack Mounts on the "Pay it Forward" Thread and I asked if he still had them. He sent them to me right after Christmas. They are amazing and so much better quality. I moved the mount to the back because I can stand on my Smittybilt rear bumper and easily remove the jack (even with another person if needed).
http://demello-offroad.com/demello-jack-hi-lift-clamps
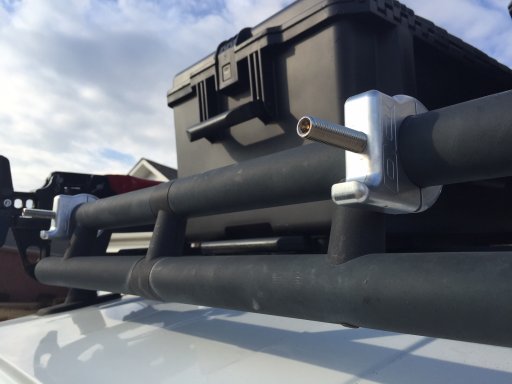
Really can't believe they have lowered the price on these to only $65. They blow away the $85 ones I ordered in every way. Thank you Demello for making a quality product.

BROfessor Out
I bought some (what I thought was) cheap high lift jack brackets off www.purefjcruiser.com
http://www.purefjcruiser.com/warrior-products-c-682/rack-systems-c-682_684/warrior-products-fj-cruiser-hilift-jack-mount-for-oem-rack-p-2637.html
I hated them. They sent the wrong parts. The wing nuts and bolts were wrong size. The Carriage Bolts supplied did not work well because the holes in the mounts are round and apparently they didn't realize that a square head won't fit in a round hole so you couldn't get the jack tight. It rattled like crazy going down dirt roads and I hate rattles.
Then a really nice member on OB posted some Demello High Lift Jack Mounts on the "Pay it Forward" Thread and I asked if he still had them. He sent them to me right after Christmas. They are amazing and so much better quality. I moved the mount to the back because I can stand on my Smittybilt rear bumper and easily remove the jack (even with another person if needed).
http://demello-offroad.com/demello-jack-hi-lift-clamps
Really can't believe they have lowered the price on these to only $65. They blow away the $85 ones I ordered in every way. Thank you Demello for making a quality product.
BROfessor Out
Attachments
-
 533.5 KB Views: 61

This is a great build BROfessor..! I love the FJ, and I almost bought one instead of the H3. Yes, I've had many attempts at kicking myself in the butt since.. Keep posting updates, I totally dig it..!
Sent from my SM-J320R4 using OB Talk mobile app
Sent from my SM-J320R4 using OB Talk mobile app

That is an awesome FJ I've never seen one setting up so high with such impressive shoes on.This sums up the limits of the FJ. This is not me, but a guy on the FJ forum who is extremely talented and has taken the FJ i would venture to say just about as far as you can.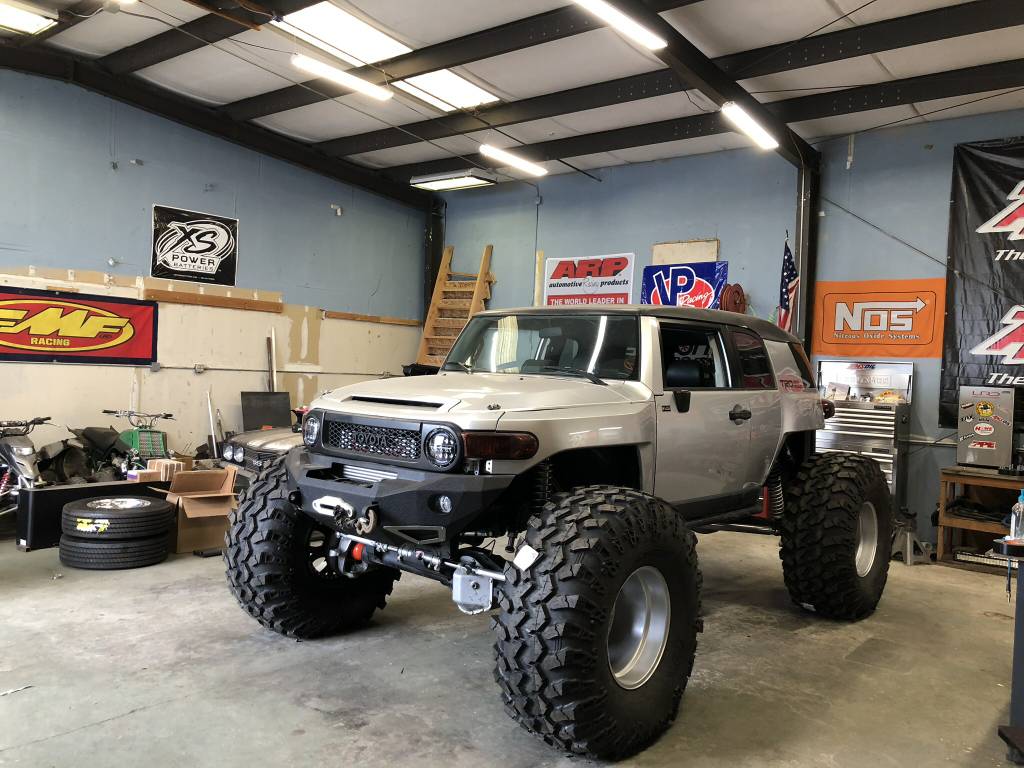
Sent from my SM-G930V using Tapatalk
Sent from my SM-N950U using OB Talk mobile app
Your build is coming along great looks fab.High Lift Jack Mounts
I bought some (what I thought was) cheap high lift jack brackets off www.purefjcruiser.com
http://www.purefjcruiser.com/warrior-products-c-682/rack-systems-c-682_684/warrior-products-fj-cruiser-hilift-jack-mount-for-oem-rack-p-2637.html
View attachment 46696
I hated them. They sent the wrong parts. The wing nuts and bolts were wrong size. The Carriage Bolts supplied did not work well because the holes in the mounts are round and apparently they didn't realize that a square head won't fit in a round hole so you couldn't get the jack tight. It rattled like crazy going down dirt roads and I hate rattles.
Then a really nice member on OB posted some Demello High Lift Jack Mounts on the "Pay it Forward" Thread and I asked if he still had them. He sent them to me right after Christmas. They are amazing and so much better quality. I moved the mount to the back because I can stand on my Smittybilt rear bumper and easily remove the jack (even with another person if needed).
http://demello-offroad.com/demello-jack-hi-lift-clamps
View attachment 46695
Really can't believe they have lowered the price on these to only $65. They blow away the $85 ones I ordered in every way. Thank you Demello for making a quality product.
View attachment 46698
BROfessor Out
Sent from my SM-N950U using OB Talk mobile app
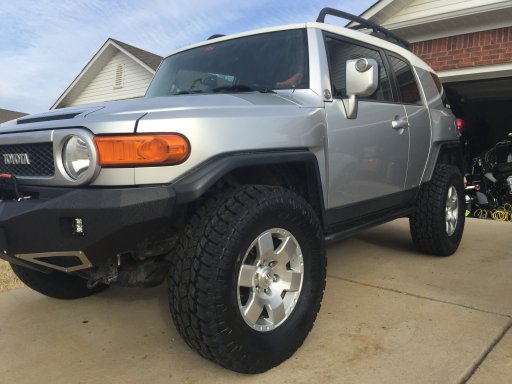
Little Girl got some new shoes this past week. 3" lift, 2" spacers and a little trim of the subframe and I was able to go from 285's to 305/70-17. HUGE difference. About a complete 2" over the previous. Love them. Went with what I had - Toyo AT2. Took it out yesterday and rubbed a few times when the suspension was in distress and maxed out on turn radius, but I can live with that.
til next paycheck. BROfessor OUT
til next paycheck. BROfessor OUT
THAT looks GREAT BROFESSOR..!Little Girl got some new shoes this past week. 3" lift, 2" spacers and a little trim of the subframe and I was able to go from 285's to 305/70-17. HUGE difference. About a complete 2" over the previous. Love them. Went with what I had - Toyo AT2. Took it out yesterday and rubbed a few times when the suspension was in distress and maxed out on turn radius, but I can live with that.
View attachment 47046
til next paycheck. BROfessor OUT
The difference... just...
Really, really nice for sure..!
Sent from my SM-T377R4 using OB Talk mobile app

Member III
Your build looks great. Looking forward to more pics of your modes.As you might can tell from this pic it lowered my front end about 3 inches.
View attachment 46565
All of my travel off road was pretty much riding on the bump stops.

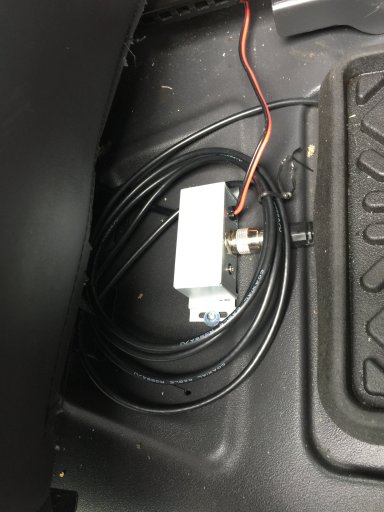
This past weekend we went on a trip with several guys from Overland Bound and Natural State Overland up in the Ozark NF here in AR. Instead of using 2-way radios like I have always used they use CB radios. So I had to make a purchase.
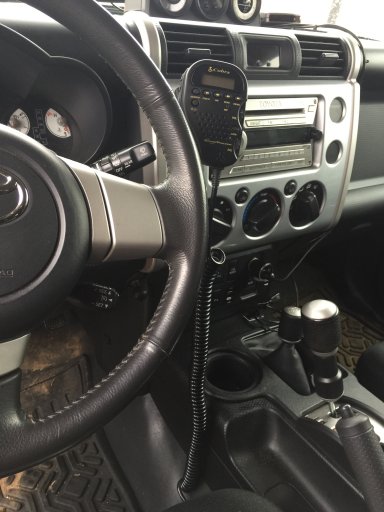
First I purchased the inside mount for the mic/CB.
This is a great addition to any FJ cruiser. This mount can go either on the driver side or the passenger side. I will most likely order another and have it hold my Ipad Mini when I purchase it. Very easy to install and a perfect mount for the mic.

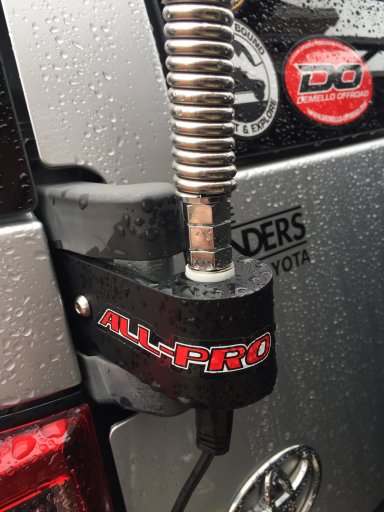
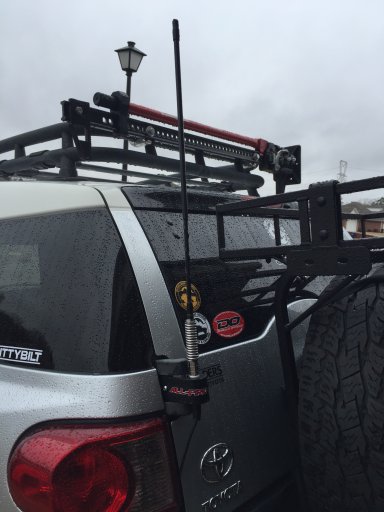
Next I purchased the antenna mount for the rear of the vehicle. This a specially made antenna mount that replaces part of the door hinge.
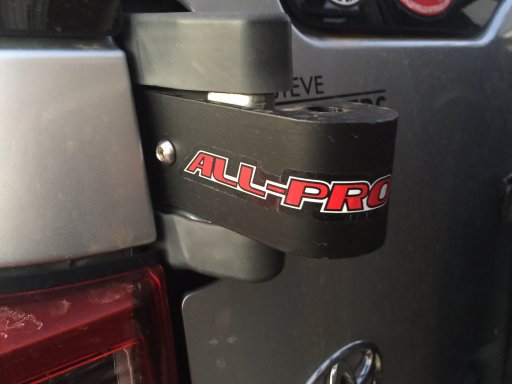
https://www.allprooffroad.com/shop/fj-cruiser-bandi-cb-mount/
It fits perfect and is an easy install. Next came the Firestick Antenna. I went with the 2 foot. I knew I wasn't going to have to communicate with anyone that was a large distance away and I didn't want it to stick up any higher than my roof rack because of limbs and other things that could rip it off. I also bought a spring to go with it. It is perfect.
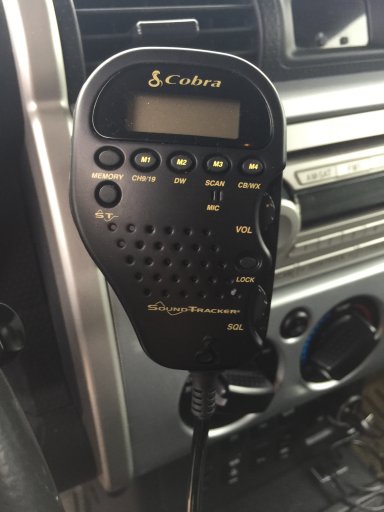
Finally came the CB. I had looked all over trying to figure out what I wanted. I knew I didn't want something large that took up a lot of space. I wanted something with minimal space that could do the job. I found it.
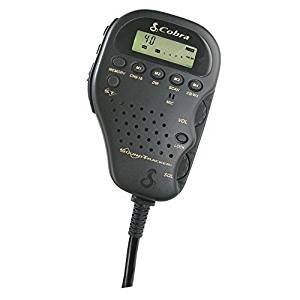
The Cobra 75WXST radio is so awesome. There is very little to mount. It is easy to operate and it takes up minimal space. It has a small box that comes with it where the antenna wire comes in. I mounted the box underneath the seat to get it out of the way and ran the cord for the mic up the right side of the driver side seat to the mic mount. I tucked the wires underneath the center console and ran the positive and negative wires to the batter and I was done. Perfect.
Til next time BROfessor Out.
First I purchased the inside mount for the mic/CB.
This is a great addition to any FJ cruiser. This mount can go either on the driver side or the passenger side. I will most likely order another and have it hold my Ipad Mini when I purchase it. Very easy to install and a perfect mount for the mic.
Next I purchased the antenna mount for the rear of the vehicle. This a specially made antenna mount that replaces part of the door hinge.
https://www.allprooffroad.com/shop/fj-cruiser-bandi-cb-mount/
It fits perfect and is an easy install. Next came the Firestick Antenna. I went with the 2 foot. I knew I wasn't going to have to communicate with anyone that was a large distance away and I didn't want it to stick up any higher than my roof rack because of limbs and other things that could rip it off. I also bought a spring to go with it. It is perfect.
Finally came the CB. I had looked all over trying to figure out what I wanted. I knew I didn't want something large that took up a lot of space. I wanted something with minimal space that could do the job. I found it.
The Cobra 75WXST radio is so awesome. There is very little to mount. It is easy to operate and it takes up minimal space. It has a small box that comes with it where the antenna wire comes in. I mounted the box underneath the seat to get it out of the way and ran the cord for the mic up the right side of the driver side seat to the mic mount. I tucked the wires underneath the center console and ran the positive and negative wires to the batter and I was done. Perfect.
Til next time BROfessor Out.
Member III
I'm still figuring out my Ham Radio....This past weekend we went on a trip with several guys from Overland Bound and Natural State Overland up in the Ozark NF here in AR. Instead of using 2-way radios like I have always used they use CB radios. So I had to make a purchase.
First I purchased the inside mount for the mic/CB.
View attachment 47924
This is a great addition to any FJ cruiser. This mount can go either on the driver side or the passenger side. I will most likely order another and have it hold my Ipad Mini when I purchase it. Very easy to install and a perfect mount for the mic.
View attachment 47925
Next I purchased the antenna mount for the rear of the vehicle. This a specially made antenna mount that replaces part of the door hinge.
View attachment 47926
https://www.allprooffroad.com/shop/fj-cruiser-bandi-cb-mount/
It fits perfect and is an easy install. Next came the Firestick Antenna. I went with the 2 foot. I knew I wasn't going to have to communicate with anyone that was a large distance away and I didn't want it to stick up any higher than my roof rack because of limbs and other things that could rip it off. I also bought a spring to go with it. It is perfect.
View attachment 47932 View attachment 47933
Finally came the CB. I had looked all over trying to figure out what I wanted. I knew I didn't want something large that took up a lot of space. I wanted something with minimal space that could do the job. I found it.
View attachment 47927
The Cobra 75WXST radio is so awesome. There is very little to mount. It is easy to operate and it takes up minimal space. It has a small box that comes with it where the antenna wire comes in. I mounted the box underneath the seat to get it out of the way and ran the cord for the mic up the right side of the driver side seat to the mic mount. I tucked the wires underneath the center console and ran the positive and negative wires to the batter and I was done. Perfect.
View attachment 47931 View attachment 47930 View attachment 47929
Til next time BROfessor Out.
can't imagine tackling a CB again. More power to you. I did the little handheld Midland, and rear tire carrier mount antenna bracket. I REALLY want to get a ham set up to run along with it though, the hand held is fine on trails between vehicles, but the ham reaches so much further...
Member III
This past weekend I finally found the right new shovel to replace the other that I had broken. I did a review on my new shovel. It is called the Root Slayer and it is amazing.
https://www.overlandbound.com/forums/threads/root-slayer-shovel.13089/#post-199464
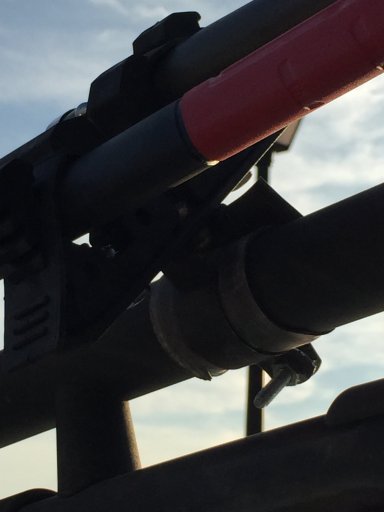
Now I really wanted to get this out of the vehicle and get it mounted. I don't like things inside sliding around and making noise on the trails so I really wanted a mount for the roof rack. I had looked around and Good Lord I didn't want to spend $85-$120 on a couple pieces of metal that would hold these things up there. So I found a DIY way to get this done and I really do love the outcome.
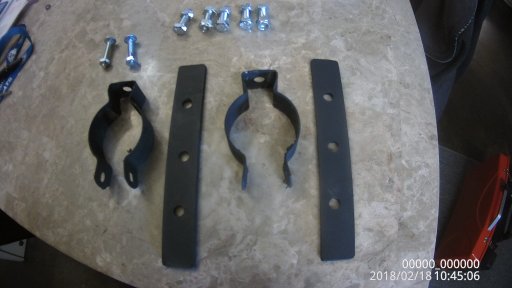
This is almost what I started out with. Some conduit clamps, a flat steel bar, 3/8x1 bolts and nuts all from Lowe's and then 4 Quick Fists I got from Amazon. I had some Black spray paint laying around as always so I cut the flat steel at 6-1/2" and then drilled my 3 holes evenly. Let me tell you, that is some hard stuff. I dulled out 3 drill bits until I finished. Painted them up and whoala!
Next I attached the Quick Fists and then mounted them up. I shot some videos that made it easier to show what I did. Total cost was around $35. Way more in my budget. I LOVE how it turned out and it looks amazing on the FJ. The Razorback axe my wife is getting me should come in this week to get more pics.
Waiting for the tax return and then I will be able to add more to this thread I hope! Until then!
BROfessor Out!
https://www.overlandbound.com/forums/threads/root-slayer-shovel.13089/#post-199464
Now I really wanted to get this out of the vehicle and get it mounted. I don't like things inside sliding around and making noise on the trails so I really wanted a mount for the roof rack. I had looked around and Good Lord I didn't want to spend $85-$120 on a couple pieces of metal that would hold these things up there. So I found a DIY way to get this done and I really do love the outcome.
This is almost what I started out with. Some conduit clamps, a flat steel bar, 3/8x1 bolts and nuts all from Lowe's and then 4 Quick Fists I got from Amazon. I had some Black spray paint laying around as always so I cut the flat steel at 6-1/2" and then drilled my 3 holes evenly. Let me tell you, that is some hard stuff. I dulled out 3 drill bits until I finished. Painted them up and whoala!
Next I attached the Quick Fists and then mounted them up. I shot some videos that made it easier to show what I did. Total cost was around $35. Way more in my budget. I LOVE how it turned out and it looks amazing on the FJ. The Razorback axe my wife is getting me should come in this week to get more pics.
Waiting for the tax return and then I will be able to add more to this thread I hope! Until then!
BROfessor Out!
Great post BROfessor..! I'll sub your YouTube channel and watch those videos now...
Again, GREAT post, I've gotta "Dune Buggy" out that cavalier this week so I have a trail vehicle untill I find a good mercedes diesel for the real off roader, and this is exactly the stuff I'm looking for, Thanks man..!
Again, GREAT post, I've gotta "Dune Buggy" out that cavalier this week so I have a trail vehicle untill I find a good mercedes diesel for the real off roader, and this is exactly the stuff I'm looking for, Thanks man..!
Thank you. My wife calls me McGyver...says I can fix anything. But creating something from scratch is a little outside my comfort zone. lol. I've got a few other things in mind also. Just have to spend a little time drawing up the plans. I really am enjoying this whole process.Great post BROfessor..! I'll sub your YouTube channel and watch those videos now...
Again, GREAT post, I've gotta "Dune Buggy" out that cavalier this week so I have a trail vehicle untill I find a good mercedes diesel for the real off roader, and this is exactly the stuff I'm looking for, Thanks man..!
T
That's what I dig about it all too, figuring out what to do next, and how to get to the end result..!
McGyver, That Works..!Thank you. My wife calls me McGyver...says I can fix anything. But creating something from scratch is a little outside my comfort zone. lol. I've got a few other things in mind also. Just have to spend a little time drawing up the plans. I really am enjoying this whole process.
That's what I dig about it all too, figuring out what to do next, and how to get to the end result..!
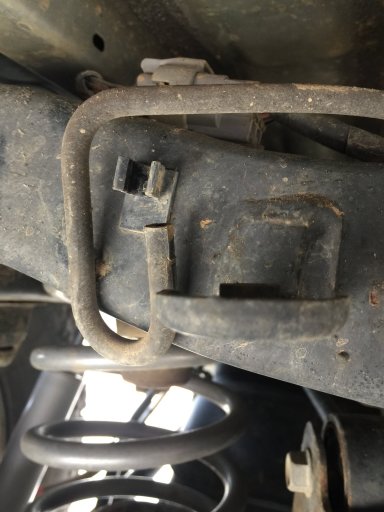
A few weeks ago I watched a video on doing a Scuba Mod on the FJ. Several guys told me I needed to get the Scuba Mod done before springs and when all the rains hit here in Arkansas. So I watched the video.
One thing that really ticked me off about this video is that they state "go search on the internet and you will easily find the parts you need for this mod"... NOPE. I searched and searched and searched and found people who had done the mod and said how easy it was blah blah blah and nobody EVER listed the parts. Except for one guy who created some fancy something that was about $250.
So after watching the video about 26 times I was able to come up with a parts list.
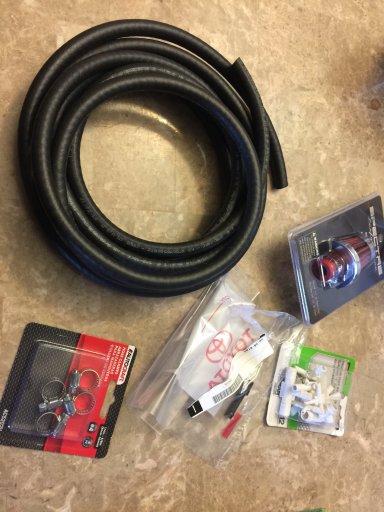
All you need is some 3/8" hose ( I got plenty so I could do the front also in time)
Hose Clamps - the squeeze kind would have worked better
The Toyota Part from the Camry
and nobody had 1 - 3/8x3/8x1/4 tee so I had to spend about $6 at AutoZone for a ton of them I will never use.
I bought the Spectre filter also they recommended, but if you reroute this to your gas tank fill area you can't use it because it is too big. Save it for the front.
Black Zip Ties
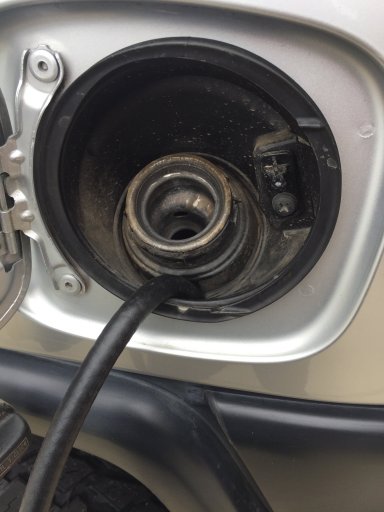
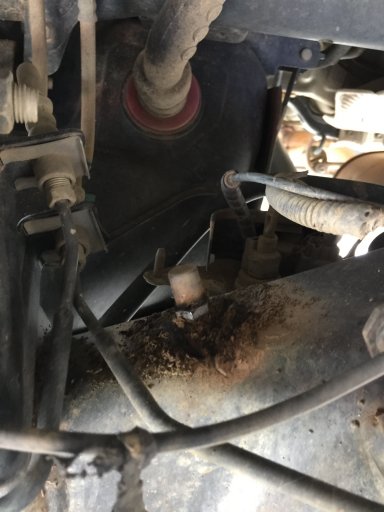
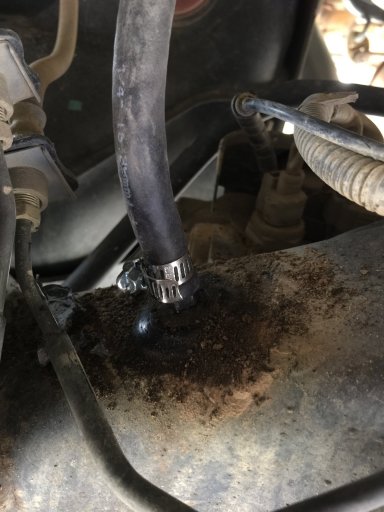
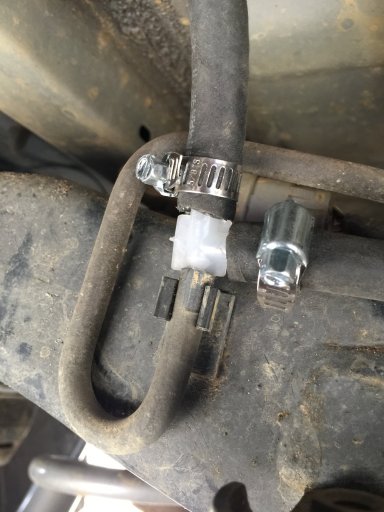
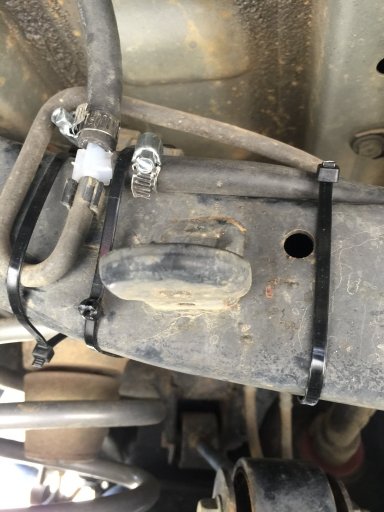
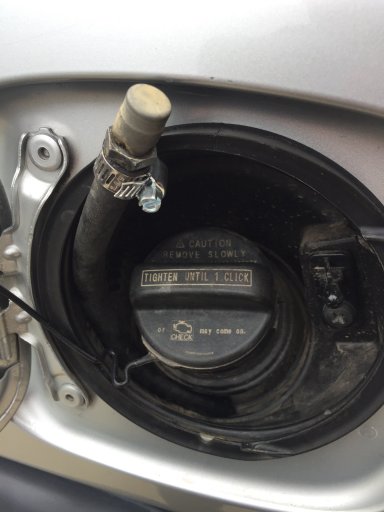

It took me about 2-1/2 weeks to get started on this project because as soon as I got all the parts it started raining and didn't stop until yesterday. I don't have a shop and I'm not laying in the water so I didn't mind waiting. Once it stopped I went out to the driveway and about 30 minutes later I was done. Even took a little time to clean up some of the wiring from the rear lights on my Smittibilt bumper that had come loose from the trails and also clean out some leaves and trash from around my rear wheels. Can't ever have enough zip ties.
Whoala! Rear Scuba mod is complete. From what I hear the front is a nightmare to get to and you have to do it all by feel. Don't really see a need in doing that until I get the snorkel. I won't be going in water that deep until then anyway and the front axle breather is much higher.
Until then...ride SAFE! Keep our Trails CLEAN! Get involved in the TrailGuardian program!
BROfessor Out!
One thing that really ticked me off about this video is that they state "go search on the internet and you will easily find the parts you need for this mod"... NOPE. I searched and searched and searched and found people who had done the mod and said how easy it was blah blah blah and nobody EVER listed the parts. Except for one guy who created some fancy something that was about $250.
So after watching the video about 26 times I was able to come up with a parts list.
All you need is some 3/8" hose ( I got plenty so I could do the front also in time)
Hose Clamps - the squeeze kind would have worked better
The Toyota Part from the Camry
and nobody had 1 - 3/8x3/8x1/4 tee so I had to spend about $6 at AutoZone for a ton of them I will never use.
I bought the Spectre filter also they recommended, but if you reroute this to your gas tank fill area you can't use it because it is too big. Save it for the front.
Black Zip Ties
It took me about 2-1/2 weeks to get started on this project because as soon as I got all the parts it started raining and didn't stop until yesterday. I don't have a shop and I'm not laying in the water so I didn't mind waiting. Once it stopped I went out to the driveway and about 30 minutes later I was done. Even took a little time to clean up some of the wiring from the rear lights on my Smittibilt bumper that had come loose from the trails and also clean out some leaves and trash from around my rear wheels. Can't ever have enough zip ties.
Whoala! Rear Scuba mod is complete. From what I hear the front is a nightmare to get to and you have to do it all by feel. Don't really see a need in doing that until I get the snorkel. I won't be going in water that deep until then anyway and the front axle breather is much higher.
Until then...ride SAFE! Keep our Trails CLEAN! Get involved in the TrailGuardian program!
BROfessor Out!
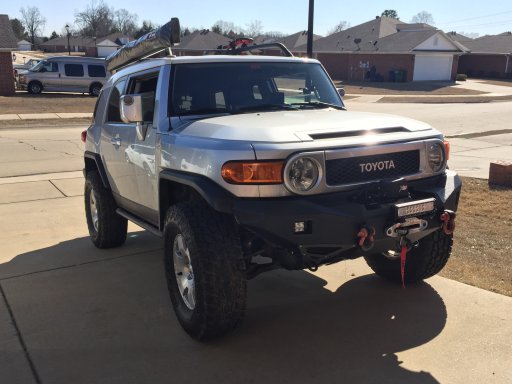
Removed front bumper yesterday evening after returning from my daughter's bowling competition so that I could take it to the local High School Welding shop to get a custom brush guard fabricated for it. She looks like she is getting a facelift. lol
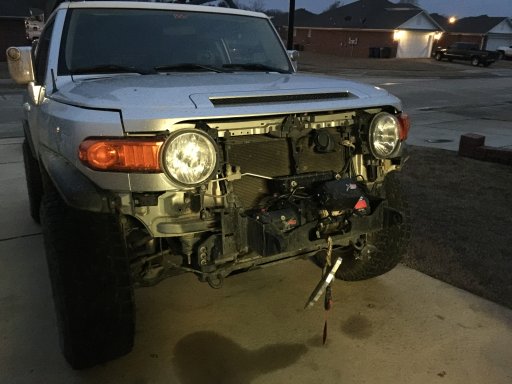
While it was off I decided to try out the local Wal-Mart brand Bedliner on my grill. Love how it turned out. Not completely finished yet. It started to rain. Want to get 3 coats on it before I put it back on. Will do a coat a day this week. Since I don't have to drive it every day it makes it easy to let her sit while I work on her.
Before...
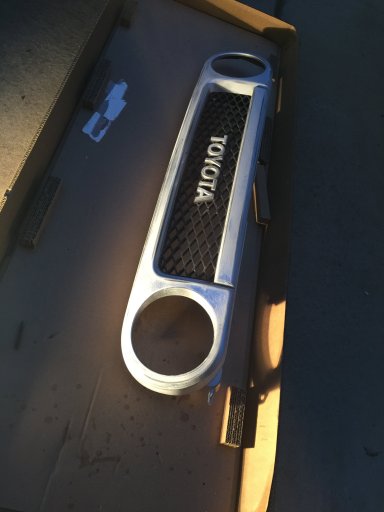
After...
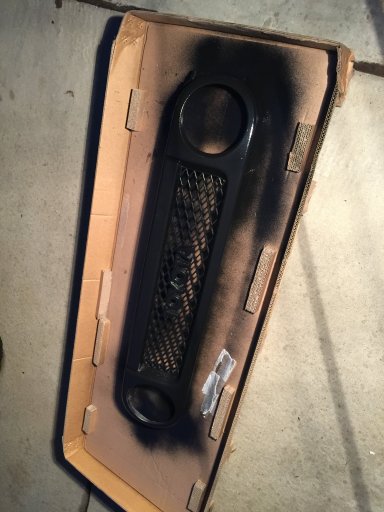
Will post pics later this week when I get it back on and the bumper comes back. Til then...BROfessor OUT!
While it was off I decided to try out the local Wal-Mart brand Bedliner on my grill. Love how it turned out. Not completely finished yet. It started to rain. Want to get 3 coats on it before I put it back on. Will do a coat a day this week. Since I don't have to drive it every day it makes it easy to let her sit while I work on her.
Before...
After...
Will post pics later this week when I get it back on and the bumper comes back. Til then...BROfessor OUT!
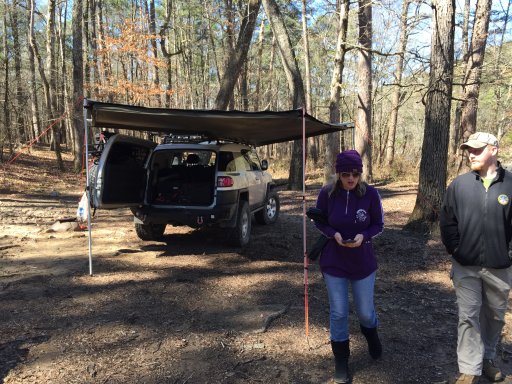
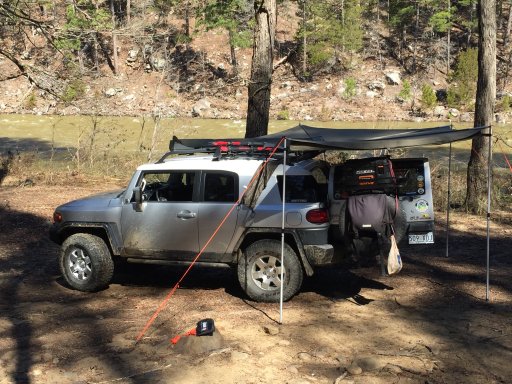
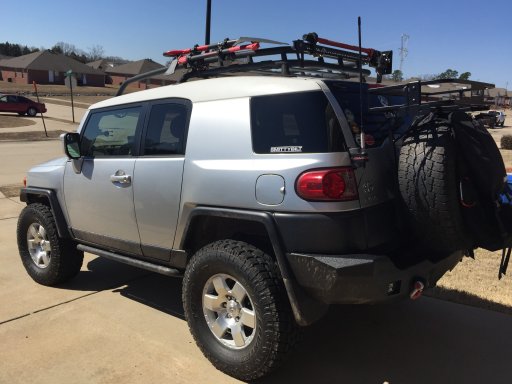
Oztent Foxwing Awning came in this past week. Part of our purchase with our tax return for the year. LOVE IT! Looks great on the FJ.
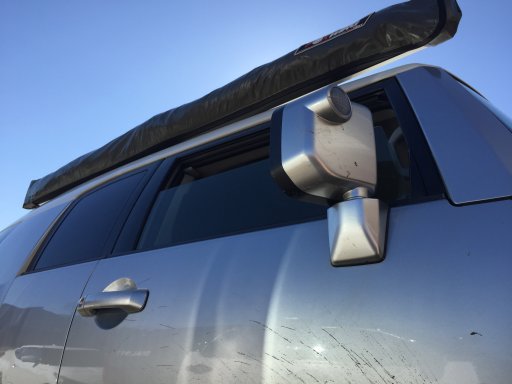
Took it out in the Ouachitas and found the perfect place to open it up for some shade.
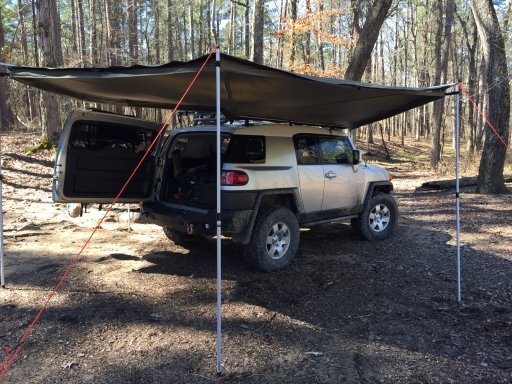
Oztent RV-5 also came in. Cannot wait to be able to get out and try this thing out! We are gonna be so comfy in this!
til next time BROfessor Out!
Took it out in the Ouachitas and found the perfect place to open it up for some shade.
Oztent RV-5 also came in. Cannot wait to be able to get out and try this thing out! We are gonna be so comfy in this!
til next time BROfessor Out!
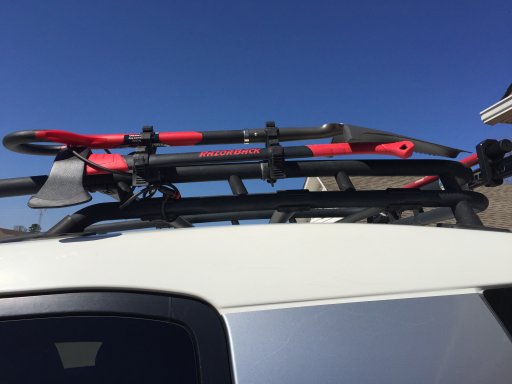
Finished up my DIY Axe and Shovel mount when my new Razorback (from the state of Arkansas so its perfect!) Axe came in.
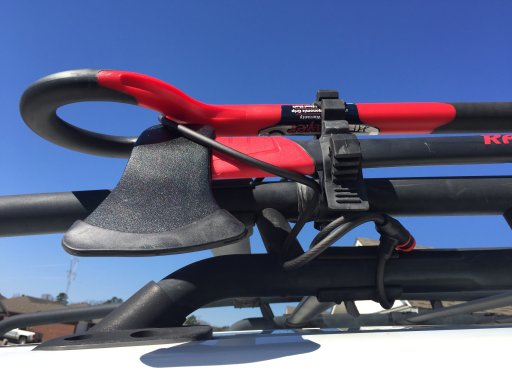
Got it all mounted up and it would not hold. It kept sliding down from the weight of the shovel and axe. So after looking around the checking out what others have done in this situation, I read where a guy went to a local store and bought a tire inner tube and put it under the mounts and they held perfectly. So the wife and I went down to our local Wal-Mart and bought a tube. They were all the same price so I bought the largest one (in case I needed more in the future) and went back home. Also picked me up a bicycle cable lock with a key for those guys in town with sticky fingers. lol Worked Perfectly. Been down a few routes now and it hasn't slipped at all. Very pleased.
til the next check comes in for the next mod...BROfessor Out
