Golden Eagle - 2005 Ford Excursion 4x4 V10 Gas

  • HTML tutorial

kostkafex

Rank IV
Launch Member

Enthusiast III

1,116
Chino Valley, AZ, USA
First Name
Phil
Last Name
Kostka
Member #

12283

PXL_20210506_214700107 (1).jpg
Our second kid arrived in April, and we got tired of dealing with the small back seat + 2 car seats in my 2018 GMC Canyon. So the search was on for a larger exploration/road trip vehicle. Then she said the magic words every Ford and large SUV enthusiast wants to hear, "What's the largest SUV we could buy?" So the search was on for a suitable Excursion. I wanted gas as I was tired of the diesel maintenance on my Canyon and not up for paying the "diesel tax", as a comparable diesel Excursion is a good 10-15K above a gas truck. We tend to have multiple trips to CA from AZ to visit family so the cargo capacity and interior room are both a premium, and we enjoy exploring Arizona backroads, forest roads, and whatnot. Once the boys are older I'm certain we'll get into actual wheeling, which isn't gonna happen in this rig.

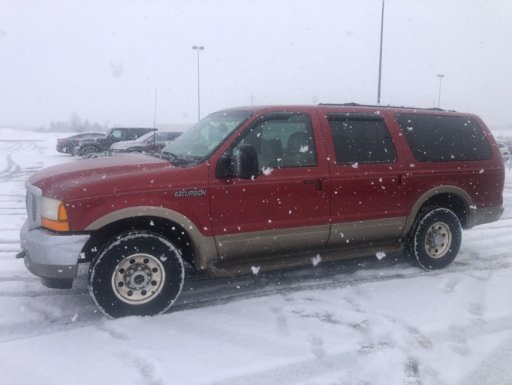
This particular example is a 2005 Limited in Pueblo Gold over Medium Pebble Leather. This is the last year of production, and has merely 126k miles, and was a single-owner truck. I also really like "dust" colored vehicles so this fits all the bills. It is a 4x4 but with the non-LSD 3.73 so I'll need to remedy that in the future. Front captain chairs with 2nd and 3rd-row bench for 8 total passengers. Optioned with the rear-seat DVD entertainment package for all those Disney DVDs. The front suspension looks brand new and it drives nicely. I've already done a basic tune-up and interior clean-up.

The shortlist of plans are:
  • Lighting - The OEM headlights are cloudy, so I plan to swap to the HD headlights (factory blackout) with an upgraded harness and bulbs. Then swap to LED fog lights (Diode Dynamics SS3 in the factory location).
  • Visibility - Swap to 08+ towing mirrors, add an Android Auto-compatible head unit with front/rear cameras. These trucks have decent visibility but it's still massive, so cameras are a must.
  • Capability - Shock upgrade and 33" all-terrain tires. It has nearly-new Michelin Defender LTX all-seasons, so I'll burn through those before diving into new tires. Not 100% sure on shocks, probably Bilstein 4600 or KYB Monomax (needs a 4" lift to use Bilstein 5100's, and the wife already thinks it sits high...)
  • Performance - 5-star tunes for 87 with tow mode, remove choke-down y-pipe, straight-through muffler - The V10 is pretty potent as it sits, but a tune apparently really wakes it up and makes the trans operate a bit more efficiently. The factory y-pipe necks down significantly and is an easy fix for any muffler shop. Been watching a ton of Engine Masters on MTOD, and a straight-through produces the most power, and this thing too damn quiet.
 

kostkafex

Rank IV
Launch Member

Enthusiast III

1,116
Chino Valley, AZ, USA
First Name
Phil
Last Name
Kostka
Member #

12283

Did about a 42-mile loop of dirt roads this past weekend, in an area just west of home called Camp Wood. Elevation ranges from 4500ft to 5900ft, so a good amount of climbing and descending. Mostly forest roads with a little bit of singletrack. The Excursion did fantastic, I'm really impressed with it being all stock and on all seasons. I realized that I didn't engage 4x4 high properly (needed to be rolling, not stopped) so it was in 2wd the entire time, which amazed me even more.

PXL_20210606_222915095.MP.jpgPXL_20210606_235701727.jpegcampwood3.png
 

kostkafex

Rank IV
Launch Member

Enthusiast III

1,116
Chino Valley, AZ, USA
First Name
Phil
Last Name
Kostka
Member #

12283

Installed a proper roof rack (the OEM one literally rubs the roof) using superstrut, as well as adding an awning. Cribbing on mb_01sc's notes from the ford-trucks.com forum.

I purchased everything from my local Home Depot and was able to put it all together in an hour or so for about $75 in materials. I also installed the NAPA Maxi Trac 8x8 Awning at the same time. Please remember to wear ear/eye/hand protection as you'll be working with sharp metal and power tools.

Parts:
  • 1x 10' 14 gauge superstrut (half height, for the crossbars)
  • 1x 2' 12 gauge superstrut (full height, for the risers)
  • 1 pack 1/4” superstrut nuts (comes with 5 nuts, you only need 4)
  • 1 pack 3/8" superstrut nuts (comes with 5 nuts, you only need 4)
  • 4x 1/4"-20 1/2” bolts
  • 4x 1/4" flat washers
  • 4x 1/4" lock washers
  • 4x 3/8"-16 1" bolts (longer needed if mounting the 14 gauge holes up)
  • 8x 3/8" flat washer (4x for the crossrails to risers, 4 to make the 1/4 bolt surface larger)
  • 4x 3/8" lock washers
Tools
  • Angle grinder aka DeathWheel
  • 4.5" Cutoff Wheel
  • 4.5" Flap Disc
  • Ruler/Tape measure
  • Sharpie
  • Pliers
  • Socket set
  • 13mm wrench (for awning)
  • Moving blanket (to protect the roof when installing rails)
Steps:
  1. Cut the 14-gauge into two 54" sections. You can see how the OEM rail compares to the 54" sections, and where step 2 needs to happen.
    railsandstock.png
  2. Section out the 3rd and 4th slots to form one long slot. This is due to the factory rack being 43" which doesn't line up with the superstrut slots.
    slottedrails.jpg
  3. Cut the 12-gauge superstrut into 4x 2" sections, centering a slot in each one.
  4. Using your pliers, pull the springs off all the superstrut nuts.
    cutsprings.jpg
  5. If using the NAPA awning, drill out the 2nd hole from the long end of the L bracket with a 3/8" bit, as the bracket will engage the 3/8" bolts later.
    awningholes.jpg
  6. If using the NAPA awning, loosely install the L bracket to the awning with the provided hardware.
  7. Preassemble the 12-gauge 2" risers with the following hardware: 1/4-20 1/2" bolt, 1/4" lock washer, 1/4" flat washer, 3/8" flat washer. I felt the 3/8" washer was needed to ensure adequate contact with the rail.
    riserpreassembled.jpg
  8. Slide each riser/hardware into the OEM rails, ensure the superstrut nut is sideways to have adequate contact with the OEM rail, you can see how it's oriented in the pictures. Position the risers on the rail as you see fit and final tighten. Note that the riser width, with the U facing towards the front/back of the truck, fits the OEM rails like it was designed to.
    finalriserabove.pngfinalriser.jpg
  9. Put a moving blanket down between the rails to avoid scratches, then put each cross rail into place.
    railandmovingblanket.jpg
  10. Secure each cross rail with the 3/8" bolt, 3/8" lock washer, 3/8" flat washer, and 3/8" superstrut nut. Ensure the superstrut nut is positioned with the serrations upward. Note, if you wish to install the cross rails in the opposite orientation, longer bolts are required.
    topraildone.pngfinalrailandriser.jpg
  11. Once all cross rails have been installed, measure your distance between the rails, and set the hardware on the awning to the same distance. Awning hardware should be finger-tight for minor adjustments.
  12. Slide the awning into the cross rail. It's surprisingly a nice fit and will support itself as you install the hardware. I flipped the included hardware over for the second bolt to the cross rail, and will most likely be trimming the hardware down.
    finalrack.jpgrailandawning.pngrailandawning.png
  13. Step back and admire your handy work
    finalrack.jpg
I'm curious how wind noise will be and how the cheap awning will stand up to the Arizona sun, so I'll report back after the first outing.

truckandawning.jpg
 

Attachments

kostkafex

Rank IV
Launch Member

Enthusiast III

1,116
Chino Valley, AZ, USA
First Name
Phil
Last Name
Kostka
Member #

12283

Re-routed the vent tubes for the differentials and transfer case to the engine bay and behind the taillight, respectively. Factory vents mount to the frame which is pretty low IMHO. The loop is for extra protection from water, kinda like a reverse p-trap on a sink. Also replaced the front bump stops as the factory ones were crumbling.

PXL_20210624_041509114.jpgPXL_20210623_222721683.jpgPXL_20210624_033639350.jpg
 

Bellair

Rank I

Enthusiast I

231
Caledonia, Livingston County, New York, United States
First Name
Bill
Last Name
Santangelo
New to the app and discussions. I started getting into over-landing a couple months ago when I picked up a 01 excursion 7.3l. I love the thing. I have only just started my camp kitchen project for it. So it’s not even close to being ready for camping yet. It’s also my daily driver so my main mods have been to improve those aspects of it.
 

Attachments

Bellair

Rank I

Enthusiast I

231
Caledonia, Livingston County, New York, United States
First Name
Bill
Last Name
Santangelo
Installed a proper roof rack (the OEM one literally rubs the roof) using superstrut, as well as adding an awning. Cribbing on mb_01sc's notes from the ford-trucks.com forum.

I purchased everything from my local Home Depot and was able to put it all together in an hour or so for about $75 in materials. I also installed the NAPA Maxi Trac 8x8 Awning at the same time. Please remember to wear ear/eye/hand protection as you'll be working with sharp metal and power tools.

Parts:
  • 1x 10' 14 gauge superstrut (half height, for the crossbars)
  • 1x 2' 12 gauge superstrut (full height, for the risers)
  • 1 pack 1/4” superstrut nuts (comes with 5 nuts, you only need 4)
  • 1 pack 3/8" superstrut nuts (comes with 5 nuts, you only need 4)
  • 4x 1/4"-20 1/2” bolts
  • 4x 1/4" flat washers
  • 4x 1/4" lock washers
  • 4x 3/8"-16 1" bolts (longer needed if mounting the 14 gauge holes up)
  • 8x 3/8" flat washer (4x for the crossrails to risers, 4 to make the 1/4 bolt surface larger)
  • 4x 3/8" lock washers
Tools
  • Angle grinder aka DeathWheel
  • 4.5" Cutoff Wheel
  • 4.5" Flap Disc
  • Ruler/Tape measure
  • Sharpie
  • Pliers
  • Socket set
  • 13mm wrench (for awning)
  • Moving blanket (to protect the roof when installing rails)
Steps:
  1. Cut the 14-gauge into two 54" sections. You can see how the OEM rail compares to the 54" sections, and where step 2 needs to happen.
    View attachment 201620
  2. Section out the 3rd and 4th slots to form one long slot. This is due to the factory rack being 43" which doesn't line up with the superstrut slots.
    View attachment 201622
  3. Cut the 12-gauge superstrut into 4x 2" sections, centering a slot in each one.
  4. Using your pliers, pull the springs off all the superstrut nuts.
    View attachment 201612
  5. If using the NAPA awning, drill out the 2nd hole from the long end of the L bracket with a 3/8" bit, as the bracket will engage the 3/8" bolts later.
    View attachment 201610
  6. If using the NAPA awning, loosely install the L bracket to the awning with the provided hardware.
  7. Preassemble the 12-gauge 2" risers with the following hardware: 1/4-20 1/2" bolt, 1/4" lock washer, 1/4" flat washer, 3/8" flat washer. I felt the 3/8" washer was needed to ensure adequate contact with the rail.
    View attachment 201621
  8. Slide each riser/hardware into the OEM rails, ensure the superstrut nut is sideways to have adequate contact with the OEM rail, you can see how it's oriented in the pictures. Position the risers on the rail as you see fit and final tighten. Note that the riser width, with the U facing towards the front/back of the truck, fits the OEM rails like it was designed to.
    View attachment 201616View attachment 201615
  9. Put a moving blanket down between the rails to avoid scratches, then put each cross rail into place.
    View attachment 201619
  10. Secure each cross rail with the 3/8" bolt, 3/8" lock washer, 3/8" flat washer, and 3/8" superstrut nut. Ensure the superstrut nut is positioned with the serrations upward. Note, if you wish to install the cross rails in the opposite orientation, longer bolts are required.
    View attachment 201623View attachment 201614
  11. Once all cross rails have been installed, measure your distance between the rails, and set the hardware on the awning to the same distance. Awning hardware should be finger-tight for minor adjustments.
  12. Slide the awning into the cross rail. It's surprisingly a nice fit and will support itself as you install the hardware. I flipped the included hardware over for the second bolt to the cross rail, and will most likely be trimming the hardware down.
    View attachment 201613View attachment 201617View attachment 201617
  13. Step back and admire your handy work
    View attachment 201613
I'm curious how wind noise will be and how the cheap awning will stand up to the Arizona sun, so I'll report back after the first outing.

View attachment 201611
Why not use something like makerbeam or t track? They are aluminum and less prone to rust vs the Kindorf, They would be a little weaker but it would also have a lower profile?
 

Bellair

Rank I

Enthusiast I

231
Caledonia, Livingston County, New York, United States
First Name
Bill
Last Name
Santangelo
New to the app and discussions. I started getting into over-landing a couple months ago when I picked up a 01 excursion 7.3l. I love the thing. I have only just started my camp kitchen project for it. So it’s not even close to being ready for camping yet. It’s also my daily driver so my main mods have been to improve those aspects of it.
Took this shot this morning of the first mod I did. They are rock crawling wheel well led lights. I replaced the factory door lights with one each.
 

Attachments

kostkafex

Rank IV
Launch Member

Enthusiast III

1,116
Chino Valley, AZ, USA
First Name
Phil
Last Name
Kostka
Member #

12283

Why not use something like makerbeam or t track? They are aluminum and less prone to rust vs the Kindorf, They would be a little weaker but it would also have a lower profile?
Made with what was easily on hand. Not terribly worried about rust up here in the high desert of AZ. The total cost for the rack was under $70. Lower profile was not completely the goal as the awning has to clear the doors and curve of the roof.
 

kostkafex

Rank IV
Launch Member

Enthusiast III

1,116
Chino Valley, AZ, USA
First Name
Phil
Last Name
Kostka
Member #

12283

Took this shot this morning of the first mod I did. They are rock crawling wheel well led lights. I replaced the factory door lights with one each.
FYI you can (and should) start your own thread to detail your build by clicking the "Post Thread" button at the top of the Full Sized Rigs forum. I'd like to keep this thread dedicated to my rig, thanks.
 
  • Like
Reactions: EffinNewGuy

Bellair

Rank I

Enthusiast I

231
Caledonia, Livingston County, New York, United States
First Name
Bill
Last Name
Santangelo
Why not use something like makerbeam or t track? They are aluminum and less prone to rust vs the Kindorf, They would be a little weaker but it would also have a lower profile?
Made with what was easily on hand. Not terribly worried about rust up here in the high desert of AZ. The total cost for the rack was under $70. Lower profile was not completely the goal as the awning has to clear the doors and curve of the roof.
Ah ok. I’m in NY rust is always in my mind.
 

Bellair

Rank I

Enthusiast I

231
Caledonia, Livingston County, New York, United States
First Name
Bill
Last Name
Santangelo
Took this shot this morning of the first mod I did. They are rock crawling wheel well led lights. I replaced the factory door lights with one each.
FYI you can (and should) start your own thread to detail your build by clicking the "Post Thread" button at the top of the Full Sized Rigs forum. I'd like to keep this thread dedicated to my rig, thanks.
Ok good idea thanks
 

kostkafex

Rank IV
Launch Member

Enthusiast III

1,116
Chino Valley, AZ, USA
First Name
Phil
Last Name
Kostka
Member #

12283

Noticed the hatch open height really bothered me, especially in the driveway, which has a bit of angle to it. After doing some research, it turns out Ford installed different open length struts based on RWD (high) vs 4X4 (low), and you can just swap to get the hatch open height you want. I went with Strong Arm 4139's and am very impressed. Height is at a better livable spot and the struts open the hatch with authority. Before/after shot below:

IMG_20210804_114334.jpg
 
  • Like
Reactions: SS308

kostkafex

Rank IV
Launch Member

Enthusiast III

1,116
Chino Valley, AZ, USA
First Name
Phil
Last Name
Kostka
Member #

12283

My parents and brother came into town for Labor Day weekend. We drove the Thumb Butte Loop, featuring my favorite vista, Sunset Point.
PXL_20210904_184807665.jpg
My dad smelled coolant at one point. We inspected the truck back home and sure enough, the upper plastic end tank is cracking. Replacement ordered:
PXL_20210911_162139846.jpg
The parents also brought me these, which I will most likely pay someone to put on, the install is a PITA
PXL_20210907_205937250.jpg
 

kostkafex

Rank IV
Launch Member

Enthusiast III

1,116
Chino Valley, AZ, USA
First Name
Phil
Last Name
Kostka
Member #

12283

Blacked out the inner mesh of the factory grille, which was a tan plastic. Subtle, but looks better to me!
grills.png
Attempted to install the new radiator, realized the top mount pin was broken in shipping... after we installed it! They are sending a new one.
PXL_20210925_183539660.jpg
 
  • Like
Reactions: Neon Paradise

KAIONE

Rank V
Member
Investor

Advocate I

1,721
Vancouver, WA, USA
First Name
Kanak
Last Name
Attack
Member #

31476

This is a dream build for me, I’ll be watching for sure, best of luck and can’t wait to see this already great build!
 
  • Like
Reactions: kostkafex

kostkafex

Rank IV
Launch Member

Enthusiast III

1,116
Chino Valley, AZ, USA
First Name
Phil
Last Name
Kostka
Member #

12283

Ran Mount Union here in Prescott with a few buddies from the Overland Discord Channel. Ten miles of off-pavement fun. Weather was quite cold and windy, we saw snow up on the mountain for a lot of the run. Truck and new tires did fantastic. High-speed video below.

 
  • Like
Reactions: KAIONE