Influencer I
About 25 years ago we bought a family car. A 1993 Toyota FZJ80 Landcruiser. It served us for 20 years for family camping, and car pooling around town. Now that the 4 kids have left the house, we have no use for it.
Looking at the low resale value, we decided instead to invest and convert it into a house/camper having all the options of being on/off the road and being independent of lodging and food.
We documented the project in a photo album.
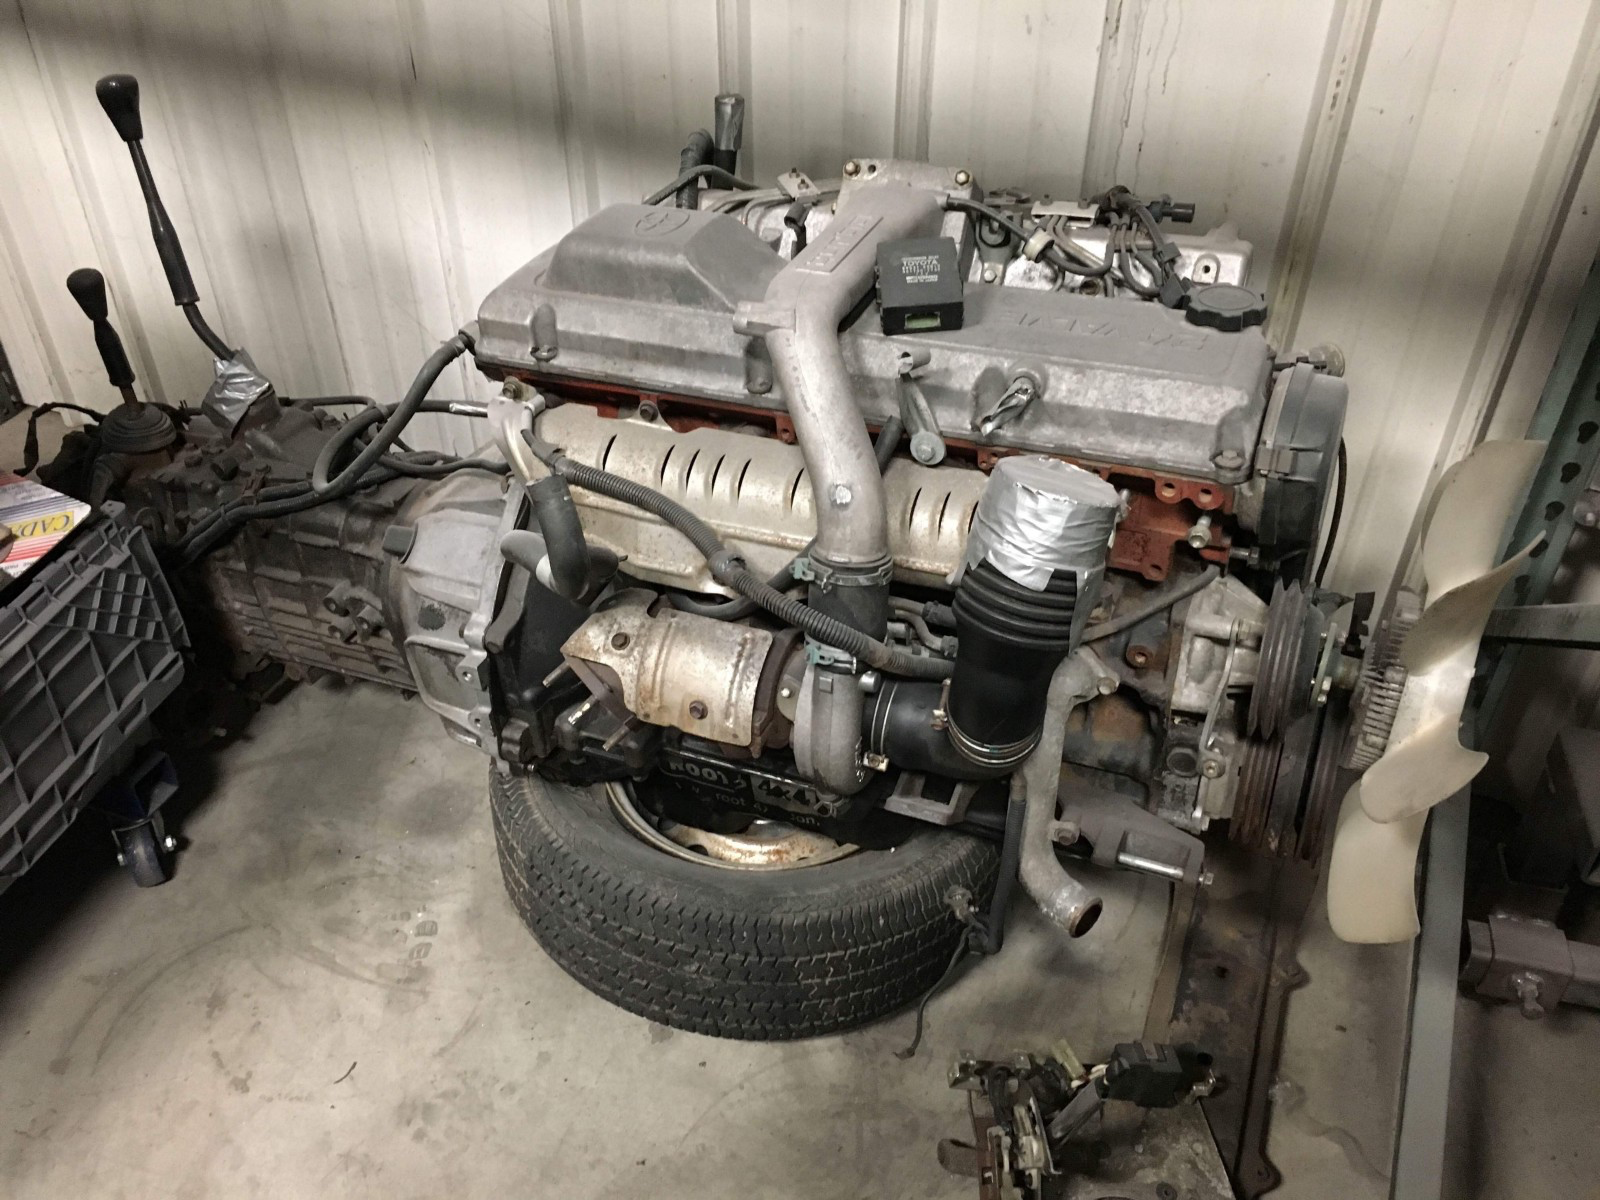
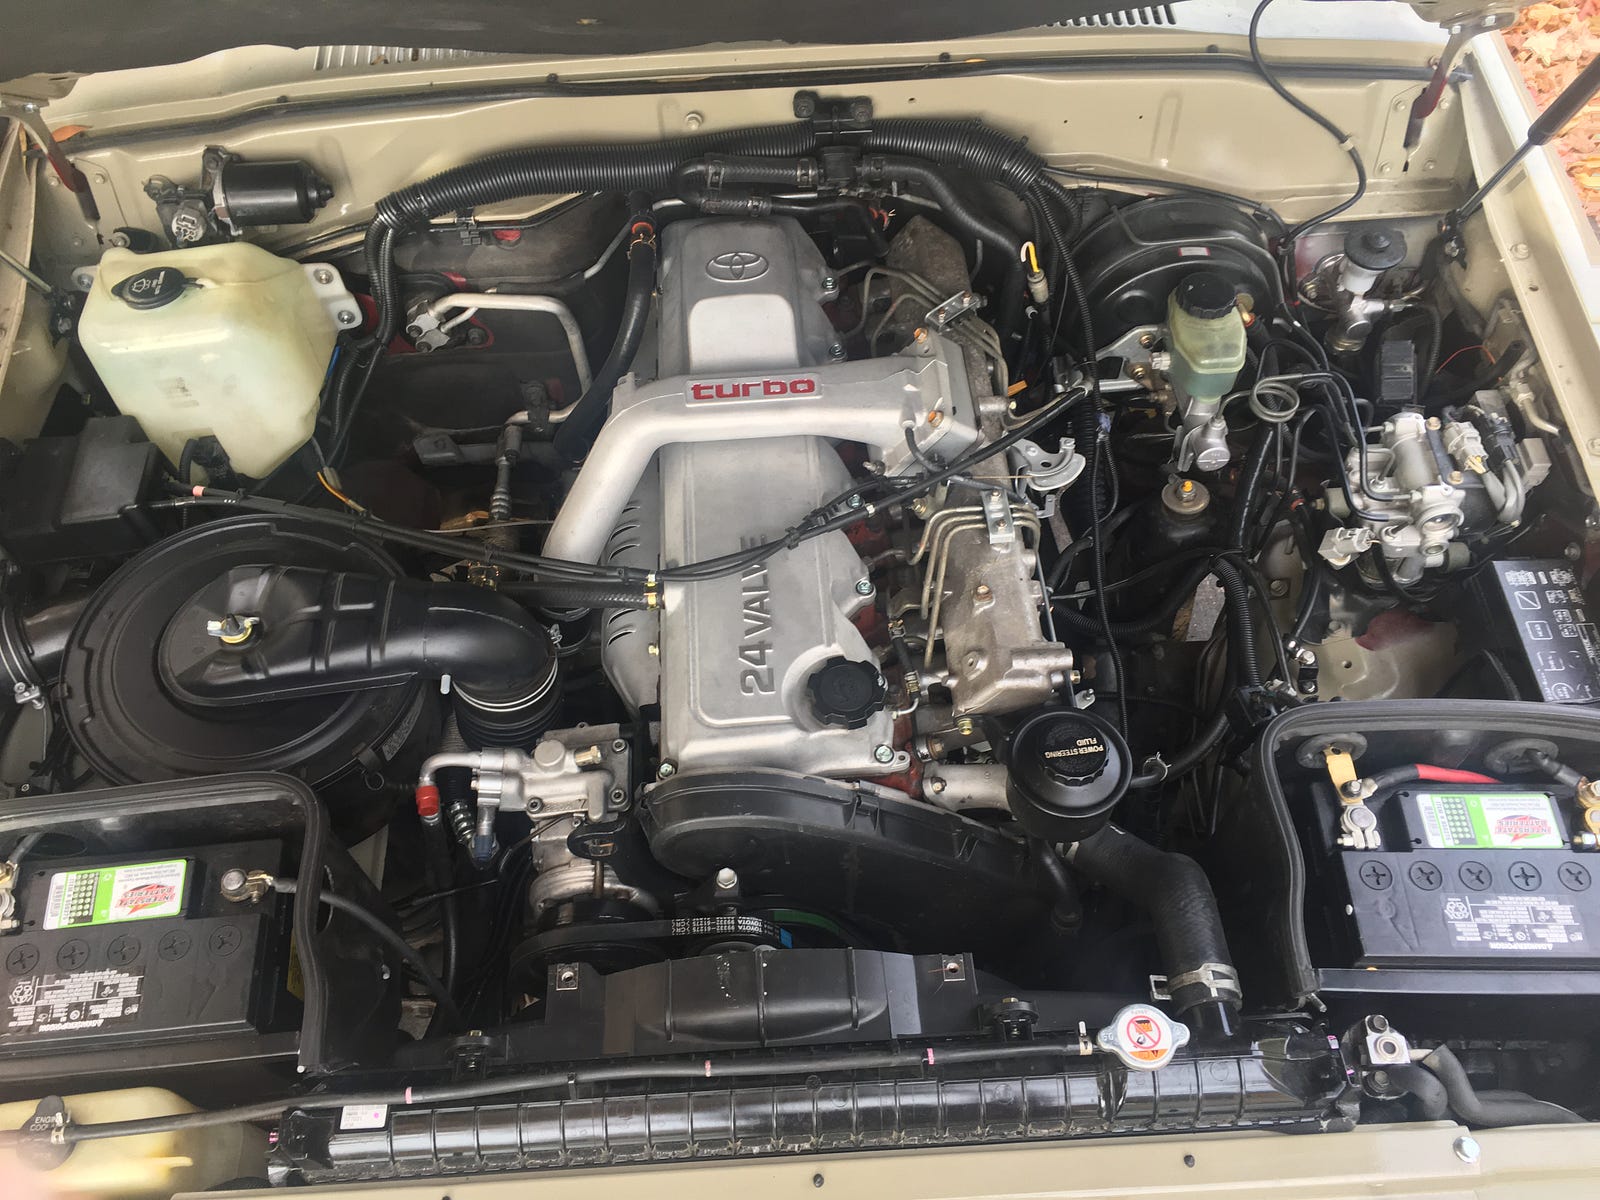
The first issue was to create a reliable overland vehicle, with a robust drive train, a fuel efficient engine and one that could travel over any terrain. This meant we would have to replace the 10 MPG 1FZ-FE gas engine/auto transmission with a 1HDFT (which is a Toyota 24-valve turbo diesel engine mated with an H151 5-speed manual transmission). This 24 MPG upgrade would allow us a 700-mile range per tank of gas.
Searching for the right engine was a long process -we’re talking 2 years. After exhausting eBay and Craigslist, in December 2017 the engine was finally found through the North America Land Cruiser Community (through Facebook). The engine/drivetrain came out of a European HDJ81 Land Cruiser and was sent to Valley Hybrids, a shop in Stockton, California that specializes in diesel engine conversion for Land Cruisers. They replaced most of the external parts, rebuilt the injector pump and injectors, and did all the checks to verify that the engine was in excellent running condition. They also rebuilt the 5-speed transmission. The transfer case was converted to part time 2WD/4WD from all time 4WD in order to get even better milage on the highway. They have done an amazing job. We could have not chosen a better shop.
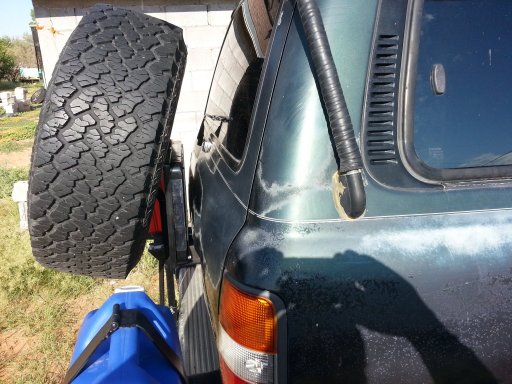
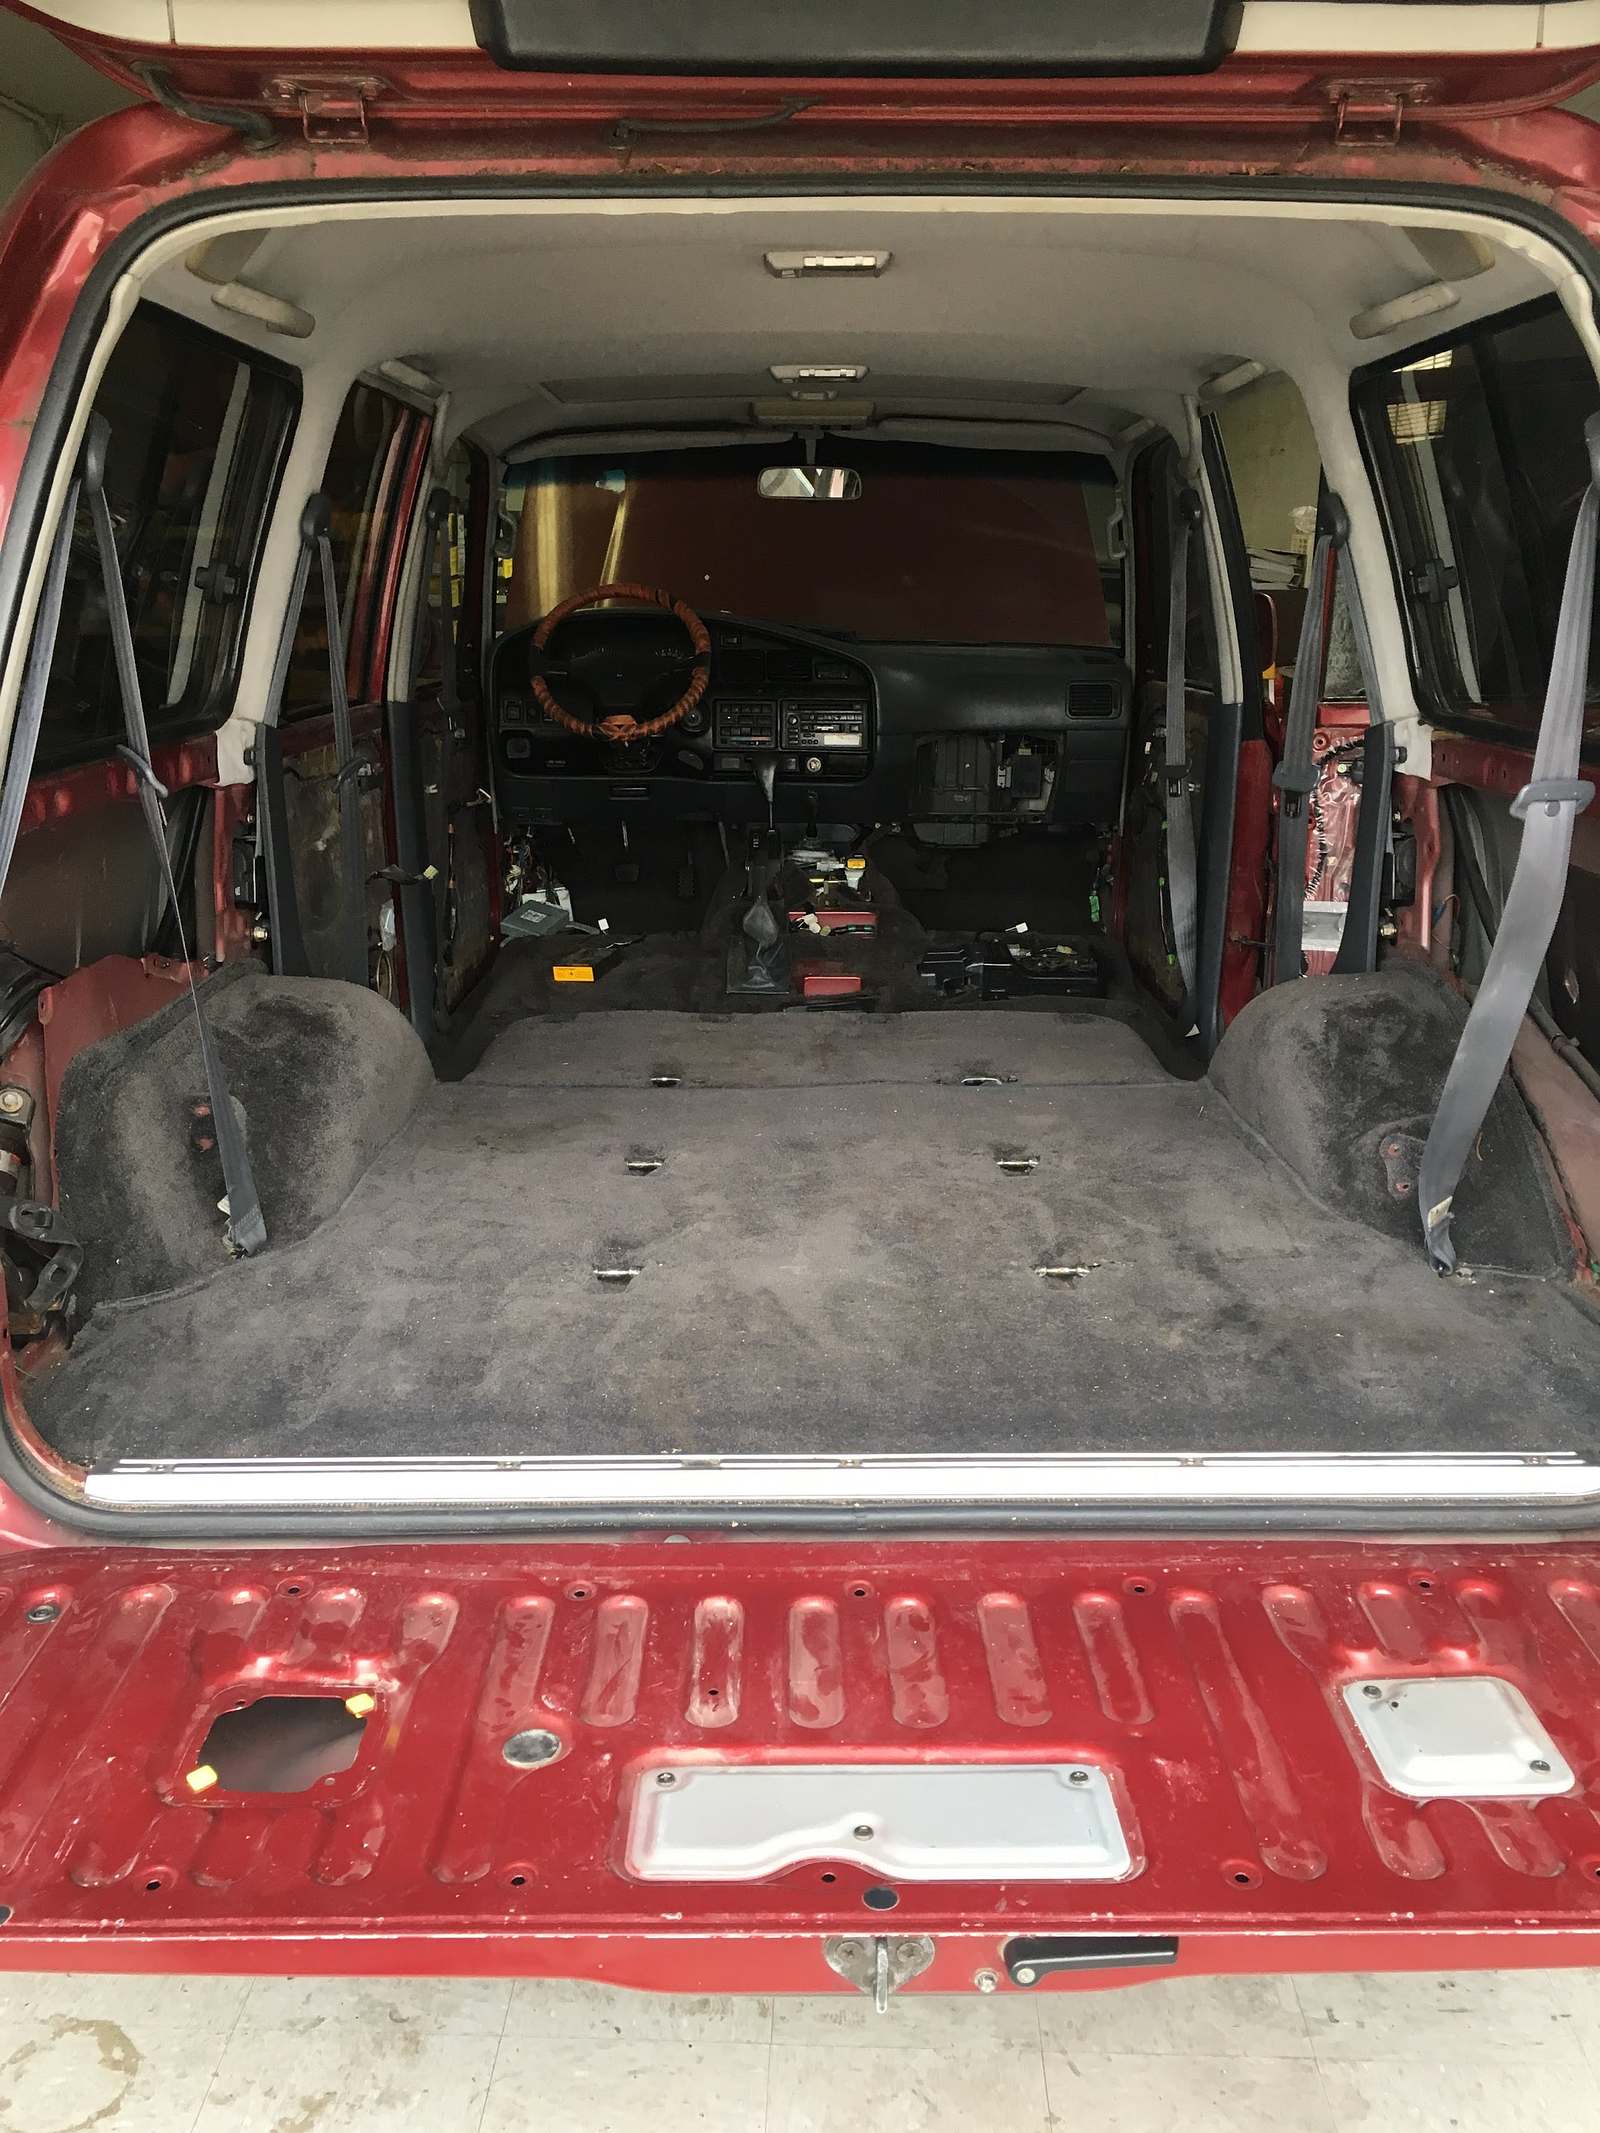
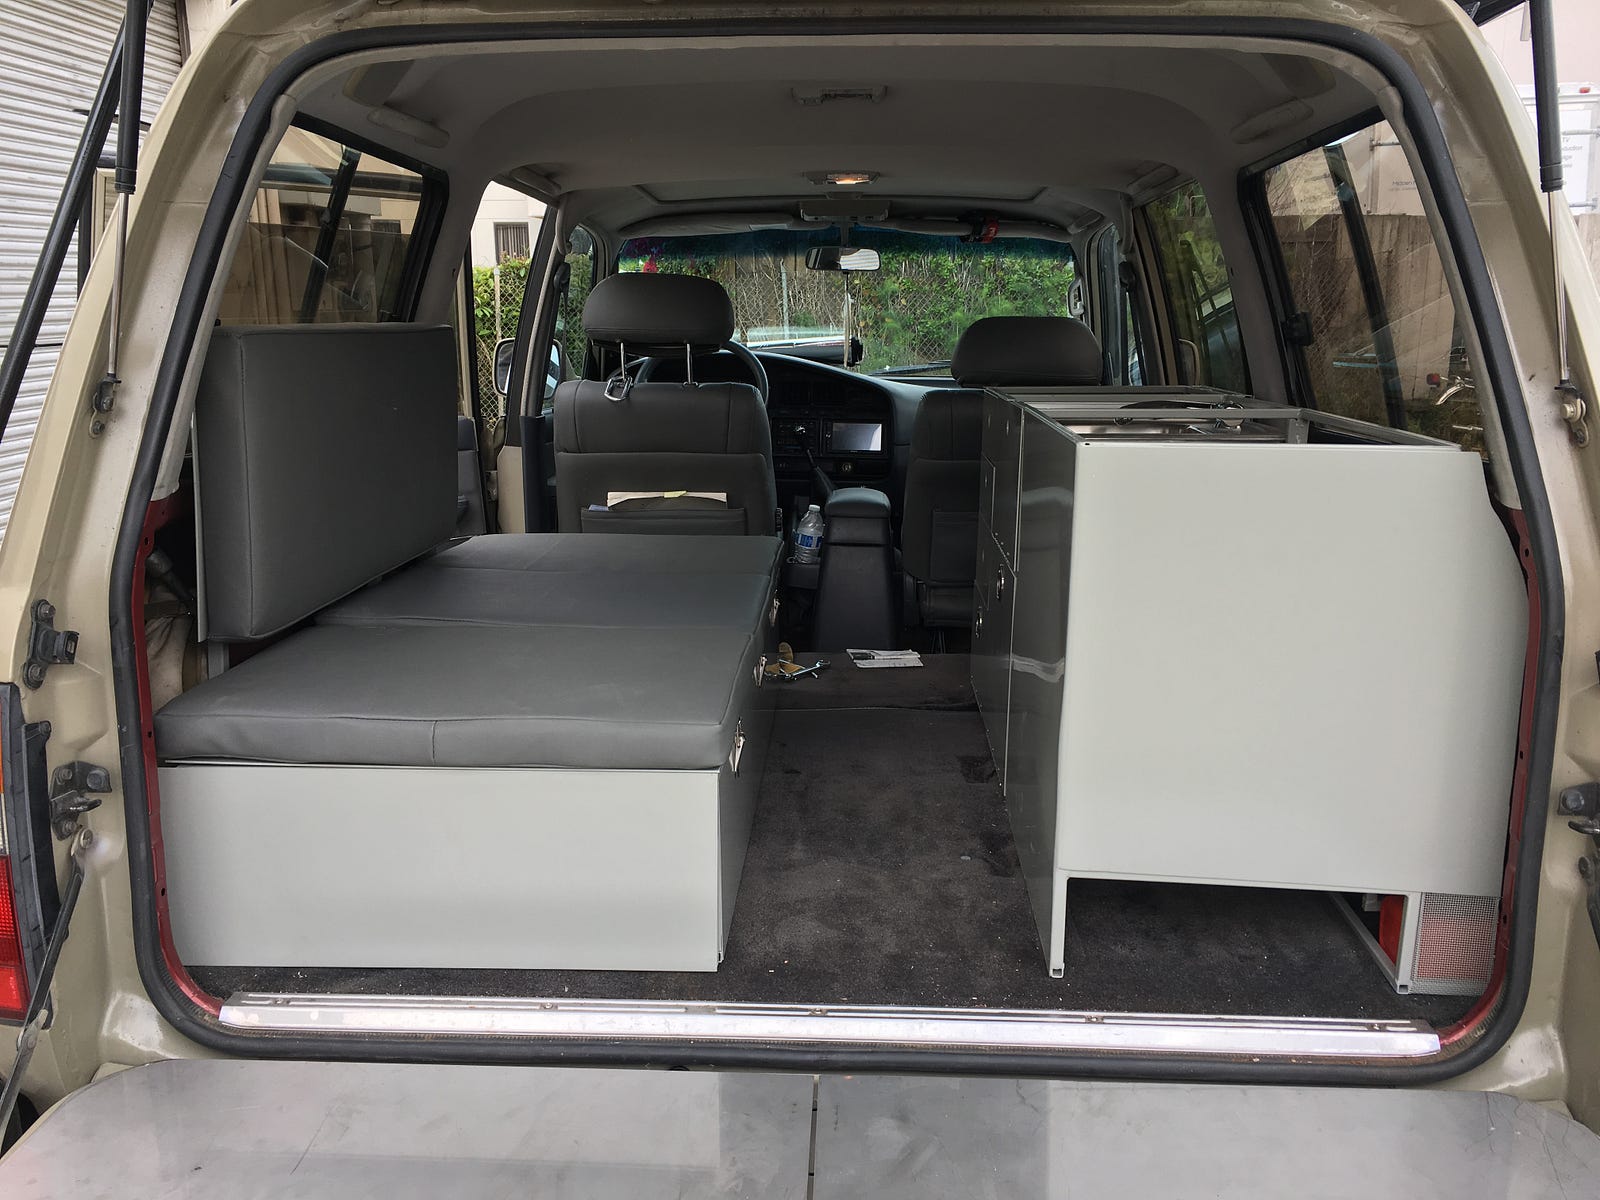
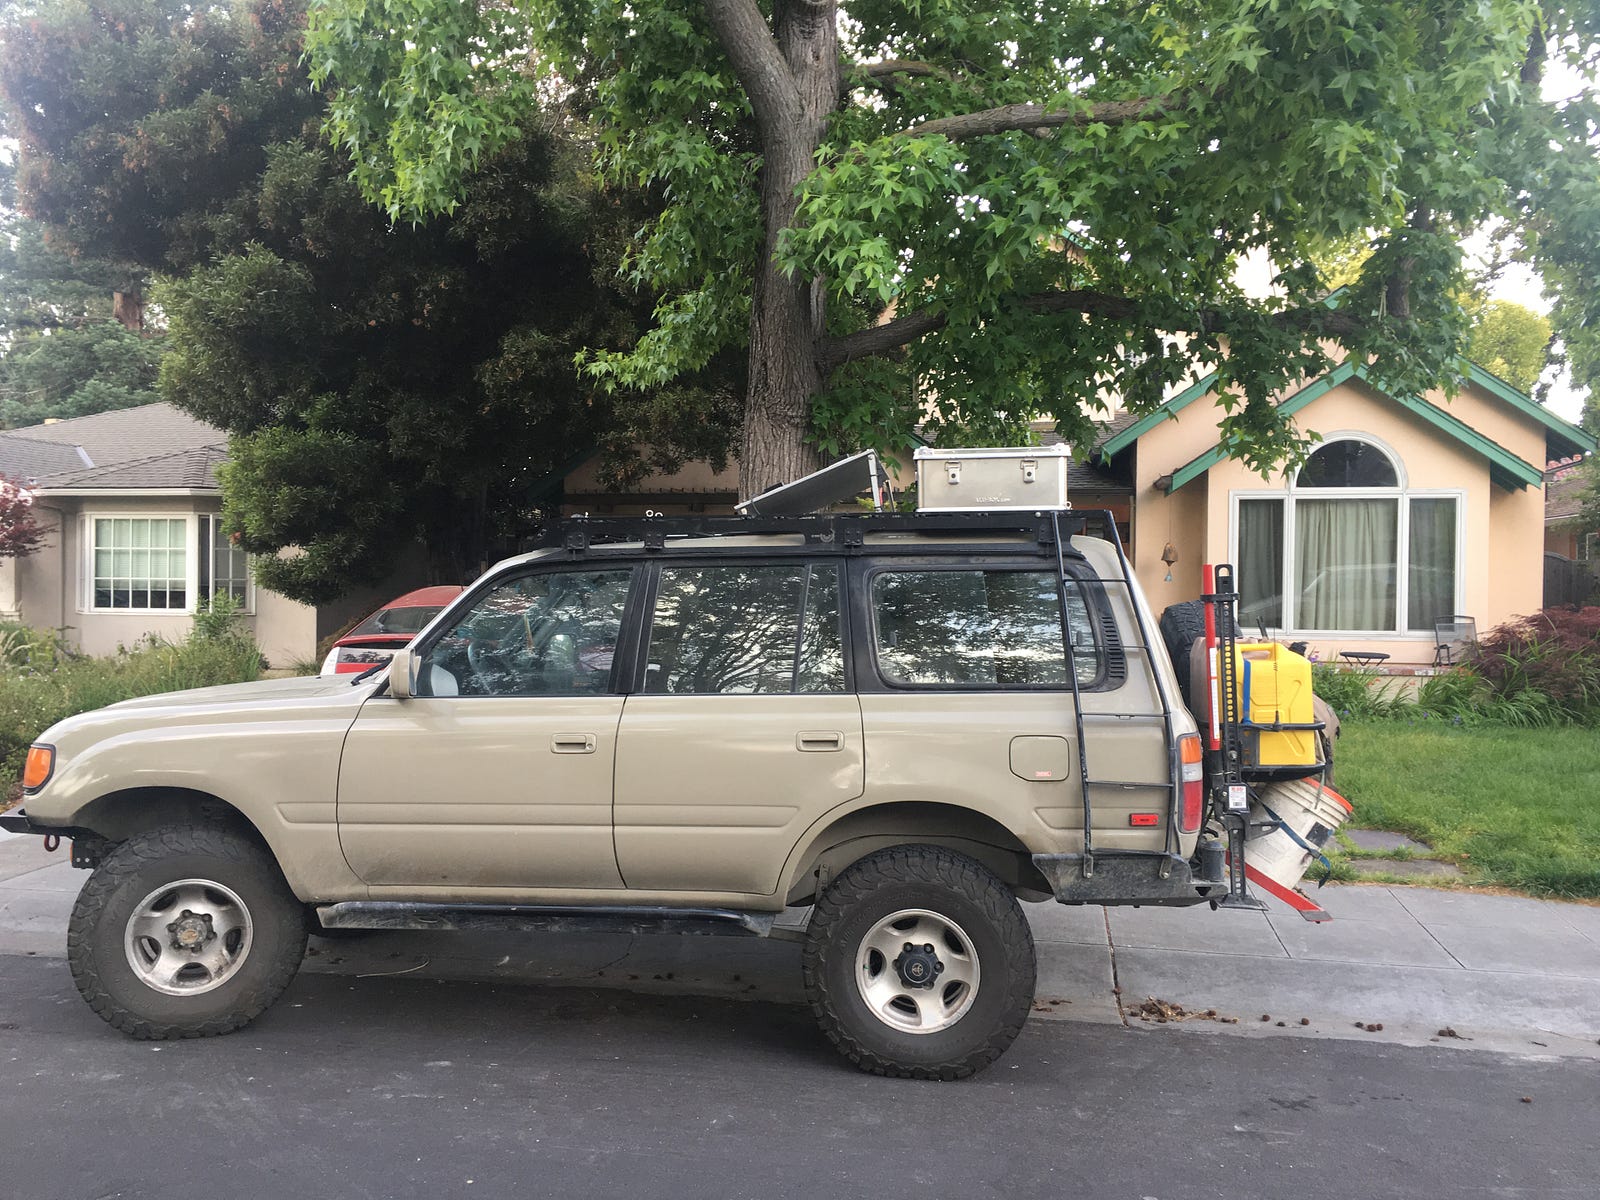
Meanwhile, “back at the ranch”, the vehicle was undergoing more changes. The bumpers were upgraded with more rugged units that can accept a winch and a spare tire in the back. Product of 4x4Labs. The front seats were refinished with new leather and seat warmers. The two rows of rear seats were removed to allow space for a kitchen and bed.
The electrical and fuel systems had to be converted to the diesel engine and the transmission hump had to allow for the new manual shifters. The vehicle was then painted with a ‘sand’ color to blend better with nature.

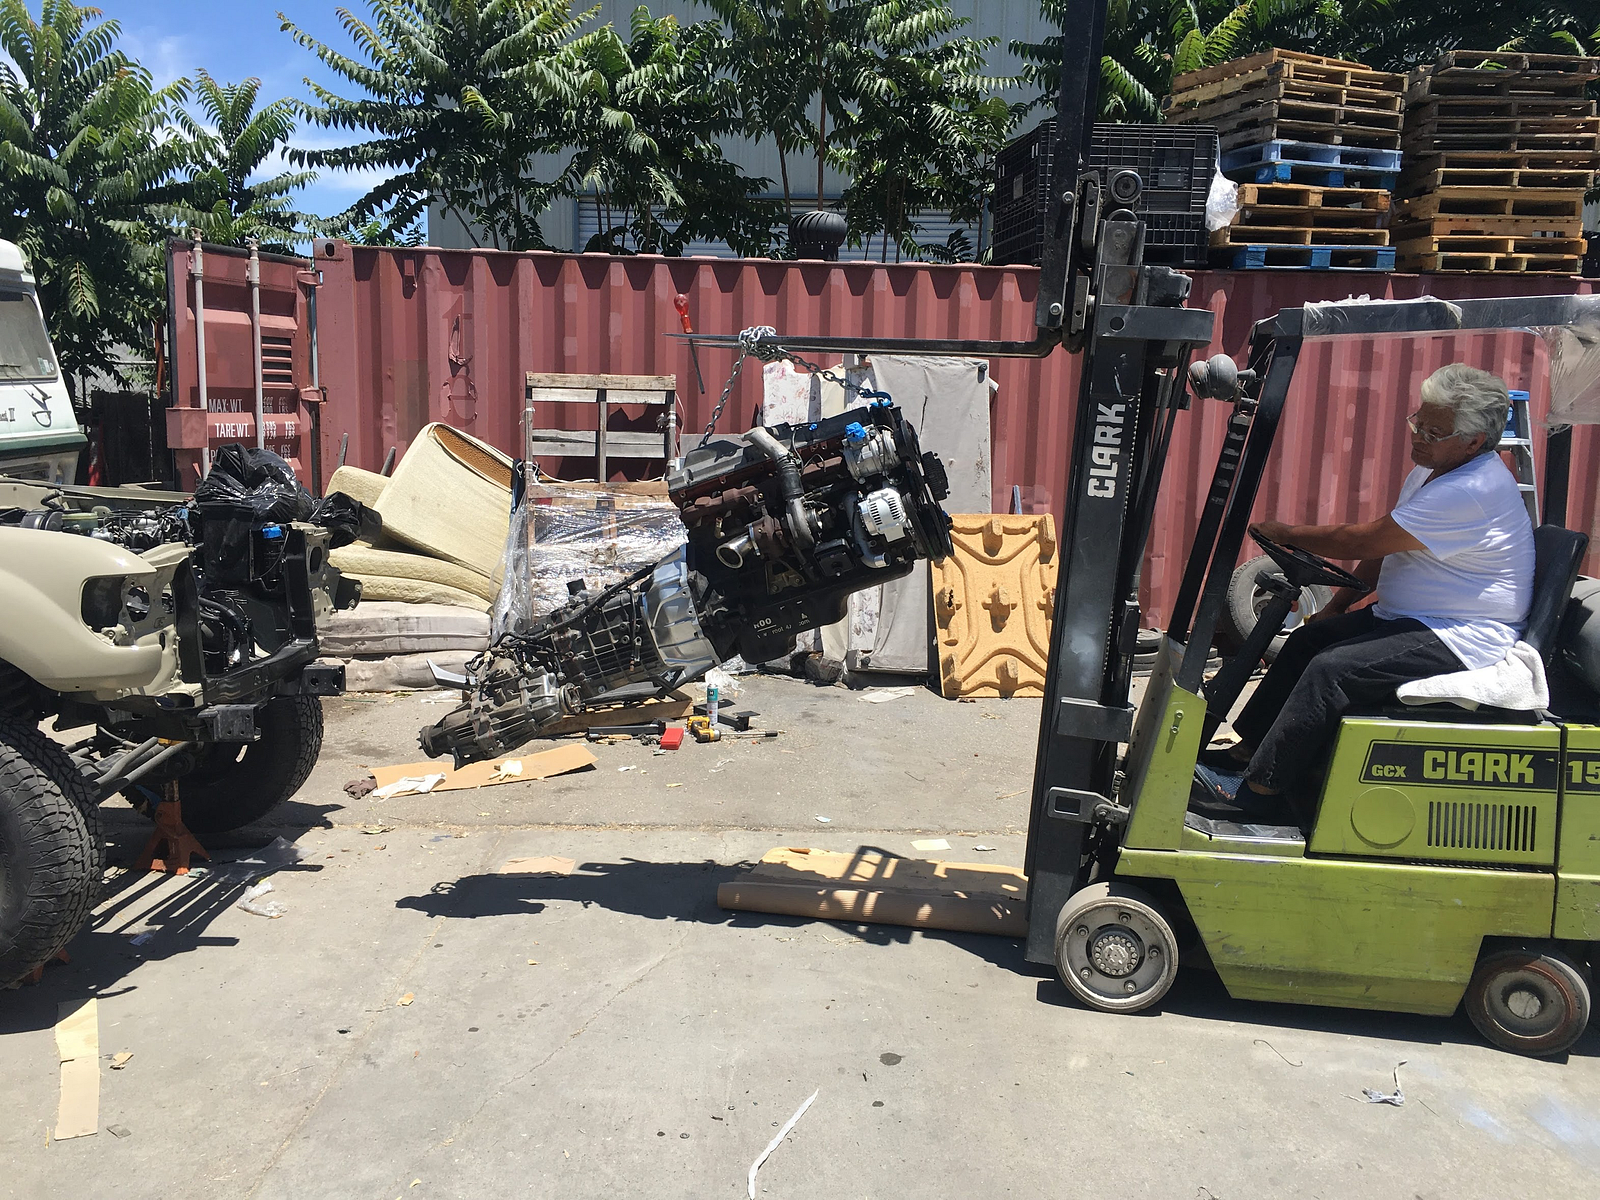
In June, the engine was completed at Valley Hybrids. We borrowed a truck and brought it from Stockton to San Jose, California. On a hot sunny day in July the engine was finally put into the vehicle. Since this engine was designed for this Land Cruiser model in other countries, little metal work modification was required.
The finished job on the drivetrain required testing before the work on the “tiny house” began. The car was driven for 1000 miles. It also required a trip to the CA DMV to change the title of the vehicle from gas to diesel.

The big test was a road trip from San Francisco Bay Area to Tempe. The vehicle was taken on a 2000-mile trip to Arizona including 4WD trails in Sedona. It drove beautifully and got 24 mpg. There were no mechanical issues. The last day it was driven over 1000 miles with one gas stop for 10 minutes.
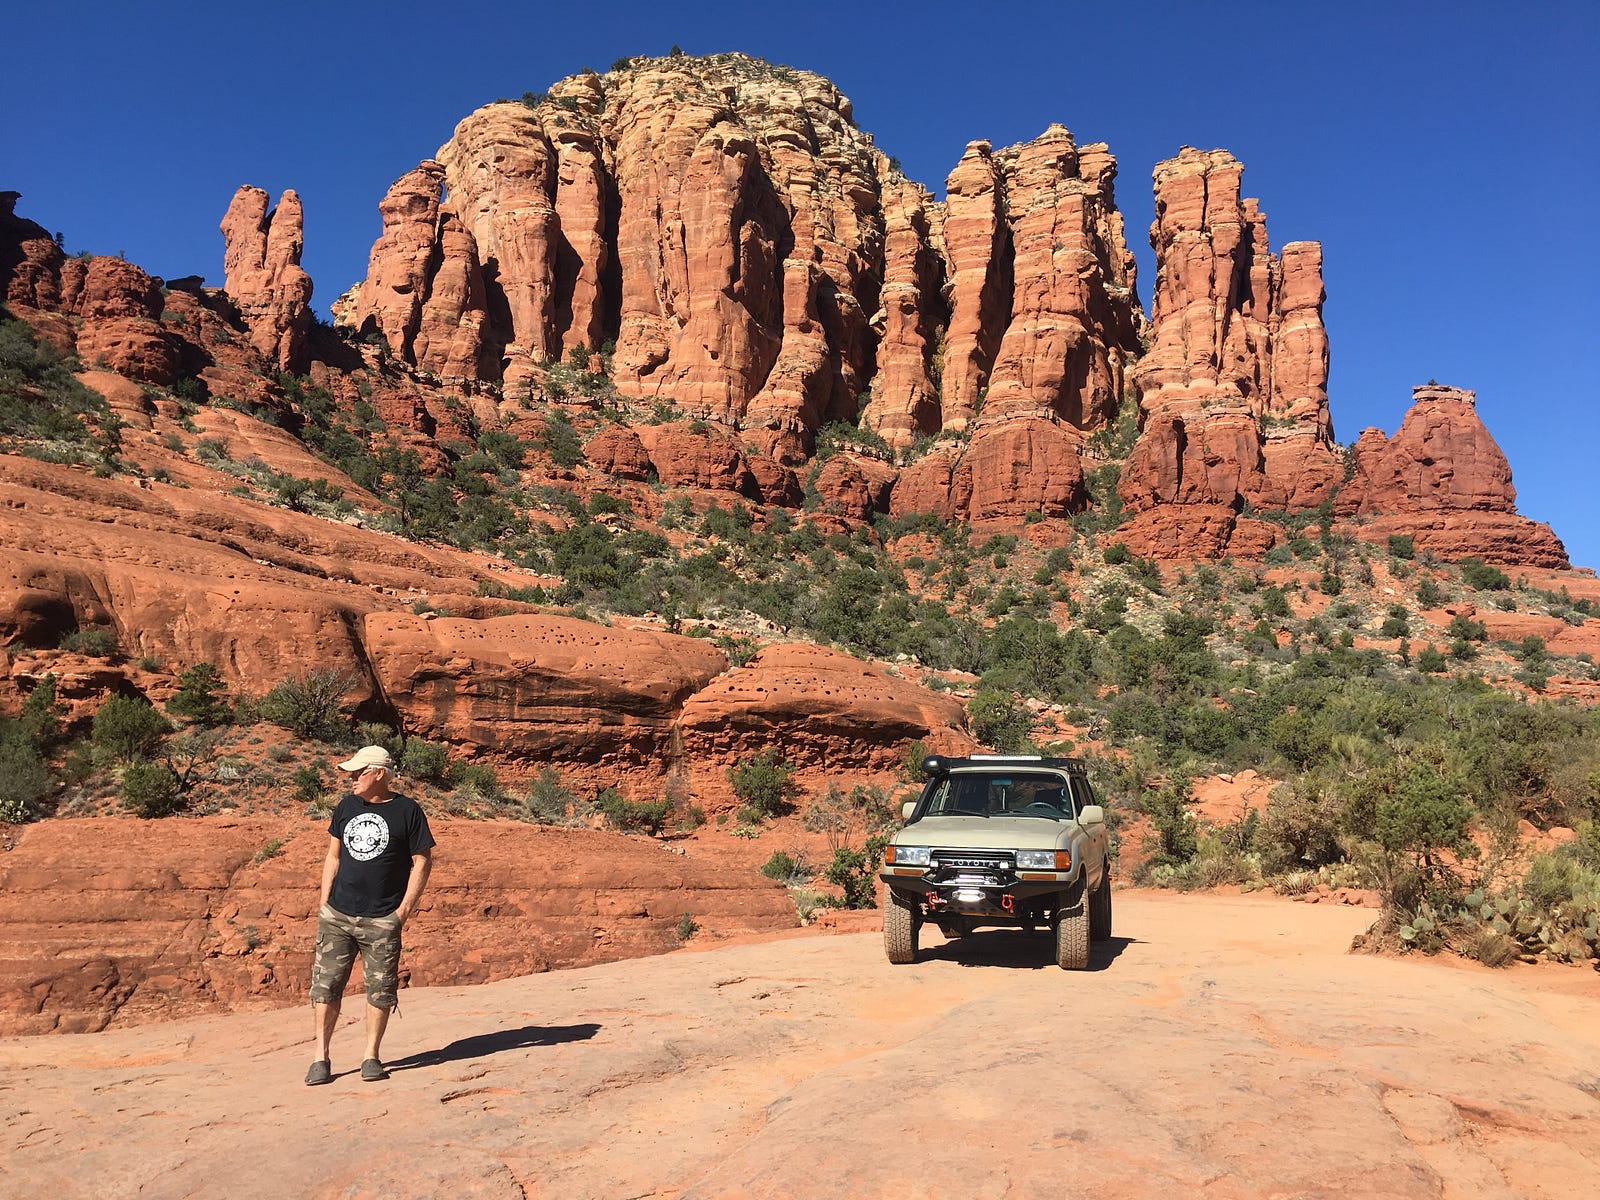
Broken Arrow to Chicken Point, Sedona, AZ
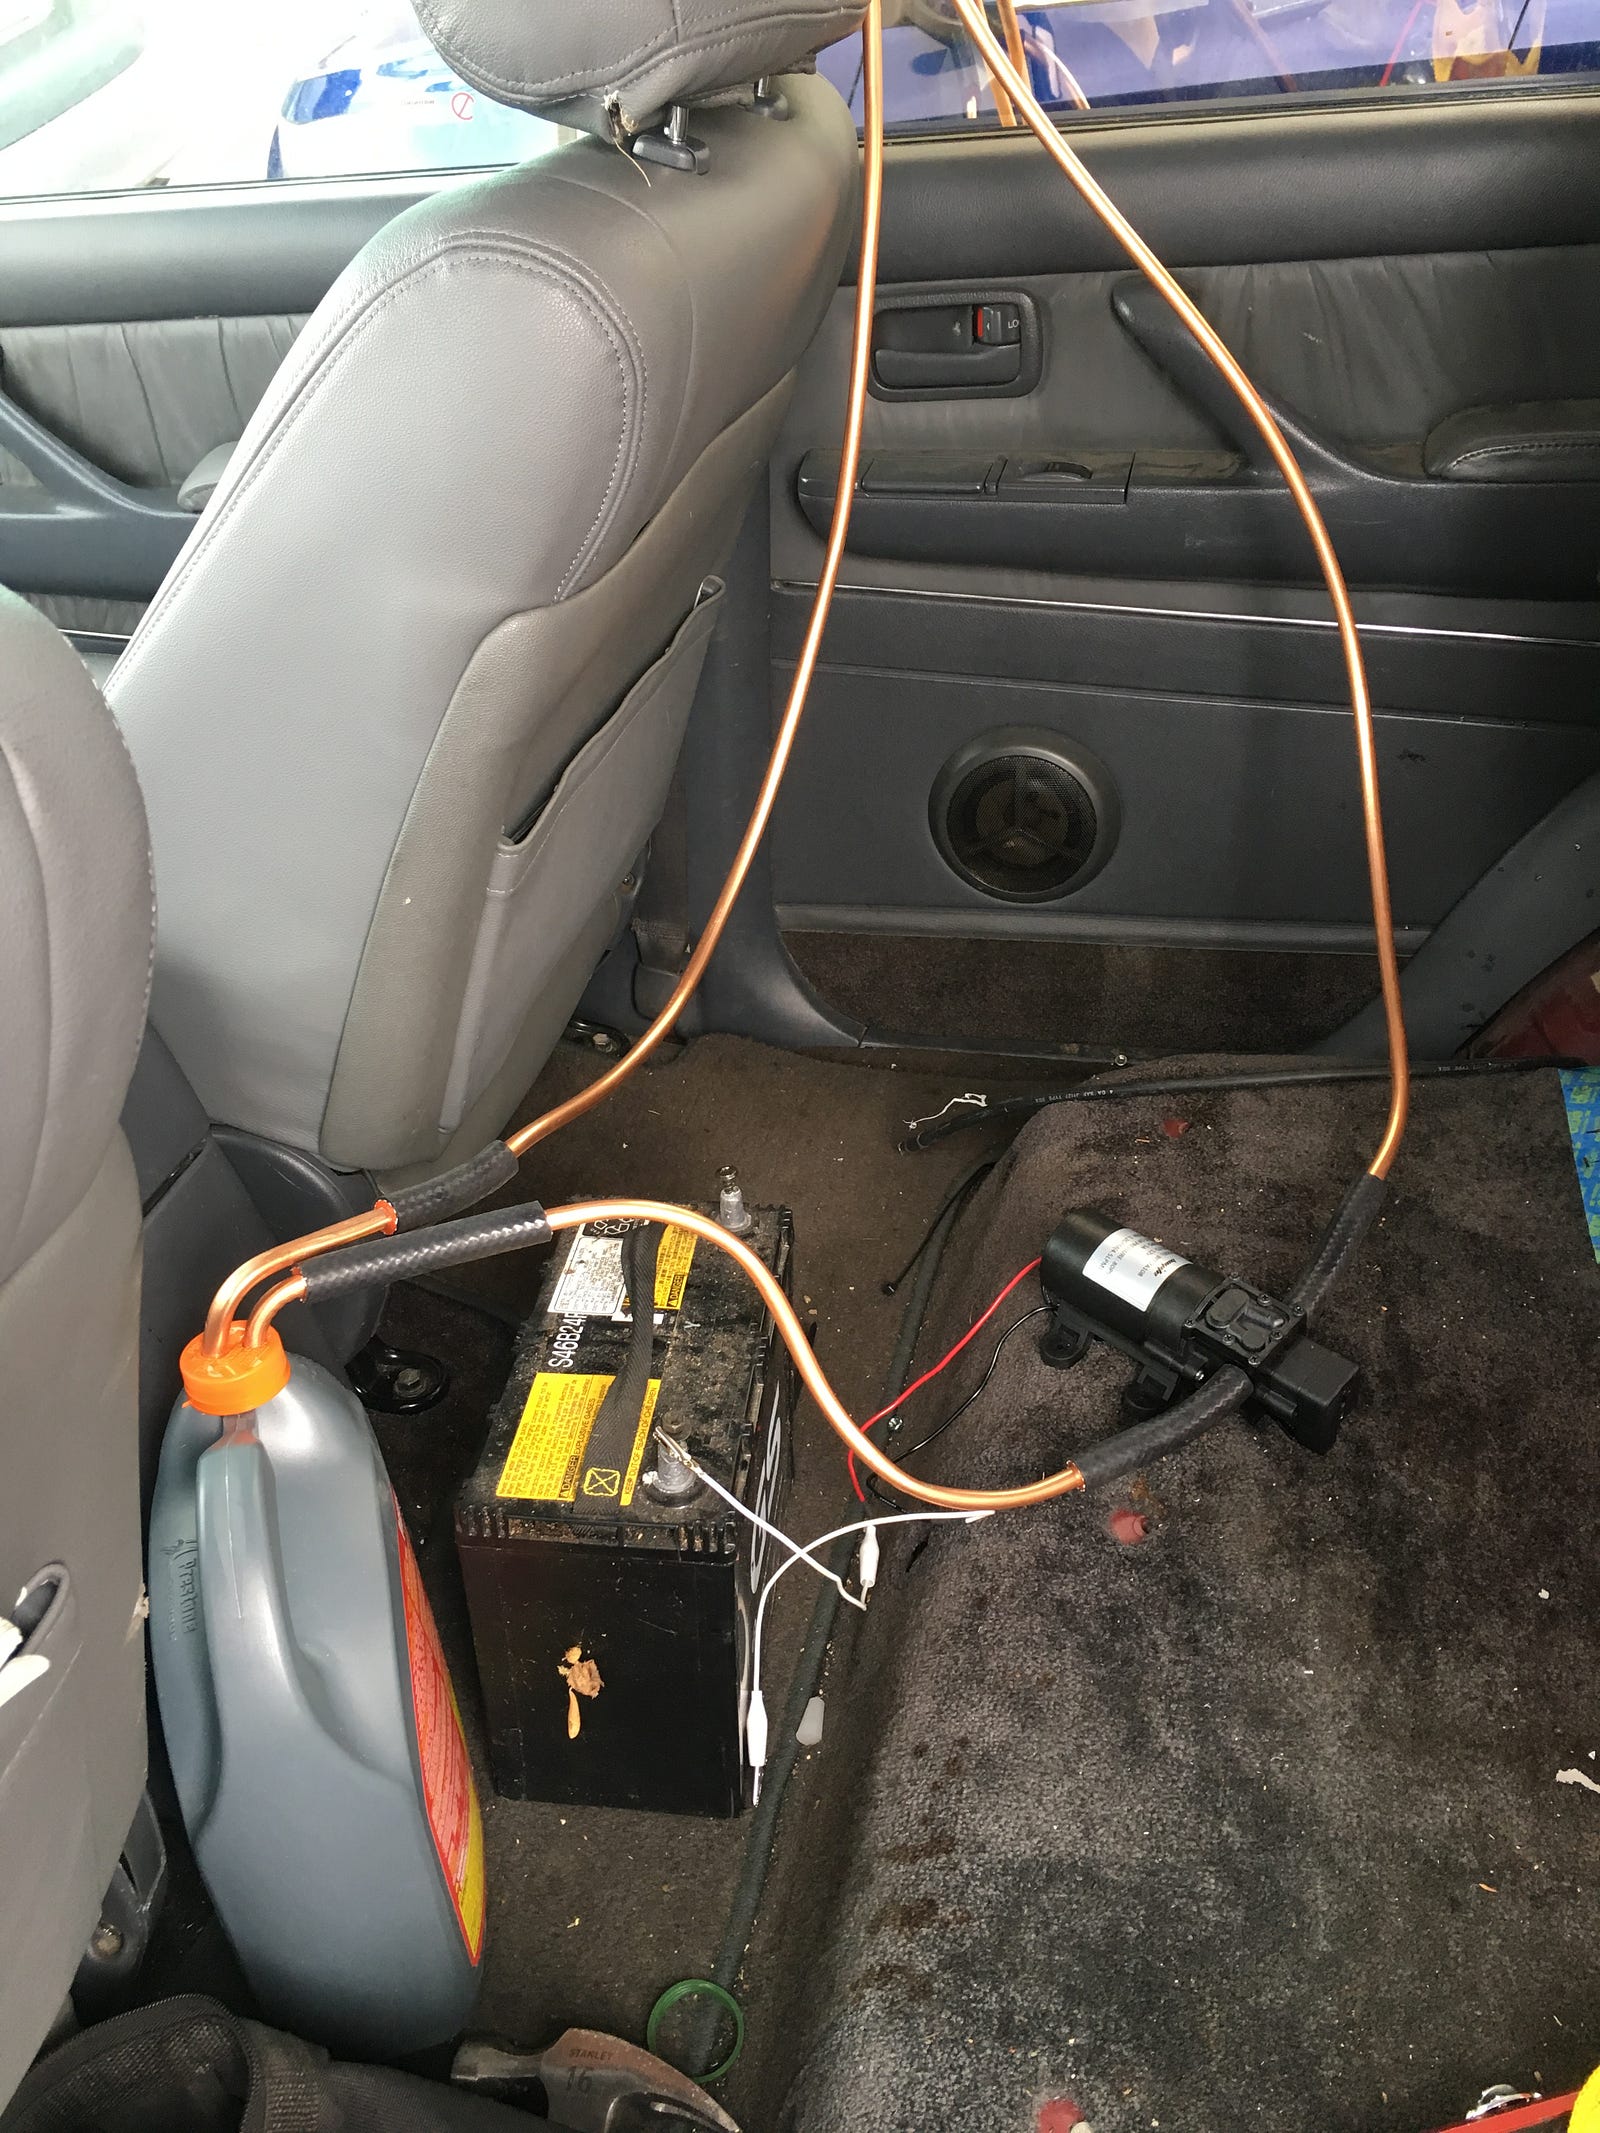
We were ready now to move ahead with the interiors. At this point we added a second battery to support the ‘home’ part of the car. It is charged by the alternator when the engine is running and disconnects when the voltage drops below 12.5 VDC when the engine is not running. It will be hooked to a solar panel if the car will be parked for extended period of times while using the fridge.
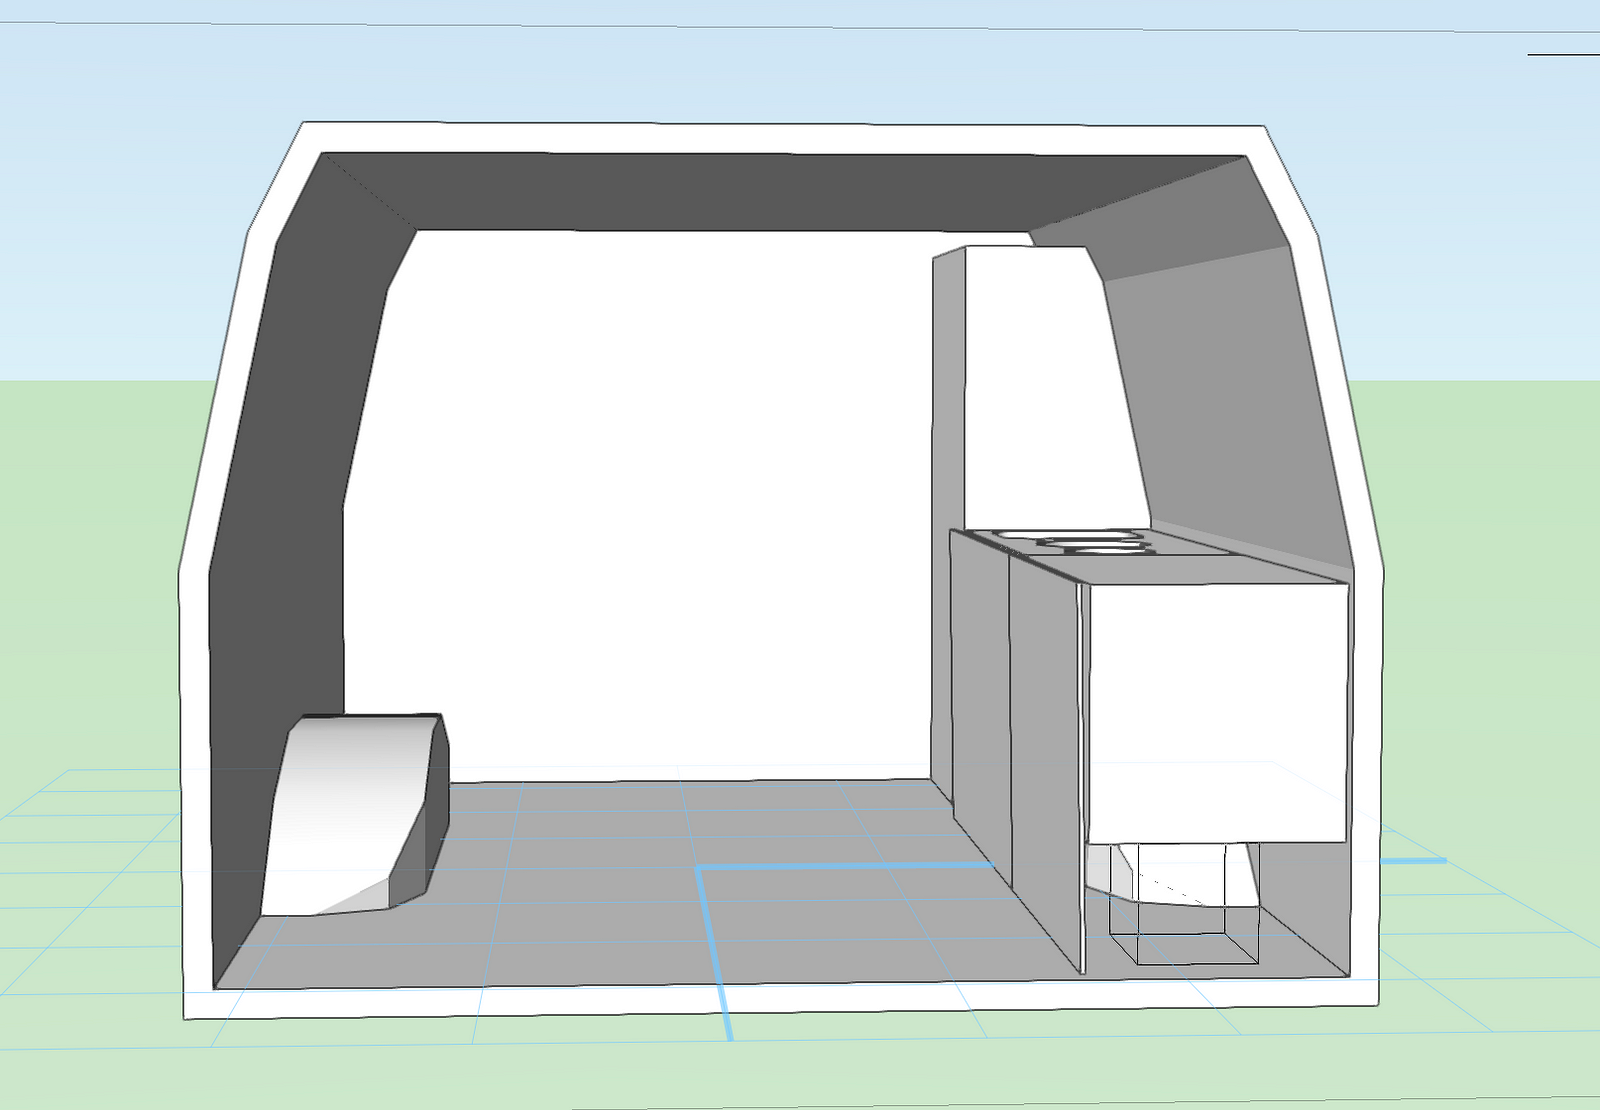
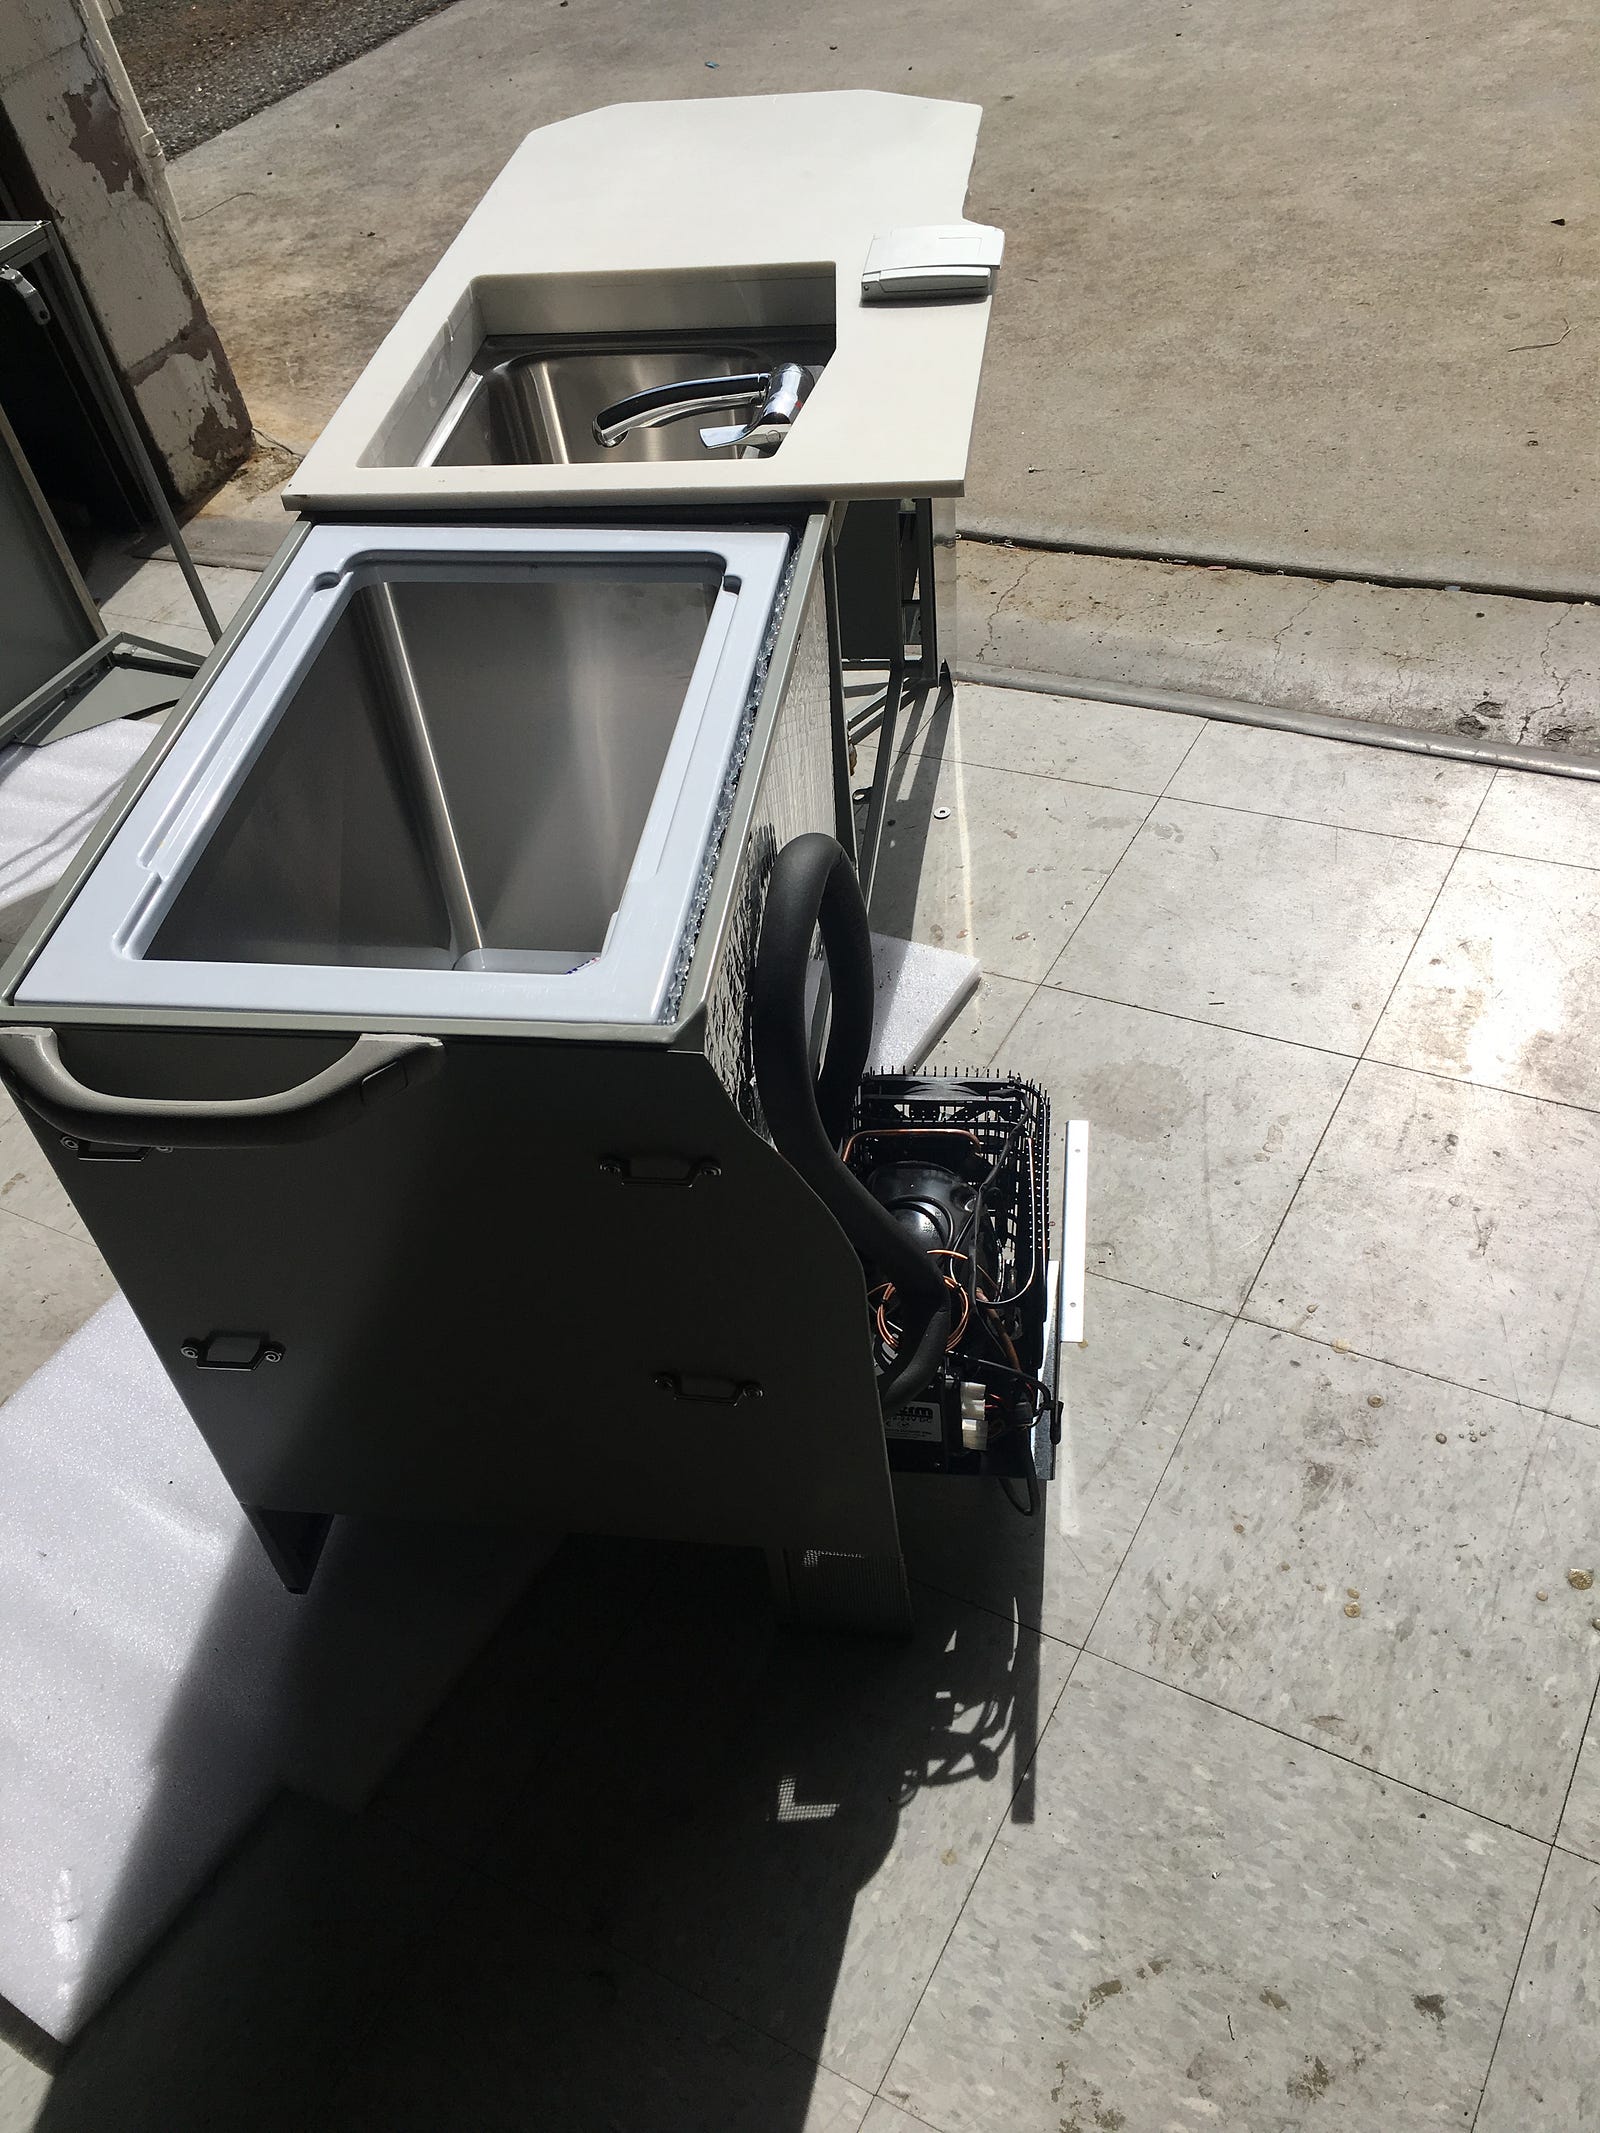
Tali Hardonag Architects began the interior design of the vehicle in order to convert it into a “tiny home”. After a long search a marine grade fridge/freezer was selected to accommodate the limited space — Webasto BI-41 dual. The advantage of this model is that it has a detached compressor that can be placed up to 6 feet away from the fridge. It will probably reside behind the fridge inside the wheel well. We’re still scouting for a sink and a stove that will fit in the layout.
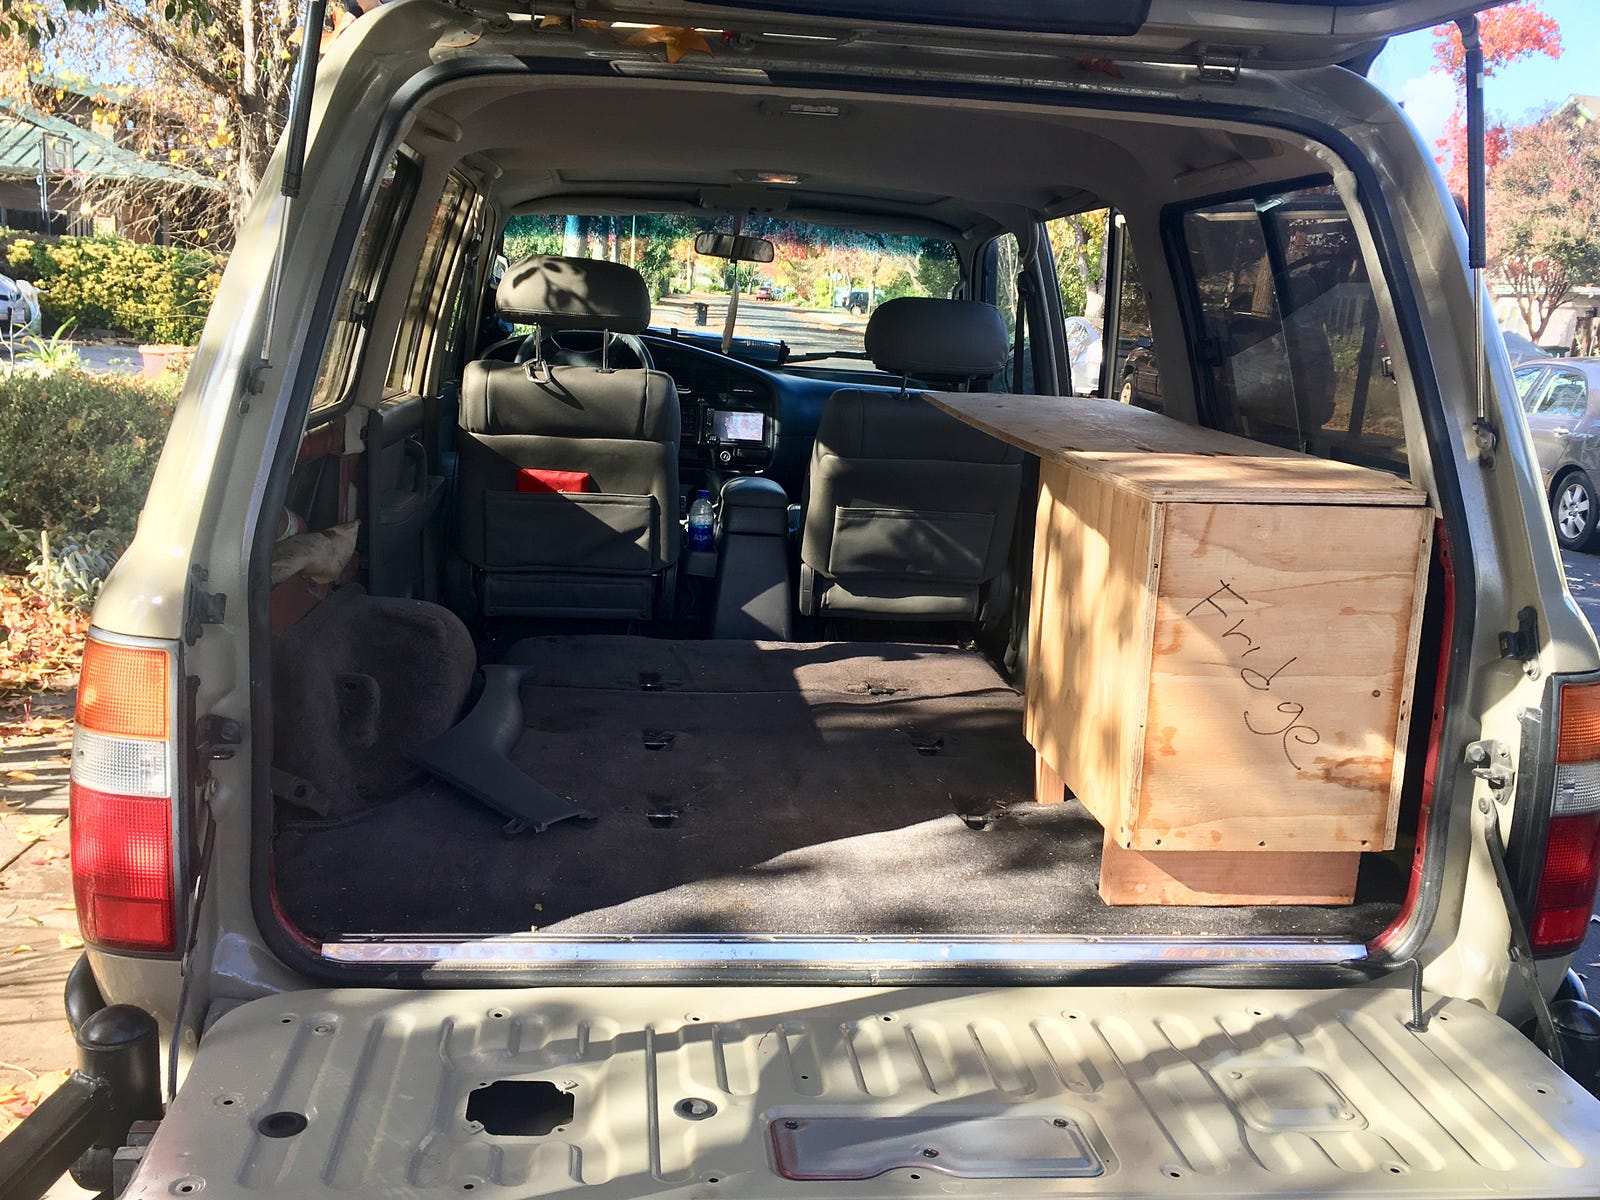
We’re currently finishing the design for the kitchen and building a mock-up from plywood in order to experience the space inside the vehicle.
New year 2019!
Our search for a sink and faucet zeroed in on a Kohler K-3349–1-NA. We liked it because its a sturdy 18 ga model, small and deep. The faucetwill fold in to the well.
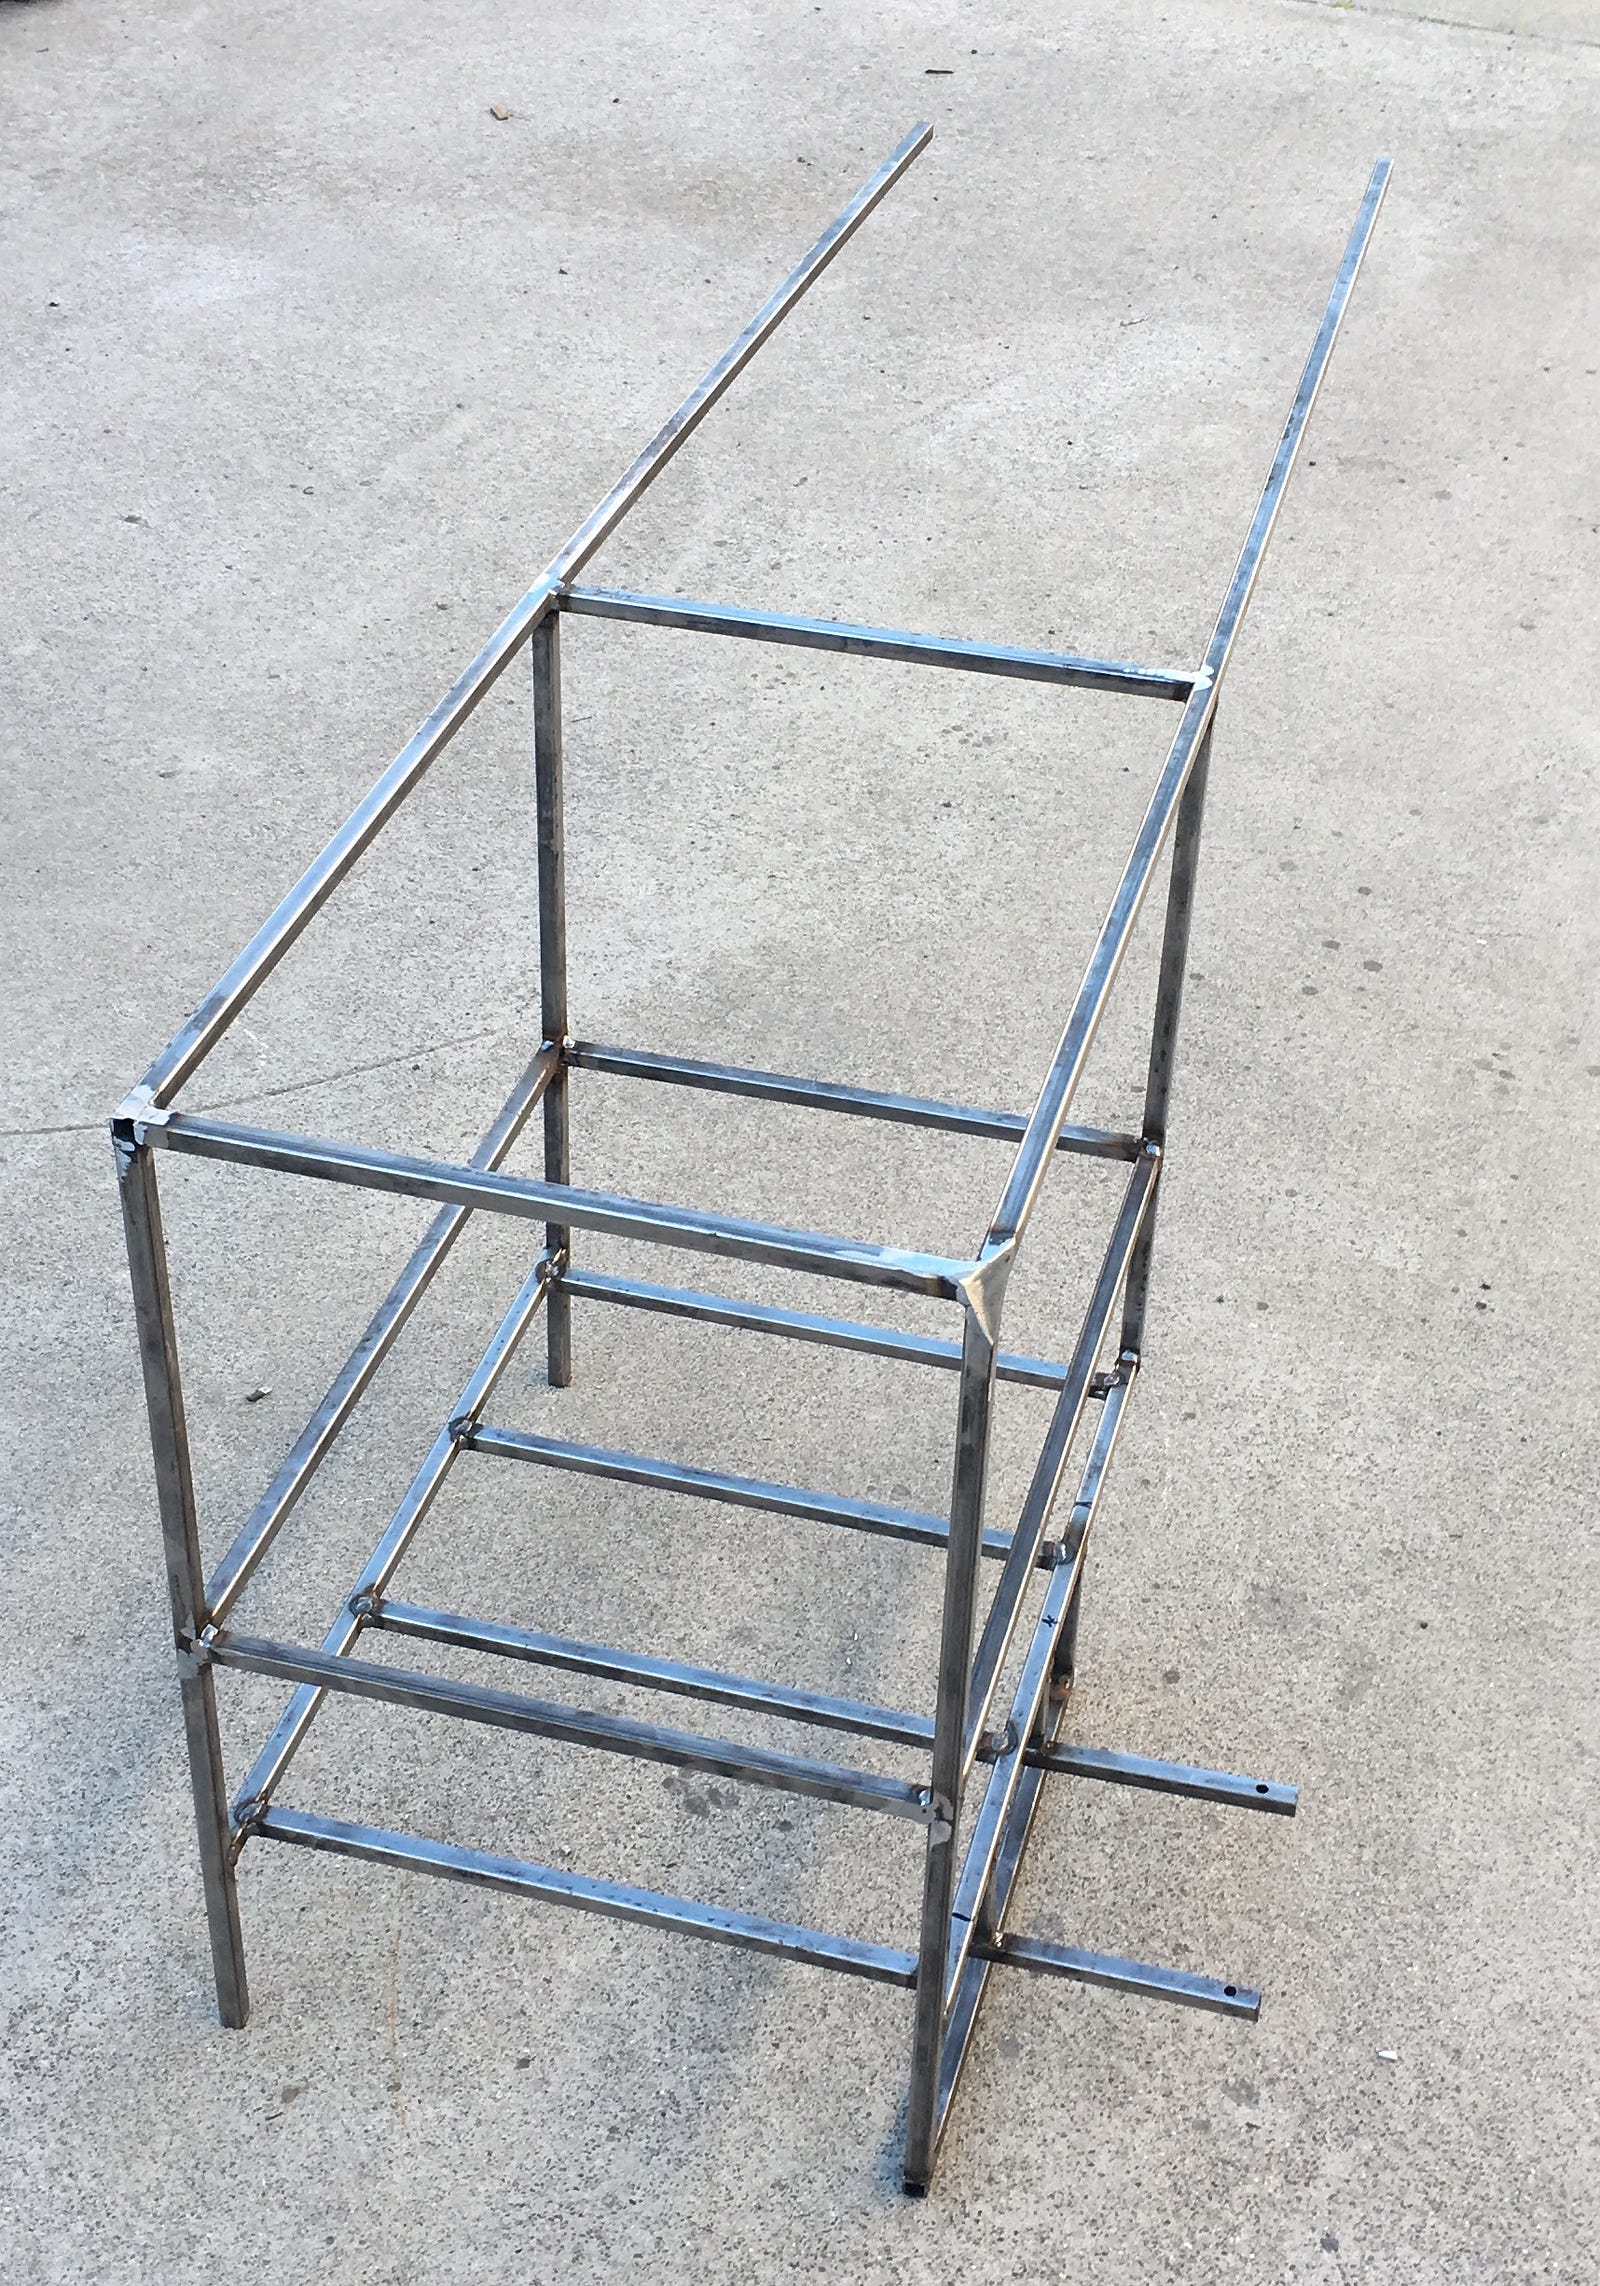
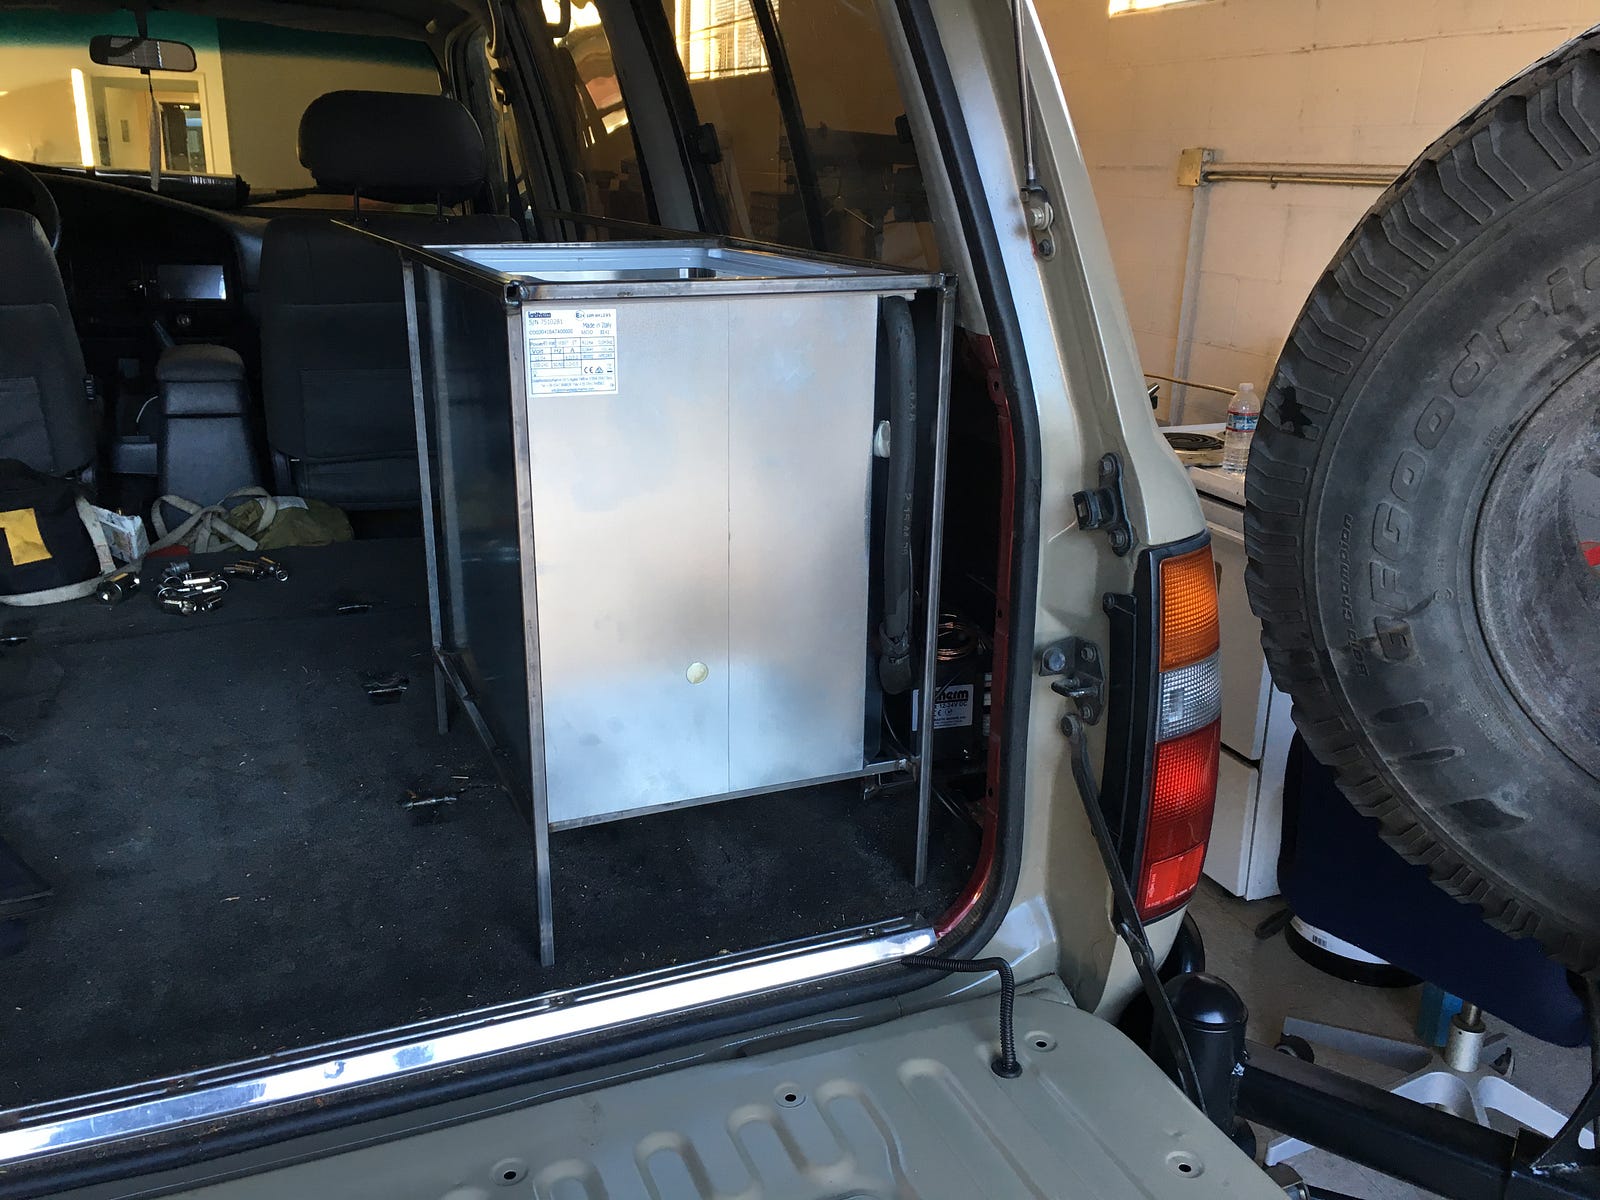
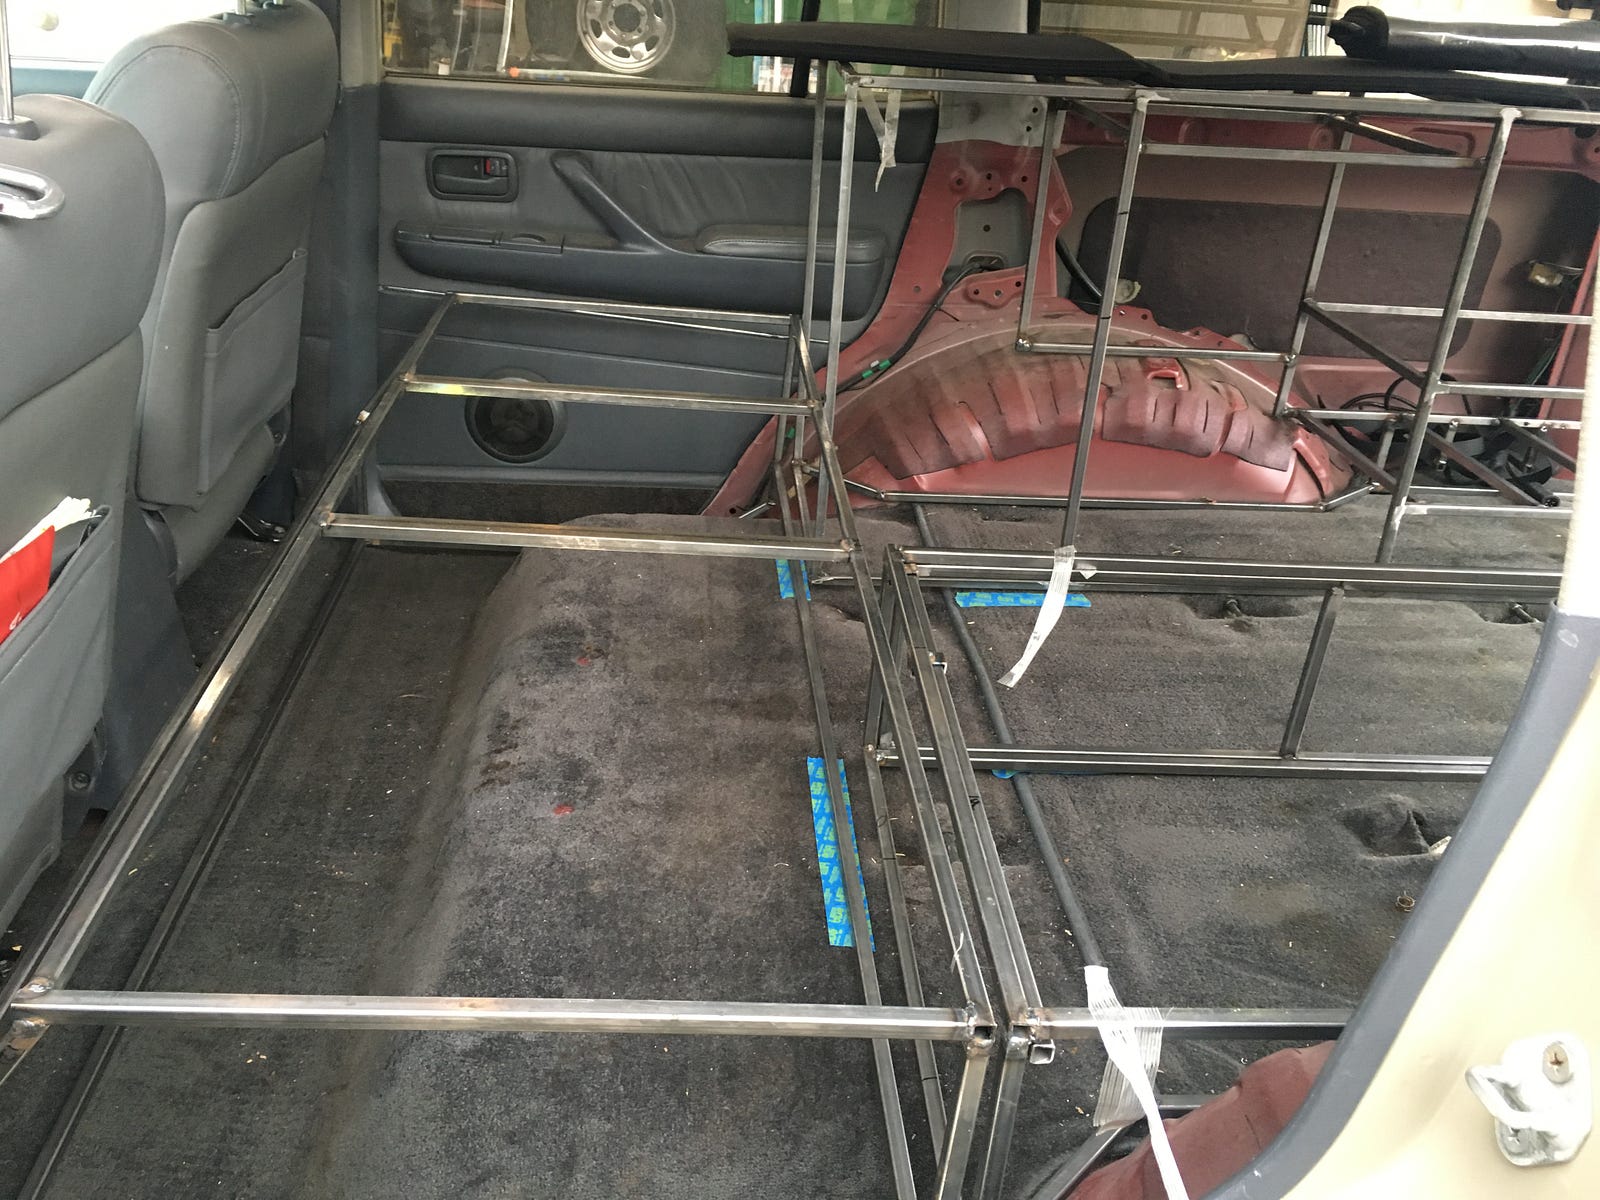
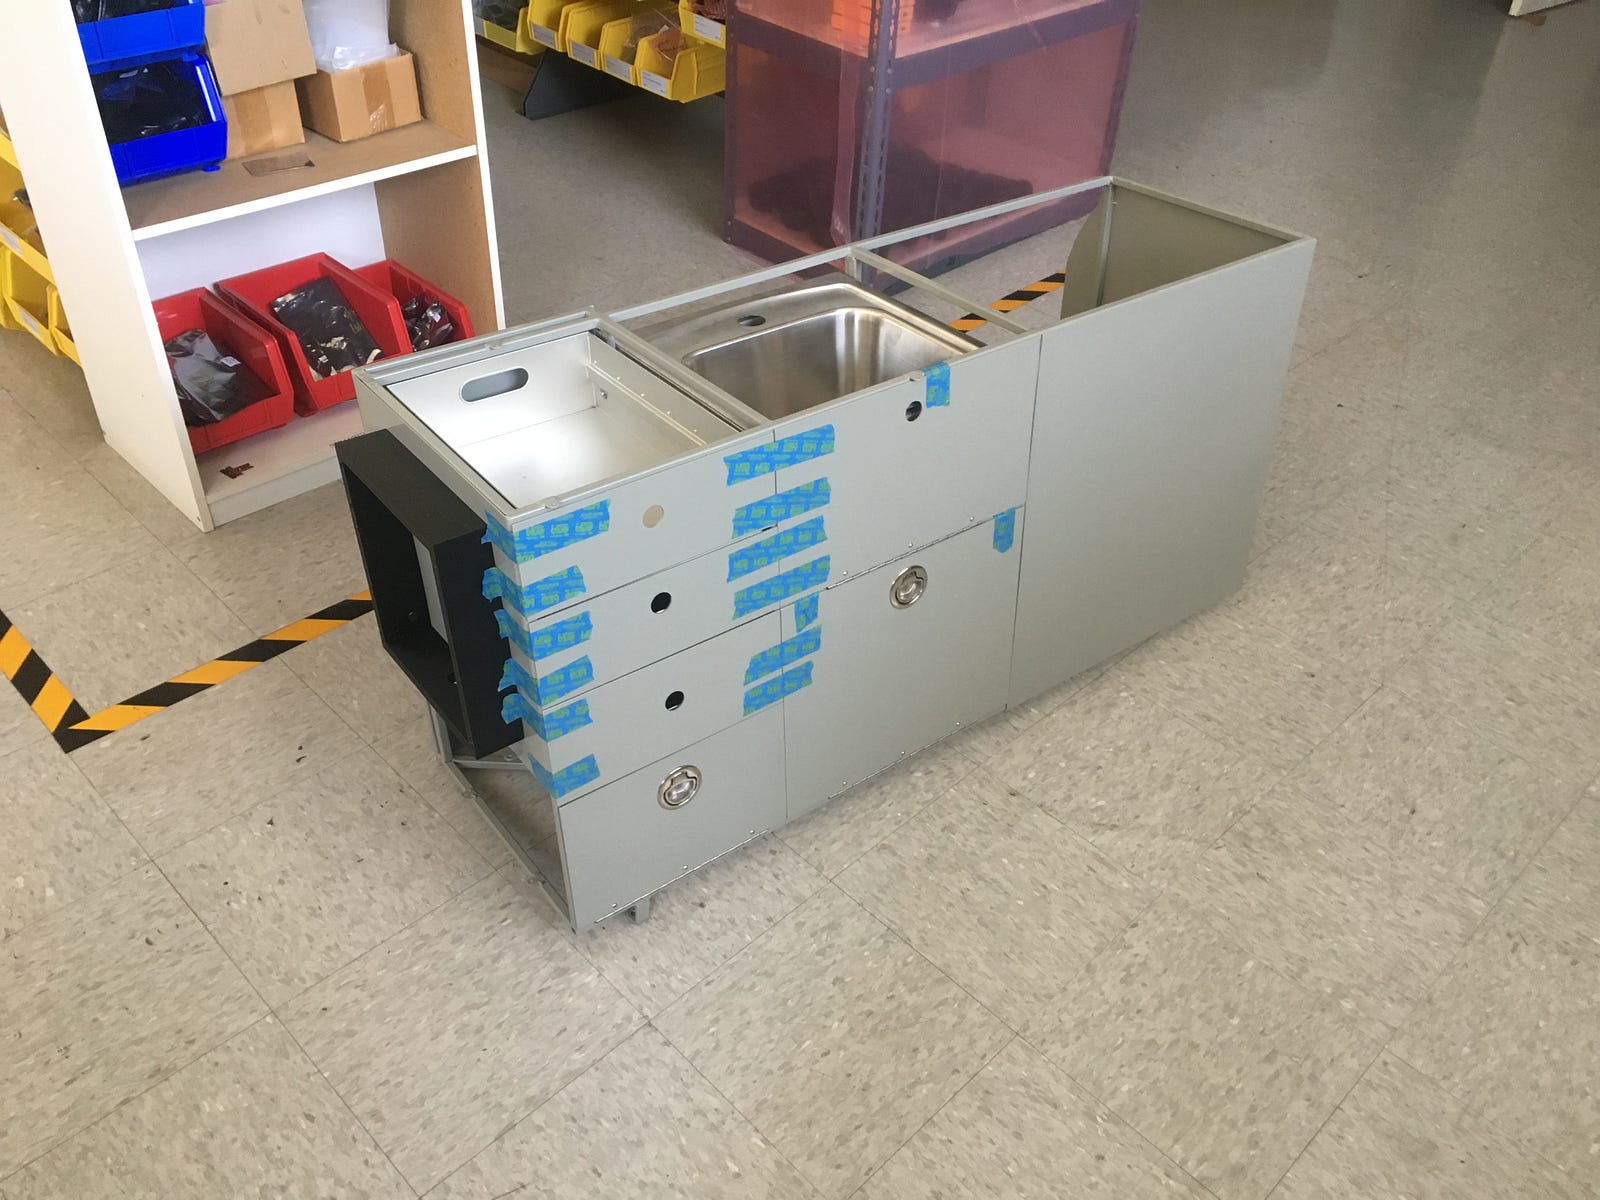
The cabinet frame is made of 1/2" square tubular steel frame. That would be covered in the future with aluminum sheets and powder coated gray to match the interior of the car. We sized the frame to fit the fridge.
The fridge fits nicely with the compressor tucked into the wheel well.
The Kohler sink Kohler K-3349–1-NA came in and was mounted on the frame. It required to be ‘sunk’ in about an inch, so the faucet folds flush with the counter top cover. We are still debating what material to build the counter top.

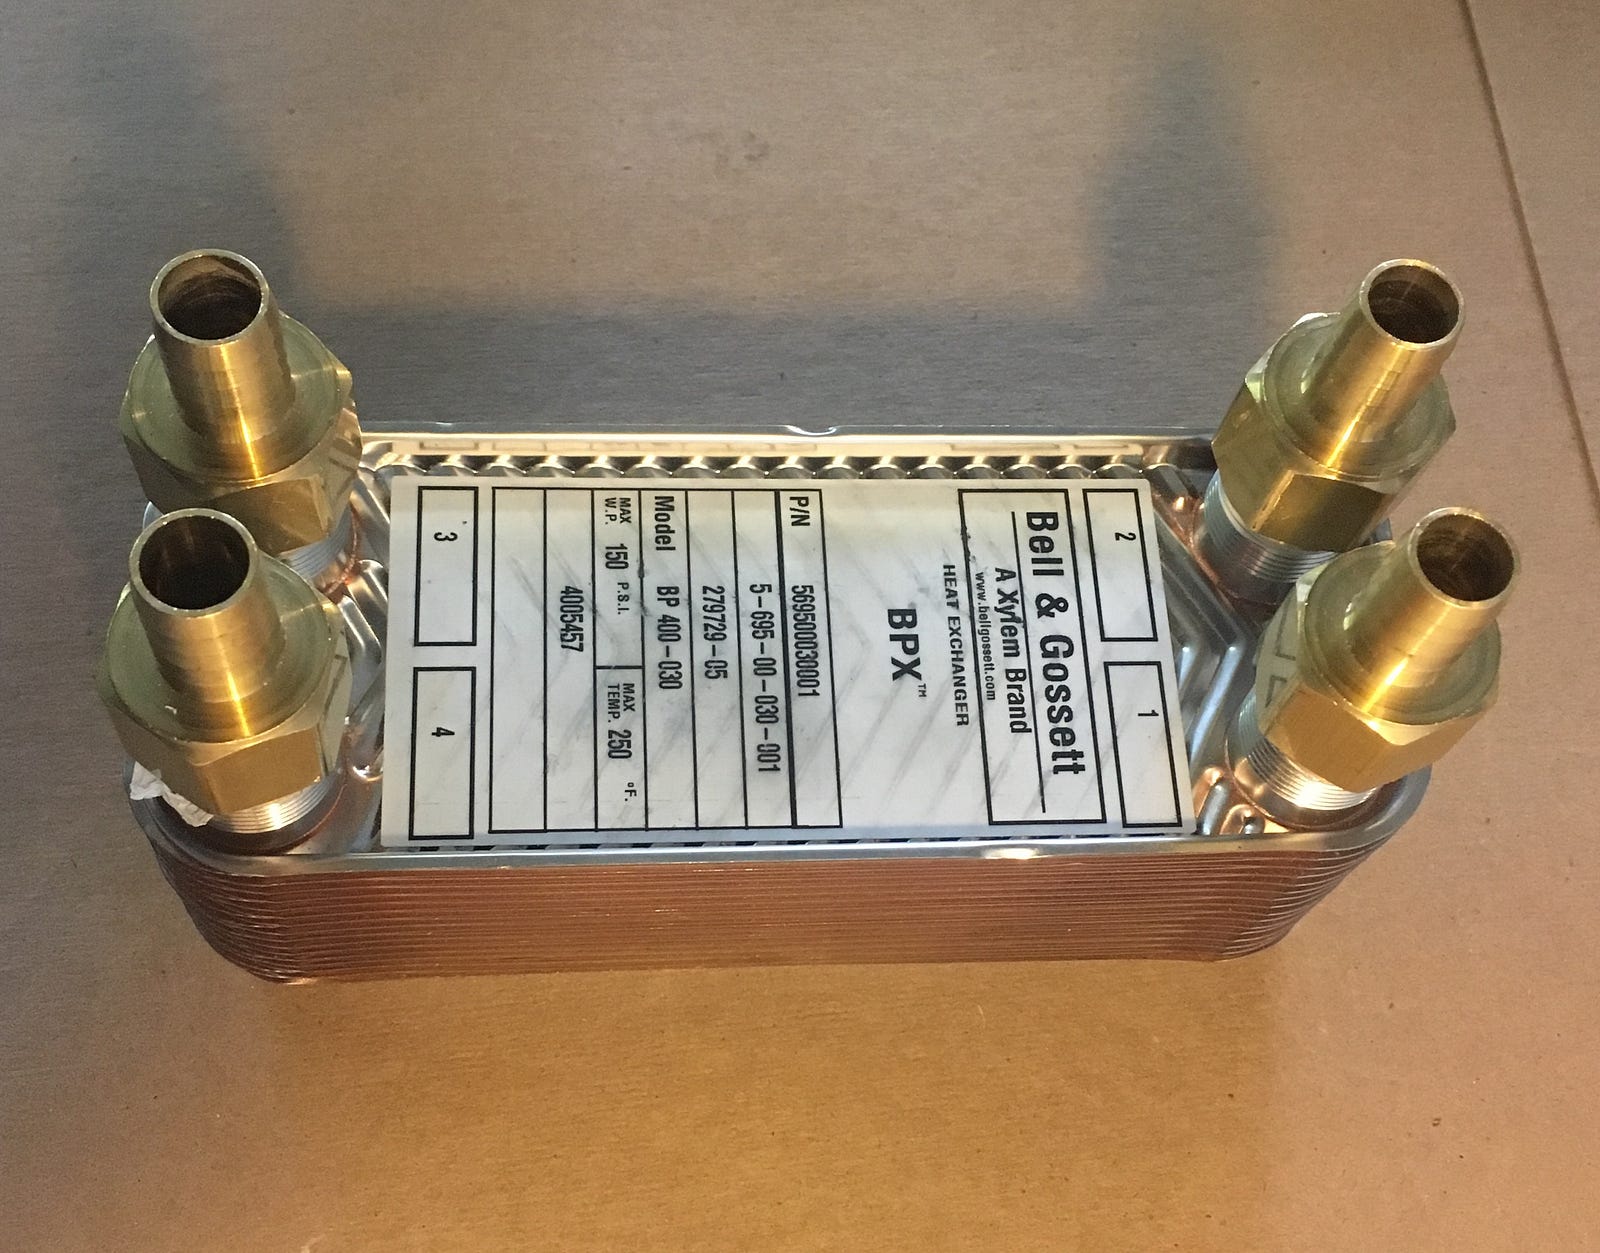
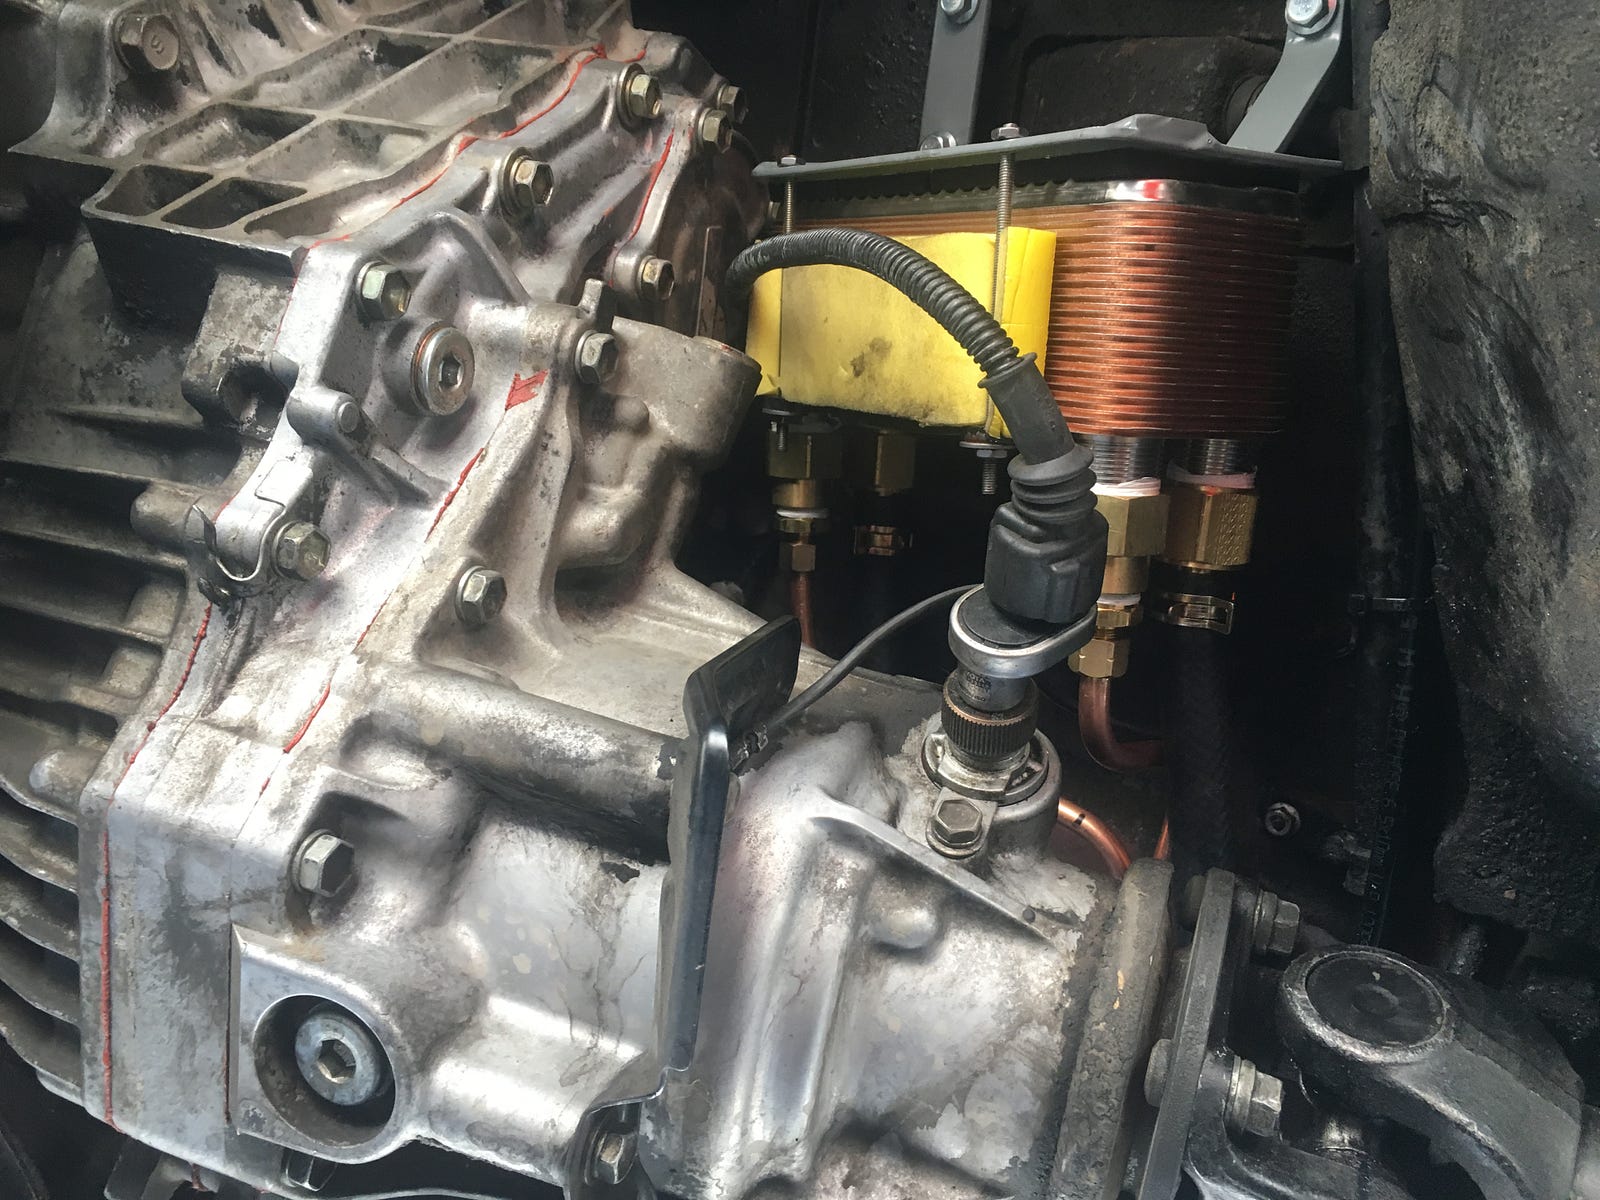
We are also working on the heat exchange unit for the hot water system. We will have to find a place in the vehicle for this unit.
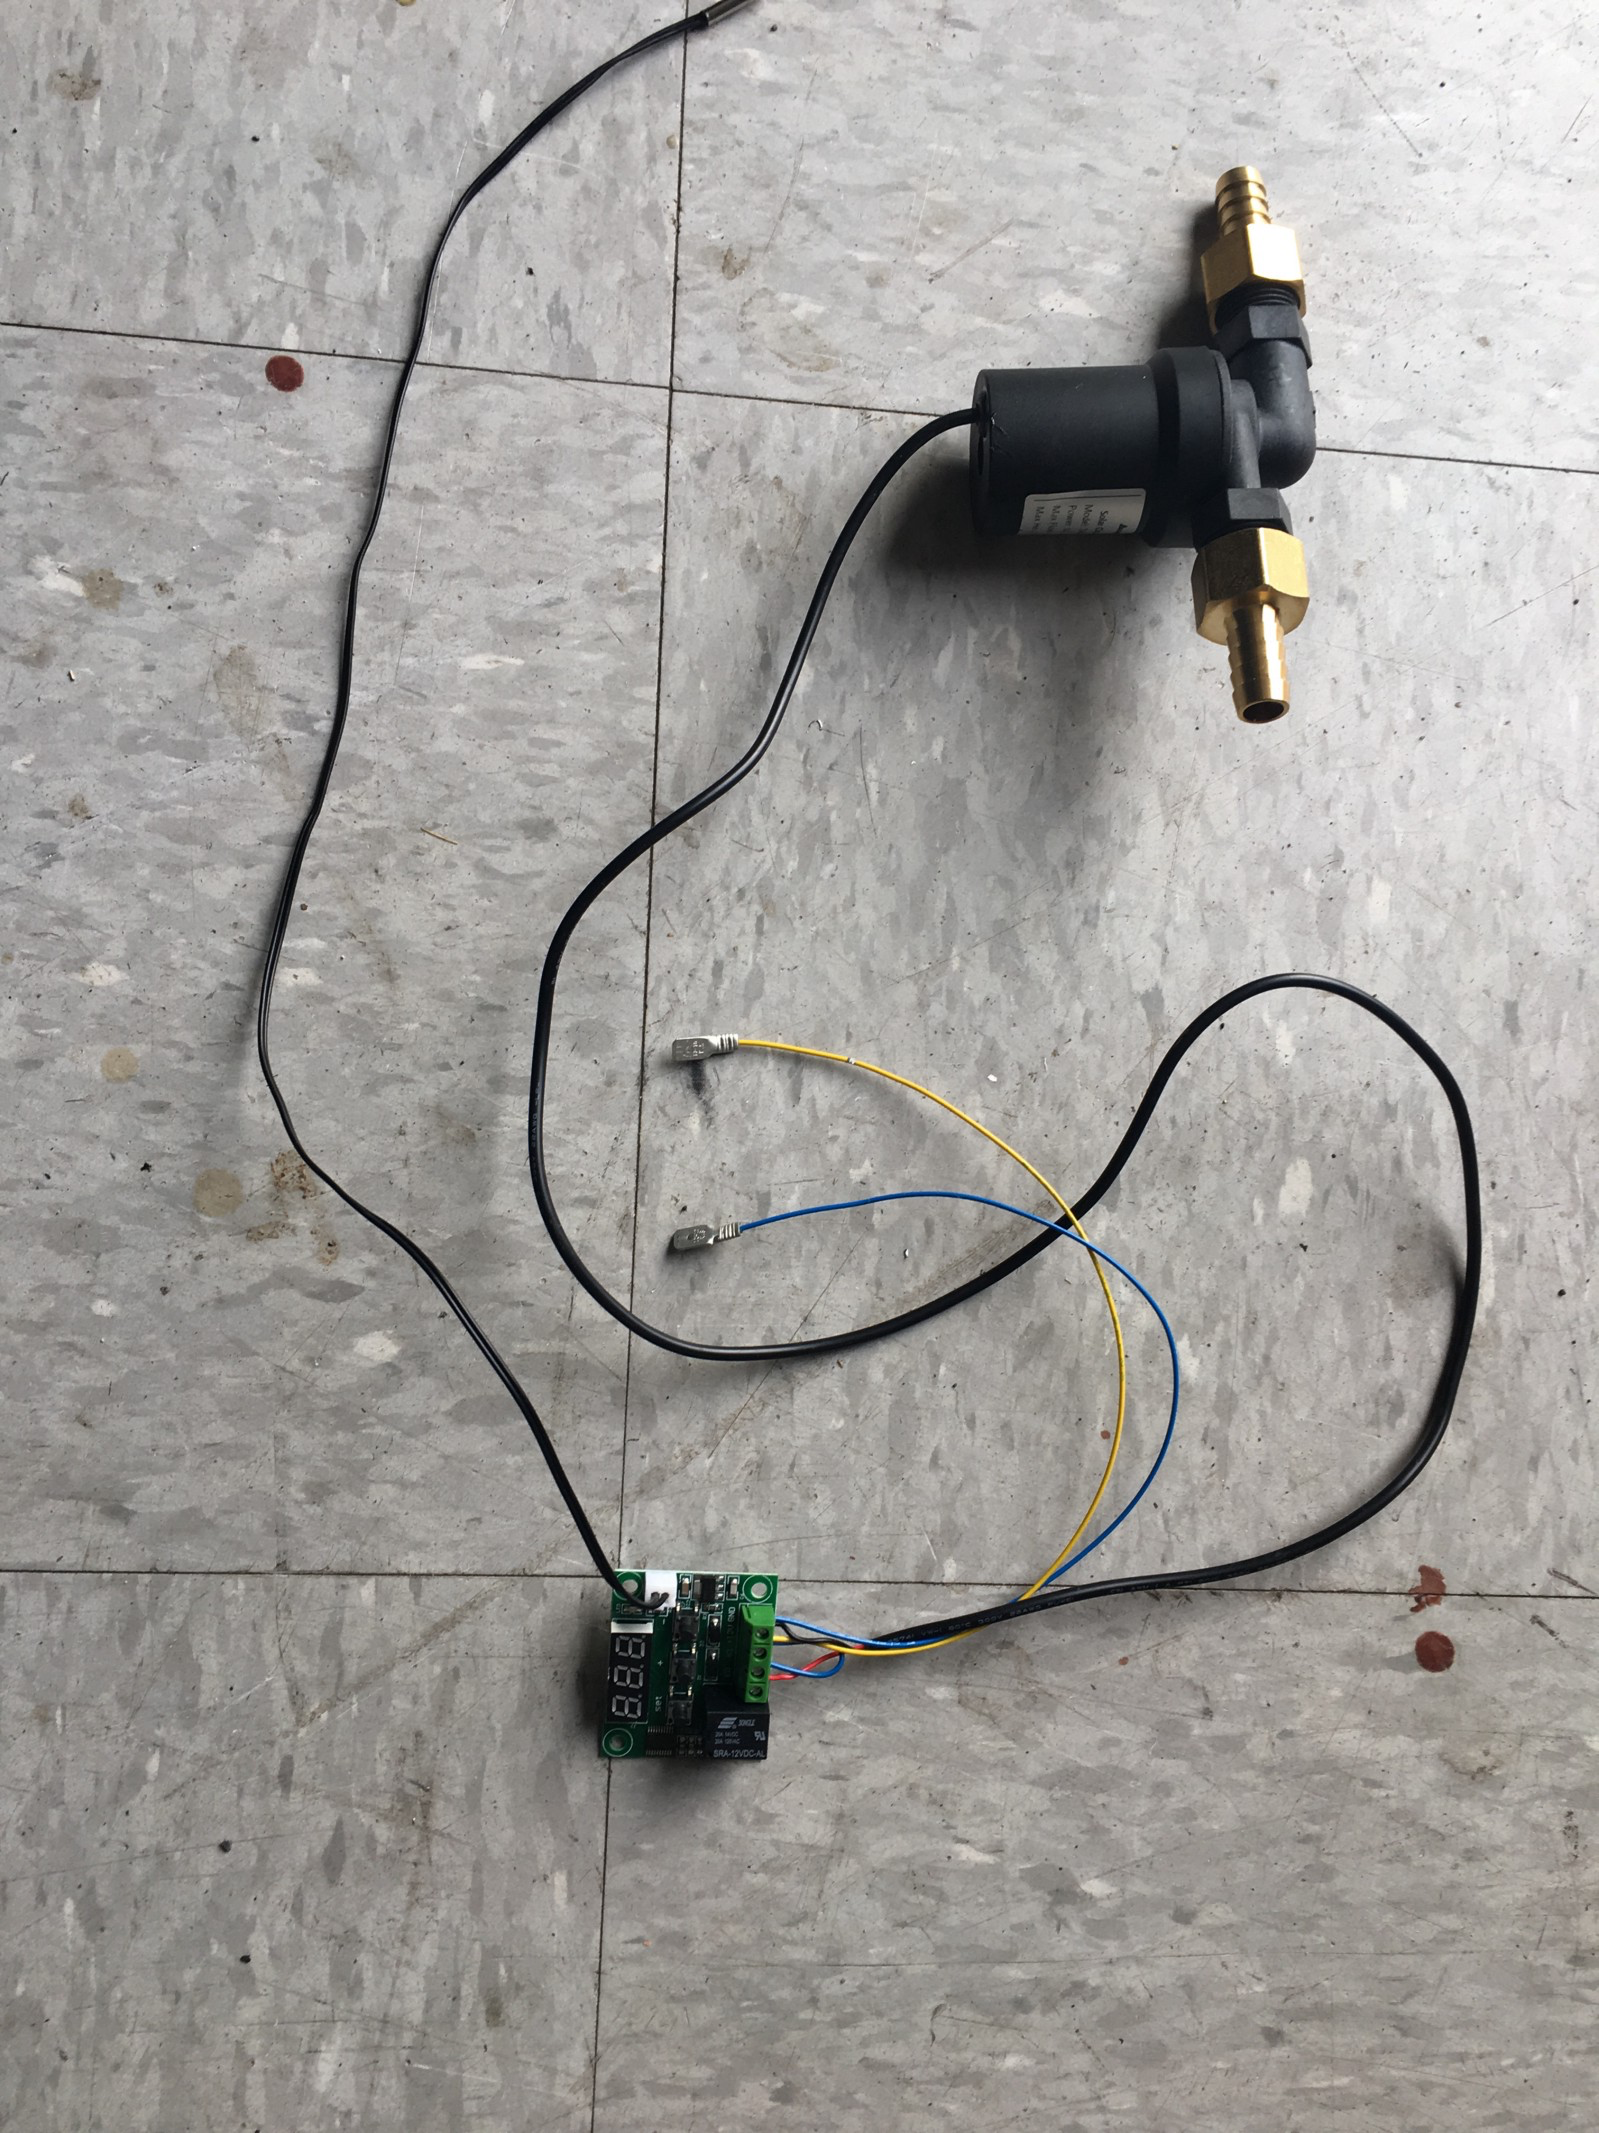
The water from the ‘hot water tank’ gets circulated with a pump that is being controlled by a thermostat. A switch on the dash will turn on and off the pump.
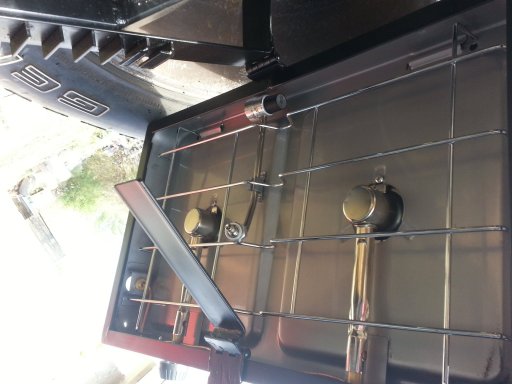
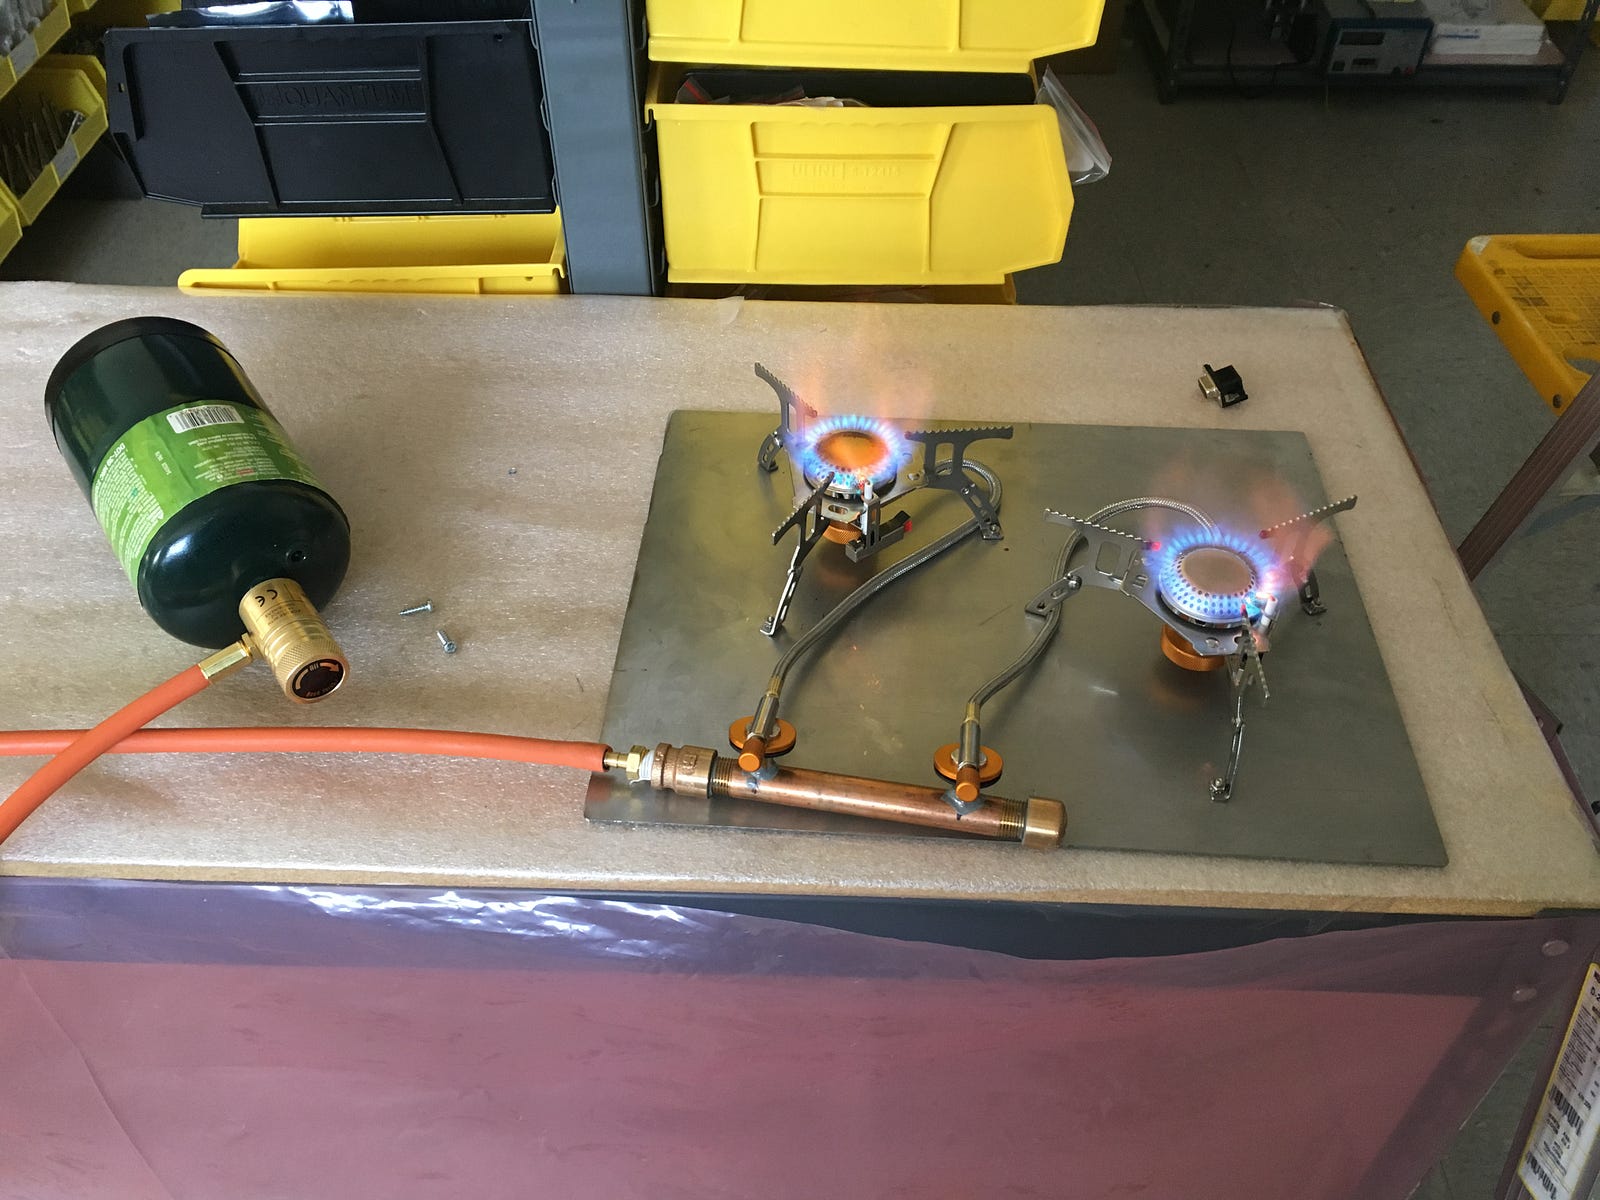
We had issues with space for the stove. We ended up building a stove from two camping stoves and some machined brass pipe parts. The connection was used from a torch welder and it hooks to a standard coleman propane tank. The stove was assembled and tested. It will require a wind shield and is designed to fit in a drawer under the fridge when not used. We can pull it back to cook by the tail gate, or to remove it completely and place it on the counter top for cooking in wet or cold weather.
Our next task is to find drawers and finish the storage unit behind the front seats. Last we will build the couch that turns into a bed.
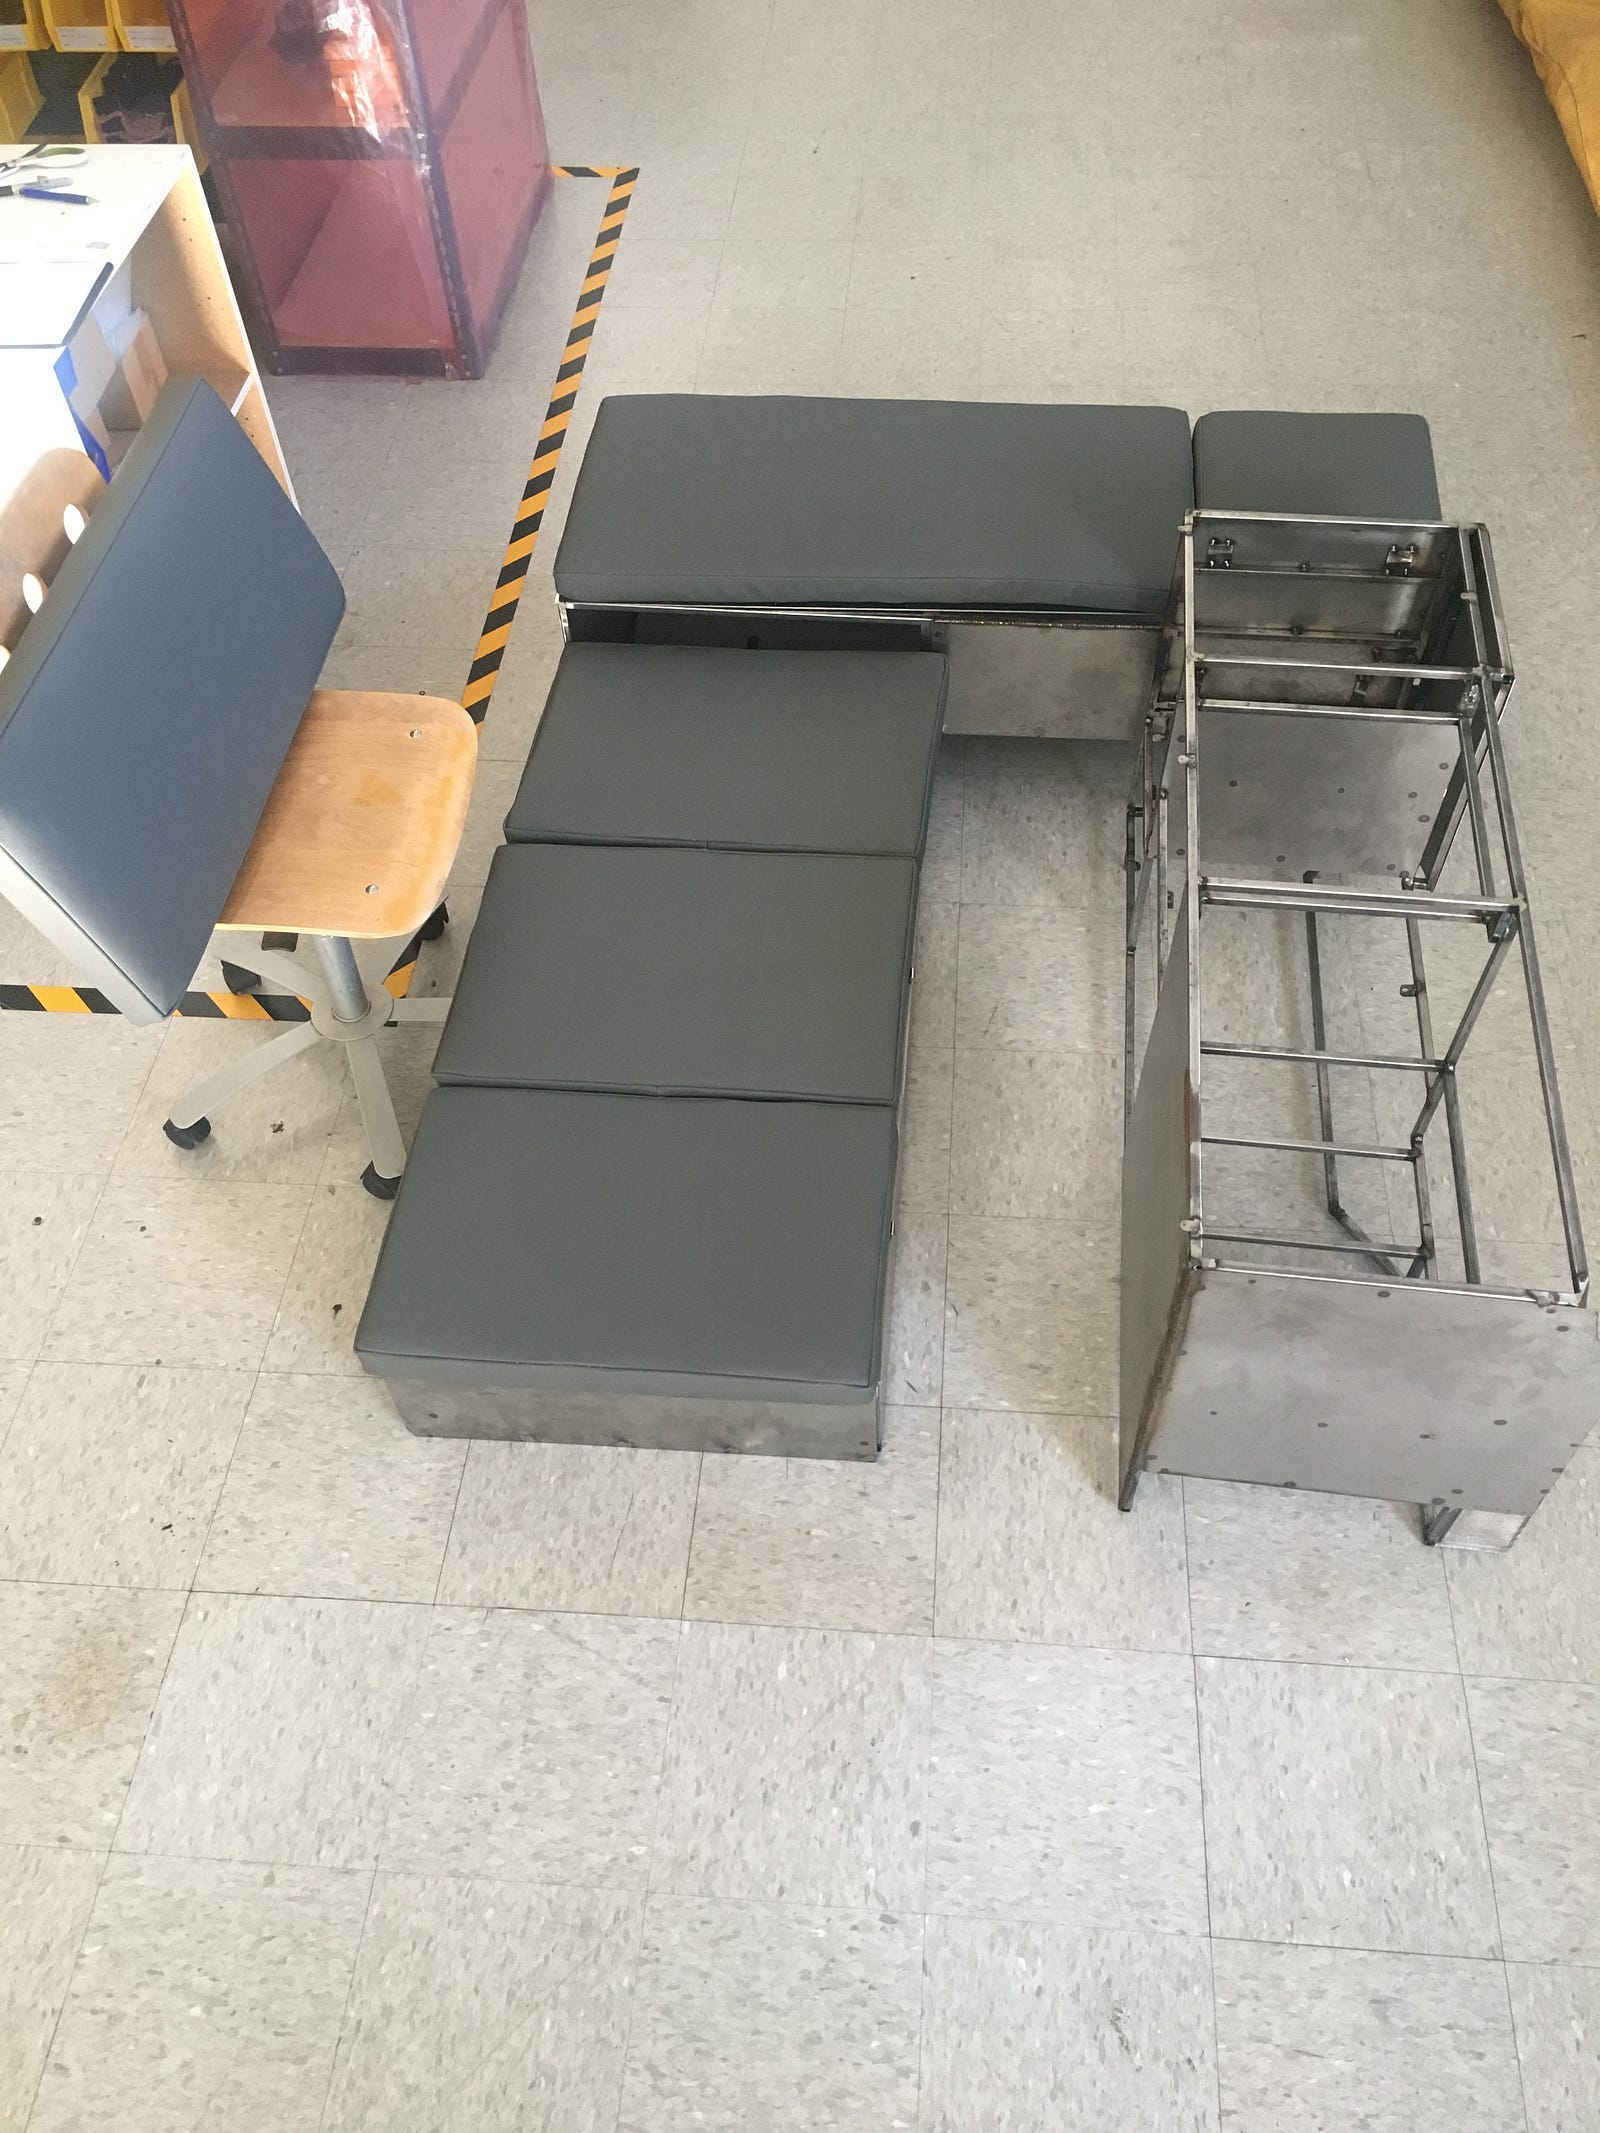
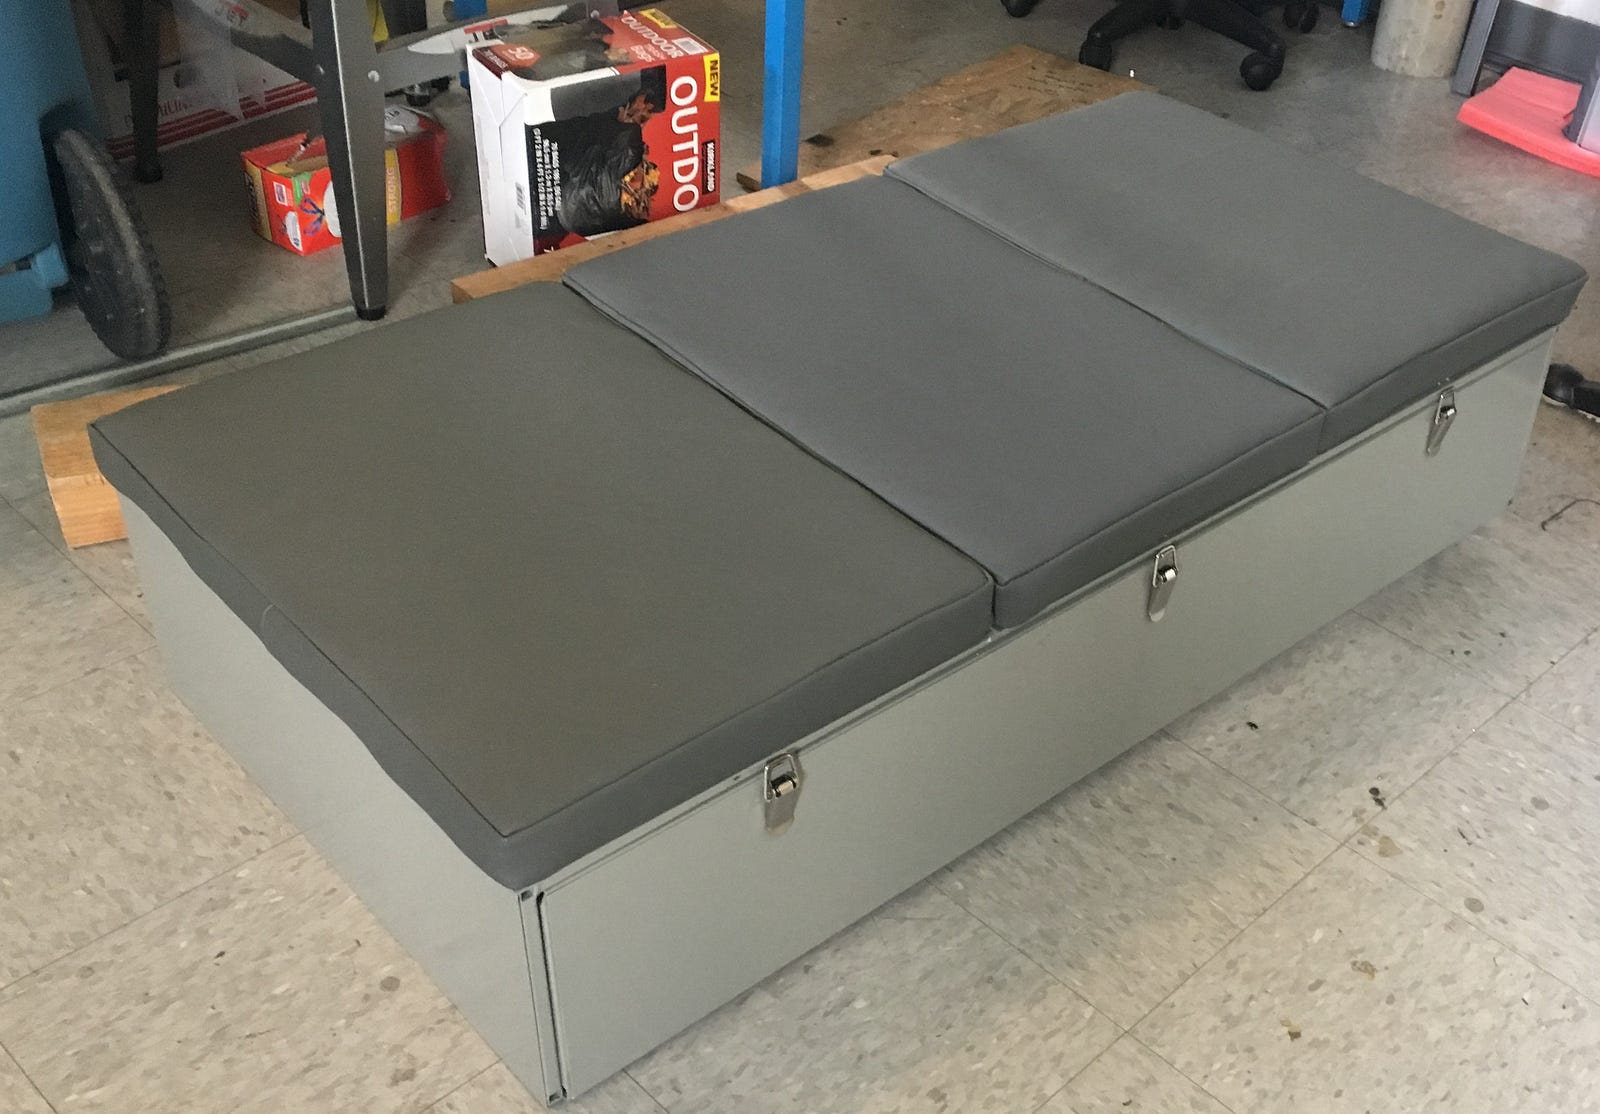
The storage compartment will be behind the front seats with 3 aluminum lids that hinge. We are not sure if we want this as compartments or one large storage that can be divided by boxes or storage bags. The two hatches on the driver side and center will have 2" cushions and will be the upper part of the bed.
The lower side of the bed will be a bench that has a slider part that opens to a twin bed. The bench will have 3 cushions so that passengers will be able to sit on a bench seat in the back. They will have leather on top to match the front seats. The bench also has a storage area underneath.
There will have to be some latches to lock it in place. We will also install a back cushion for the bench, that will be removable and used as the part of the mattress that covers the slider part of the bed.

These 3 frames will be attached to each other and to the vehicle itself with screws. They will not be permanent, and can always be removed.

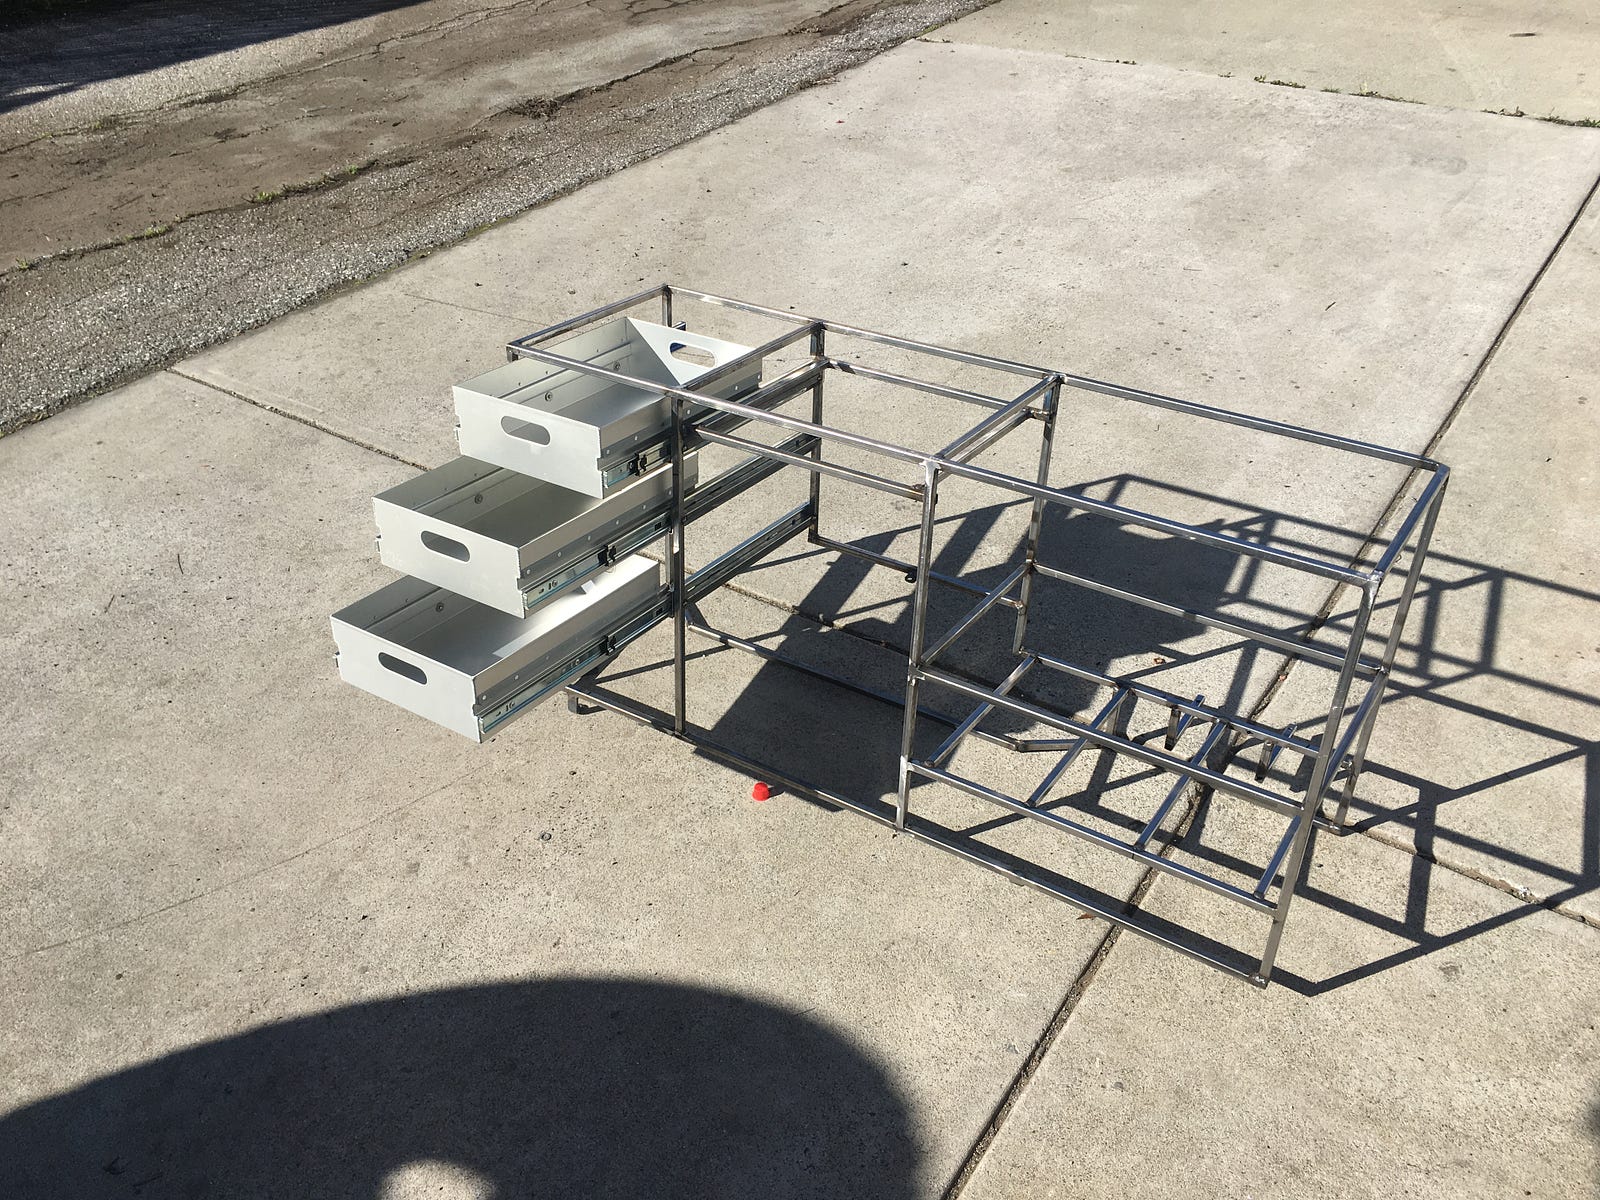
We ordered SkyCart aluminum drawers and installed them with extension glides. The bottom drawer is a bit lower to allow taller pots to fit in.
Stove work is done and it has been tested.

The stove will slide under the Fridge. We can pull it out and work on the tailgate or on a table. If weather gets bad, we may be forced to cook inside.
Kitchen cabinet got aluminum doors. This is 6061-T6 0.1" thick. All metal work will be powder coated.
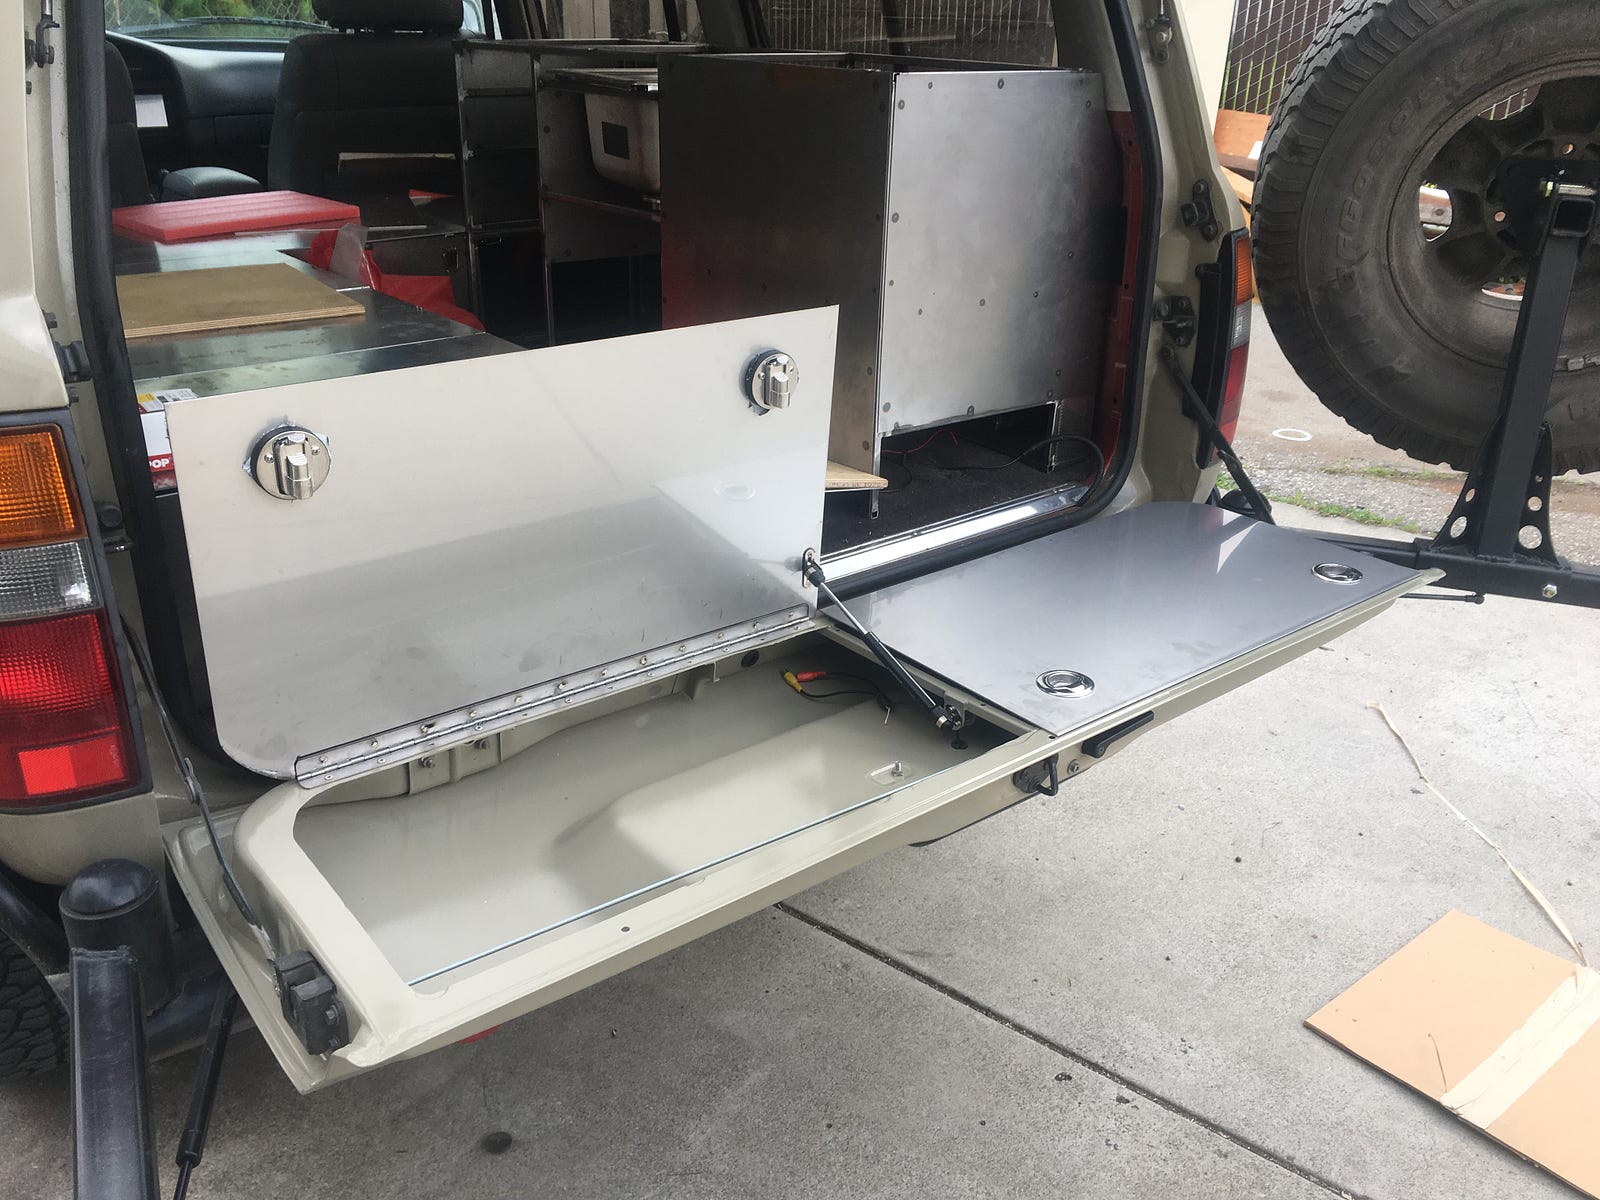
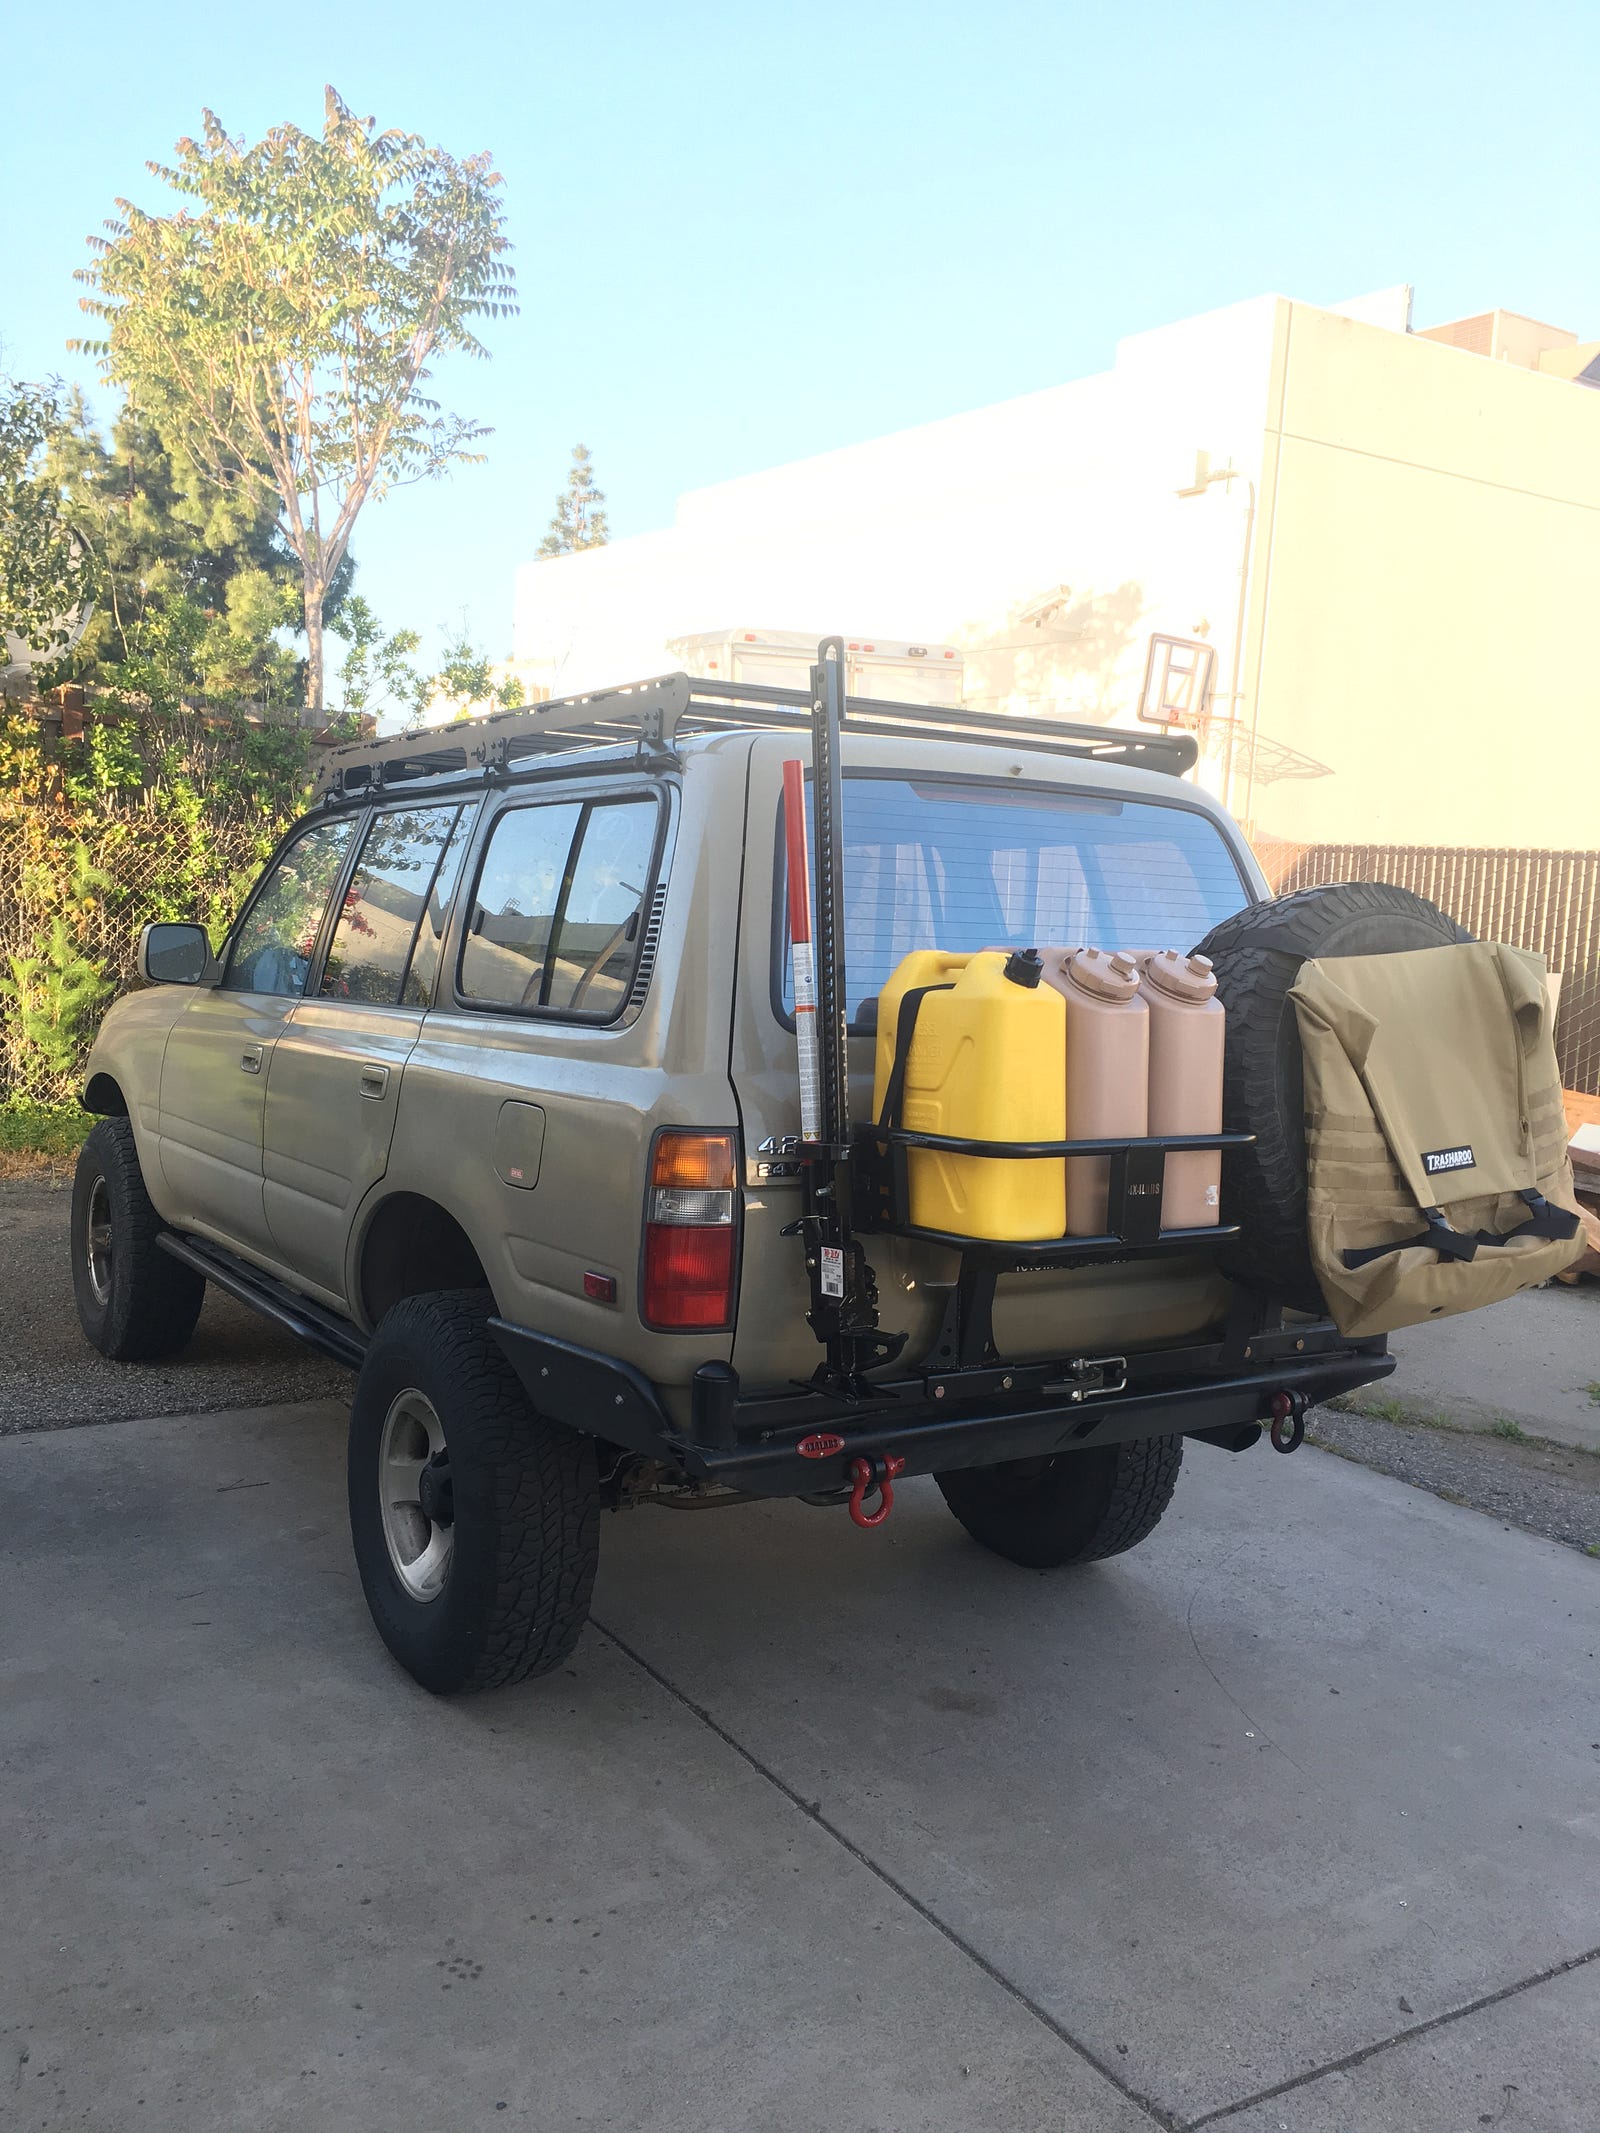
The rear tail gate has food grade stainless steel plates with latches so that we can store all the recovery gear. It is a bit heavy, so when opening it, care must be taken.
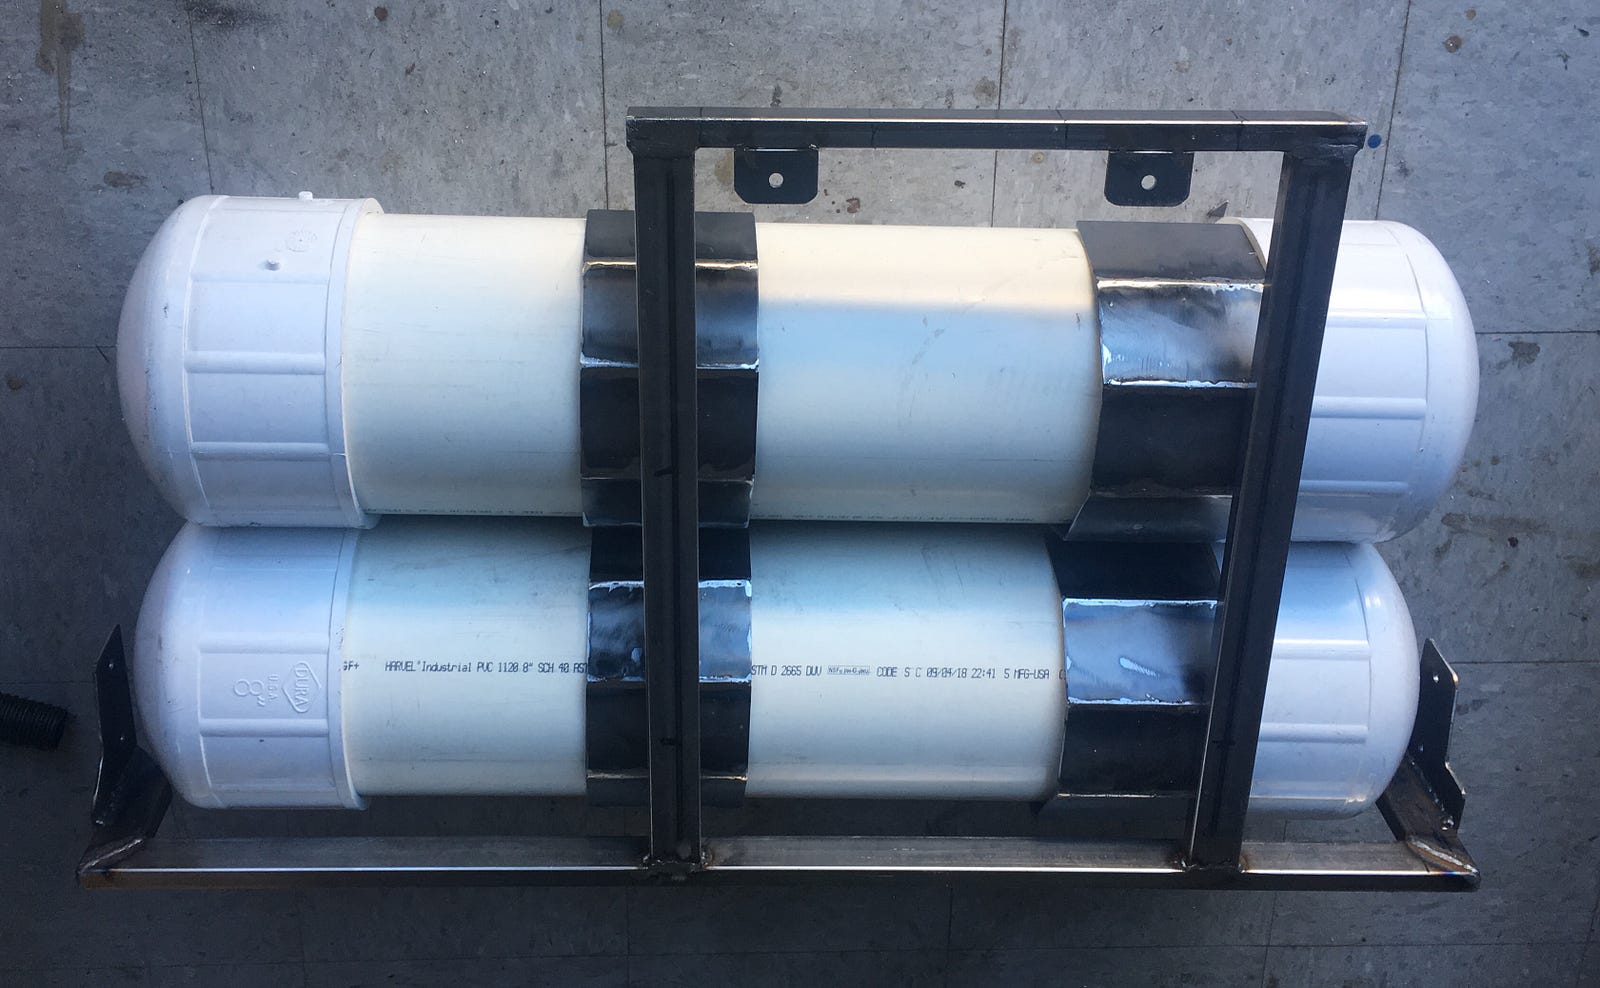
The bracket for the water tanks that sit under the vehicle is done. Water tanks are 8" PVC schedule 40 with caps. Each tank provides 30 liters of water. One of the tanks will be hot water. A circulating pump with a thermostat will run the water through a heat exchange unit with the radiator coolant. The compressor will pressurize the tank so that water will ‘climb’ to the faucet and shower. Ha, yes, the shower…
The exterior shower unit is a Bullfinch shower head. The unit is well made, and very compact. We will let you know how clean we come out.
The shower head plugs in and has the handle integrated into it.

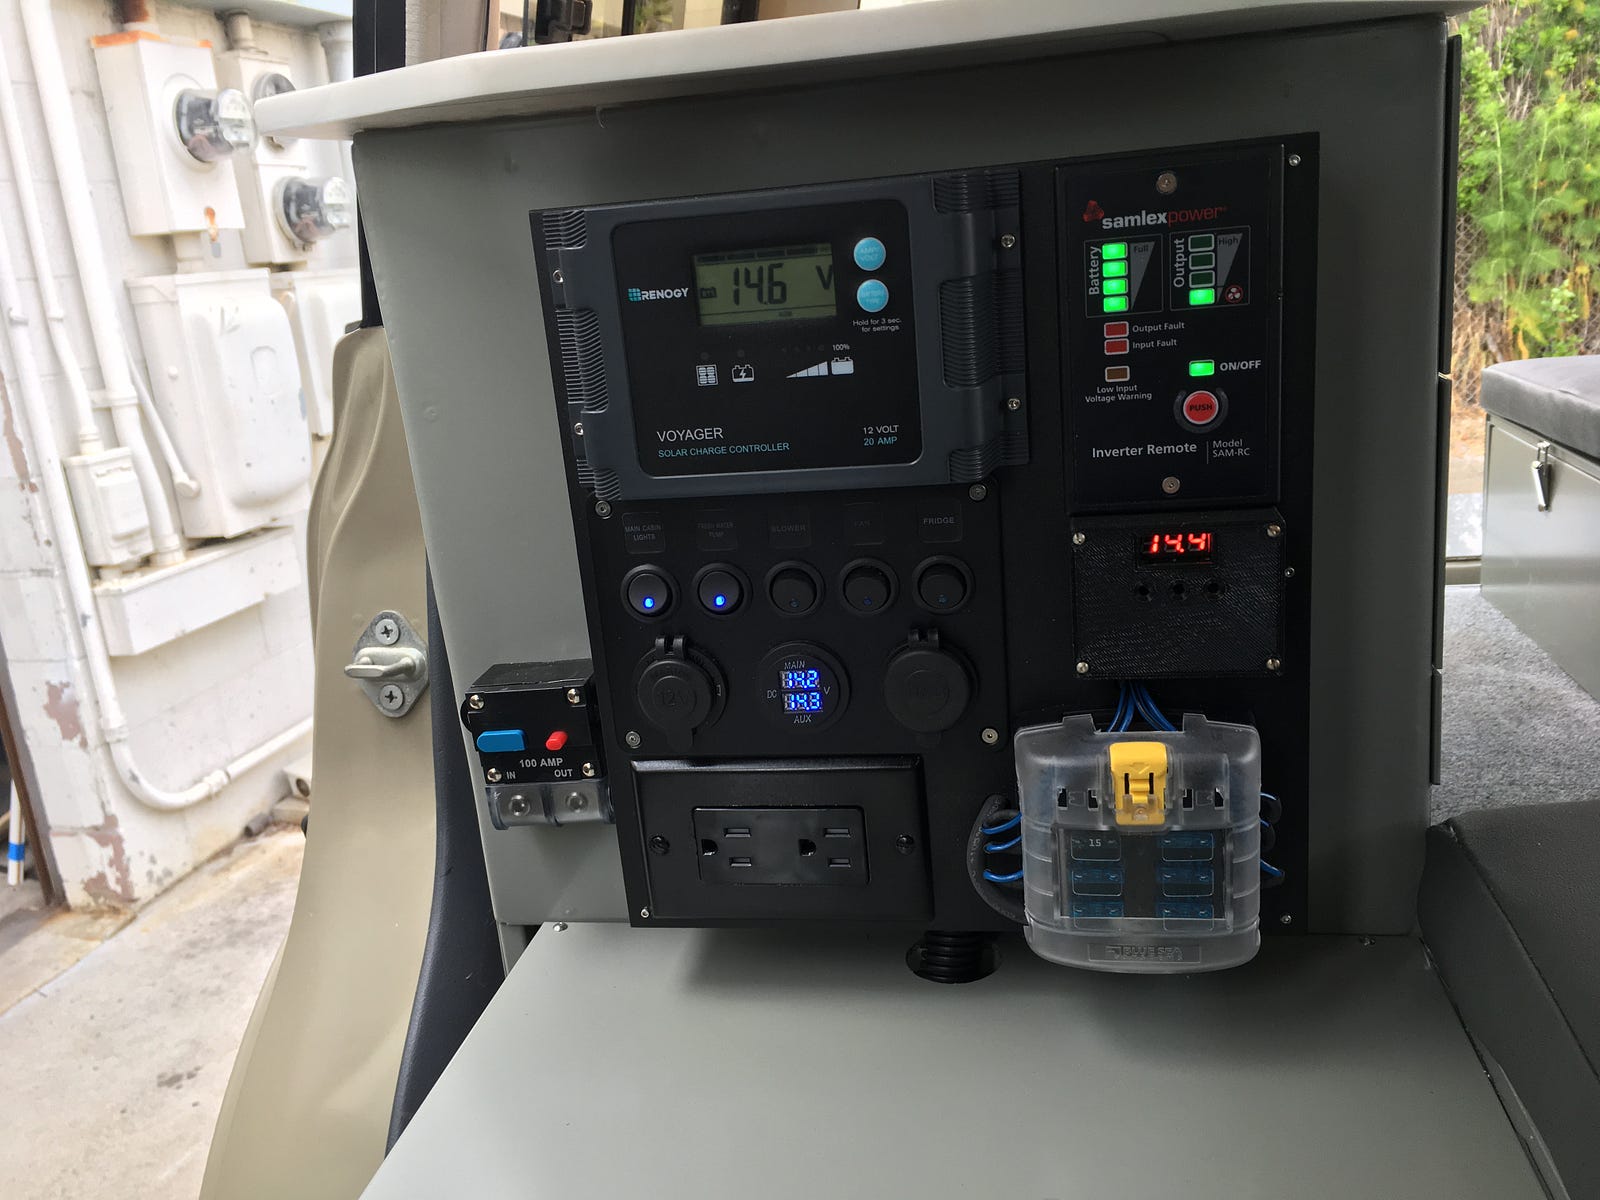
Also, the electrical panel is being assembled. Solar panel controller, 110 VAC Converter panel, main switch panel, thermostat controller, 110V plug and fuse box. A main disconnect will be added as well.

The 110VAC 1KW converter was mounted inside the wheel well to save space.
A bit more work on the exterior. Added rock sliders and new Old Man Emu suspension from Cruiser Outfitters. The suspension is a bit stiffer because of all the expected load we are planning to add to the car. Only thing left on the outside are tires. We planed to put BF Goodrich 295/75R16 but they are not available anywhere. Bummer. Just ordered on Costco 285/75R16. Maybe next time.
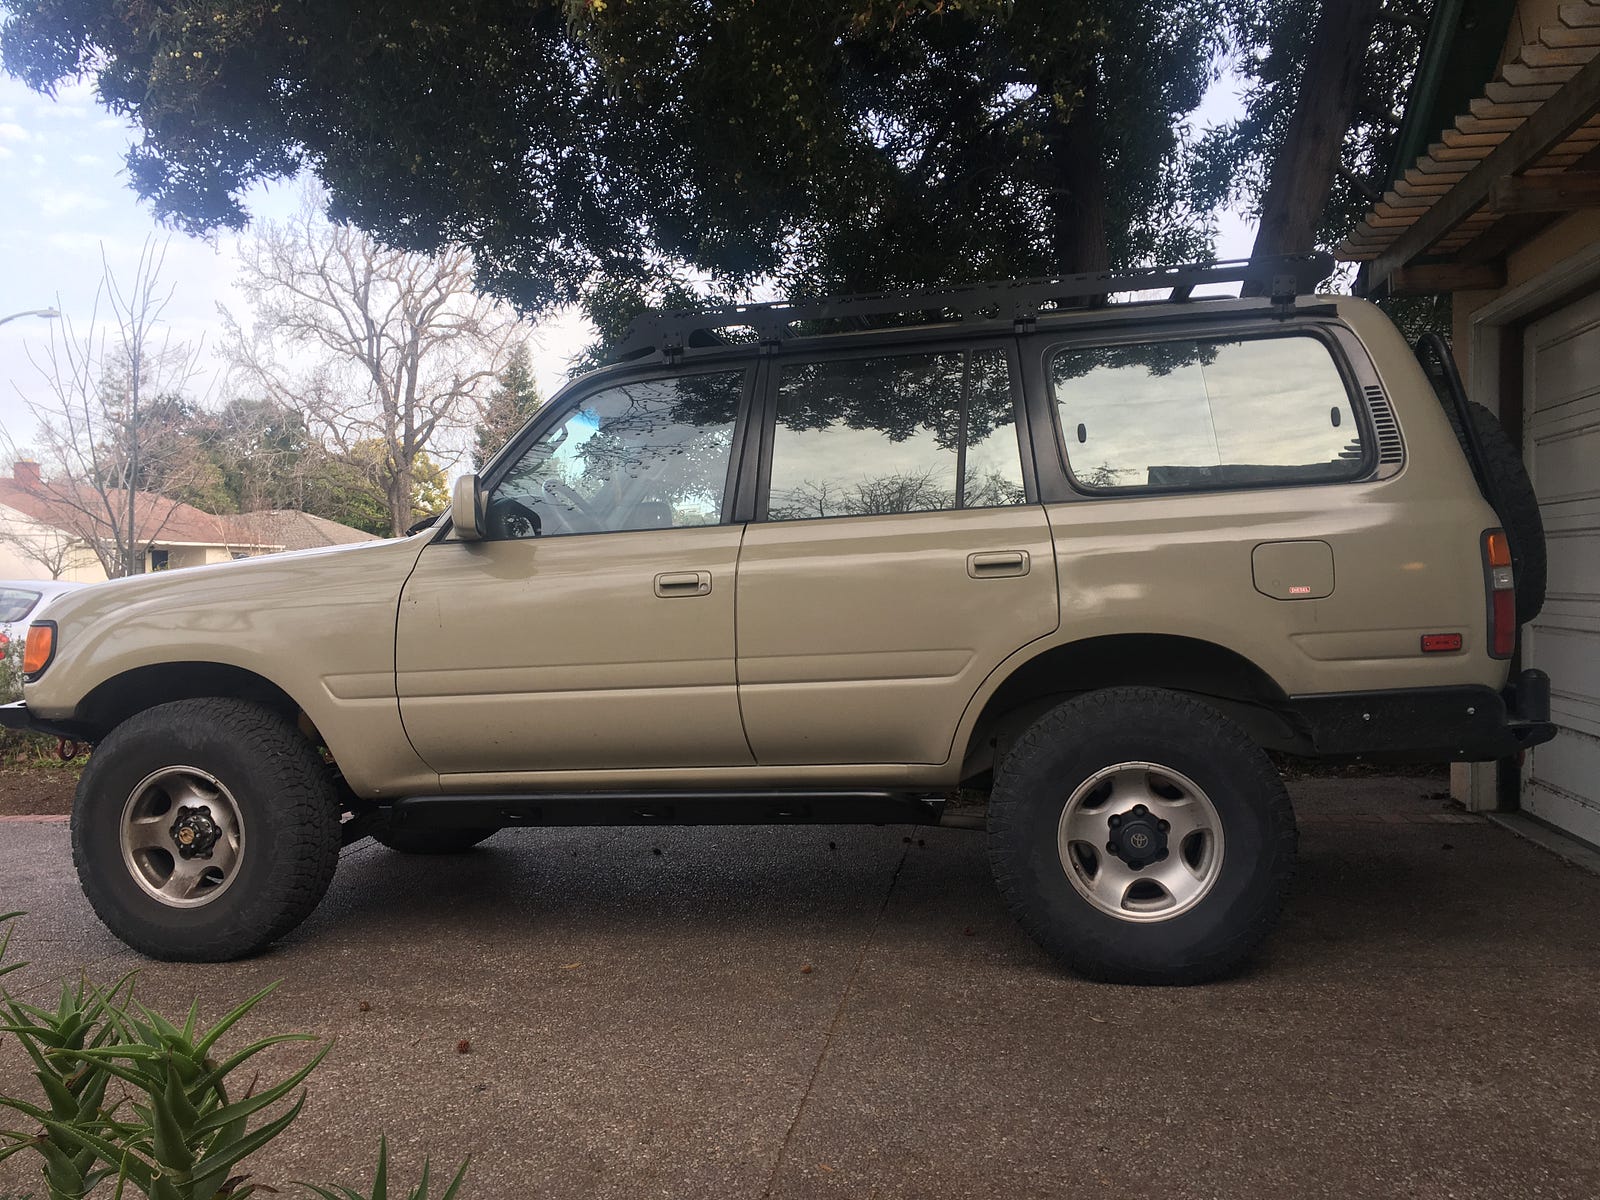
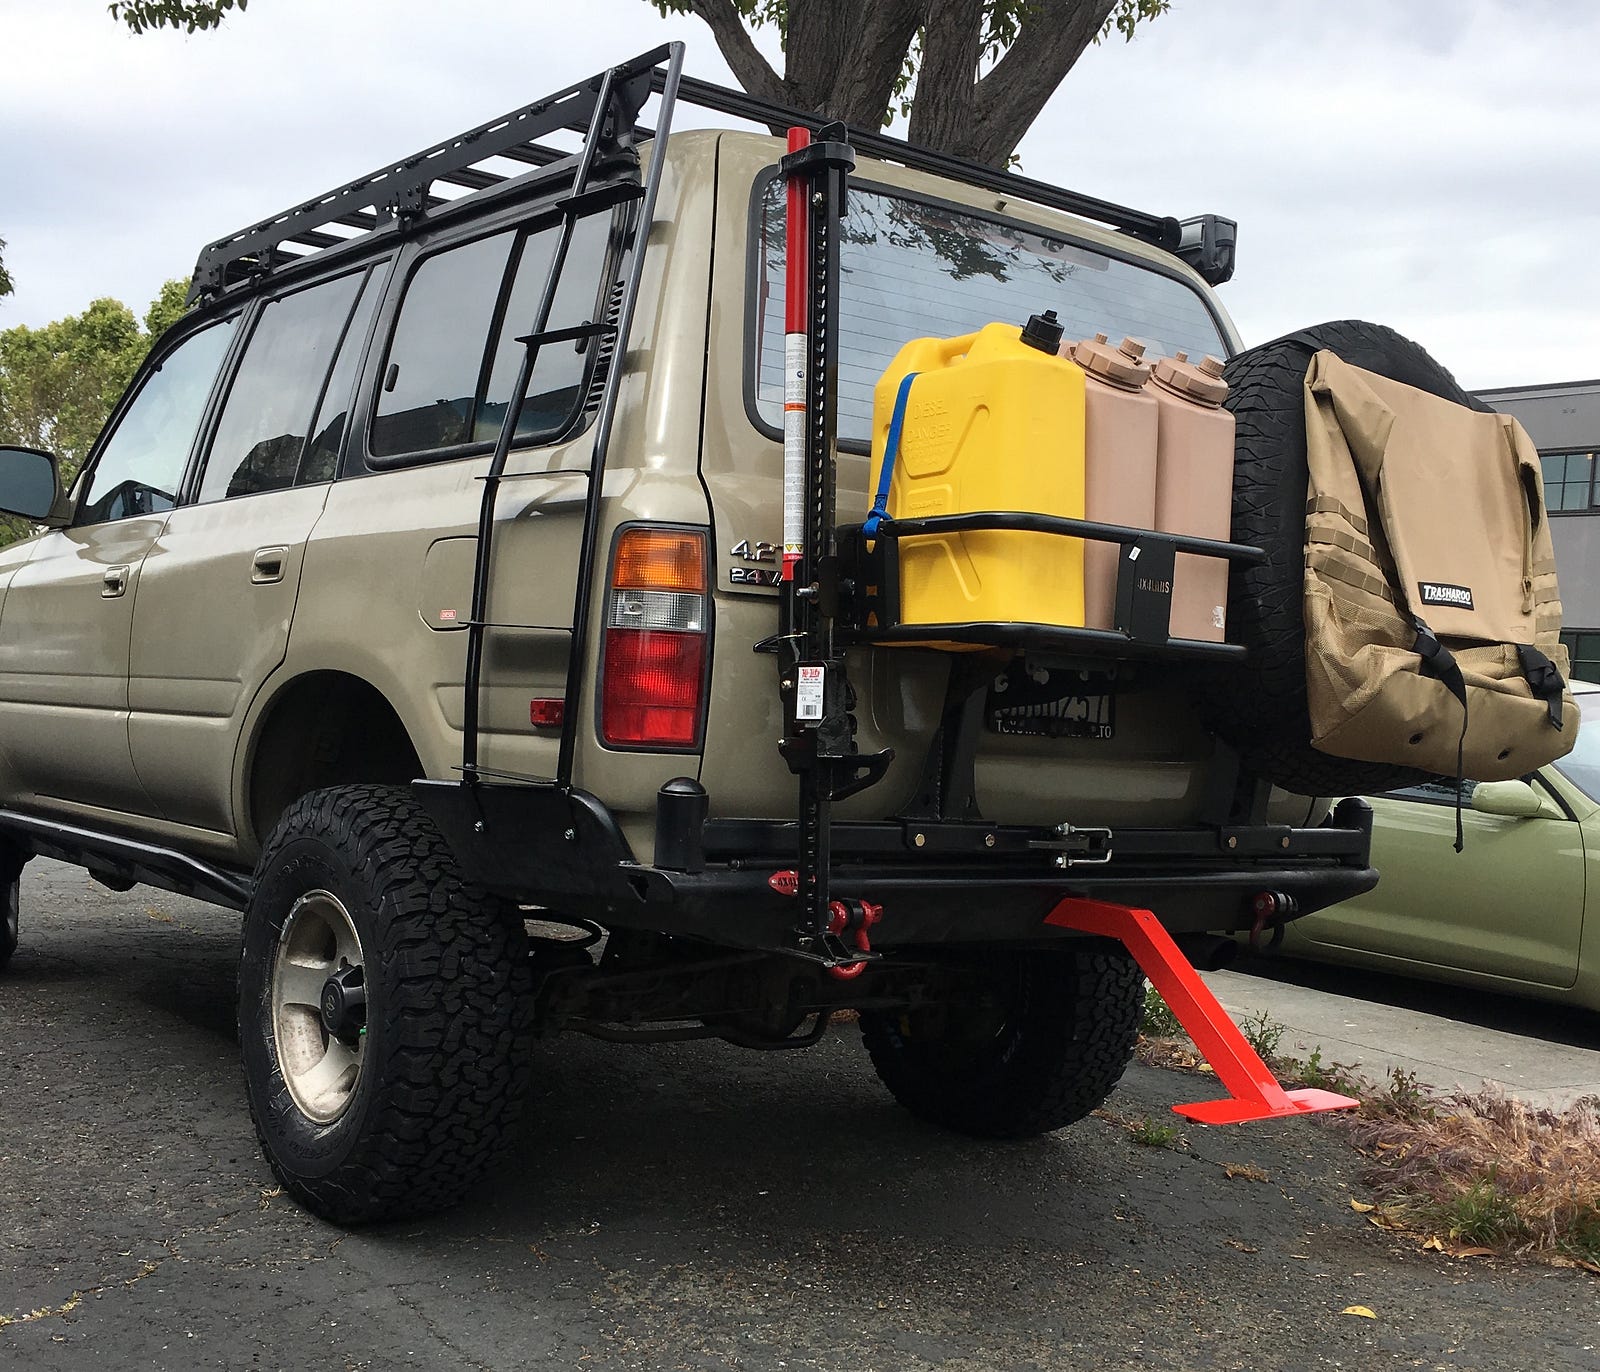
We also added a rear rack from 4x4 Labs. Luke is an amazing guy and a great designer. It supprts 3 Jerry Cans and a High Lift. The roof rack is made by Prinsu Design in Idaho. It easily mounts on the vehicle and spreads the weight. Very well designed!!
The air system was installed with an ARB compressor and a 1 Gallon air tank. A pressure reducer was required for the air system that pushes the water up out of the tanks to the faucet and shower head. We are fighting gravity all our lives…

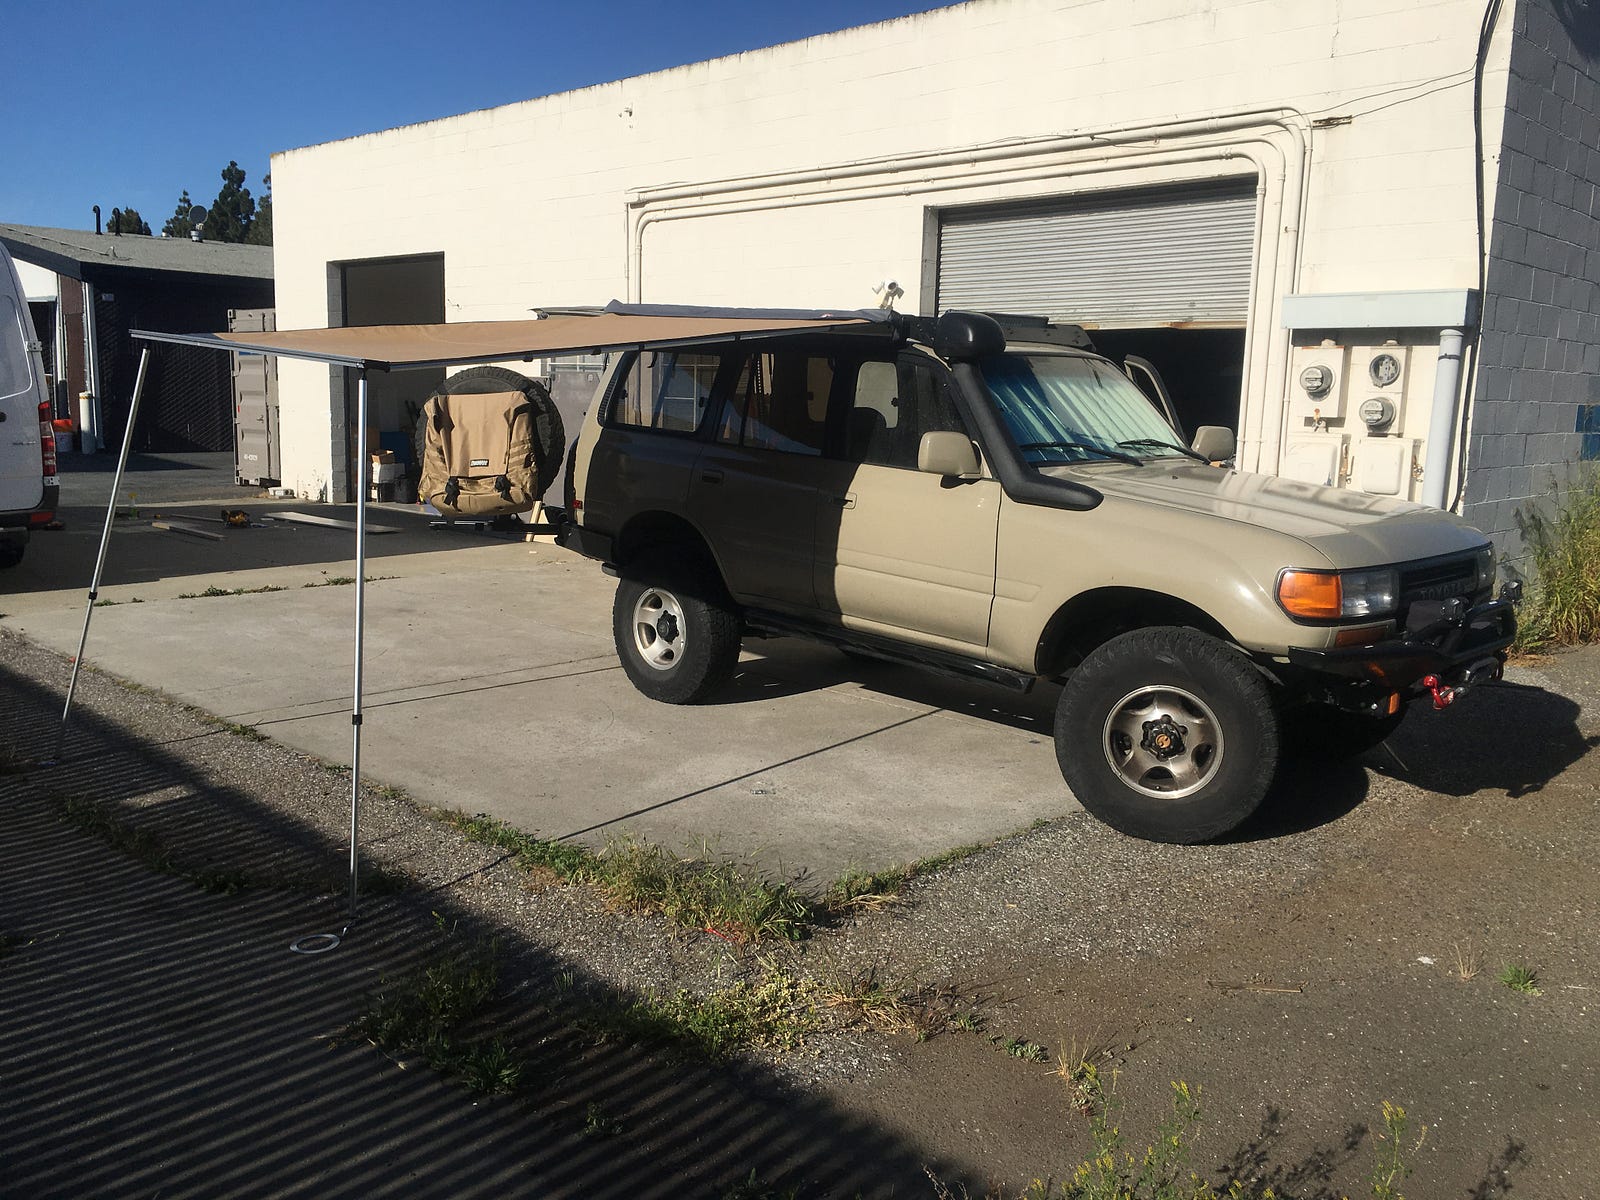
The ARB awning was installed with custom made brackets.
The interior was done by Sid’s Custom Upholstery (Alex is professional, charming and highly recommended) and was finished yesterday. All the cushions are leather to match the from seats. We used 2" firm foam to leave as much headroom as possible. All the leather was purchased from LSEAT and they have very good service.
The cabinets were finally powder coated with Navy Gray (Cardinal GR-01) by Moises Finishing in San Jose. We installed the drawers with soft close glides. Also, all the sheet metal inside was covered with noise dampening sticky material. The couch/bed had the leather cushions installed with stainless snap buttons.
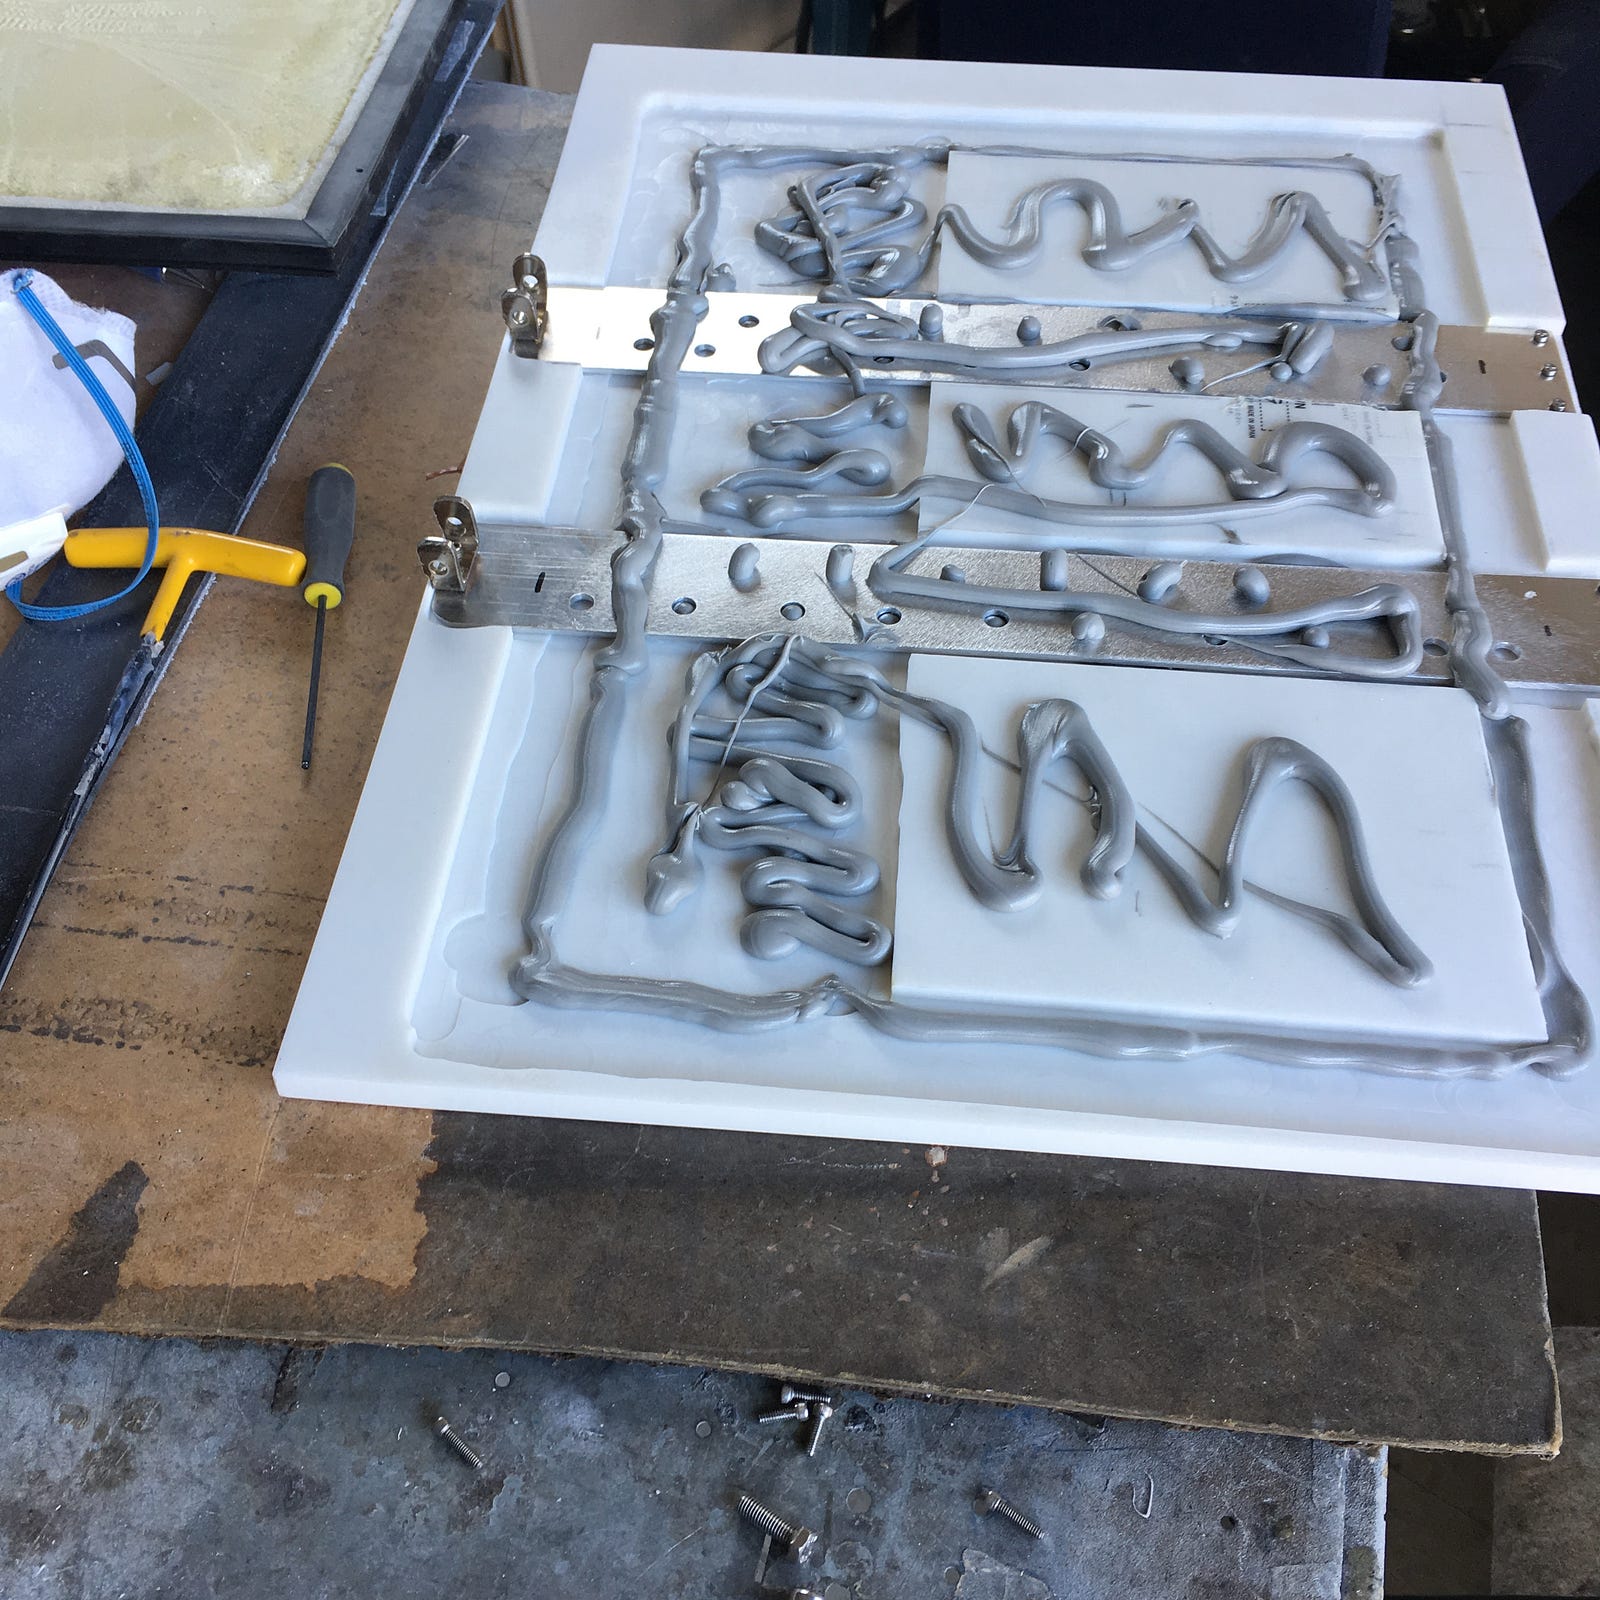
The finished panels for the drawers were installed using 100% silicon to glue them. We hope it will hold.
The heat exchange was mounted above the transfer case. There was just enough space for it. Silicon hoses to the radiator water. Rigid copper for the drinking/shower water.
The drain for the sink was hooked up. The last section is silicon hose and it exits behind the right rear wheel. An extension can be attached if we want the water to flow away from the vehicle. Otherwise we can just put a small bucket.
Now that the cabinets are ready, It’s time to finish the plumbing and electrical.
Just figured that we need to run wires down from the solar panels on the roof. We figured a ladder would serve two functions. Also added a step to climb to the back, since the tail gate is 36" off the ground. Ah, yes, and we got new tires!
We did a test of the hot water system. Ran it through a 1 gallon container. It took 10 minutes to bring it to temperature. Seems like we will have hot water after all. The original pump that we chose was not self priming, so we chose a different pump. We used an old prius battery to run the pump.
We leave to Alaska in less then 4 weeks, and now everything must come together...
Things are coming together. The electrical is almost done. Some of the wires had to be run under the carpet, so we pulled everything off the back and cleaned before starting to assemble.

We used an old Corian slab to build the countertop. It takes a long time to get everything accurate, but once it’s assembled it looks great. The material is easy to work with and the glue lines are almost invisible.

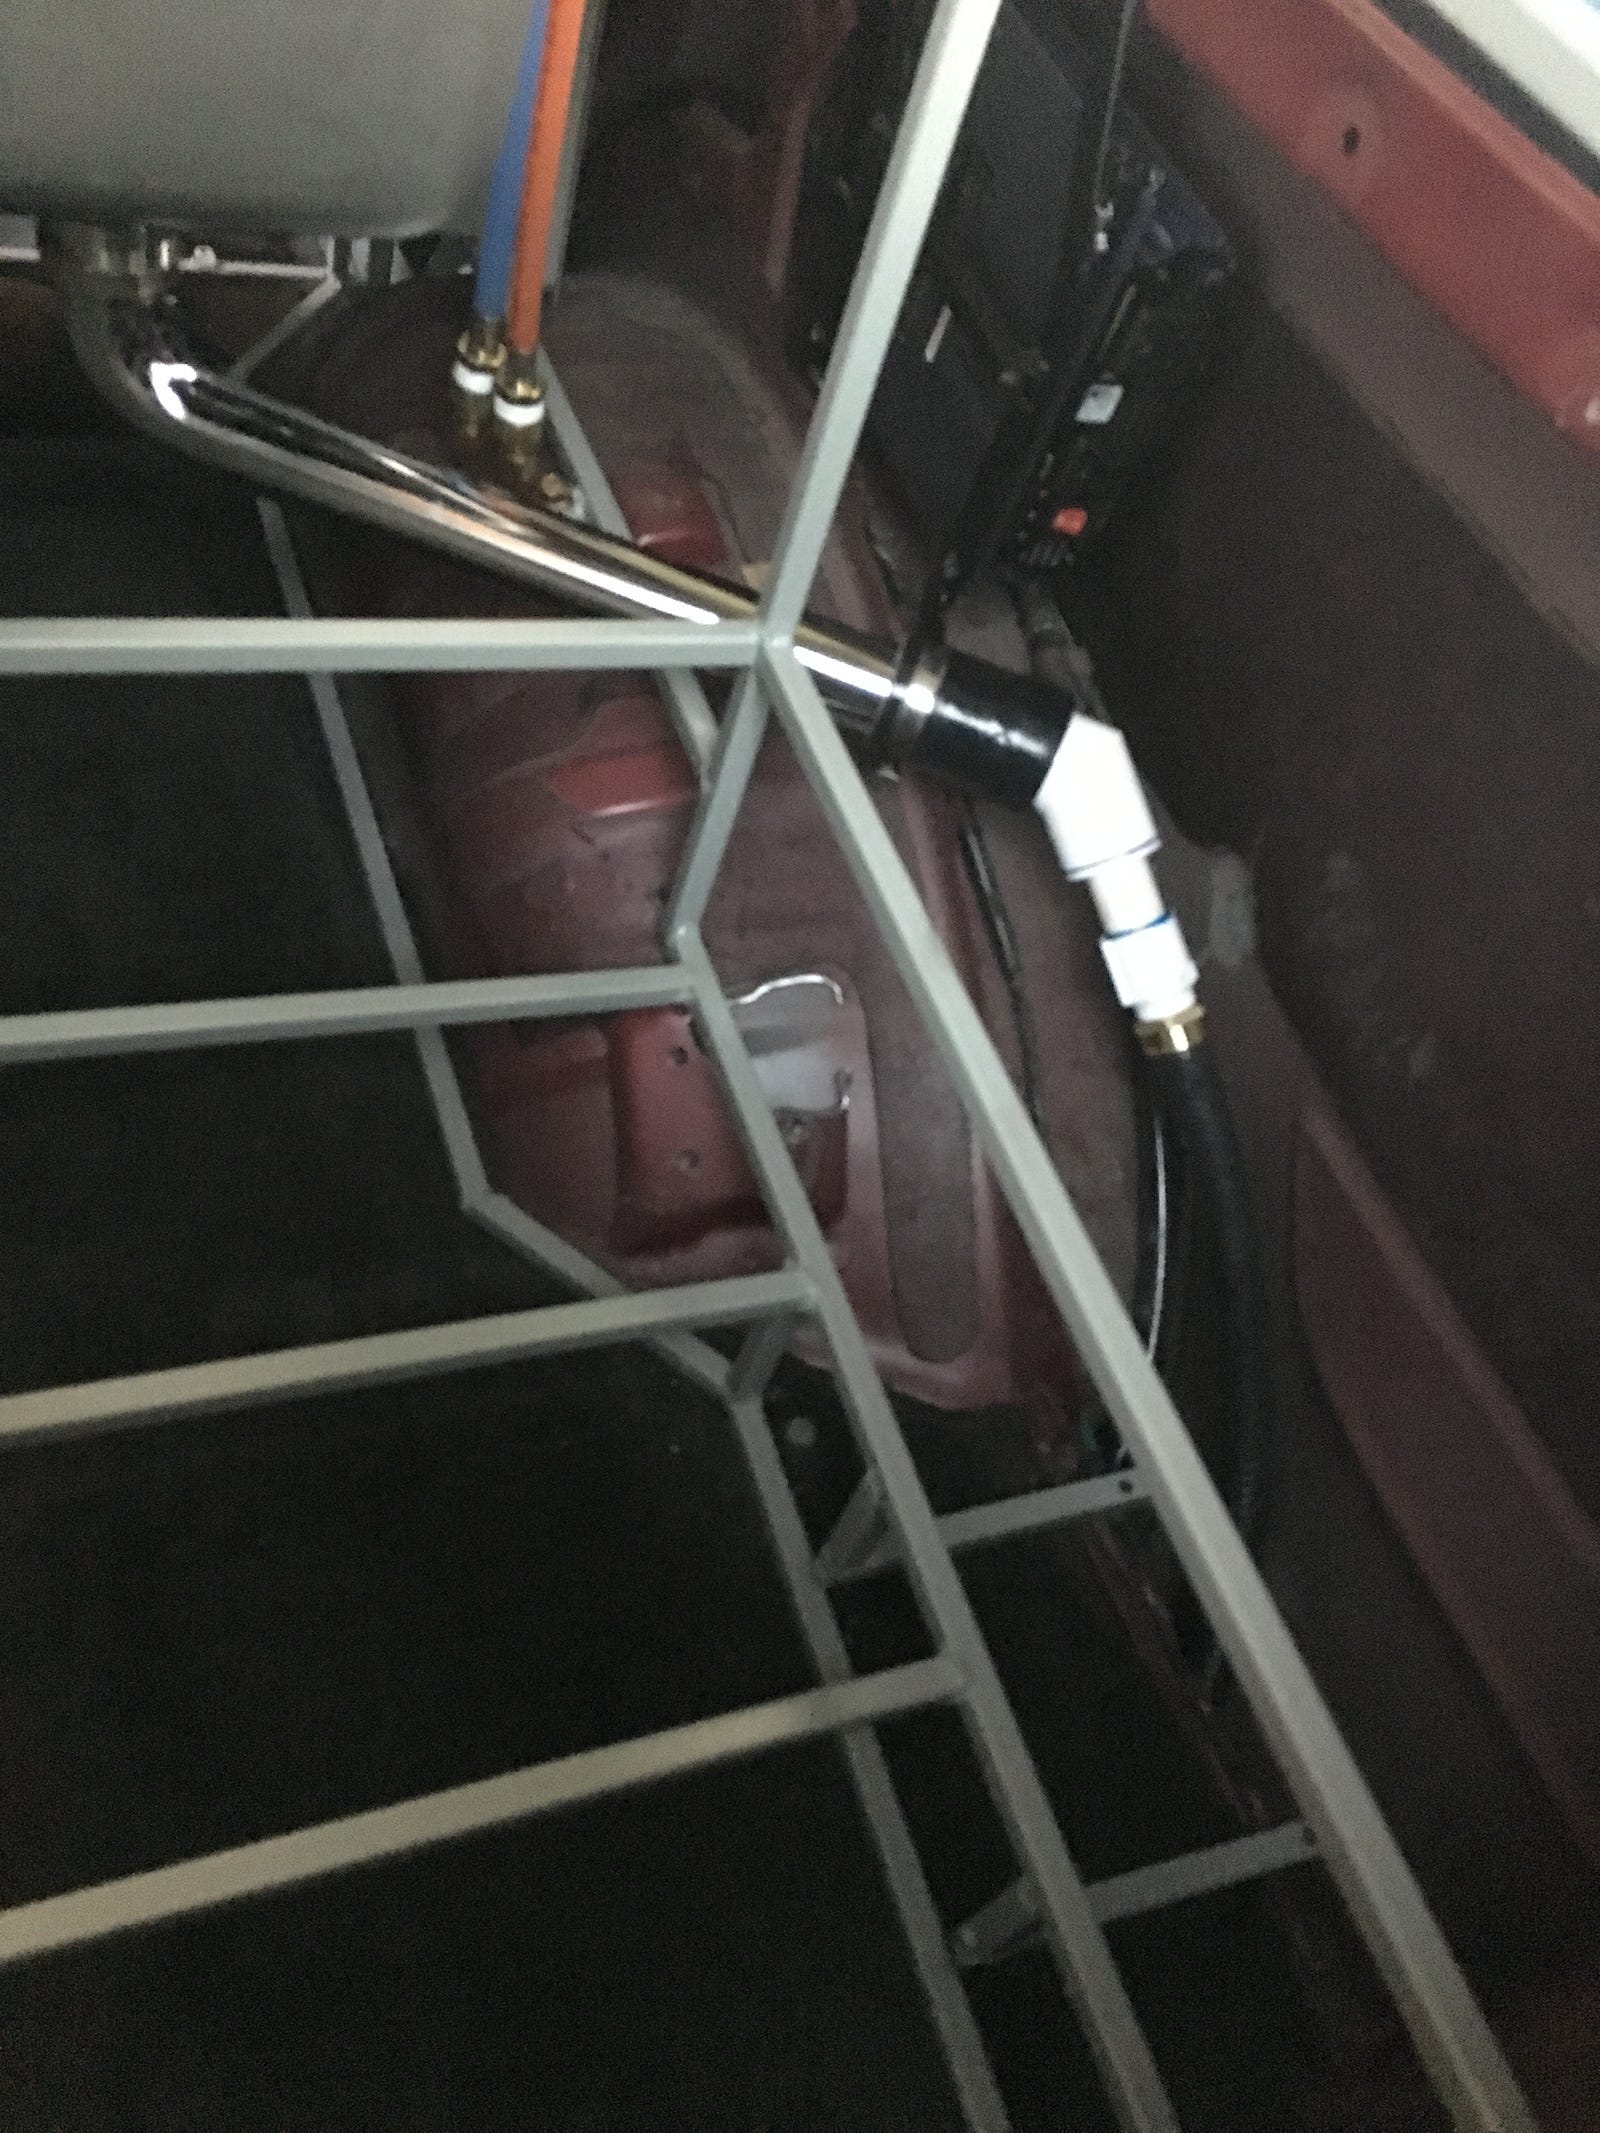
We used 3/8" copper pipe for the water system. Most used compression fitting, except in a few places that used a silicon hose with clamp to relieve the stress of the vibrations.
The lid for the fridge gave us a bit of a problem. For a $1000 fridge, the quality of the lid is not great. It just sits on the top of the fridge and is made of molded plastic with a sheet of Formaica on top. We figured that securing is a must, so we used removable hinges on the back, and rubber latches in the front. All this had to be integrated into the lid and a Corian on top of it all. It was a time consuming task.
The electrical panel is all done and ready to be hooked up.
Interior lights were tested with the ‘bed’ opened.
The layout for the water tanks was done before construction.

The water tanks were finally finished after a pressure test, and installed under the vehicle. We used 8" PVC pipes and they provided 9 gallons each. It heats 9 gallons to 150F in 18 minutes when the engine is running and warm


We added a protective plate for the plumbing.
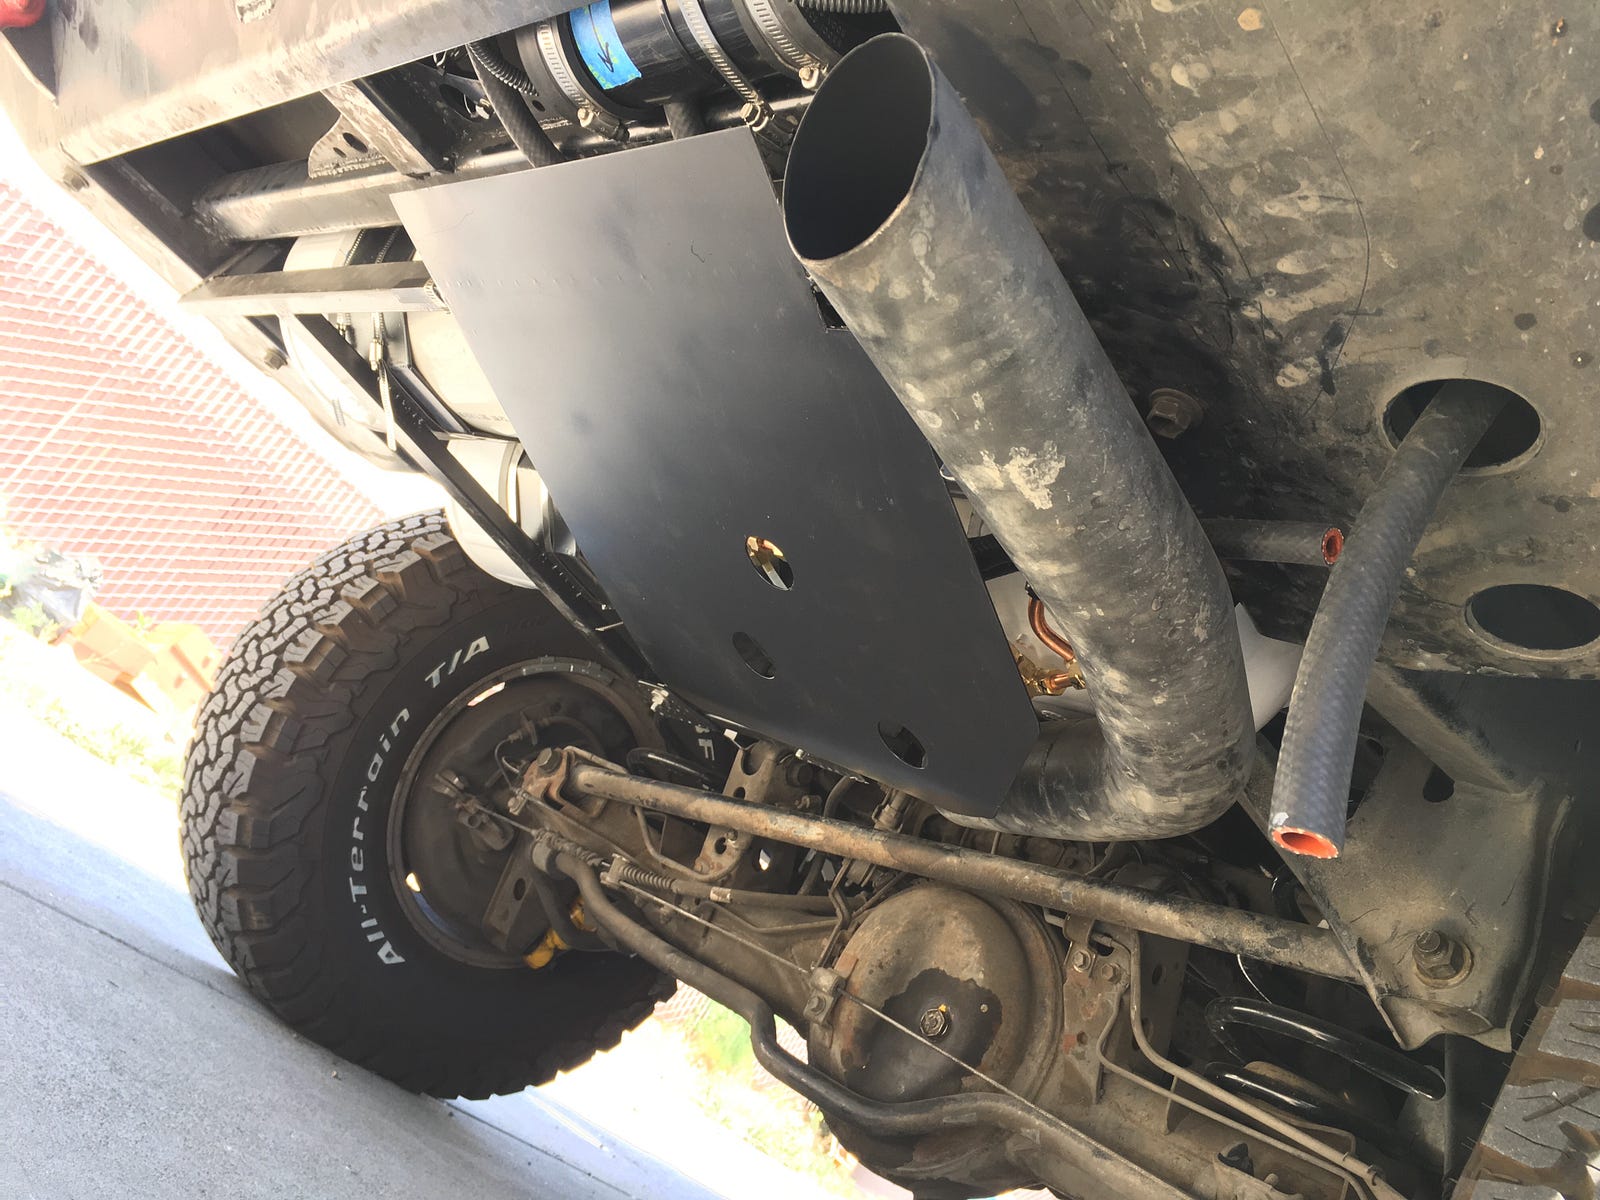
The circulating pump was installed inside a PVC pipe to provide some protection. It was installed in the rear bumper.
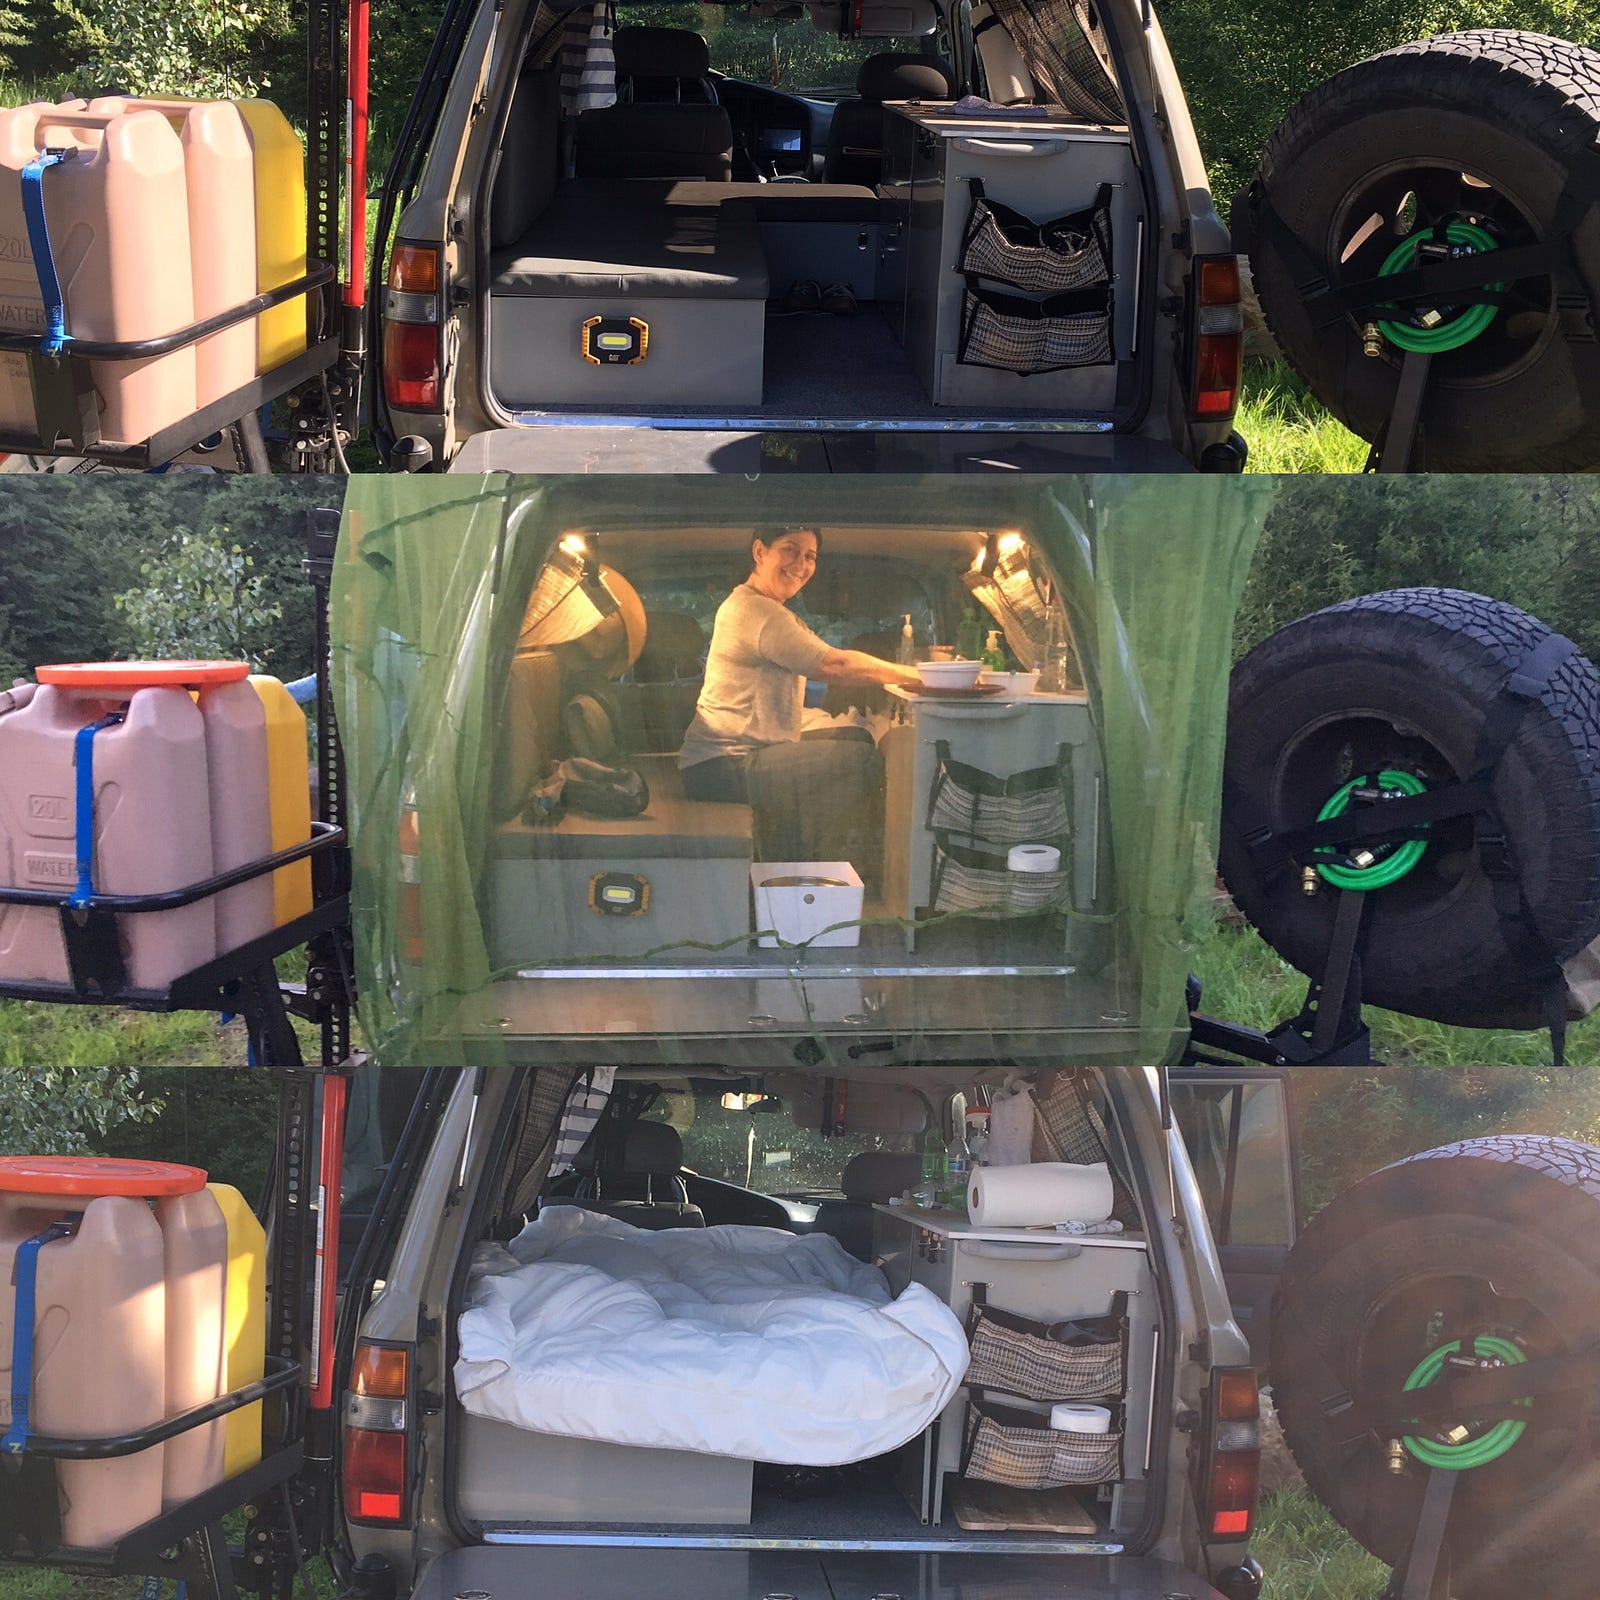
So the setup for the three modes of the car — drive, cook, sleep are below...
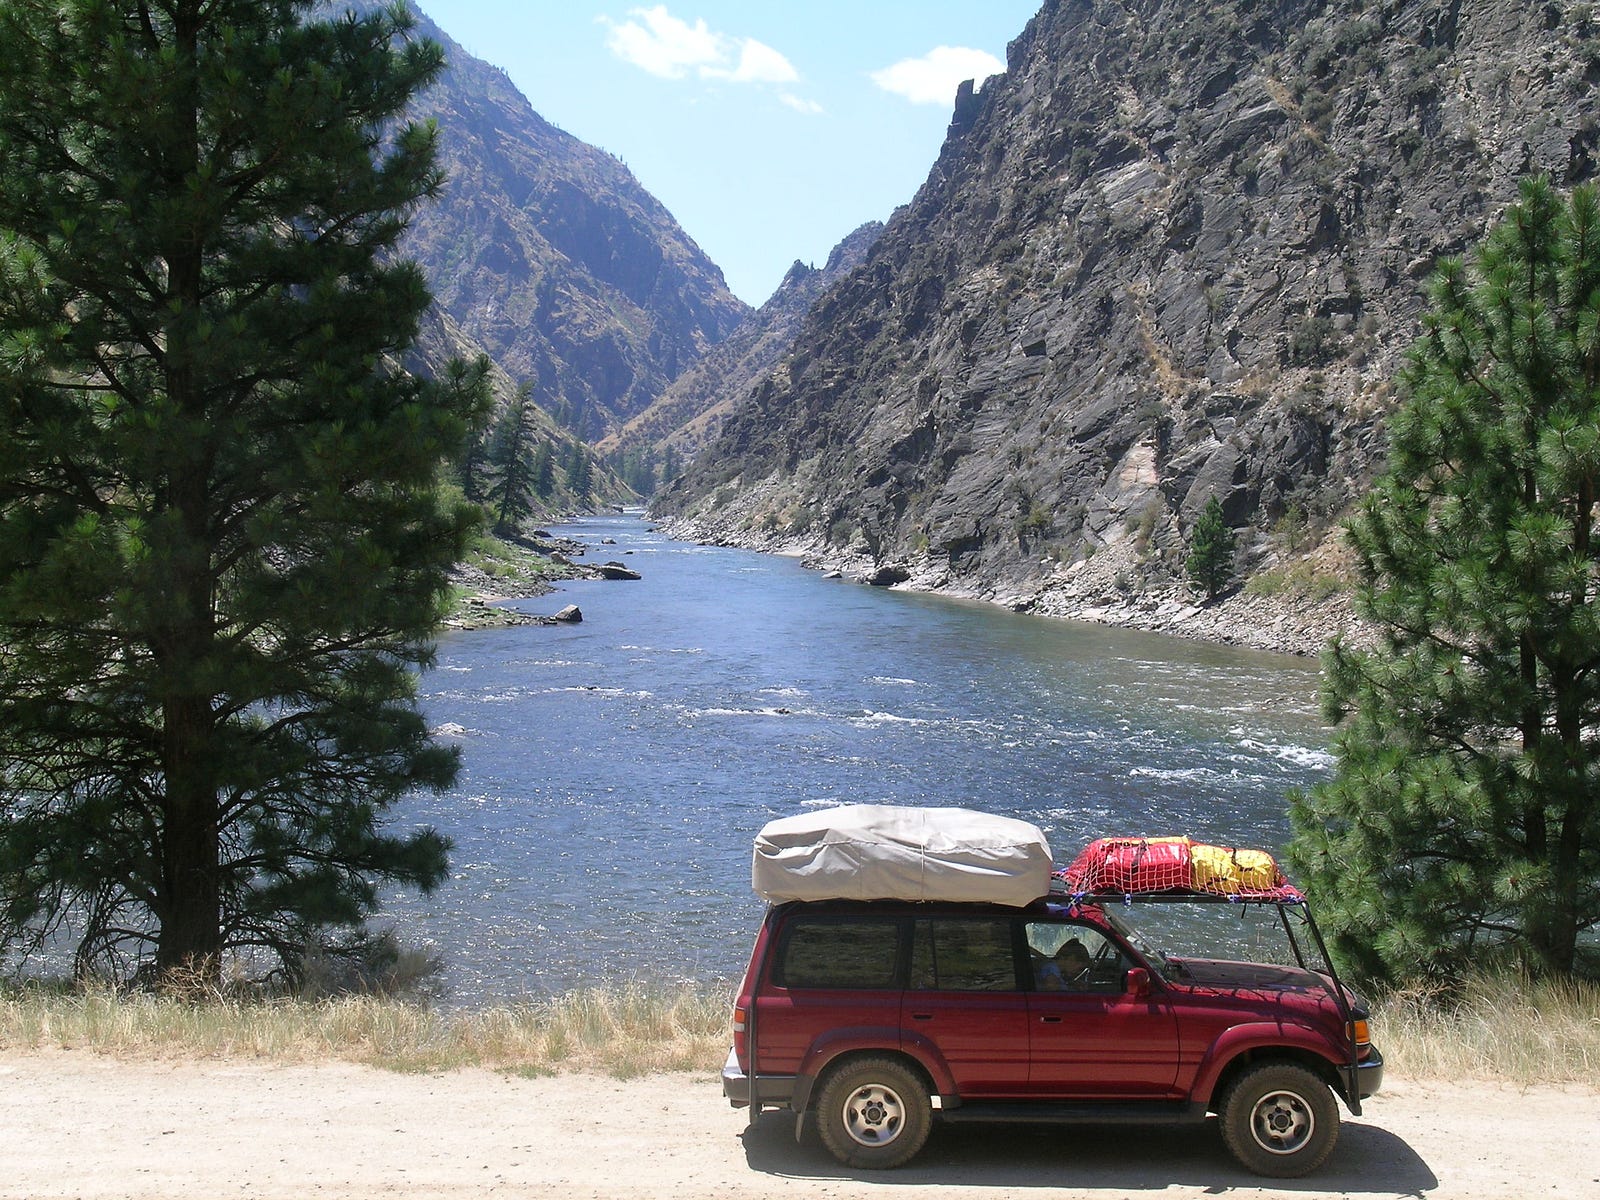
At this point the vehicle was ready for the first test. An 8000 miles trip to Alaska.
Our depature date was June 14. The destination Alaska. It was an 8000 miles round trip that would put the vehicle and all the systems to a test.
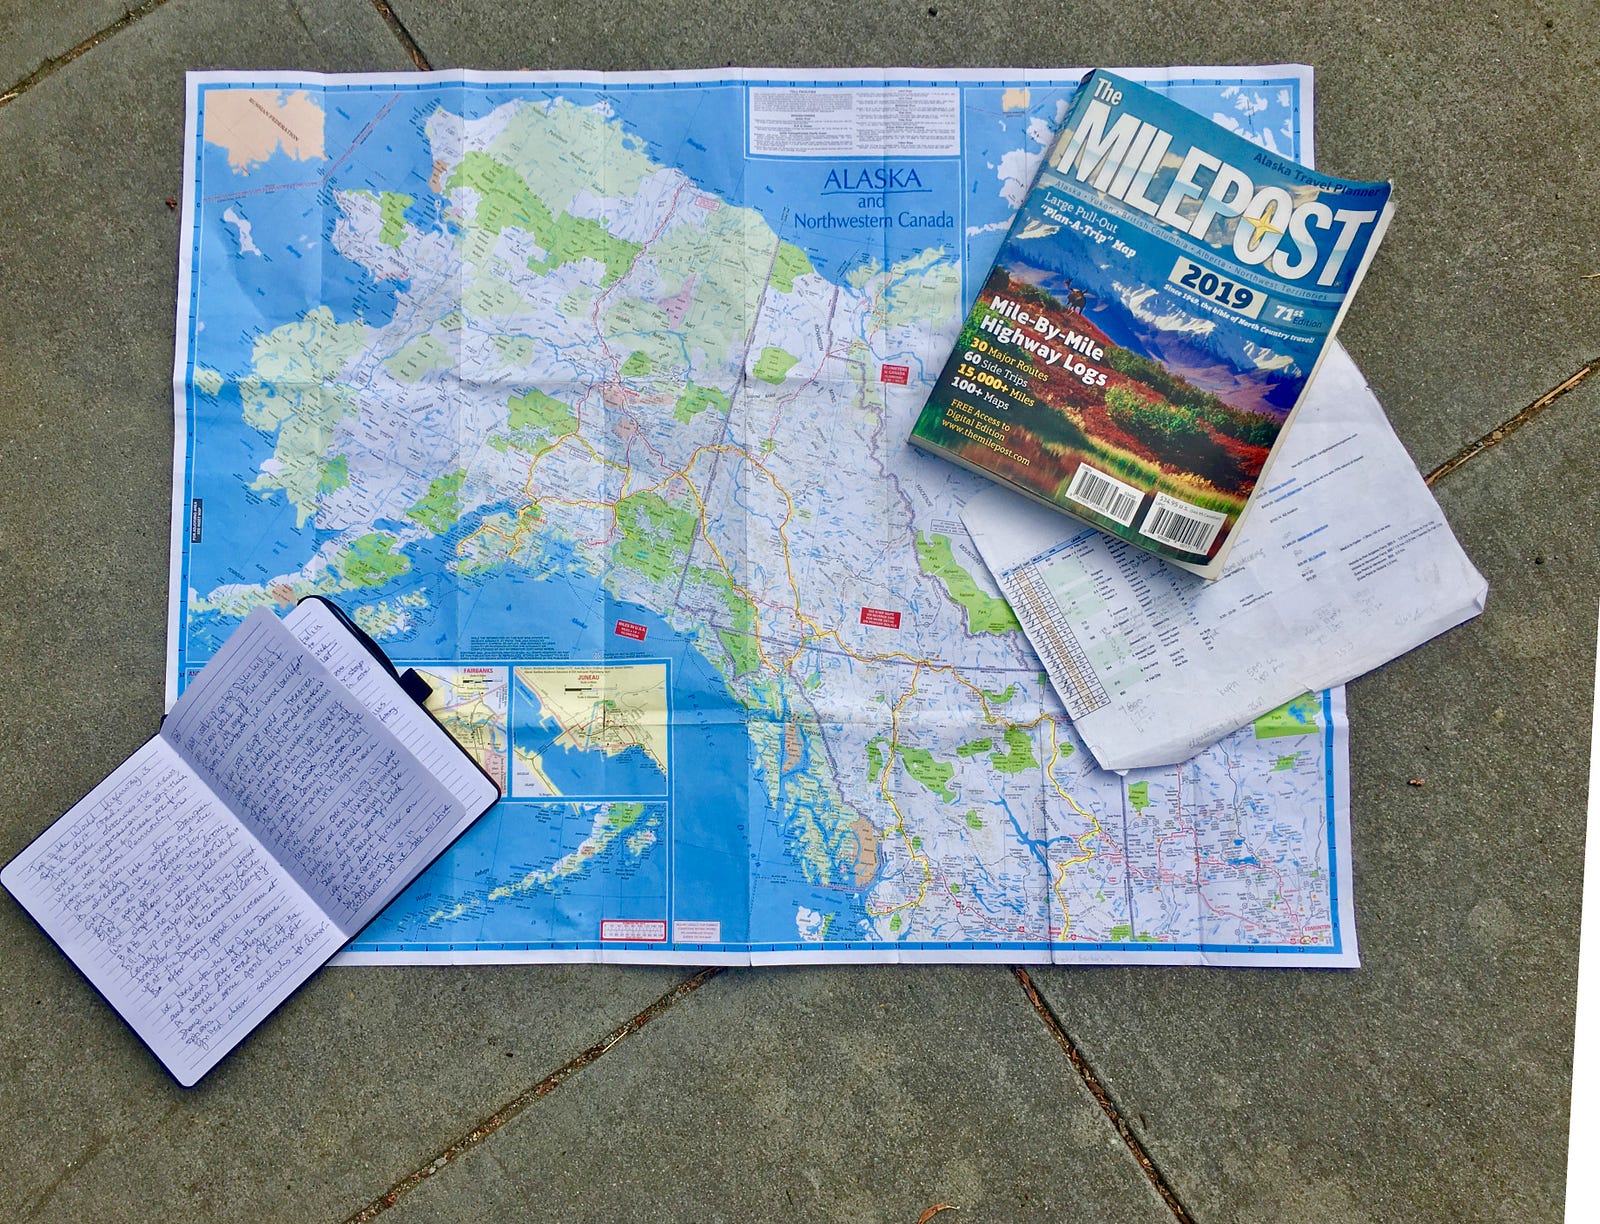
We planned the route so most roads would be traveled once starting and ending in Palo Alto, CA. Dashed lines are done in a ferry, green is the return route.

The build was finished 12 hours before the departure. The water system was leaking under pressure. It used mostly 3/8 pressure fittings and we ended up wraping the connection with teflon tape before puting the pressure fit nut. Also the pressure reducer helped. We fitted two alu-boxes on the roof and a solar panel that worked as a wind deflector. One box had dry goods, and the other every tool, part and screw that we thought could go wrong.
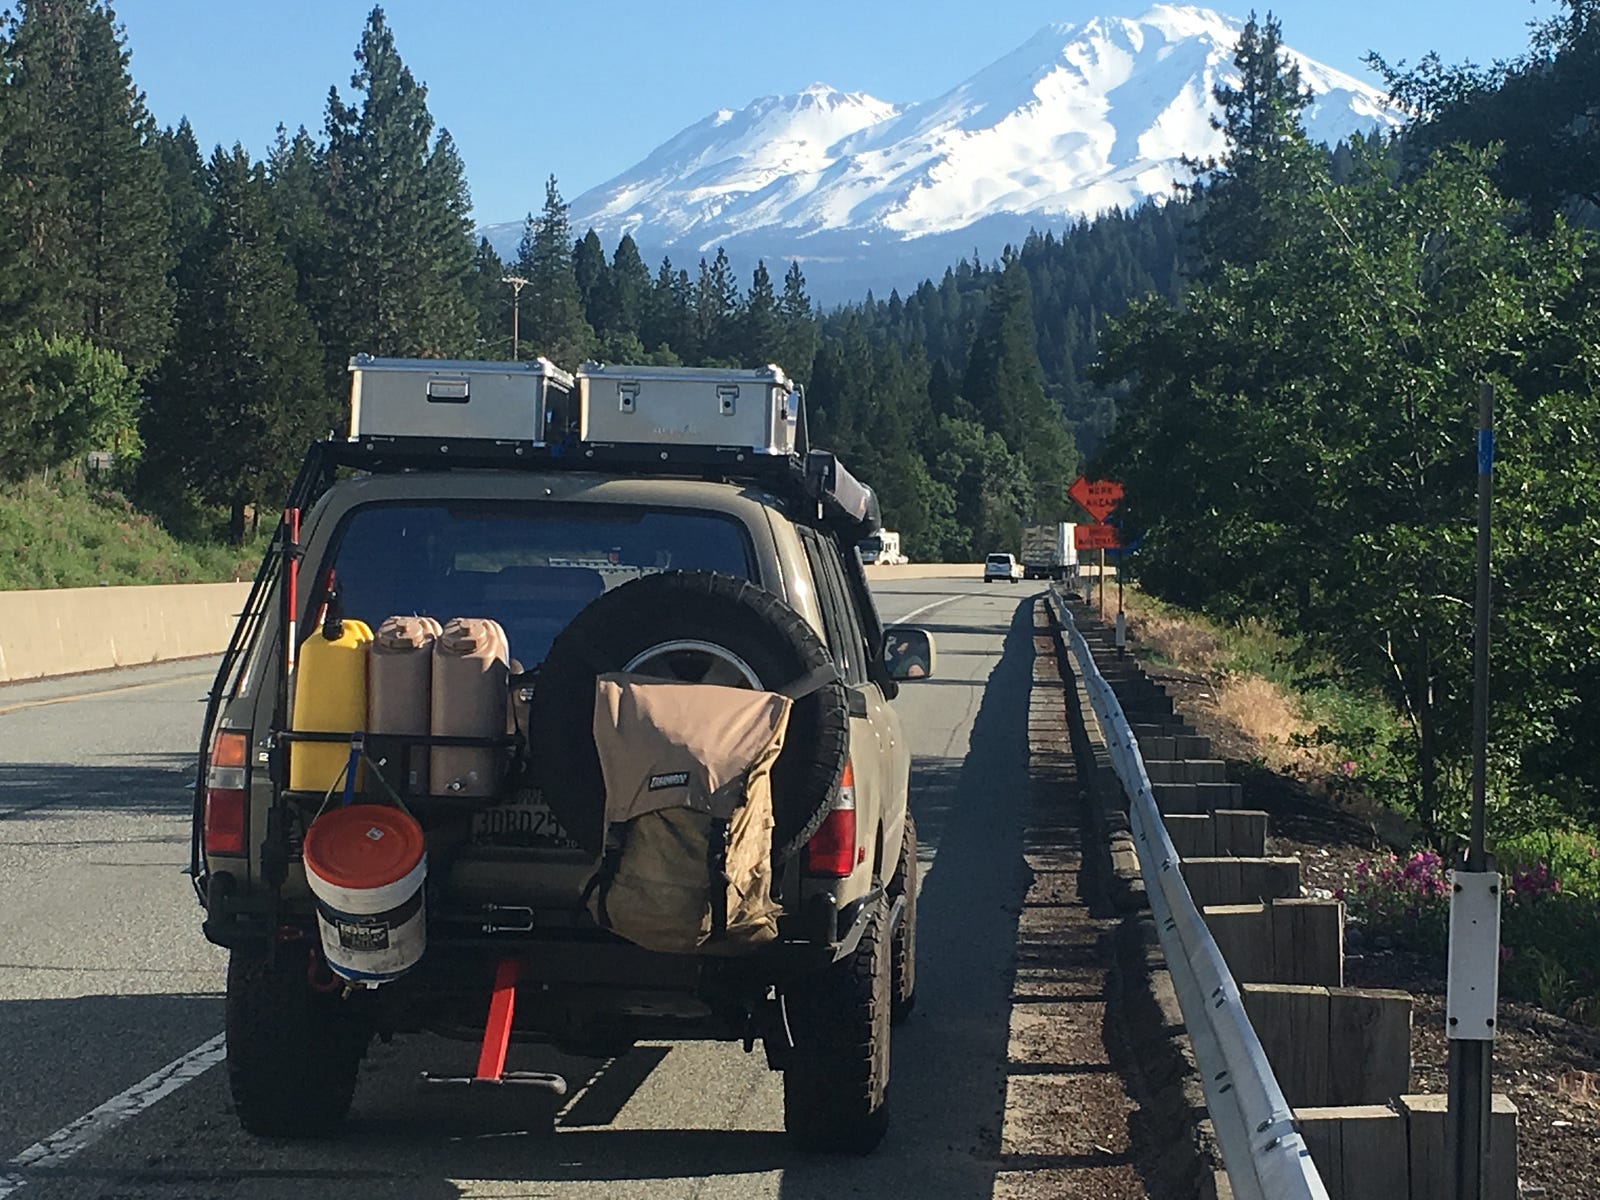
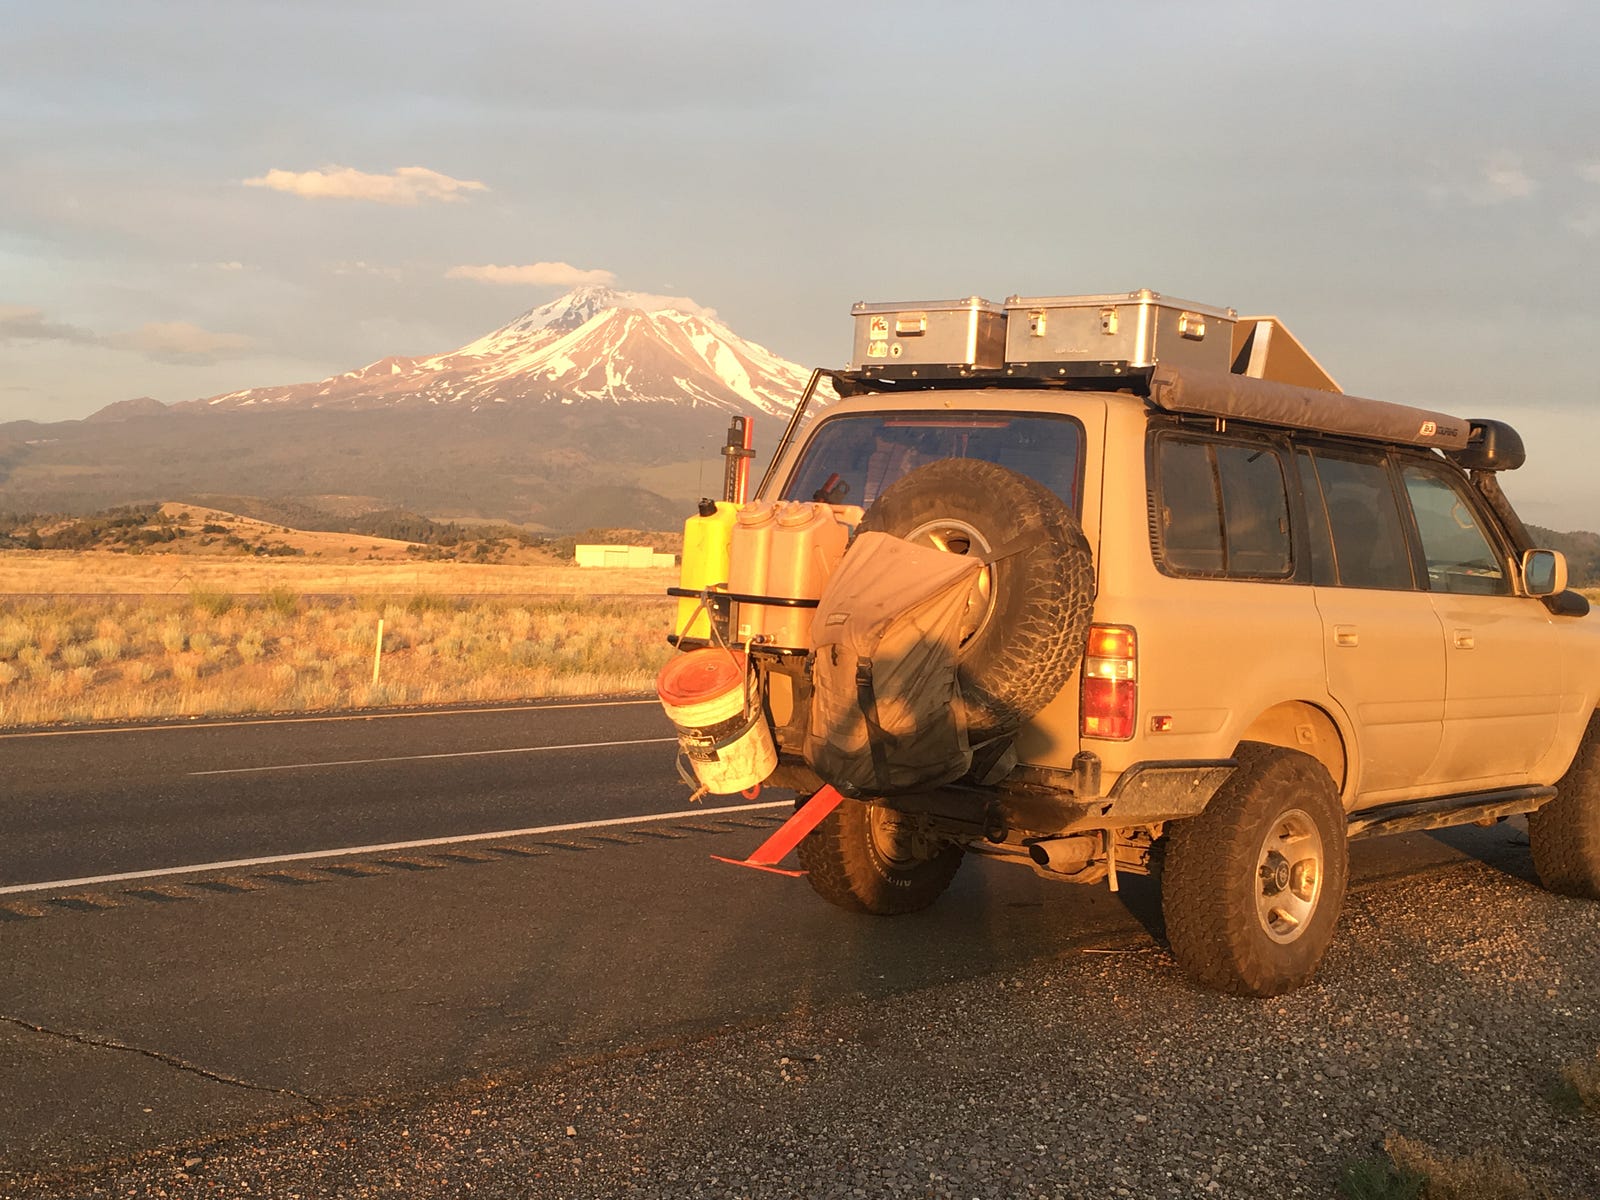
The first 300 miles went well. We made it to Mount Shasta.
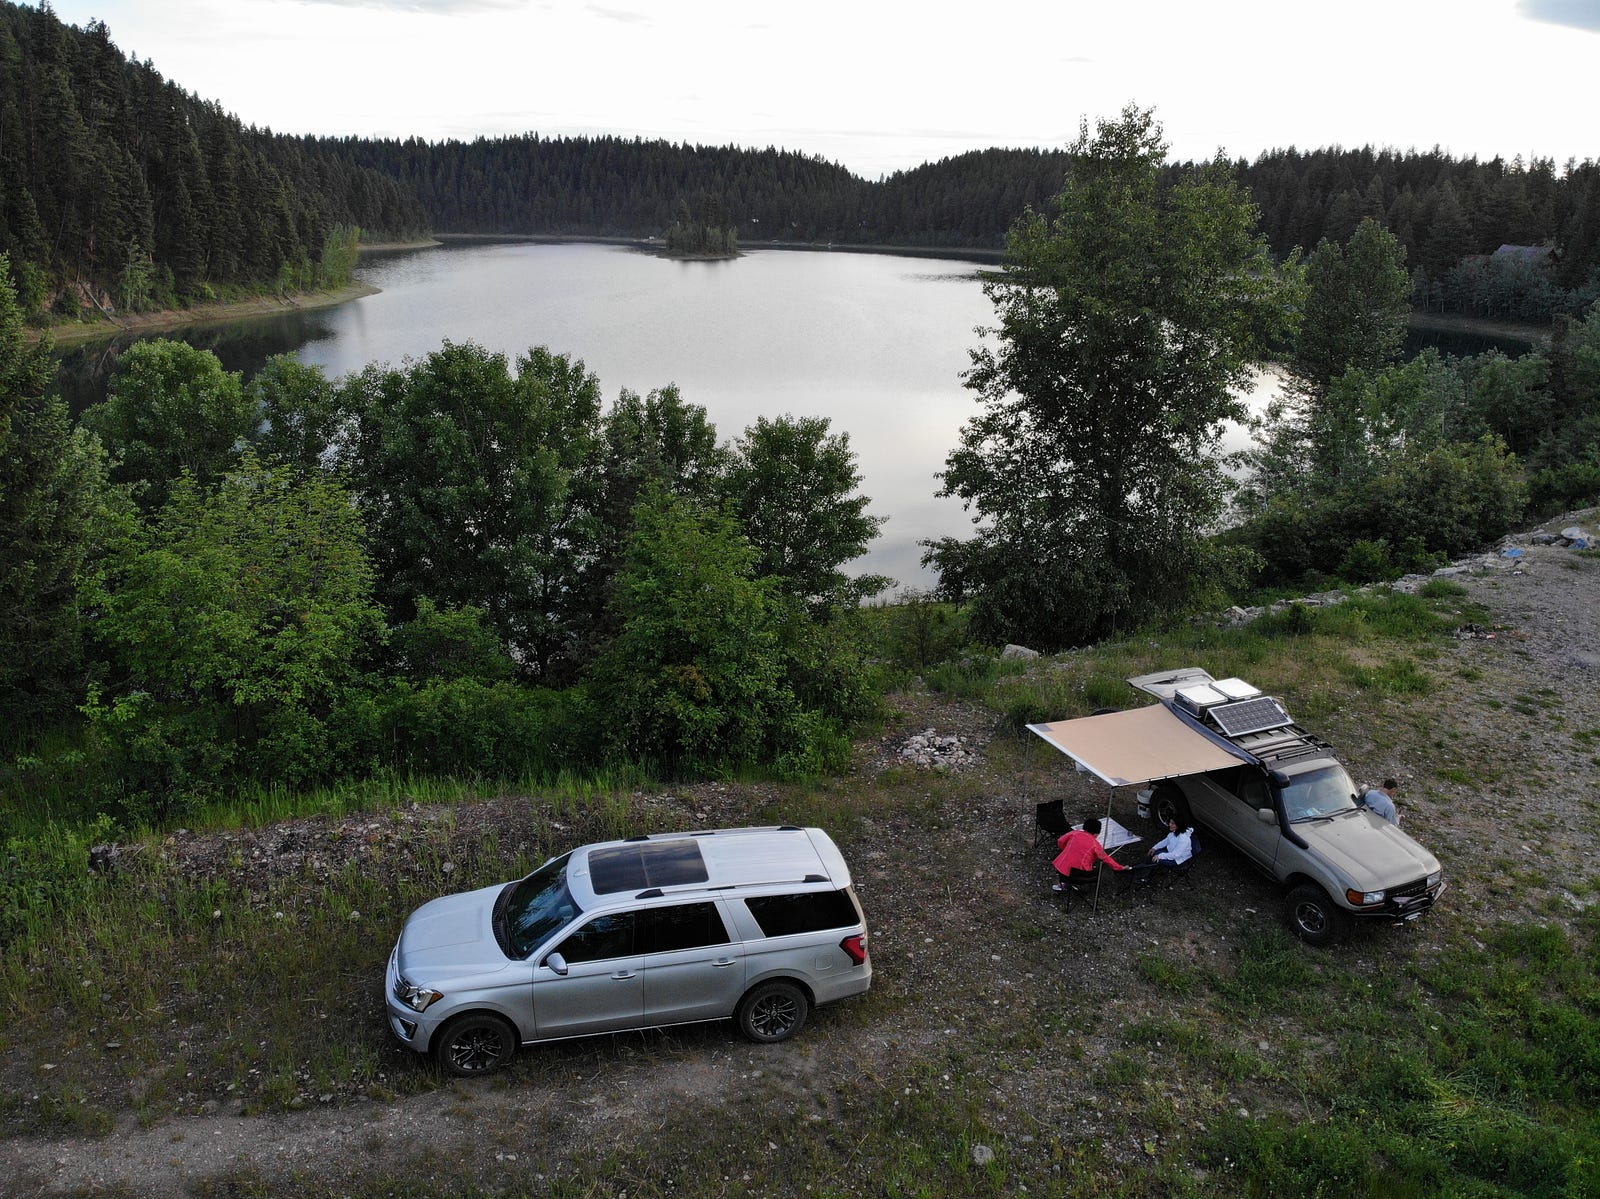
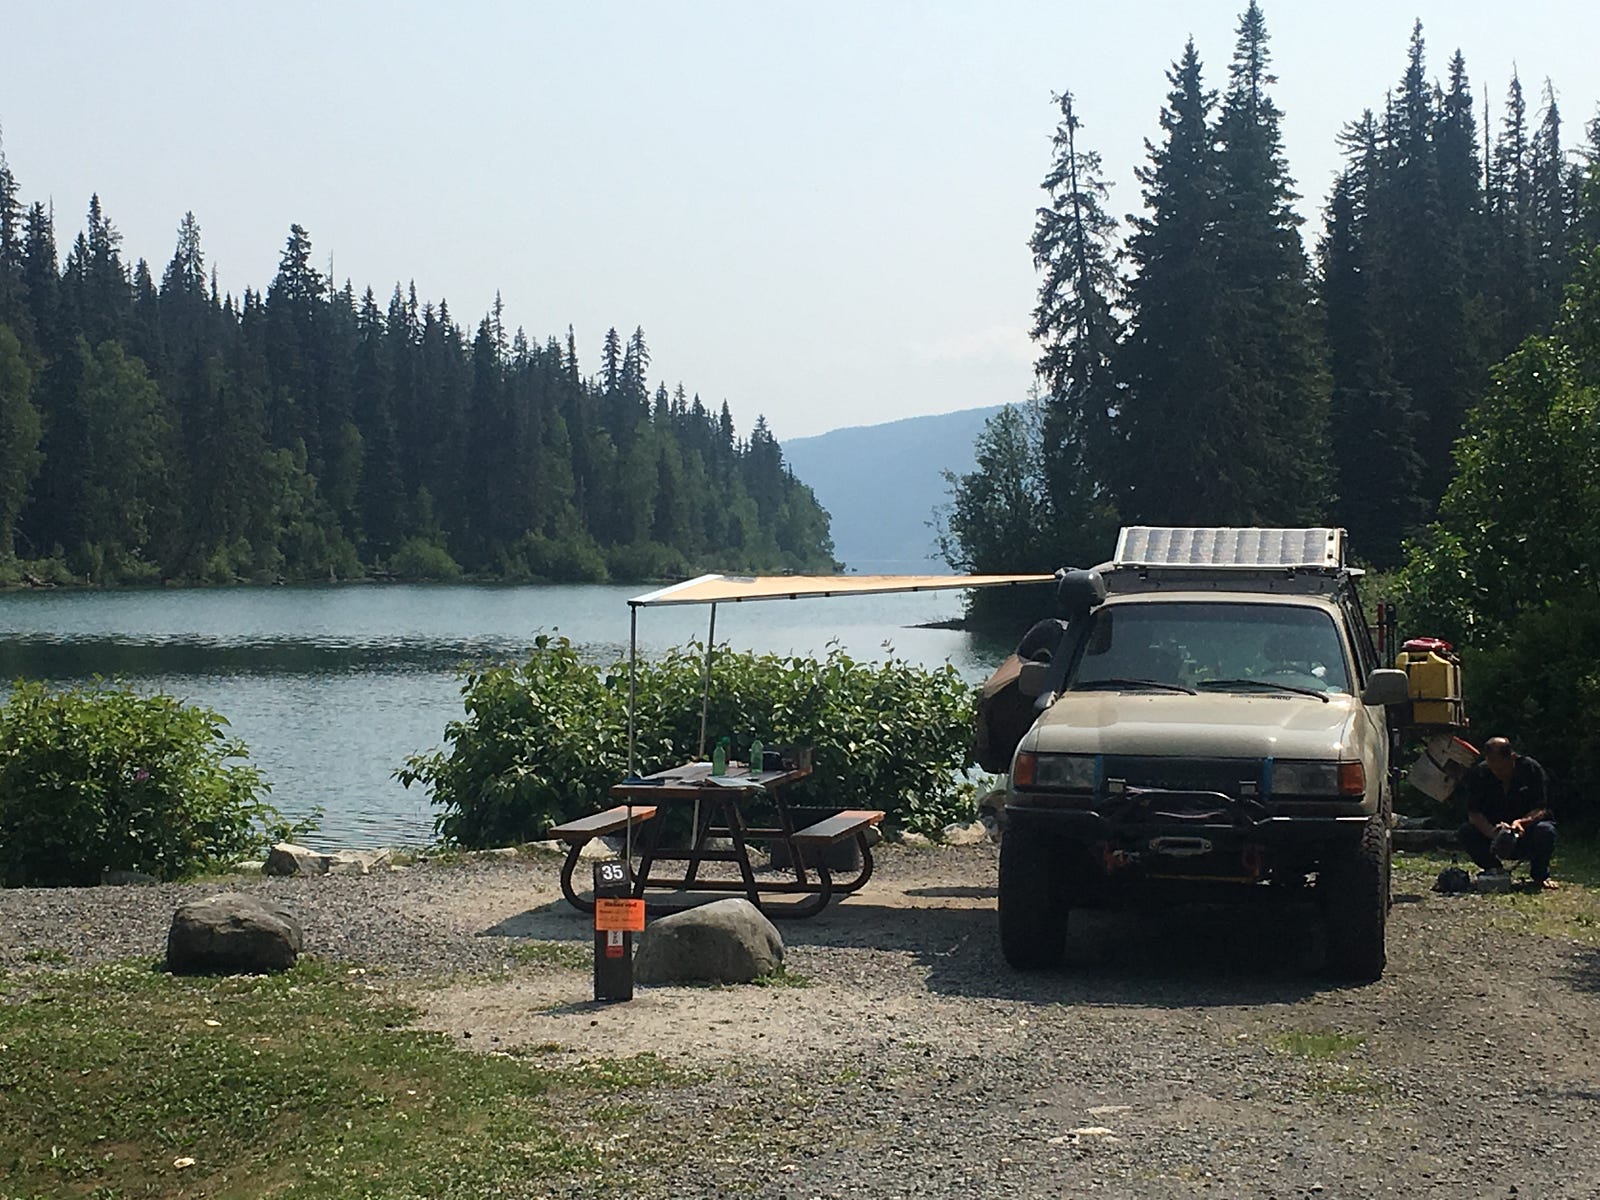
We stopped at a friend’s home in Seattle and our first camp was in Blue Lake, BC. Setup worked amazing. We cooked dinner and went to bed. No shower that night.
The following night was Lake Inga in BC. The kitchen/water system supported 2 couples and worked well. We placed a bucket under the sink drain, so it will not create a puddle.
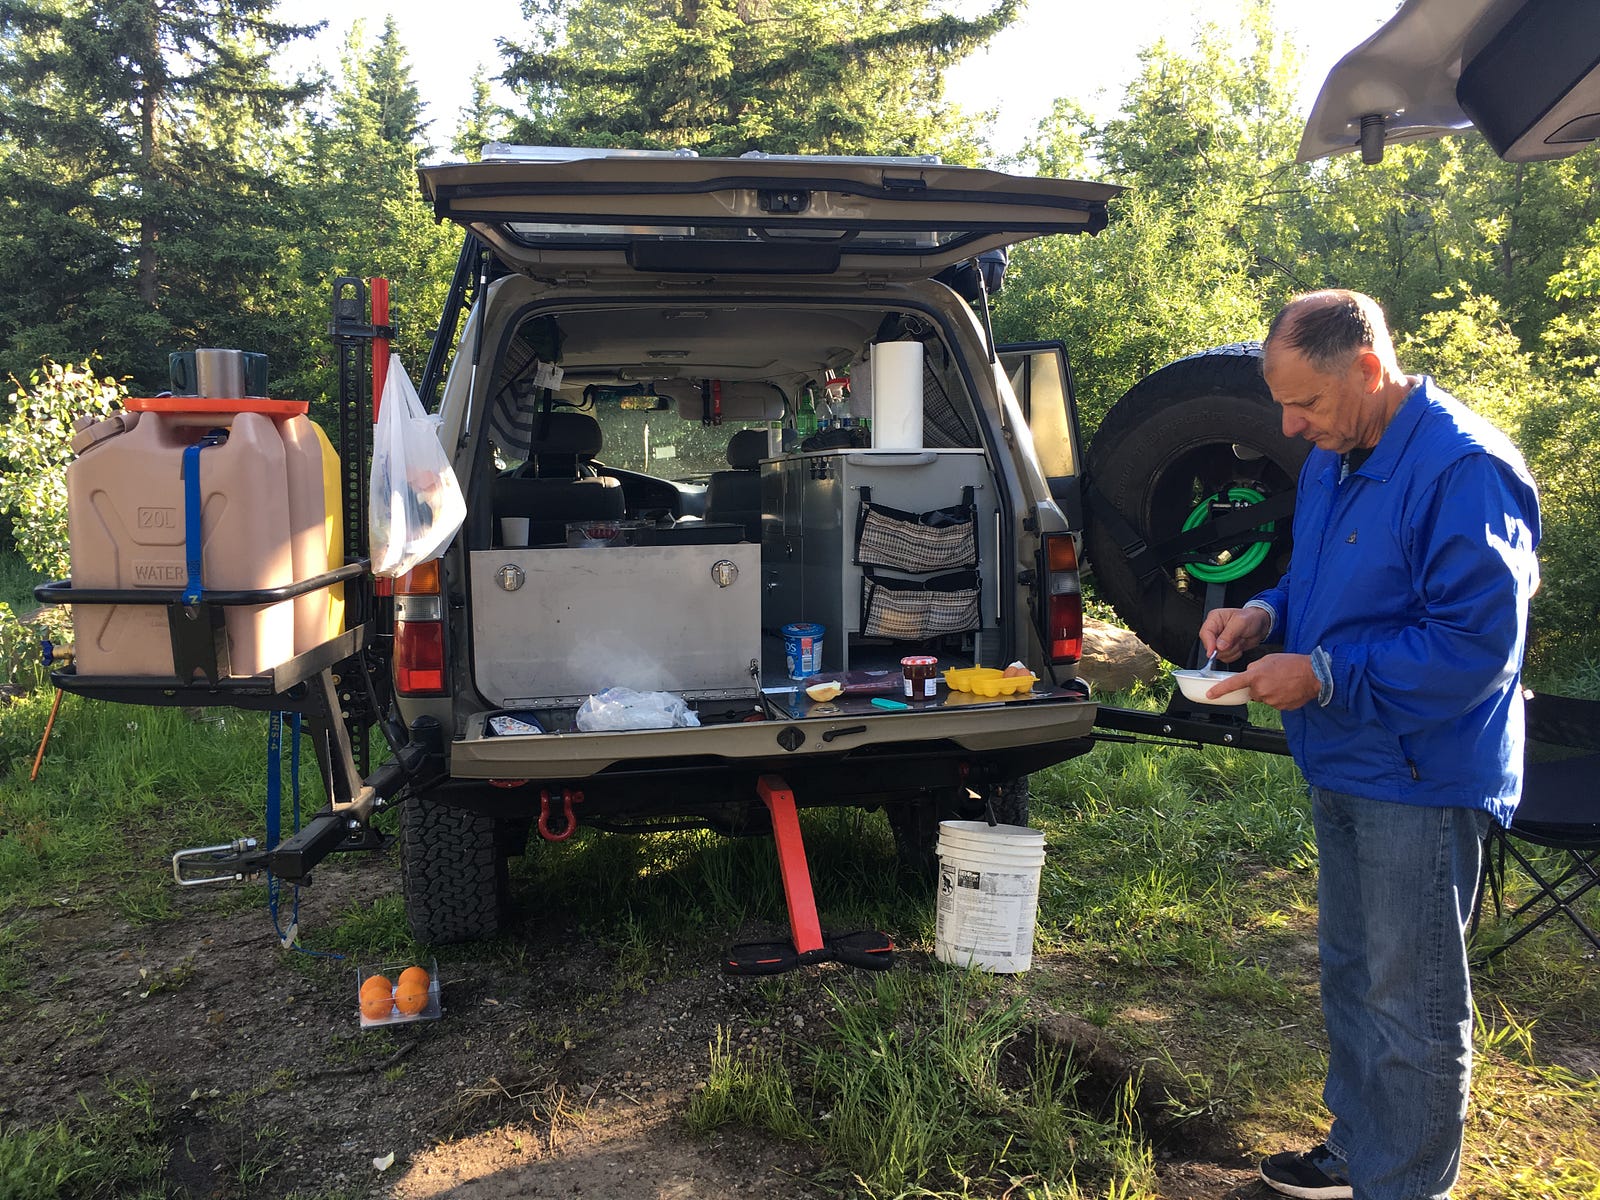
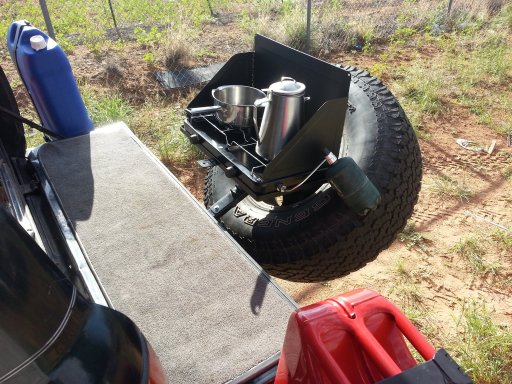
The process was, open the back, pull the stove on the tail gate and cook dinner. The Jerrycan in the back was handy to quick wash. We installed a faucet on the bottom of it, so it would be easy access. The kitchen was all set in the tail gate, except the pots under the sink.

The color we picked for the vehicle, seemed to blend nicely with the background.

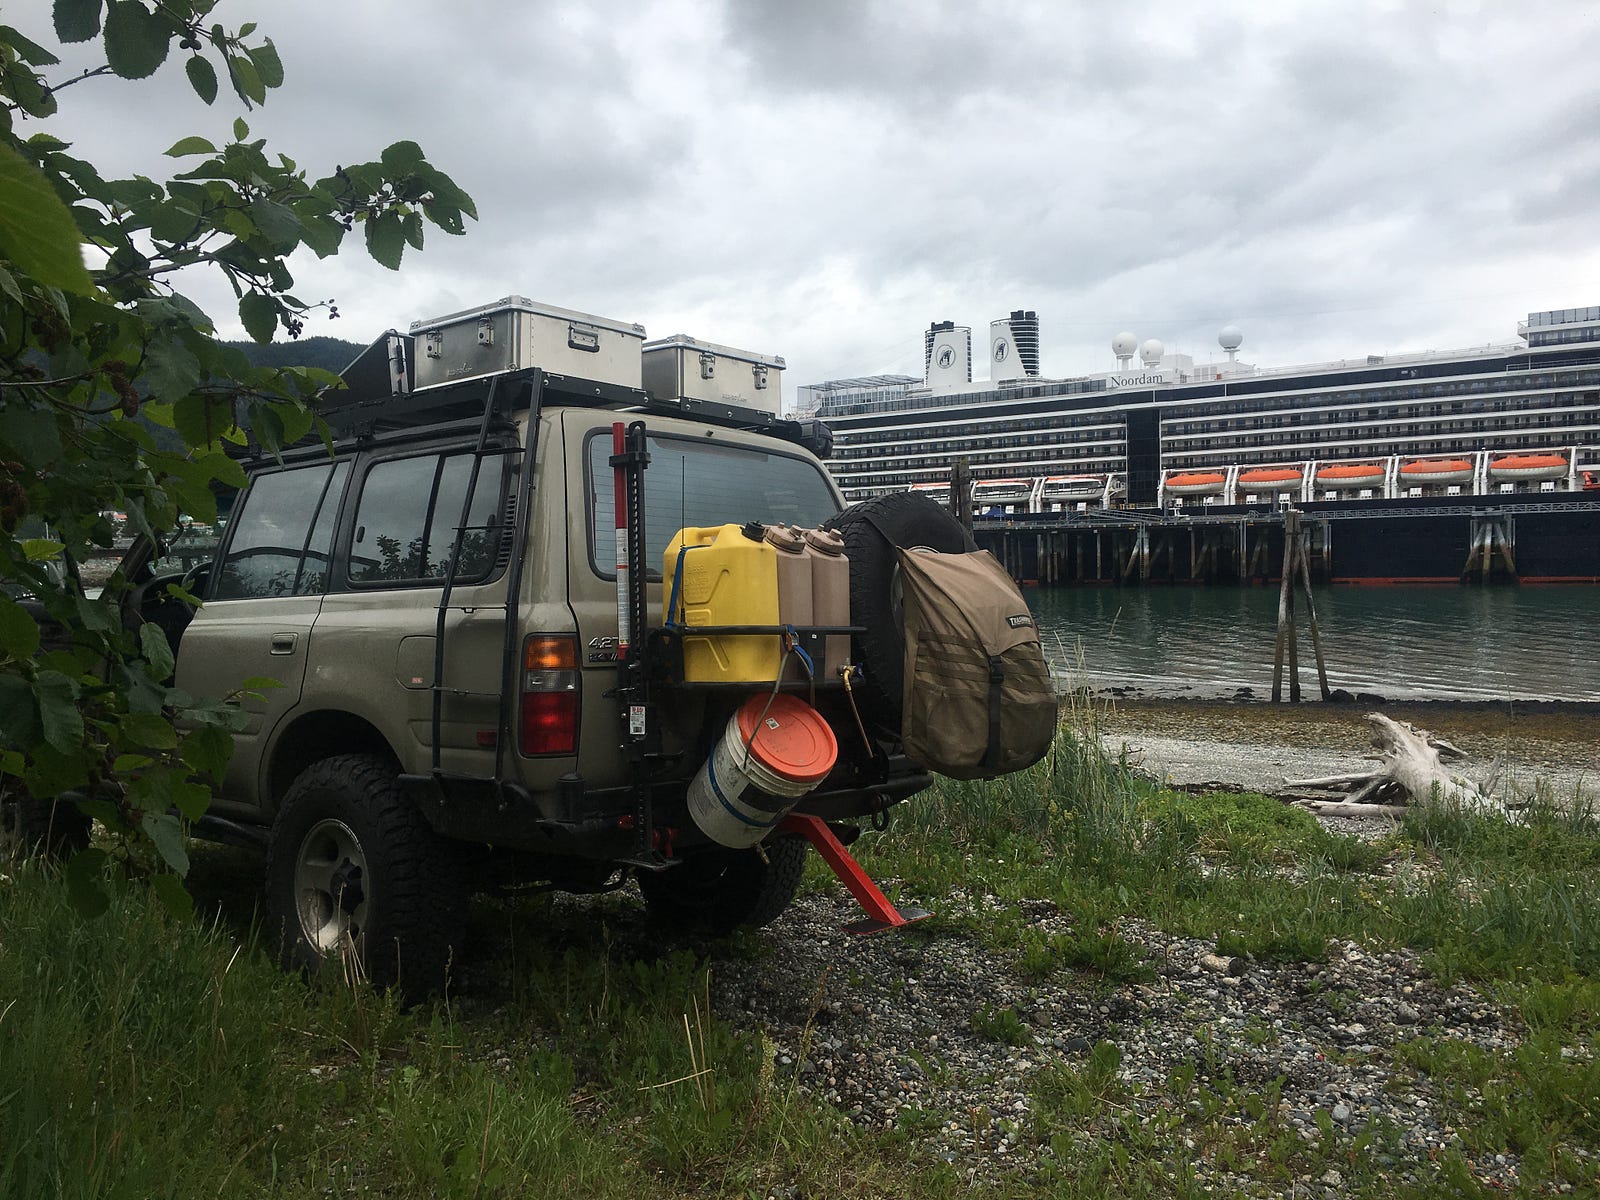
After 3000 miles we made it to the Alaska border. The bag tied to the spare tire ‘Trasharoo’ had a portable BBQ and the trash collected during the day.

We got to Haines on a ferry from Skagway. We saw that there are different ways of traveling to Alaska…
Haines Junction was 3200 miles. Evrything was still working great. Hot water heated up in 20 min. 9 gallons to 150F.

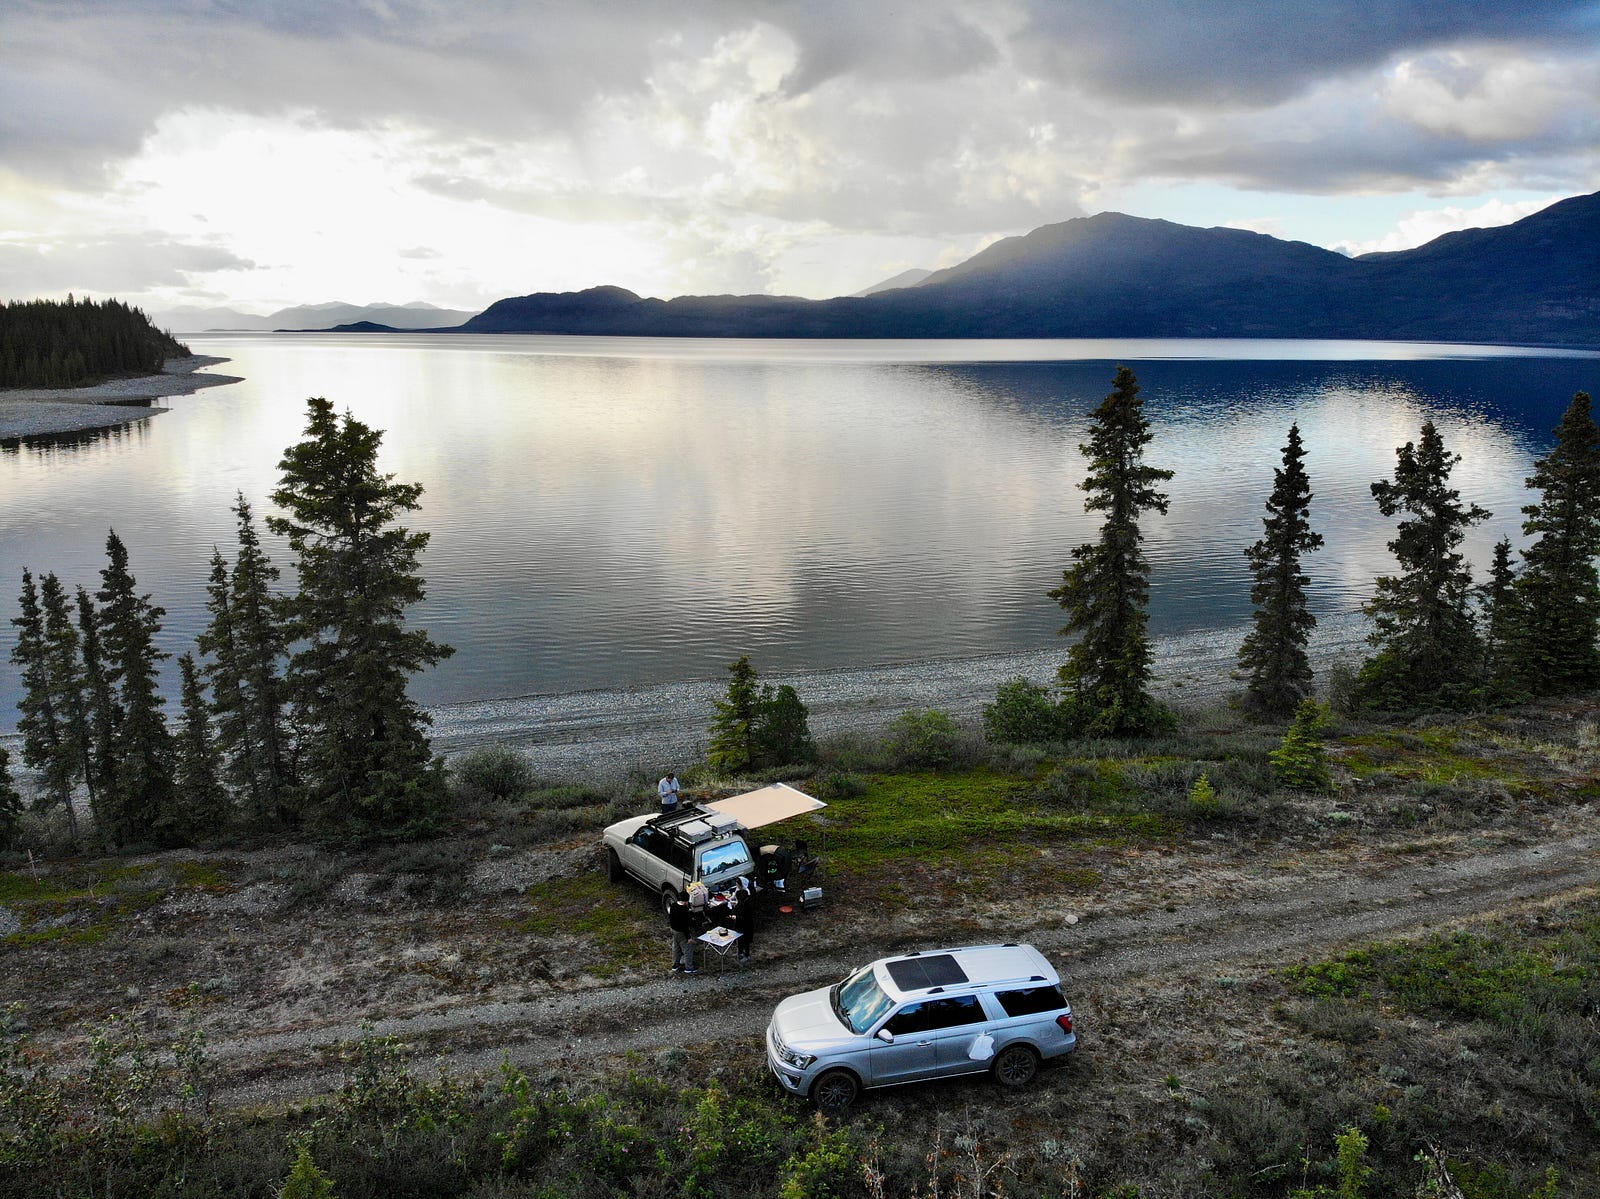
Kluane Lake was our stop for the night. Had to take a couple of miles of a rough dirt road to get to the shore. We were alone for the night. No bear visits.
We took a dirt road to Wrangell-St. Elias glacier. We were told that it should take 3.5 hours. Took us 1h 20 min. We were flying!!!!
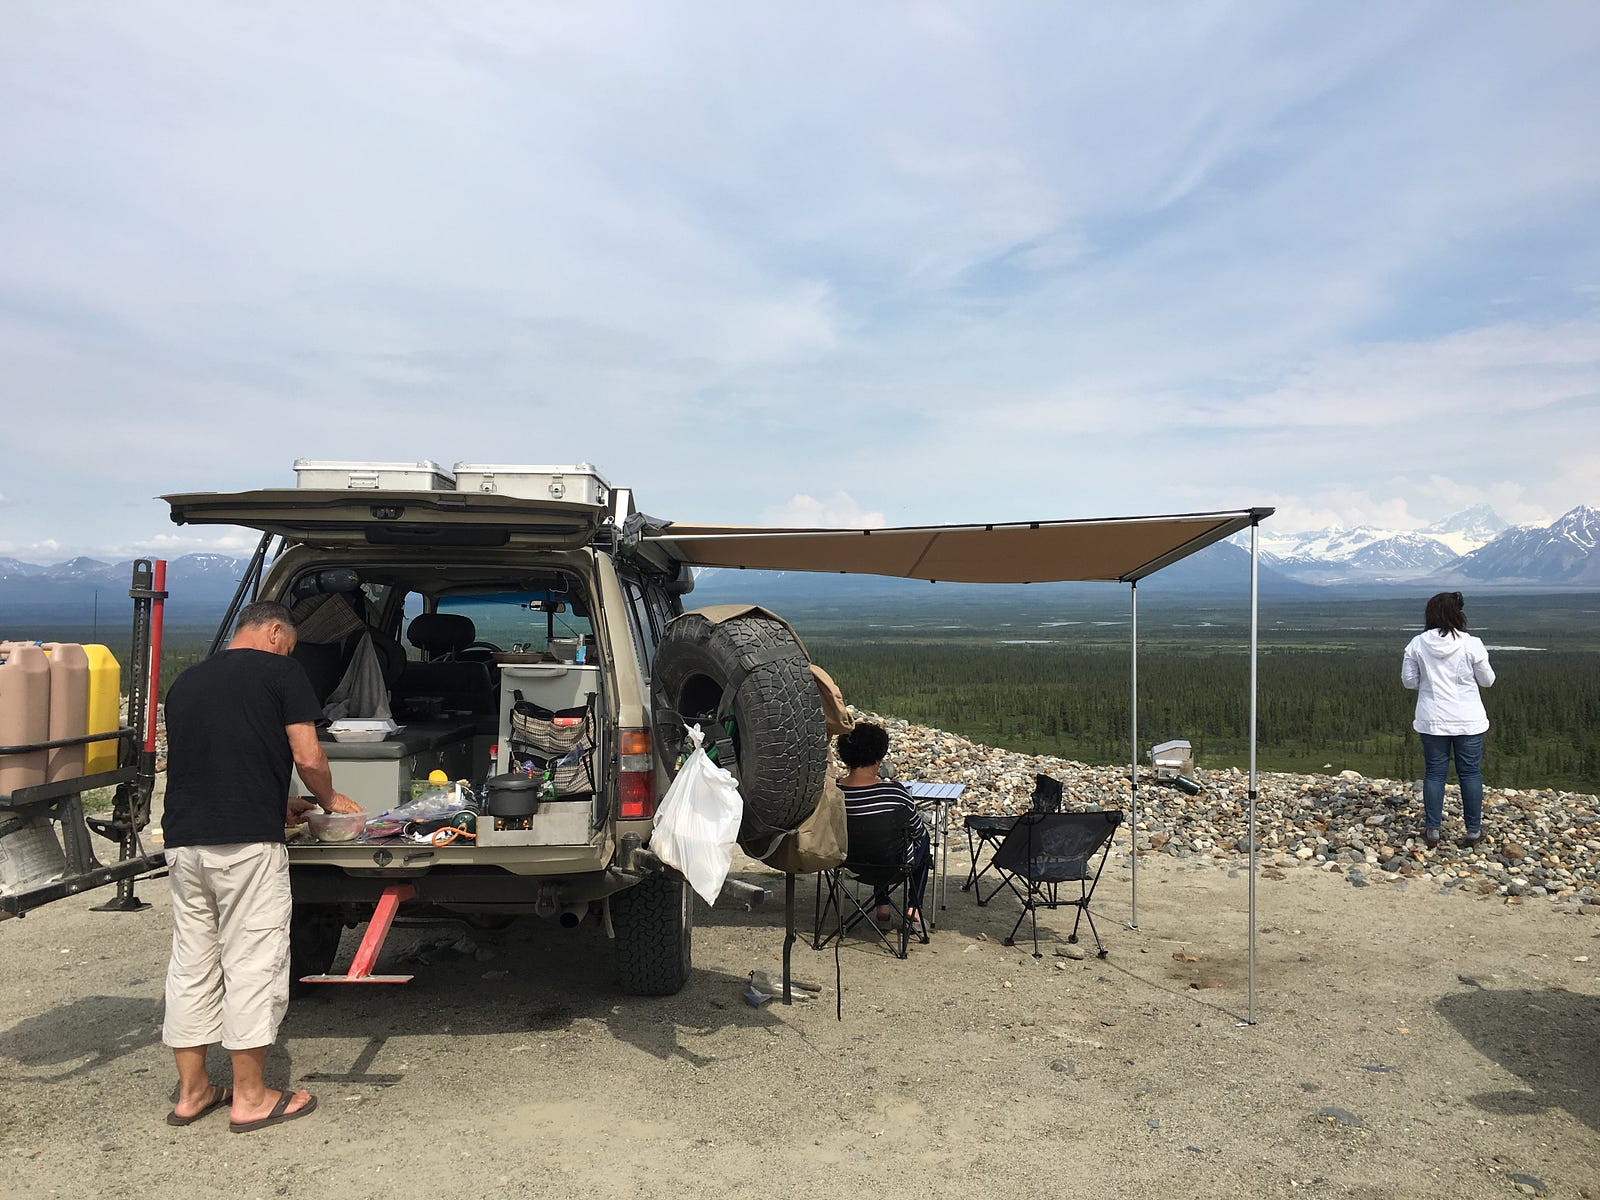
The next two days we traveled north and made it to the Denali Highway. We figured we will make kebabs for lunch with the Alaska Range on the background. We were almost 4000 miles of travel.
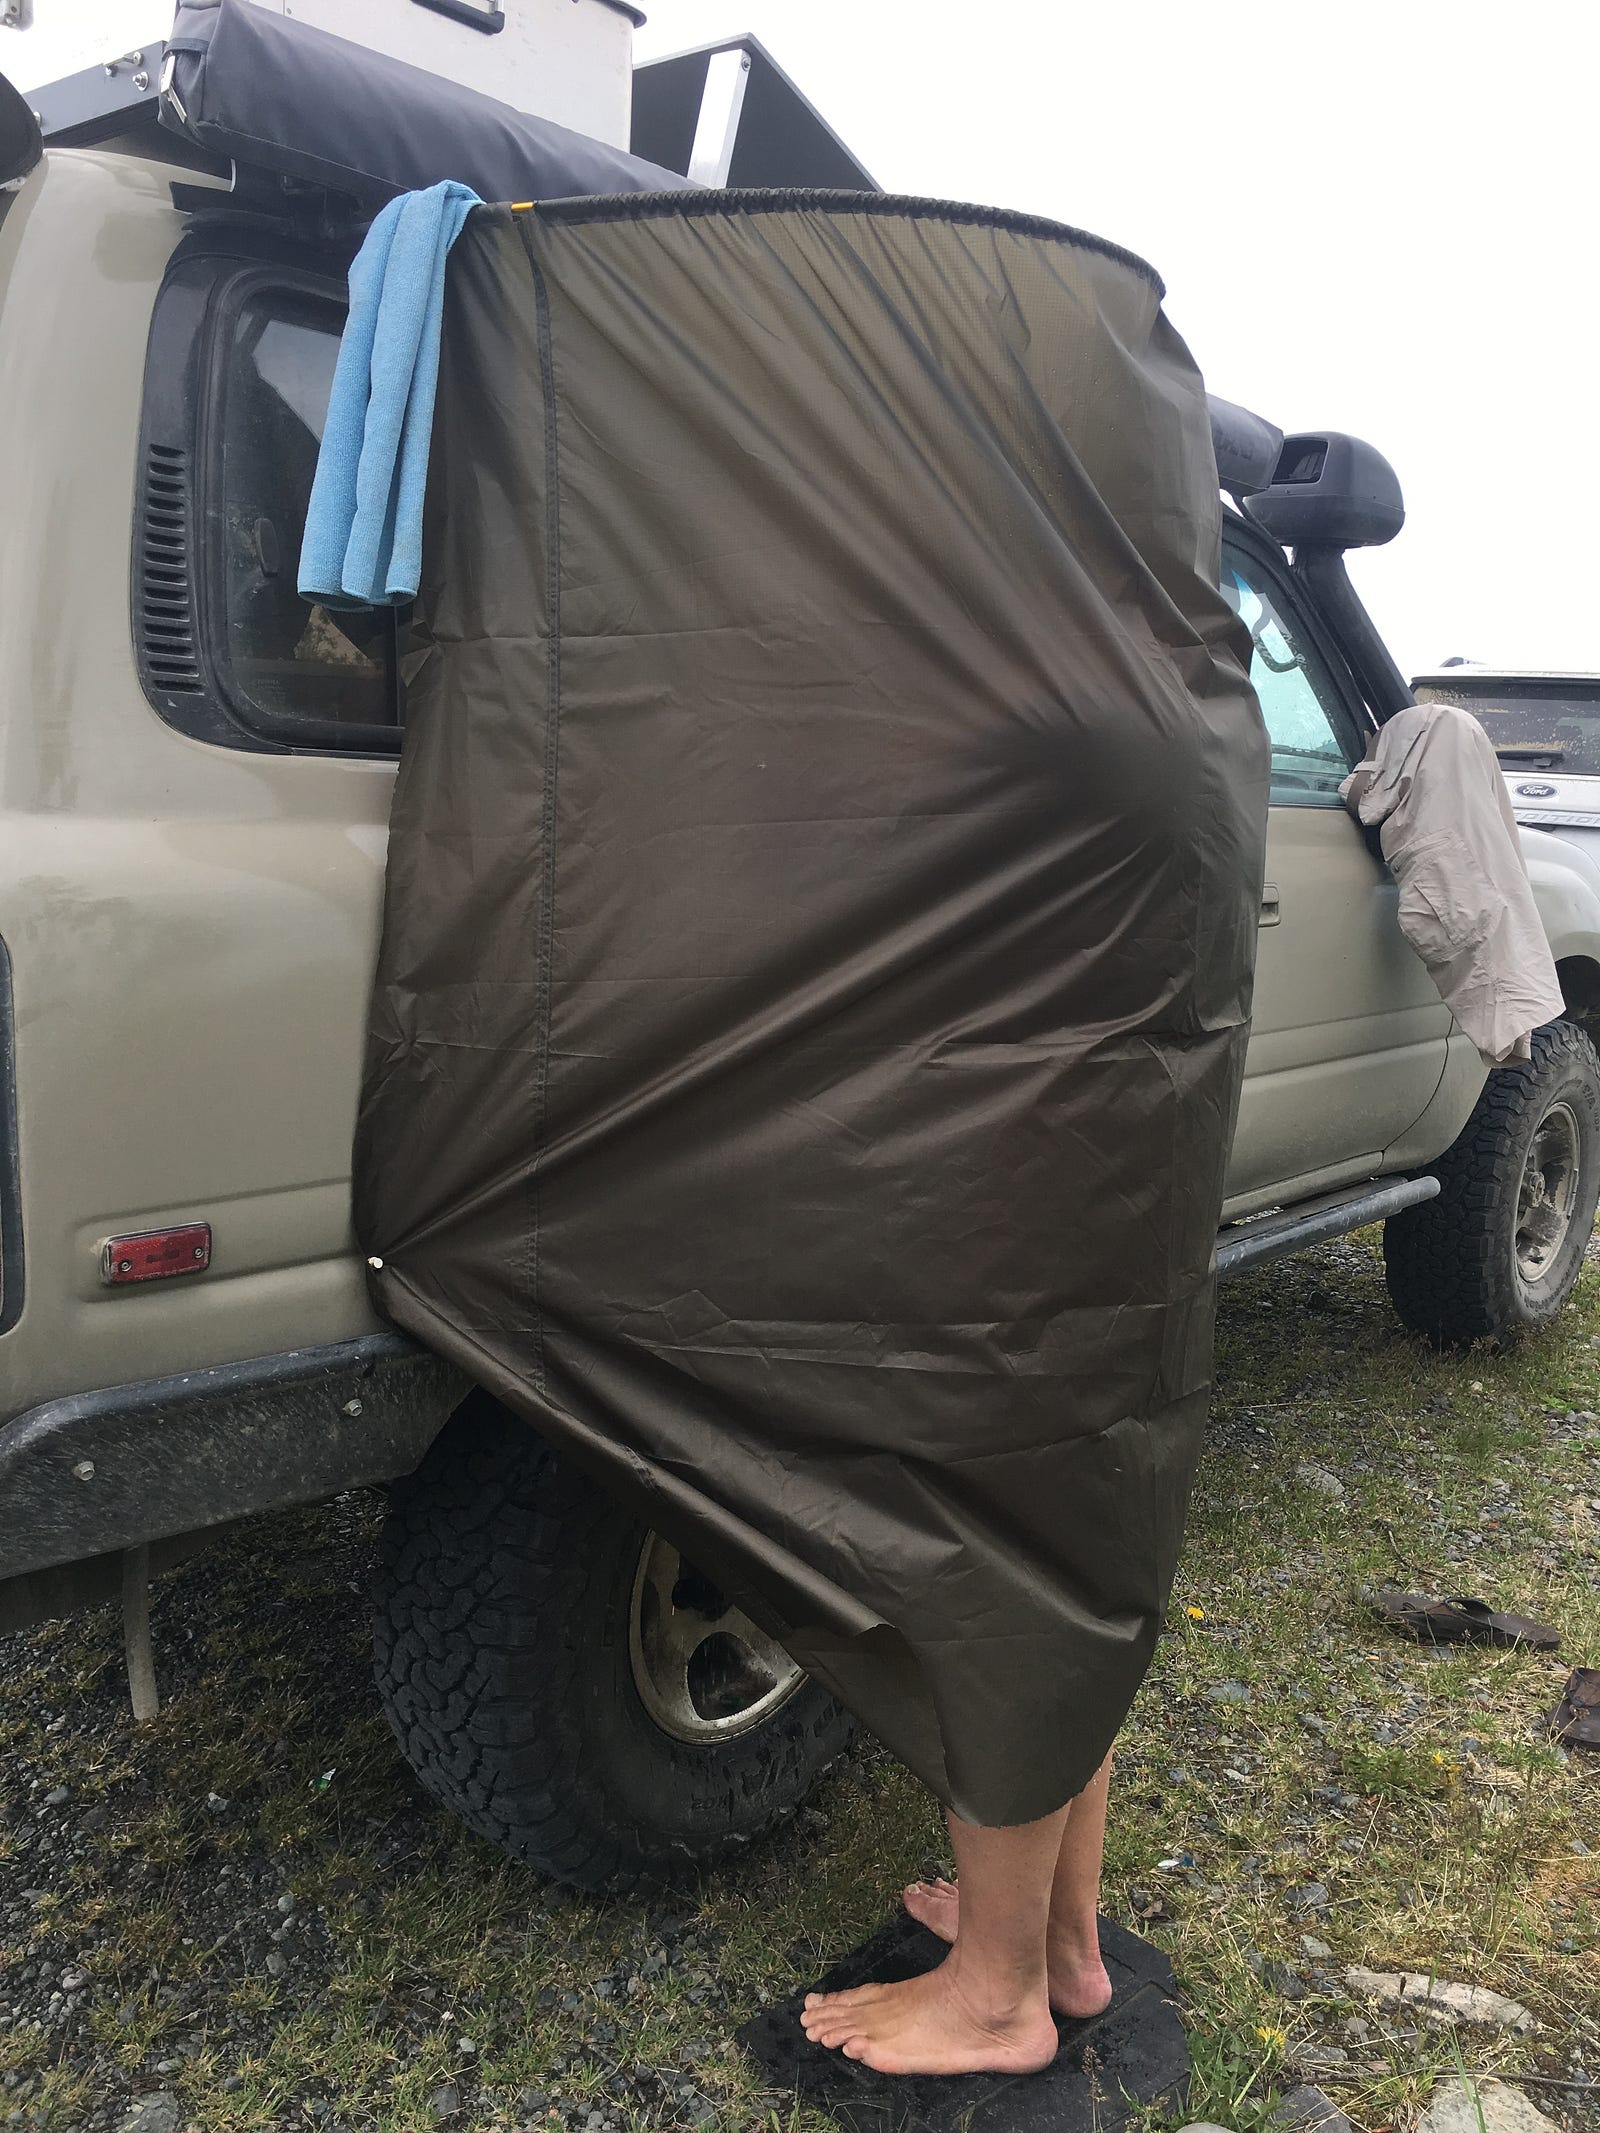
Ha, yes, and some of us decided to take a hot shower.
We then headed south through Talkeetna, Anchorage to Seward. We camped on the river bank with beautiful views. We logged 5000 miles. One oil change on the road.

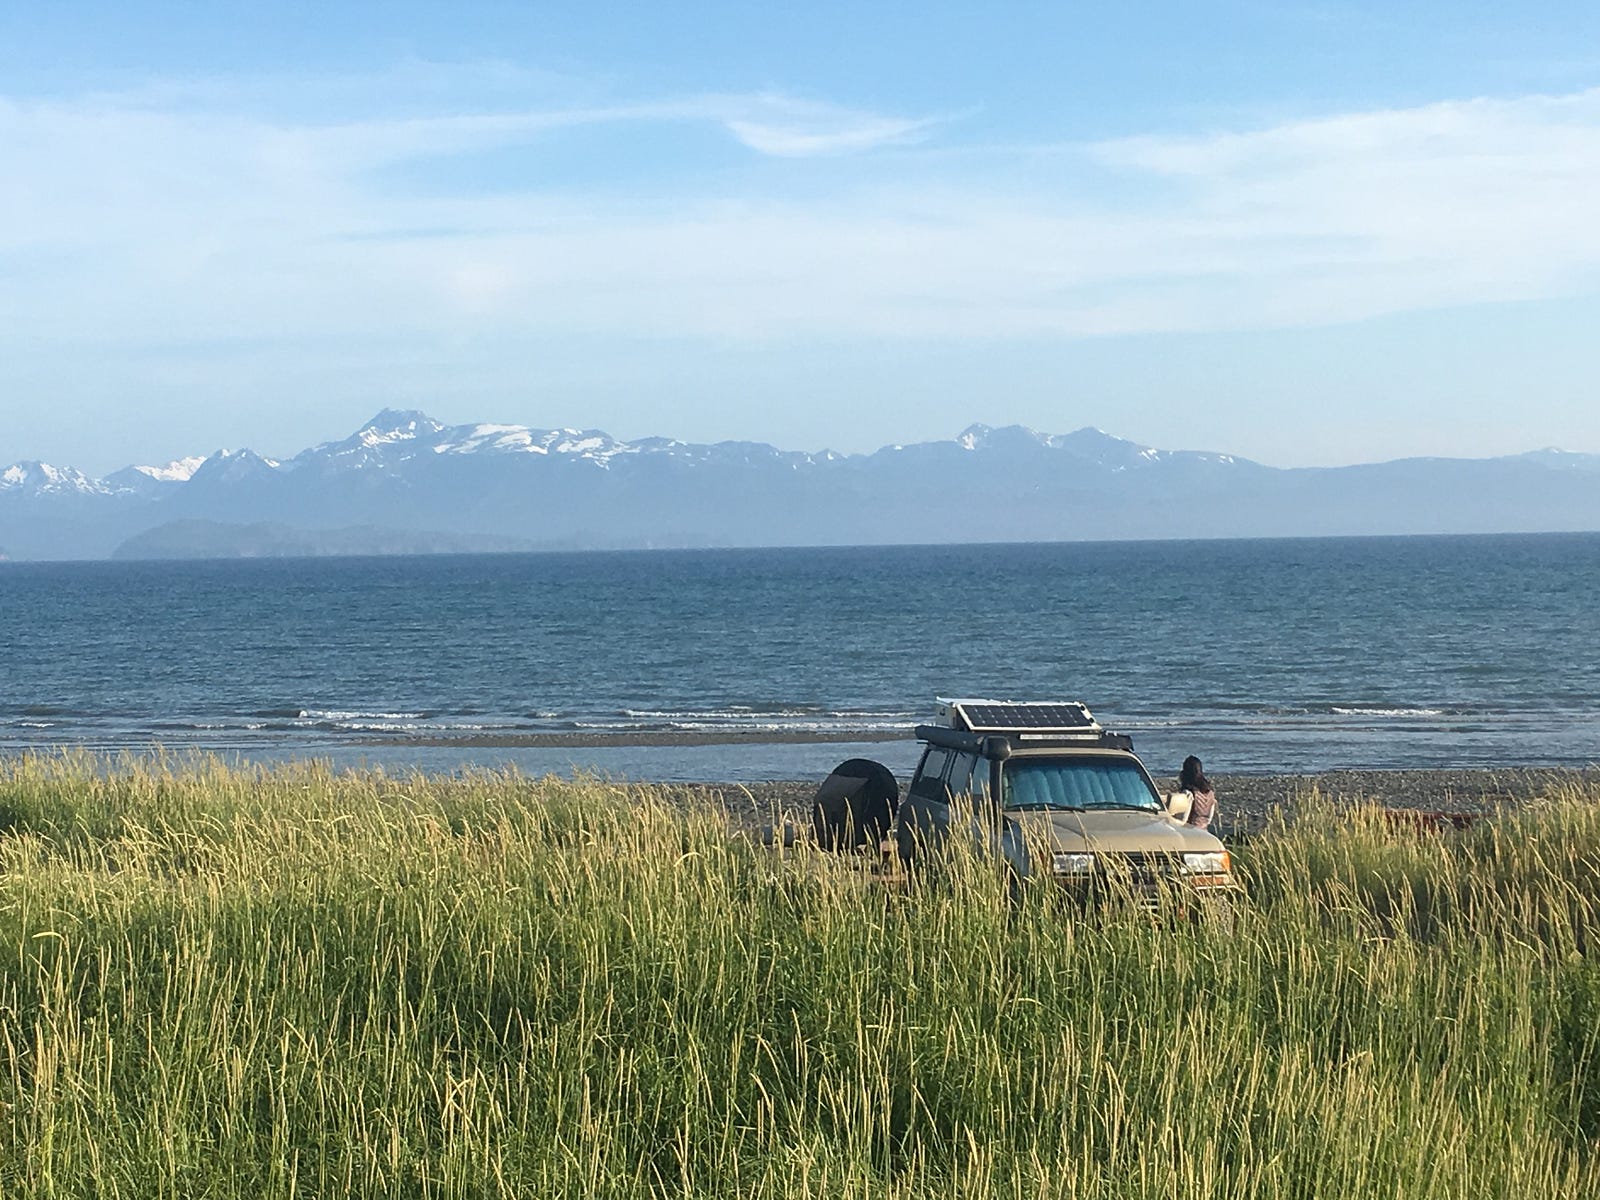
The next day we camped on the beach of the Spit in Homer.
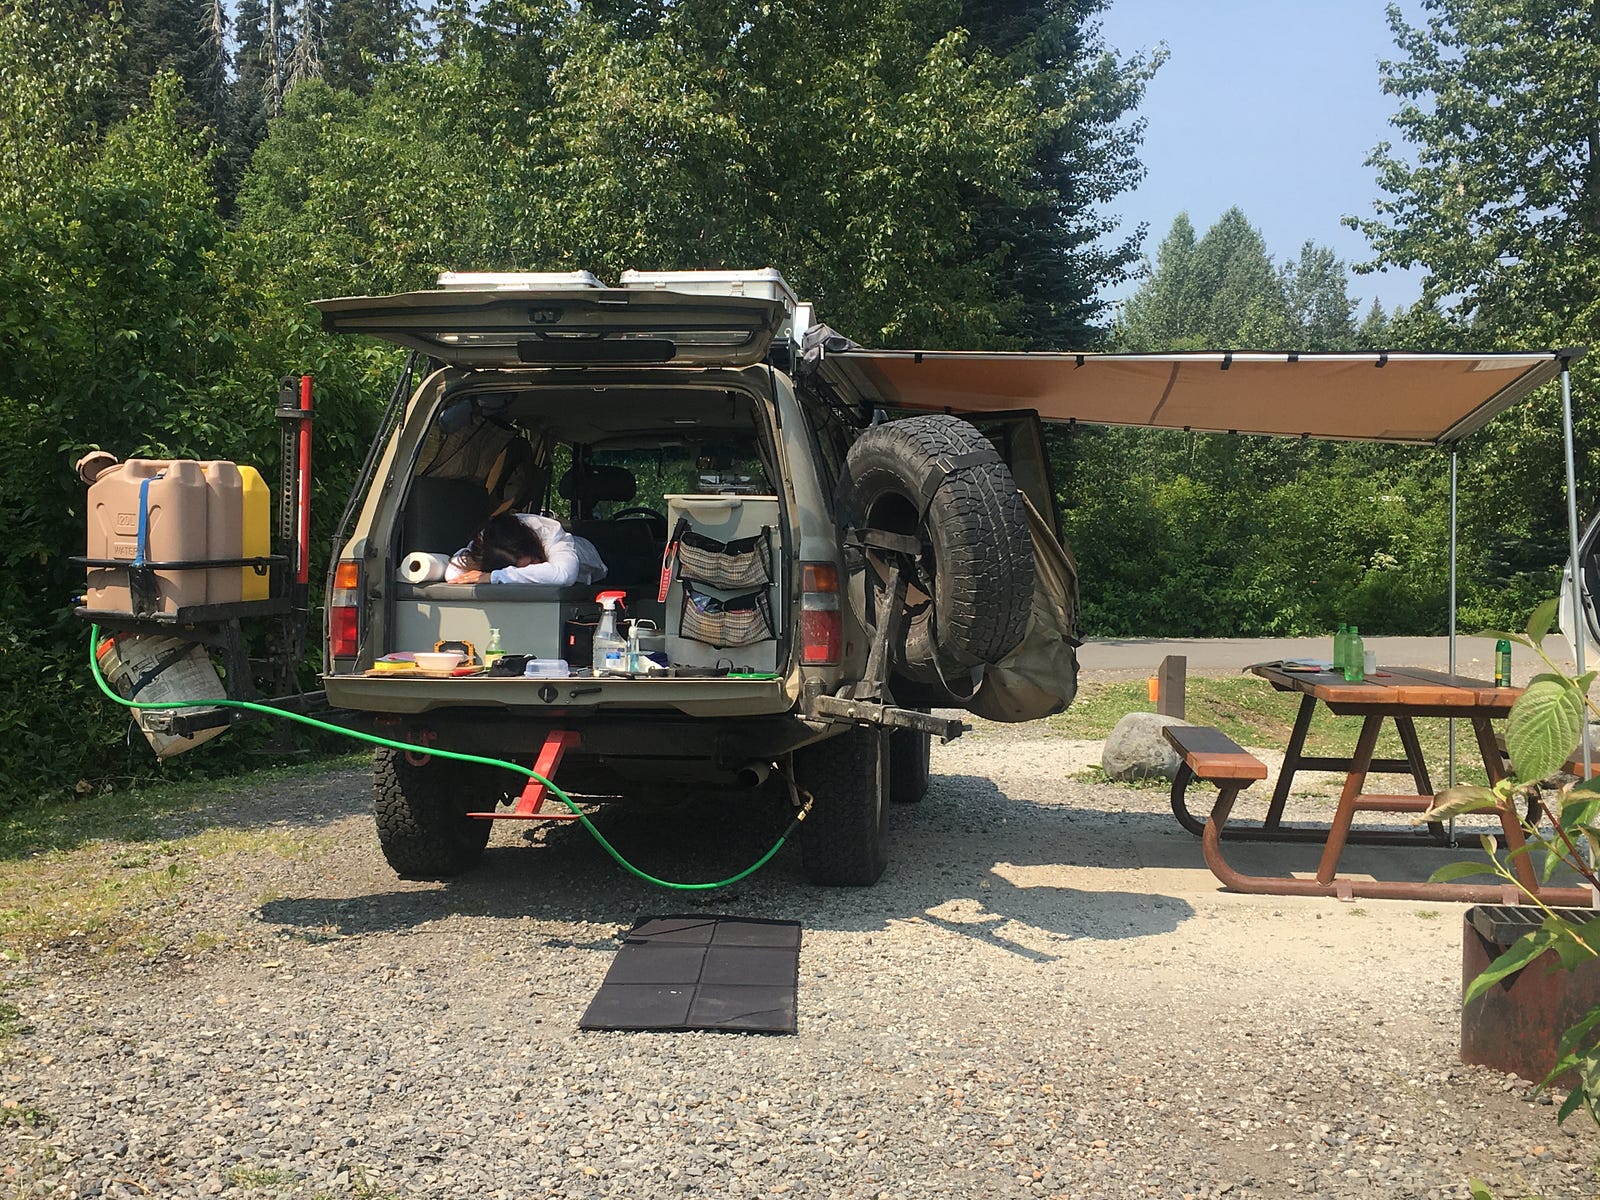
The setup seemed to be working great. We could get food ready in 20 minutes with the table set up and the awning open.

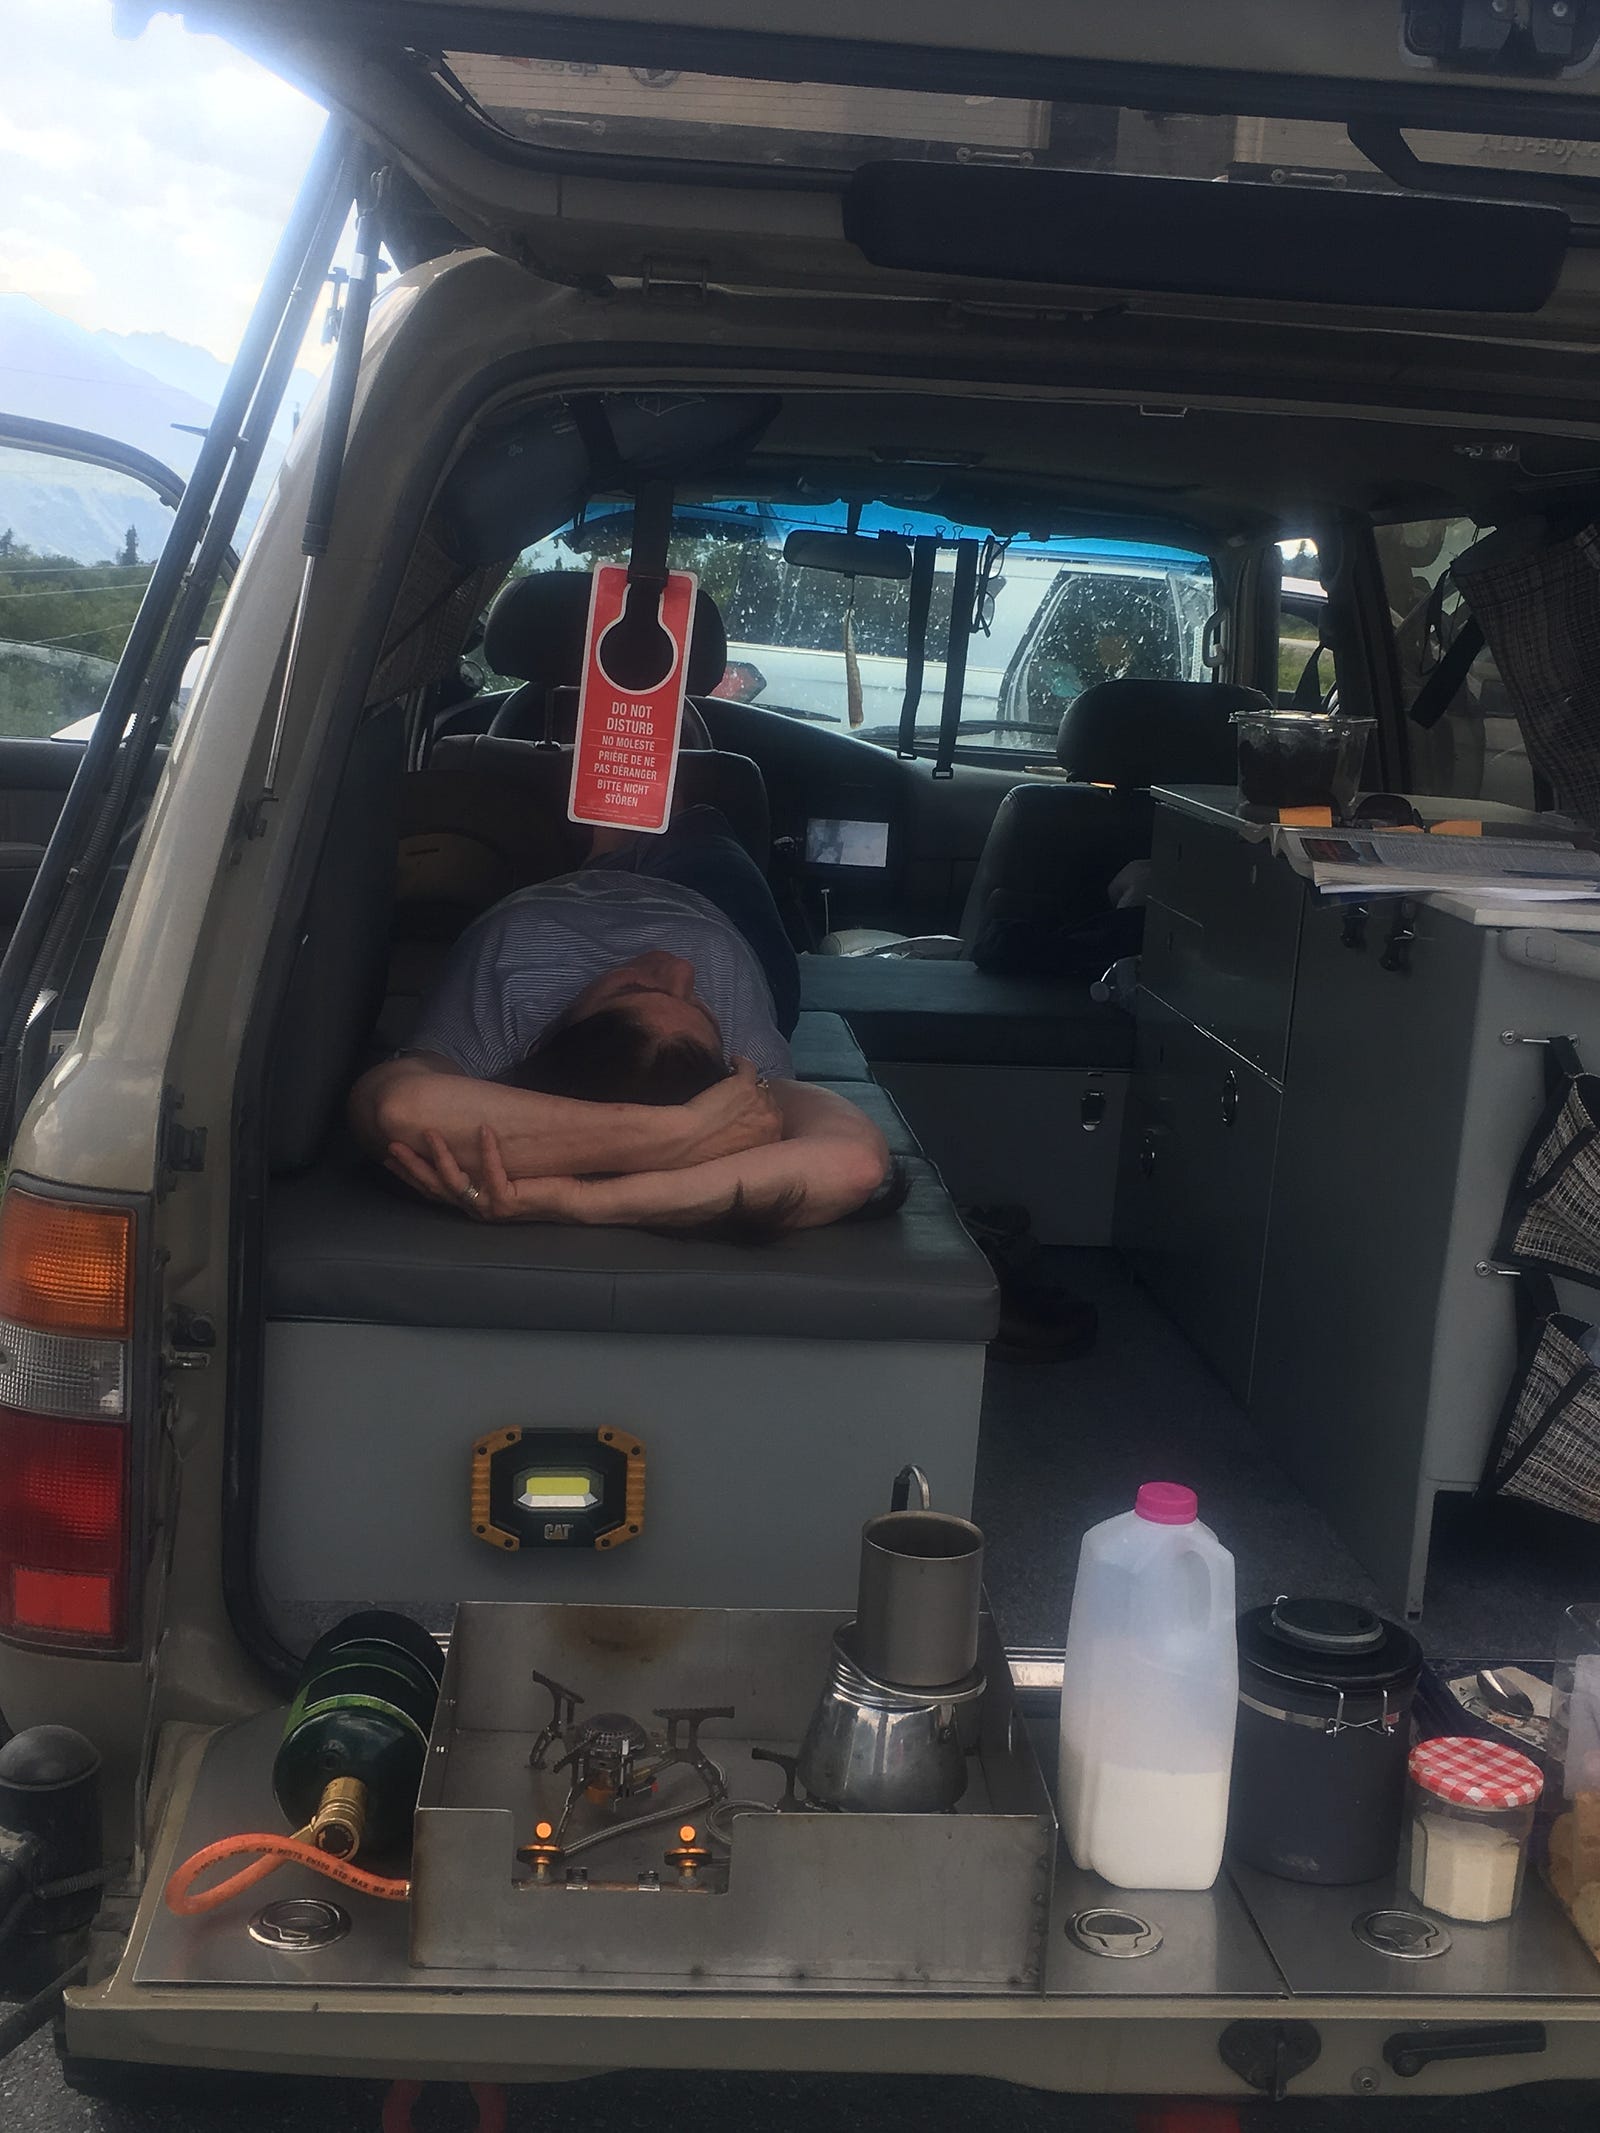
And… coffee in 6 minutes while some of us get to rest.
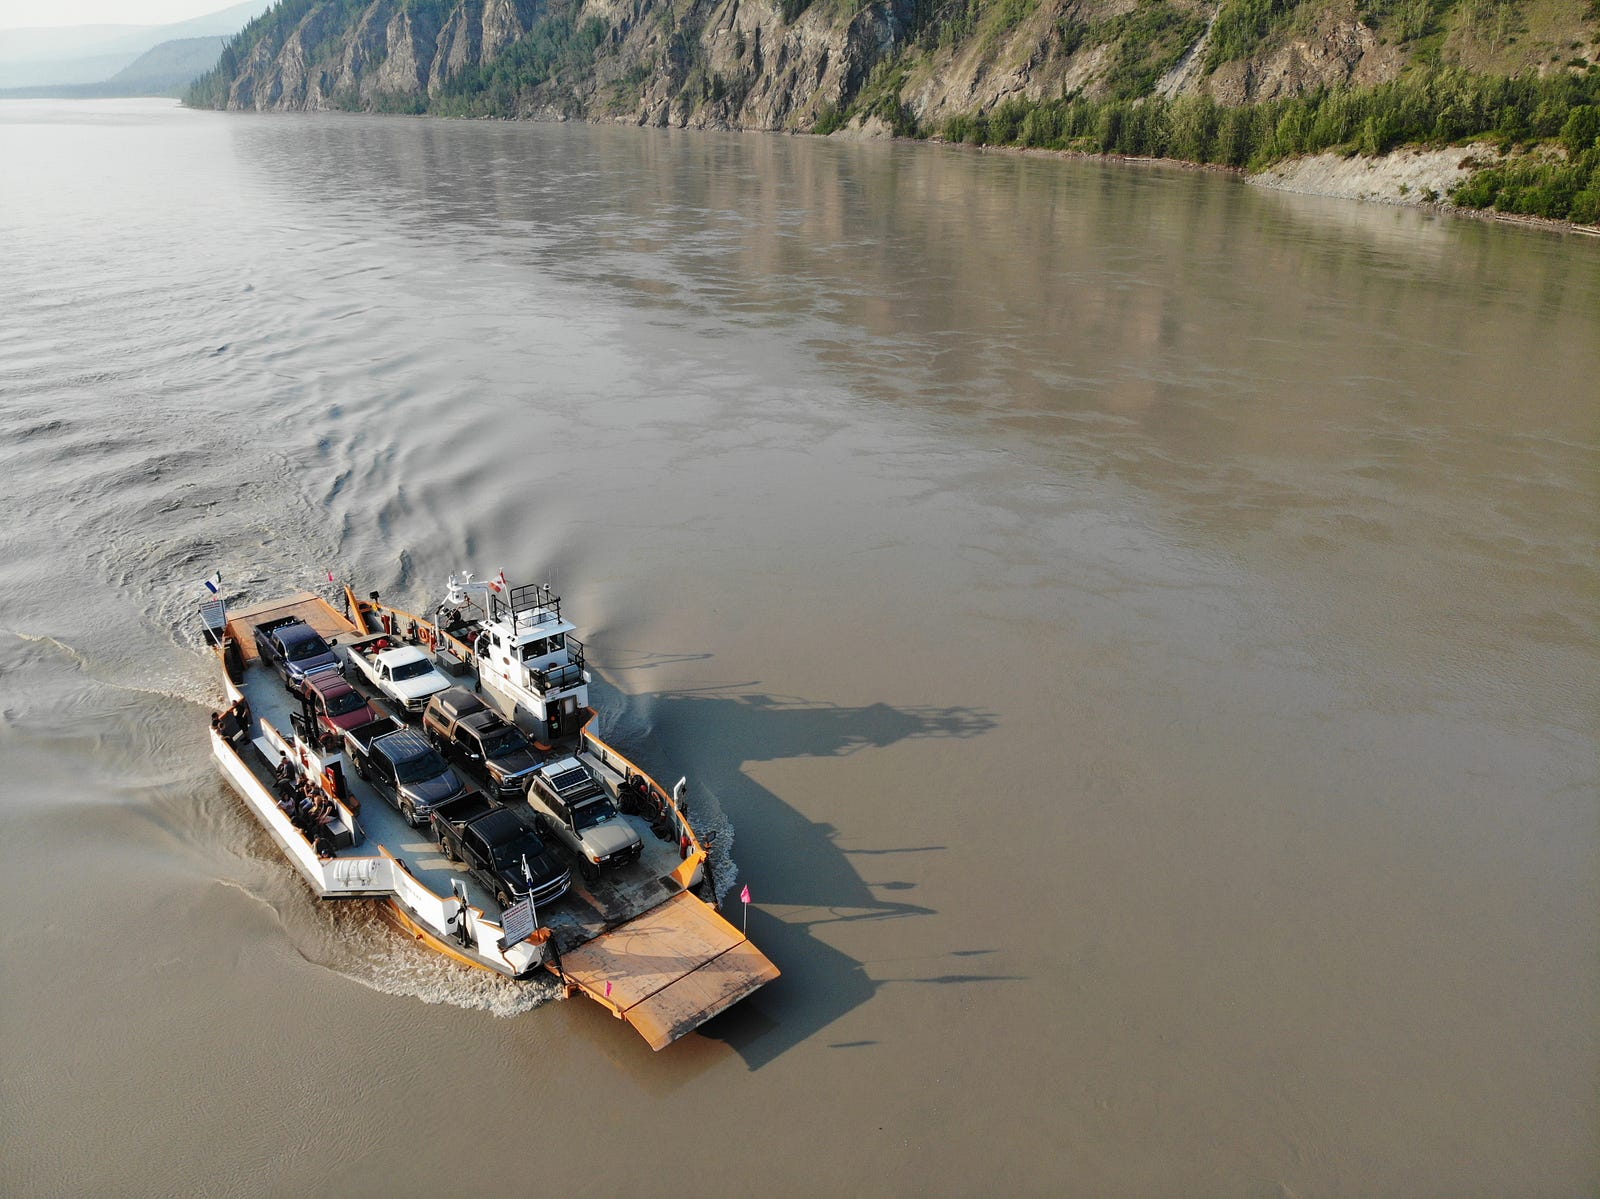
Not traveling with a big RV seemed to pay off. Easy and fast travel on dirt roads and fitting in small ferries.
Filling the internal tanks was also possible from the jerrycans. We carried a hose, so we could fill water anywhere.
Our last camp was in a state camp and the only one that needed a fee. Meziadin Junction.
We made it back to Mount Shasta after 7500 miles.
And made it home after almost 8000 miles and 25 days. Time to start planning the next trip. The vehicle was flawless. 2 screws came loose on the top of the A/C condenser. We had spares and installed them in a few minutes.
This wheel has done 5000000 revolutions.

Hope you enjoyed the blog. We enjoyed making it!
We are currently planning the next trip. Ship the vehicle to western Europe and driving to Vladivostok across Asia. Will keep you posted.
Looking at the low resale value, we decided instead to invest and convert it into a house/camper having all the options of being on/off the road and being independent of lodging and food.
We documented the project in a photo album.
The first issue was to create a reliable overland vehicle, with a robust drive train, a fuel efficient engine and one that could travel over any terrain. This meant we would have to replace the 10 MPG 1FZ-FE gas engine/auto transmission with a 1HDFT (which is a Toyota 24-valve turbo diesel engine mated with an H151 5-speed manual transmission). This 24 MPG upgrade would allow us a 700-mile range per tank of gas.
Searching for the right engine was a long process -we’re talking 2 years. After exhausting eBay and Craigslist, in December 2017 the engine was finally found through the North America Land Cruiser Community (through Facebook). The engine/drivetrain came out of a European HDJ81 Land Cruiser and was sent to Valley Hybrids, a shop in Stockton, California that specializes in diesel engine conversion for Land Cruisers. They replaced most of the external parts, rebuilt the injector pump and injectors, and did all the checks to verify that the engine was in excellent running condition. They also rebuilt the 5-speed transmission. The transfer case was converted to part time 2WD/4WD from all time 4WD in order to get even better milage on the highway. They have done an amazing job. We could have not chosen a better shop.
Meanwhile, “back at the ranch”, the vehicle was undergoing more changes. The bumpers were upgraded with more rugged units that can accept a winch and a spare tire in the back. Product of 4x4Labs. The front seats were refinished with new leather and seat warmers. The two rows of rear seats were removed to allow space for a kitchen and bed.
The electrical and fuel systems had to be converted to the diesel engine and the transmission hump had to allow for the new manual shifters. The vehicle was then painted with a ‘sand’ color to blend better with nature.
In June, the engine was completed at Valley Hybrids. We borrowed a truck and brought it from Stockton to San Jose, California. On a hot sunny day in July the engine was finally put into the vehicle. Since this engine was designed for this Land Cruiser model in other countries, little metal work modification was required.
The finished job on the drivetrain required testing before the work on the “tiny house” began. The car was driven for 1000 miles. It also required a trip to the CA DMV to change the title of the vehicle from gas to diesel.
The big test was a road trip from San Francisco Bay Area to Tempe. The vehicle was taken on a 2000-mile trip to Arizona including 4WD trails in Sedona. It drove beautifully and got 24 mpg. There were no mechanical issues. The last day it was driven over 1000 miles with one gas stop for 10 minutes.
Broken Arrow to Chicken Point, Sedona, AZ
We were ready now to move ahead with the interiors. At this point we added a second battery to support the ‘home’ part of the car. It is charged by the alternator when the engine is running and disconnects when the voltage drops below 12.5 VDC when the engine is not running. It will be hooked to a solar panel if the car will be parked for extended period of times while using the fridge.
Tali Hardonag Architects began the interior design of the vehicle in order to convert it into a “tiny home”. After a long search a marine grade fridge/freezer was selected to accommodate the limited space — Webasto BI-41 dual. The advantage of this model is that it has a detached compressor that can be placed up to 6 feet away from the fridge. It will probably reside behind the fridge inside the wheel well. We’re still scouting for a sink and a stove that will fit in the layout.
We’re currently finishing the design for the kitchen and building a mock-up from plywood in order to experience the space inside the vehicle.
New year 2019!
Our search for a sink and faucet zeroed in on a Kohler K-3349–1-NA. We liked it because its a sturdy 18 ga model, small and deep. The faucetwill fold in to the well.
The cabinet frame is made of 1/2" square tubular steel frame. That would be covered in the future with aluminum sheets and powder coated gray to match the interior of the car. We sized the frame to fit the fridge.
The fridge fits nicely with the compressor tucked into the wheel well.
The Kohler sink Kohler K-3349–1-NA came in and was mounted on the frame. It required to be ‘sunk’ in about an inch, so the faucet folds flush with the counter top cover. We are still debating what material to build the counter top.
We are also working on the heat exchange unit for the hot water system. We will have to find a place in the vehicle for this unit.
The water from the ‘hot water tank’ gets circulated with a pump that is being controlled by a thermostat. A switch on the dash will turn on and off the pump.
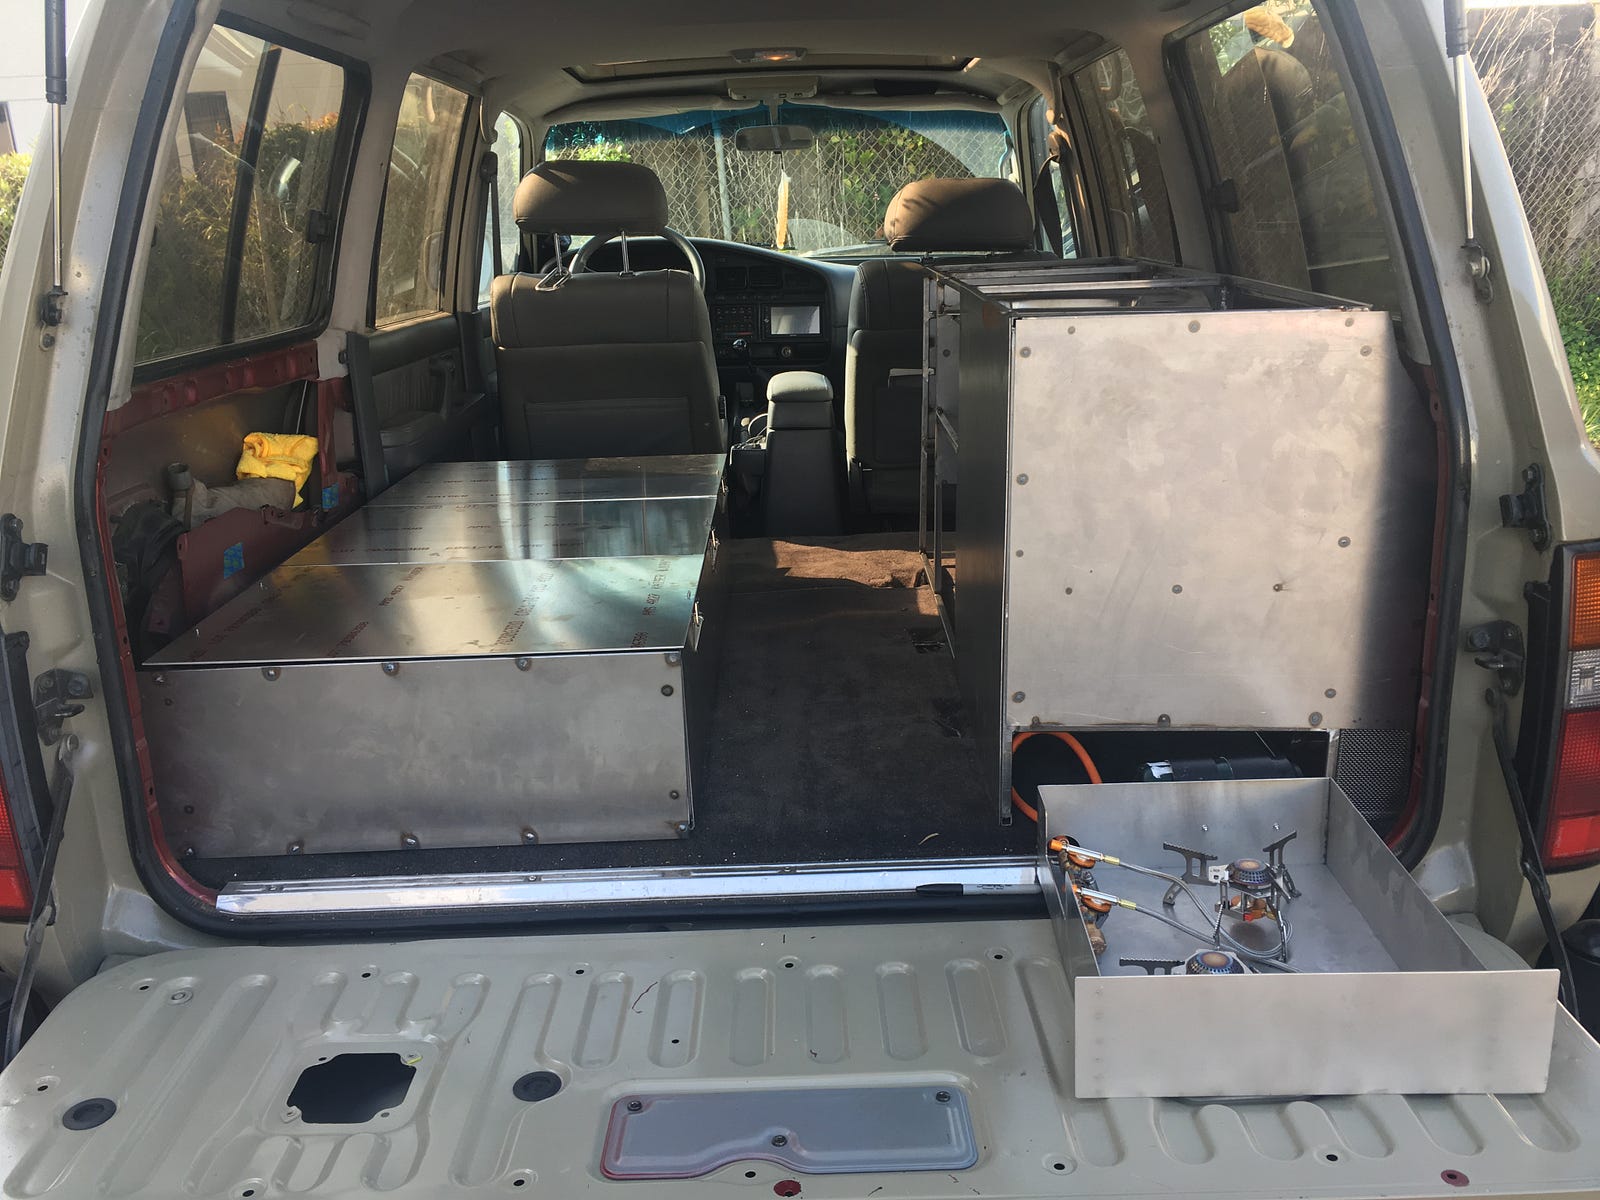
We had issues with space for the stove. We ended up building a stove from two camping stoves and some machined brass pipe parts. The connection was used from a torch welder and it hooks to a standard coleman propane tank. The stove was assembled and tested. It will require a wind shield and is designed to fit in a drawer under the fridge when not used. We can pull it back to cook by the tail gate, or to remove it completely and place it on the counter top for cooking in wet or cold weather.
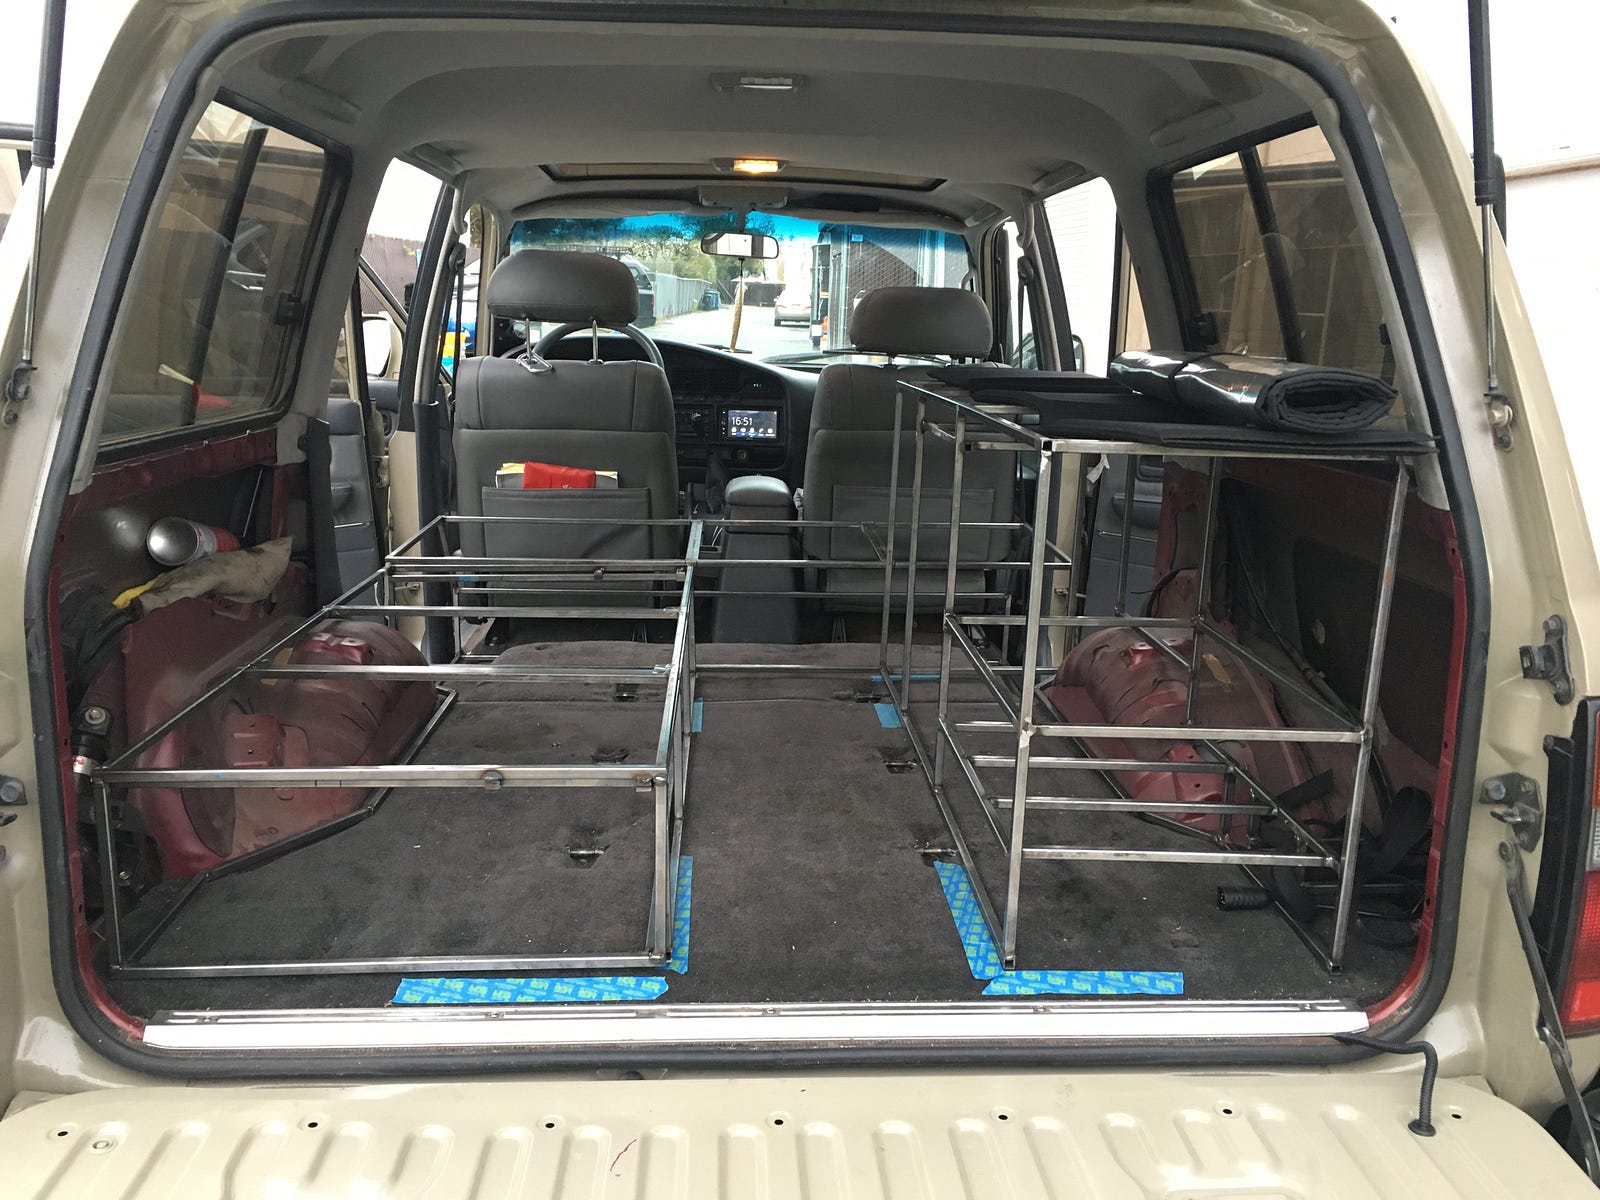
Our next task is to find drawers and finish the storage unit behind the front seats. Last we will build the couch that turns into a bed.
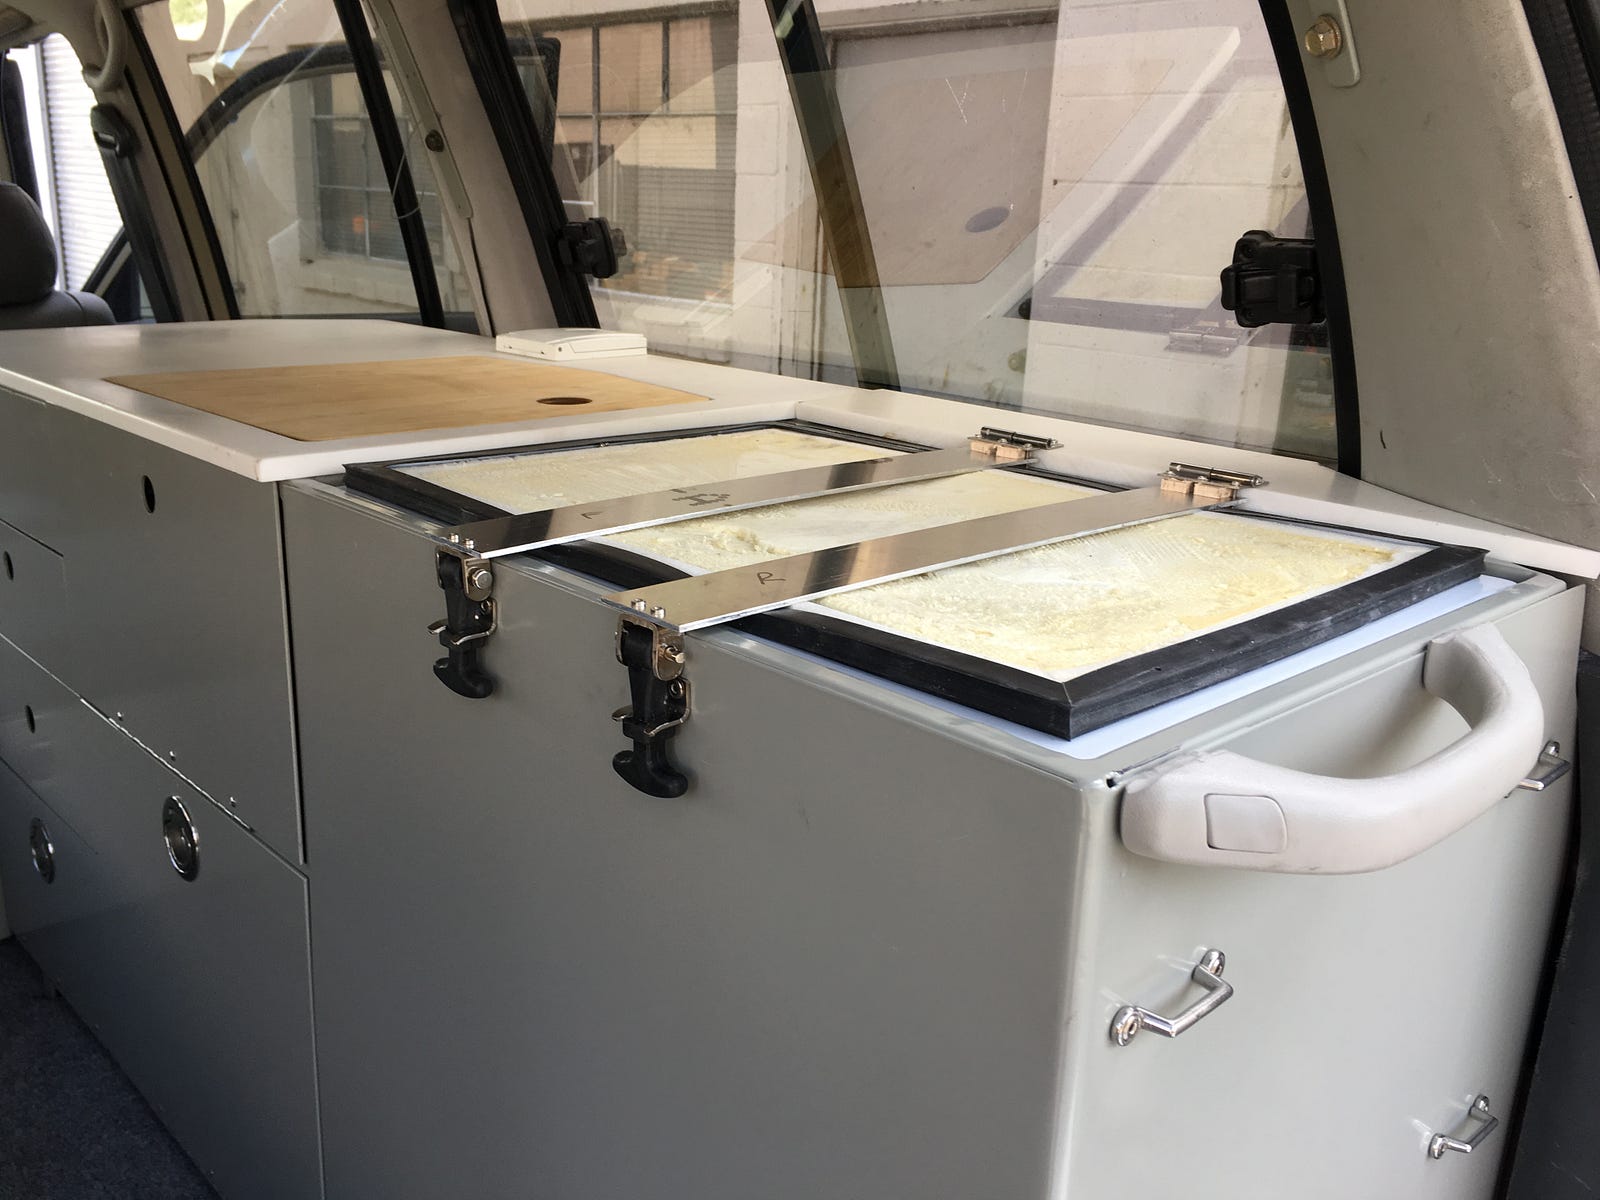
The storage compartment will be behind the front seats with 3 aluminum lids that hinge. We are not sure if we want this as compartments or one large storage that can be divided by boxes or storage bags. The two hatches on the driver side and center will have 2" cushions and will be the upper part of the bed.
The lower side of the bed will be a bench that has a slider part that opens to a twin bed. The bench will have 3 cushions so that passengers will be able to sit on a bench seat in the back. They will have leather on top to match the front seats. The bench also has a storage area underneath.
There will have to be some latches to lock it in place. We will also install a back cushion for the bench, that will be removable and used as the part of the mattress that covers the slider part of the bed.
These 3 frames will be attached to each other and to the vehicle itself with screws. They will not be permanent, and can always be removed.
We ordered SkyCart aluminum drawers and installed them with extension glides. The bottom drawer is a bit lower to allow taller pots to fit in.
Stove work is done and it has been tested.
The stove will slide under the Fridge. We can pull it out and work on the tailgate or on a table. If weather gets bad, we may be forced to cook inside.
Kitchen cabinet got aluminum doors. This is 6061-T6 0.1" thick. All metal work will be powder coated.
The rear tail gate has food grade stainless steel plates with latches so that we can store all the recovery gear. It is a bit heavy, so when opening it, care must be taken.
The bracket for the water tanks that sit under the vehicle is done. Water tanks are 8" PVC schedule 40 with caps. Each tank provides 30 liters of water. One of the tanks will be hot water. A circulating pump with a thermostat will run the water through a heat exchange unit with the radiator coolant. The compressor will pressurize the tank so that water will ‘climb’ to the faucet and shower. Ha, yes, the shower…
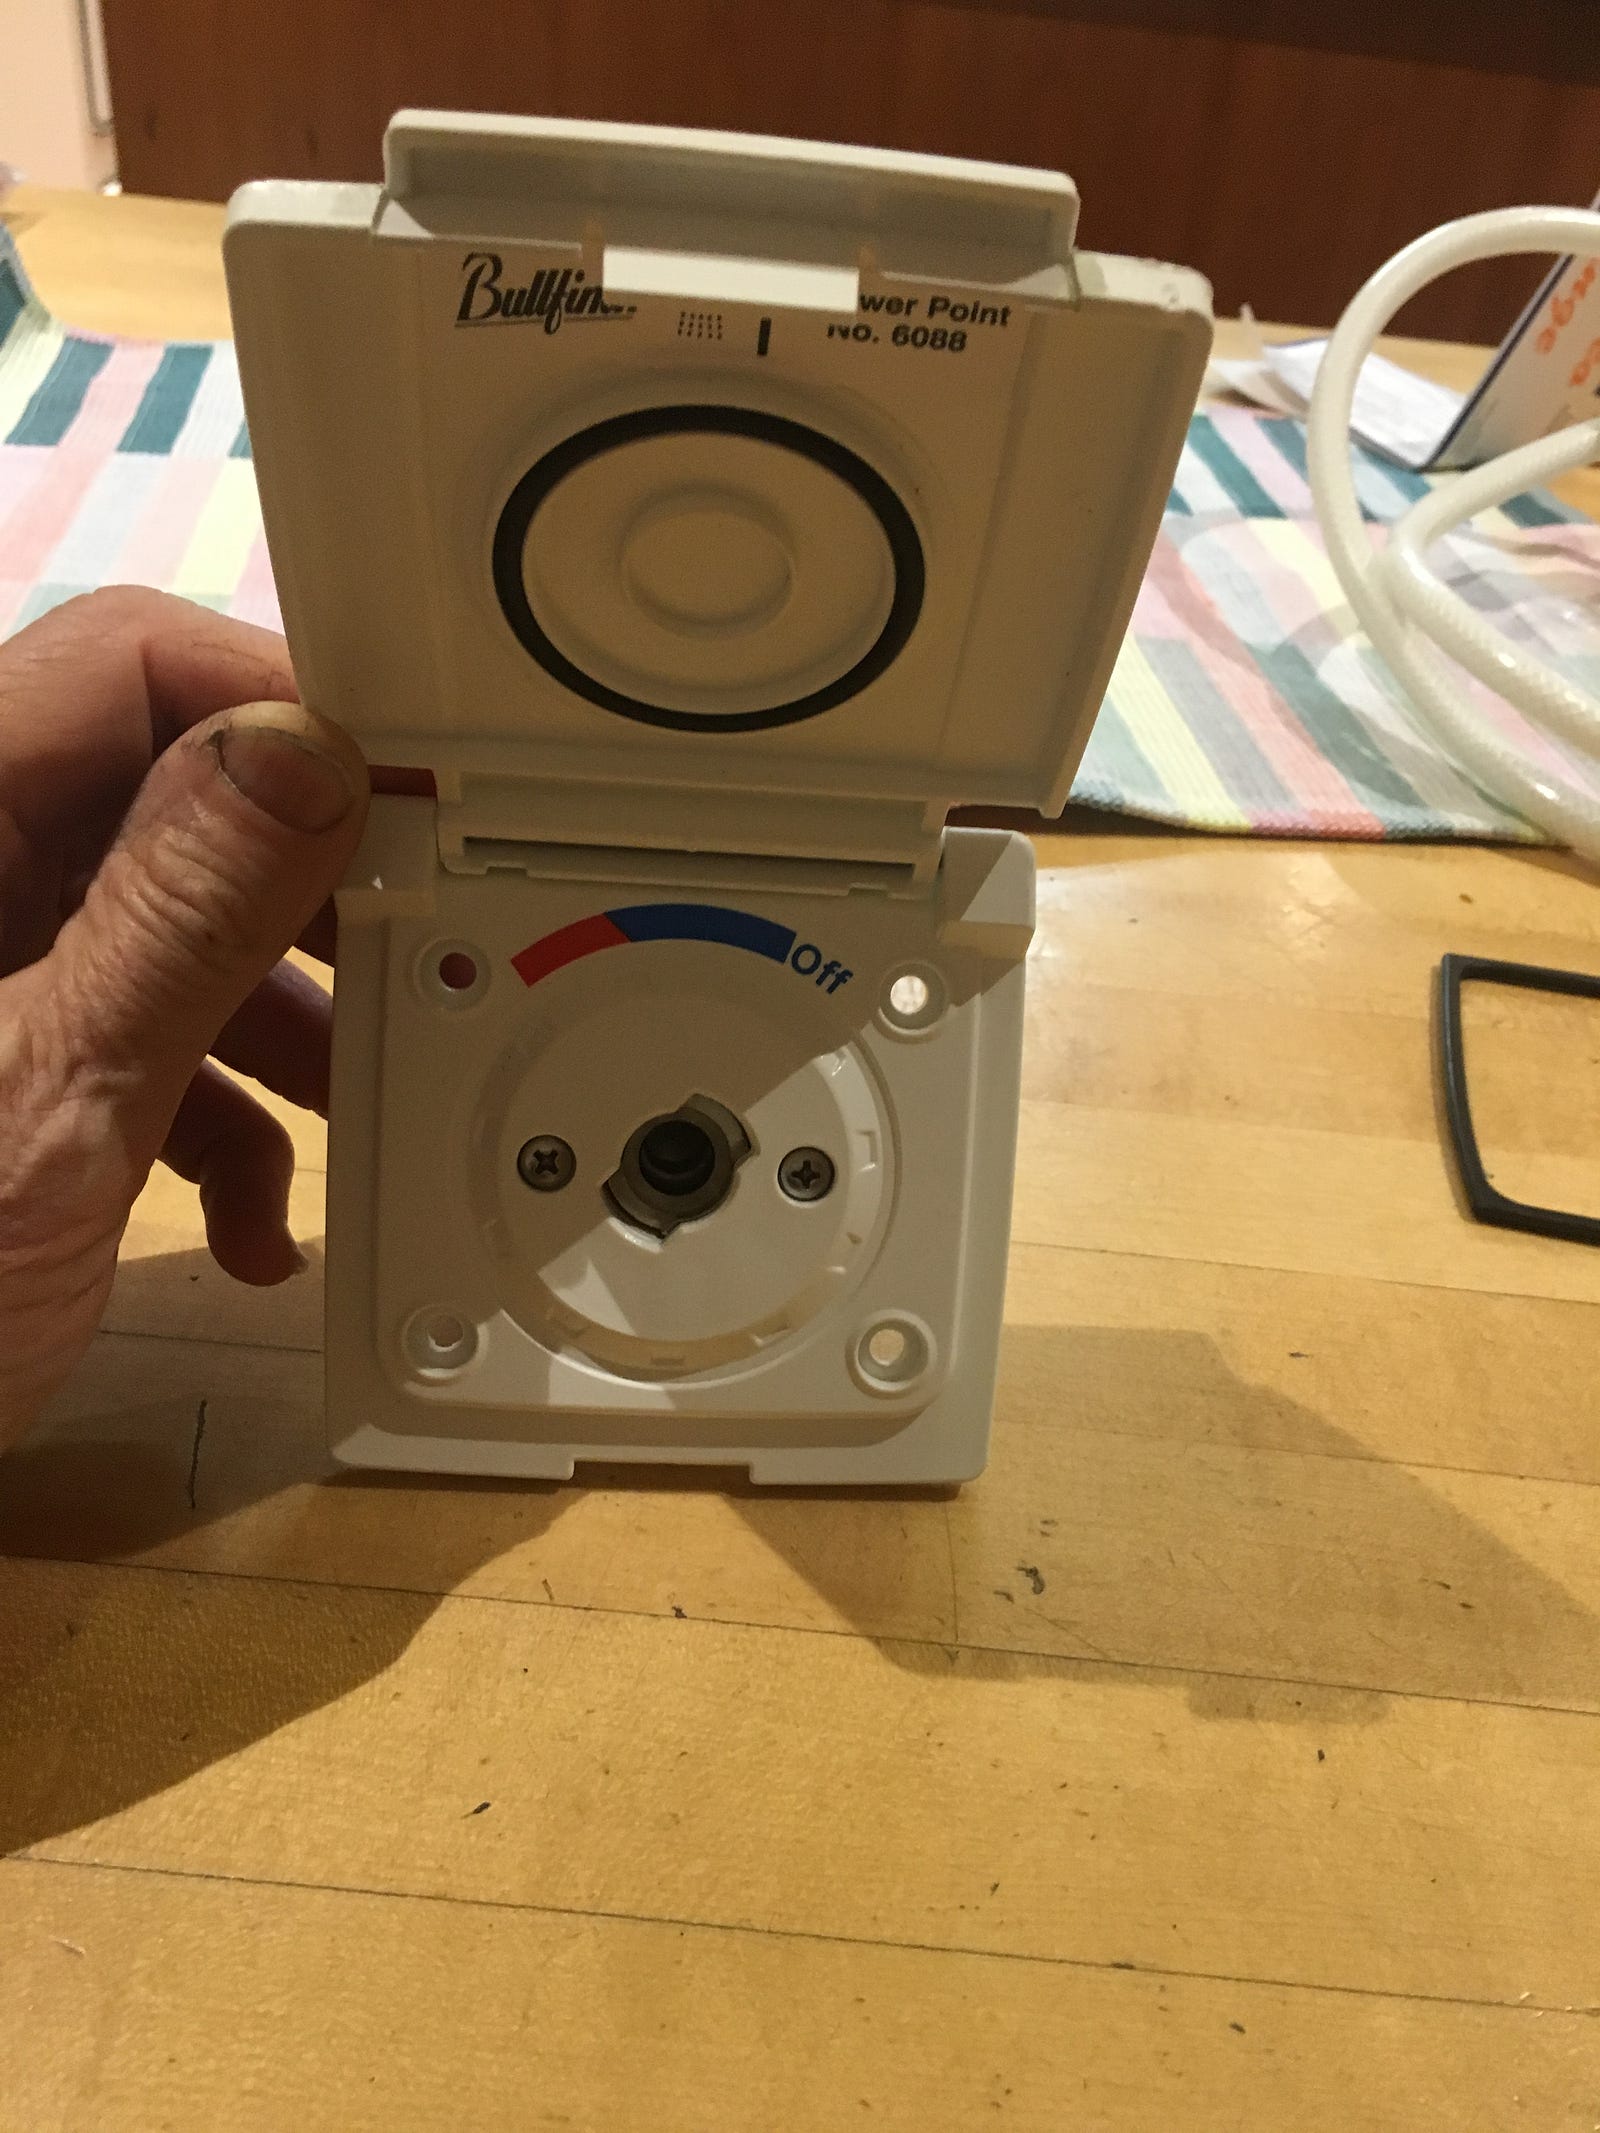
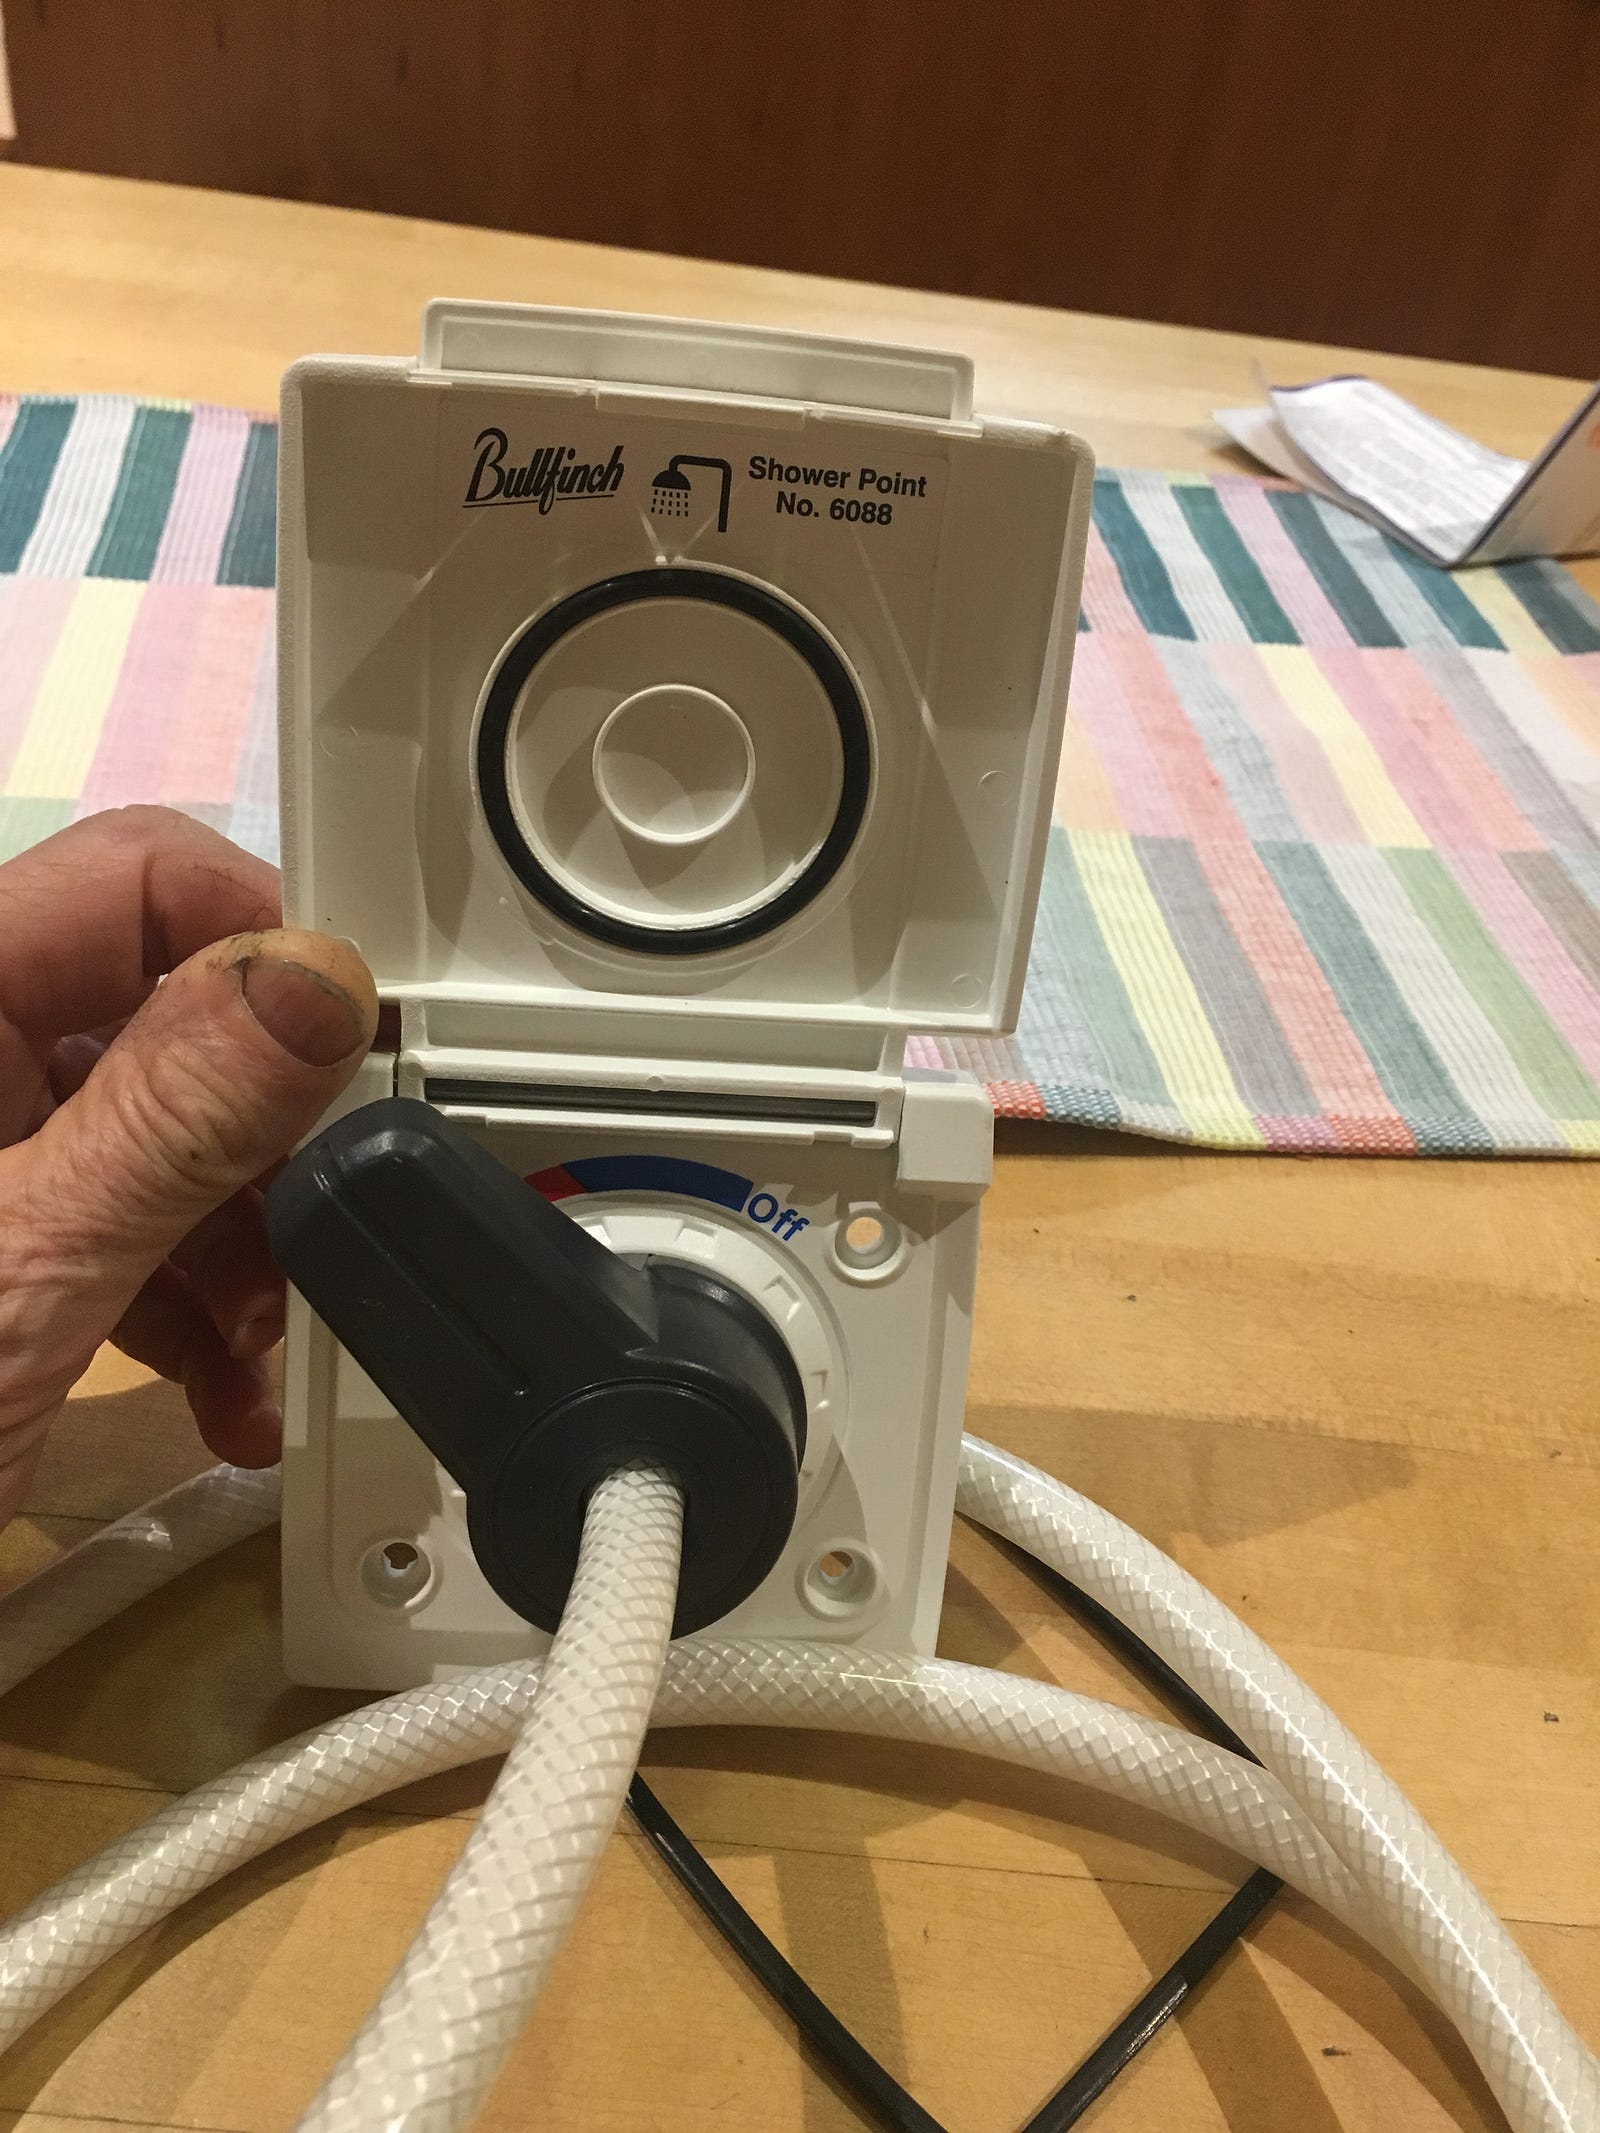
The exterior shower unit is a Bullfinch shower head. The unit is well made, and very compact. We will let you know how clean we come out.
The shower head plugs in and has the handle integrated into it.
Also, the electrical panel is being assembled. Solar panel controller, 110 VAC Converter panel, main switch panel, thermostat controller, 110V plug and fuse box. A main disconnect will be added as well.
The 110VAC 1KW converter was mounted inside the wheel well to save space.
A bit more work on the exterior. Added rock sliders and new Old Man Emu suspension from Cruiser Outfitters. The suspension is a bit stiffer because of all the expected load we are planning to add to the car. Only thing left on the outside are tires. We planed to put BF Goodrich 295/75R16 but they are not available anywhere. Bummer. Just ordered on Costco 285/75R16. Maybe next time.
We also added a rear rack from 4x4 Labs. Luke is an amazing guy and a great designer. It supprts 3 Jerry Cans and a High Lift. The roof rack is made by Prinsu Design in Idaho. It easily mounts on the vehicle and spreads the weight. Very well designed!!
The air system was installed with an ARB compressor and a 1 Gallon air tank. A pressure reducer was required for the air system that pushes the water up out of the tanks to the faucet and shower head. We are fighting gravity all our lives…
The ARB awning was installed with custom made brackets.
The interior was done by Sid’s Custom Upholstery (Alex is professional, charming and highly recommended) and was finished yesterday. All the cushions are leather to match the from seats. We used 2" firm foam to leave as much headroom as possible. All the leather was purchased from LSEAT and they have very good service.
The cabinets were finally powder coated with Navy Gray (Cardinal GR-01) by Moises Finishing in San Jose. We installed the drawers with soft close glides. Also, all the sheet metal inside was covered with noise dampening sticky material. The couch/bed had the leather cushions installed with stainless snap buttons.
The finished panels for the drawers were installed using 100% silicon to glue them. We hope it will hold.
The heat exchange was mounted above the transfer case. There was just enough space for it. Silicon hoses to the radiator water. Rigid copper for the drinking/shower water.
The drain for the sink was hooked up. The last section is silicon hose and it exits behind the right rear wheel. An extension can be attached if we want the water to flow away from the vehicle. Otherwise we can just put a small bucket.
Now that the cabinets are ready, It’s time to finish the plumbing and electrical.
Just figured that we need to run wires down from the solar panels on the roof. We figured a ladder would serve two functions. Also added a step to climb to the back, since the tail gate is 36" off the ground. Ah, yes, and we got new tires!
We did a test of the hot water system. Ran it through a 1 gallon container. It took 10 minutes to bring it to temperature. Seems like we will have hot water after all. The original pump that we chose was not self priming, so we chose a different pump. We used an old prius battery to run the pump.
We leave to Alaska in less then 4 weeks, and now everything must come together...
Things are coming together. The electrical is almost done. Some of the wires had to be run under the carpet, so we pulled everything off the back and cleaned before starting to assemble.
We used an old Corian slab to build the countertop. It takes a long time to get everything accurate, but once it’s assembled it looks great. The material is easy to work with and the glue lines are almost invisible.
We used 3/8" copper pipe for the water system. Most used compression fitting, except in a few places that used a silicon hose with clamp to relieve the stress of the vibrations.
The lid for the fridge gave us a bit of a problem. For a $1000 fridge, the quality of the lid is not great. It just sits on the top of the fridge and is made of molded plastic with a sheet of Formaica on top. We figured that securing is a must, so we used removable hinges on the back, and rubber latches in the front. All this had to be integrated into the lid and a Corian on top of it all. It was a time consuming task.
The electrical panel is all done and ready to be hooked up.
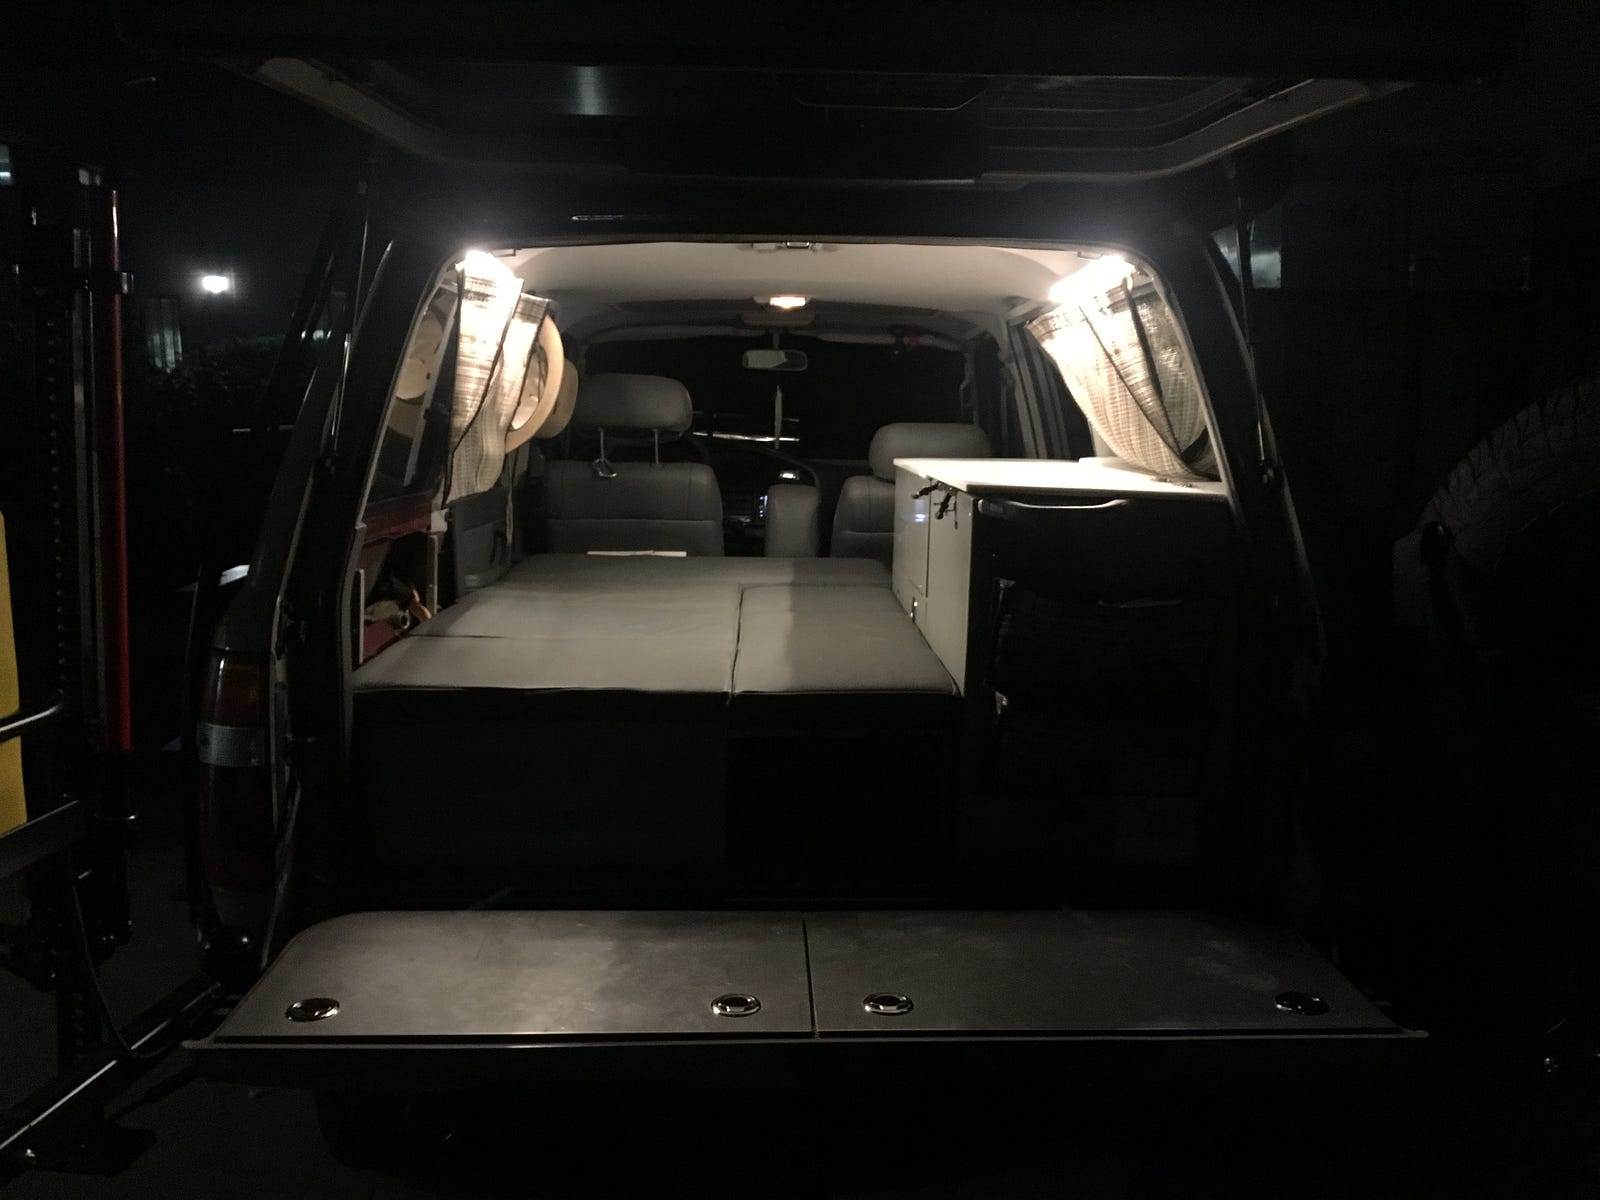
Interior lights were tested with the ‘bed’ opened.
The layout for the water tanks was done before construction.
The water tanks were finally finished after a pressure test, and installed under the vehicle. We used 8" PVC pipes and they provided 9 gallons each. It heats 9 gallons to 150F in 18 minutes when the engine is running and warm
We added a protective plate for the plumbing.
The circulating pump was installed inside a PVC pipe to provide some protection. It was installed in the rear bumper.
So the setup for the three modes of the car — drive, cook, sleep are below...
At this point the vehicle was ready for the first test. An 8000 miles trip to Alaska.
Our depature date was June 14. The destination Alaska. It was an 8000 miles round trip that would put the vehicle and all the systems to a test.
We planned the route so most roads would be traveled once starting and ending in Palo Alto, CA. Dashed lines are done in a ferry, green is the return route.
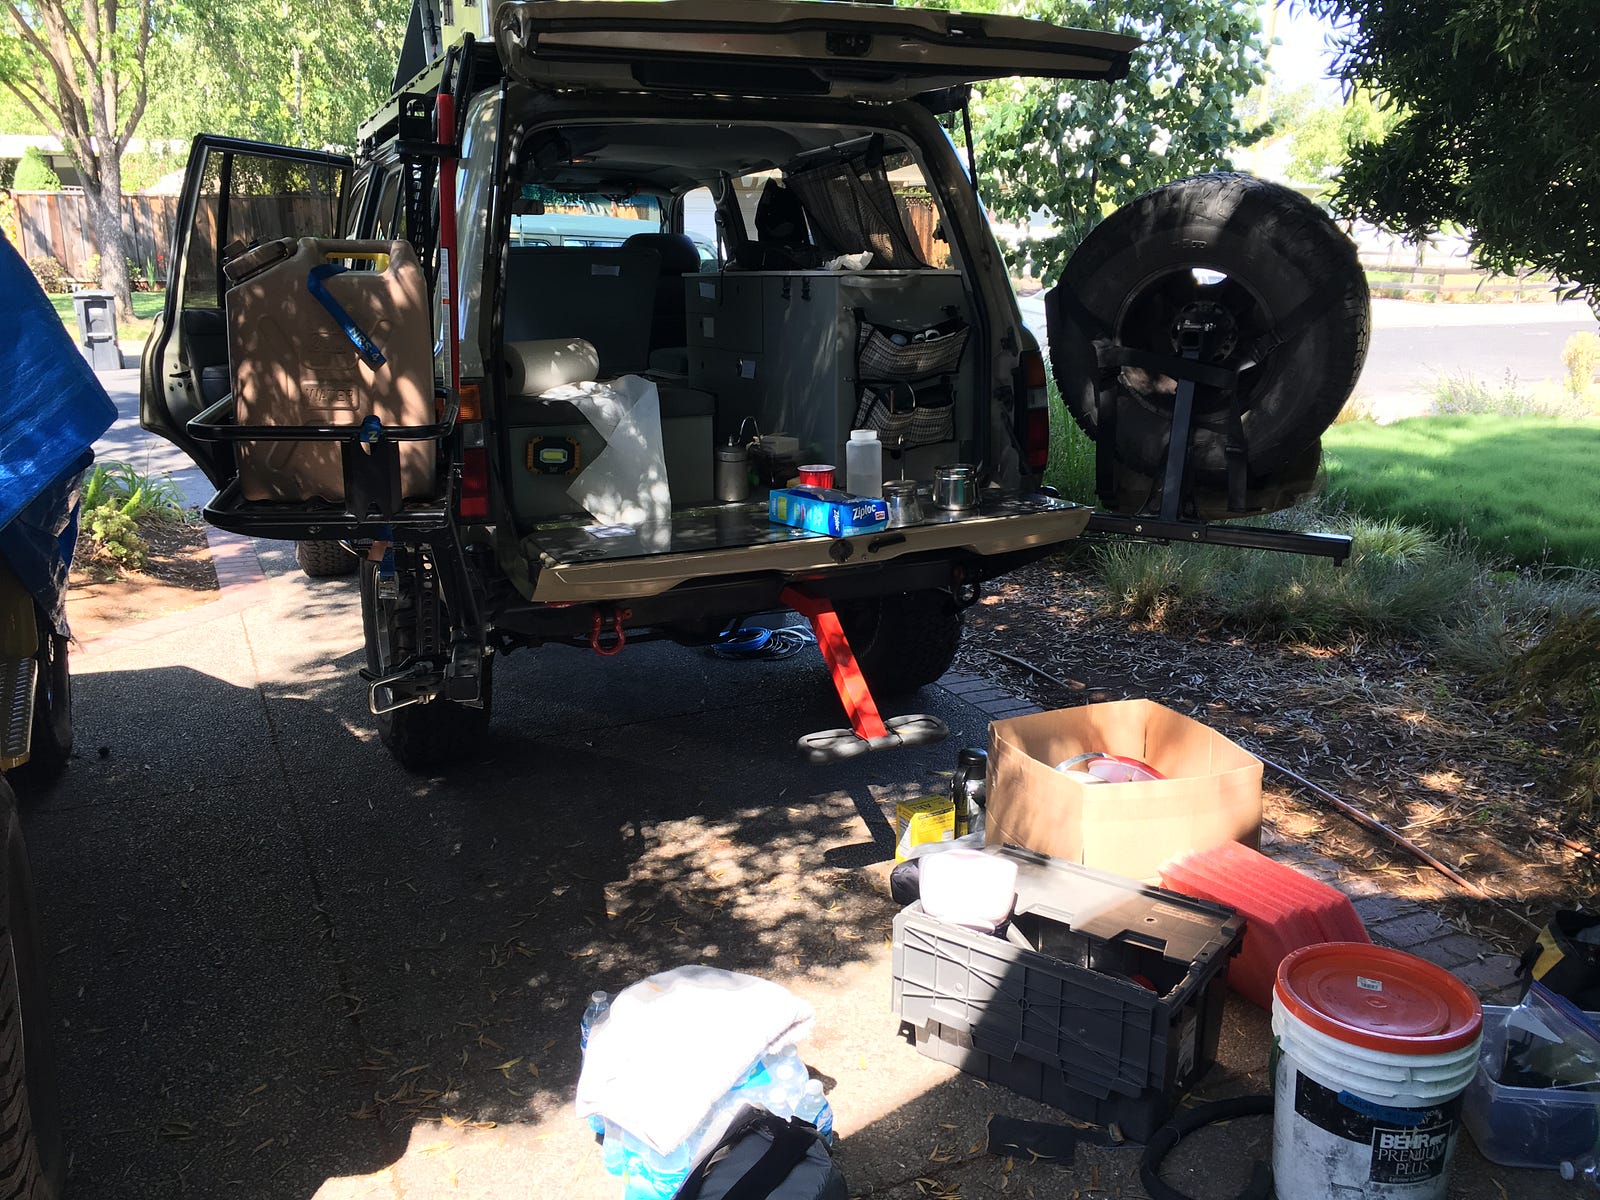
The build was finished 12 hours before the departure. The water system was leaking under pressure. It used mostly 3/8 pressure fittings and we ended up wraping the connection with teflon tape before puting the pressure fit nut. Also the pressure reducer helped. We fitted two alu-boxes on the roof and a solar panel that worked as a wind deflector. One box had dry goods, and the other every tool, part and screw that we thought could go wrong.
The first 300 miles went well. We made it to Mount Shasta.
We stopped at a friend’s home in Seattle and our first camp was in Blue Lake, BC. Setup worked amazing. We cooked dinner and went to bed. No shower that night.
The following night was Lake Inga in BC. The kitchen/water system supported 2 couples and worked well. We placed a bucket under the sink drain, so it will not create a puddle.
The process was, open the back, pull the stove on the tail gate and cook dinner. The Jerrycan in the back was handy to quick wash. We installed a faucet on the bottom of it, so it would be easy access. The kitchen was all set in the tail gate, except the pots under the sink.
The color we picked for the vehicle, seemed to blend nicely with the background.
After 3000 miles we made it to the Alaska border. The bag tied to the spare tire ‘Trasharoo’ had a portable BBQ and the trash collected during the day.
We got to Haines on a ferry from Skagway. We saw that there are different ways of traveling to Alaska…
Haines Junction was 3200 miles. Evrything was still working great. Hot water heated up in 20 min. 9 gallons to 150F.
Kluane Lake was our stop for the night. Had to take a couple of miles of a rough dirt road to get to the shore. We were alone for the night. No bear visits.
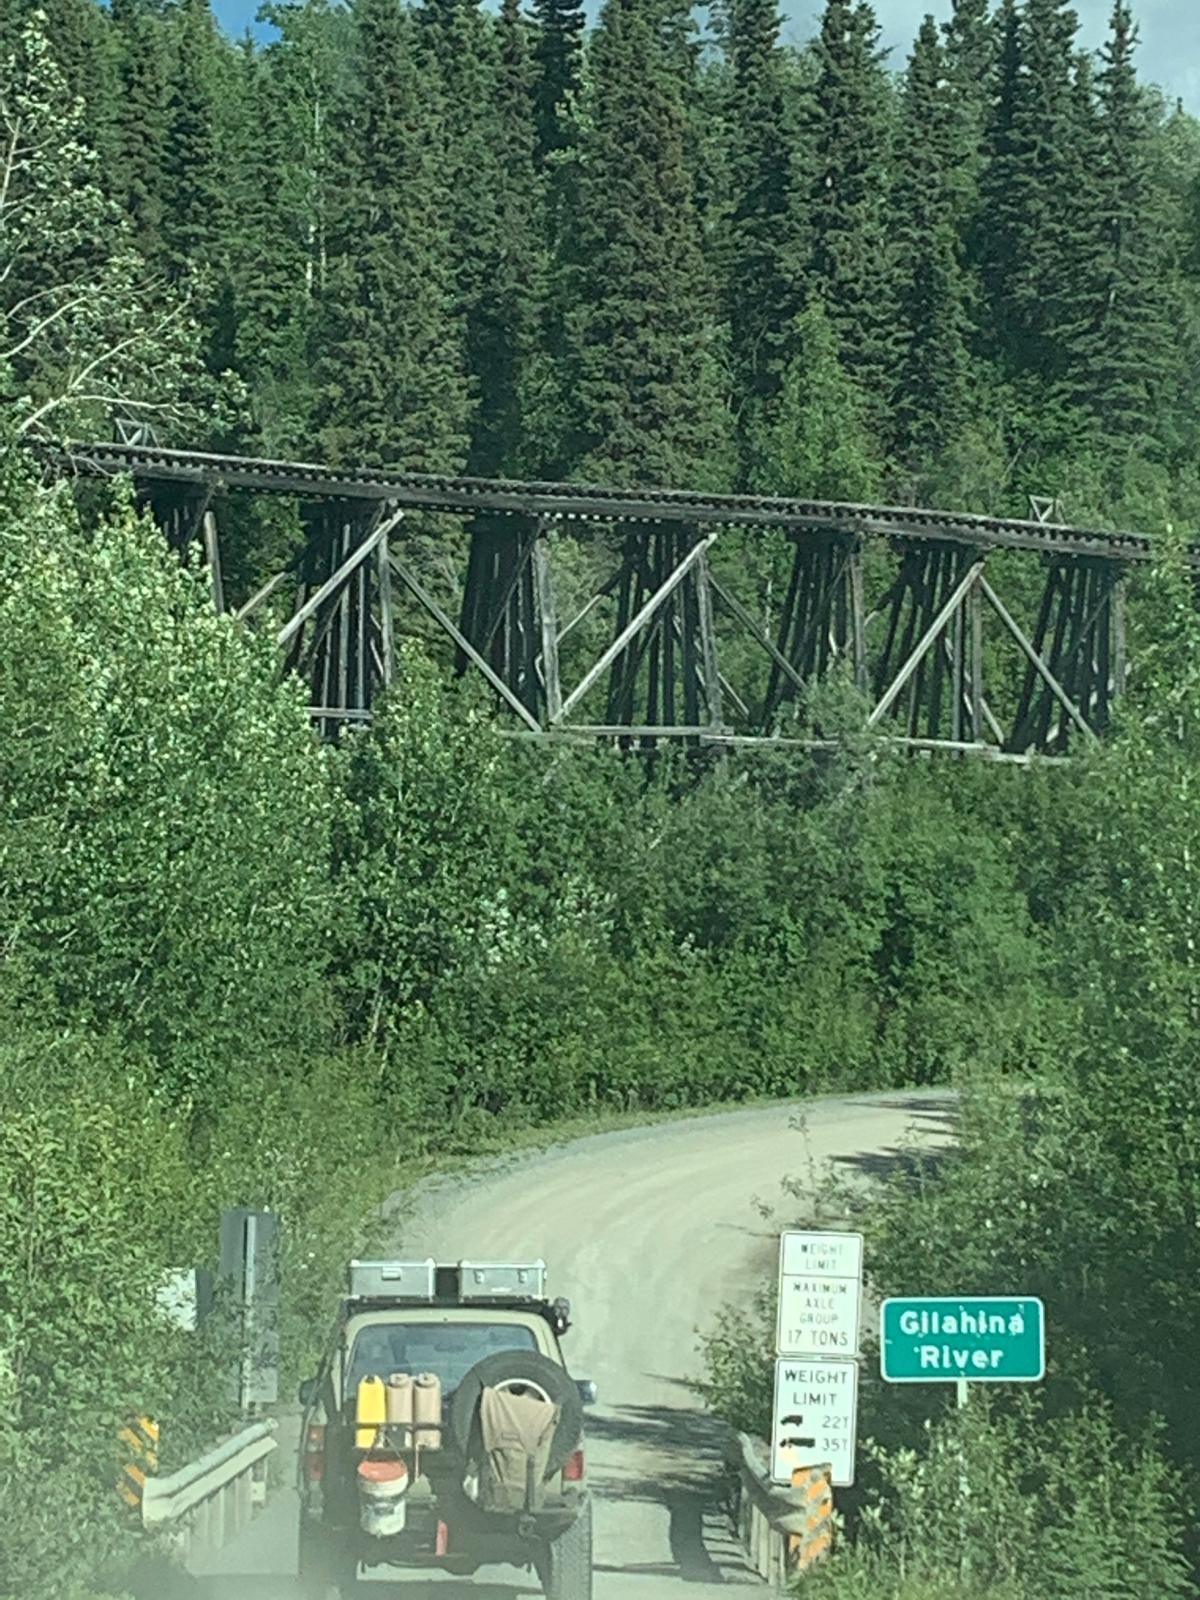
We took a dirt road to Wrangell-St. Elias glacier. We were told that it should take 3.5 hours. Took us 1h 20 min. We were flying!!!!
The next two days we traveled north and made it to the Denali Highway. We figured we will make kebabs for lunch with the Alaska Range on the background. We were almost 4000 miles of travel.
Ha, yes, and some of us decided to take a hot shower.
We then headed south through Talkeetna, Anchorage to Seward. We camped on the river bank with beautiful views. We logged 5000 miles. One oil change on the road.
The next day we camped on the beach of the Spit in Homer.
The setup seemed to be working great. We could get food ready in 20 minutes with the table set up and the awning open.
And… coffee in 6 minutes while some of us get to rest.
Not traveling with a big RV seemed to pay off. Easy and fast travel on dirt roads and fitting in small ferries.
Filling the internal tanks was also possible from the jerrycans. We carried a hose, so we could fill water anywhere.
Our last camp was in a state camp and the only one that needed a fee. Meziadin Junction.
We made it back to Mount Shasta after 7500 miles.
And made it home after almost 8000 miles and 25 days. Time to start planning the next trip. The vehicle was flawless. 2 screws came loose on the top of the A/C condenser. We had spares and installed them in a few minutes.
This wheel has done 5000000 revolutions.
Hope you enjoyed the blog. We enjoyed making it!
We are currently planning the next trip. Ship the vehicle to western Europe and driving to Vladivostok across Asia. Will keep you posted.
Last edited: