

Enthusiast I
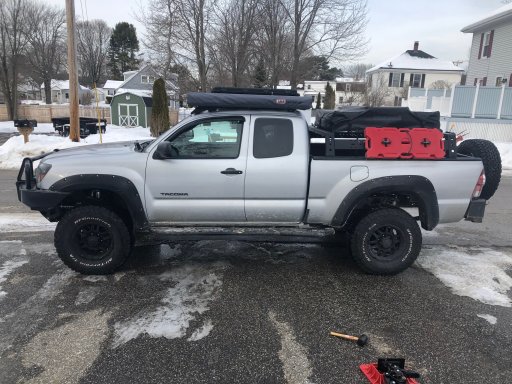
Hello! This is the start of my "in progress" build of my 2011 Toyota Tacoma SR5 Access Cab/Long Bed.
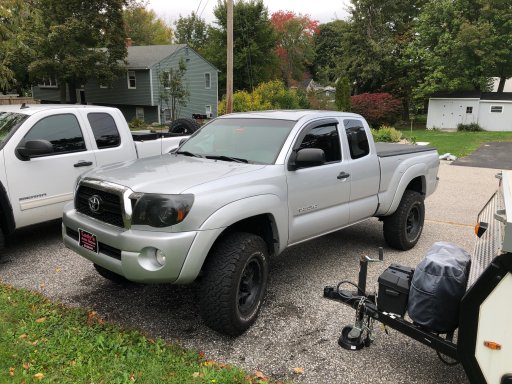
It is an automatic V6 4x4 and was originally purchased used, with 104,000 miles on it. When I first purchased it, it came with a 3" Rough Country spacer lift and 285/75R16 BFGoodrich KO2's. It also came with a soft Tonneau cover installed and HID headlights.
Here is a picture of it when I originally purchased it!
______________________________________________________________________________________
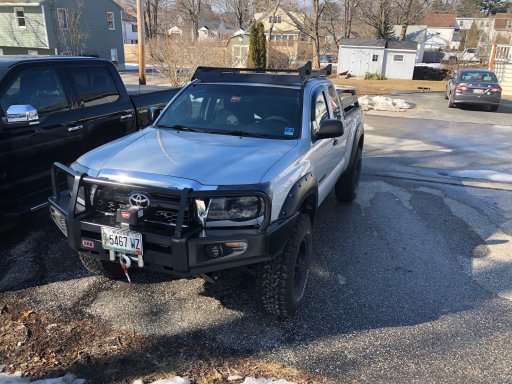
My first addition was an “ARB” Front Deluxe Winch Mount Bumper. (Part #3423130)
A “Warn” 8000 lbs. Winch (Part #WAR26502)
A “Body Armor 4x4” Rear Bumper (Part #TC-2961)
And “Bushwacker” Pocket Style Fender Flares (Part #31920-02)

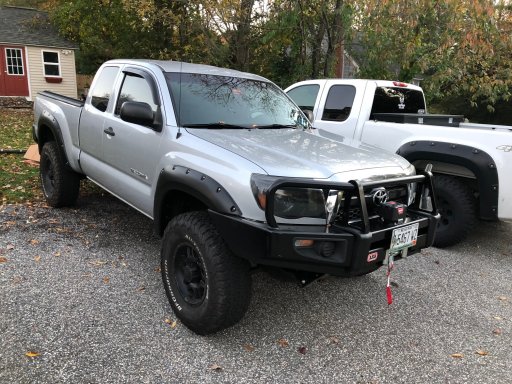
The winch was HEAVY. Naturally. Installing that onto the bumper was easy and the instructions provided by both companies were simple to follow and with the help of my brother, we were able to get that thing bolted on. The rear bumper was very easy. It was a direct bolt on and with the help of a buddy of mine, we had it on pretty quickly. After those were installed, I threw the fender flares on which were also fairly easy to attach!
______________________________________________________________________________________
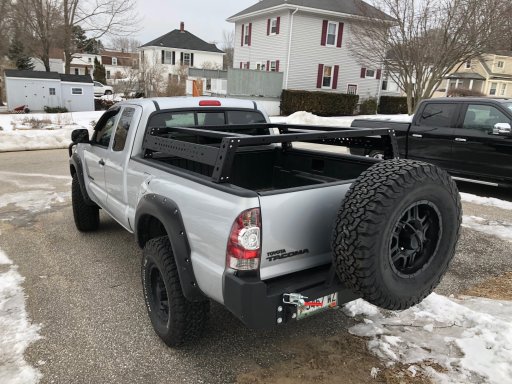
I then ordered the “Body Armor 4x4” Tire Carrier. (Part #TC-5293)
Additionally, I ordered a full-size spare. 16x8 “Ion” Alloy wheel (Part #179-6883MB)
And “BFGoodrich” All-Terrain T/A KO2 285/75R16 (Part #5855)
Installing the tire carrier was very easy. The instructions provided were simple to follow and it bolted directly up to the existing bumper. I then took the rim and tire down to my local VIP shop and they mounted and balanced it for me and I threw it on the back!
______________________________________________________________________________________
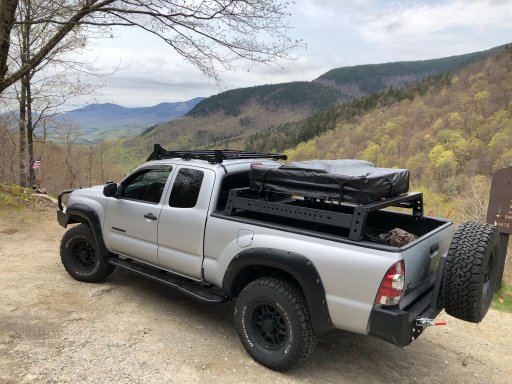
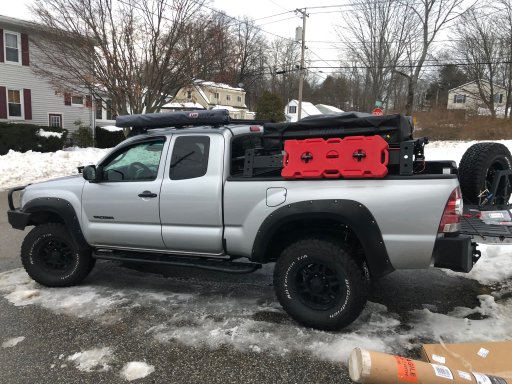
Next, after exchanging some e-mails and shopping around for a good bed rack to hold my future roof top tent, I ordered a “KB Voodoo MAX Modular TACO MAX 10” High bed rack. (Part #SQ4452789)
With the bed rack, I also ordered their Hi Lift Jack mounting brackets. (Part #SQ2984115)
They offered a special bracket to use with Tonneau covers, but I didn’t want to order anything extra and also didn’t mind not having the Tonneau cover installed because they were unsure if my particular brand of cover was compatible. They do have a list of compatible Tonneau covers, however!
I installed this to my bed and replaced the main mounting hardware with tamper-proof bolts to keep it from walking off my truck. The rack was light enough for me to install myself and was pretty straight forward as it bolts to the rails on the inside of the bed.
______________________________________________________________________________________
Next was a big order from CBI Off-road with the “Prinsu Access Rack w/ 40” lightbar cutout/wind deflector” (Part #T2/T3-ACR-WD40)
The “Awning Mounting Brackets” (Part #AWNING-MB)
Two “Heretic Studios Quattro – Billet” lights (Part #LB-5WTQTRO-FLD-CLR)
“CBI” Ditch light brackets (Part #T2-DLB)
“CBI” Bolt-On Rock Sliders with kickout and top plate. (Part #T2/T3-RSBO-KKOT-FLAT-WTP)
I then finally got my roof top tent. I ended up going with a Yakima small 2-Person Skyrise Tent. (Part #8007407)
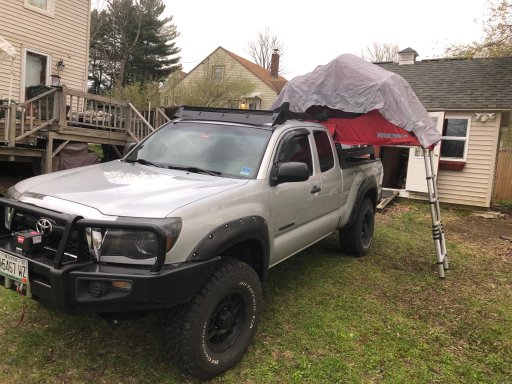
I reluctantly drilled into the roof of my truck to install the roof rack. I used a lot of clear silicone gel in the spacers and bolts connecting the rack to my roof and the install was rather easy. I watched a lot of videos on it before I installed it because the last thing I wanted, was poorly drilled holes and water leaks into the ceiling of my truck. I let the silicone dry and conducted a leak test with a first time go!
After scratching my head and realizing I was trying to put the ditch light brackets on backwards, I installed them with ease and wired up the ditch lights.
The rock sliders were a challenge. I installed them by myself and used an array of jack stands and strength to bolt them on. I had a difficult bolt on one of the crossmembers that ended up stripping. I had to drill this bolt out very carefully, but was able to re-tap it and put a brand-new bolt in attaching the slider to the frame. Once they were on, it was worth it!
For the tent, the mounting hardware it came with was not compatible with my roof rack. What I ended up doing was drilling new holes through the bottom of the tent with very large washers to displace the load of the bolts and attached a total of 8 bolts on the crossmembers of the roof rack.
The tent itself is AWESOME. It has a built-in foam mattress that folds when packing it up and, although not depicted in the above picture, the gray rain cover stretches out using flexible rods allowing good rain protection. There is a small skylight inside and four windows around it. After taking the cover off, you just pull on the adjustable ladder and the tent is pretty much ready to go. It came with a heavy-duty cover which is fairly easy to toss on when packing it up as well.
______________________________________________________________________________________
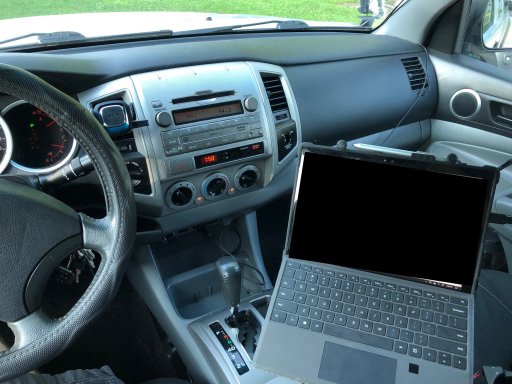
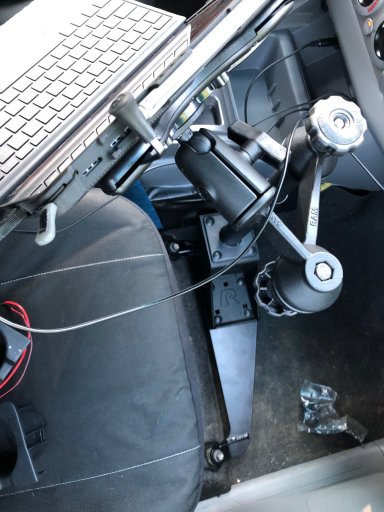
For navigation, I’m currently using my Surface Pro 4 with a “RAM Mount” setup. I plan on moving to an android tablet later, but I am using the Surface Pro with a USB GPS puck and software program “TOPO Fusion”. The mount is a direct bolt on to the seat mount and is very sturdy. You can also swap the tablet holder with others as well.
The RAM Mount Base (Part #RAM-VB-138) is designed for my style of vehicle.
Also, with it is, RAM Double Swing Arm (Part #RAM-VP-SW1-89) and RAM X-Grip Universal 12” Tablet (Part #RAM-HOL-UN11U)
Installing this was very easy and I also re-soldered and wired, what was originally a cigarette lighter, tablet charger into the bottom middle console to keep it charged while using it. (This is also only temporary because it does not have enough power to keep the tablet charged).
______________________________________________________________________________________
Next was an “ARB” Awning 1250-2100mm (Part #ARB3110A).
A “ROTOPAX” RX-4G (4 Gallon) gas can (Part #RX-4G).
Two “Auxbeam” 7” LED flood lights (Part #B00T8UY53Q)

I attached the awning to the Prinsu awning brackets which fit perfectly. Unfortunately, the 4 gallon did not line up with the side rails of my KB Voodoo rack. I ended up drilling a couple new holes and successfully attaching the mounts to the truck. I also attached the two flood lights to the rear to be activated via switch to light up the back. These are currently still not hooked up, and I have the wires ran to about the center of the vehicle for now until I install my SPOD setup.
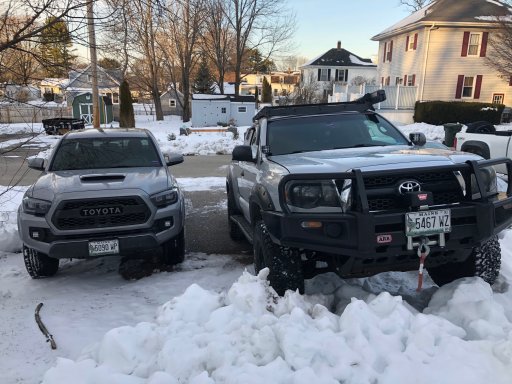
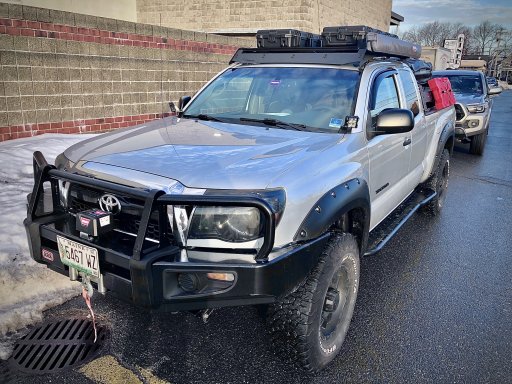
My brother's truck next to mine!
______________________________________________________________________________________
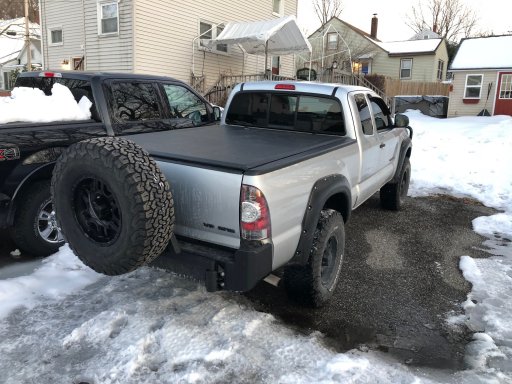
I then got two “Pelican” IM3100 Storm Long Cases (Part #IM3100) to bolt to the top of the truck. These are low profile, but will be holding most of my recovery gear and some blankets and cold weather stuff.
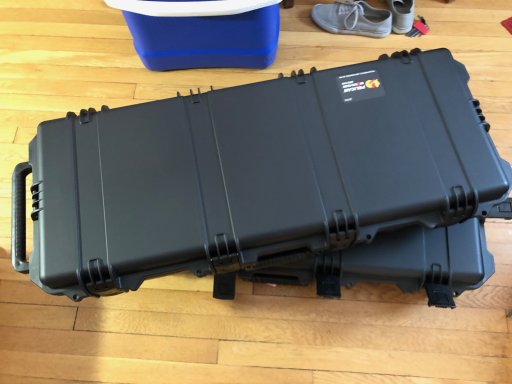
The cases were installed just using some bolts and rubber washers to keep the water from getting in. The bolts are a little long, but I will be cutting the excess and using some silicone to really waterproof these holes.
______________________________________________________________________________________
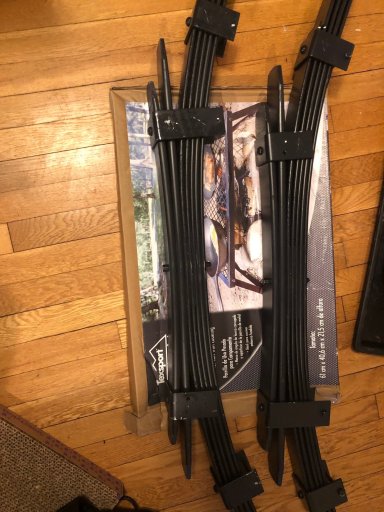
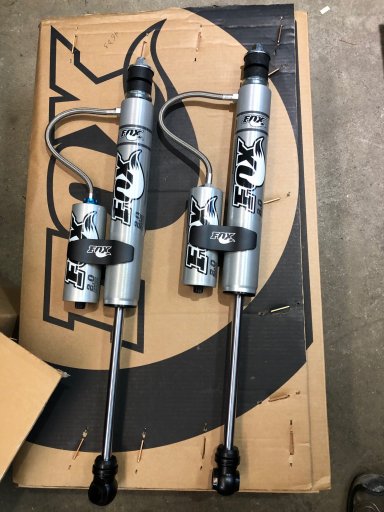
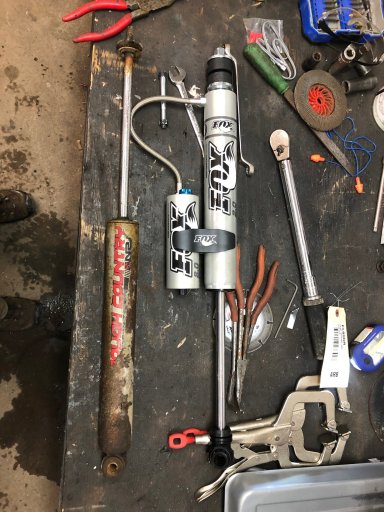
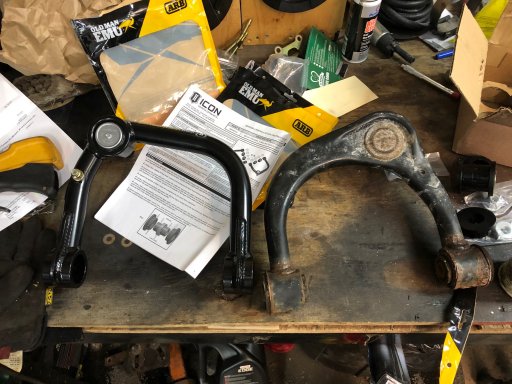
Now for another big one. All new suspension! I ended up ordering the following,
Two “FOX” 2.5 Extended Length Coilovers with DSC (Part #880-06-418)
Two “FOX” 2.0 Shocks with Reservoirs and CD adjust (Part #985-26-117)
“Toytec” Front Differential Drop (Part #TAC-DR-05)
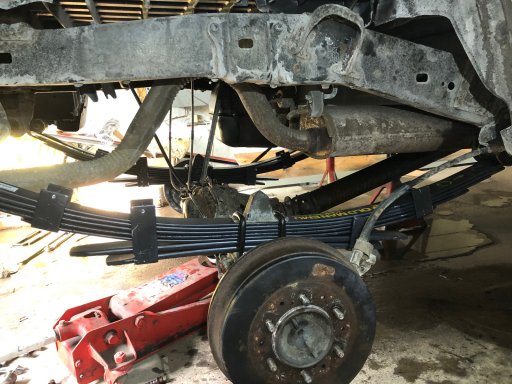
“ARB” Old Man Emu 660 lb. Leaf Spring Pack (Part #EL096R)
“Toytec” Solid Steel Axle Shims (Part #TT3DS)
“ARB” U-Bolt set (Part #OMEU53A)
“ARB” Leaf Spring Bushing Kit (Part #OMESB108)
“Toytec” Stainless Steel Extended Rear Brake Lines (Part #SS-20-05)
“ICON” Tubular Upper Control Arms w/ Delta Joint (Part #58450DJ)
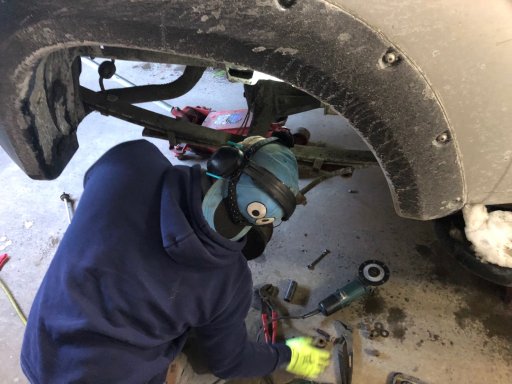
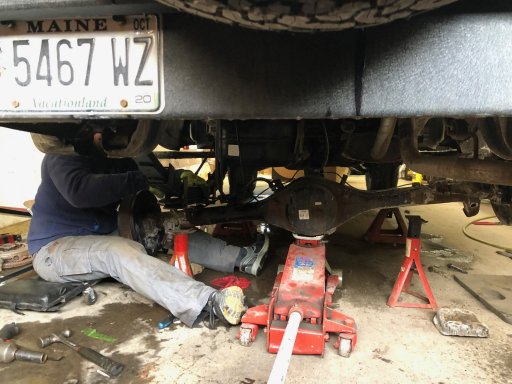
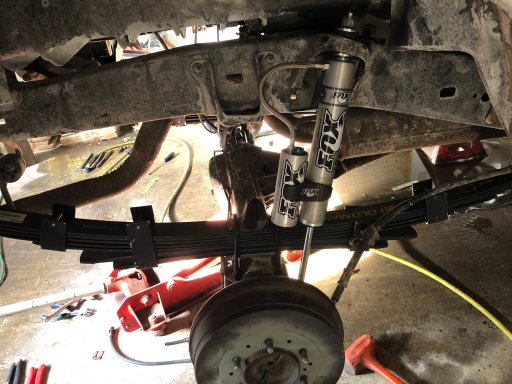
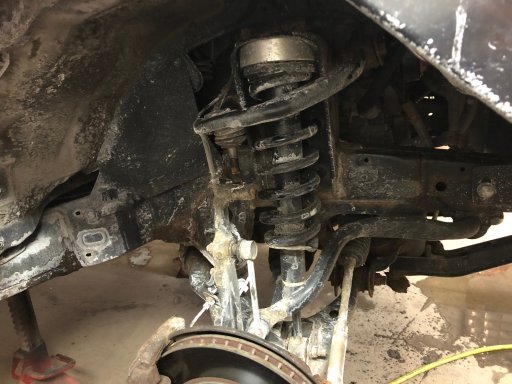
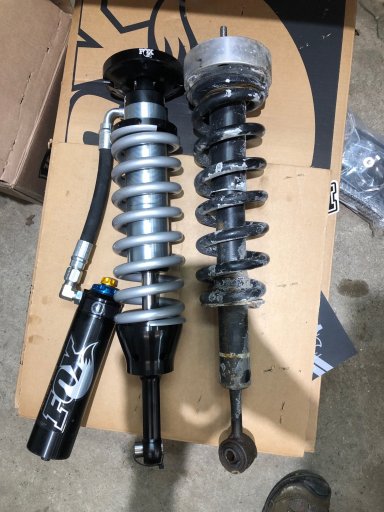
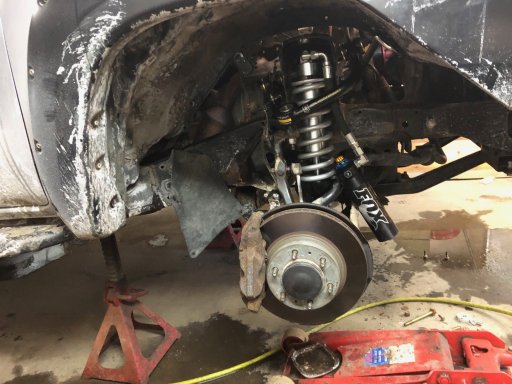

My buddy and I worked a ten-hour shift and moved directly in to installing the new suspension right after. We started at 8 am and finished at about 6 pm. The disassembly went well and wasn’t too difficult. Everything bolted right up. Please excuse the dirtiness and salt as we had a storm not too long ago and I didn’t have time (aka was lazy) to spray it down before doing the install. Other than being time consuming, the install went well. We were pretty lucky because the truck gained some height and we almost couldn’t get it out of the garage. I want to thank my buddy for helping me out, because without him it would have been a huge pain to do by myself!
The only thing I had to do differently was place the front reservoirs BEHIND the mounting bracket as my tires would just barely rub on the back of them. They are now mounted to and behind the supplied sway bar brackets on top of the frame. I am pretty close to rubbing near the back portion of the fender, but I am able to do normal driving and fully lock without rubbing currently.
When I test drove it after putting everything on, it was a HUGE difference. It rides so much better and my truck isn’t flopping all over the place with what I had on before.
______________________________________________________________________________________
As for the interior, I removed the rear seats and currently have a steel plate with MOLLE cutouts on order to place in the back. I have been planning on welding some plates to flatten the rear floor and maybe place a storage bin that is capable of rolling out to hold items. I am still toying with what I am going to do with the interior and am open to ideas!
I plan on updating this thread as I continue to add to my build. My future plans are to do some minor refurbishing of the frame as it is beginning to become rusty, although it is in pretty good shape for being in New England.
I know, I know, lockers are definitely on the list to add in the future. I was torn between suspension and lockers and ended up going with suspension as one of my original support leaf springs had snapped in half and the rear shocks were fairly cheap.
I have an SPOD kit I will be installing soon for my AUX lights as well.
Let me know what you think! Also, if you have any suggestions or tips, please let me know!
If anyone is interested in a video about my vehicle let me know and if there is enough interest, I’ll accommodate!
-Alex
It is an automatic V6 4x4 and was originally purchased used, with 104,000 miles on it. When I first purchased it, it came with a 3" Rough Country spacer lift and 285/75R16 BFGoodrich KO2's. It also came with a soft Tonneau cover installed and HID headlights.
Here is a picture of it when I originally purchased it!
______________________________________________________________________________________
My first addition was an “ARB” Front Deluxe Winch Mount Bumper. (Part #3423130)
A “Warn” 8000 lbs. Winch (Part #WAR26502)
A “Body Armor 4x4” Rear Bumper (Part #TC-2961)
And “Bushwacker” Pocket Style Fender Flares (Part #31920-02)
The winch was HEAVY. Naturally. Installing that onto the bumper was easy and the instructions provided by both companies were simple to follow and with the help of my brother, we were able to get that thing bolted on. The rear bumper was very easy. It was a direct bolt on and with the help of a buddy of mine, we had it on pretty quickly. After those were installed, I threw the fender flares on which were also fairly easy to attach!
______________________________________________________________________________________
I then ordered the “Body Armor 4x4” Tire Carrier. (Part #TC-5293)
Additionally, I ordered a full-size spare. 16x8 “Ion” Alloy wheel (Part #179-6883MB)
And “BFGoodrich” All-Terrain T/A KO2 285/75R16 (Part #5855)
Installing the tire carrier was very easy. The instructions provided were simple to follow and it bolted directly up to the existing bumper. I then took the rim and tire down to my local VIP shop and they mounted and balanced it for me and I threw it on the back!
______________________________________________________________________________________
Next, after exchanging some e-mails and shopping around for a good bed rack to hold my future roof top tent, I ordered a “KB Voodoo MAX Modular TACO MAX 10” High bed rack. (Part #SQ4452789)
With the bed rack, I also ordered their Hi Lift Jack mounting brackets. (Part #SQ2984115)
They offered a special bracket to use with Tonneau covers, but I didn’t want to order anything extra and also didn’t mind not having the Tonneau cover installed because they were unsure if my particular brand of cover was compatible. They do have a list of compatible Tonneau covers, however!
I installed this to my bed and replaced the main mounting hardware with tamper-proof bolts to keep it from walking off my truck. The rack was light enough for me to install myself and was pretty straight forward as it bolts to the rails on the inside of the bed.
______________________________________________________________________________________
Next was a big order from CBI Off-road with the “Prinsu Access Rack w/ 40” lightbar cutout/wind deflector” (Part #T2/T3-ACR-WD40)
The “Awning Mounting Brackets” (Part #AWNING-MB)
Two “Heretic Studios Quattro – Billet” lights (Part #LB-5WTQTRO-FLD-CLR)
“CBI” Ditch light brackets (Part #T2-DLB)
“CBI” Bolt-On Rock Sliders with kickout and top plate. (Part #T2/T3-RSBO-KKOT-FLAT-WTP)
I then finally got my roof top tent. I ended up going with a Yakima small 2-Person Skyrise Tent. (Part #8007407)
I reluctantly drilled into the roof of my truck to install the roof rack. I used a lot of clear silicone gel in the spacers and bolts connecting the rack to my roof and the install was rather easy. I watched a lot of videos on it before I installed it because the last thing I wanted, was poorly drilled holes and water leaks into the ceiling of my truck. I let the silicone dry and conducted a leak test with a first time go!
After scratching my head and realizing I was trying to put the ditch light brackets on backwards, I installed them with ease and wired up the ditch lights.
The rock sliders were a challenge. I installed them by myself and used an array of jack stands and strength to bolt them on. I had a difficult bolt on one of the crossmembers that ended up stripping. I had to drill this bolt out very carefully, but was able to re-tap it and put a brand-new bolt in attaching the slider to the frame. Once they were on, it was worth it!
For the tent, the mounting hardware it came with was not compatible with my roof rack. What I ended up doing was drilling new holes through the bottom of the tent with very large washers to displace the load of the bolts and attached a total of 8 bolts on the crossmembers of the roof rack.
The tent itself is AWESOME. It has a built-in foam mattress that folds when packing it up and, although not depicted in the above picture, the gray rain cover stretches out using flexible rods allowing good rain protection. There is a small skylight inside and four windows around it. After taking the cover off, you just pull on the adjustable ladder and the tent is pretty much ready to go. It came with a heavy-duty cover which is fairly easy to toss on when packing it up as well.
______________________________________________________________________________________
For navigation, I’m currently using my Surface Pro 4 with a “RAM Mount” setup. I plan on moving to an android tablet later, but I am using the Surface Pro with a USB GPS puck and software program “TOPO Fusion”. The mount is a direct bolt on to the seat mount and is very sturdy. You can also swap the tablet holder with others as well.
The RAM Mount Base (Part #RAM-VB-138) is designed for my style of vehicle.
Also, with it is, RAM Double Swing Arm (Part #RAM-VP-SW1-89) and RAM X-Grip Universal 12” Tablet (Part #RAM-HOL-UN11U)
Installing this was very easy and I also re-soldered and wired, what was originally a cigarette lighter, tablet charger into the bottom middle console to keep it charged while using it. (This is also only temporary because it does not have enough power to keep the tablet charged).
______________________________________________________________________________________
Next was an “ARB” Awning 1250-2100mm (Part #ARB3110A).
A “ROTOPAX” RX-4G (4 Gallon) gas can (Part #RX-4G).
Two “Auxbeam” 7” LED flood lights (Part #B00T8UY53Q)
I attached the awning to the Prinsu awning brackets which fit perfectly. Unfortunately, the 4 gallon did not line up with the side rails of my KB Voodoo rack. I ended up drilling a couple new holes and successfully attaching the mounts to the truck. I also attached the two flood lights to the rear to be activated via switch to light up the back. These are currently still not hooked up, and I have the wires ran to about the center of the vehicle for now until I install my SPOD setup.
My brother's truck next to mine!
______________________________________________________________________________________
I then got two “Pelican” IM3100 Storm Long Cases (Part #IM3100) to bolt to the top of the truck. These are low profile, but will be holding most of my recovery gear and some blankets and cold weather stuff.
The cases were installed just using some bolts and rubber washers to keep the water from getting in. The bolts are a little long, but I will be cutting the excess and using some silicone to really waterproof these holes.
______________________________________________________________________________________
Now for another big one. All new suspension! I ended up ordering the following,
Two “FOX” 2.5 Extended Length Coilovers with DSC (Part #880-06-418)
Two “FOX” 2.0 Shocks with Reservoirs and CD adjust (Part #985-26-117)
“Toytec” Front Differential Drop (Part #TAC-DR-05)
“ARB” Old Man Emu 660 lb. Leaf Spring Pack (Part #EL096R)
“Toytec” Solid Steel Axle Shims (Part #TT3DS)
“ARB” U-Bolt set (Part #OMEU53A)
“ARB” Leaf Spring Bushing Kit (Part #OMESB108)
“Toytec” Stainless Steel Extended Rear Brake Lines (Part #SS-20-05)
“ICON” Tubular Upper Control Arms w/ Delta Joint (Part #58450DJ)
My buddy and I worked a ten-hour shift and moved directly in to installing the new suspension right after. We started at 8 am and finished at about 6 pm. The disassembly went well and wasn’t too difficult. Everything bolted right up. Please excuse the dirtiness and salt as we had a storm not too long ago and I didn’t have time (aka was lazy) to spray it down before doing the install. Other than being time consuming, the install went well. We were pretty lucky because the truck gained some height and we almost couldn’t get it out of the garage. I want to thank my buddy for helping me out, because without him it would have been a huge pain to do by myself!
The only thing I had to do differently was place the front reservoirs BEHIND the mounting bracket as my tires would just barely rub on the back of them. They are now mounted to and behind the supplied sway bar brackets on top of the frame. I am pretty close to rubbing near the back portion of the fender, but I am able to do normal driving and fully lock without rubbing currently.
When I test drove it after putting everything on, it was a HUGE difference. It rides so much better and my truck isn’t flopping all over the place with what I had on before.
______________________________________________________________________________________
As for the interior, I removed the rear seats and currently have a steel plate with MOLLE cutouts on order to place in the back. I have been planning on welding some plates to flatten the rear floor and maybe place a storage bin that is capable of rolling out to hold items. I am still toying with what I am going to do with the interior and am open to ideas!
I plan on updating this thread as I continue to add to my build. My future plans are to do some minor refurbishing of the frame as it is beginning to become rusty, although it is in pretty good shape for being in New England.
I know, I know, lockers are definitely on the list to add in the future. I was torn between suspension and lockers and ended up going with suspension as one of my original support leaf springs had snapped in half and the rear shocks were fairly cheap.
I have an SPOD kit I will be installing soon for my AUX lights as well.
Let me know what you think! Also, if you have any suggestions or tips, please let me know!
If anyone is interested in a video about my vehicle let me know and if there is enough interest, I’ll accommodate!
-Alex
Last edited:


