2004 Discovery 2 Expo Build

  • HTML tutorial

MStudt

Rank V
Launch Member

Member II

2,268
Springfield, OR, USA
First Name
Mike
Last Name
Studt
Member #

0820

I finished up one project, and started on another. I've had the headliner done for a bit now, but never got around to posting it. I've only got 2 pictures at the moment of the finished project. It looks the same from front to back so 1 picture should do.


MStudt

Rank V
Launch Member

Member II

2,268
Springfield, OR, USA
First Name
Mike
Last Name
Studt
Member #

0820

I've started on the sleep/storage platform for the front section. I've only been working on this for a few hours so far, and hope to have the framing finished by the end of the week.

This is how the project began.


After removing the seats I needed to bend some metal that I could use as a mount. I have 3 of these plates that'll bolt into the factory seat bolt locations, and they'll get tied into the platform. These will be the anchor points for the front, and I'll continue to use the turn buckles in the rear.


I have 3 small sections mounted to the rear section. These sections will be used to bolt the front and back sections together.


These 3 supports will be tied together on the top/bottom in the front/back. I plan on welding some wire mesh in the center section to act as a divider.
 

jhill15

Rank 0

Contributor II

98
Nice job on the liner! I had a saggy liner in my 01 so I ended up pulling it out and spraying it with bedliner. Turned out great!
 
  • Like
Reactions: Graeman

MStudt

Rank V
Launch Member

Member II

2,268
Springfield, OR, USA
First Name
Mike
Last Name
Studt
Member #

0820

Nice job on the liner! I had a saggy liner in my 01 so I ended up pulling it out and spraying it with bedliner. Turned out great!
We were going to use Raptor Liner, but decided against it. Just something about having texture on the headliner, and the potential need to clean the headliner was something that I didn't want to deal with. I liked the fact that I can get the same durable service, have a glossy look, and have it UV resistant with the Durabak. I wish it covered up more of the imperfections, but I think it turned out pretty good.
 
  • Like
Reactions: Graeman and SLO Rob

MStudt

Rank V
Launch Member

Member II

2,268
Springfield, OR, USA
First Name
Mike
Last Name
Studt
Member #

0820

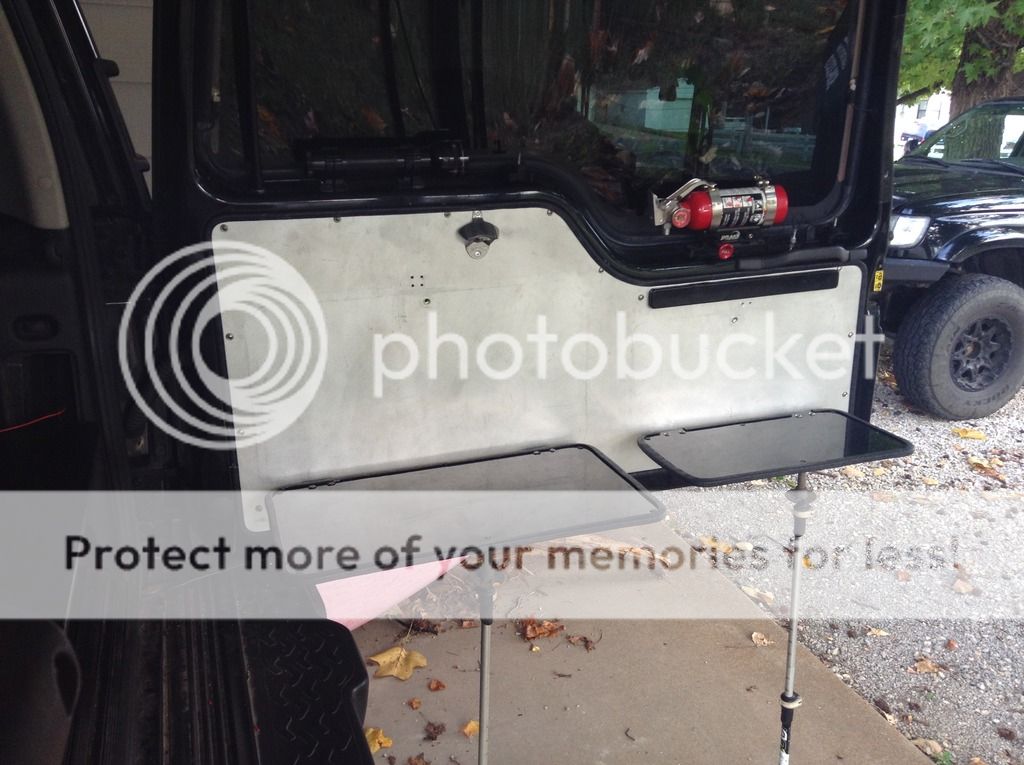
I've been able to get quite a bit finished up over the last week or so. The rear door is finally complete, and everything is working as it should.

Rear door panel finished up.


Dual fold down tables that are supported with our trekking poles. These are covered in HDPE for easy cleaning, and they can serve as cutting boards. The rear door also has a bottle opener, magnetic knife bar, led light on a gooseneck, modified rear door pull, and grap handle.


This is the cooking arrangement with stove, knives, and cutting board.


LED on a gooseneck, and the small on/off button to the right.


This is the modified door handle, and grab handle. The Rover used to have a handle flush mounted into the original rear door panel. That was no longer usable due to the panel that I made. I drilled a small hole, and ran the original cable from the handle through it. The added some heat shrink around the cable, and clamped it together. This will also us to open, and close the door from the inside it we need to.
 

MStudt

Rank V
Launch Member

Member II

2,268
Springfield, OR, USA
First Name
Mike
Last Name
Studt
Member #

0820

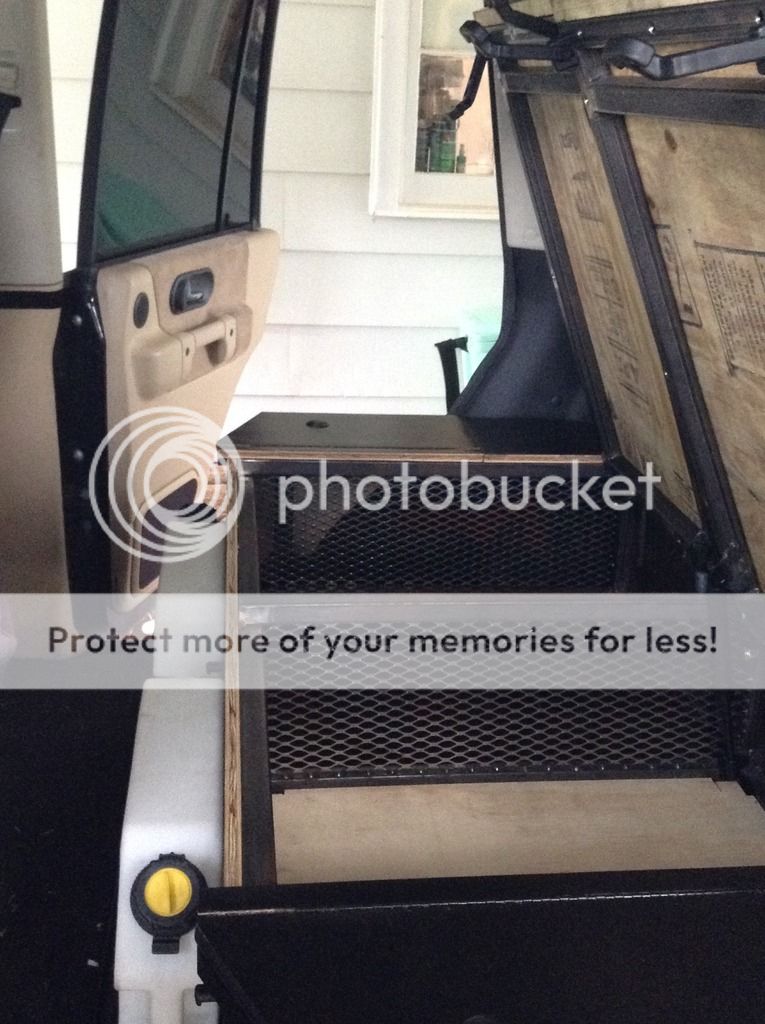
The front section of the platform is just about finished. I still need to add another section to the very front to extend about another 14" forward. I'm considering making two fold out sections to act as headrest, and to make the platform 74" in total length.

Looking from the rear forward. The back section has two large drawers that'll house all of our cooking supplies, and other things.


Side shot of the front section. I'm thinking of adding some black edge trim to the exposed plywood. Just not sure if I want to be able to see the unfinished wood or not, But maybe I'm just being OCD since it's never going to be seen once the custom bed is in there.


There are two small side compartments that are going to be used to store personal items, and things that we'll need to have close by. Even have a his, and her side. Which, will most likely end up as her, and her sides.


The handles for the side compartment are a push type knob. You push the knob down, and the it pops up. Once it's up you turn it 45*, and pull up.


The middle of the front section also has two large hatches that flip up for more storage. Each hatch is held down by two rubber draw latches, and has one gas lifter for easy opening.


Here you can see the latches. I was able to install out two 1 gallon Rotopax just under the lips of the hatches. These Rotopax are going to be for drinking water, and will be kept inside most of the time.
 

MStudt

Rank V
Launch Member

Member II

2,268
Springfield, OR, USA
First Name
Mike
Last Name
Studt
Member #

0820

I'll have some new pictures to post up by the end of the weekend. I'm hoping to have the platform all finished up by Sunday. The last project is making two folding headrests that'll extend the platform about another 14" forward. This will give the platform an overall length of 74", and a collapsed length of 60".

I will have another addition in the next couple weeks. Next week my Front Runner roof rack will be delivered. Along with the new rack I'll also have a couple sets of awning mounts, and a mount for the jack. The rack is going to have a 99" CVT awning on the driver side, and a 55" CVT awning off the rear.

Stay tuned.
 

MStudt

Rank V
Launch Member

Member II

2,268
Springfield, OR, USA
First Name
Mike
Last Name
Studt
Member #

0820

I finished the platform over the weekend, but ran of of daylight. I'll make sure to get some pictures in the next couple of days. Since the platform got finished up we were able to order the custom bed yesterday as well. We're going with a 5 piece bed that is made from 3" high density foam, and comes with custom slips to protect them.

With the platform finished up I was able to start, and actually finish it. I installed the new Front Runner roof rack, 2 CVT awnings, shovel mount, and Bushcable limb risers.


  • Like
Reactions: Ryan Matthes

Ryan Matthes

OB Ambassador
Member
Supporter +
Investor

Explorer I

3,932
Chapel Hill, NC
First Name
Ryan
Last Name
Matthes
Member #

2377

Awesome build - I love the D2 platform, had on '04 myself but the lifetime of living in NE got the best of it. Your platform is fantastic. What is / are your next plan for this?
 

MStudt

Rank V
Launch Member

Member II

2,268
Springfield, OR, USA
First Name
Mike
Last Name
Studt
Member #

0820

Awesome build - I love the D2 platform, had on '04 myself but the lifetime of living in NE got the best of it. Your platform is fantastic. What is / are your next plan for this?
I still have to wire up the inside for USB outlets, Bluesea fuse box, and the power inverter. The list is so long right now I've lost track. Mostly small things at this point, but still a long list of small things.
 

MStudt

Rank V
Launch Member

Member II

2,268
Springfield, OR, USA
First Name
Mike
Last Name
Studt
Member #

0820

Not a lot of progress, but still some. I received the new steering guard from MM4X4 over the weekend, and was able to get it installed. This was by far the best looking skid that I could find, and it was cheap! Even with shipping from the UK this cost me $160. Came with all the hardware, and powder coated black.


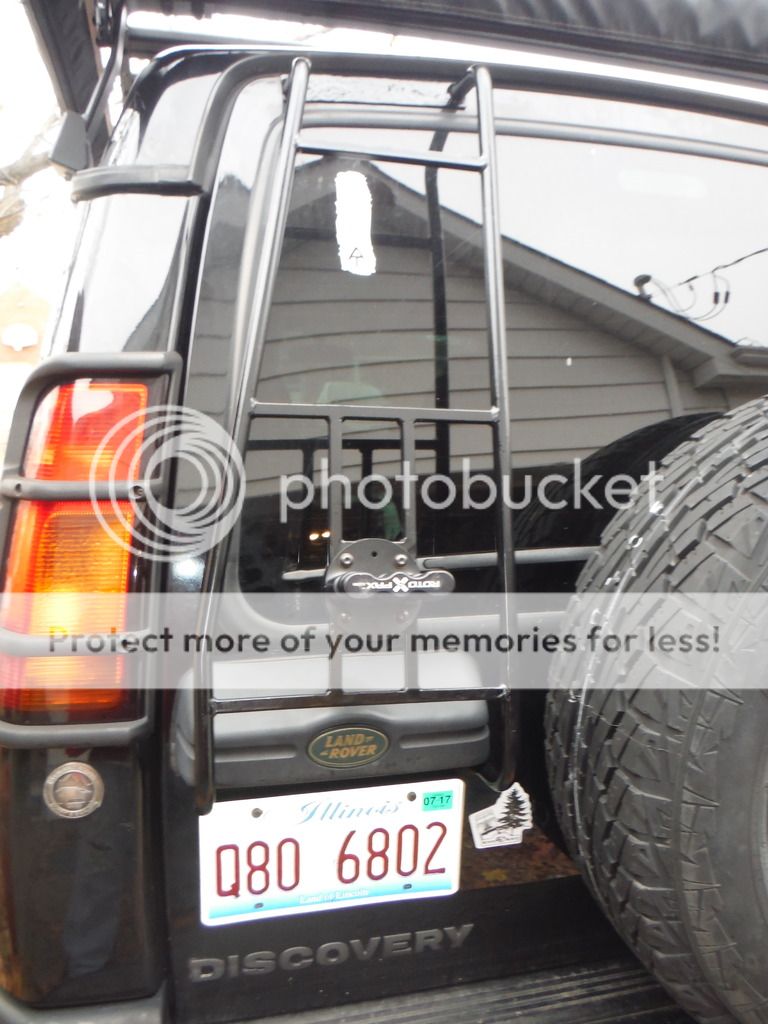
I also spent a few hours a couple weekends ago stripping all the paint off the OEM Rover ladder for some additional tube work. I added some 1/2" box tubing to the lower part of the ladder to accommodate a couple Rotopax. Once this addition was finished I rust treated the bare metal, primed it a couple times, and then painted it black again.


  • Like
Reactions: k9sar

Silver_Slug

Rank 0

Traveler I

60
The front section of the platform is just about finished. I still need to add another section to the very front to extend about another 14" forward. I'm considering making two fold out sections to act as headrest, and to make the platform 74" in total length.

Looking from the rear forward. The back section has two large drawers that'll house all of our cooking supplies, and other things.
I saw you said you used 1x1x0.065, I'm guessing that was steel?
Also what thickness plywood did you use for the top of the platform and drawers? Now that I am on winter break I am about to build this. Just finalizing materials and slides.


Sent from my iPhone using Tapatalk
 

MStudt

Rank V
Launch Member

Member II

2,268
Springfield, OR, USA
First Name
Mike
Last Name
Studt
Member #

0820

I saw you said you used 1x1x0.065, I'm guessing that was steel?
Also what thickness plywood did you use for the top of the platform and drawers? Now that I am on winter break I am about to build this. Just finalizing materials and slides.
The tubing was steel rather than aluminum. To use aluminum I would had to of used thicker material, and wouldn't have save any weight in the end. I looked at both option, but aluminum has a bad deflection that requires thicker material. For the deck I used 1/2" plywood, and then applied matte black formica to the top.
 

Silver_Slug

Rank 0

Traveler I

60
The tubing was steel rather than aluminum. To use aluminum I would had to of used thicker material, and wouldn't have save any weight in the end. I looked at both option, but aluminum has a bad deflection that requires thicker material. For the deck I used 1/2" plywood, and then applied matte black formica to the top.
How much thicker aluminum would the aluminum needed to be? I'm still trying to learn when to use aluminum and steel.
Personally I was looking at using .75 x .75 x 1/8 wall 6063 aluminum. My rig is pretty limited in space and I want to maximize as much as possible. I have also looked at jawing solid aluminum bars in .5 x .5 6061 and .5 x .5 x .065 steel either should be strong enough but it's gonna suck to weld together just cause of size.
I really appreciate you answering my questions. Thank you