I see your 3 Scouts and raise.Maybe you should drive my tow pig? Can fit 3 scouts!

I see your 3 Scouts and raise.Maybe you should drive my tow pig? Can fit 3 scouts!

Explorer I
3030
Explorer I
3030


Advocate III
20990
A trick my dad taught me to install u-joints… as soon as you get them seated as far as you can with your press (or vice, or u-joint installation tool, ect) is to smack the solid part of shaft next to the u-joint caps with a BFH with the caps still having an external force applying pressure to just the caps. This causes the U-Joint caps to stay tight against the trunnion wile the vibration loosens the tension of the shaft yokes allowing you to install the retaining rings easier. Also I have found seating one cap at a time using this method makes going a lot smoother as well.It's been busy but trying to continue progressing..
Today I broke down and finally bought a shop press. The factory joins in the 10 bolt axle shafts were just stubborn as could be. I was able to get the old ones out but my gosh did it take some force.
Then I took some time to wire wheel the 25 years of rust off the shafts.
Getting the new ujoints in was hit and miss. I think they got a bit compressed (a few thousands) as I had trouble getting the c-clips on a couple and even blew out one of the caps by putting a little touch on it in the wrong way. I recognize my mistake and will give it another shot tomorrow.
View attachment 239191
View attachment 239192
View attachment 239193
This. I also do this after the clips are installed if the joints are stiff to turn. I use WD40 on the caps when removing and installing them. On caps that have been in for eons I use a little heat before I press them, otherwise the shafts get squeezed in as you found out.A trick my dad taught me to install u-joints… as soon as you get them seated as far as you can with your press (or vice, or u-joint installation tool, ect) is to smack the solid part of shaft next to the u-joint caps with a BFH with the caps still having an external force applying pressure to just the caps. This causes the U-Joint caps to stay tight against the trunnion wile the vibration loosens the tension of the shaft yokes allowing you to install the retaining rings easier. Also I have found seating one cap at a time using this method makes going a lot smoother as well.
Another trick I picked up was applying a thin layer of grease to theu-joint caps before pressing them in.
Explorer I
3030
Yup, that's what happened. Gunna run down to the parts store in a bit. Will try not to break another $20 bill.This. I also do this after the clips are installed if the joints are stiff to turn. I use WD40 on the caps when removing and installing them. On caps that have been in for eons I use a little heat before I press them, otherwise the shafts get squeezed in as you found out.

Explorer I
3030
Explorer I
3030


Explorer I
3030


Explorer I
3030
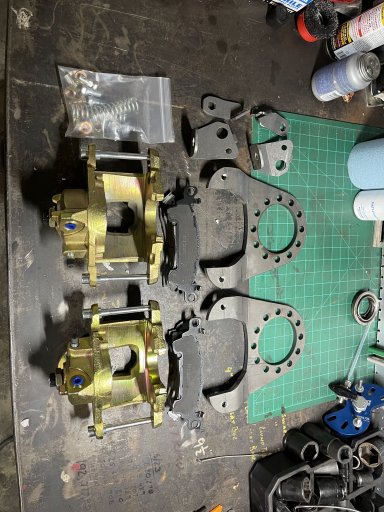
Thanks! The calipers were delivered late and wouldn't you know they have two different finishes. Really messes with my ocd!Wow, looking good.
Explorer I
3030

Explorer I
3030

Explorer I
3030
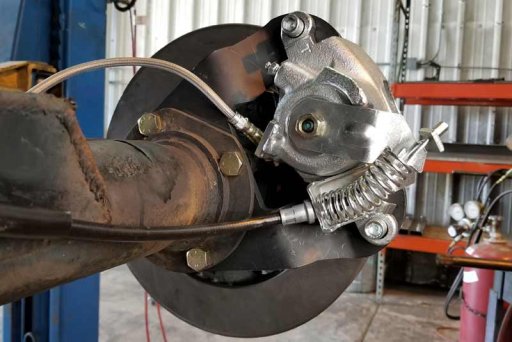
I got the Cadillac eldorado calipers that have the parking brake levers.What are your plans for a parking brake?

Explorer I
3030
Explorer I
3030