Whats below a rookie? That's where I'm starting in night sky photography

  • HTML tutorial

murps

Rank V
Launch Member

Advocate II

2,309
Denver, CO, USA
First Name
d
Last Name
m
Member #

0711

Hello,

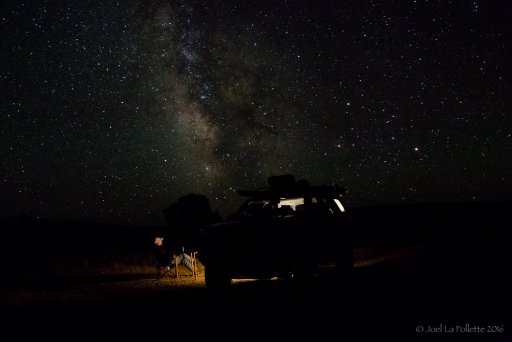
My parents have a pretty sweet Nikon D3300 and I want to borrow it and try out some night sky shooting. When we head out overlanding the light pollution is next to zero so I figure it’s the perfect opportunity. Yes, I could google this but I don’t want to get lost in an ocean of info if I can get some one-on-one info.

So here is my question, with the below lenses/equipment, does anyone have any advice, websites, blogs, etc that they can share with me. Would love to get some silhouettes with stars, milky way, and try some star streak shots too. Any input or direction would be a great help.

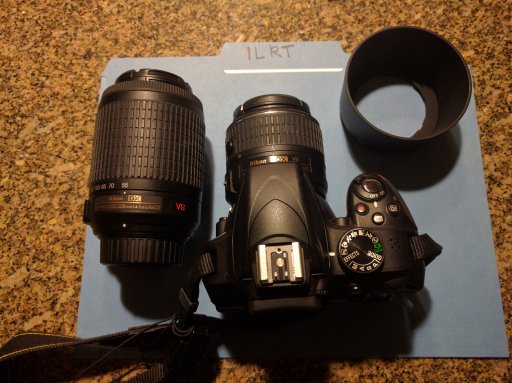
Camera: Nikon - D3300 DSLR Camera
Lenses: Nikkor ED 18-55mm F3.5-5.6G and Nikkor ED 55-200mm F4-5.6G
Equipment: Tripod
Software: Photoshop

IMG_20161214_222505.jpg
 

Blank

Rank III

Advocate II

626
Yuma, AZ
Unfortunately neither of those lenses or that body is going to be prime gear for night photography, but you probably don't want to hear someone tell you that, so here's what you can do to get the best results from the equipment you have. I would use the 18-55 at the wide end of the range, like 18-20mm. That will allow you to use the widest aperture (f/3.5) of that lense. Set the camera to M or 'manual' mode. Set the ISO to the lowest native value (probably 100) and set the shutter speed to about 10 seconds. Put your camera on the tripod of course and if you don't have a remote, set your timer release to 2-5 seconds. Put your focus to manual and use live view to check focus using the brightest star or a far off light. Don't bump it after that. Compose and take a shot. You can start to raise the ISO value incrementally until you find the amount of sensor noise unacceptable. At 18mm you can get away with a shutter speed up to about 25 seconds before the stars start to be 'streaked' noticeably. The longer lense you use (more mm's) the shorter the exposure will need to be to prevent streaking. The timer is used so you don't blur the stars when you press the shutter, it gives the camera time to settle. If there is a slight breeze, remove the camera strap. It will swing and blur your pic unless you have a very sturdy tripod. Good luck with your astro photos.

 
Last edited:

ce4460

Rank V
Launch Member

Pathfinder I

2,741
Washington
First Name
Will
Last Name
Campbell
Member #

1023

Service Branch
Army
Unfortunately neither of those lenses or that body is going to be prime gear for night photography, but you probably don't want to hear someone tell you that, so here's what you can do to get the best results from the equipment you have. I would use the 18-55 at the wide end of the range, like 18-20mm. That will allow you to use the widest aperture (f/3.5) of that lense. Set the camera to M or 'manual' mode. Set the ISO to the lowest native value (probably 100) and set the shutter speed to about 10 seconds. Put your camera on the tripod of course and if you don't have a remote, set your timer release to 2-5 seconds. Put your focus to manual and use live view to check focus using the brightest star or a far off light. Don't bump it after that. Compose and take a shot. You can start to raise the ISO value incrementally until you find the amount of sensor noise unacceptable. At 18mm you can get away with a shutter speed up to about 25 seconds before the stars start to be 'streaked' noticeably. The longer lense you use (more mm's) the shorter the exposure will need to be to prevent streaking. The timer is used so you don't blur the stars when you press the shutter, it gives the camera time to settle. If there is a slight breeze, remove the camera strap. It will swing and blur your pic unless you have a very sturdy tripod. Good luck with your astro photos.

This is something I've often wondered. I've used the above technique but never got the desired result. Basically, in order to get an exposure long enough to register the light from a star, it ends up being so long the stars streak. How do you get sharp and bright pins of light rather than streaking?

Also, if the pictured lens are not desirable, what is best to capture star constellations?
 

Blank

Rank III

Advocate II

626
Yuma, AZ
This is something I've often wondered. I've used the above technique but never got the desired result. Basically, in order to get an exposure long enough to register the light from a star, it ends up being so long the stars streak. How do you get sharp and bright pins of light rather than streaking?

Also, if the pictured lens are not desirable, what is best to capture star constellations?
Capturing stars can be done with almost any camera with manual controls, but its like off roading... You can go off road with many vehicles and get to your destination, it's all about how easily you can get there and the quality of the ride. With cameras IRT photographing stars I look for two things. 1) A sharp lens with a large aperture. 2) A camera with a large sensor that is known to have good high-ISO performance that returns low noise in the image.

If your main problem is that you must set too long of an exposure to get the stars to appear, there are only two ways of resolving this. You either have to gather more light in a shorter amount of time (a lens with a larger aperture e.g. f/2.8 or larger) or you need to artificially increase the camera sensor's sensitivity to light by increasing the ISO value. The downside to this is that as you amplify the sensor's sensitivity, you also amplify the digital noise captured in the image. So preferably, the best solution is to buy better lenses. The downside to this is cost.

I won't go into which cameras I'd recommend, it would go all Ford vs. Chevy in a moment. Suffice to say, cameras with physically largers sensors (what are refered to as 'full frame' vs. APS-C or 'cropped sensors') will be better suited to night photography by virtue of generally being able to capture more light at lower ISO settings. Not to say other cameras can't be used.

The takeaway: Use a lens with a max aperature of f/2.8 to say f/1.4 and your chances of capturing pinpoint stars with any camera go up exponentially compared to a lens in the range of f/3.5-5.6

Note: You can NOT underestimate the value of having a proper rigid tripod when trying to shoot stars or any long exposure photos, but that is a whole other topic in itself.
 
Last edited:

9Mike2

Rank V
Launch Member

Member III

2,741
Garden Grove, California
Member #

2706

Check out " The Astronomy Forum ", They have whole Tread groups with suggestions and apps to use on different brands of cameras. Also check out the Downloadable app called " Stellarium " for your computer or phone it's free, you can setup your location and get the sky above you any where in the world plus you can move forward and back in time to see what you may want to film.....
 
  • Like
Reactions: murps

NWNavigator

Rank VI
Launch Member
Member

Influencer I

2,973
End of the Oregon Trail
First Name
Joel
Last Name
La Follette
Member #

2053

@Ryan Barnes has boiled the whole subject down and hit all the main points perfectly. Well done. Wish I would have know all that when I tried shooting the stars this past summer. The recommendation for a sturdy tripod is paramount. I sometimes will attach a sandbag to mine if there is a breeze, or sandbag the feet. I prefer a ball-mount head for easy adjustability, but any head will work.

I would only add a good headlamp to the list of gear and perhaps a camp stool and warm jacket. Even in our high desert summer nights can be chilly. I've also found that black photographers tape is handy for locking the focus ring once you have tested focus and are happy with the result. There's is nothing worse than finding out later that you bumped something and now own a bunch of fuzzy star images....

The cool thing is that shooting a bunch of images digitally isn't as expensive as it would have been in the film days... have fun!

Antone-7252.jpg
 

TheAdventureIndex

Rank V
Member
Investor

Member III

2,268
San Mateo,CA
Member #

2676

Unfortunately neither of those lenses or that body is going to be prime gear for night photography, but you probably don't want to hear someone tell you that, so here's what you can do to get the best results from the equipment you have. I would use the 18-55 at the wide end of the range, like 18-20mm. That will allow you to use the widest aperture (f/3.5) of that lense. Set the camera to M or 'manual' mode. Set the ISO to the lowest native value (probably 100) and set the shutter speed to about 10 seconds. Put your camera on the tripod of course and if you don't have a remote, set your timer release to 2-5 seconds. Put your focus to manual and use live view to check focus using the brightest star or a far off light. Don't bump it after that. Compose and take a shot. You can start to raise the ISO value incrementally until you find the amount of sensor noise unacceptable. At 18mm you can get away with a shutter speed up to about 25 seconds before the stars start to be 'streaked' noticeably. The longer lense you use (more mm's) the shorter the exposure will need to be to prevent streaking. The timer is used so you don't blur the stars when you press the shutter, it gives the camera time to settle. If there is a slight breeze, remove the camera strap. It will swing and blur your pic unless you have a very sturdy tripod. Good luck with your astro photos.

Awesome advice here. Also specs on the above pic? interested to know the meta data
 

Blank

Rank III

Advocate II

626
Yuma, AZ
Awesome advice here. Also specs on the above pic? interested to know the meta data
This was taken at the Glamis Sand Dunes in Aug 2016 during the Perseids Metor Shower.

Nikon D810 with a Tamron 15-30 f/2.8 @ 15mm 2.8, ISO3200, 13sec.

I set the drive mode to continuous, ran up the hill and then ran back, only standing in place for one 13 second exposure. I saw the meteor while I was standing there and hoped I captured it. The timing was perfect. So this was one image, no composting. Just some adjustments in Lightroom.

I don't think I'll ever be able to capture a meteor, Milky Way, self portrait ever again.
 

TheAdventureIndex

Rank V
Member
Investor

Member III

2,268
San Mateo,CA
Member #

2676

This was taken at the Glamis Sand Dunes in Aug 2016 during the Perseids Metor Shower.

Nikon D810 with a Tamron 15-30 f/2.8 @ 15mm 2.8, ISO3200, 13sec.

I set the drive mode to continuous, ran up the hill and then ran back, only standing in place for one 13 second exposure. I saw the meteor while I was standing there and hoped I captured it. The timing was perfect. So this was one image, no composting. Just some adjustments in Lightroom.

I don't think I'll ever be able to capture a meteor, Milky Way, self portrait ever again.
It's possible!

Keep it up!

EDIT: Any advice on getting better color temps?
 
Last edited:
  • Like
Reactions: 9Mike2

Lepik

Rank II

Advocate II

455
Colorado
The gear does not matter. Just like the vehicle does not really matter. Sure you will have limitations based on the gear you have but if you have a DSLR and a sense you can acoomplish most of what you are looking for. There is a guy online called FROKNOWSPHOTO. Tall white guy with an afro. He has lots of videos. Some are around night photography and others are around fireworks. Def worth checking out on Youtube. Most of all get out and have fun.. A few tips I have
1.) Always use a tripod with night photography
2.) Buy a cheap remote, wireless or not so you don't touch the camera when shooting.
3.) Open the aperture wide up. Lower numbers mean more light. F/4 F2.8 etc.
4.) Get as far away from city lights as possible.
5.) Check online for when the sky will be clear. There are apps and websites you can search to tell you how visible the night sky will be.
6.) share with us your photos :D
 

murps

Rank V
Launch Member

Advocate II

2,309
Denver, CO, USA
First Name
d
Last Name
m
Member #

0711

The gear does not matter. Just like the vehicle does not really matter. Sure you will have limitations based on the gear you have but if you have a DSLR and a sense you can acoomplish most of what you are looking for. There is a guy online called FROKNOWSPHOTO. Tall white guy with an afro. He has lots of videos. Some are around night photography and others are around fireworks. Def worth checking out on Youtube. Most of all get out and have fun.. A few tips I have
1.) Always use a tripod with night photography
2.) Buy a cheap remote, wireless or not so you don't touch the camera when shooting.
3.) Open the aperture wide up. Lower numbers mean more light. F/4 F2.8 etc.
4.) Get as far away from city lights as possible.
5.) Check online for when the sky will be clear. There are apps and websites you can search to tell you how visible the night sky will be.
6.) share with us your photos :D
solid advice!
 

TOUGE

Rank V
Launch Member

Enthusiast III

2,268
Gold Coast QLD, Australia
First Name
Tim
Last Name
Ash
Member #

19244

When I was first getting in to astro photography these website helped me the most.

https://www.lonelyspeck.com/milky-way-exposure-calculator/ is a very quick and easy way of working out the best shutter speed to use with the equipment you own. The whole website is an extremely good resource for astrophotography for beginners.

http://www.photopills.com/academy Photopills is a website and also an APP that is incredibly useful for planning your shots at night. The app is augmented reality for the sun and moon phases and where the Galactic center will be. You can set your location to where the phone currently is using the GPS or you can move the locations around the world and change the time and date so you can plan or see where the sun/moon/galactic center is anywhere around the world at any time. It also tell you sun rise/set times blue/golden hour times The app also has tons of other info from the site but you will need phone signal for it to work. The app isn't cheap but I have found it extremely handy when out exploring.

This one I took with the tripod on the camp table in Joshua Tree NP, I didn't go out there to take photos but it just worked out almost perfectly when I got the photopills app out and it said galactic center was in a good spot and no moon that night, The yellow glow in the bottom right is light spill from Los Angeles. That photo is at 24mm@f2.0, 21sec, iso 2150, Camera was a Sony A99.
 

murps

Rank V
Launch Member

Advocate II

2,309
Denver, CO, USA
First Name
d
Last Name
m
Member #

0711

When I was first getting in to astro photography these website helped me the most.

https://www.lonelyspeck.com/milky-way-exposure-calculator/ is a very quick and easy way of working out the best shutter speed to use with the equipment you own. The whole website is an extremely good resource for astrophotography for beginners.

http://www.photopills.com/academy Photopills is a website and also an APP that is incredibly useful for planning your shots at night. The app is augmented reality for the sun and moon phases and where the Galactic center will be. You can set your location to where the phone currently is using the GPS or you can move the locations around the world and change the time and date so you can plan or see where the sun/moon/galactic center is anywhere around the world at any time. It also tell you sun rise/set times blue/golden hour times The app also has tons of other info from the site but you will need phone signal for it to work. The app isn't cheap but I have found it extremely handy when out exploring.

This one I took with the tripod on the camp table in Joshua Tree NP, I didn't go out there to take photos but it just worked out almost perfectly when I got the photopills app out and it said galactic center was in a good spot and no moon that night, The yellow glow in the bottom right is light spill from Los Angeles. That photo is at 24mm@f2.0, 21sec, iso 2150, Camera was a Sony A99.
That's awesome!
 

PNWExplore

Rank III
Launch Member

Advocate II

628
Bend Oregon
Member #

6881

I love astro photography, such a challenge and very rewarding.

Keys to good astro:
Aperture of at lease f2.8
ISO of at least 1600
At least 35mm wide of Full frame and 18mm wide on Crop sensor

From there you should be able to accomplish a lot
 
  • Like
Reactions: murps

pikeintheboat

Rank I
Launch Member

Traveler I

271
Ellettsville, Indiana
Member #

7978

I am learning to do this too. I have a Nikon D5100. Just got the 35mm lens for it!! Basically you start with longer than normal exposure times. Open the aperture wide to let in more light, and then experiment with ISO to get the exposure correct. My first night shots were of fireworks displays in "Bulb" mode, but the same rules apply to astro-shots. I'm probably echoing some other posters, but you should:
  1. Have a tripod
  2. Have a remote(IR or wireless) for shutter control
  3. Wide angle lens for big sky shots; kit lens should do fine
  4. Time to setup a shot
  5. Notebook to remember your settings
Worry about the artistic stuff later and play with the technique until you get a solid looking shot. Take many shots. Most of all, have fun.

Matt
 
  • Like
Reactions: murps