Member II
- 2,268
- First Name
- Mark
- Last Name
- Tebo
- Member #
-
12262
- Service Branch
- US Army Retired
Converted my Starlink to 12 volts.
If you have one of these things I highly recommend converting it to 12 volts, best part is I didn't cut the Dishy cable so I can still use the Starlink Router.
I used this video as a starting point: Starlink 12 volt Conversion
Parts list I used:
Pelican 1170 Case Pelican 1170 on Amazon
DC 12v to 5v USB C converter 12 volt to 5 volt converter Amazon
GL.iNet GL-MT3000 Router Portable Router Amazon
Dishy cable adapter Dishy Cable Adapter Amazon
Wire Connectors Wire Connectors Amazon
Anderson Powerpole Connector Covers Powerpole Covers Amazon
Powerpole Cable Powerpole Cable Amazon
Powerpole Connector Kit Powerpole Connector Kit Amazon
Powerpole Panel Mount Powerpole Panel Mount Amazon
Boondocker IO Dishy Dualie DC Power Supply Dualie Dishy Adapter
Note the lead time on this component can be long. You can substitute it with the two components below:
12 to 48 volt Converter 12 to 48 Volt Converter Amazon
PoE Injector PoE Injector
When I tested the Starlink contraption this weekend, without the Dishy attached it pulls 3 watts or .25 amps. With the Dishy attached and watching a Youtube video it was 41 watts or a little over 3 amps.
You can't see the router in the app, however as soon as I plugged the antenna into the adapter the antenna unstowed and updated. You do have complete control of the Router logging in as Admin etc.
.25 amps with no Dishy
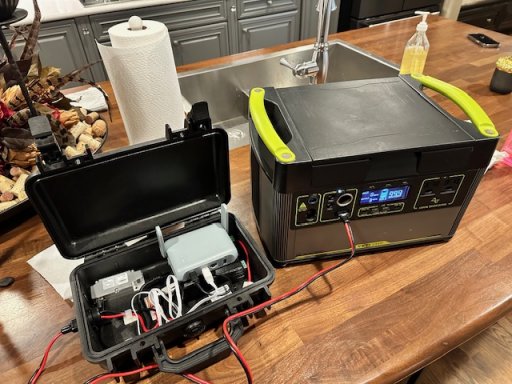
About 3.4 to 3.6 amps with the Dishy and streaming a video
View attachment Starlink Test.MOV
If you have one of these things I highly recommend converting it to 12 volts, best part is I didn't cut the Dishy cable so I can still use the Starlink Router.
I used this video as a starting point: Starlink 12 volt Conversion
Parts list I used:
Pelican 1170 Case Pelican 1170 on Amazon
DC 12v to 5v USB C converter 12 volt to 5 volt converter Amazon
GL.iNet GL-MT3000 Router Portable Router Amazon
Dishy cable adapter Dishy Cable Adapter Amazon
Wire Connectors Wire Connectors Amazon
Anderson Powerpole Connector Covers Powerpole Covers Amazon
Powerpole Cable Powerpole Cable Amazon
Powerpole Connector Kit Powerpole Connector Kit Amazon
Powerpole Panel Mount Powerpole Panel Mount Amazon
Boondocker IO Dishy Dualie DC Power Supply Dualie Dishy Adapter
Note the lead time on this component can be long. You can substitute it with the two components below:
12 to 48 volt Converter 12 to 48 Volt Converter Amazon
PoE Injector PoE Injector
When I tested the Starlink contraption this weekend, without the Dishy attached it pulls 3 watts or .25 amps. With the Dishy attached and watching a Youtube video it was 41 watts or a little over 3 amps.
You can't see the router in the app, however as soon as I plugged the antenna into the adapter the antenna unstowed and updated. You do have complete control of the Router logging in as Admin etc.
.25 amps with no Dishy

About 3.4 to 3.6 amps with the Dishy and streaming a video
View attachment Starlink Test.MOV


