What Did You Do With Your Rig Today?

  • HTML tutorial

RoarinRow

Rank V
Launch Member

Member III

2,771
Elk Grove, CA, USA
First Name
Rolando
Last Name
Nispiros
Member #

17011

Ham/GMRS Callsign
KN6JJS

ryanorr280

Rank V
Launch Member

Member III

1,567
Wewoka, Seminole County, Oklahoma, United States
First Name
Ryan
Last Name
Orr
Member #

22140

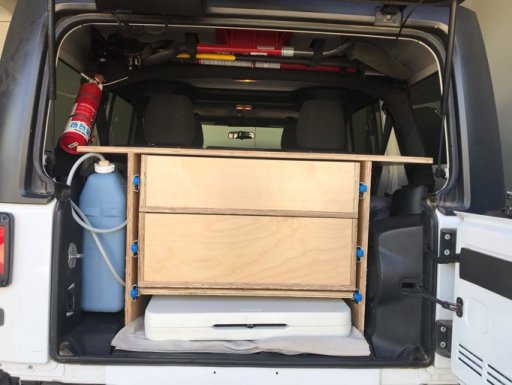
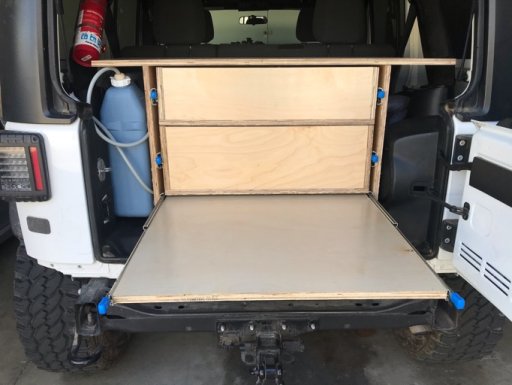
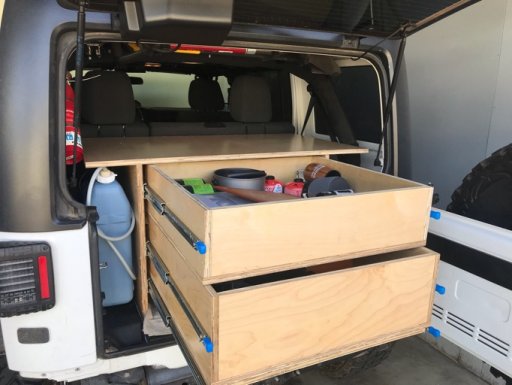
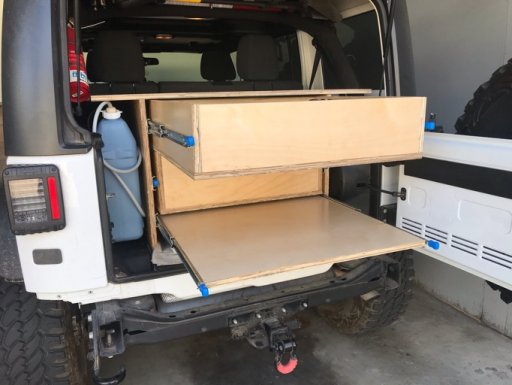
Great mod work! I did something similar, but later just put my tracks into my Thule box like what you have shown. Then I put a rack basket where you have the tracks now.
Thanks, Putting them inside the box was my original plan. But so far I’m telling myself I want a way to mount them without the box since I rarely use it. Only for longer trips.
 
  • Like
Reactions: RoarinRow

RoarinRow

Rank V
Launch Member

Member III

2,771
Elk Grove, CA, USA
First Name
Rolando
Last Name
Nispiros
Member #

17011

Ham/GMRS Callsign
KN6JJS
Thanks, Putting them inside the box was my original plan. But so far I’m telling myself I want a way to mount them without the box since I rarely use it. Only for longer trips.
It's good those track are low profile cause you put them almost anywhere.
 

Enthusiast II

1,250
Hartford, SD
Yes I have been fallowing @Dakota Houligans Bronco Build, it’s the inspiration for mine. I love his dash build, and I have learned a lot from him. I was really impressed with his plastic welding skills and am thinking of trying my hand at it to modify my dash next spring.
As for the frame off... it’s going to happen... but probably after I rebuild the 302 that I’m currently pulling out. I’ll get the engine rebuilt over the winter and put it in storage for next fall. When I pull the engine again, I’ll go ahead and pull the transmission to rebuild and will hopefully have my 203/205 doubler built and ready to install. While everything is out again, I’ll prep the body for paint (worked as a body tech journeyman for several years in my youth, and miss doing body work). Then I’ll send it off to the paint shop to have them separate the body from the frame so I can take the frame to the sand blaster and paint it.
This is my dream at least.
It's a lot of work but I have a lot of support and encouragement from my crazy family that wants to take it to the mountains. Be careful mine started as an engine and axle swap... Then a conversation with the wife and kids and now it is a whole new ball game! But in the end the fun and memories we have with the kids will be worth it all.
 

RubiRigo

Rank V
Launch Member

Traveler III

1,623
Mountain View, CA, USA
First Name
Rodrigo
Last Name
S
Member #

23284

Finished building the drawer system for the Jeep last weekend. It works great and the seats can stay up. I’m very happy with the results and can’t wait to load up and go try it out on our next trip
 

Attachments

RoarinRow

Rank V
Launch Member

Member III

2,771
Elk Grove, CA, USA
First Name
Rolando
Last Name
Nispiros
Member #

17011

Ham/GMRS Callsign
KN6JJS
Finished building the drawer system for the Jeep last weekend. It works great and the seats can stay up. I’m very happy with the results and can’t wait to load up and go try it out on our next trip
Very good build! Wish I had your skills.
 
  • Like
Reactions: RubiRigo

RubiRigo

Rank V
Launch Member

Traveler III

1,623
Mountain View, CA, USA
First Name
Rodrigo
Last Name
S
Member #

23284

Finished building the drawer system for the Jeep last weekend. It works great and the seats can stay up. I’m very happy with the results and can’t wait to load up and go try it out on our next trip
Very good build! Wish I had your skills.
Thank you bud. The hardest part is to get it started. Once you get all your cuts figured out, everything is easygoing. The good news is that it’s only wood and if you mess up, you can still get more and try it again.
 

RoarinRow

Rank V
Launch Member

Member III

2,771
Elk Grove, CA, USA
First Name
Rolando
Last Name
Nispiros
Member #

17011

Ham/GMRS Callsign
KN6JJS
Thank you bud. The hardest part is to get it started. Once you get all your cuts figured out, everything is easygoing. The good news is that it’s only wood and if you mess up, you can still get more and try it again.
I could imagine the planning and measuring involved. Fun stuff for sure.
 
  • Like
Reactions: RubiRigo

rho

Rank V
Launch Member

Member III

2,031
SF bae area
First Name
Juliette
Last Name
Penning
Member #

18700

Ham/GMRS Callsign
AG6YB
Finished building the drawer system for the Jeep last weekend. It works great and the seats can stay up. I’m very happy with the results and can’t wait to load up and go try it out on our next trip
Dude, that looks great!
 
  • Like
Reactions: RubiRigo

M Rose

Local Expert
Mod Team
Member

Advocate III

5,584
Northeast Oregon, United States
First Name
Michael
Last Name
Rose
Member #

20990

Ham/GMRS Callsign
W7FSB
Service Branch
US ARMY Retired
Finished building the drawer system for the Jeep last weekend. It works great and the seats can stay up. I’m very happy with the results and can’t wait to load up and go try it out on our next trip
That looks very nice. I hope to see it in person one day.
 

Highplainsdrifter

Rank II
Launch Member

Contributor III

327
X
First Name
Kevin
Last Name
Pressley
Member #

23932

Today I ordered some Plano containers so l can sort my kitchen supplies and camp gear not the most fun stuff to purchase for the truck but I am in need of more organization
Which Plano containers did you order, and who did you order from ? I tried to order the package of 3- #1919 last week from Amazon but they were out of the three pack. They had a four pack for $169 but I didn't want or need four. Strange thing is Amazon could sell me one (high cost) or four (@ decent cost) but not 3. Does that make sense.
I got the 108Q from Amazon I ordered three separate ones they are grey and have the wheels on one side
 

Boucher

Rank V
Member

Member II

2,011
Maidens, VA, USA
First Name
John
Last Name
Boucher
Member #

14789

Service Branch
Retired USN
Finished my Aux battery install, I used the CTEK 250SA DC to DC charger which feeds my 100 AH battery. This feeds the 3000 Watt inverter, a Switch bank for aux components, and a 12V and USB charge points located on the control panel. I still need to improve the control panel as I feel the plastic was to thin for my needs. I added the battery blue tooth sensor with app but I will prob remove it as my battery went down over 20% since it was installed. I will see how it works when I add the solar panel to the CTEK later in the week.
Wow hooked up the solar panel the CTEK app says its pushing 13.05 Volts been like that past few hours. Rich solar 100 w off amazon for 80 bucks
 

Downs

Rank V
Launch Member

Member III

2,827
Hunt County Texas
First Name
Joshua
Last Name
Downs
Member #

20468

Ham/GMRS Callsign
KK6RBI / WQYH678
Service Branch
USMC 03-16, FIRE/EMS
Had a few days off so got plenty done. Not much in the way of pictures.

XJ:
  1. Inspected for a noise in the rear drums
  2. Readjusted Brake shoes
  3. Replaced battery hold down bolts, when I went to the larger battery the old ones were no longer long enough
  4. Found a nail in the front passenger tire. The CJ frame is currently blocking the mounting base for my tire changer

CJ:
  1. Painted some more odds and ends
  2. Got the Tcase finished with exception of the shift shaft seals, all I needed was the thinnest shim in the new pack of shims to get within spec ha. Amazon dropped the ball on the seals and lost them so had to reorder.
  3. Rear driveshaft rebuilt with new slip yoke
  4. Replaced Valve Cover gaskets. Engine is a little sludgy. More than I would like but I'm going to ride it till it won't go anymore. Compression is still alright.
  5. Got the clutch linkage rebuilt
  6. Steering gearbox mounted back on the frame
  7. Remounted the headers
  8. Reconnected the exhaust
  9. Replaced the ancient spark plugs
  10. Remounted the carburetor
  11. Started trying to reverse the hack job one of the previous owners did with all the emissions gear.
  12. Put the sending unit and new seal on to the gas tank
Not as much as I was hoping to get done but made some decent progress on getting the frame/drivetrain where I want it before I start messing with the tub. The tub/body I'm not super concerned with. I'm going to make it look decent but I'm not going for a show Jeep so I'm hoping that after I get all this squared away I'll be picking up speed towards a basic completion.
 

GEARS

Rank V
Launch Member

Enthusiast III

2,191
Cincinnati
First Name
Mr
Last Name
Fabulous
Member #

9496

Hello all, my post likely belongs in the camp kitchen forum but I thought more people would see it here (mods feel free to move it). I've been tinkering with a compact and easy to clean camp stove setup. This is made from stainless steel and will work with a wood fire or butane stove. Its also sturdy enough to hold up cast iron cookware and quite windproof with the extra baffle installed. I'll be using a snowpeak stove instead of the one in the photos. Its got a much more dispersed flame. Maybe it will give you all some ideas, have a great day.

IMG_20200930_194845783.jpgIMG_20200930_194451751_20200930_200300.jpgIMG_20200930_194757342.jpgIMG_20200930_194741551.jpgIMG95202009309519462139595HDR_20200930_200210.jpgIMG952020093095194712980_20200930_200145.jpg