Suburban Rebellion - Go Big or Go Home - 2013 Suburban Build

  • HTML tutorial

UtahRnr

Rank II

Enthusiast III

473
Utah
2. Dual Battery Setup

So I spent a long time looking at options for the dual battery setup before settling on the hardware I picked. Some of the things that went into consideration were:

-Override switch for the House battery as a backup to ‘jump start’ a drained main battery

-Separate House electrical system for added accessories to not drain the main battery

- Override switch for the House battery to support the start battery / alternator for high current demand winching (the one accessory planned to connect directly to the main battery

-Ability for House battery to handle long term current drain w/o charging ie refrigerator, inverter, lights, etc.

-Ability to incorporate a solar charging system in the future future


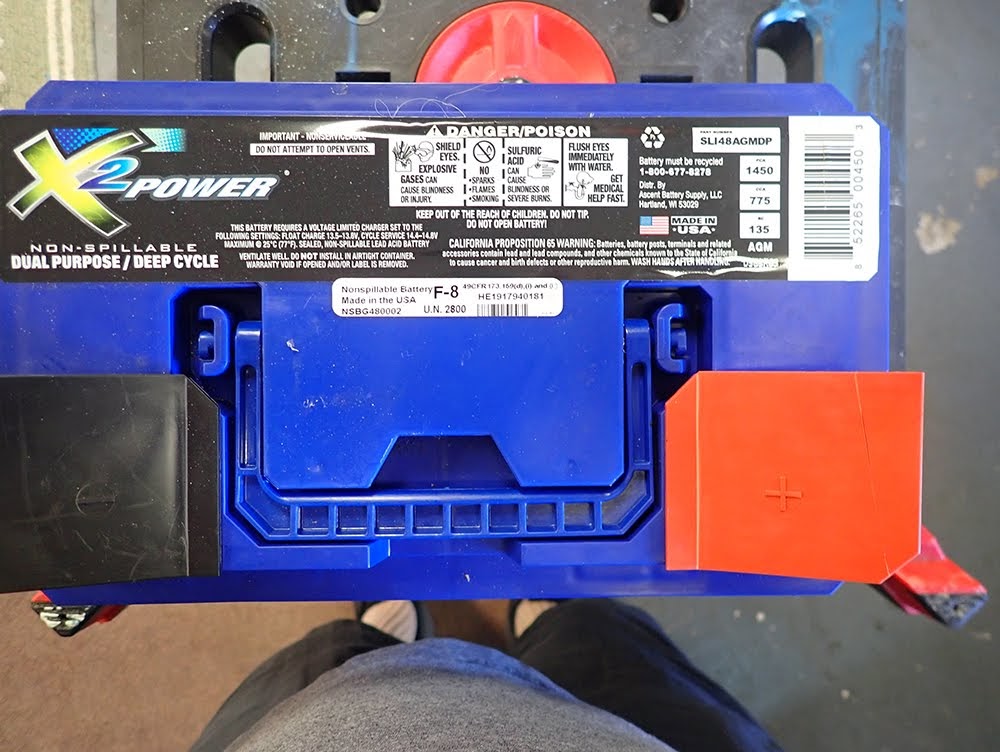
Battery Selection – I went with an AGM battery from Batteries Plus (made by NorthStar). It comes with a 60 month replacement warranty and will handle both high current starting and tolerate deep cycle discharges. It has a 69 AH capacity in the stock Group 48 size.


GM was nice enough to leave the driver front battery tray in place when they moved the Main battery back to the passenger firewall location for later year Suburbans. So all I needed was an $8 hold-down from the Chevy dealer and a bolt.

Here’s the stock second battery tray. Thanks GM!


So let’s get everything else together:

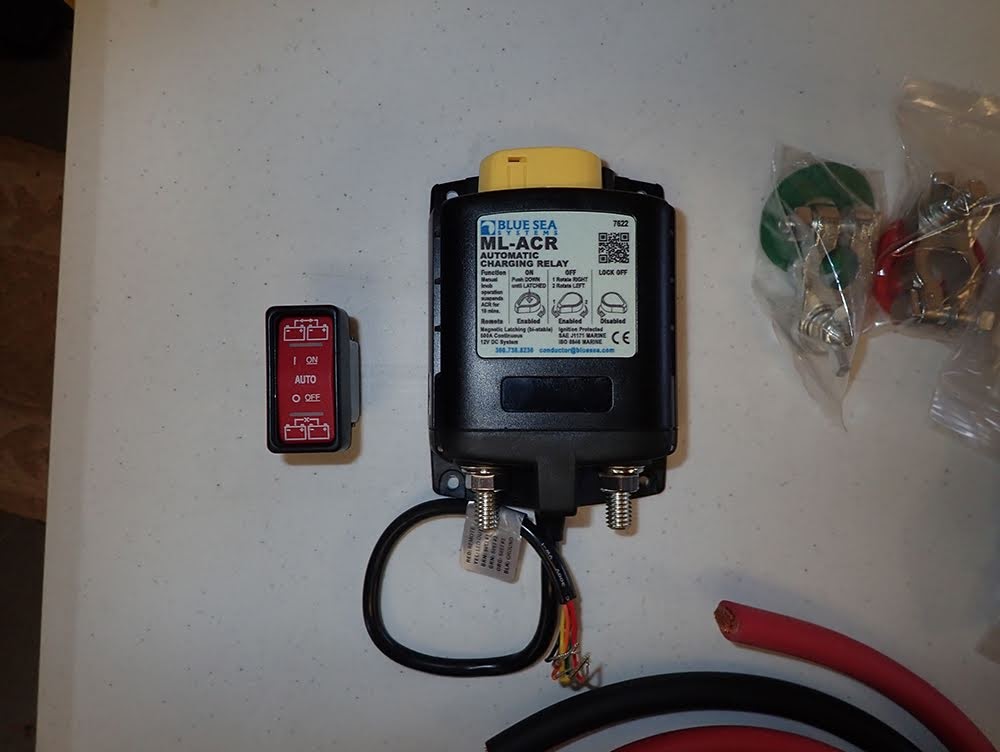
10 ft x 2 (Black and Red) 1/0 Welding Cable

Blue Sea ML ACR (Magnetic Latch Automatic Charging Relay)

200 A ANL Fuse Holder / Fuse

Battery Terminals

Shrink Tubing

Copper 1/0 terminal connectors

Hydraulic Crimping Tool (I highly recommend you use this or get pre-made cables)

Battery Hold down

Misc tools


The Blue Sea ML ACR was selected for several reasons. It has a high 500 A capacity rating on the relay. It automatically senses charging voltages on either circuit and closes the relay to connect the batteries after the charging voltage is sensed for 30 seconds. This delay gives the alternator a chance to bring back up the start battery without overloading it with a discharged house batteries. It has a low voltage sensor that will keep the batteries isolated with certain low voltage conditions. It has a manual override lever directly on top of the relay to either lock out the relay or force it to engage. It also has a remote switch that can be mounted in the cab to perform the same override functions.


1/0 Welding cable was used to connect the two battery’s positive terminals with the fuse and relay placed in line. The 200 A ANL Fuse for the new House battery was mounted on the fender wall next to the main fuse block. This keeps it close to the House battery that it’s protecting. It also is convenient for future power connections on the House circuit.


The House battery ground was connected to the stock grounding point for the second battery on the engine block.


Selecting a good spot for the ML ACR was a bit more difficult. I finally settled on the fender wall next to the Main battery. It gets some protection there but still offers easy access to the override lever.

***IMPORTANT NOTE: You can see below that when the new cable is routed to the firewall, it gets real close to the hing location when closed. I had to zip tie the cabling down tight near the battery tray to keep it from being hit by the hinge mechanism.


The positive 1/0 cable is connected to the Main Battery directly at the fuse terminal mounted on the positive battery terminal.


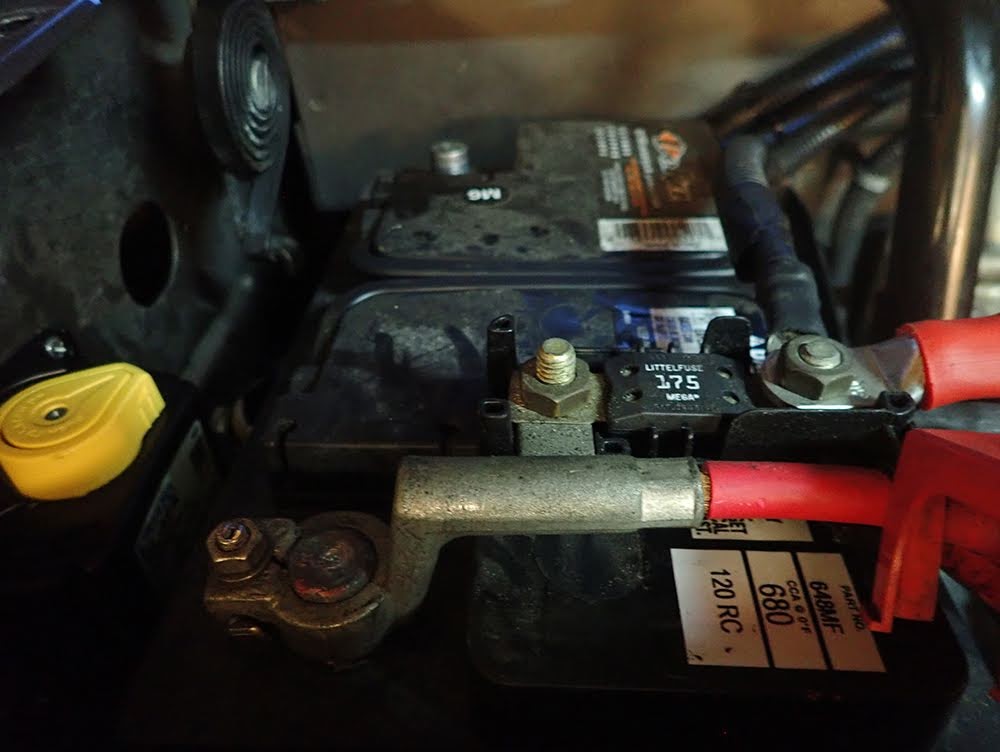
Here’s the finished Relay and cabling next to the Main battery.

Clever placement!
 

DrRobert

Rank III
Launch Member

Enthusiast III

646
Bristow, VA
Member #

11858

I am just now revisiting this thread but wish I had paid more attention a year ago. There isn't nearly enough Suburban overlanding discussion in the forums (or if there is, I'm missing it).

I ended up going with the Fabtech K1019 6" lift because that was the only kit I could find that would work with the Z22 autoride that the LTZ has as stock. I didn't originally want to go that high because I'm not rock crawling with this but really only needed a few extra inches of clearance on some of the forest service and fire roads I travel on. I paired this with the 20x9 XD Monster 778 and 295/55/20 Nitto Ridge Grapplers. These tires do great on highway and do not add much to road noise. Like one of the other posters here, I was concerned about that. The lift and tires have performed great in a wide variety of snow, mud and poor-to-lousy roads.

For my winch setup, I ended up getting the WARN Trans4mer system brush guard along with the winch carrier and then got the WARN Zeon 12S. I've really come to love that winch. The trans4mer brush guard has worked well, IMO. My only disappointment with the Trans4mer system brush guard is the recovery points are half-hooks instead of a full shackle. It works but I'm investigating other solutions.

I have a Smittybuilt safari-basket style roof rack which I use a lot because I'm usually transporting a handful of people and all their gear. I've paired that with a Raingler webbing cargo net which has been fantastic. I heard some less-than-favorable comments about the Smittybuilt rack, but it's worked great for me and it hasn't chipped or rusted. It's proved to be quite versatile.

On one side of the roof rack, I mounted an ARB aluminum touring awning (#814405) and the Kit 5 quick release brackets. I bit the bullet and also eventually got the ARB Deluxe awning room with floor (#813108A) and haven't regretted it for a minute. That thing has been wonderfully useful.

Pics attached of the exterior mods.

20201211_144915.jpg

20201211_135950.jpg

20201211_144915.jpg
20201230_145507.jpg

20201216_124356.jpg

Overall, I feel like the mods do what I need them to and have been happy with the changes. I still have all the room I can possibly want for all the gear and people with all the comforts a Suburban provides but can also get it dirty in the backcountry.
 

FXTPhoto

Rank 0

Contributor I

60
Baltimore, MD, USA
First Name
Frank
Last Name
Tiralla
Hi, love your post. I have an 07 and I'm looking at converting mine over to an overland vehicle. Looking forward to following you build.

I currently have 285/70/17 with a leveling kit (2.5" front, 1.5" rear.

Trying to figure out what to add next. Will likely be battery or bumper.
 
  • Like
Reactions: DrRobert

DrRobert

Rank III
Launch Member

Enthusiast III

646
Bristow, VA
Member #

11858

Hi, love your post. I have an 07 and I'm looking at converting mine over to an overland vehicle. Looking forward to following you build.

I currently have 285/70/17 with a leveling kit (2.5" front, 1.5" rear.

Trying to figure out what to add next. Will likely be battery or bumper.
Depending on what you're doing, I would suggest the battery. I've found a lot more utility when out camping in having a battery backup than utility of the bumper. The exception to that rule is that the brush guard on the bumper houses the winch and that's been very useful for moving fallen trees out of the way. I'm on the east coast so that's a recurring issue. If you're thinking about armoring the bumper, that's a big step up and suggests you're taking the full-size into some pretty rough terrain. An armored bumper is pretty heavy on a Suburban, too. But I bet it will look cool! LOL... Good luck and send pics!
 

MajorIdaho

Rank 0

Contributor I

60
Boise, ID, USA
First Name
Marshall
Last Name
Major
OK, so it's time to kickoff this epic Suburban build thread. I've been putting it off for too long.
There needs to be more love out there for Fullsize Overland rigs; so let's get the party started.
But first a little perspective is in order...

The Truck: She's a sweet little 2013 Suburban 1500 LTZ - 4wd, with all the bells and whistles that has been my highway queen for work for the past umpteen thousand miles without any complaints (at least until the past year which is part of the story). My last driver was a 2008 4Runner that I drove the wheels off until trading it in for the Suburban. I had an ulterior motive at the time which was several driving trips with the family (+ dogs) so I was looking for the space. Well the Suburban really delivered as the ultimate highway queen and I fell in love immediately.

Fast forward September, 2018, and I've spent the last year planning my next offroad explorer which would be a 2018 4Runner. Oh, the hours I spent watching videos and reading reviews and forum posts to plan out the build. I had the 4Runner build nailed down. I even talked to several local shops to lineup the work. Then came the fateful day I drove the Suburban into to Toyota dealership to talk with the salesman I've dealt with in the past to have him start looking for the exact options I was looking to buy in the next month. Well that didn't go unnoticed...


To keep it short, let's just say engine light at 137k miles - oil pressure range... in the shop... %#%^$@&&&@@... new engine with 100,000 mile warranty. Well, let's think twice about that trade-in for a 4Runner.

And that's where she started whispering sweet nothings in my ear...
"If you look under my hood, you'd see the second battery tray the factory graciously installed for you."
"You forgot about the factory locker they put in my rear differential."
"If you push that button on the door, I'll blow cold snowflakes on your backside all day long."
"You know I have 8 cylinders and if you push that Tow/Haul button on the shifter, I'll actually move like I should."
... on and on and on...

And so here we go. We go big or we go home!
The 2013 Suburban LTZ build has started and we're on a roll.
Here's the baseline:


If you need some motivation to read this thread, here it is...


So first up is Tires, Wheels, and a Lift...
More soon to follow.

Edit 12/10/2018:
General Roadmap -
1. Capable A/T tires, new wheels and a small lift (~3")... done
2. Dual Battery setup - add new accessories (lights, air compressor, etc.) off house battery ... done
3. Front Bumper with integrated winch and recovery points. Improved wheel clearance and approach angles... done
4. Rock sliders to replace the factory plastic sidestep.
5. Rear bumper with improved wheel clearance, departure angle, integrated swing out spare holder, etc. (this one's going to be tough)
6. Roof rack sufficient for potential RTT in the future.
7. Rear drawer storage system with sleeping platform.
8. Coms - Ham radio, GMRS, CB...
.
.
.
We'll see where it goes from there.
Current build:

Thanks for the post. This is great. Would you mind updating and letting us know how it is going, what you like and what you would do differently? Also, did you ever do the Rear drawer storage system with sleeping platform?

Thanks!
 

kilby

Rank III
Launch Member

Enthusiast III

646
Rox Park Colorado
First Name
Joel
Last Name
Kilby
Member #

20682

2. Dual Battery Setup

Blue Sea ML ACR (Magnetic Latch Automatic Charging Relay)

200 A ANL Fuse Holder / Fuse

The Blue Sea ML ACR was selected for several reasons. It has a high 500 A capacity rating on the relay. It automatically senses charging voltages on either circuit and closes the relay to connect the batteries after the charging voltage is sensed for 30 seconds. This delay gives the alternator a chance to bring back up the start battery without overloading it with a discharged house batteries. It has a low voltage sensor that will keep the batteries isolated with certain low voltage conditions. It has a manual override lever directly on top of the relay to either lock out the relay or force it to engage. It also has a remote switch that can be mounted in the cab to perform the same override functions.

Hey, thanks for the dual battery parts list! I did the cheap dual battery mod in my 99 suburban. Looking to use some nicer parts in my '16 Sierra because the Cole Hersee piece I used in the '99 just broke after only about 18 months. I think the Blue Sea solenoid is exactly what I need!