
Enthusiast III
It’s very rare that we have problems fitting all of our gear in the back of our little crossover but, with everything stacked up back there it becomes quite a chore to dig everything out just to get one thing out of the crate that is inevitably at the bottom of the pile. I decided that a shelf of some kind would be very helpful, at least to keep things that require continuous easy access like clothes duffels, food, etc. separate from the crates that really only come out when we set up camp.
Of course, Subaru doesn’t offer anything remotely like this.
My first attempt was a sort of frame made of t-slot extrusions with a platform on top.
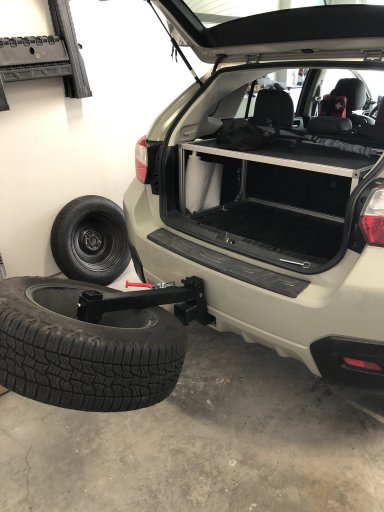
It bolted into holes in the replacement floor that I had already built and installed. My plan was originally to have it evolve into a sort of drawer system but the Crosstrek has a 3” or so lip between the cargo floor and hatch opening so I decided that to make drawers to clear the opening would be a waste of vertical space. I then planned to put a slide-out surface on the underside of the platform but the whole thing never really felt sturdy enough for me to be confident in that. In addition, the thing requires tools to install/remove and needed to have its dozens of tiny bolts constantly tightened with two different sizes of Allen wrench or it would wobble and rattle.
I’ve disassembled it and stored the pricey parts for a future project. This brings us to v2!
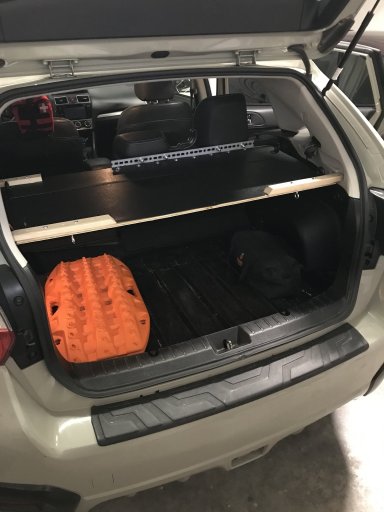
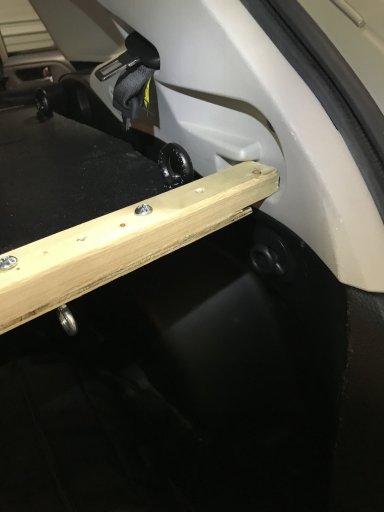
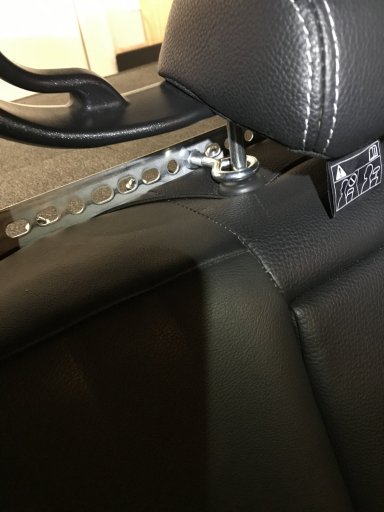
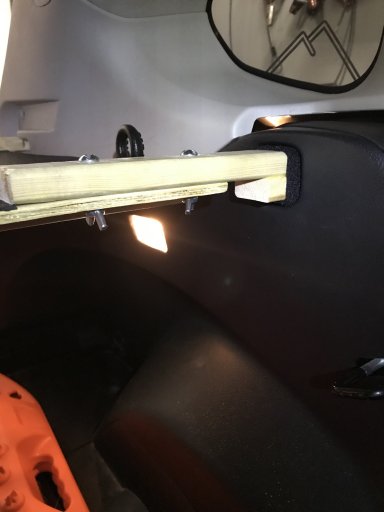
Made out of some spare plywood, this shelf slots into the little tracks for the factory canvas cargo cover and is secured by eye bolts to the prongs of the rear headrests, which feel hefty enough to take some load. There’s another removable beam securing the driver’s side corner to the cargo cover slot because we travel with that seat flipped down to hold our cooler. It’s lighter, simpler, and feels sturdier than the aluminum one and takes up less space. I can install or remove it in minutes without tools and, unlike v1, can be stored inside the car if I have an unexpected need to reconfigure. There are FrontRunner tie down rings in each corner and I covered the whole top in 1mm hair cell ABS plastic. It looks a little rough but I think it’ll work well. The most it will likely need to hold is a duffel of clothes or 2 and maybe a grocery bag of food, what’s important is that it elevates all that so we won’t need to move it all to get to the camp crates. Also, even if you count the initial cost of the wood that I had lying around it cost me less than $50 so it won’t break my heart if it fails in any way.
I know it might have made it stronger if I’d done a longer 1 piece crossbeam below the platform but I’m happy with the extra inch or so of of space I gained by flipping it and the beams holding it up are held in by 3 wood screws and 2x 1/4” bolts with washers each. I also feel better having the platform below the back of the seat instead of at back-of-neck level in the event of a collision for any (infrequent) passengers.
Any thoughts? I hope this was helpful if anyone wants to try something similar.
Of course, Subaru doesn’t offer anything remotely like this.
My first attempt was a sort of frame made of t-slot extrusions with a platform on top.

It bolted into holes in the replacement floor that I had already built and installed. My plan was originally to have it evolve into a sort of drawer system but the Crosstrek has a 3” or so lip between the cargo floor and hatch opening so I decided that to make drawers to clear the opening would be a waste of vertical space. I then planned to put a slide-out surface on the underside of the platform but the whole thing never really felt sturdy enough for me to be confident in that. In addition, the thing requires tools to install/remove and needed to have its dozens of tiny bolts constantly tightened with two different sizes of Allen wrench or it would wobble and rattle.
I’ve disassembled it and stored the pricey parts for a future project. This brings us to v2!

Made out of some spare plywood, this shelf slots into the little tracks for the factory canvas cargo cover and is secured by eye bolts to the prongs of the rear headrests, which feel hefty enough to take some load. There’s another removable beam securing the driver’s side corner to the cargo cover slot because we travel with that seat flipped down to hold our cooler. It’s lighter, simpler, and feels sturdier than the aluminum one and takes up less space. I can install or remove it in minutes without tools and, unlike v1, can be stored inside the car if I have an unexpected need to reconfigure. There are FrontRunner tie down rings in each corner and I covered the whole top in 1mm hair cell ABS plastic. It looks a little rough but I think it’ll work well. The most it will likely need to hold is a duffel of clothes or 2 and maybe a grocery bag of food, what’s important is that it elevates all that so we won’t need to move it all to get to the camp crates. Also, even if you count the initial cost of the wood that I had lying around it cost me less than $50 so it won’t break my heart if it fails in any way.
I know it might have made it stronger if I’d done a longer 1 piece crossbeam below the platform but I’m happy with the extra inch or so of of space I gained by flipping it and the beams holding it up are held in by 3 wood screws and 2x 1/4” bolts with washers each. I also feel better having the platform below the back of the seat instead of at back-of-neck level in the event of a collision for any (infrequent) passengers.
Any thoughts? I hope this was helpful if anyone wants to try something similar.


