Service bed to overland trailer
- Thread starter WJ Overland
- Start date
You are using an out of date browser. It may not display this or other websites correctly.
You should upgrade or use an alternative browser.
You should upgrade or use an alternative browser.


Member III
View attachment 229329
Amazing work.
Curious on the overall weight, I've been looking into doing something similar but with an Aluminum service bed. (If I can find one)
Sorry for the delay.
I have not had it weighed completed but I did weight items and materials as I built it. I am estimating the loaded/wet weight to be 2200-2400.
I can say I have seen an aluminum service bed, but they could be out there. I tow with a 02 Jeep Grand Cherokee or a Jeep Gladiator with no problem. Off road trails have been pretty mild, but have had no issues.
Good luck on your build. I had a blast doing this one. Will probably be building a square drop out of aluminum square tube and sandwich foam wall panels this winter. We'll see how it goes.
Member III
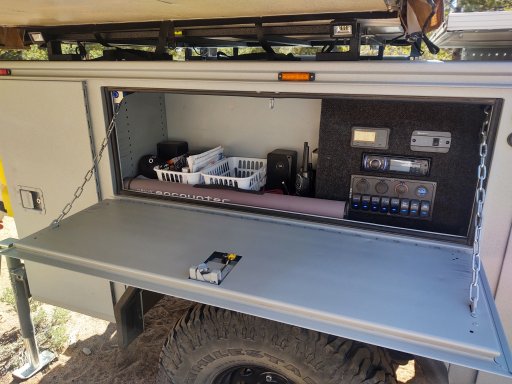
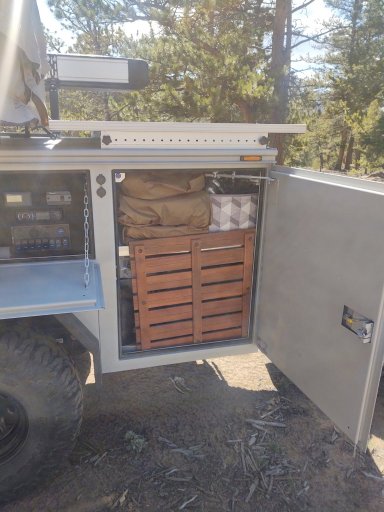
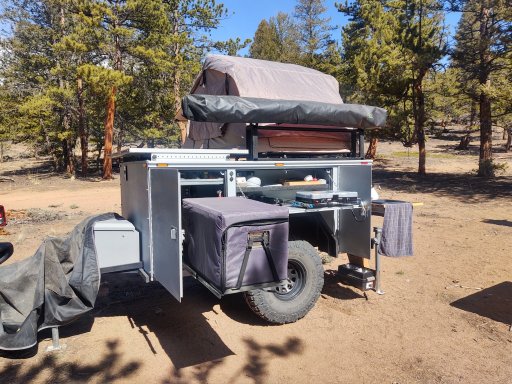
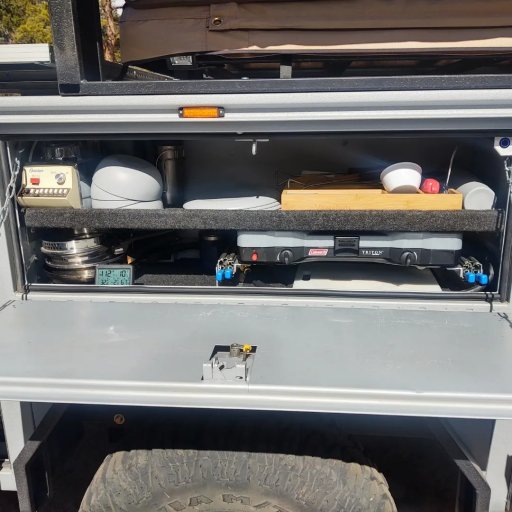
It has been a while since I posted some updates. Pics are of the cabinets loaded with pretty much everything we take, literally "and the kitchen sink". Have a diesel heater, works good so far up to 9700ft. Will probably be testing it soon at 11000ft and hopefully it will still keep us warm! . I did add a mount and 270 awning. Have not opened it yet, been crazy windy this spring and would rather not turn the trailer into an airplane. Also added a teak platform for when showering. Don't want to get our feet muddy.
Attachments


Member III
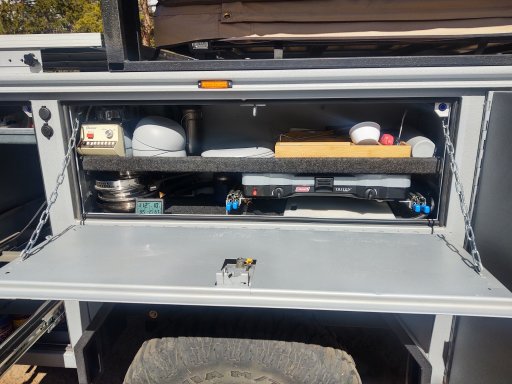
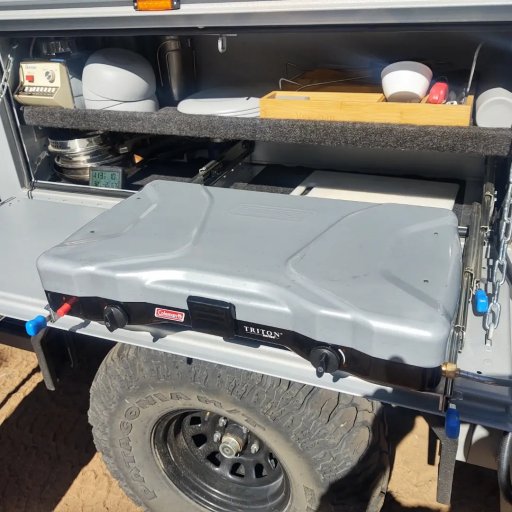
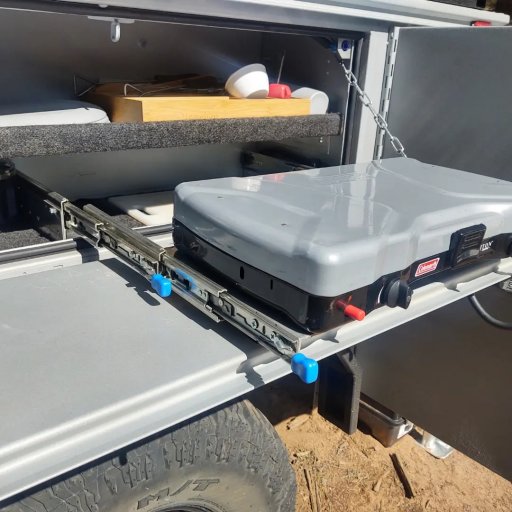
Build a double slider for the cooktop. Keeps the unit from bouncing around on the trails. Sets up very quickly. Just pull out and connect the gas line and your ready to start cooking. Worked great last weekend and even added a little more storage underneath.
Attachments
Member III
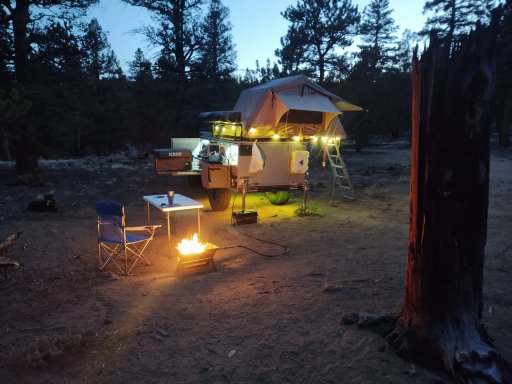
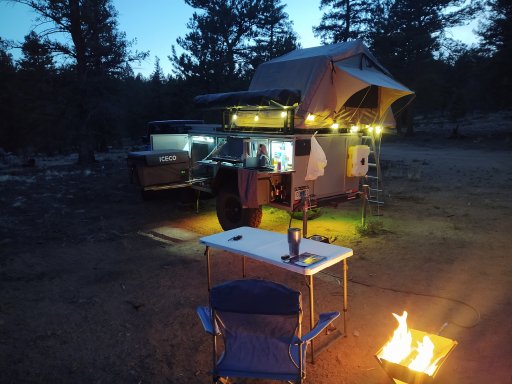
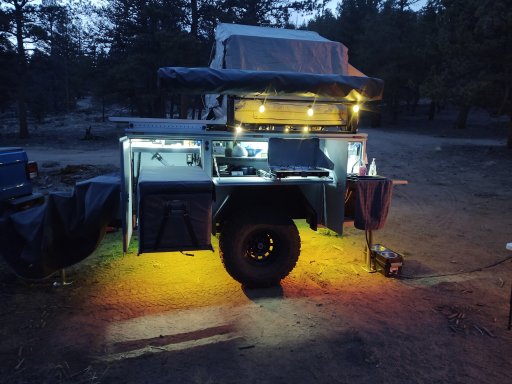
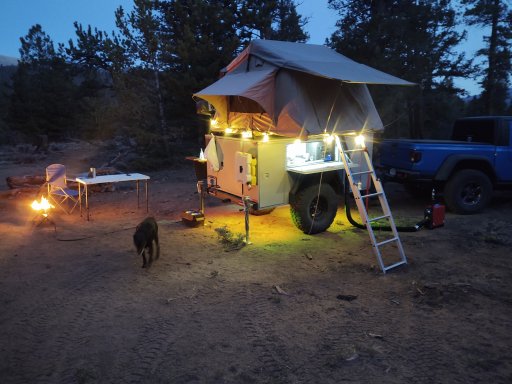
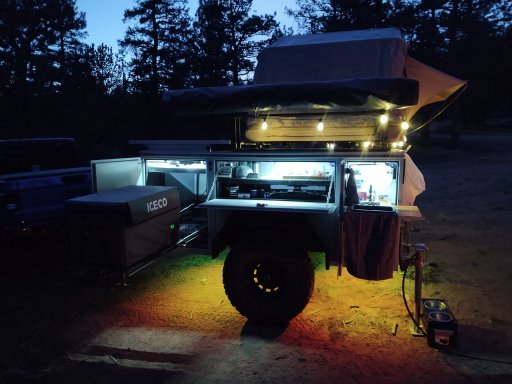
Here a a few pictures with everything lit up at night. Plenty of light to cook, cleanup, and sit out visiting or playing games. The under trailer lights can change color, but we usually leave them on yellow for the bugs.
Now it just needs to warm-up around here to be able to sit outside more and enjoy everything!
Now it just needs to warm-up around here to be able to sit outside more and enjoy everything!
Attachments
A BLENDER!! Do you have some umbrella toothpicks in there too!?! HAHA LOVE IT!
Amazing build! Gonna be a good summer for you!
Amazing build! Gonna be a good summer for you!
Member III
A BLENDER!! Do you have some umbrella toothpicks in there too!?! HAHA LOVE IT!
Amazing build! Gonna be a good summer for you!
There is always room for umbrella toothpicks!
Member III
Another question. So I assume those lights are the roll LED's that have the remote control and change colors, correct? Did you cut them into different lengths? If so how did you add them to the power/remote controller?
There are several different lights. The led lights in the cabinets are 10" long and just plain white led with each cabinet having individual push button to turn on. The led string "bulb" lights are USB patio lights that get strung at camp and plugged in to a USB plug on either side of the trailer. The led "colored" lights are 6 rock lights that are mounted on the frame and the cables are ran into the "electrical" cabinet over the passenger wheel. The controller is mounted behind the radio/switches and connected to a fuse panel and switch. When I turn the switch on, I can then control those lights through an app on my phone. Hope this answers your questions.
Got it!There are several different lights. The led lights in the cabinets are 10" long and just plain white led with each cabinet having individual push button to turn on. The led string "bulb" lights are USB patio lights that get strung at camp and plugged in to a USB plug on either side of the trailer. The led "colored" lights are 6 rock lights that are mounted on the frame and the cables are ran into the "electrical" cabinet over the passenger wheel. The controller is mounted behind the radio/switches and connected to a fuse panel and switch. When I turn the switch on, I can then control those lights through an app on my phone. Hope this answers your questions.
Can you control the rock lights independently? And if so what kind of lights are they?
I have 4 locations I would like to have colored lights. And ideally I would be able to control them independently. If not I can at least put switches on them to be able to turn them off if I do not want that light on. They would all be the same colors though. But it would be really cool to have the lights on the other side of the tent red while the kitchen is still a white light while we are using it for instance.
Member III
Got it!There are several different lights. The led lights in the cabinets are 10" long and just plain white led with each cabinet having individual push button to turn on. The led string "bulb" lights are USB patio lights that get strung at camp and plugged in to a USB plug on either side of the trailer. The led "colored" lights are 6 rock lights that are mounted on the frame and the cables are ran into the "electrical" cabinet over the passenger wheel. The controller is mounted behind the radio/switches and connected to a fuse panel and switch. When I turn the switch on, I can then control those lights through an app on my phone. Hope this answers your questions.
Can you control the rock lights independently? And if so what kind of lights are they?
I have 4 locations I would like to have colored lights. And ideally I would be able to control them independently. If not I can at least put switches on them to be able to turn them off if I do not want that light on. They would all be the same colors though. But it would be really cool to have the lights on the other side of the tent red while the kitchen is still a white light while we are using it for instance.
The 6 rock lights work together as one, so no on being able to be independent. I understand your thought of using a switch on each one, but I would be concerned that is would loose the connection with the controller and may not work. I think I have seen rock lights with only 4 lights, so you might try just using a smaller setup, 1 set of lights and controller for one side and another set on lights and controller for the other side. That might be the best option. If you were going to keep the same colors all the time, then maybe just install red one on 1 side and white one for the kitchen and switch them independently like normal. That would simply it. I think I have even seen some lights that have 2 colors, so that might be an option as well. Amazon has pretty much anything you can think of.
Yeah, the switches would have to go inline AFTER the controller. I am about to hit the order button on amazon. I added RGB 4 pin extension wire and a connector kit that has every type of connector you can think of. I like the idea to turn them all yellow for the bugs as well. I am going for it, I think I can make the 4 zones work with switches. I will let you know how it goes!The 6 rock lights work together as one, so no on being able to be independent. I understand your thought of using a switch on each one, but I would be concerned that is would loose the connection with the controller and may not work. I think I have seen rock lights with only 4 lights, so you might try just using a smaller setup, 1 set of lights and controller for one side and another set on lights and controller for the other side. That might be the best option. If you were going to keep the same colors all the time, then maybe just install red one on 1 side and white one for the kitchen and switch them independently like normal. That would simply it. I think I have even seen some lights that have 2 colors, so that might be an option as well. Amazon has pretty much anything you can think of.
Just found a rabbit hole. If you go to superbrightleds.com they have every type of connector and controller you can imagine. I could totally make 4 zones with independent colors/dimming if I wanted to build it myself. Sorry for the post overload and I will now stop hijacking your thread about your sick ass trailer.
Member III
Just found a rabbit hole. If you go to superbrightleds.com they have every type of connector and controller you can imagine. I could totally make 4 zones with independent colors/dimming if I wanted to build it myself. Sorry for the post overload and I will now stop hijacking your thread about your sick ass trailer.
LOL. Not a problem. Good luck with yours and enjoy the build.

Enthusiast III
It has been a while since I posted some updates. Pics are of the cabinets loaded with pretty much everything we take, literally "and the kitchen sink". Have a diesel heater, works good so far up to 9700ft. Will probably be testing it soon at 11000ft and hopefully it will still keep us warm! . I did add a mount and 270 awning. Have not opened it yet, been crazy windy this spring and would rather not turn the trailer into an airplane. Also added a teak platform for when showering. Don't want to get our feet muddy.
Can you tell me more about that sink basin and how it attaches? It looks like it's wider than the door and appears like it slides in from the side?
I just picked up a similar utility bed on a Toyota pickup frame and your build is amazing. Very inspiring, thank you!
Last edited:
Member III
It has been a while since I posted some updates. Pics are of the cabinets loaded with pretty much everything we take, literally "and the kitchen sink". Have a diesel heater, works good so far up to 9700ft. Will probably be testing it soon at 11000ft and hopefully it will still keep us warm! . I did add a mount and 270 awning. Have not opened it yet, been crazy windy this spring and would rather not turn the trailer into an airplane. Also added a teak platform for when showering. Don't want to get our feet muddy.
Can you tell me more about that sink basin and how it attaches? It looks like it's wider than the door and appears like it slides in from the side?
I just picked up a similar utility bed on a Toyota pickup frame and your build is amazing. Very inspiring, thank you!
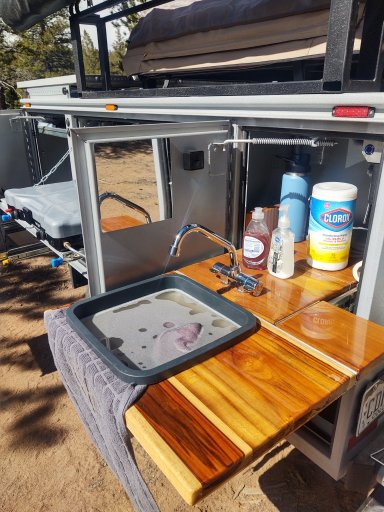
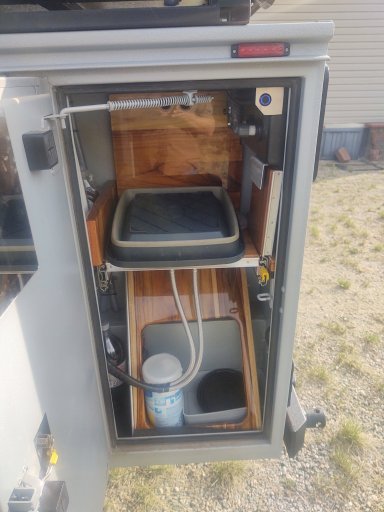
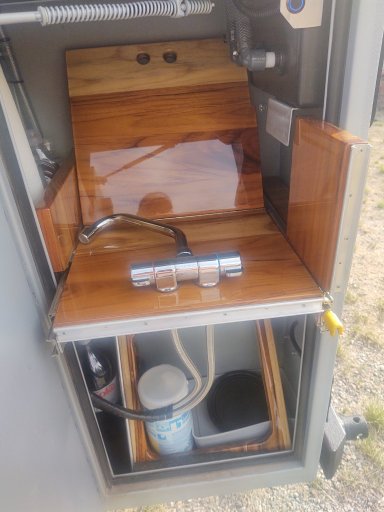
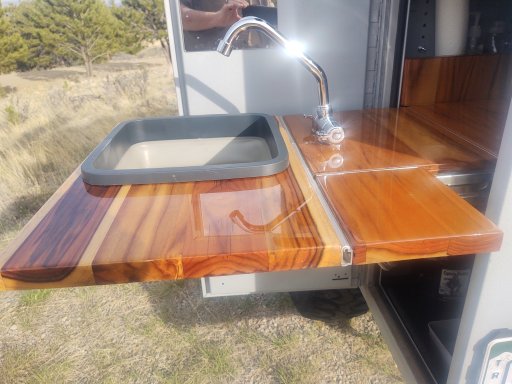
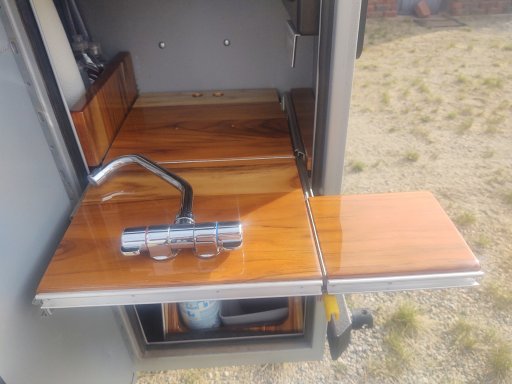
The countertop is mounted on sliders and hinges. It slides out and the "wings" drop down. The countertop that holds the sink countertop attaches to the other part with a "J mount". The sink is a collapsible type and just sets in the hole. It took a little bit to figure out and did it by CAD, "cardboard aided design"!
Hope this answers your questions and is a little more clearer.
Attachments


Enthusiast III
It has been a while since I posted some updates. Pics are of the cabinets loaded with pretty much everything we take, literally "and the kitchen sink". Have a diesel heater, works good so far up to 9700ft. Will probably be testing it soon at 11000ft and hopefully it will still keep us warm! . I did add a mount and 270 awning. Have not opened it yet, been crazy windy this spring and would rather not turn the trailer into an airplane. Also added a teak platform for when showering. Don't want to get our feet muddy.
Can you tell me more about that sink basin and how it attaches? It looks like it's wider than the door and appears like it slides in from the side?
I just picked up a similar utility bed on a Toyota pickup frame and your build is amazing. Very inspiring, thank you!
The countertop is mounted on sliders and hinges. It slides out and the "wings" drop down. The countertop that holds the sink countertop attaches to the other part with a "J mount". The sink is a collapsible type and just sets in the hole. It took a little bit to figure out and did it by CAD, "cardboard aided design"!
Hope this answers your questions and is a little more clearer.
Thank you, that makes sense. How did you adhere the slide to the wings? Screws? And it feels good and sturdy?
What jacks did you use for leveling?
Last edited:
Member III
It has been a while since I posted some updates. Pics are of the cabinets loaded with pretty much everything we take, literally "and the kitchen sink". Have a diesel heater, works good so far up to 9700ft. Will probably be testing it soon at 11000ft and hopefully it will still keep us warm! . I did add a mount and 270 awning. Have not opened it yet, been crazy windy this spring and would rather not turn the trailer into an airplane. Also added a teak platform for when showering. Don't want to get our feet muddy.
Can you tell me more about that sink basin and how it attaches? It looks like it's wider than the door and appears like it slides in from the side?
I just picked up a similar utility bed on a Toyota pickup frame and your build is amazing. Very inspiring, thank you!
The countertop is mounted on sliders and hinges. It slides out and the "wings" drop down. The countertop that holds the sink countertop attaches to the other part with a "J mount". The sink is a collapsible type and just sets in the hole. It took a little bit to figure out and did it by CAD, "cardboard aided design"!
Hope this answers your questions and is a little more clearer.
Thank you, that makes sense. How did you adhere the slide to the wings? Screws? And it feels good and sturdy?
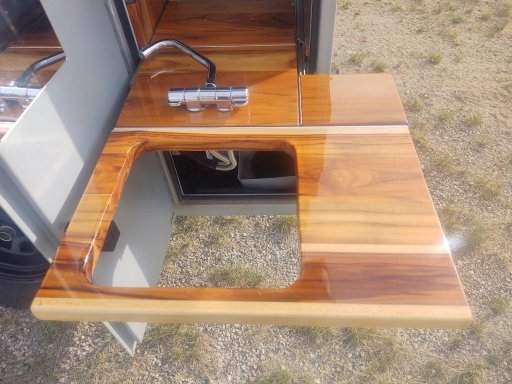
I used aluminum angle and screws to attach the main countertop to the slides. The wings (rear and right side), are attached with piano hinges and wood screws. Everything is very solid and can hold any pans, dishes and a sink full of water. I would estimate the whole thing can hold probably 15-20lbs.
I bought the collapsible sink last year on Amazon. I wanted to get another one to add a hole for a hose that I could run 20' away from camp to drain water through but now they don't sell them. So, I will either go without or try to find another the same size. It is 12.4"x12.4". Guess I should have brought 2!
Member III
It has been a while since I posted some updates. Pics are of the cabinets loaded with pretty much everything we take, literally "and the kitchen sink". Have a diesel heater, works good so far up to 9700ft. Will probably be testing it soon at 11000ft and hopefully it will still keep us warm! . I did add a mount and 270 awning. Have not opened it yet, been crazy windy this spring and would rather not turn the trailer into an airplane. Also added a teak platform for when showering. Don't want to get our feet muddy.
Can you tell me more about that sink basin and how it attaches? It looks like it's wider than the door and appears like it slides in from the side?
I just picked up a similar utility bed on a Toyota pickup frame and your build is amazing. Very inspiring, thank you!
The countertop is mounted on sliders and hinges. It slides out and the "wings" drop down. The countertop that holds the sink countertop attaches to the other part with a "J mount". The sink is a collapsible type and just sets in the hole. It took a little bit to figure out and did it by CAD, "cardboard aided design"!
Hope this answers your questions and is a little more clearer.
Thank you, that makes sense. How did you adhere the slide to the wings? Screws? And it feels good and sturdy?
What jacks did you use for leveling?
5000lbs from Tractor Supply. Welded the mounting ring to the rear bumper and tongue so each could be removed and stored inside the trailer.
Enthusiast III
It has been a while since I posted some updates. Pics are of the cabinets loaded with pretty much everything we take, literally "and the kitchen sink". Have a diesel heater, works good so far up to 9700ft. Will probably be testing it soon at 11000ft and hopefully it will still keep us warm! . I did add a mount and 270 awning. Have not opened it yet, been crazy windy this spring and would rather not turn the trailer into an airplane. Also added a teak platform for when showering. Don't want to get our feet muddy.
Can you tell me more about that sink basin and how it attaches? It looks like it's wider than the door and appears like it slides in from the side?
I just picked up a similar utility bed on a Toyota pickup frame and your build is amazing. Very inspiring, thank you!
The countertop is mounted on sliders and hinges. It slides out and the "wings" drop down. The countertop that holds the sink countertop attaches to the other part with a "J mount". The sink is a collapsible type and just sets in the hole. It took a little bit to figure out and did it by CAD, "cardboard aided design"!
Hope this answers your questions and is a little more clearer.
Thank you, that makes sense. How did you adhere the slide to the wings? Screws? And it feels good and sturdy?
I used aluminum angle and screws to attach the main countertop to the slides. The wings (rear and right side), are attached with piano hinges and wood screws. Everything is very solid and can hold any pans, dishes and a sink full of water. I would estimate the whole thing can hold probably 15-20lbs.
I bought the collapsible sink last year on Amazon. I wanted to get another one to add a hole for a hose that I could run 20' away from camp to drain water through but now they don't sell them. So, I will either go without or try to find another the same size. It is 12.4"x12.4". Guess I should have brought 2!
This is one I have with the drain plug but it's not the right dimensions for your application. They sometimes call them "collapsible cutting boards", maybe that search term will help you find one that fits.
Appreciate all the information! Those jacks seem perfect.
