Reaver's DIY adventure box!

  • HTML tutorial

reaver

Rank VI
Member

Explorer I

3,680
Caldwell, ID, USA
First Name
Brian
Last Name
McGahuey
Member #

23711

Ham/GMRS Callsign
GMRS WRMV941
OK, so, fridge slide is in:


Water tank and water pump are mounted!


And rack is bolted down with 4 3in long big timber lag bolts. This thing isn't going anywhere.


Tomorrow night I tighten up the wiring, and start cleaning out the trailer.

@David H is coming over on Saturday to help me move the tent from the X to the trailer.
 

reaver

Rank VI
Member

Explorer I

3,680
Caldwell, ID, USA
First Name
Brian
Last Name
McGahuey
Member #

23711

Ham/GMRS Callsign
GMRS WRMV941
Kicking butt and taking no prisoners! Nice work bud!
Well, sometimes it helps to have a hard date that it needs to be ready by.

I definitely will want the tent to be up a little higher, but it's 100% usable in its current form.

I already know there are things that I'll need to add/change in the future. These include:

- purchase and install corner trim
- Adding lights for camp
- Interior lighting
- Build kitchen shelves/storage
- Find a smaller camp stove
- Raise the rack and figure out how to get an awning on there.

But these can be handled as time/money allows.

The wife also mentioned that she wants me to use the X to tow this, and not the truck. Due to trying to not wheel my daily, which I totally understand.

That poses its own set of challenges, as I have to pull the bumper, put the tow hitch on it, wire it for lighting and dc-dc charging, etc. Its totally doable though, and the X shouldn't have much of an issue towing it. Unless we're doing something steep and at high altitude...
 
  • Like
Reactions: Shahn and Ubiety

Ubiety

Rank VI
Member

Explorer I

5,221
Sammamish, WA, USA
First Name
Greg
Last Name
Ubiety
Member #

6193

Ham/GMRS Callsign
Ribs
Iteration is key ;) You cannot know exactly how something should be best setup until you get it out there and use it. You cannot get out there and use it until you have first created something. I am approaching my truck bed kitchen that way. Hurrying up to get something useable, then use it, then improve it. You are doing a great job and I am enjoying watching your progress! Doing a great job!
 

reaver

Rank VI
Member

Explorer I

3,680
Caldwell, ID, USA
First Name
Brian
Last Name
McGahuey
Member #

23711

Ham/GMRS Callsign
GMRS WRMV941
Iteration is key ;) You cannot know exactly how something should be best setup until you get it out there and use it. You cannot get out there and use it until you have first created something. I am approaching my truck bed kitchen that way. Hurrying up to get something useable, then use it, then improve it. You are doing a great job and I am enjoying watching your progress! Doing a great job!
This is the way.

I can honestly say that if I were to do this again, I would buy premade doors instead of trying to build my own. I can absolutely make them work, but they're not idea, by any means. I would eventually like to possibly build a teardrop/squaredrop trailer, and the lessons I learned here will certainly translate to that build, but that's not going to be for a while.
 
  • Like
Reactions: Ubiety

reaver

Rank VI
Member

Explorer I

3,680
Caldwell, ID, USA
First Name
Brian
Last Name
McGahuey
Member #

23711

Ham/GMRS Callsign
GMRS WRMV941
Whelp, trailer is ready to be loaded up! I tightened up the wiring so nothing is hanging down. Also vacuumed up all the sawdust.

All that's left to accomplish before the trip is run the harness for the DC charger in the truck, and move the tent from the X to the trailer!
 
  • Love
Reactions: Ubiety and M Rose

reaver

Rank VI
Member

Explorer I

3,680
Caldwell, ID, USA
First Name
Brian
Last Name
McGahuey
Member #

23711

Ham/GMRS Callsign
GMRS WRMV941
I got the DC charger harness in the tonight. Ran the wires to the bumper, and tracked down an ignition switched 12v source under the hood. I then hooked up the ignition activation wire to the DC charger, and ran the wire through the tongue box. Now all that's left is to make the plug on the trailer side and test it out!
 

reaver

Rank VI
Member

Explorer I

3,680
Caldwell, ID, USA
First Name
Brian
Last Name
McGahuey
Member #

23711

Ham/GMRS Callsign
GMRS WRMV941
I've officially started loading the trailer! I also decided yesterday to go ahead and purchase some flood lights to mount on it to give us camp lighting. I'm going out run the wires for those tonight, so I can get them wired up tomorrow night. Nothing like a last minute project to get things moving!
 

M Rose

Local Expert
Mod Team
Member

Advocate III

5,584
Northeast Oregon, United States
First Name
Michael
Last Name
Rose
Member #

20990

Ham/GMRS Callsign
W7FSB
Service Branch
US ARMY Retired
I've officially started loading the trailer! I also decided yesterday to go ahead and purchase some flood lights to mount on it to give us camp lighting. I'm going out run the wires for those tonight, so I can get them wired up tomorrow night. Nothing like a last minute project to get things moving!
Those lights will be indispensable
 

reaver

Rank VI
Member

Explorer I

3,680
Caldwell, ID, USA
First Name
Brian
Last Name
McGahuey
Member #

23711

Ham/GMRS Callsign
GMRS WRMV941
Ugh....

I was out trying to wire up the lights until 11:30 last night, and was unsuccessful.

I'm gonna do a change of plans with how I'm wiring them.

12ga positive and negative going into a junction box with bus bars. Then 22ga (that's what the lights have in them currently) running to each light.

I suspect trying to run 4 lights in series is causing too much voltage drop for them to turn on.

So, no lights on the trailer for this trip. Unless I can figure out a way to get them wired once we get to camp.

:disrelieved:
 

M Rose

Local Expert
Mod Team
Member

Advocate III

5,584
Northeast Oregon, United States
First Name
Michael
Last Name
Rose
Member #

20990

Ham/GMRS Callsign
W7FSB
Service Branch
US ARMY Retired
Ugh....

I was out trying to wire up the lights until 11:30 last night, and was unsuccessful.

I'm gonna do a change of plans with how I'm wiring them.

12ga positive and negative going into a junction box with bus bars. Then 22ga (that's what the lights have in them currently) running to each light.

I suspect trying to run 4 lights in series is causing too much voltage drop for them to turn on.

So, no lights on the trailer for this trip. Unless I can figure out a way to get them wired once we get to camp.

:disrelieved:
We will get them working at camp… I have faith in it.
 
  • Like
Reactions: reaver

reaver

Rank VI
Member

Explorer I

3,680
Caldwell, ID, USA
First Name
Brian
Last Name
McGahuey
Member #

23711

Ham/GMRS Callsign
GMRS WRMV941
Took the trailer out for it's maiden voyage this weekend!

Folks, let me introduce you to Groot!!


Overall, the trailer did amazing!! There's definitely changes/adjustments that need to be made.

I was having an issue with the tail lights, where they really only work if my headlights aren't on (which sounds like more of a truck side issue than a trailer issue).

I also need to add a partition between the fridge and water section, and the main storage. I also want to add a waterproof SAE gland to run power up into the tent.

I'm also going to work with @dansun86 over at Talus Expedition Gear to help me build new crossbars that will support both the tent, and mounting the awning.


The water system I have on board works AWESOME!! It's so nice to be able to hit the switch, and open the faucet, and have running water. And we still didn't use all 10.6 gallons in that tank (we had another 5.3gal tank we used for drinking as well).

Solar setup worked well, as did the DC charging. We had 88ah on Saturday morning. I put our 120w solar panel out in less than ideal conditions, and in a few hours, the battery was back up to 100ah.

Things I noticed after the build were that the trailer seems to be PERFECTLY balanced. It tracks beautifully behind the truck. It's also WAY less bouncy after adding the weight of the box, and the gear inside. So, I think I'll just leave the springs as they are. I might think about adding some shocks to it down the road.

We ran into a pretty decent layer of Owyhee mud coming out of there, and I actually ended up drifting the truck and trailer around a corner (it was not on purpose). I just used a little throttle control, and the trailer went exactly where the truck went. I almost looked like I knew what I was doing!!

Anyways, this is the aftermath of our drive out....


reaver

Rank VI
Member

Explorer I

3,680
Caldwell, ID, USA
First Name
Brian
Last Name
McGahuey
Member #

23711

Ham/GMRS Callsign
GMRS WRMV941
Worked on getting all the wiring in place for the lights. Got the power box built, bus bars installed, and the harness built.

Now all that's left is to add ring terminals to the power and ground for the bus bars, and see if it works. Unfortunately, I ran out of time tonight for that.

 
  • Like
Reactions: Ubiety

reaver

Rank VI
Member

Explorer I

3,680
Caldwell, ID, USA
First Name
Brian
Last Name
McGahuey
Member #

23711

Ham/GMRS Callsign
GMRS WRMV941
Tested out the camp lights this morning. They all work! Now I just need to get the box mounted, and the lights back on the brackets, and I'm good to go.

Next up, adding a partition wall between the main storage and the water tank/fridge area.
 
  • Like
  • Love
Reactions: M Rose and Ubiety

reaver

Rank VI
Member

Explorer I

3,680
Caldwell, ID, USA
First Name
Brian
Last Name
McGahuey
Member #

23711

Ham/GMRS Callsign
GMRS WRMV941
I think I fixed my tail lights. I decided to see if it was a ground issue. The original lights were grounded to the trailer frame via a self tapping screw by the tongue jack. I originally had a ring terminal on the ground wire for the lights, and grounded it to the harness at that screw as well.

I decided to cut the ring terminals off, and but connect the ground wires to together. Problem solved! Lights are now working as the should be!

Next little project is getting the partition wall built, as well as figuring out how best to get power up to the tent.
 

reaver

Rank VI
Member

Explorer I

3,680
Caldwell, ID, USA
First Name
Brian
Last Name
McGahuey
Member #

23711

Ham/GMRS Callsign
GMRS WRMV941
I've been making tweaks and modifications to the trailer throughout the year.

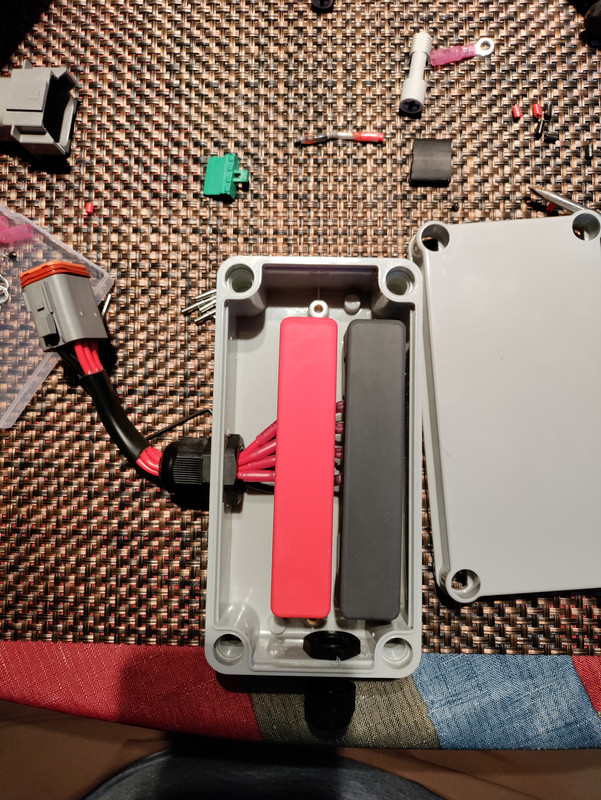
I've been having lots of issues with the tail lights. I ended up completely replacing the 4 pin harness and the tail lights. Instead of solder-seal or crimped connectors for the lights, I went with 4 pin dt plugs, and prewired the harness. I tested everything before installing it, then tested it once it was in the trailer. Everything works, and hopefully I have no more issues.

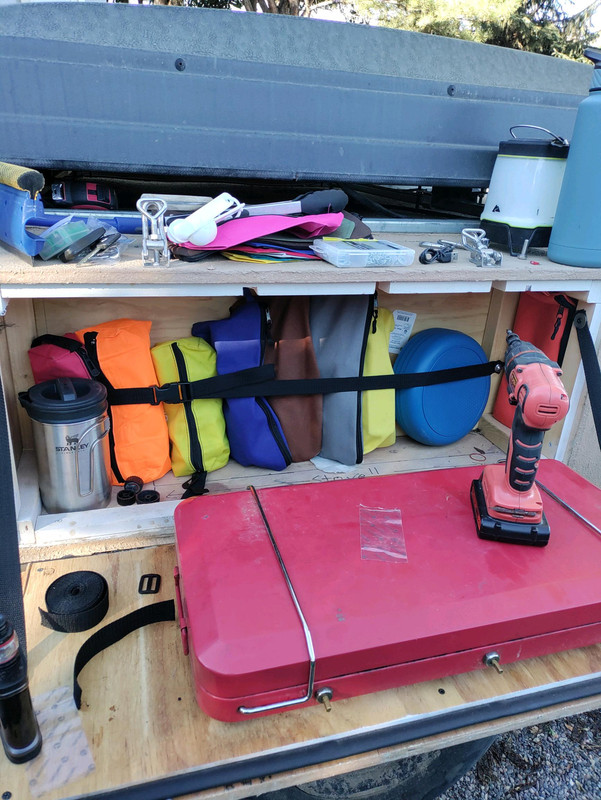
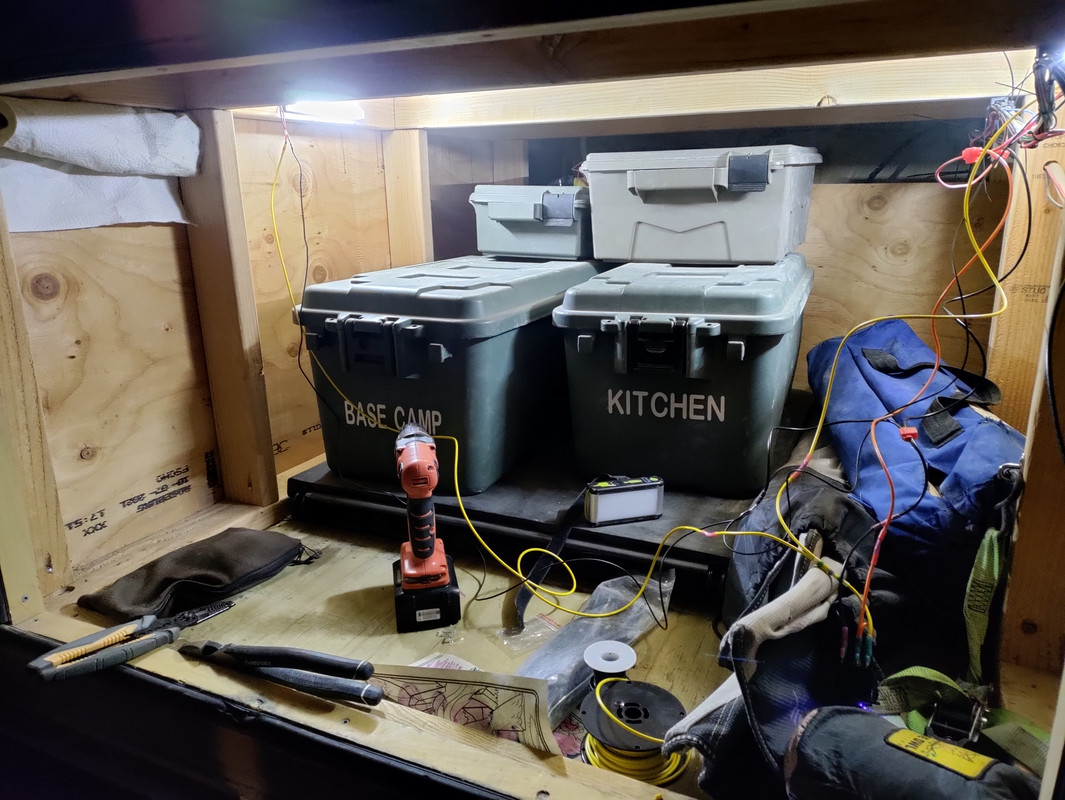
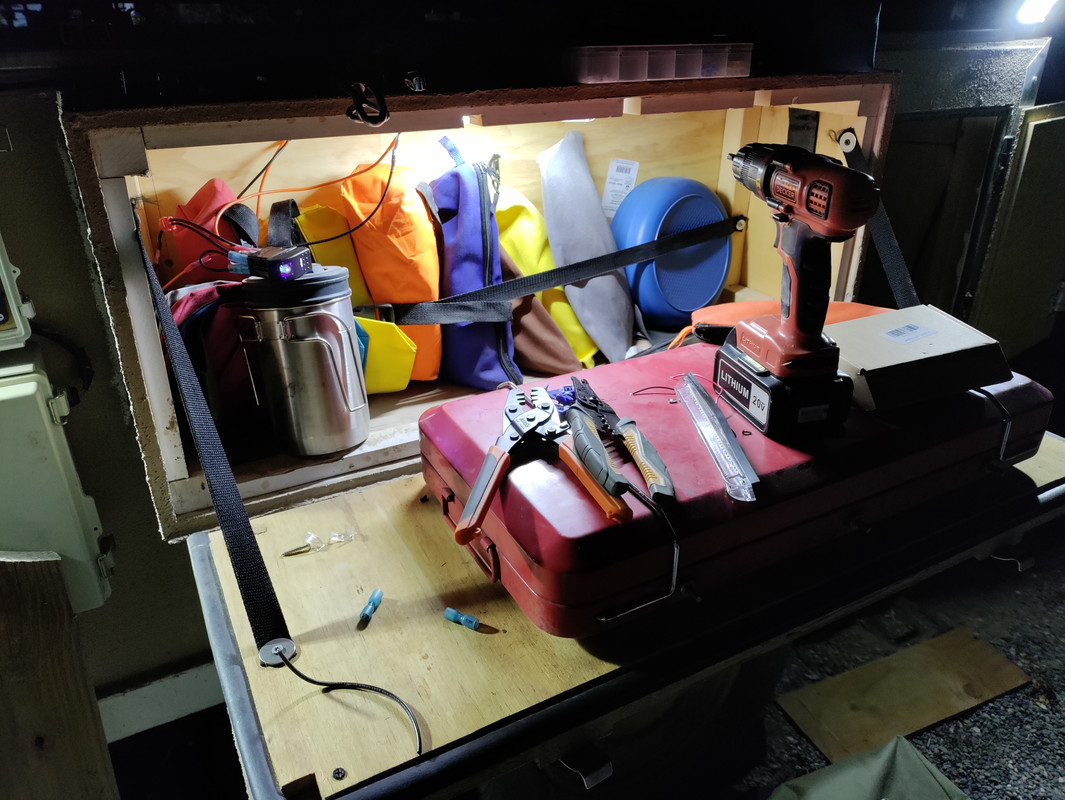
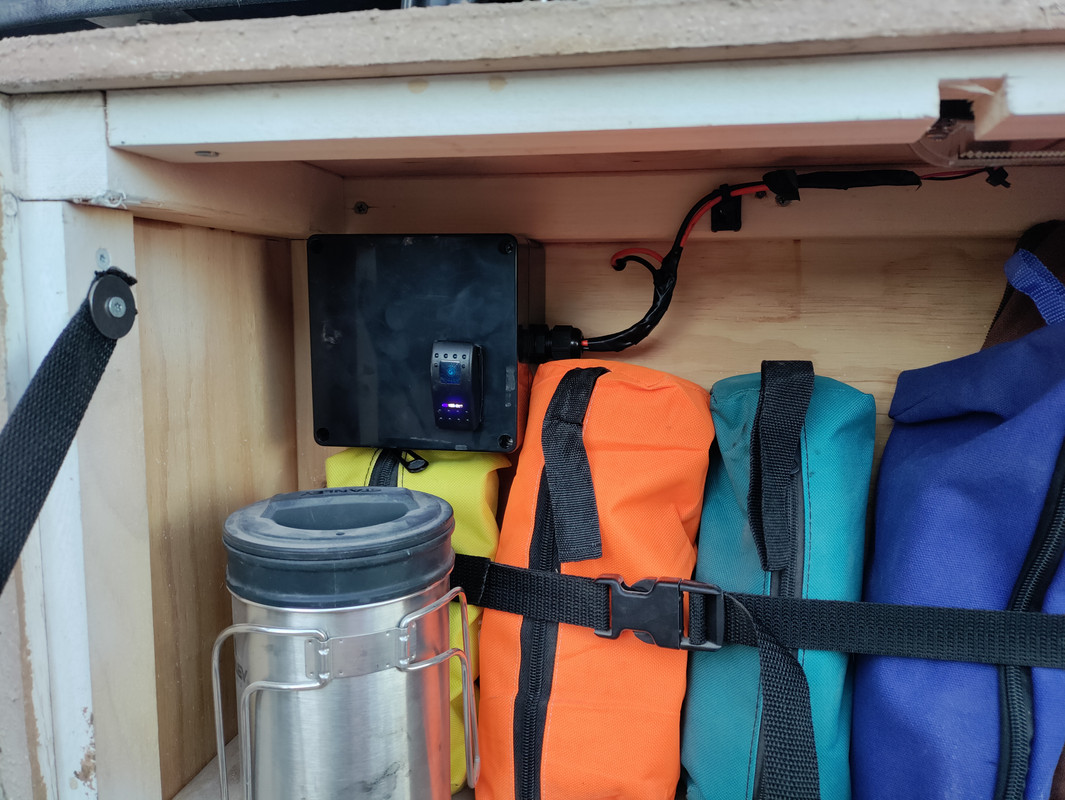
Came up with a way to organize the kitchen box. This is just the first iteration. I like the bags, but I may try and come up with some sort of velcro panel for the bags.

The bright orange bag is coffee. I call it "my morning emergency" bag.


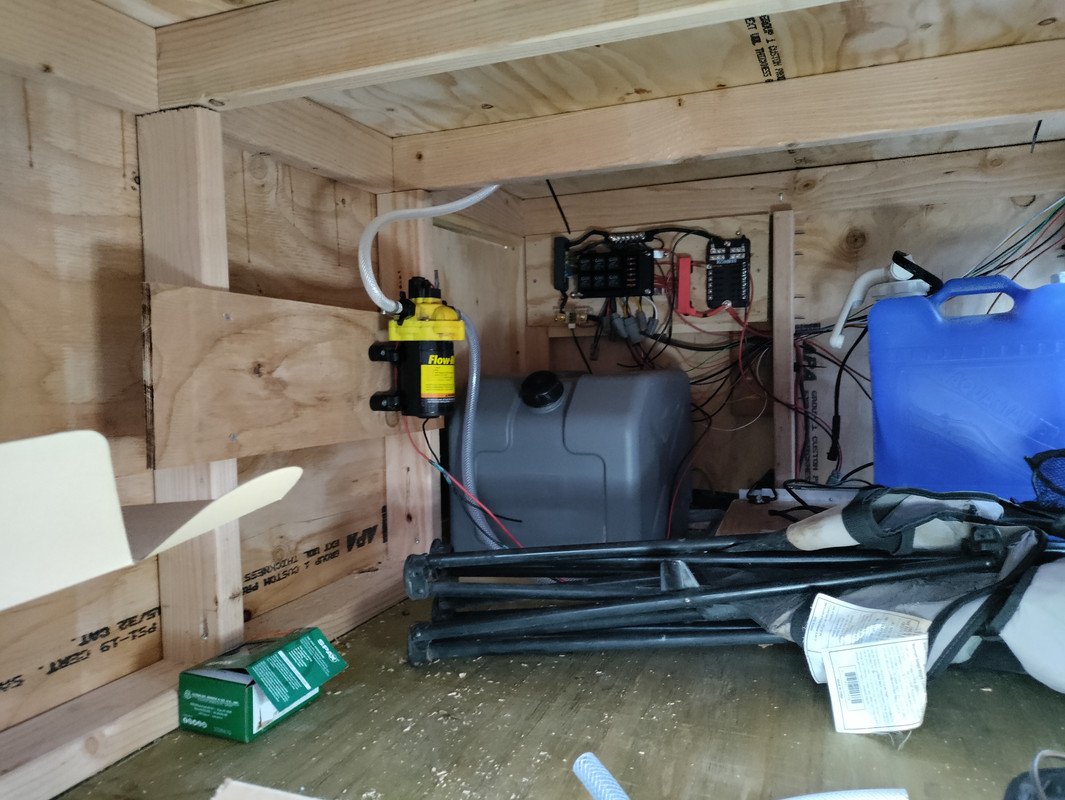
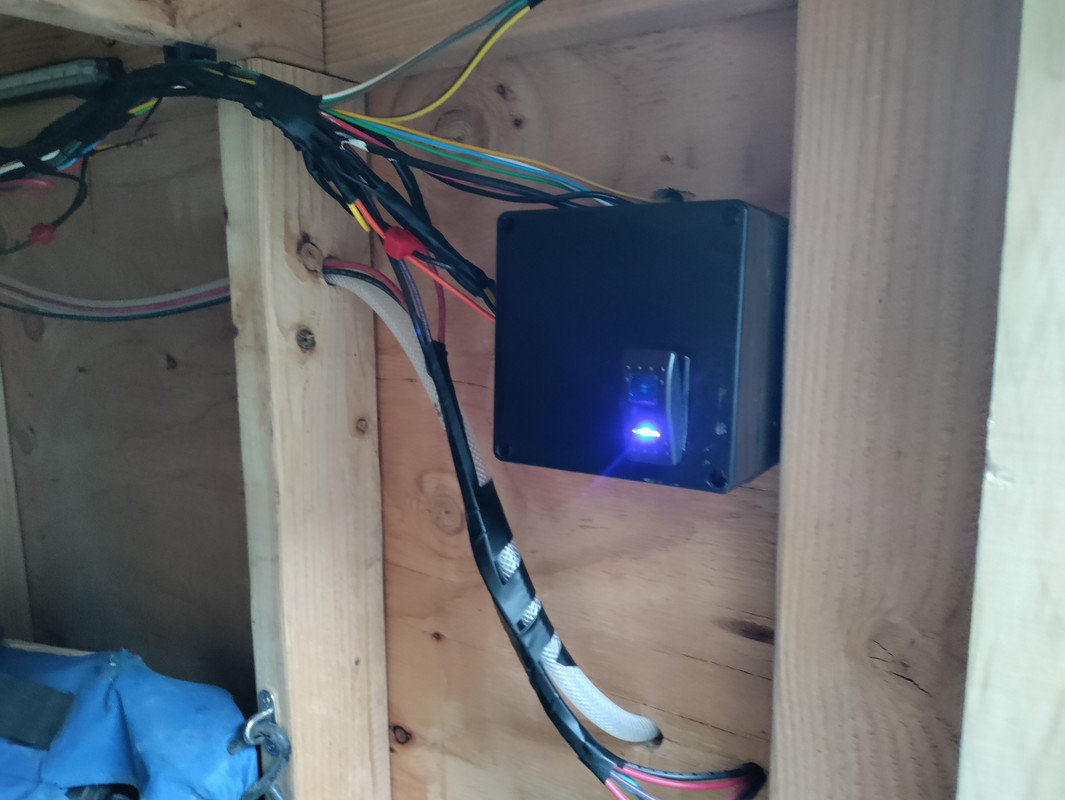
I also added some interior cargo lights, as well as a light in the kitchen box.


Switches are wired inline with the lights, as they're very low amperage. I also mounted them in abs boxes on the inside of the cargo box, and kitchen box.


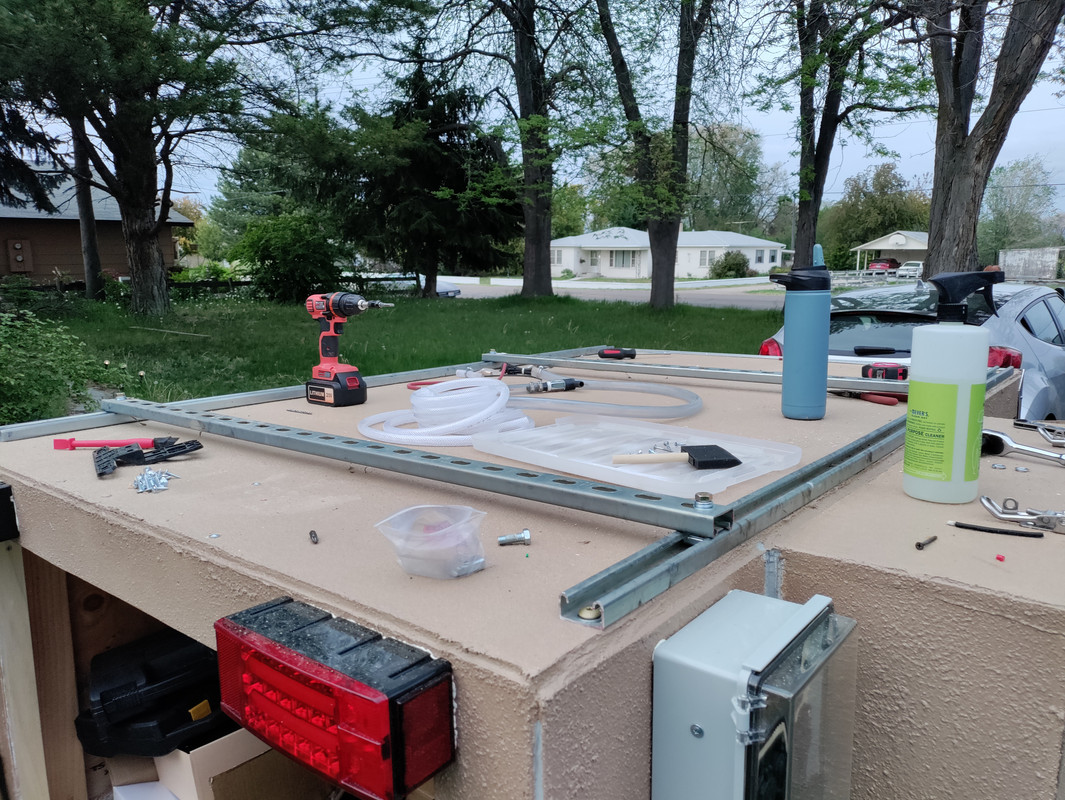
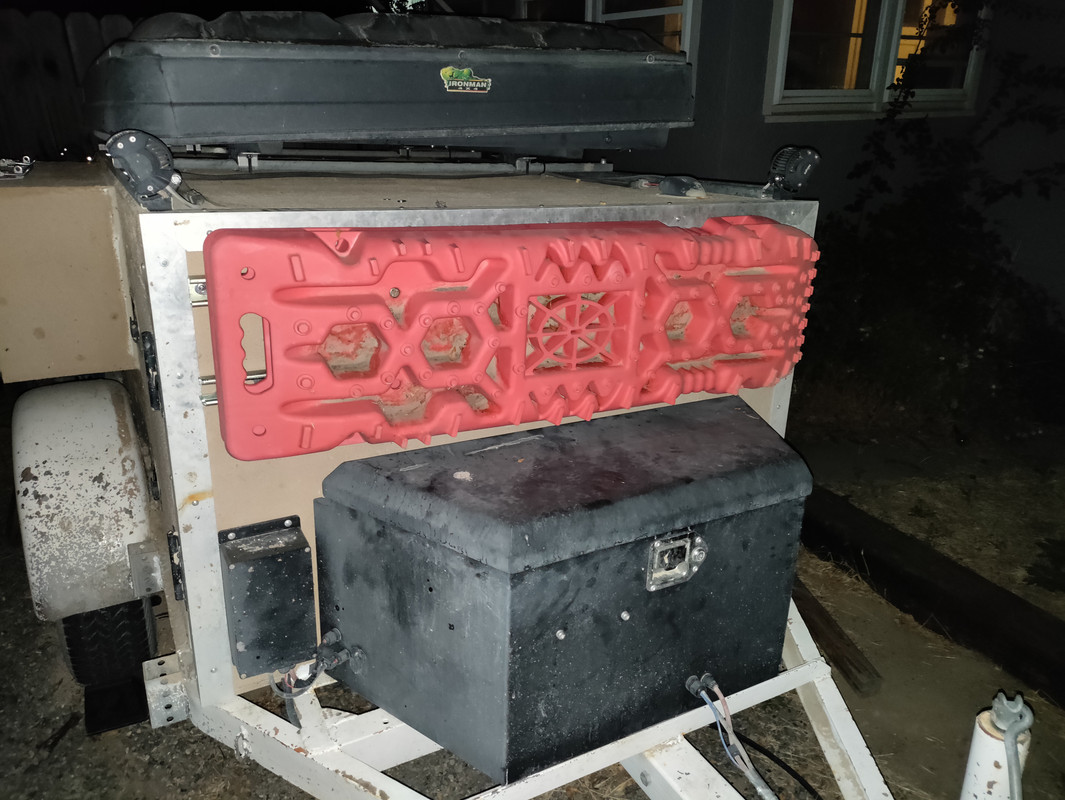
I also added some superstrut on the front to mount my traction boards.


And finally, one more superstrut on the drivers side that I can use to mount my axe


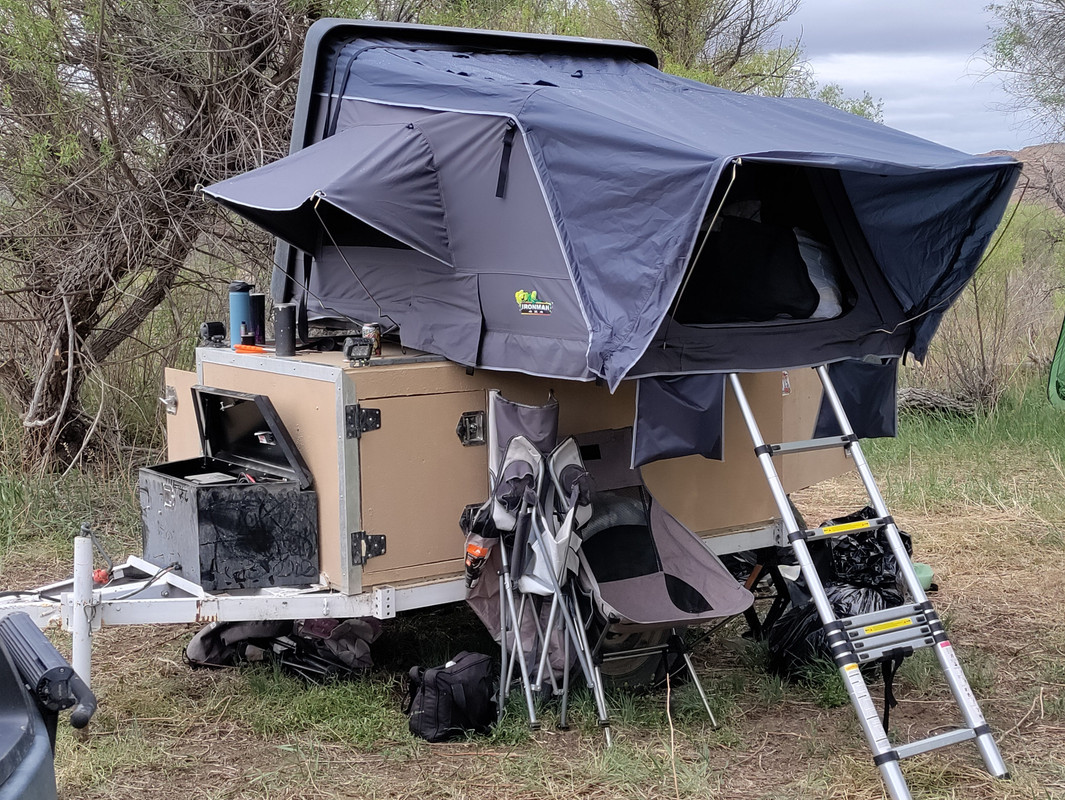
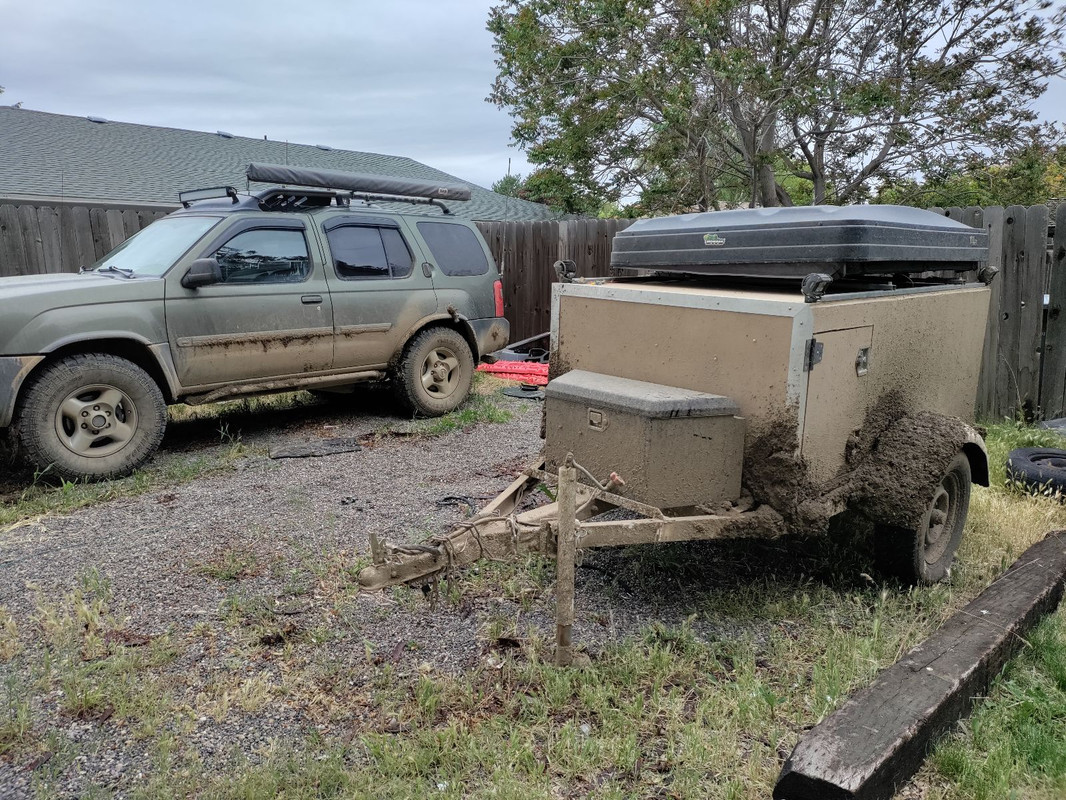
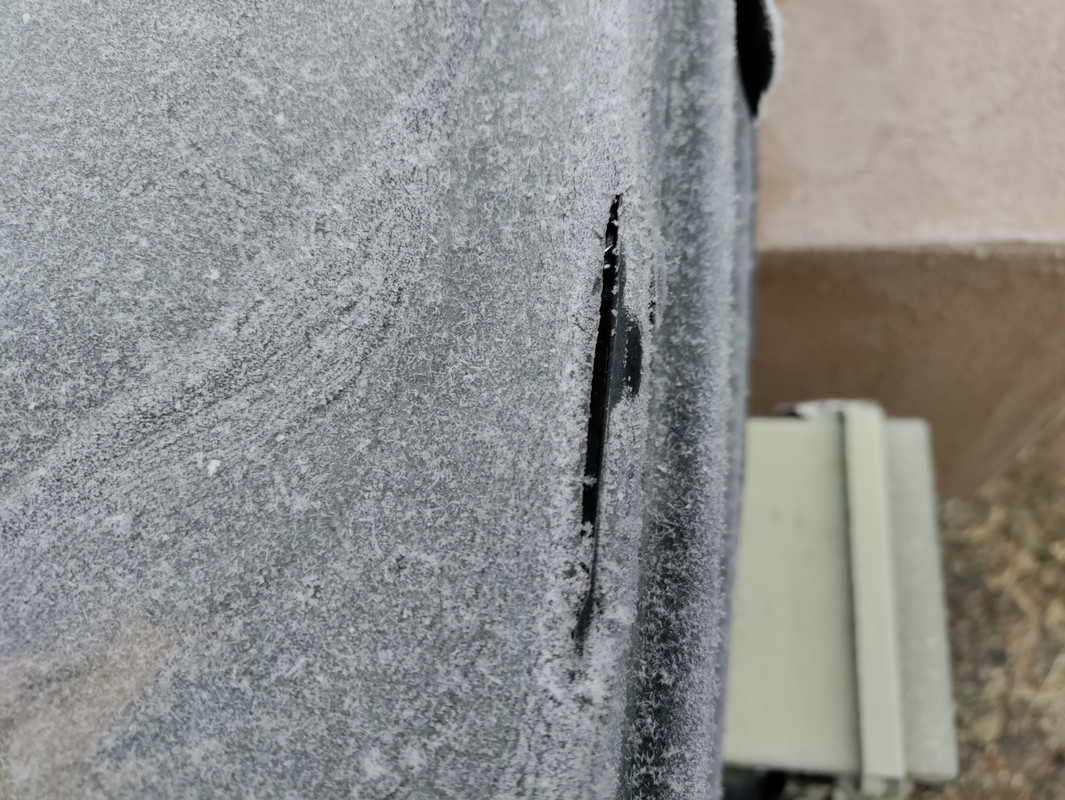
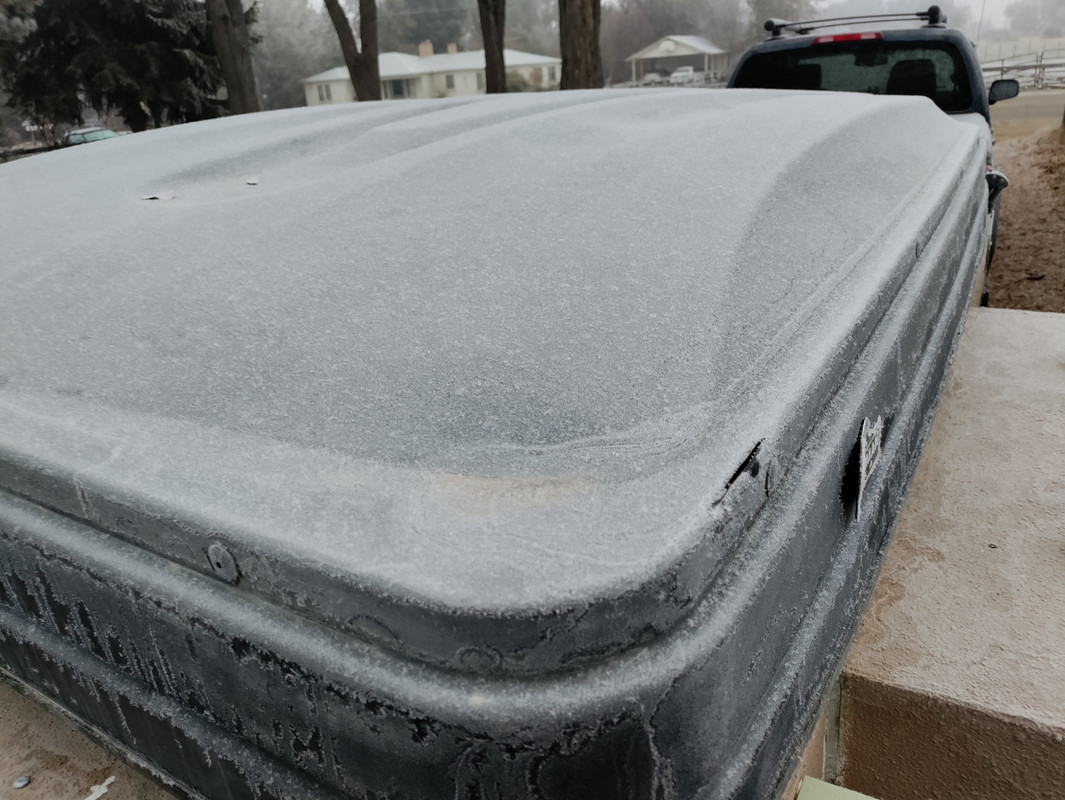
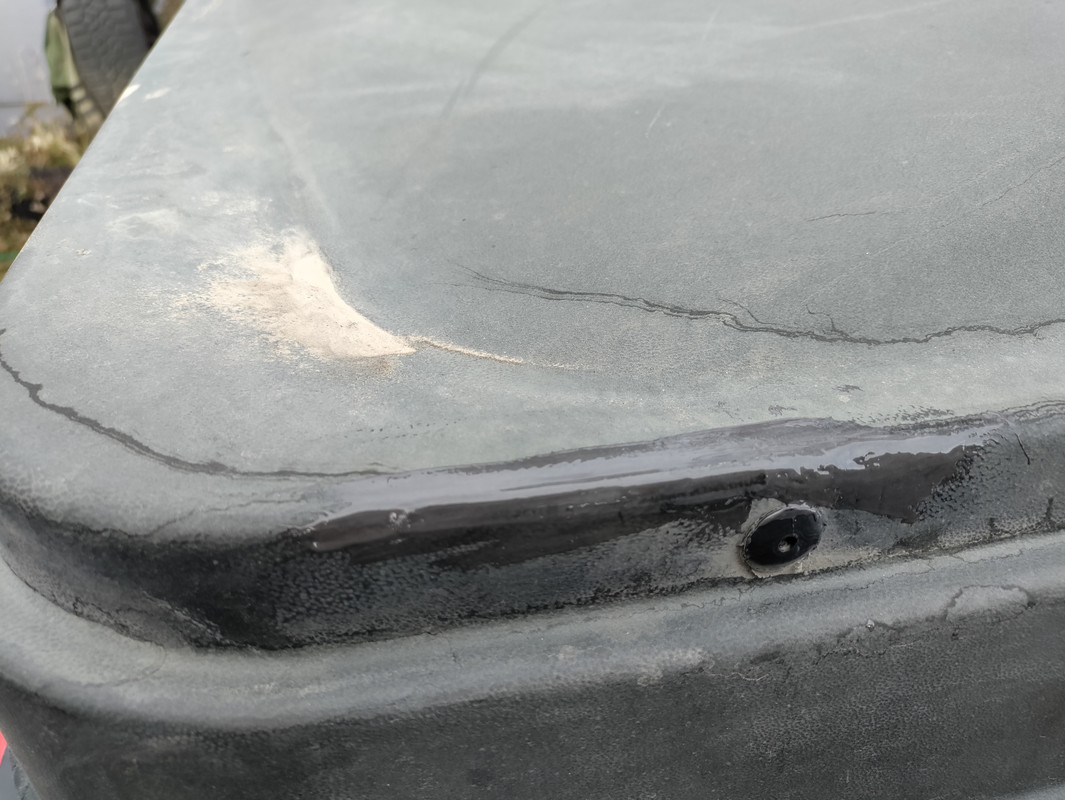
Also, while I was replacing the tail lights, I noted a small crack in the shell of the RTT. I reached out to Ironman 4x4, and they ended up sending me a replacement tent under warranty.


I patched sealed up the shell using marine epoxy.


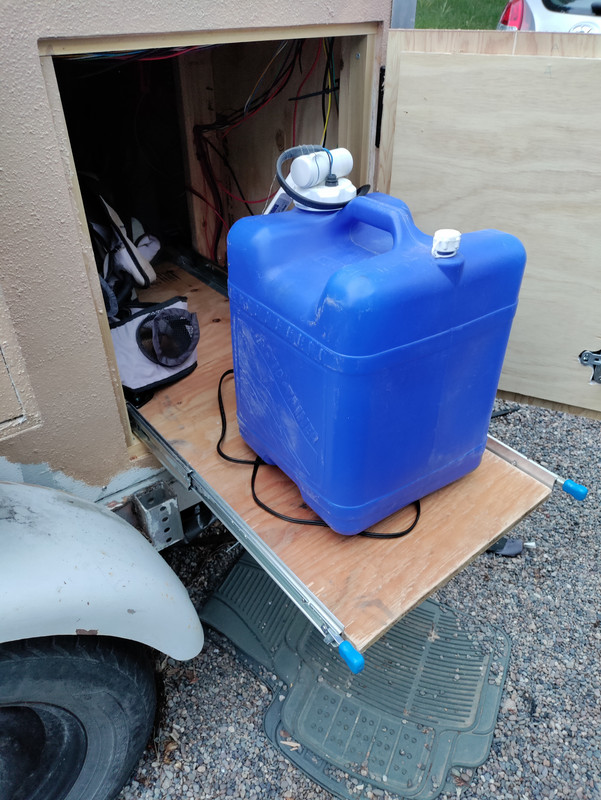
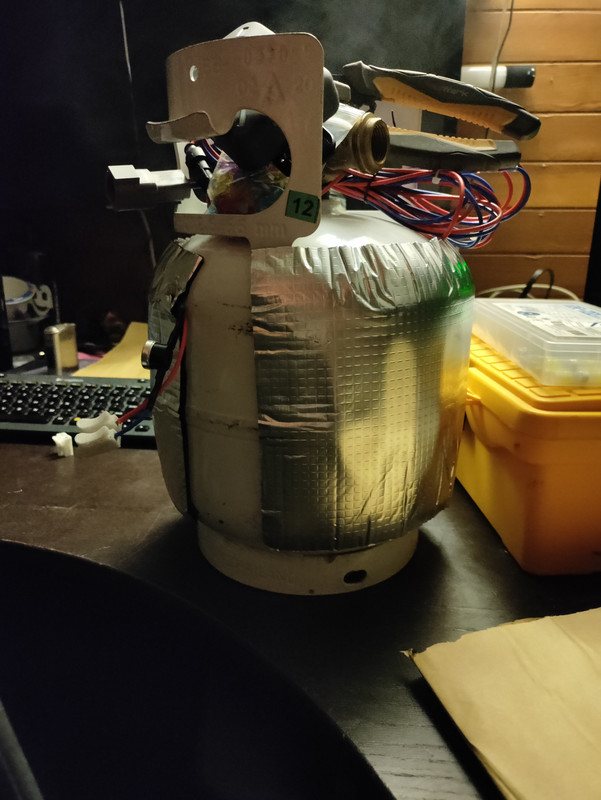
I also made a propane tank heater for when it's cold. I also added a heating pad to my lifepo4 battery, and another heater for the water tank. I'll add switches to the interior box after Christmas.


I also stopped by Lowes in the way home, and pick up some 1 3/8 in super strut. I'm going to use it to build some longer crossbars for the trailer, and new crossbars for the Xterra. The trailers crossbars will get some vertical bars that will hold an 8 foot Ironman awning and awning room. The original tent is going on top of the Xterra for the time being.

Lastly, I picked up some 4 Inch Self inflating mattresses to replace the stock mattress in the tent. I've laid on them in the floor, and they seem VERY comfortable.
 
Last edited:

reaver

Rank VI
Member

Explorer I

3,680
Caldwell, ID, USA
First Name
Brian
Last Name
McGahuey
Member #

23711

Ham/GMRS Callsign
GMRS WRMV941
Over the last few days, I've decided that I'm going to rebuild the box of the trailer.

I'm planning on making a lot of changes that just can't be done without rebuilding it,including the framing of the box.

Exterior width will be exactly 48". Length will stay the same as it currently is, and the height will increase from 30 to either 36 or 40 inches. The reason for this is two fold.

  1. Allow me to stack two plano totes (which I cannot currently do)
  2. Allow me to use pre made and easily sourced doors (either 24x30 or 24x36)
Exterior panels will be changed from plywood to acm (aluminum composite) panels. I also need to move the side doors back a bit, to allow me to use the 2x2 steel stake pockets to form the base of the rack. Currently, I cannot use the front stake pockets, as they interfere with the doors.

I also learned that I wire up the shunt for my battery monitor incorrectly. It correctly shows discharge, but doesn't show when the battery is charging. Shunt will be moved to the tongue box, and will become the primary negative terminal so it accurately shows charge as well.

I'll probably change the tail lights as well, to a single row mounted directly to the frame, with a center brake light mounted to the rack.

This will likely happen after our bdr trip this year.
 
  • Like
Reactions: K12

reaver

Rank VI
Member

Explorer I

3,680
Caldwell, ID, USA
First Name
Brian
Last Name
McGahuey
Member #

23711

Ham/GMRS Callsign
GMRS WRMV941
And as always, plans are constantly changing, and shifting.

New plan is to leave the structure of the box intact. This will allow me to tweak and modify what I currently have to the point where I know exactly what works (box height being the exception), and then will likely order a custom overland trailer.

There are four stake pockets along each side of the trailer, currently. These were originally used to hold the vertical sign post steel that made the original uprights. Unfortunately, in its current configuration, the only ones I can utilize are the rearmost pockets.

The plan is to move the axle back about 6 inches. The reason for doing this is that I can move the stake pockets that touch the front of the fender back, and utilize those to mount the base of the rack.

I'm also going to replace the doors. I will be using Pre-made baggage doors. I can have them made to be the exact size I need and they're waterproof/dustproof. The front doors would be a reasonable price. The rear door will be a bit more expensive.

Water tank will be switched out from a 10.6 gallon double Jerryccan style, to a 10.6 gallon flat skinny tank. This will allow me to add the original tank back in, if need be, to double my capacity. But when I don't need the additional 10 gallons, I can use that space for additional storage (like in the winter).

I also discovered that I wired up the battery monitor incorrectly. It reads discharge correctly, but doesn't show me when it's charging. So, the shunt will be moved to the tounge box, and become the primary negative post for everything (including solar and DC-DC charger). This should accurately show me how much juice is going into the battery as well.

The last part I'm working on is taking the interior electrical setup, and putting it in a junction box. I'll then mount powerpole connectors so that I can label and easily add/change systems on the trailer. For example, I currently have a 12 slot fuse block and a 6 relay box. I'm currently using 5 spots on the fuse block, and 4 slots on the relay box. It would be really nice, if to add new items, I just run the wires, add power pole connectors to the end, and plug them into wherever I want them.

I'm also not a fan of the paint I used to paint the box. In the spring, the frp panels will be coming off the box. I'll then seal the entire box with epoxy, and have it bed lined.

I think that's it for now. As I design and plan things, I'll post images as I go. At this point, this is mostly just for working through ideas in my head. But maybe someone can find it useful.