Pwny's build codenamed "RamRod"

  • HTML tutorial

mylilpwny

Rank V
Launch Member

Pathfinder I

Hey guys. Been away from the forum for a while (boy life can throw some nasty curve balls altho I was never good at hitting sliders much either lol). I had originally planned on building my grandfathers 2wd f150 but plans were altered as the motor let go at a young 110k (never much of a ford guy anyways but hey free truck right) while running my family business i was working as a subcontractor and my truck was my money so got me a new set of wheels.

Enter "RamRod" (nicknamed by my friends apperently didn't have a choice).
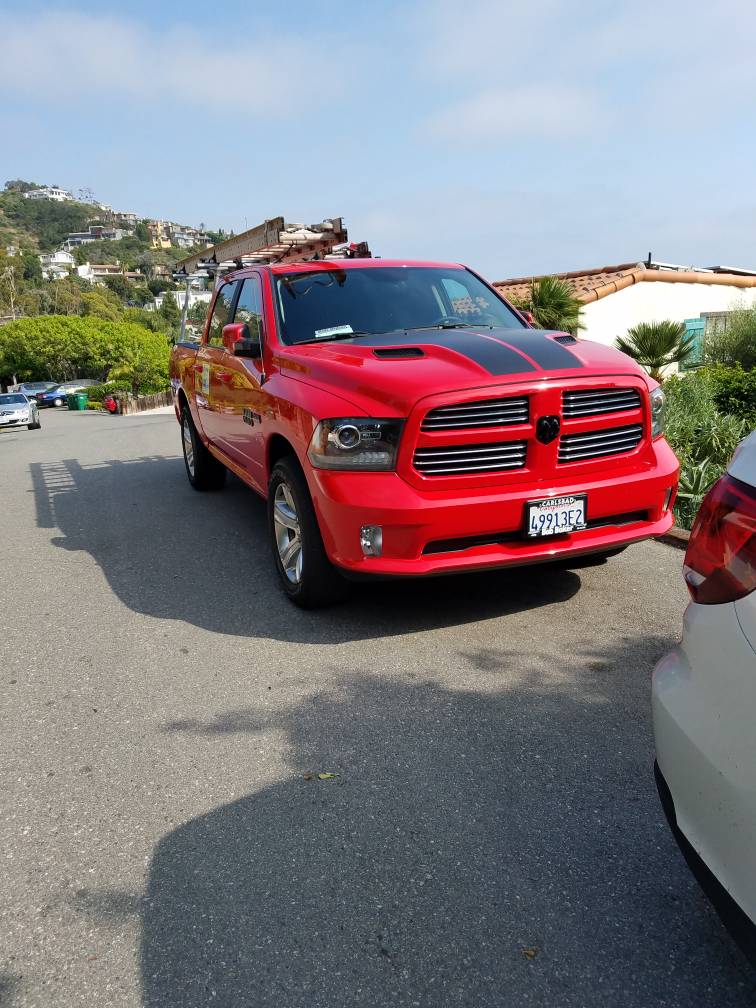
2016 Ram 1500 Sport 4x4 5.7 that i honestly got for a hell of a deal. And helped scratch my dodge itch since i missed my old 12v cummins. The truck is perfect for what I am wanting.

This will be a very slow project as work and currently taking care of my wife and mom does not leave me with tons of spare time but looking forward to the journey this truck takes me down.
It will be a mild build as it is my daily and dont plan to go to crazy with it (yet)

Upgrades and plans will be updated (slowly lol) as I go.

Plans for stage 1 of build.
Factory tow hooks (sports do not have them)
20" light bar in bumper
Led pods for reverse lighting
And 2 pods on rack facing back for camp light.
Have a busted tracrac I am going to cut hight down.
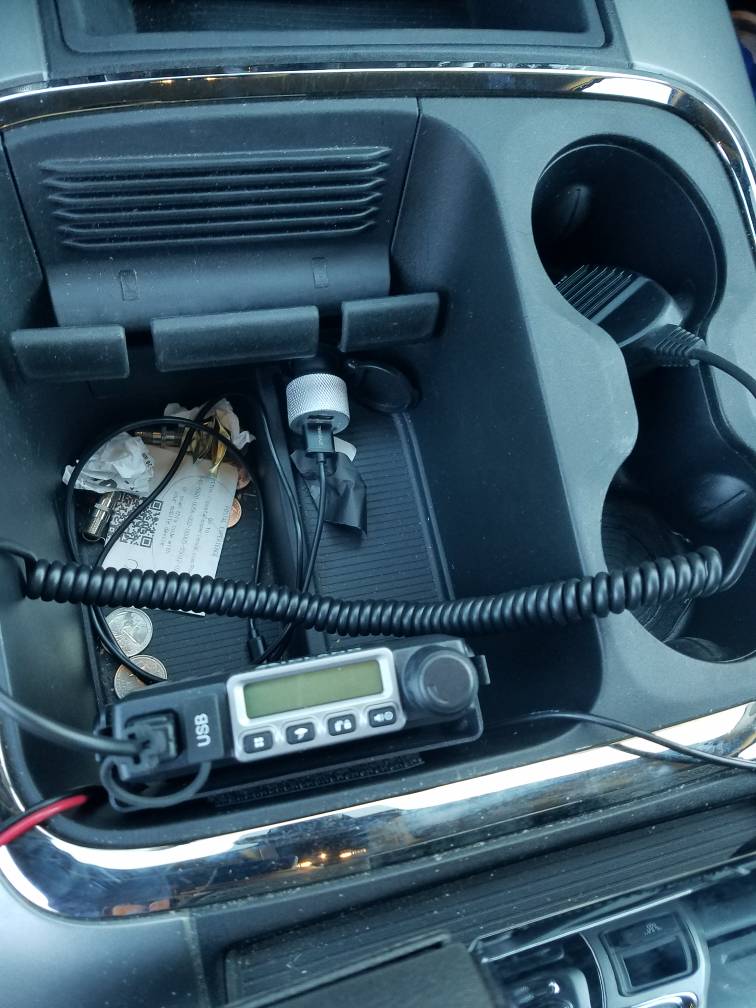
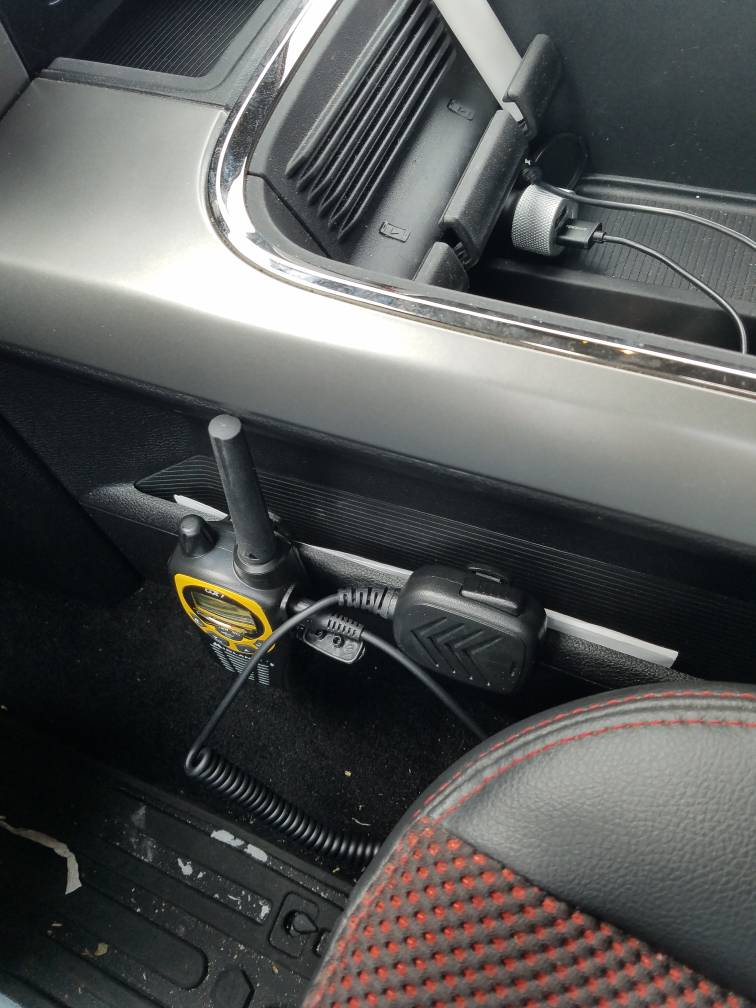
Comms will be a gmrs (first one) for now till i figure out how to mount my giant cb (if i ever do)
Bilstein 5100 level struts and control arms in front with bilstein 5100 in back.
35" tires
This will be the first stage of the build there are other plans for it but for now i will stick with this.
Any ways now to the pictures right?


And one of RamRod gettin some work done


Sent from my SM-G930V using OB Talk mobile app
 

Coolhand

Rank V
Launch Member

Enthusiast III

1,934
Miami Lakes, FL
Member #

6560

Welcome, nice to see another Ram here. There are a few of us. Mine is a pretty slow build as well.

Overland Bound member #6560
 
  • Like
Reactions: kickkem

mylilpwny

Rank V
Launch Member

Pathfinder I

Small progress being made. I have temp mounted my gmrs radio in the truck, this will get permanently mounted once I can afford a new antenna (dont want to pull the console twice for one job lol) and found the place my hand held will live


Boy that shows me how much i need to clean my truck lol anyways back to it
It plan to run the cables clean once the new antenna (boy does this one leave much to be desired)

My buddy and I decided to test them on some "trails" ( i dont really consider this area much of trails lol). The radios worked great. Much clearer than cb and even with an antenna that makes me sad it still performed well within what we asked of it.


Well not much of an update but its sonething [emoji1]

Sent from my SM-G930V using OB Talk mobile app
 

mylilpwny

Rank V
Launch Member

Pathfinder I

Finally got to take the truck on a shake down trip with my buddy. Well was supposed to be a trip but when you check your tent and find a masive hole in the roof you change your plans. So out to ocotillo wells it was. We stayed in my trailer by salton see and hung out for the weekend. Turned into more of a work than play trip but ya gata do what ya gata do. Anywho. The truck did much better than I expected and got to learn some of the stock limits. Have come to the conclusion that sliders will be put on much sooner then planned. Not to many pics as most of our wheeling was at night.


We had alot of fun running around the 4x4 park sunday morning before heading home. Went to wander our way to pumpin patch and ended up ziging not zaging and got into so pretty rough tracks.

All in all a fun trip even with all the work. Now to get some new equipment and plan a real shake down trip [emoji1]

Sent from my SM-G930V using OB Talk mobile app
 
  • Like
Reactions: kickkem and Jimmy P

mylilpwny

Rank V
Launch Member

Pathfinder I

Nice looking truck. Absolutely love mine. I wanted a jk but with the side job i was doing carrying ladders on a wrangler a bit difficult. And i do tow (rarely) . In the end very happy with the decision would have liked the 6foot bed but didn't want a quad cab and got used to the 5.5 need with the last truck. This one will be a long and slow build but since i plan to keep it i dont mind

Sent from my SM-G930V using OB Talk mobile app
 

mylilpwny

Rank V
Launch Member

Pathfinder I

Hey everyone. Time to bring this back to life. Sorry for no updates in quite some time life and work went into overdrive and got a bit hectic for a minute lol. Now that I have hit slow season with work some progress will begin to be made on the truck.

First update is with phone mount. For a while I was using the factory phone "holder" for the truck in the center console area. Very nice to have and worked great for driving on pavement. In the dirt and trying to view phone for maps or anything else on the other hand sucked lol. Originally intended to use my ram mount for my mount but could not find a clean way to install it. So back to the interwebs rabbit hole i went. In my search I remembered the name rokform from my motorcycle days and checked them out. I ended up with their universal kit. Placed the phone portion on my phone case and then had to figure out how I was going to place the mount. Tried multiple locations buy could not find a place I liked. So back into the rabbit hole i went. Came across the proclip mounts but did not like the phone holder as it did not fit with a case. Found that they sell just the base and ordered one. So this is what I ended up with. The rokform mount attached to the proclip base. Now that I have had it on for a bit I can say I love it. Holds very secure even on rough roads and looks cleaner installed then my ram mount. 20180502_111724.jpeg20180502_111815.jpeg20180430_110822.jpeg

Sent from my SM-G930V using OB Talk mobile app
 

mylilpwny

Rank V
Launch Member

Pathfinder I

New addition to the truck came in a few days ago. I have always had window vents on my vehicles and felt odd not having them, so I ordered a set for my birthday. Install was as always with these very easy. I like the look of the in channels better then the stick on ones. Just a heads up to fellow ram owners thinking of these. Do yourself a favor and leave the windows rolled up for atleast 72 hours so the rubber can mold into the new location with the vents in. This will help eliminate the windows auto roll down when it senses the resistance. I did this and have had no problem with that particular issue. 20180608_111706.jpeg

Sent from my SM-G930V using OB Talk mobile app
 

mylilpwny

Rank V
Launch Member

Pathfinder I

View attachment 63069 Time to update on some progress that has been made. Some of this is has needed to be updated for a bit.

Some new items ordered.
First was a new window punch and seat belt cutter. Did not have one for the truck and needed to have for the o-Sh!t moment. As with most everything I am doing on the inside of the truck, I am trying to keep everything to having a clean install. So since I did not want the typical large window hammer just mounted somewhere. Enter these! I ordered these on the recommendation of my neighbor who is a 15 year Firefighter , he said he caries one of these and the leatherman raptor on him while on shift at all times. From what I have been able to tell so far they should work just fine. I have not mounted them yet since I have not found a clean spot to mount. I got the 2 pack for the simple fact that I wanted both driver and passenger to be able to have one in arms reach in the case we needed them. Will update once mounted.

The next item was delivered around the same time. I had been contemplating getting a molle seat back panel for quite some time. My issue was that I did not want to spent the money on the ones that are from say Blue Ridge Overland for $55-$60 if I was not sure if I would keep it. While searching on Amazon I found this alternative. These are not of the same quality as those that are from more reputable brands, but will fit my purpose for now and if I like the set up I will upgrade to a higher quality/stronger ones later. These were ordered mostly for a proof of concept for the build ideas. They do seem to be made well. They do have a built in pocket that some may like, my only concern is the hook and loop used may not be able to handle the wight of pouches and gear added to the molle. In this case I will just be sewing the pouches shut as we can simply reach behind the panel and access the factory seat back pocket. I have not added any pouches as of yet other than a molle equipt small med kit and my hand held radios now have a new location to live. 20180626_163324 (Medium).jpg


At this point it was time for a trip. As the wife and I were still had a tent with a hole in it camping was out. Since we were still unsure of the direction we wanted to go, we were not ready to purchase a new tent yet as we are contemplating a trailer. So enter going to a family cabin in the Lake Arrowhead area. We did do some exploring around the area and found some fun trails that even with stock suspension and tires the truck handled with ease. This trip was taken the weekend before the Fourth of July.
20180701_181925 (Medium).jpg
20180701_182246 (Medium).jpg 20180701_182527 (Medium).jpg
IMG_20180701_200622 (Medium).jpg 20180630_210104 (Medium).jpg
20180630_211445 (Medium).jpg
The flies and other bugs were absolutely ridiculous that night. We used our (well mine since hers were not in the truck) Alpha Defense/Salt Armor face/neck shields to help prevent inhaling the extra protein lol. 20180630_211450 (Medium).jpg


Hey guys, remember the ladies are not the only ones who are allowed to accessorize! 20180701_190640 (Medium).jpg
 
Last edited:

mylilpwny

Rank V
Launch Member

Pathfinder I

Next Update comes from just a couple weeks ago and it is the first "major" build step. I finally got a camper for the truck. Found a nice (and cheap) used A.R.E. DCU unit that was speced close to what I would have ordered. I found the shell at a place called Custom Road. If you are in the San Diego area or don't mid a bit of a drive check them out. If you do contact them ask for Alfonso, he was great and knowledgeable with everything I had asked. The customer service experience I received was hands down one of the best from a accessories shop I have ever dealt with. I can not say this will always be the case but my experience was fantastic. They are a small shop with an offsite storage yard so pre calling is the best way to go. I had called them i the morning right after they had opened and told them the (stupidly tight) time crunch I was on, they said not a problem and that since I was an hour (ish) away to go ahead and head down and they would have everything ready for me. So with the news that it would be able to happen (tho skeptical) I headed out the door for the hour drive ahead, well morning traffic made it more like an hour and 45 lol. When I got to the shop it was exactly like they said, we introduced each other and he said hey pull into the shop and we will be ready to go. They had the shell freshly cleaned and ready for inspection. I asked that since I would be doing more off roading than most with a shell like this if we could do additional anchor point and not just at the four corners and to my surprise he not only said no problem but suggested the way to go and that it would only add the extra cost of materials for the bolts. I offered to pay the extra labor time as I was the one requesting the extra work but he refused and insisted that all I pay was for the extra bolts. In a matter of no time (altho at the time with my time crunch felt like forever lol) they were done. Total time from when I rolled into the parking lot to the time I rolled out was less than an hour, roughly 48 minutes. Again I can not say enough about how great these guys at this shop are.

Any ways should probably get to the actual progress on the truck lol. The shell is extremely close to what I would have ordered new. It has front/rear window with the side doors and boxes on both sides. I do wish it was cab height as it sits about 2-3 inches above the cab of the truck. All this and with it being black it matches well enough with the truck to not need to be painted. Near future plans is to add some lighting to inside/out, add some relectix to some what help with the heat inside and to work on helping keep dust down.
don't forget they need a washin from time to time
20180617_202852 (Medium).jpg
20180617_204824 (Medium).jpg
20180712_111826 (Medium).jpg


Now was time for a shake down trip. We new we wanted to escape the heat we had at home so the plan was Bishop-Bridgeport area or towards Flagstaff. Well the night before we planed to leave (we have this habit of execute first plan later lol ) we see flagstaff is nothing but rain the whole time of our trip. So up north we went. Since our old tent had a hole in it we had originally planed to just wheel during the day and hotel at night. Out of no were we acquired a family members tent. So camping at night it was. The wife prefered to stay in campgrounds so, after some fantastic negotionating by yours truley, we stayed in campgrounds lol. Over all the trip was fantastic (outside of the new to us tent) and there was plenty of exploring to be had.
Here are some photos from the trip.
20180713_144850 (Medium).jpg
20180714_111120 (Medium).jpg
20180714_200530 (Medium).jpg
20180714_202509 (Medium).jpg
20180714_203429~2 (Medium).jpg
20180715_092550 (Medium).jpg
20180715_134550 (Medium).jpg
20180715_134659 (Medium).jpg
20180715_134753 (Medium).jpg

Now to one of the highlights of the trip. This is Rocky. We found him just walking down the middle of the street in Benton (middle of nothing around with no cell coverage). He was extremely dehidrated and with it being 97* out at the time with no shade around was over heated as well. 4 waterbottles down and into the airconditioning he went. We went to the gas station to try and call the owner but after an hour of no luck we contacted animal control. Since we were so far out they said it would take 2 hours to get to us. We offered to load him into the truck and drive him to the humane society if they would wait. So with a.c. on blast we headed out for the hour drive to the humane society's location. After the trip a few days later we got a call leting us know that the owners had come to pick him up and were beside their selves that he had been found and was ok. Glad he could get back to his home and be healthy in the end.
20180715_163137 (Medium).jpg

That is all we got for now. We are possibly going on a trip next month for the meteor shower just not sure if or where yet..... and if we take that god awful tent or not lol
 

mylilpwny

Rank V
Launch Member

Pathfinder I

So a thing happened today. Say hello to the our new (well at least to us) trailer.
2007 Fleetwood Evolution E2. In fantastic condition with pretty much all mechanics repaired or replaced in the last year with records! O yeah and a new roof as well! All that it needs is to have the screens replaced in the canvas. So now the discussion for my wife and myself is do we have the screens replaced or just replace the whole canvas.

Anyways many mods to come for this thing as we get it set up to or liking. A few mods already done is 2nd water tank to bring total to 43gallons, a cradle underneath to hold the rolling grey water tank and an on board air compressor.

I know some people will say that this is not an overlanding trailer and yes you are right lol. But the plans for an expo trailer changed when we got the great news that my mom with stage 4 cancer is now cancer free! So with that news we decided to shift plans a bit and get something like this. We will still be able to get off the beaten path a bit. And for more "extreme" trips we are just going to tent it.

Hoping to do a trip soon with it and see what work we need to do to make it work for us.

Will get better pictures when I not tired and hot lol and start to get some work done. First plan is to add a second battery and wire in a better battery disconnect since the factory one is junk.

Anyways that's all we got for now guys. IMG_20180803_193423_291.jpegIMG_20180803_193423_293.jpeg

Sent from my Pixel 2 XL using OB Talk mobile app
 

Contributor I

Thanks. We looked pretty hard and was about to make a the drive out to Flagstaff but this one popped up an hour from home and got lucky enough to snag it for a steal of a deal.
Eh. It's ok. I kid I kid. So much room for activities and addition/mods can be done. I have a sneaking suspicion I'm going to have a few weekends with mod help. Hahaha.
 

mylilpwny

Rank V
Launch Member

Pathfinder I

Eh. It's ok. I kid I kid. So much room for activities and addition/mods can be done. I have a sneaking suspicion I'm going to have a few weekends with mod help. Hahaha.
Haha just saw this. It made me laugh since I just told you that you are coming down this weekend to help with RamRod and the trailer without a name
 

mylilpwny

Rank V
Launch Member

Pathfinder I

Hey all it is that time. I apologize for not updating sooner but not much really going on.

Any who..... first mod to update is my dash mount. I was looking for a way to mount things cleanly to the dash like navs, tablet, radar, etc. I could not for the life of me figure out how to mount anything, especially any thing suction mounted. I ran across Bayou Goat Mounts and decided to give it a try. I went with the three inch triple mount and for the price I am very happy! If you have a 09-18 Ram with the tray over the radio on top of the dash I would highly suggest you check them out. I did not really take any photos of the install since it was so easy. Take the rubber pad out, remove the 2 torx screws, place plate and tighten screws. It was that simple. Very pleased with this purchase, easily the best mod I have gotten for the truck for under $50 bucks.
IMG_20180904_155921-800x600.jpg
IMG_20180904_155958-800x600.jpg Radar Detector there for reference.


The next update I do not have any photos of since it was just one of those things that just needed to get done. I was having issues of my shell tagging the back of the truck over bumps. The way these shells are made for this bed there is a bit of a lip on the front since the front of bed/ back of cab on these trucks are not straight but curved. Come to find out that lip was tagging the cab in around the center window. To remedy this problem the solution was the good ol' grinder. As this was not a 1 person job I needed a second set of hands, Enter @DieselPoweredCamel ! With the 2 of us we were able to slide the shell back and grind away at the front lip till there was plenty of clearance so it would not wack the cab any longer. I have to give a huge thanks to you bud, you came in clutch for this and a huge thanks to Brad (his step dad) for lending the grinder since mine is a paper weight at this point.


The next mod was a lighting game upgrade! The factory lighting on the Rams are not that great so it was time to step up the game. I found a set of pods to replace the factory fog lights. Install was very straight forward, unbolt the fog lights and bolt in the new pods. They are baja designs squadron sports , two spots and two floods. I got a set of the amber rock covers for the floods. I was originally going to just replace the lenses with the amber ones but the rock covers seemed like a better bang for buck option while adding a bit of protection as well.
IMG_20180915_170445-800x600.jpg new pods next compared to factory fogs.
IMG_20180917_182400-800x600.jpg sorry not sure why the picture is so stretched.


The next mod was to accompany the new lighting upgrade. While there was nothing wrong with the switch that came with them, there was no were I could find to mount it cleanly. So time to upgrade my switch game right? After many hours ( well maybe not that long lol) of researching I decided to go with a Switch-Pro 9100. As many others have contemplated i am sure on the price, I am very happy with the decision. I almost went with the spod touch screen but decided I wanted the tactile feel of a switch more. I also came up with a mounting solution that would make for a clean install for the switch panel of the switch-pro on my Ram. I decided to use an Edge monitor a-pillar mount for the Ram 2500/3500, and with some trimming and modifications it turned out nicely. I epoxied a sheet of abs on the inside of the pillar mount to give a place for the bolt onto. Drilled a couple holes and done! boy seems like it was much easier when writing it up lol. I am extremely pleased with the outcome of the install, not only do I get all the great additions of the switch-pro but it made for a very clean install.

IMG_20180922_184850.jpg
IMG_20180922_192014.jpg IMG_20180924_184334-800x600.jpg

Last upgrade/mod for the time being is a very important one. Ya boy is not OB#14104!!!!!!!!! I must say the packaging and presentation of the membership package was second to none. I was very impressed my the thought and time that went behind the presentation of what you get. Very pleased to have officially join the OB family. I do still need to place my badges, 1 I have been to lazy to clean the truck to pace them and 2 I have not decided where to put them.
IMG_20180830_121302-800x600.jpg

And now time for the obligatory rig shots!

MVIMG_20180908_171543-800x600.jpg
MVIMG_20180908_162131-800x600.jpg
MVIMG_20180908_161215-800x600.jpg
 
  • Like
Reactions: ToyotaGirl76

mylilpwny

Rank V
Launch Member

Pathfinder I

Well everyone somethings are meant to come to an end. RamRod is officially gone. We really did like this truck but at the end of the day just could not get past a few of the things I really did not like about the truck and lack of aftermarket support. The replacement through the deal of then century is a 2019 Tacoma trd off-road and also happens to be the first brand new vehicles we have ever bought. Even tho it is only the first 24hrs I am extremely happy with the decision and can't wait to begin building the new rig. Some of the parts from the ram will be thrown up on the forum sine I will not have use for the ram specific parts. Thanks for taking a look at this build.