Midwest Voyager - 04 WJ Grand Cherokee

  • HTML tutorial

MrWilsonWJ

Rank V
Launch Member

Member III

1,691
Kennewick, WA
First Name
Dustin
Last Name
Wilson
Member #

23384

Good to see another WJ build on here, looks like you got a good start going. Like others have said there isn't much out there for the WJ for off road parts or pre fab drawer setups. I did something similar to what @tjZ06 mentioned with removing my rear seat and built drop in boxes for storage. I made it a 2 piece setup that matched the split of the rear seats so I could put one side or the other back in if I were to have passengers in the back. Makes for a decent amount of extra storage and having the entire cargo area flat I use mine to sleep in
Box4.jpgBox3.jpgBox2.jpgBox1.jpg
 

MrWilsonWJ

Rank V
Launch Member

Member III

1,691
Kennewick, WA
First Name
Dustin
Last Name
Wilson
Member #

23384

Mine is right at 6.5, 6 leaves steering to light and prone to DW, just over 7 is where driveline vibration becomes detectable. Quit while I was ahead. Have a bit of noise coming from the T-Case, but it has 230k on it so not surprised, thought about changing to a part time transfer case, as the Quadra Drive is a pia to rebuild, but is really nice to have full time four wheel drive for Michelle to commute in the winter. Will probably go with a rebuild when it finally gives up the ghost.
If you currently have the 249 Tcase shop the wrecking yards for a 242HD from a early durango, the ones that came in the WJ are hard to find. It's a part time case with a full time option. That's what I did with mine, the rebuild and install was pretty easy. While at the wrecking yard I snagged the durango driveline to use with the swap, had it shortened a bit and ran a 1310/1330 u joint and it's been working great for 3 or 4 years now.
 

OTH Overland

Local Expert Washington, USA
Member
Investor

Trail Blazer III

4,847
Camano Island, WA, USA
First Name
Dave
Last Name
Ballard
Member #

20527

Ham/GMRS Callsign
N7XQP
Service Branch
Fire/EMS/SAR
Good to see another WJ build on here, looks like you got a good start going. Like others have said there isn't much out there for the WJ for off road parts or pre fab drawer setups. I did something similar to what @tjZ06 mentioned with removing my rear seat and built drop in boxes for storage. I made it a 2 piece setup that matched the split of the rear seats so I could put one side or the other back in if I were to have passengers in the back. Makes for a decent amount of extra storage and having the entire cargo area flat I use mine to sleep in
Nice job on the seat delete! We removed the 2/3 section from ours and built a dog platform for our GSD that was much lower and easier for her to get in and out of as she was getting old. No that she is no longer with us, we just pulled it back out and planning on reinstalling the seat. I will miss the storage for the heavy stuff, and your pics make we want to build a new version .. lol but now the WJ is mainly a day or overnight trip rig, we could use some back seats as we have deleted the other rigs.
 

MrWilsonWJ

Rank V
Launch Member

Member III

1,691
Kennewick, WA
First Name
Dustin
Last Name
Wilson
Member #

23384

Nice job on the seat delete! We removed the 2/3 section from ours and built a dog platform for our GSD that was much lower and easier for her to get in and out of as she was getting old. No that she is no longer with us, we just pulled it back out and planning on reinstalling the seat. I will miss the storage for the heavy stuff, and your pics make we want to build a new version .. lol but now the WJ is mainly a day or overnight trip rig, we could use some back seats as we have deleted the other rigs.
Spot for the dog was another reason for building mine as I did, we have a Great Dane/ Mastiff mix so that setup gives her plenty of room. I put up a pet barrier on the edge of my boxes so she gets between it and the front seats then pack all our gear between it and the rear hatch. The amount of space gained with the boxes apposed to just folding the seats down was impressive. I used to keep all my tools, recovery gear and random crap in the spare tire compartment but with the boxes I was able to empty it out into just one of the boxes and had the whole other one for camp gear.
 

MidwestVoyager

Rank III
Launch Member

Enthusiast III

845
Pratt County, KS, USA
First Name
Matt
Last Name
Westerhaus
Member #

23604

Service Branch
Fire/NREMT-BLS
@MrWilsonWJ really nice build on the rear seat delete. I've got two kiddo's, one pretty fresh and the other just a few years old so I'll be keeping the rear seat in tact but will be building out the rear cargo space. We get about two weeks a year to get out there so it won't be anything too crazy, but I do want it built out for emergency preparedness as well. I enjoy studying online maps throughout the forest systems to try to find hidden gems to explore while we're out there. I appreciate the photos, they will help me, no doubt.

We took my Ram out to the San Juan's of Colorado which offered plenty of room but it was a bit tricky on some of the rougher FS roads we encountered. 90% of the miles were just fine for it but those 10% really slowed us down being extra mindful of the long wheel base and poor breakover angle.
 

JimBill

Rank V
Member
Investor

Advocate I

2,268
San Benito County, CA, USA
First Name
James
Last Name
Madison
Member #

18747

Lifting a WJ is certainly an adventure. Working mine to a 3" lift a little at a time, just about to finish it off with EMO HD springs for a 3 inch lift. Just a couple notes after reading the thread-

With a budget boost I am running 4.6 deg castor with no death wobble and a happy front pinion angle.
The rear upper spacer for the upper control arm (wishbone) is to keep the ball joint from maxing out on full droop. I highly recommend it. I have been tearing through ball joints and have a core 4x4 wishbone with johnny joint ready to put in. Did it for the adjustability, but all I really need is the spacer.
An adjustable track bar is a must to recenter the front axle. Most track bars out there do not have the right bushings. I ran a JKS but the polyurethane bushings wore extremely fast and always had play, even with a fresh set of hard bushings and 9/16 inch hardware upgrade. The track bar is the most common suspect for death wobble.
Switched to a trail forged adjustable track bar. Johnny Joint on one side and their "better bushing" on the other, with 9/16 hardware. No play, and no signs of wear yet. Highly recommend.

Had no death wobble for years, it was loosie goosie and flexed like crazy, with everything wore out. I finally had an original dried out factory bushing disintegrate so I switched from stock control arms to core 4x4 adjustable arms. Then the fun began. Had to replace all rod ends, replace track bar, and play with caster angle. DW showed up once more after all that, and tracked it down to a blown right front shock that had trouble rebounding. Since then I have had a few momentary wheel shakes like it wanted to death wobble when I have had the front suspension unload and then suddenly load on landing (think driving over whoopdy doos a little too fast). There is some interesting geometry that shows up when you get the track bar arcing below level and only arcing to the negative. So I am flirting with needing to add a drop pitman arm and track bar drop bracket.

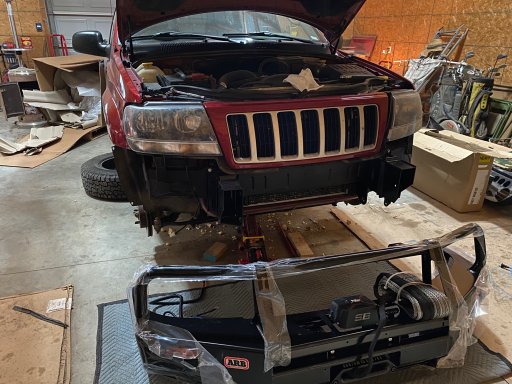
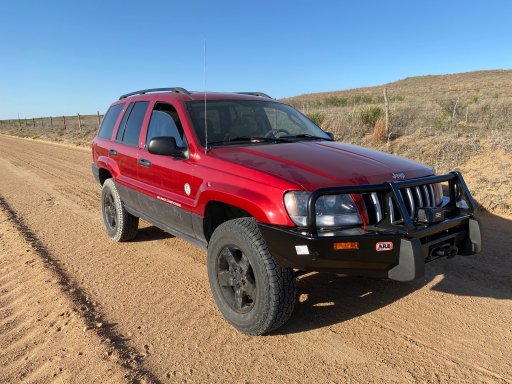
FYI I chose 3 inch lift to keep as many stock parts as I could, not so much to stay short arm, I almost went 3 inch long arm. But- if I break out in the wild I can put in a junkyard or parts store stock suspension arm or drive line to make it home. The IRO 4" long arm is the flex king, but at that point stock drivelines get iffy and so on. Budget boost, 3", 3 1/2 inch, 4 inch- doesn't make a difference for tire size. Limited to about a 245/75-16 or 265/70-16 (both about 30.6 inches) unless you start cutting sheetmetal or penalize your flex with way to much bumpstop extension.

That said, I am going with 265/75-16 (31.7 inches) here shortly on Wrangler 16 inch steelies and will set the axle positions for the best stuffed centering I can with 2 1/2 inch bumpstop extensions in the front and 2" in the back. Then it is sawzall and sledge hammer time as required. (bumper trim, fog light removal, washer bottle relocate already done).

WJ's are certainly an adventure in patience.

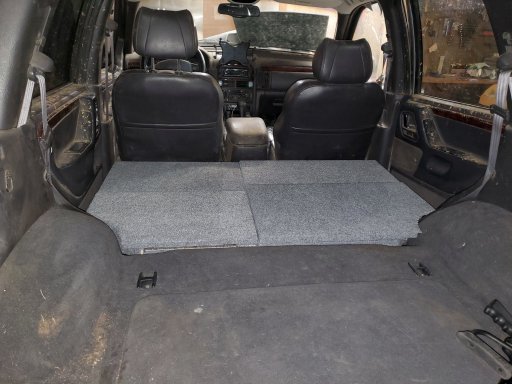
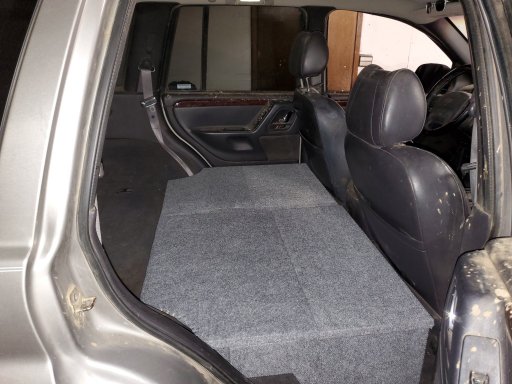
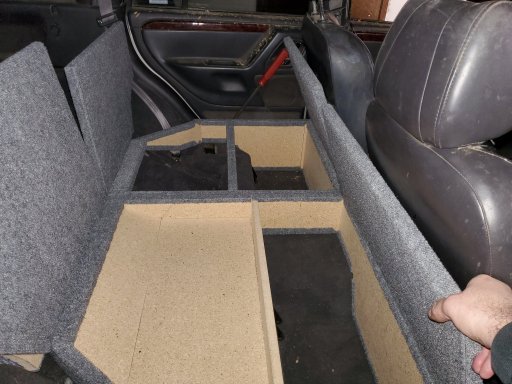
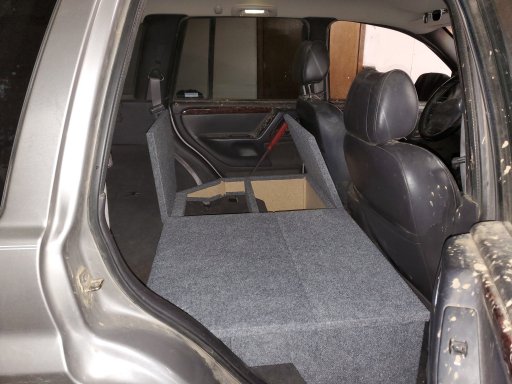
@MrWilsonWJ, You could sell the dimensioned plans for the rear seat delete and save us all some time trying to copy it! very nice.
 

MrWilsonWJ

Rank V
Launch Member

Member III

1,691
Kennewick, WA
First Name
Dustin
Last Name
Wilson
Member #

23384

When I built those I used osb because I had a sheet laying around and well didn't feel like going to buy a sheet of plywood. While they are still usable and good shape some of the screws have pulled out for the lids so I'll be pulling them apart to rebuild out of better material at some point. If people are interested I can pull all the measurements and post them in my build thread. Not sure when I'll get to doing it though.
 
  • Like
Reactions: OTH Overland

MidwestVoyager

Rank III
Launch Member

Enthusiast III

845
Pratt County, KS, USA
First Name
Matt
Last Name
Westerhaus
Member #

23604

Service Branch
Fire/NREMT-BLS
Winch has arrived in the mail. ARB front bumper is set to arrive next week on a freight truck! Going to get the factory bumper/facia removed this weekend. Also rebuilt the rzeppa cv joint on the front drive shaft at the transfercase.
 

MrWilsonWJ

Rank V
Launch Member

Member III

1,691
Kennewick, WA
First Name
Dustin
Last Name
Wilson
Member #

23384

If you have any of the U-Pull-It type wrecking yards around you cruise those once in a while to look for a Double Cardan style front driveline and the yokes. I don't remember the Year or model split for which WJ's have them but it's an easy upgrade. When running a lift the U joint style driveline will last better and be stronger. I think I paid $25 for the driveline a $5 for the yoke.
 
  • Like
Reactions: MidwestVoyager

MidwestVoyager

Rank III
Launch Member

Enthusiast III

845
Pratt County, KS, USA
First Name
Matt
Last Name
Westerhaus
Member #

23604

Service Branch
Fire/NREMT-BLS
If you have any of the U-Pull-It type wrecking yards around you cruise those once in a while to look for a Double Cardan style front driveline and the yokes. I don't remember the Year or model split for which WJ's have them but it's an easy upgrade. When running a lift the U joint style driveline will last better and be stronger. I think I paid $25 for the driveline a $5 for the yoke.
I’ll keep an eye out. Will see how long this new joint lasts.
 

MidwestVoyager

Rank III
Launch Member

Enthusiast III

845
Pratt County, KS, USA
First Name
Matt
Last Name
Westerhaus
Member #

23604

Service Branch
Fire/NREMT-BLS
Gaining on it, waiting on a few extra hands to float the bumper for mounting. I tried with just one helper and we found we needed more hands. Not the easiest task, lining up the mounting holes.

Winch installed well. I had to clock both the motor and clutch ends of the winch. For anyone curious, it is possible to click the smittybilt xrc 3 series (install manual said otherwise) the fairlead that came with the winch was not compatible so I swapped in an offset fairlead from a local company, custom splice, which was a cool addition. Been fixing a few little odds and ends while waiting on some willing helpers for the bumper.
 

Attachments

  • Like
Reactions: tjZ06

OTH Overland

Local Expert Washington, USA
Member
Investor

Trail Blazer III

4,847
Camano Island, WA, USA
First Name
Dave
Last Name
Ballard
Member #

20527

Ham/GMRS Callsign
N7XQP
Service Branch
Fire/EMS/SAR
Finally, it’s mounted, winch is hand-spooled and ready for a tension spooling. Ready for some trips this year now and it’s maiden voyage.
Bumper and winch look really good! much better than my DIY winch/towbar setup.