M1102 Trailer Build

  • HTML tutorial

Phillysteak

Rank IV
Member

Enthusiast III

1,116
Arizona
First Name
Philip
Last Name
Haasnoot
Member #

24385

Thanks @Swhirstein ! I agree a swing for the jerry cans would have been a good idea if I kept the tire there. Ended up mounting the tire underneath the trailer with a winch. Getting the spare into the bed once was enough to realize it wasn't a good idea to keep it there.
 

Swhirstein

Rank IV
Launch Member

Advocate III

1,316
Davenport, Iowa, USA
First Name
Scott
Last Name
Hirstein
Member #

9592

Thanks @Swhirstein ! I agree a swing for the jerry cans would have been a good idea if I kept the tire there. Ended up mounting the tire underneath the trailer with a winch. Getting the spare into the bed once was enough to realize it wasn't a good idea to keep it there.
Right. I am looking at mounting mine under the front of my trailer as well because it is not an ideal location to have the spare in the trailer!
 

Phillysteak

Rank IV
Member

Enthusiast III

1,116
Arizona
First Name
Philip
Last Name
Haasnoot
Member #

24385

Thank you @PNW EXPLR ! I haven't personally gotten my hands on one of those plasma tables but that doesn't look like a bad rig at all! I have however run quite a few different plasma tables and I can say the top three things you want to watch for:

1. Get a plasma cutter that has a machine mounted torch, the grippers that attempt to attach a hand-held torch do a terrible job. Most handheld torch heads also have rubberized handles and trying to keep proper alignment by gripping a flexible material is just awful. Machine mounted heads will save you from numerous headaches.

2. Software is key, the "FireControl" software that langmuir system comes with seems pretty solid. If you call the company they might be able to get you in-touch with an existing customer so they can show you the machine and controls. The salesman will chew your ear off about how great it is, less than 5 minutes of talking with a machine owner will tell you everything you need to know.

3. Make sure you oversize your compressor, and don't skimp on the air dryer. You want to make sure the air supply can keep up with the machine and that it is as clean and dry as possible.
 
  • Like
Reactions: PNW EXPLR

PNW EXPLR

Local Expert Southeast Washington, USA
Member
Investor

Explorer I

4,285
Kennewick, WA, USA
First Name
Michael
Last Name
Denniston
Member #

3030

Ham/GMRS Callsign
KJ7LYZ
Thank you @PNW EXPLR ! I haven't personally gotten my hands on one of those plasma tables but that doesn't look like a bad rig at all! I have however run quite a few different plasma tables and I can say the top three things you want to watch for:

1. Get a plasma cutter that has a machine mounted torch, the grippers that attempt to attach a hand-held torch do a terrible job. Most handheld torch heads also have rubberized handles and trying to keep proper alignment by gripping a flexible material is just awful. Machine mounted heads will save you from numerous headaches.

2. Software is key, the "FireControl" software that langmuir system comes with seems pretty solid. If you call the company they might be able to get you in-touch with an existing customer so they can show you the machine and controls. The salesman will chew your ear off about how great it is, less than 5 minutes of talking with a machine owner will tell you everything you need to know.

3. Make sure you oversize your compressor, and don't skimp on the air dryer. You want to make sure the air supply can keep up with the machine and that it is as clean and dry as possible.
Hey thanks for the tips. I will have to give them a call.
Keep up the awesome fab work!
 

Phillysteak

Rank IV
Member

Enthusiast III

1,116
Arizona
First Name
Philip
Last Name
Haasnoot
Member #

24385

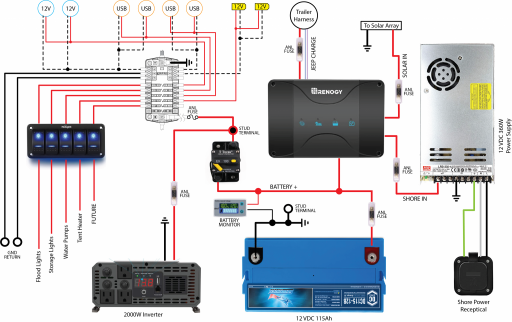
With all of the rain we've gotten here in Arizona this year (NOT complaining) it gave me plenty of opportunities to find leaks in my side mounted tool boxes. I finally tracked down the last few areas to seal and can begin mounting all of the electrical hardware around the rig. Working through a preliminary electrical schematic, if anyone has any feedback I'm not sure if I'm being too fuse happy or if this is the right way to make sure everything is protected.

SubSystem V1.png

I also have a Sailrite LSZ-1 Sewing machine on the way so I can finally start fabricating the fold out shower enclosure. Which means after the electrical subsystem is finished it's time to mount the water tank, pumps, filters, and figure out the plumbing!
 
  • Like
Reactions: SAR-MEDIC

reaver

Rank VI
Member

Explorer I

3,680
Caldwell, ID, USA
First Name
Brian
Last Name
McGahuey
Member #

23711

Ham/GMRS Callsign
GMRS WRMV941
With all of the rain we've gotten here in Arizona this year (NOT complaining) it gave me plenty of opportunities to find leaks in my side mounted tool boxes. I finally tracked down the last few areas to seal and can begin mounting all of the electrical hardware around the rig. Working through a preliminary electrical schematic, if anyone has any feedback I'm not sure if I'm being too fuse happy or if this is the right way to make sure everything is protected.

View attachment 248131

I also have a Sailrite LSZ-1 Sewing machine on the way so I can finally start fabricating the fold out shower enclosure. Which means after the electrical subsystem is finished it's time to mount the water tank, pumps, filters, and figure out the plumbing!
I love me an electrical diagram!

A few things I've noticed:

The renogy charger isn't designed to be used in this fashion. While you could theoretically set it up this way, you'll probably have to combine you shore charger and vehicle input, as that model only has a solar and vehicle side input. I'd honestly recommend getting something like a noco battery charger/maintainer, and just wiring that in.

I'd also recommend using a relay box instead of wiring your switches inline. There are a few reasons for this. First of all, you only need to run a single power and ground wire to the switches, then return wires to your relay box. This also puts less strain on the switches, and let's the relays switch the power to your accessory. Water pumps can draw up to 10A (most are in the 5A range), and depending on which heater you're using, those can pull ALOT of juice, and potentially burn your switches out faster. A relay in a relay box is MUCH faster to switch out.

Other than that, looks like a pretty solid setup.
 
  • Like
Reactions: Phillysteak

Phillysteak

Rank IV
Member

Enthusiast III

1,116
Arizona
First Name
Philip
Last Name
Haasnoot
Member #

24385

@The Crow Thank you! I'm not sure what I'm sitting at weight wise currently, I was planning to finish installing the electrical and water system before I try and track down a local weigh station.

@reaver Very good points on the Relays and the Noco. I was originally going to wire the power supply and the vehicle-in port together but the Noco battery charger is reasonably priced, so it will be replacing the AC-DC power supply altogether.

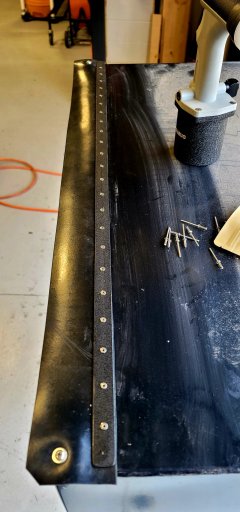
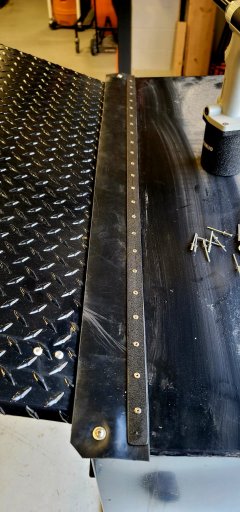
Before the electrical subsystem gets installed, it is time to seal the enclosures once and for all. I stripped out all of the factory-installed foam seals and re-applied seals with good quality versions. I also added a rubber "roof" flap to seal up the main source for water ingress. The tool boxes have weathered two storms since perfectly, so I feel comfortable adding the electrical system finally.

20230122_145944.jpg 20230122_145954.jpg

P.s. - A pneumatic rivet gun is worth every penny
 

FolioGrow

Rank I

Contributor III

124
Dallas, TX, USA
First Name
BRETT
Last Name
STRAUSS
Thank you @overland_fam ! Certainly has been an adventure working on this trailer. I have the entire trailer modeled in CAD so I can certainly share the components you need. I've attached the PDF drawings below for the corner mounts and the center mounts if you choose to use those hardpoints as well. These plates were designed for 2" square tubing, if you go bigger they would need to be adjusted.

I can send over the DXF cut files, shoot me a DM with your E-mail address, the OB forums won't allow me to attach .DXF files to the post =/
Id love to get these files. I’m trying to build out my M1101 currently. Looking for the template for the top plates for the front corners.
Brett@foliogrow.com