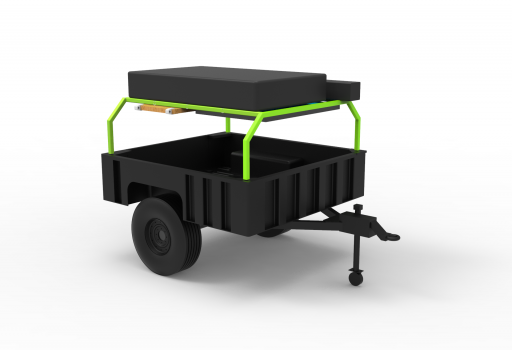
M1102 Trailer Build

  • HTML tutorial

Phillysteak

Rank IV
Member

Enthusiast III

1,116
Arizona
First Name
Philip
Last Name
Haasnoot
Member #

24385

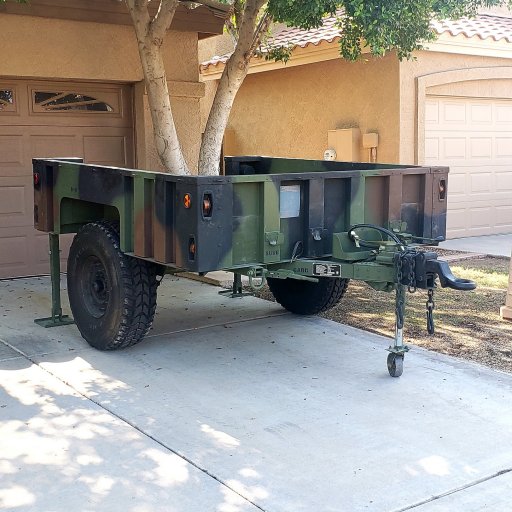
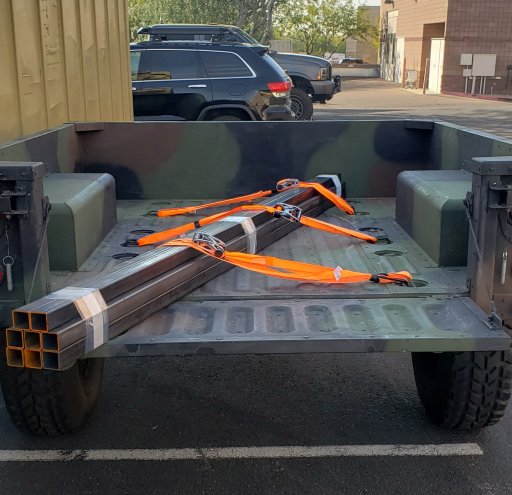
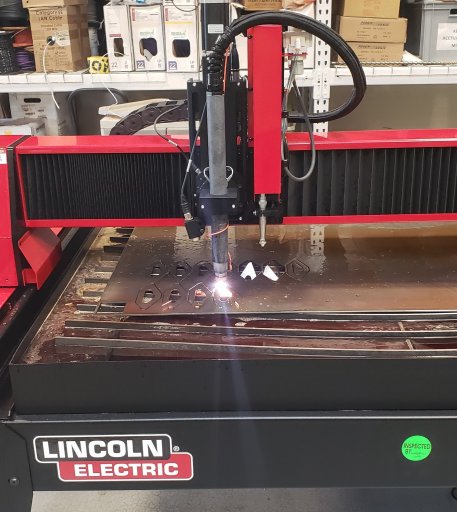
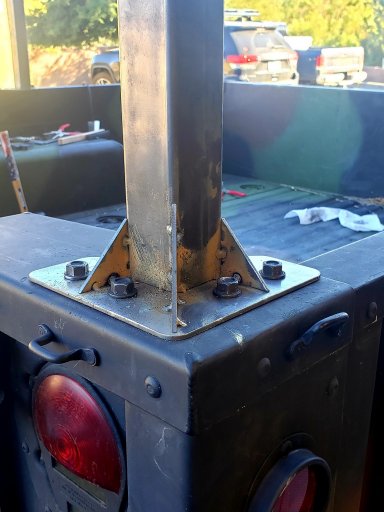
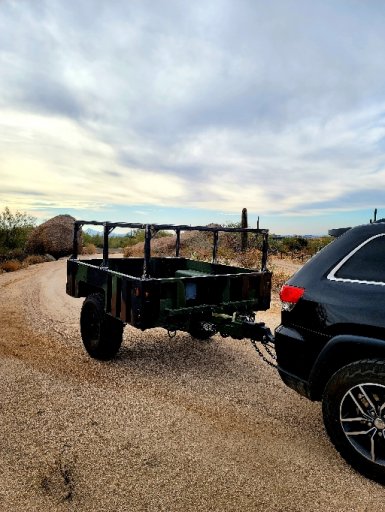
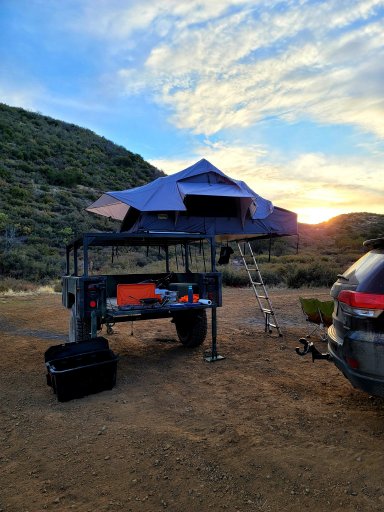
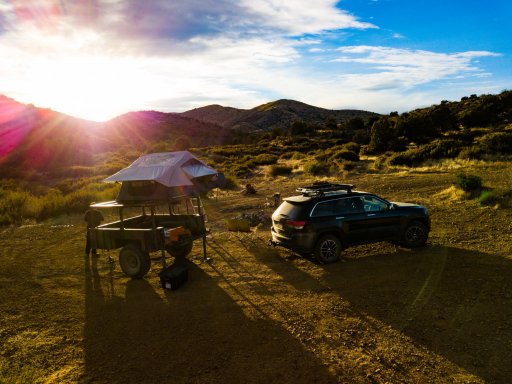
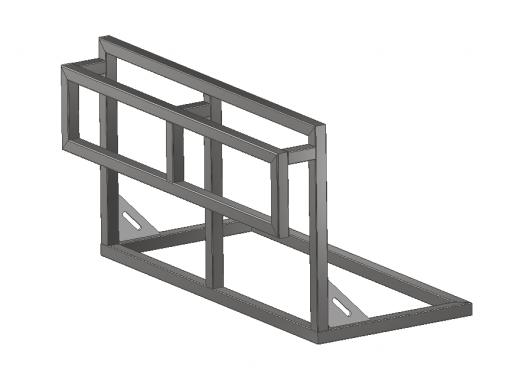
Living in Arizona one of my hobbies is getting out into the wild to take photos, primarily astrophotography (Can't share those photos on the forums as the files are too big). There are plenty of locations I've only ever traveled to in the dark, the first several times I went to the Grand Canyon I couldn't tell you what it looked like during the day. The overnight trips were spent sleeping either in a ground tent or the back of the Jeep during the colder months. Since I now have access to a CNC plasma cutter I decided it was time to bite the bullet and build an overlanding trailer. I landed on the M1101/M1102 as the most viable platform for my needs. Picking up my trailer tomorrow and excited to get started, I don't have the slightest idea of when my Smittybilt Gen2 RTT will arrive so I'm trying to have the rack finished within the next 2 weeks.

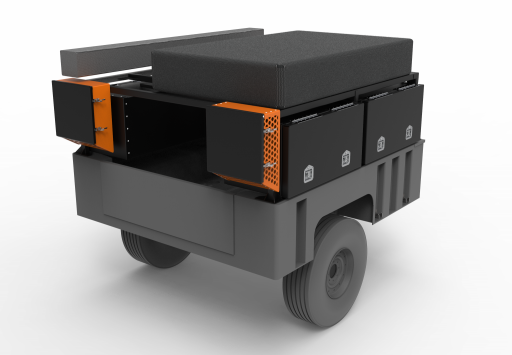
I figured I would start with the basics that I know I'll need and fill in the remainder after camping in the trailer a few times. Planning to add some custom storage boxes on both sides of the rack, I'm going to design those next once I finish my gear list for each box.

Camper Packed.83.png

I was originally going to use a chunk of butcher block I have laying in the Garage but considering the weight I think I'm going to plasma cut and form an aluminum (or possibly stainless) kitchen extension out of sheet metal instead.

Camper Unpacked.81.png

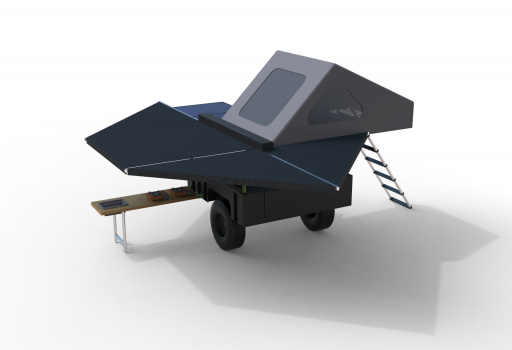
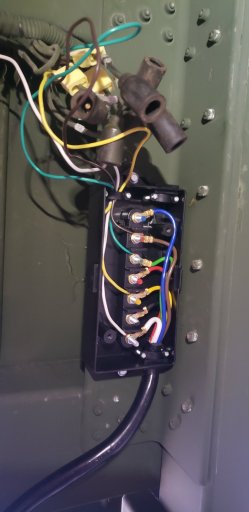
I was thinking of adding a hydraulic solenoid valve to the surge brake that would be triggered when the tow vehicle is put in reverse. Working on designs for mounting the following next:

1. 25 Gallon Grey water tank and pump (Fits in front of the wheel well, Right side)
2. 2 x Deep cycle batteries (Fits behind wheel well, left side)
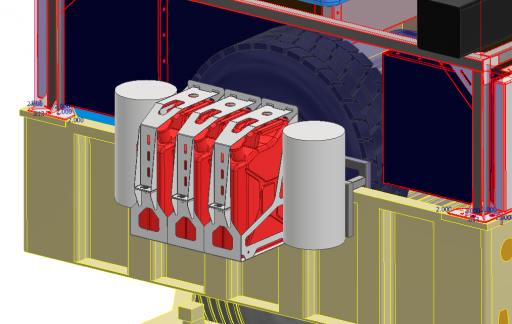
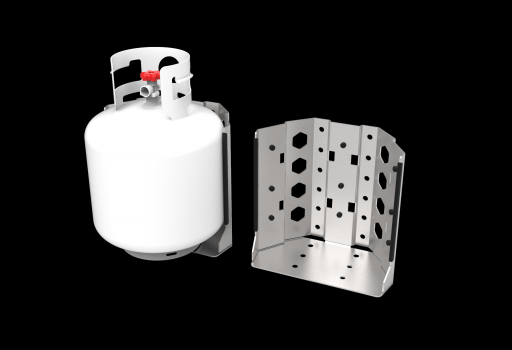
3. 2 x Propane Tank mounts
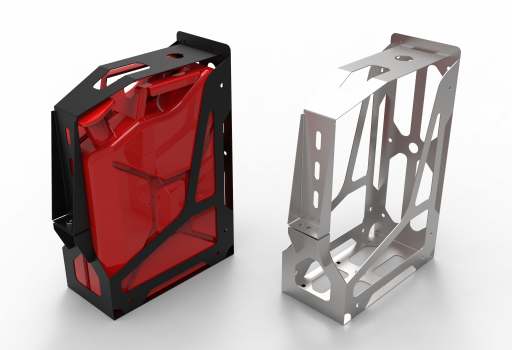
4. 2 x 5 Gallon Gas cans
5. Foldable side steps

Still looking for a good 270 Degree awning option. I like the Overland Vehicle Systems Nomadic 270, any other suggestions on awnings?
 
Last edited:

smritte

Rank V
Launch Member

Member III

2,827
Ontario California
First Name
Scott
Last Name
SMR
Member #

8846

Ham/GMRS Callsign
KO6BI
I don't like surge brakes due to the backing up issues and the fact you cant tune them to your load. The solenoid idea would be a great mod. Down the road, see if you can convert over to electric brakes. I'm not familiar with the axle on your rig but, most have a common hub pattern and it's easy to swap over. Off road I have towed with no brakes, surge and electric. I will only tow with electric and a controller that senses g-force.

I have been staring at bat wings for my new trailer for almost a year. I have looked at some on rigs and the rest online. I still haven't decided which one. I have a layout figured out in my head as to how I want to be. One of my requirements is, I want side panels for wind/rain. Because I just finished the build, I haven't taken it out yet. Once out I'm going to use tarps and poles to see if the layout actually works camping or if a standard rectangle is all I really need. Those things are expensive.

Once you get your tent set up at your house, Look to see how adjustable the ladder height is. There's several type of ladder designs and most only have a couple of height settings. Mod it if you have to so the ladder angle match's your height then figure out a mounting system to hold the ladder bottom from moving while you use it. I use a stake with cord hammered in behind the ladder and tied to the bottom rung. Some places it's not needed and some its really needed.

Looks like a fun build and gratz on access to a plasma. I just got access to the one at my work but I have to do all the CAD myself. I have a bunch of things I've been wanting to build using it and I'm still learning the software.
 

Phillysteak

Rank IV
Member

Enthusiast III

1,116
Arizona
First Name
Philip
Last Name
Haasnoot
Member #

24385

@smritte Yeah I'm planning to tack weld the structure and then get the tent set up to test the ladder height before I get everything fully welded. I have 2 10'x10' pop up canopies so I'll probably bring those along until I figure out if I actually need a batwing or not. What CAD software are you working with? If you need any help let me know, I've been using Autodesk Inventor for 17 years but I've also worked in all the other major CAD packages.
 

Phillysteak

Rank IV
Member

Enthusiast III

1,116
Arizona
First Name
Philip
Last Name
Haasnoot
Member #

24385

Picked up the trailer over the weekend, in phenomenal condition. They kept it in a garage and it's only purpose was to tow their kayak to the lake, It's one of those motorized kayaks with a small jetski engine so I'm pretty sure they scared themselves with the kayak early on and then never used the trailer again. Tires look brand new, it was already converted to 12v (poorly converted) but I still opted to swap out the lights for LED bulbs.

20201017_122533.jpg

At least they tried to keep the connections dry...

20201017_165826.jpg 20201017_170334.jpg

$25 on Amazon yielded a pretty decent quality 7 pin harness and junction box. I'm planning to run the wiring for the solenoid valve to this box once that arrives. This weekend I need to cut off the existing harness connections and extend the wires with appropriate gauge wire to clean this all up.

20201017_170338.jpg 20201017_180141.jpg

Have this Solenoid bypass on order, luckily the surge brake on the M1102 has exposed hydraulic connections to add this inline:

https://www.etrailer.com/Accessories-and-Parts/Demco/DM5837.html
 

smritte

Rank V
Launch Member

Member III

2,827
Ontario California
First Name
Scott
Last Name
SMR
Member #

8846

Ham/GMRS Callsign
KO6BI
Nice find.
I started using Fusion 360 recently. I have played with Inkscape and Sketch it in the past and really liking 360. So far all my things are 2d. Sheet metal mostly. My biggest issue is converting the file for the plasma. I have a friend helping me there. I have several mounting solutions in the works I want in ABS. That made me want a cnc router.

I discovered those junction boxes too. I wish I would have found them before. They make it so easy. I miscalculated my front pigtail on my new trailer. It was too short. The box made it real easy to swap it out.
 

Phillysteak

Rank IV
Member

Enthusiast III

1,116
Arizona
First Name
Philip
Last Name
Haasnoot
Member #

24385

Cut a template for the mounting plates to check the fitment. Need to adjust some dimensions for the second set of screws, but that's why you cut templates out of cheap materials first.

20201020_103439.jpg
 

Phillysteak

Rank IV
Member

Enthusiast III

1,116
Arizona
First Name
Philip
Last Name
Haasnoot
Member #

24385

Second time did the trick and all the holes in the corner plates and side brackets align properly. The M1102 has two sets of Rivnuts ( 3/8-16 Threads) on either side of the trailer but not in the position I need them in, so I'm going to have to add one additional set per side in the middle for my middle supports. Planning to plasma cut these brackets out of 0.13in thick steel.

Patiently waiting for the plasma to arrive is going to be the hardest part of the build.

20201020_195956.jpg

20201020_195930.jpg
 

Phillysteak

Rank IV
Member

Enthusiast III

1,116
Arizona
First Name
Philip
Last Name
Haasnoot
Member #

24385

Getting the plasma cutter turned into quite the adventure. The first manufacturer guaranteed a delivery of 4-6 weeks, after a month of waiting and another month of back-and-forth with them they just flat out said they weren't going to deliver. I try to support local AZ businesses whenever possible, I have to say this is the first time a company just flat out took our money and tried to run with it.

We re-ordered a plasma, this time from a company we knew would deliver. Got the torchmate 4400 up and running in under a day and got all of the trailer components cut quickly, tacking all of the major parts together and checking to ensure everything is square before I start fully welding the frame.

Steel Delivery.jpg

Plasma.jpg

Frame V1.jpg

Footing.jpg

A lot of parts left to tack and adjust before welding. I'm hoping to have the frame mostly welded by the end of the week so I can start working on the utility boxes.
 

Phillysteak

Rank IV
Member

Enthusiast III

1,116
Arizona
First Name
Philip
Last Name
Haasnoot
Member #

24385

With most of the welding done I decided to take the trailer for a light trail run. The added weight of the rack makes the on-road and off-road ride much better, a lot less bouncing around.

One half of me wants to build the storage boxes and get the tent mounted to the rack for a few test runs before painting the rack. The other half of me knows once I install all that gear I'm not going to want to take it off to paint the rack.... decisions decisions.

Putting the Jeep on 33" tires once I get the lift installed which will even out the trailer a bit more.
 

Attachments

  • Like
Reactions: DzrtShamrock

Phillysteak

Rank IV
Member

Enthusiast III

1,116
Arizona
First Name
Philip
Last Name
Haasnoot
Member #

24385

Rack welding completed and decided to paint it before I started mounting everything. Four cans of Krylon fusion in Satin black did the trick, my welds won't win any awards but they'll hold. Tomorrow the Smittybilt XL Gen2 tent gets mounted for a test run, excited to get it out in the wild and free up garage space.

20210109_160832.jpg

I've been working on the side boxes and rear storage boxes. Side boxes will probably be made from 0.08" thick aluminum with riveted construction, although I do have a spool gun for my MIG and might just stop being a baby about learning how to use it to weld these boxes rather than rivet them. On the rear of the trailer I'm planning to build one "wet" box, I love kayaking so I wanted a space to store wet gear away from everything else. The other rear box is for the diesel heater, the heater is on the way so once I get my hands on it to take dimensions I can finalize these boxes.

Test 2.119.png

I need to work on the mounts for the gas cans and propane, probably going to downsize to two 11 pound propane tanks. Being able to roll into a big box store and swap the tank would be convenient, but even some home depots around me are completely out of 20lb propane tanks at the moment; So going with 11lb tanks and having them refilled will work fine. I figure in the winter I can swap out one 5 gal jerry can for diesel to run the heater, but in Arizona that would only be for a few months and then I can switch back. I've been racking my head for a better spot to mount a spare tire, but for now it seems like the front of the trailer cargo area is the most secure spot. I plan to mount the tire to a rack bolted to the trailer which will also help support the fuel/propane rack. Originally I was going to remove the stabilizers that come on the M1102 trailers so I can mount the fuel rack lower, but they are very well built and I opted to leave them; The only down side is the fuel rack will have to be mounted 6-8 inches higher.

Test 2.117.png
 
  • Like
Reactions: MarioT'sCJResto

Phillysteak

Rank IV
Member

Enthusiast III

1,116
Arizona
First Name
Philip
Last Name
Haasnoot
Member #

24385

Got the tent mounted today, have to say I'm pretty impressed with the Smittbilt Gen 2. I'm going to have to set it up in the backyard and go over all the bolts and straps to get it set up properly. First trial run went well, of course as soon as I found a good spot and got out of the Jeep I was greeted with the gentle hiss of my rear driver side tire: Apparently I ran over half a bullet. Now I'm considering adding a compressor to the trailer, my Kobalt 12v inflator hasn't left me hanging yet but I'd rather that be a backup than my plan A.

20210110_204405.jpg

DJI_0237.jpg
20210110_183458.jpg
 

Phillysteak

Rank IV
Member

Enthusiast III

1,116
Arizona
First Name
Philip
Last Name
Haasnoot
Member #

24385

@Timbren-Industries thank you for the reply, however the M1102 cargo trailer I based my build around already has the suspension in place. As an aside you may want to consider providing .STEP files of your bolt-on suspension kits. Having the files makes designing the trailer frames that they attach to much easier and ensures a proper fitment/alignment.
 

Phillysteak

Rank IV
Member

Enthusiast III

1,116
Arizona
First Name
Philip
Last Name
Haasnoot
Member #

24385

Tent heater is on the way so it's time to get the fuel can and spare tire mounting in order before I build the storage boxes. I was originally going to bolt the jerry can and propane holders onto the frame of the trailer but opted to build a sub-frame to take the load of the fuel off the front sheet metal of the trailer.

Frame V1.PNG

Once the rack is fitted up to the trailer I'll finalize the mounting tabs, sticking with 3/8-16 rivnuts for fastening to the trailer itself.
Mount V1.PNG

During my search for jerry can mounts I found a few I really liked, but I can't bring myself to purchase jerry can holders for $120-150 a piece; So I spun this up in CAD. Plasma cut and welded 16 gauge steel:

untitled.127.png
 

Phillysteak

Rank IV
Member

Enthusiast III

1,116
Arizona
First Name
Philip
Last Name
Haasnoot
Member #

24385

Got a chance to cut the parts for the Jerry can mounts, the Plasma did not like the DXF for the top hold-down bracket so I'll have to fix those issues and cut the remaining part. Was able to squeeze in some weld practice coupons into the sheet with these parts, time to get the welder dialed in and knock a few of these out for the trailer:

20210126_164414.jpg
 

Phillysteak

Rank IV
Member

Enthusiast III

1,116
Arizona
First Name
Philip
Last Name
Haasnoot
Member #

24385

@DzrtShamrock Originally I designed these mounts for the propane when I thought I'd be using 20lb canisters, working on a smaller simplified version for the 11lb cans I'm going with:

untitled.86.png
 

Phillysteak

Rank IV
Member

Enthusiast III

1,116
Arizona
First Name
Philip
Last Name
Haasnoot
Member #

24385

@smritte First I ordered the style below, I figured I'd get some use out of it and eventually take the components out of the enclosure to install into my own. However I didn't even get it out of the box and already noticed it was damaged, handles smashed, LCD screen cracked; this style they are selling doesn't have a fuel filter and the housing is made from paper thin sheet metal. It's not worth $200 when a full kit costs $108 without the garbage sheet metal housing.

Original purchase: Absolute Garbage ($200 on Amazon)
616r2A3hzTL._AC_SL1500_.jpg
The remote for this one has an LCD readout for temperature, however it's a very tiny display and the bezel actually covered part of the screen so it's hard to read.

Ended up purchasing this kit instead: ($108 on Ebay)
71zJG4smHoL._AC_SL1500_.jpg
Should arrive on Monday, eventually I want to switch this unit for a Webasto or higher quality version but can't justify 5x the price for something that will not get as much use out here in AZ.

I'm going to see if the fuel pump can handle pumping diesel directly out of the Jerry can up about 3 feet to where this mounts on the trailer. If it can I can get rid of the extra 15L fuel tank it comes with.
 

smritte

Rank V
Launch Member

Member III

2,827
Ontario California
First Name
Scott
Last Name
SMR
Member #

8846

Ham/GMRS Callsign
KO6BI
I've been looking at the second kit for a couple of months. I had to wait until all the Christmas stuff was done before jumping back into my research. let me know what you think when you try it. I was looking at doing the fuel the same was you described.