Ground up off-road trailer build

  • HTML tutorial

Road

Not into ranks, titles or points.
Launch Member

Advocate III

3,379
On the road in North America
First Name
Road
Last Name
Dude
Member #

6589

A bit of work done today. Mounted the 'axles', put the brakes/bearings/drums together and on. Test drive and it's awesome. Now to come up with a more elegant mounting system for my badass jockey wheel. Probably a better looking, much smaller plate that's welded on, and the wheel assy bolts to that.

Aluminum order next.
.
Beautiful frame and great start to the build, those holes in the square tubing look laser cut and I'm a little jealous.

How are you digging that jockey wheel?
.
Still needs a bit of cleaning up, but I'll get that when I sandblast the frame.

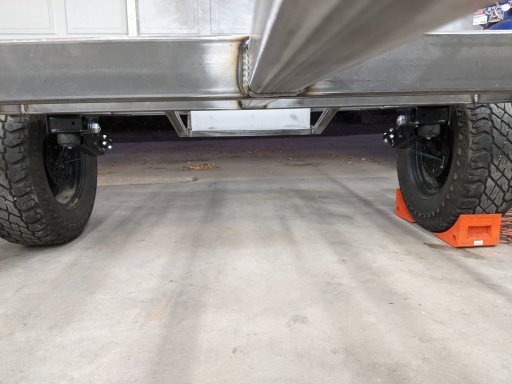
Jockey wheel hard mounted without the brackets.

View attachment 212134
.

I've had the same jockey wheel (mine is the ArkXO750) on my trailer for a few years and love it.

I can now move my trailer by hand in far more different environments than I could before with the simpler single-wheel, less stout, tongue jack I used to have. It is also much quicker to set up and pack back up.

The removable (and magnetic) side handle, heavy duty square body and swivel, multiple height positions before you start to crank, yoke lock above the pivot point, etc all make for a far superior trailer jack.

I like what you're doing for a more permanent looking mount; looks terrific.

arkXO750_0185-900n.jpg
..
loadedup_5452-900n.jpg
.
 

EarthlingJim

Rank III
Launch Member

Enthusiast III

646
Northern Colorado
First Name
JimShanonn
Last Name
Harpe
Member #

18213

Very little work the last couple days... At least outwardly. Lot of thinking.

Working on a tail light setup that I'm ok with. Here's a proof of concept that I'm kicking around. One for each side, mounted under the departure/lower spare support in the rear. The next piece will be a bit more refined.


PXL_20211012_175814632.jpg
 

EarthlingJim

Rank III
Launch Member

Enthusiast III

646
Northern Colorado
First Name
JimShanonn
Last Name
Harpe
Member #

18213

Very cool. Subscribing to follow this build. Based on the whiteboard dawning, this is going to be sweet!

Haha, I forget that my mess is visible in the background. That scribble is in a battle with what I've had drawn in fusion 360 for like 3 months. The scribble has a good chance of winning tho. Just complicates the hatch and the fact that I will likely have to have my (ultimately 35") spare out back and it complicates that too.
 
  • Like
Reactions: KonzaLander

EarthlingJim

Rank III
Launch Member

Enthusiast III

646
Northern Colorado
First Name
JimShanonn
Last Name
Harpe
Member #

18213

Little bit of work this weekend. Started some sliders and built a battery box. Lost 4" of ground clearance, but the monster sized battery is right over the 'axle'. That'll give us a 6" deep false floor for storage and room for electrical/water stuff towards the back. Not how I wanted to do it, but that battery is too big to go beneath the rear storage with the heater back there. Adapt and overcome.PXL_20211018_004117397.jpg
 

Attachments

old_man

Rank V
Launch Member

Member III

2,827
Loveland, Colorado
First Name
Tom
Last Name
Houston
Member #

8300

Ham/GMRS Callsign
WØNUT Extra
Where in NorCo are you located. My home is in Loveland. I am currently working out of state in Arizona but make it home for a week at a time every month or so. I would like to see what you are doing.
 
  • Like
Reactions: EarthlingJim

EarthlingJim

Rank III
Launch Member

Enthusiast III

646
Northern Colorado
First Name
JimShanonn
Last Name
Harpe
Member #

18213

Only significant update I've got is on the rear swing out tire carrier. It took me a couple days to work out the latching mechanism. It's an early Earthroamer rear storage box latch that I harvested from the recycle bin at work. The upright portion will hold a receiver tube in the center with a plate drilled for my bolt pattern. I have a similar setup on my truck. I have an aluminum maxtrax mount that I stick in there sometimes, a storage box and it leaves it wide open for other accessories. The pivot I bought from 4xinnovations. It's got bearings and seals and position locking. For $120, I figured it was worth the time save. I've been busy trying to get my plasma table setup, and that's taking some time away from the project. On to aluminum soon, I hope. Disregard the shop. I paused my shop refurb for this project.


PXL_20211031_203009962.jpgPXL_20211031_203039967.jpg IMG_20211101_092322_919.jpg
 

EarthlingJim

Rank III
Launch Member

Enthusiast III

646
Northern Colorado
First Name
JimShanonn
Last Name
Harpe
Member #

18213

Where in NorCo are you located. My home is in Loveland. I am currently working out of state in Arizona but make it home for a week at a time every month or so. I would like to see what you are doing.
I'm over in Johnstown. Not far at all.
 
  • Like
Reactions: MSD

MSD

Rank V
Member
Investor

Advocate III

1,647
Colorado, USA
First Name
Mark
Last Name
Duff
Member #

30665

You do amazing work.
Looking forward to following this build thread.
I figured you worked for ER based on the tool box sticker.
I’m located in Loveland too.
 
  • Like
Reactions: EarthlingJim

EarthlingJim

Rank III
Launch Member

Enthusiast III

646
Northern Colorado
First Name
JimShanonn
Last Name
Harpe
Member #

18213

Having some material acquisition issues this week. The late addition of a subfloor to relocate the battery/add storage consumed a fair amount of our material. Problem is, the stuff I want, is on nationwide backorder. Maybe Wednesday. Maybe. Floor and subfloor nearly complete. Upside down here on the table. Dog box has no false floor. It needs to be as low to the ground as possible. One old disabled dog, one young disabled dog.PXL_20211114_235313086.jpg
 

EarthlingJim

Rank III
Launch Member

Enthusiast III

646
Northern Colorado
First Name
JimShanonn
Last Name
Harpe
Member #

18213

Ok.. a few updates. I've been hitting it pretty hard, but you maybe wouldn't be able to tell visually.

I sandblasted the frame and sprayed it. That was a weekend mostly in setup and cleanup. Bleh, that part sucked.

PXL_20211123_231044785.jpg

The wiring is finished. All stuffed in the frame, looking pretty alright.
PXL_20211127_213938713.jpg

PXL_20211127_225908944.jpg
Tonight I tried my hand at bending up some fenders. They're alright. They'll look less large when the trailer is rolling the same size tires as the truck. I should get them welded up and mounted tomorrow.
PXL_20211129_040539954.jpg

Making my rough campable date is looking less and less likely, but imma keep pushing.