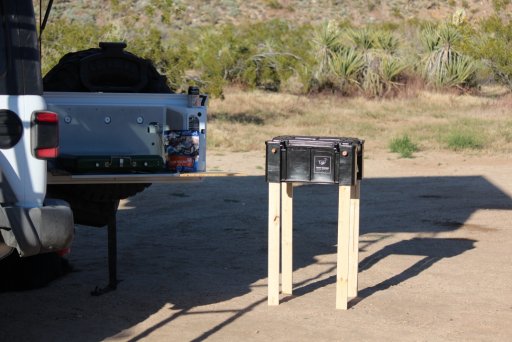
Front Runner Wolf Pack Legs

  • HTML tutorial

willnicks

Rank V
Launch Member

Advocate I

1,559
San Francisco
Member #

4466

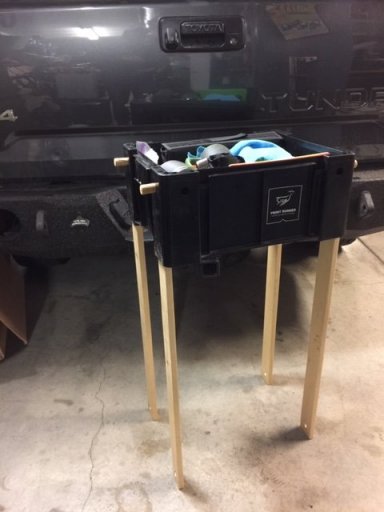
What & Why: This is a Leg DIY for Front Runner Wolf Pack Boxes. I'm fan of the Front Runner Wolf Pack boxes and I use them for my camp kitchen. What I don't like is that they can take up a lot of table space. The alternative is keeping the boxes on the ground, which can be tough on the back or result in dirt and bugs in the kitchen. The boxes have deep channels inside that look perfect for legs and 1 x 3 (3/4 x 2 1/2 actual) dimensional lumber fits just about perfectly.
IMG_2751.JPG

Cost: About 5-10 bucks depending on the wood you use and not including tools.

Materials:
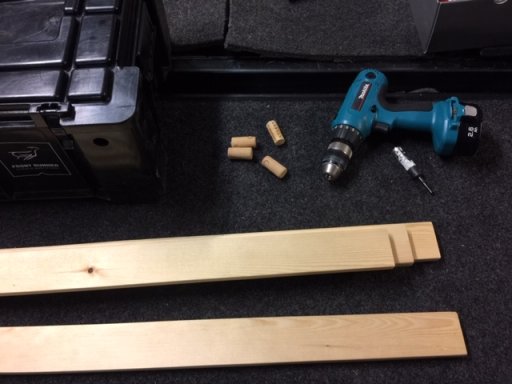
  • Hand Drill
  • 3/4" Hole Saw
  • Saw
  • Sander
  • Sealer and/or Paint
  • Old corks
  • 1x3 lumber (I used cheap pine but hardwood would be ideal for durability)
  • Two straps.
IMG_2748.JPG

Step 1: Cut your lumber to what ever size you'd like or get the hardware store to cut them for you. For this first set I found 48 inches fits my height. Also, plan ahead and check where the legs will fit in your vehicle. The lumber typically comes in 8 ft lengths for around 2 bucks each. Each length netted me 2 legs. I used a circular saw, but a hand or table saw would do just fine.

Step 2: Fit the legs in the channels sand/file as necessary. The channels on the long side of the boxes seem to be a tad tighter than the short side channels, so take this into account where you want your legs to be. I chose the short side. Sand/file for any unevenness in length if you desire. Probably not necessary since it will be on uneven ground most of the time.

Step 3: Completely sand the legs. You can sand at the end if you want, but my lumber was so darn rough it was necessary at this point due to splinters.

Step 4: Stand the the box up with the legs in the channels. You now have functional legs and can stop here if you'd like. Problem though, is each time you move the box, the legs want to fall out. So I did a couple extra steps to keep that from happening.

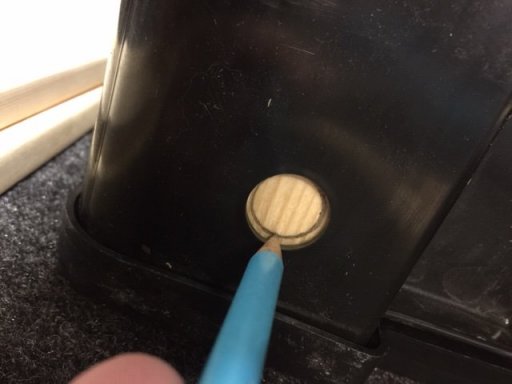
Step 5: Turn the box upside down and insert the legs until they stop. Mark a circle along the edge of the box hole. Remove the legs and insert the other end. Mark circles again.
IMG_2750.JPG

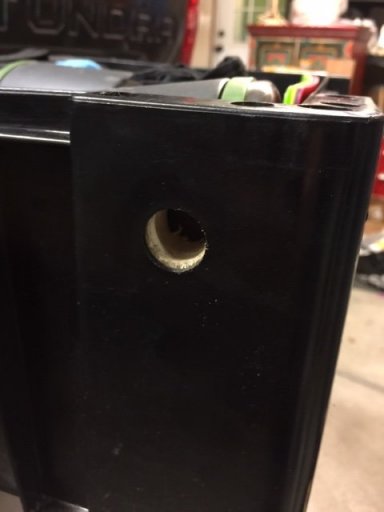
Step 6: Take your hole saw and cut holes at each marked circle. Don't drill all the way through with the hole saw or you will probably splinter apart the opposite wall (like I did on one of the legs). Just drill enough so that the pilot bit comes through the other side. Flip the leg over and finish the hole where the pilot hole is showing.

Step 7: Sand the rough edges of the holes and refit the legs of in the box. Check to see that each leg hole matches with the box holes. Use a Dremel tool or round file if you need to do any resizing.
IMG_2753.JPG

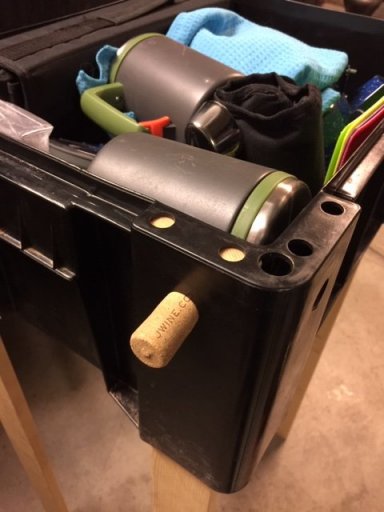
Step 8: Stand the box up with the legs inserted. In each hole insert an old and not too swollen cork. You may have to whittle the cork a bit. Once the corks are fitted, lift the box up to make sure the legs don't fall out.
IMG_2752.JPG

Step 9: Wipe the wood down with a damp rag to clean it. Then finish the legs with a sealer and/or paint. Stain it first if you like.

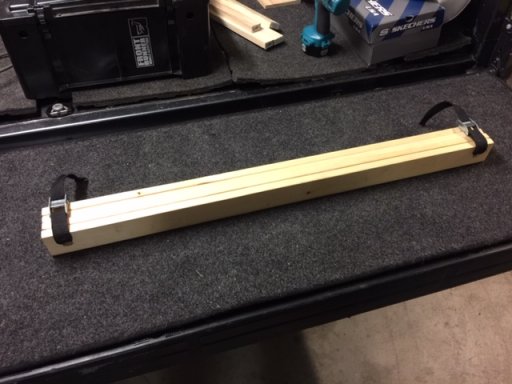
Step 10: Once the wood has dried, stack the legs and insert straps into the holes for storage. Now they won't fly all over the place.
IMG_2756.JPG

Step 11 (Optional): Find an old piece of nylon strap and staple gun/nail the ends in the middle of one of the legs to make a carry handle (for when the legs are strapped together).
 
Last edited:

stevet47

Rank II

Enthusiast II

This is great, way to think outside of the box! I'd be interested in taking it a step further and make the legs just under 2x the inside length of the box. Then hinge the legs in the middle, a simple barrel latch would keep them from folding on you. This would only cost a few bucks more and would let you store the legs inside the wolfpack.
 

willnicks

Rank V
Launch Member

Advocate I

1,559
San Francisco
Member #

4466

This is great, way to think outside of the box! I'd be interested in taking it a step further and make the legs just under 2x the inside length of the box. Then hinge the legs in the middle, a simple barrel latch would keep them from folding on you. This would only cost a few bucks more and would let you store the legs inside the wolfpack.
That's a great idea.
 

GPsGeeps

Rank IV

Enthusiast III

What & Why: This is a Leg DIY for Front Runner Wolf Pack Boxes. I'm fan of the Front Runner Wolf Pack boxes and I use them for my camp kitchen. What I don't like is that they can take up a lot of table space. The alternative is keeping the boxes on the ground, which can be tough on the back or result in dirt and bugs in the kitchen. The boxes have deep channels inside that look perfect for legs and 1 x 3 (3/4 x 2 1/2 actual) dimensional lumber fits just about perfectly.

View attachment 73658

Cost: About 5-10 bucks depending on the wood you use and not including tools.

Materials:
  • Hand Drill
  • 3/4" Hole Saw
  • Saw
  • Sander
  • Sealer and/or Paint
  • Old corks
  • 1x3 lumber (I used cheap pine but hardwood would be ideal for durability)
  • Two straps.
View attachment 73660

Step 1: Cut your lumber to what ever size you'd like or get the hardware store to cut them for you. For this first set I found 48 inches fits my height. Also, plan ahead and check where the legs will fit in your vehicle. The lumber typically comes in 8 ft lengths for around 2 bucks each. Each length netted me 2 legs. I used a circular saw, but a hand or table saw would do just fine.

Step 2: Fit the legs in the channels sand/file as necessary. The channels on the long side of the boxes seem to be a tad tighter than the short side channels, so take this into account where you want your legs to be. I chose the short side. Sand/file for any unevenness in length if you desire. Probably not necessary since it will be on uneven ground most of the time.

Step 3: Completely sand the legs. You can sand at the end if you want, but my lumber was so darn rough it was necessary at this point due to splinters.

Step 4: Stand the the box up with the legs in the channels. You now have functional legs and can stop here if you'd like. Problem though, is each time you move the box, the legs want to fall out. So I did a couple extra steps to keep that from happening.

Step 5: Turn the box upside down and insert the legs until they stop. Mark a circle along the edge of the box hole. Remove the legs and insert the other end. Mark circles again.

View attachment 73661

Step 6: Take your hole saw and cut holes at each marked circle. Don't drill all the way through with the hole saw or you will probably splinter apart the opposite wall (like I did on one of the legs). Just drill enough so that the pilot bit comes through the other side. Flip the leg over and finish the hole where the pilot hole is showing.

Step 7: Sand the rough edges of the holes and refit the legs of in the box. Check to see that each leg hole matches with the box holes. Use a Dremel tool or round file if you need to do any resizing.

View attachment 73662

Step 8: Stand the box up with the legs inserted. In each hole insert an old and not too swollen cork. You may have to whittle the cork a bit. Once the corks are fitted, lift the box up to make sure the legs don't fall out.

View attachment 73665

Step 9: Wipe the wood down with a damp rag to clean it. Then finish the legs with a sealer and/or paint. Stain it first if you like.

Step 10: Once the wood has dried, stack the legs and insert straps into the holes for storage. Now they won't fly all over the place.

View attachment 73664

Step 11 (Optional): Find an old piece of nylon strap and staple gun/nail the ends in the middle of one of the legs to make a carry handle (for when the legs are strapped together).

This is a great 2 for 1 DIY! I'm in for more table space and especially saving the back. Great job!
 

Road

Not into ranks, titles or points.
Launch Member

Advocate III

3,379
On the road in North America
First Name
Road
Last Name
Dude
Member #

6589

Whoa, very cool tip. I have four of those boxes and will be making a set of legs for one or more.

Thanks man, very cool hack.


What & Why: This is a Leg DIY for Front Runner Wolf Pack Boxes. I'm fan of the Front Runner Wolf Pack boxes and I use them for my camp kitchen. What I don't like is that they can take up a lot of table space. The alternative is keeping the boxes on the ground, which can be tough on the back or result in dirt and bugs in the kitchen. The boxes have deep channels inside that look perfect for legs and 1 x 3 (3/4 x 2 1/2 actual) dimensional lumber fits just about perfectly.

View attachment 73658

Cost: About 5-10 bucks depending on the wood you use and not including tools.

Materials:
  • Hand Drill
  • 3/4" Hole Saw
  • Saw
  • Sander
  • Sealer and/or Paint
  • Old corks
  • 1x3 lumber (I used cheap pine but hardwood would be ideal for durability)
  • Two straps.
View attachment 73660

Step 1: Cut your lumber to what ever size you'd like or get the hardware store to cut them for you. For this first set I found 48 inches fits my height. Also, plan ahead and check where the legs will fit in your vehicle. The lumber typically comes in 8 ft lengths for around 2 bucks each. Each length netted me 2 legs. I used a circular saw, but a hand or table saw would do just fine.

Step 2: Fit the legs in the channels sand/file as necessary. The channels on the long side of the boxes seem to be a tad tighter than the short side channels, so take this into account where you want your legs to be. I chose the short side. Sand/file for any unevenness in length if you desire. Probably not necessary since it will be on uneven ground most of the time.

Step 3: Completely sand the legs. You can sand at the end if you want, but my lumber was so darn rough it was necessary at this point due to splinters.

Step 4: Stand the the box up with the legs in the channels. You now have functional legs and can stop here if you'd like. Problem though, is each time you move the box, the legs want to fall out. So I did a couple extra steps to keep that from happening.

Step 5: Turn the box upside down and insert the legs until they stop. Mark a circle along the edge of the box hole. Remove the legs and insert the other end. Mark circles again.

View attachment 73661

Step 6: Take your hole saw and cut holes at each marked circle. Don't drill all the way through with the hole saw or you will probably splinter apart the opposite wall (like I did on one of the legs). Just drill enough so that the pilot bit comes through the other side. Flip the leg over and finish the hole where the pilot hole is showing.

Step 7: Sand the rough edges of the holes and refit the legs of in the box. Check to see that each leg hole matches with the box holes. Use a Dremel tool or round file if you need to do any resizing.

View attachment 73662

Step 8: Stand the box up with the legs inserted. In each hole insert an old and not too swollen cork. You may have to whittle the cork a bit. Once the corks are fitted, lift the box up to make sure the legs don't fall out.

View attachment 73665

Step 9: Wipe the wood down with a damp rag to clean it. Then finish the legs with a sealer and/or paint. Stain it first if you like.

Step 10: Once the wood has dried, stack the legs and insert straps into the holes for storage. Now they won't fly all over the place.

View attachment 73664

Step 11 (Optional): Find an old piece of nylon strap and staple gun/nail the ends in the middle of one of the legs to make a carry handle (for when the legs are strapped together).
 
  • Like
Reactions: willnicks

Anthroman

Rank I
Launch Member

Traveler I

233
San Diego
First Name
Mark
Last Name
Carrel
Member #

12869

This is awesome. I also have four of these boxes that hold all my kitchen and pantry items. Looks like I have another weekend project to add to the list!
 
  • Like
Reactions: willnicks

maxboxa

Rank 0

Contributor I

60
SF Bay Area
First Name
Jerry
Last Name
Johnson
i wonder of a little strip of 3m dual lock would work to secure the legs. really, just need the adhesive to hold the weight of the legs when you move. should hold on the box/plastic side, but may need a staple or two on the wood side.
 
  • Like
Reactions: willnicks

willnicks

Rank V
Launch Member

Advocate I

1,559
San Francisco
Member #

4466

i wonder of a little strip of 3m dual lock would work to secure the legs. really, just need the adhesive to hold the weight of the legs when you move. should hold on the box/plastic side, but may need a staple or two on the wood side.
I think so, it just needs a little bit of friction. Gluing some rubber to it or an o-ring/rubber band might do the trick.